fatboy ROCKCOCO User manual
ROCKCOCO
MANUAL
RockCocoManual-DeletingDull-NEW-230x170-singlepage.indd 1 15/12/14 10:34

HANG IN THERE
ROCKCOCO
RockCocoManual-DeletingDull-NEW-230x170-singlepage.indd 2 15/12/14 10:34
rockcoco assembly manual
ASSEMBLY OF THE ROCKCOCO
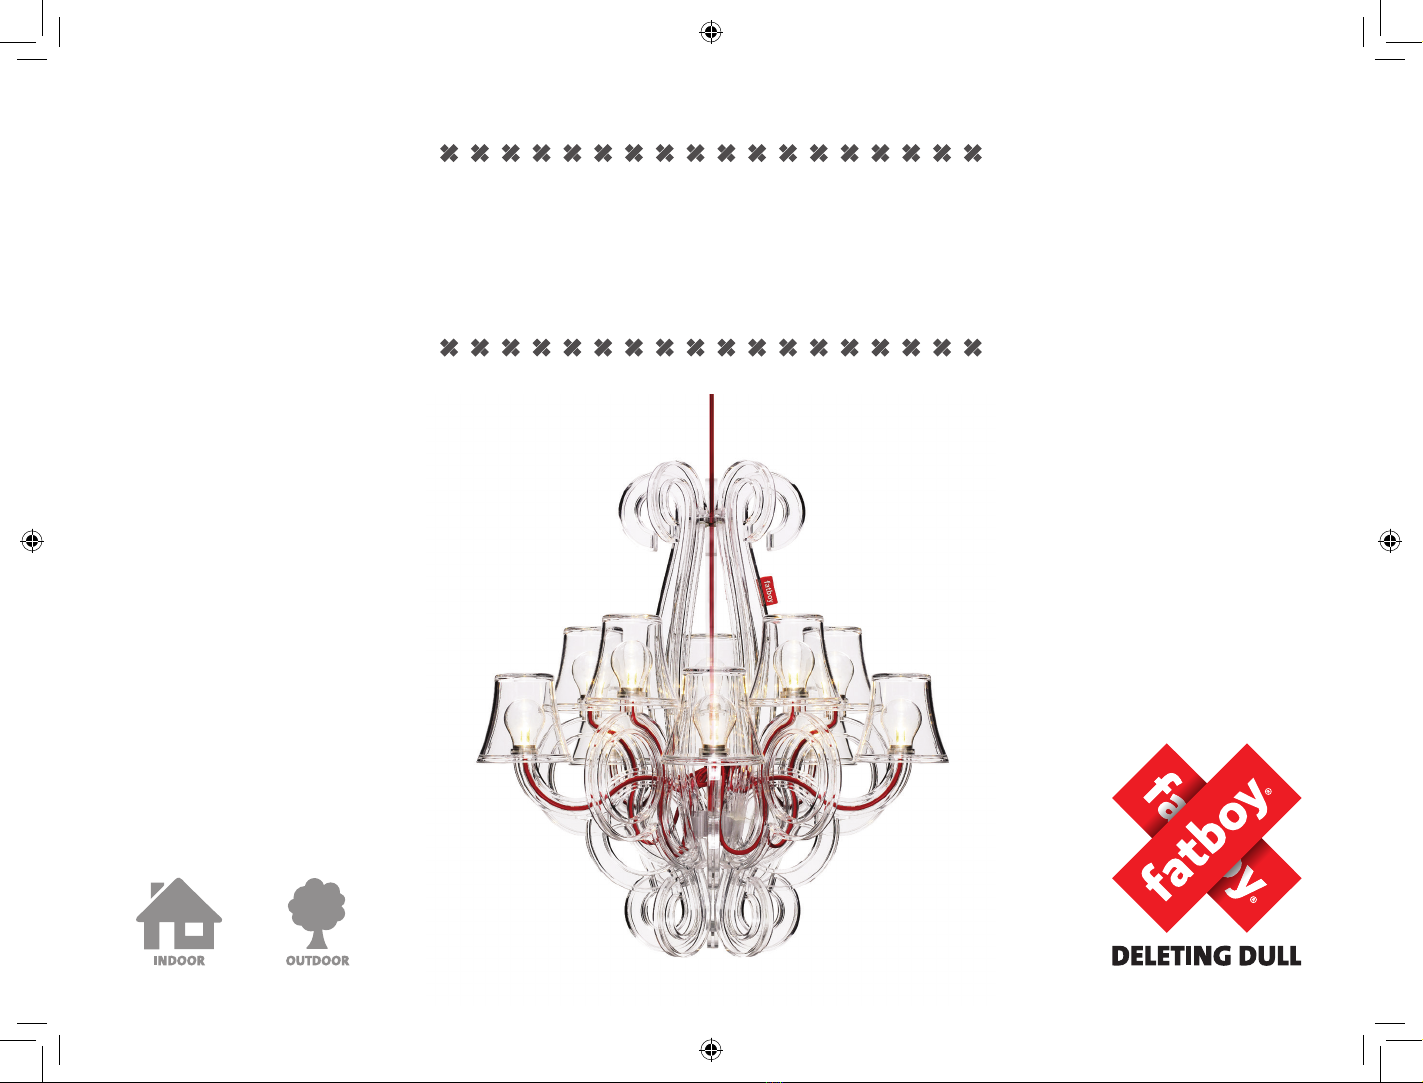
GLAMOUR MEETS
ROCK ’N ROLL
Looking for a touch of Louis XV glamour mixed with some
dirty rock`n’roll, Dutch designers DeMakersVan created this
urban but durable chandelier with iconic Fatboy wiring.
FIRST OF ALL...
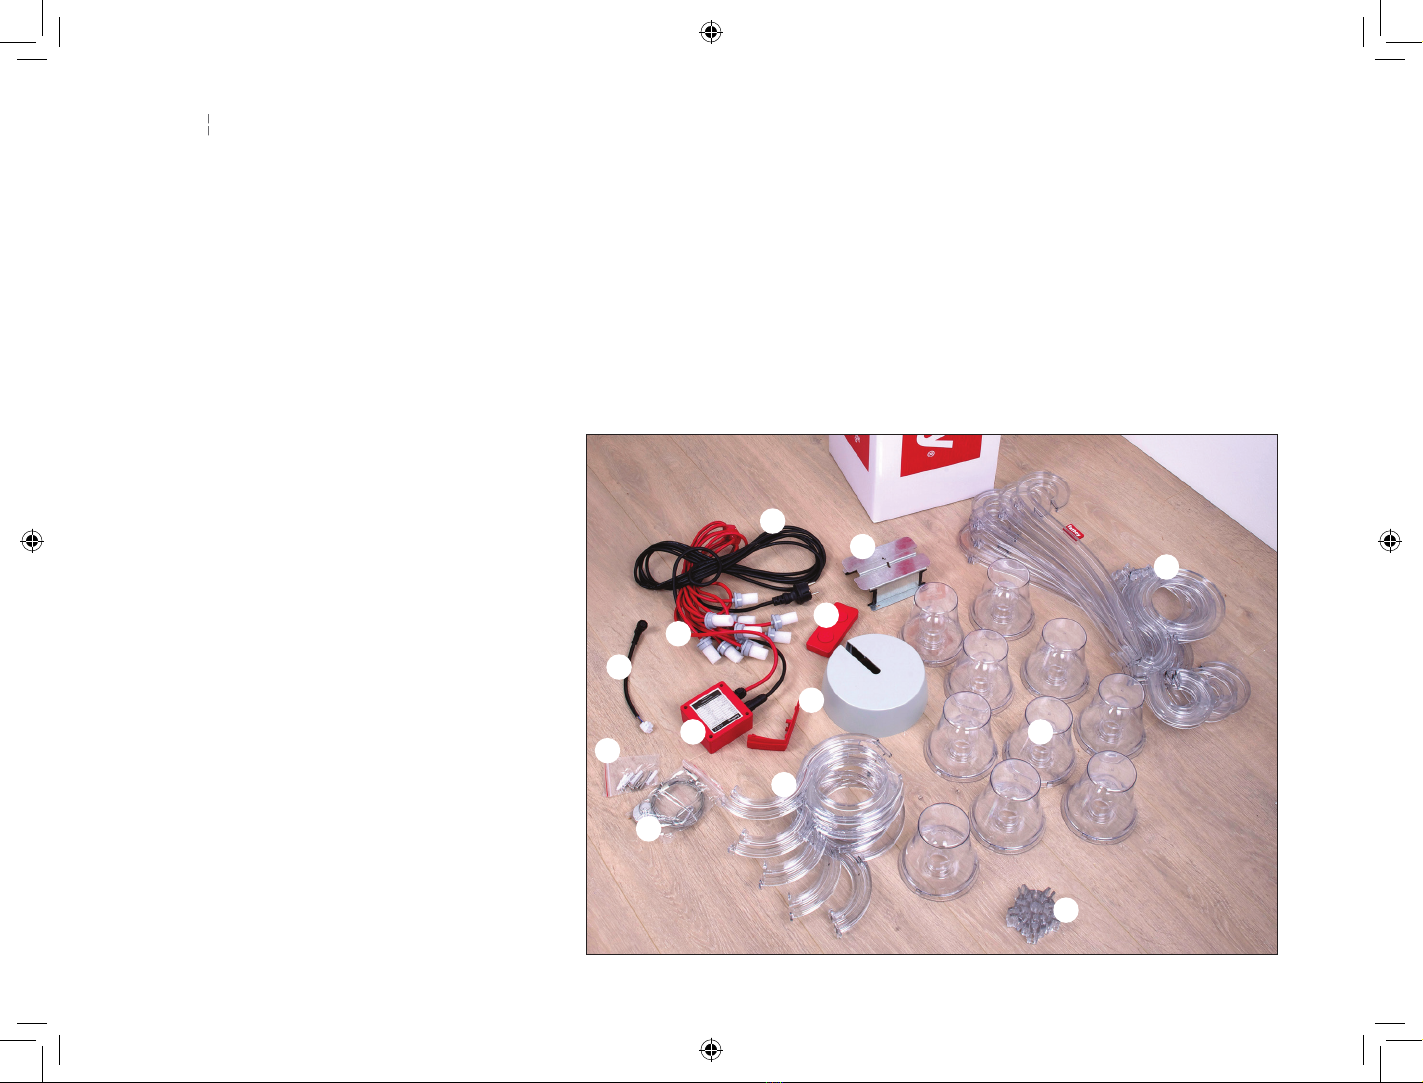
Check the contents of the box. Note! In case of missing or
damaged parts, please contact the sales crew.
1. 1 construction ring
2. 1 cap insert screw + 4 screws (ø 6mm) + 4 dowels (ø 6mm)
3. 5 long arms
4. 5 short arms
5. 1 mounting plate + wire and cable clamp (screw included)
6. cable house with led lights
7. 10 shades
8. 1 transformer case
9. 1 transformer
10. 1 short connection cable (indoor use)
11. 1 long connection cable (outdoor use)
12. 1 cap + insert
13. 1 remote
1
2
3
4
7
5
6
8
9
1 0
1 1
12
1 3
RockCocoManual-DeletingDull-NEW-230x170-singlepage.indd 3 15/12/14 10:34
rockcoco assembly manual
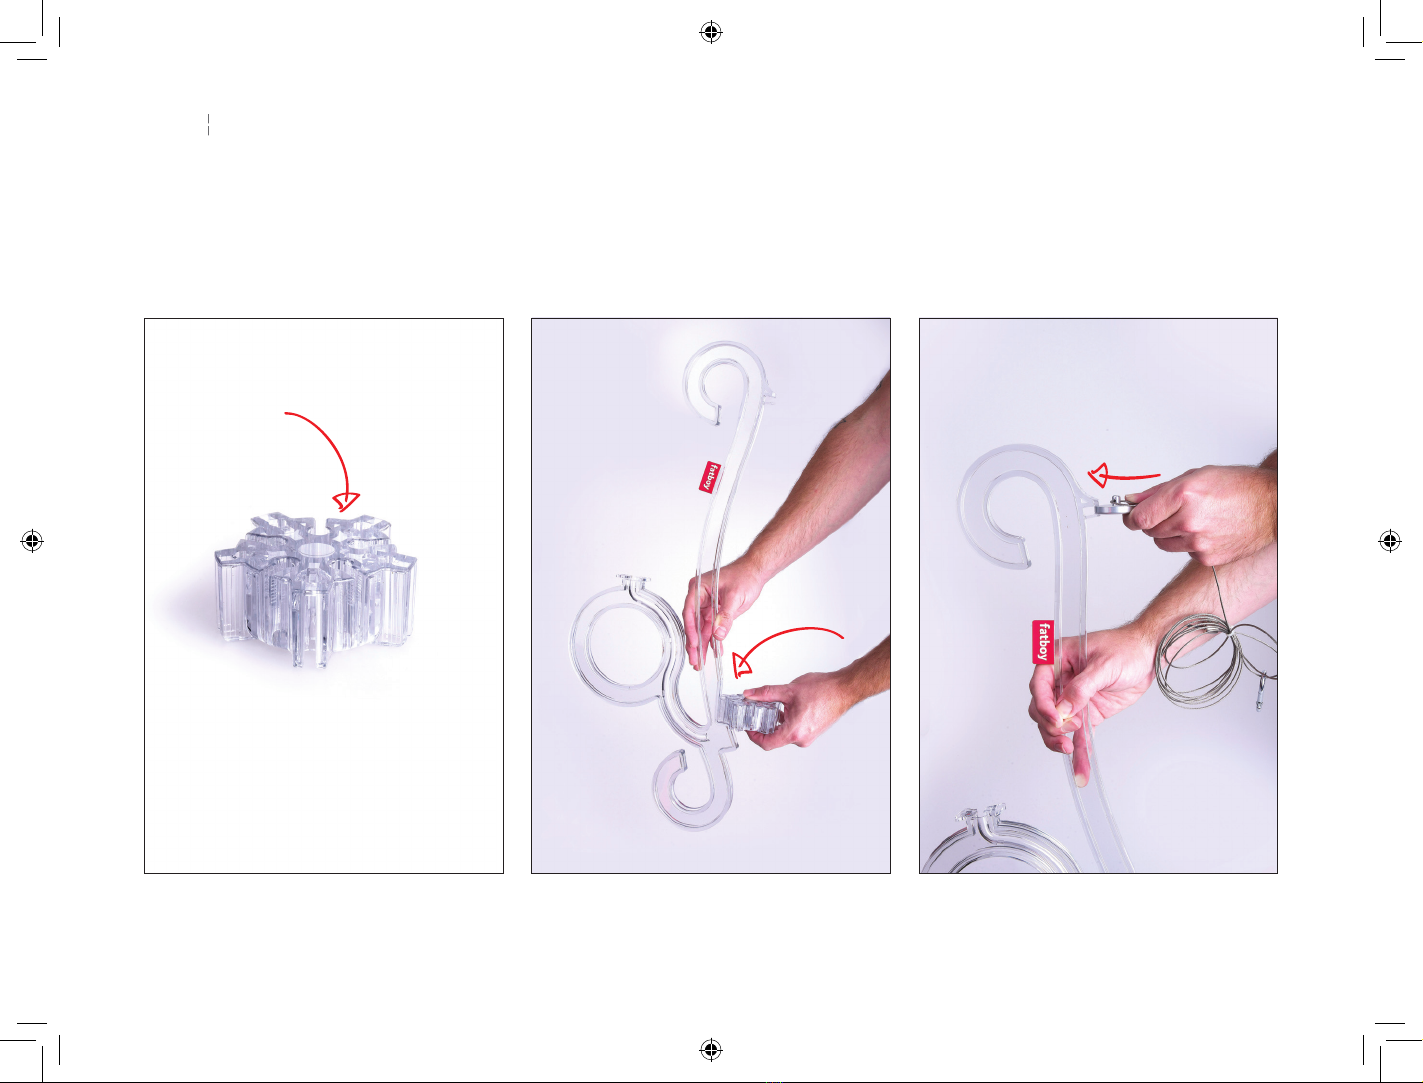
STEP 1
Position construction ring with the upper side on the top
ring (it says TOP).
STEP 3
Click mounting plate in corresponding clicker in large
arm.
STEP 2
Take arm no.1 of the 5 large arms and slide it into one of the
corresponding outer holes in the construction ring until it is
all the way through.
Make sure pin lays flush with top surface of
construction ring.
RockCocoManual-DeletingDull-NEW-230x170-singlepage.indd 4 15/12/14 10:35
rockcoco assembly manual
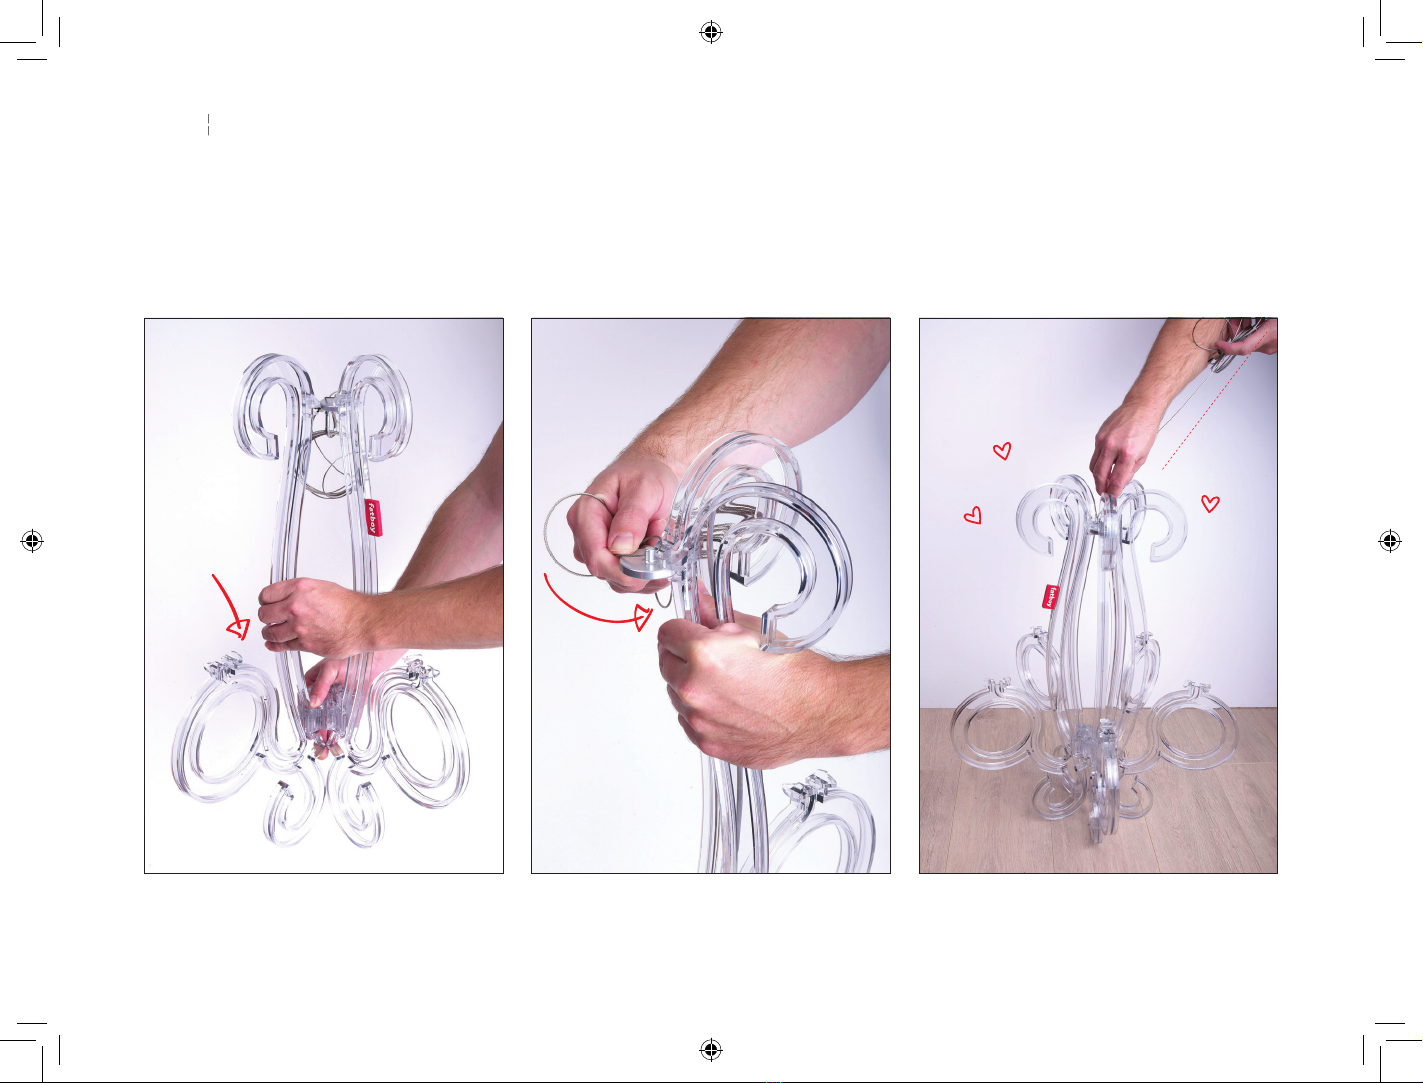
STEP 4
Slide large arm no. 2 in corresponding hole of construction
ring until it is pushed all the way through.
STEP 6
Repeat step 4 and 5 for the other 3 large arms and put the
RockCoco on a flat surface.
Enjoy your halfway result for a moment!
STEP 5
Click large arm no. 2 on the mounting plate.
To click large arm no. 2 on the mounting plate it might be
necessary to bend the arm a bit.
RockCocoManual-DeletingDull-NEW-230x170-singlepage.indd 5 15/12/14 10:35

rockcoco assembly manual
STEP 7
Take arm no. 1 of the 5 small arms and slide it into one of
the corresponding inner holes of the construction ring until
it is slid all the way through.
STEP 9
Position the cable house with Led strings in the middle of
the chandelier. Be aware of the difference in size of the Led
cables for the short arms and long arms!
STEP 8
Repeat step 7 for the other 4 small arms and wipe the sweat
from your forehead if necessary... Looks good right?
Make sure the small arm makes contact
with the construction ring.
RockCocoManual-DeletingDull-NEW-230x170-singlepage.indd 6 15/12/14 10:35
rockcoco assembly manual
STEP 10
Position the shorter Led-cables in the small arms and start
clicking the cable from the Led module.
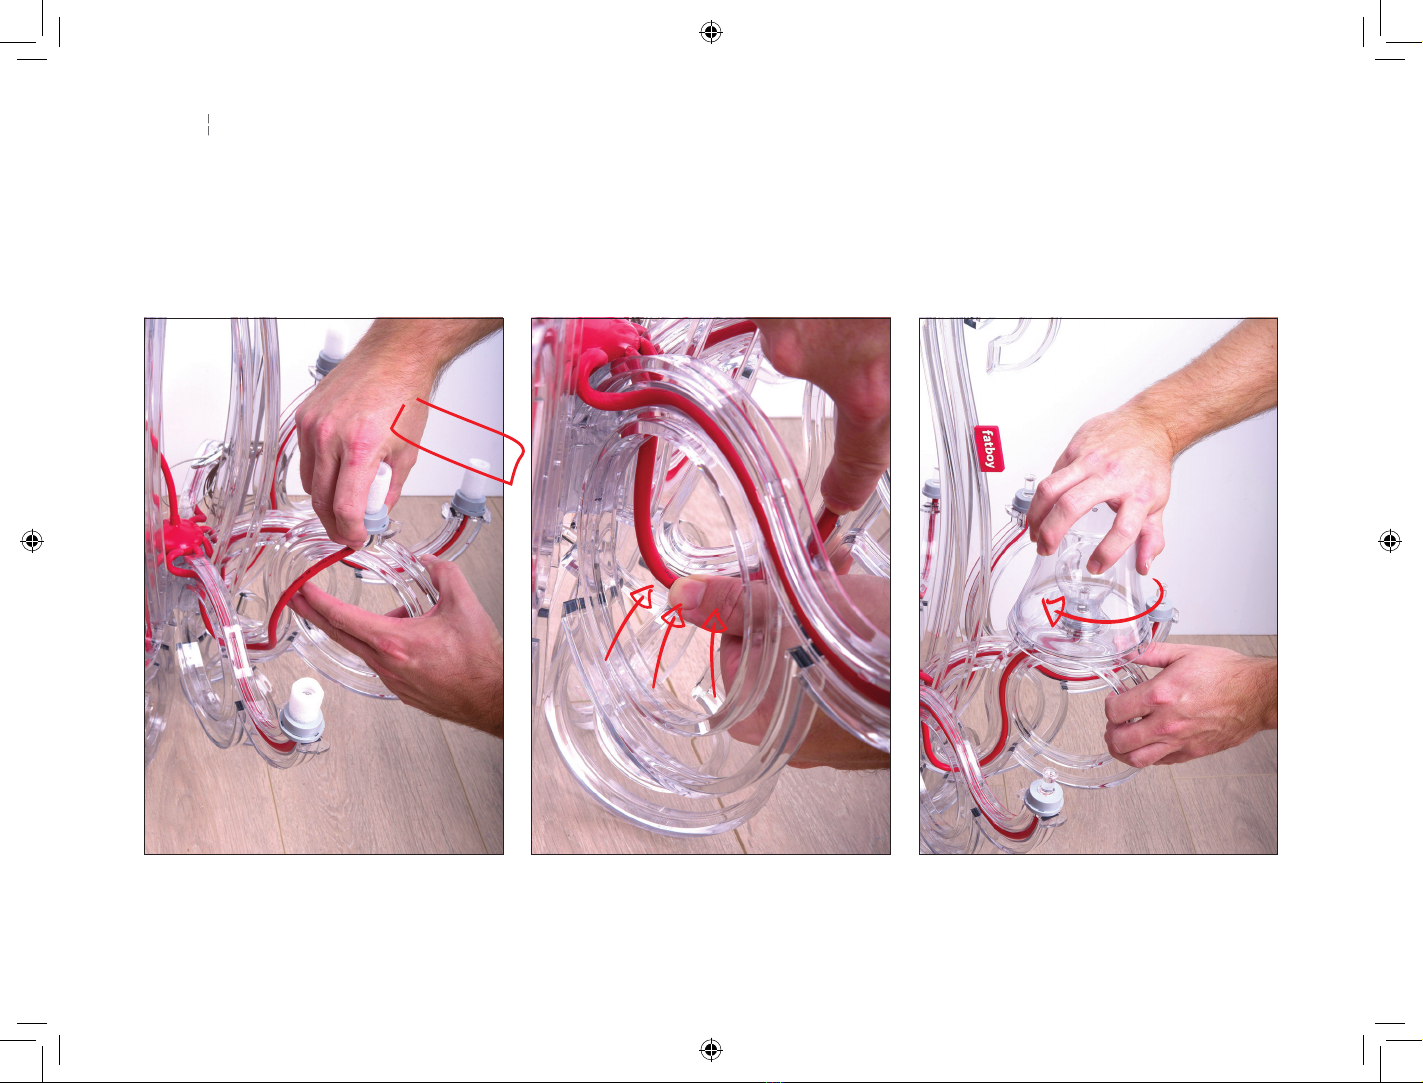
STEP 12 (FINAL STEP)
After removing the protective foams from the lights,
position shade plates on arms (repeat step for all
shade plates).
STEP 11
Position the longer Led-cables in the large arms and start
clicking the cable from the Led module.
Click the cable behind clickers. Click the cable behind clickers.
Place shade plate over Led-module on the arm.
The loud click you hear is a normal sound.
Rotate the shade plate to lock it on the arm, rotate until
friction locks the base plate.
*click *
RockCocoManual-DeletingDull-NEW-230x170-singlepage.indd 7 15/12/14 10:35

rockcoco assembly manual
YOU ARE DONE
!
NOW START ASSEMBLY FOR INDOOR OR OUTDOOR USE
INTRODUCTION
Caution! Follow the step-by-step instructions as described
for your own safety and to avoid problems with connecting
the Fatboy Ceiling kit and Fatboy Rockcoco to your home grid.
Used tools
Voltage-tester screwdriver
Crosshead screwdriver
Stripping pliers
Electrician’s pliers
Drilling machine (electric/portable)
Ø 6 mm drill bit
Ø 6 mm drill bit
Materials (included)
Dowels 4x (included)
Screws 4x (included)
Please note: not all tools are required for outdoor suspension.
RockCocoManual-DeletingDull-NEW-230x170-singlepage.indd 8 15/12/14 10:35

rockcoco assembly manual
INDOOR
ASSEMBLY
RockCocoManual-DeletingDull-NEW-230x170-singlepage.indd 9 15/12/14 10:35
rockcoco assembly manual
STEP 1
Be sure your home grid provides the required voltage,
frequency and grounding: 230 - 240 VAC / 50 - 60 Hz /
Earthed sign.
Caution! Do not install the RockCoco Ceiling kit in case of any
doubts. Please contact the sales outlet or an electrician.
STEP 2
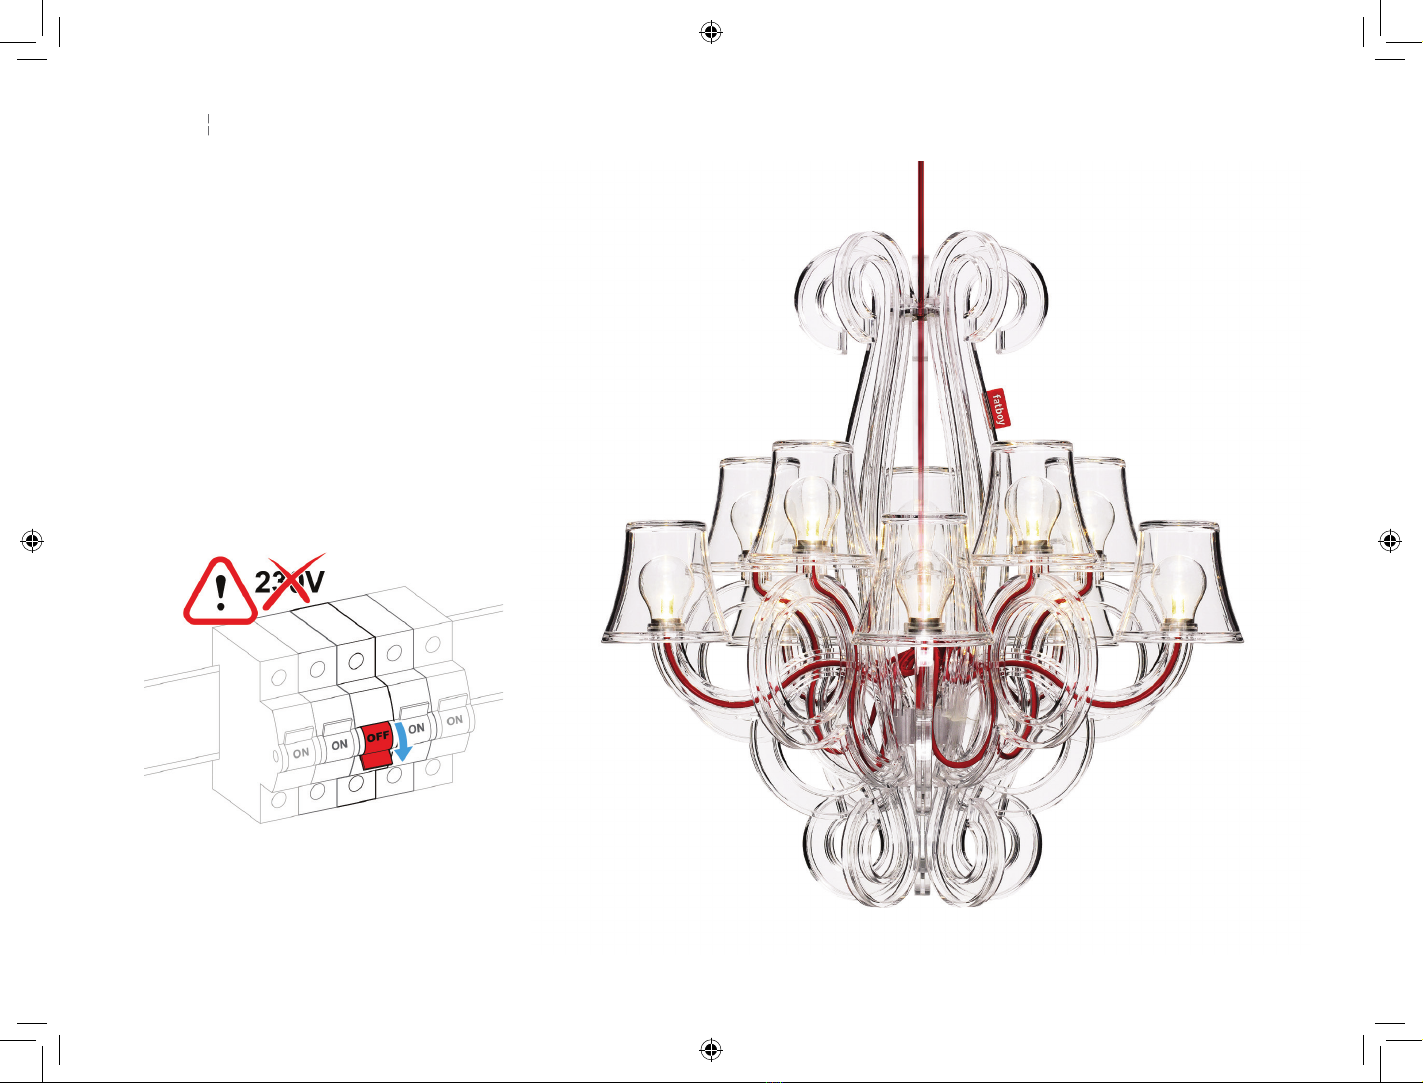
Warning! To avoid any chance of an electric shock, switch
off the current in the meter cupboard.
RockCocoManual-DeletingDull-NEW-230x170-singlepage.indd 10 15/12/14 10:35

rockcoco assembly manual
STEP 3
Determine the point of suspension for your Rockcoco inside
your home.
Note! Due to the Rockcoco’s weight (7 kg), it is required
always to mount the Fatboy Ceiling kit onto a concrete or
solid ceiling construction.
Caution! Don’t suspend the RockCoco directly on a junction
box. Make sure the fixation point meets these requirements!
Mount the lamp with at least 2 pers0ns.
Please use the following method of determining the point of suspension.
STEP 4
Strip (if necessary) and connect the cables, extruding from
the junction box, to the strip terminal-block.
STEP 5
Drill the holes in your ceiling as followes:
Wooden joists:
Rough-drill with a wood drill bit (ø 6 mm) the 4 holes.
Put the dowels (ø 6 mm) into the holes.
Concrete ceiling:
Drill with a concrete drill bit (ø 6 mm) the 4 holes.
Put the dowels (ø 6 mm) into the holes.
RockCocoManual-DeletingDull-NEW-230x170-singlepage.indd 11 15/12/14 10:35
rockcoco assembly manual
STEP 6
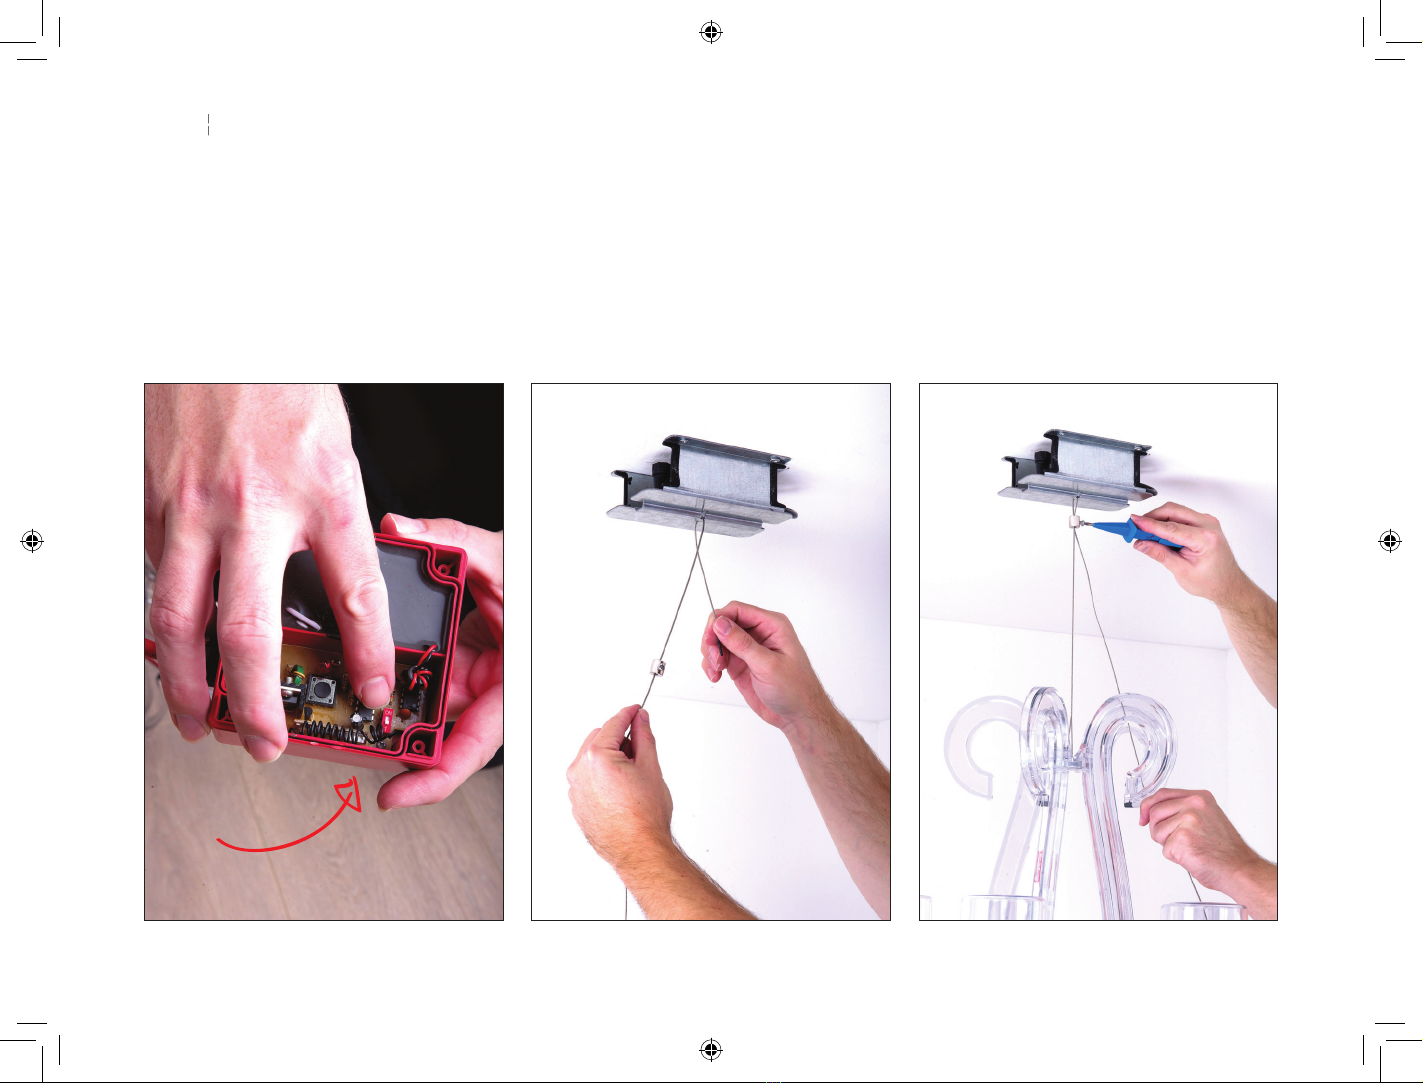
Open the transformer and flip the little switch to ON or 1.
ON: you can dim the Rockcoco ánd turn it on and off by
solely using the buttons on the remote.
1: use your light switch to turn the Rockcoco on or off.
Use the buttons on the remote to control brightness.
STEP 8
Mount the wire. Make sure the cable clamp will fit inside
the cap later on.
STEP 7
Determine the height by adjusting the wire.
flip it!
RockCocoManual-DeletingDull-NEW-230x170-singlepage.indd 12 15/12/14 10:35

rockcoco assembly manual
STEP 9
Place transformer by sliding it in the holder.
STEP 11
Roll up your cable untill the RockCoco has the perfect
height. Gently place the cable around the ceiling kit along
with the leftover wire.
Note! Check that the cables are not jammed.
STEP 10
Connect the cable with screw terminal to the
transformer. Click it on and screw tight.
RockCocoManual-DeletingDull-NEW-230x170-singlepage.indd 13 15/12/14 10:35

rockcoco assembly manual
STEP 12
Center the wire inside the ceiling cap and close by using the
insert and a screw (included).
STEP 14
Switch on the current in the meter cupboard and test the
functioning of the Rockcoco.
Rockcoco does not light up? Check all the connections.
Contact the sales outlet in case the Rockcoco does not work.
Rockcoco does light up? Congratulations and enjoy your
indoor Rockcoco!
STEP 13
Place the cap over the ceiling kit in a twisting motion until
secured tightly.
Twist
(and shout if you want )
use a
screwdriver
RockCocoManual-DeletingDull-NEW-230x170-singlepage.indd 14 15/12/14 10:35

rockcoco assembly manual
OUTDOOR
ASSEMBLY
RockCocoManual-DeletingDull-NEW-230x170-singlepage.indd 15 15/12/14 10:35

rockcoco assembly manual
STEP 1
Be sure your grid provides the required voltage, frequency
and grounding: 230 - 240 VAC / 50 - 60 Hz / Earthed sign.
Caution! Do not install the RockCoco in case of any doubts.
Please contact the sales outlet or an electrician.
STEP 2
Warning! To avoid any chance of an electric shock, switch
off the current in the meter cupboard.
STEP 3
For outdoor use, please use the large cable instead of the
short one. Click and screw the cable in the transformer and
use steel cable to hang the lamp in a tree or wherever you
like. Make sure the desired spot is stable and strong enough
to hold the lamp. The cap isn’t necessary for the suspension.
RockCocoManual-DeletingDull-NEW-230x170-singlepage.indd 16 15/12/14 10:35

RockCocoManual-DeletingDull-NEW-230x170-singlepage.indd 17 15/12/14 10:35
rockcoco assembly manual
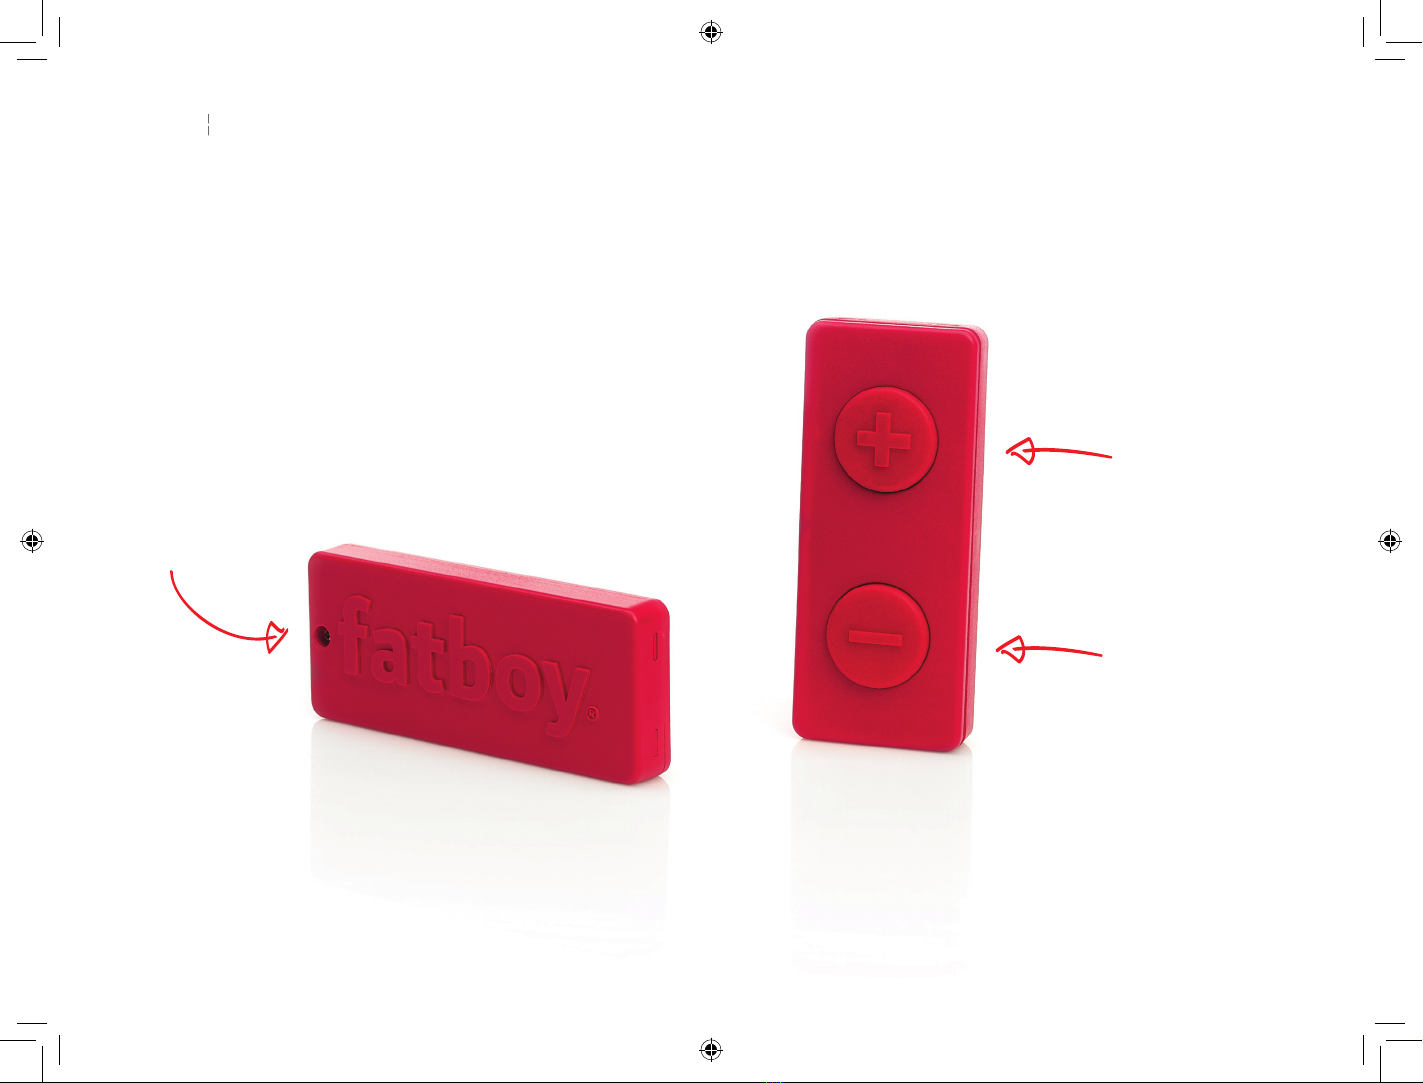
ROCKCOCO REMOTE
Unscrew to change battery. Make sure to point the remote in the direction
of the lamp and hold buttons to dim the light.
Press once + = on
Press once - = off
RockCocoManual-DeletingDull-NEW-230x170-singlepage.indd 18 15/12/14 10:35

GENERAL USE
AND CONDITIONS
RockCocoManual-DeletingDull-NEW-230x170-singlepage.indd 19 15/12/14 10:35
rockcoco assembly manual
WARRANTY INFORMARTION
Visit our website www.fatboy.com for information on warranty on your product.
Fatboy cannot accept any claim on warranty in event of:
Damage or defects caused by use, operation or treatment of the product in ways that are inconsistent with normal personal or domestic use; repairs or attempts to repair undertaken by any
party other than Fatboy the original B.V.
PRODUCT INFORMATION
The colour emitted by the LED source is 2700 K (warm white) and is perfect for creating a dash atmosphere, both indoors and outdoors.
The lamp is dust and spray proof and will not be damaged during a light rain shower or while using sprinklers in the garden.
The lamp is suitable for 100 to 240VAC, 50/60Hz AC power supply and is equipped with a Radiofrequency remote control.
WARNING! READ CAREFULLY BEFORE USE!
• Do not expose the lamp to excessive heat from heat sources.
• Do not hang any items on the lamp.
• Do not leave the remote control outdoors during rain showers.
• Keep the remote control away from water sprinklers, when in operation.
• Do not use the powercable with the terminal block outside or in wet conditions.
• Make sure that the powercable connector is properly mounted and secured by the screwlock.
• Do not use the light if the power cables are damaged
RockCocoManual-DeletingDull-NEW-230x170-singlepage.indd 20 15/12/14 10:35
Table of contents
Other fatboy Lighting Equipment manuals


Popular Lighting Equipment manuals by other brands


Aveo Engineering
Aveo Engineering THOR 36 DROP-IN installation manual

American Lighting
American Lighting TRULUX STL-UWW-5MKIT installation instructions

Konix
Konix Drakkar Aurora user manual

American DJ
American DJ D-LIGHT SYNC PAK User instructions

DIODE LED
DIODE LED EMERY BEAM LED Wet Location Batten Fixture installation guide

American DJ
American DJ Warp Tri LED User instructions


