FAURE FYAN8FW0 User manual

GETTING
STARTED?
EASY.
User Manual
FYAN8FW0
FYAN8FW1
EN User Manual
Refrigerator

VISIT OUR WEBSITE TO:
Get usage advice, brochures, trouble shooter, service and repair information:
www.faure.com/support
SAFETY INFORMATION
Before the installation and use of the appliance, carefully read the
supplied instructions. The manufacturer is not responsible for any
injuries or damage that are the result of incorrect installation or
usage. Always keep the instructions in a safe and accessible
location for future reference.
CHILDREN AND VULNERABLE PEOPLE SAFETY
•This appliance can be used by children aged from 8 years and
above and persons with reduced physical, sensory or mental
capabilities or lack of experience and knowledge if they have
been given supervision or instruction concerning the use of the
appliance in a safe way and understand the hazards involved.
•Children aged from 3 to 8 years are allowed to load and unload
the appliance provided that they have been properly instructed.
•This appliance may be used by persons with very extensive and
complex disabilities provided that they have been properly
instructed.
•Children of less than 3 years of age should be kept away from
the appliance unless continuously supervised.
•Children should be supervised to ensure that they do not play
with the appliance.
•Children shall not carry out cleaning and user maintenance of
the appliance without supervision.
•Keep all packaging away from children and dispose of it
appropriately.
GENERAL SAFETY
•This appliance is for storing food and baverages only.
•This appliance is designed for single household domestic use
in an indoor environment.
2

•This appliance may be used in, offices, hotel guest rooms, bed
& breakfast guest rooms, farm guest houses and other similar
accommodation where such use does not exceed (average)
domestic usage levels.
•To avoid contamination of food respect the following
instructions:
–do not open the door for long periods;
–clean regularly surfaces that can come in contact with food
and accessible drainage systems;
•WARNING: Keep ventilation openings, in the appliance
enclosure or in the built-in structure, clear of obstruction.
•WARNING: Do not use mechanical devices or other means to
accelerate the defrosting process, other than those
recommended by the manufacturer.
•WARNING: Do not damage the refrigerant circuit.
•WARNING: Do not use electrical appliances inside the food
storage compartments of the appliance, unless they are of the
type recommended by the manufacturer.
•Do not use water spray and steam to clean the appliance.
•Clean the appliance with a moist soft cloth. Only use neutral
detergents. Do not use abrasive products, abrasive cleaning
pads, solvents or metal objects.
•When the appliance is empty for long period, switch it off,
defrost, clean, dry and leave the door open to prevent mould
from developing within the appliance.
•Do not store explosive substances such as aerosol cans with a
flammable propellant in this appliance.
•If the supply cord is damaged, it must be replaced by the
manufacturer, its Authorised Service Centre or similarly
qualified persons in order to avoid a hazard.
SAFETY INSTRUCTIONS
INSTALLATION
WARNING! Only a qualified person
must install this appliance.
• Remove all the packaging.
• Do not install or use a damaged appliance.
• Follow the installation instructions supplied with
the appliance.
• Always take care when moving the appliance as
it is heavy. Always use safety gloves and
enclosed footwear.
• Make sure the air can circulate around the
appliance.
3

• At first installation or after reversing the door
wait at least 4 hours before connecting the
appliance to the power supply. This is to allow
the oil to flow back in the compressor.
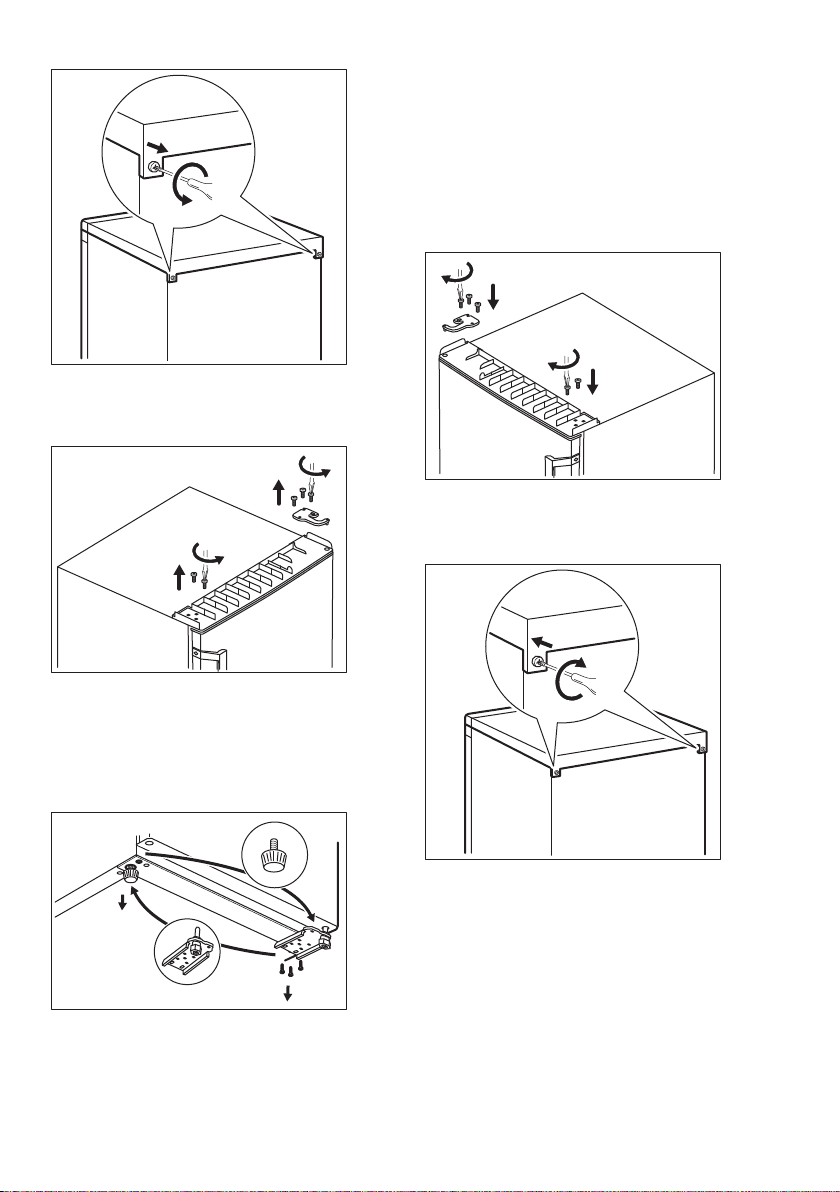
• Before carrying out any operations on the
appliance (e.g. reversing the door), remove the
plug from the power socket.
• Do not install the appliance close to radiators or
cookers, ovens or hobs.
• Do not expose the appliance to the rain.
• Do not install the appliance where there is direct
sunlight.
• Do not install this appliance in areas that are too
humid or too cold.
• When you move the appliance, lift it by the front
edge to avoid scratching the floor.
ELECTRICAL CONNECTION
WARNING! Risk of fire and electric
shock.
WARNING! When positioning the
appliance, ensure the supply cord is
not trapped or damaged.
WARNING! Do not use multi-plug
adapters and extension cables.
• The appliance must be earthed.
• Make sure that the parameters on the rating
plate are compatible with the electrical ratings
of the mains power supply.
• Always use a correctly installed shockproof
socket.
• Make sure not to cause damage to the electrical
components (e.g. mains plug, mains cable,
compressor). Contact the Authorised Service
Centre or an electrician to change the electrical
components.
• The mains cable must stay below the level of the
mains plug.
• Connect the mains plug to the mains socket
only at the end of the installation. Make sure that
there is access to the mains plug after the
installation.
• Do not pull the mains cable to disconnect the
appliance. Always pull the mains plug.
USE
WARNING! Risk of injury, burns,
electric shock or fire.
The appliance contains flammable gas,
isobutane (R600a), a natural gas with a high level
of environmental compatibility. Be careful not to
cause damage to the refrigerant circuit containing
isobutane.
• Do not change the specification of this
appliance.
• Do not put electrical appliances (e.g. ice cream
makers) in the appliance unless they are stated
applicable by the manufacturer.
• If damage occurs to the refrigerant circuit, make
sure that there are no flames and sources of
ignition in the room. Ventilate the room.
• Do not let hot items to touch the plastic parts of
the appliance.
• Do not put soft drinks in the freezer
compartment. This will create pressure on the
drink container.
• Do not store flammable gas and liquid in the
appliance.
• Do not put flammable products or items that are
wet with flammable products in, near or on the
appliance.
• Do not touch the compressor or the condenser.
They are hot.
• Do not remove or touch items from the freezer
compartment if your hands are wet or damp.
• Do not freeze again food that has been thawed.
• Follow the storage instructions on the
packaging of frozen food.
• Wrap the food in any food contact material
before putting it in the freezer compartment.
• Do not place unpacked food on the appliance.
INTERNAL LIGHTING
WARNING! Risk of electric shock.
• Concerning the lamp(s) inside this product and
spare part lamps sold separately: These lamps
are intended to withstand extreme physical
conditions in household appliances, such as
temperature, vibration, humidity, or are intended
to signal information about the operational
status of the appliance. They are not intended to
be used in other applications and are not
suitable for household room illumination.
CARE AND CLEANING
WARNING! Risk of injury or damage
to the appliance.
• Before maintenance, deactivate the appliance
and disconnect the mains plug from the mains
socket.
4

• This appliance contains hydrocarbons in the
cooling unit. Only a qualified person must do the
maintenance and the recharging of the unit.
• Regularly examine the drain of the appliance
and if necessary, clean it. If the drain is blocked,
defrosted water collects in the bottom of the
appliance.
SERVICE
• To repair the appliance contact the Authorised
Service Centre. Use original spare parts only.
• Please note that self-repair or non-professional
repair can have safety consequences and might
void the guarantee.
• The following spare parts will be available for 7
years after the model has been discontinued:
thermostats, temperature sensors, printed
circuit boards, light sources, door handles, door
hinges, trays and baskets. Please note that
some of these spare parts are only available to
professional repairers, and that not all spare
parts are relevant for all models.
• Door gaskets will be available for 10 years after
the model has been discontinued.
DISPOSAL
WARNING! Risk of injury or
suffocation.
• Disconnect the appliance from the mains
supply.
• Cut off the mains cable and discard it.
• Remove the door to prevent children and pets to
be closed inside of the appliance.
• The refrigerant circuit and the insulation
materials of this appliance are ozone-friendly.
• The insulation foam contains flammable gas.
Contact your municipal authority for information
on how to discard the appliance correctly.
• Do not cause damage to the part of the cooling
unit that is near the heat exchanger.
INSTALLATION
WARNING! Refer to Safety chapters.
5

DIMENSIONS
H1
H2
W1
D1
W2
D2
W3
D3
Overall dimensions ¹
H1 mm 845
W1 mm 560
D1 mm 575
¹ the height, width and depth of the appliance
without the handle
Space required in use ²
H2 mm 945
W2 mm 760
D2 mm 650
² the height, width and depth of the appliance
including the handle, plus the space necessary for
free circulation of the cooling air
Overall space required in use ³
H2 mm 945
W3 mm 760
D3 mm 1165
³ the height, width and depth of the appliance
including the handle, plus the space necessary for
free circulation of the cooling air, plus the space
necessary to allow door opening to the minimum
angle permitting removal of all internal equipment
LOCATION
This appliance is not intended to be used as a built-
in appliance.
In case of different installation from freestanding
respecting space required in use dimensions, the
appliance will function correctly but energy
consumption might increase slightly.
To ensure appliance's best functionality, you should
not install the appliance in the nearby of the heat
source (oven, stoves, radiators, cookers or hobs) or
6

in a place with direct sunlight. Make sure that air
can circulate freely around the back of the cabinet.
This appliance should be installed in a dry, well
ventilated indoor position.
To ensure best performance, if the appliance is
positioned below an overhanging wall unit, the
minimum distance between the top of the cabinet
shall be maintained. Ideally, however, the appliance
should not be positioned below overhanging wall
units. One or more adjustable feet at the base of
the cabinet ensure that the appliance stands level.
CAUTION! If you position the
appliance against the wall, use back
spacers provided or keep the minimum
distance indicated in the installation
instructions.
CAUTION! If you install the appliance
next to a wall, refer to the installation
instructions to understand the
minimum distance between the wall
and the side of the appliance where
door hinges are to provide enough
space to open the door when the
internal equipment is removed (e.g.
when cleaning).
This appliance is intended to be used at ambient
temperature ranging from 10°C to 43°C.
The correct operation of the appliance
can only be guaranteed within the
specified temperature range.
If you have any doubts regarding
where to install the appliance, please
turn to the vendor, to our customer
service or to the nearest Authorised
Service Centre.
It must be possible to disconnect the
appliance from the mains power
supply. The plug must therefore be
easily accessible after installation.
ELECTRICAL CONNECTION
• Before plugging in, ensure that the voltage and
frequency shown on the rating plate correspond
to your domestic power supply.
• The appliance must be earthed. The power
supply cable plug is provided with a contact for
this purpose. If the domestic power supply
socket is not earthed, connect the appliance to
a separate earth in compliance with current
regulations, consulting a qualified electrician.
• The manufacturer declines all responsibility if
the above safety precautions are not observed.
• This appliance complies with the E.E.C.
Directives.
RUBBER SUPPORTING PAD
There is no need to install this additional equipment
provided in a bag to your appliance during normal
use.
However, there is a risk the appliance become
unstable when all food products are placed only on
door shelves. In this case install the rubber
supporting pad:
1. Tilt the appliance carefully on a soft foam
packaging or similar material to avoid any
damage to the back of the appliance and the
floor.
2. Find a hole in a lower base cover and insert a
screw into the rubber supporting pad.
3. Screw it to the base cover with a cross
screwdriver.
DOOR REVERSIBILITY
WARNING! Before carrying out any
operations, remove the plug from the
power socket.
1. Make sure the appliance stands upright.
2. Open the door and remove the door
equipment. Refer to the "Daily Use" chapter.
Close the door.
3. Unscrew the screws on the back of the top
cover.
7

4. Lift the top cover and place it on a soft surface.
5. Unscrew the 4 screws that connect the upper
hinge. Put the upper hinge in a safe place
together with the screws.
6. Lift the door and put it on a soft surface.
7. Tilt the appliance carefully on a soft foam
packaging or similar material to avoid any
damage to the back of the appliance and the
floor.
8. Unscrew the screws of the bottom hinge and
adjustable feet.
9. Install the pin in the opposite hole of the hinge.
10. Screw the bottom hinge on the other side of
the appliance.
11. Install the rubber support on the side with no
hinge.
12. Fit the door on the lower hinge making sure the
hinge pin enters the door bottom hole.
13. Install the upper hinge on the opposite side of
the appliance. Fit the upper hinge pin into the
door upper hole. Tighten the screws.
14. Screw the remaining 2 screws on the top side
of the appliance with no hinge.
15. Place the top cover on the appliance and
tighten the screws on the back.
Install the door equipment.
Wait at least 4 hours before connecting the
appliance to the power supply.
8

OPERATION
SWITCHING ON
1. Insert the plug into the wall socket.
2. Turn the temperature regulator clockwise to a
medium setting.
SWITCHING OFF
To turn off the appliance, remove the plug from the
power socket.
TEMPERATURE REGULATION
The temperature is regulated automatically.
However, you can set a temperature inside the
appliance yourself.
Choose the setting keeping in mind that the
temperature inside the appliance depends on:
• room temperature,
• frequency of opening the door,
• quantity of food stored,
• appliance location.
A medium setting is generally the most suitable
one.
To operate the appliance:
1. Turn the temperature regulator clockwise to
obtain a lower temperature inside the
appliance.
2. Turn the temperature regulator
counterclockwise to obtain a higher
temperature inside the appliance.
DAILY USE
FREEZING FRESH FOOD
The freezer compartment is suitable for freezing
fresh food and storing frozen and deep-frozen food
for a long time.
The maximum amount of food that can be frozen
without adding other fresh food during 24 hours is
specified on the rating plate (a label located inside
the appliance).
STORAGE OF FROZEN FOOD
When activating an appliance for the first time or
after a period out of use, before putting the
products in the compartment let the appliance run
at least 3 hours.
The freezer drawers ensure that it is quick and easy
to find the food package you want. If large
quantities of food are to be stored, remove all
drawers, except for the bottom drawer which needs
to be in place to provide good air circulation.
Keep the food no closer than 15 mm from the door.
CAUTION! In the event of accidental
defrosting, for example due to a power
failure, if the power has been off for
longer than the value shown on rating
plate under "rising time", the defrosted
food must be consumed quickly or
cooked immediately then cooled and
then re-frozen.
THAWING
Deep-frozen or frozen food, prior to being used,
can be thawed in the refrigerator or at room
temperature, depending on the time available for
this operation.
Small pieces may even be cooked still frozen,
directly from the freezer: in this case, cooking will
take longer.
HINTS AND TIPS
HINTS FOR ENERGY SAVING
• The internal configuration of the appliance is the
one that ensures the most efficient use of
energy.
• Do not open the door frequently or leave it open
longer than necessary.
• The colder the temperature setting, the higher
the energy consumption.
• If the ambient temperature is high and the
temperature control is set to low temperature
and the appliance is fully loaded, the
compressor may run continuously, causing frost
or ice formation on the evaporator. In this case,
set the temperature control toward higher
temperature to allow automatic defrosting and
to save energy this way.
• Ensure a good ventilation. Do not cover the
ventilation grilles or holes.
9

HINTS FOR FREEZING
• Before freezing wrap and seal fresh food in:
aluminium foil, plastic film or bags, airtight
containers with lid.
• For more efficient freezing and thawing divide
food into small portions.
• It is recommended to put labels and dates on all
your frozen food. This will help to identify foods
and to know when they should be used before
their deterioration.
• The food should be fresh when being frozen to
preserve good quality. Especially fruits and
vegetables should be frozen after the harvest to
preserve all of their nutrients.
• Do not freeze bottles or cans with liquids, in
particular drinks containing carbon dioxide -
they may explode during freezing.
• Do not put hot food in the freezer compartment.
Cool it down at room temperature before
placing it inside the compartment.
• To avoid increase in temperature of already
frozen food, do not place fresh unfrozen food
directly next to it. Place food at room
temperature in the part of the freezer
compartment where there is no frozen food.
• Do not eat ice cubes, water ices or ice lollies
immediately after taking them out of the freezer.
Risk of frostbites.
• Do not re-freeze defrosted food. If the food has
defrosted, cook it, cool it down and then freeze
it.
HINTS FOR STORAGE OF FROZEN FOOD
• Freezer compartment is the one marked with
.
• The medium temperature setting ensures good
preservation of frozen food products.
Higher temperature setting inside the appliance
may lead to shorter shelf life.
• The whole freezer compartment is suitable for
storage of frozen food products.
• Leave enough space around the food to allow
air to circulate freely.
• For adequate storage refer to food packaging
label to see the shelf life of food.
• It is important to wrap the food in such a way
that prevents water, humidity or condensation
from getting inside.
SHOPPING TIPS
After grocery shopping:
• Ensure that the packaging is not damaged - the
food could be deteriorated. If the package is
swollen or wet, it might have not been stored in
the optimal conditions and defrosting may have
already started.
• To limit the defrosting process buy frozen goods
at the end of your grocery shopping and
transport them in a thermal and insulated cool
bag.
• Place the frozen foods immediately in the freezer
after coming back from the shop.
• If food has defrosted even partially, do not re-
freeze it. Consume it as soon as possible.
• Respect the expiry date and the storage
information on the package.
SHELF LIFE
Type of food Shelf life (months)
Bread 3
Fruits (except citrus) 6 - 12
Vegetables 8 - 10
Leftovers without meat 1 - 2
Dairy food:
Butter
Soft cheese (e.g. mozzarella)
Hard cheese (e.g. parmesan, cheddar)
6 - 9
3 - 4
6
Seafood:
10

Type of food Shelf life (months)
Fatty fish (e.g. salmon, mackerel)
Lean fish (e.g. cod, flounder)
Shrimps
Shucked clams and mussels
Cooked fish
2 - 3
4 - 6
12
3 - 4
1 - 2
Meat:
Poultry
Beef
Pork
Lamb
Sausage
Ham
Leftovers with meat
9 - 12
6 - 12
4 - 6
6 - 9
1 - 2
1 - 2
2 - 3
CARE AND CLEANING
WARNING! Refer to Safety chapters.
CLEANING THE INTERIOR
Before using the appliance for the first time, the
interior and all internal accessories should be
washed with lukewarm water and some neutral
soap to remove the typical smell of a brand-new
product, then dried thoroughly.
CAUTION! Do not use detergents,
abrasive powders, chlorine or oil-
based cleaners as they will damage
the finish.
CAUTION! The accessories and parts
of the appliance are not suitable for
washing in a dishwasher.
PERIODIC CLEANING
The equipment has to be cleaned regularly:
1. Clean the inside and accessories with
lukewarm water and some neutral soap.
2. Regularly check the door seals and wipe them
clean to ensure they are clean and free from
debris.
3. Rinse and dry thoroughly.
DEFROSTING OF THE FREEZER
CAUTION! Never use sharp metal
tools to scrape off frost from the
evaporator as you could damage it.
Do not use a mechanical device or any
artificial means to speed up the
thawing process other than those
recommended by the manufacturer.
About 12 hours prior to defrosting set
a lower temperature in order to build
up sufficient chill reserve in case of
any interruption in operation.
Defrost the freezer compartment when the frost
layer reaches a thickness of about 3-5 mm.
To defrost freezer compartment:
1. Switch off the appliance or pull out electrical
plug from the wall socket.
2. Remove any stored food, wrap it in several
layers of newspaper and put it in a cool place.
CAUTION! A temperature rise of
the frozen food packs during
defrosting may shorten their safe
storage life.
Do not touch frozen goods with
wet hands. Hands can freeze to
the goods.
3. Leave the door open. Protect the floor from the
defrosting water e.g. with a cloth or a flat
vessel.
4. In order to speed up the defrosting process,
place a pot of warm water in the freezer
11

compartment. In addition, remove pieces of ice
that break away before defrosting is complete.
5. When defrosting is complete, dry the interior
thoroughly.
6. Switch on the appliance and close the door.
7. Set the temperature regulator to obtain the
maximum coldness and run the appliance for
three hours using this setting.
Only after this time put the food back into the
freezer compartment.
PERIODS OF NON-OPERATION
When the appliance is not in use for long periods,
take the following precautions:
1. Disconnect the appliance from electricity
supply.
2. Remove all food.
3. Defrost the appliance.
4. Clean the appliance and all accessories.
5. Leave the door open to prevent unpleasant
smells.
TROUBLESHOOTING
WARNING! Refer to Safety chapters.
WHAT TO DO IF...
Problem Possible cause Solution
The appliance does not oper-
ate.
The appliance is switched off. Switch on the appliance.
The mains plug is not connec-
ted to the mains socket cor-
rectly.
Connect the mains plug to the
mains socket correctly.
There is no voltage in the
mains socket.
Connect a different electrical
appliance to the mains socket.
Contact a qualified electrician.
The appliance is noisy. The appliance is not supported
properly.
Check if the appliance stands
stable.
The compressor operates con-
tinually.
Temperature is set incorrectly. Refer to "Operation" chapter.
Many food products were put
in at the same time.
Wait a few hours and then
check the temperature again.
The room temperature is too
high.
Refer to "Installation" chapter.
Food products placed in the
appliance were too warm.
Allow food products to cool to
room temperature before stor-
ing.
The door is not closed correct-
ly.
Refer to "Closing the door"
section.
Door is misaligned or interferes
with ventilation grill.
The appliance is not levelled. Refer to installation instruc-
tions.
12

Problem Possible cause Solution
Door does not open easily. You attempted to re-open the
door immediately after closing.
Wait a few seconds between
closing and re-opening of the
door.
The lamp does not work. The lamp is in stand-by mode. Close and open the door.
The lamp is defective. Contact the nearest Author-
ized Service Centre.
There is too much frost and
ice.
The door is not closed correct-
ly.
Refer to "Closing the door"
section.
The gasket is deformed or
dirty.
Refer to "Closing the door"
section.
Food products are not wrap-
ped properly.
Wrap the food products better.
Temperature is set incorrectly. Refer to "Operation" chapter.
Appliance is fully loaded and is
set to the lowest temperature.
Set a higher temperature. Re-
fer to "Operation" chapter.
Temperature set in the appli-
ance is too low and the ambi-
ent temperature is too high.
Set a higher temperature. Re-
fer to "Operation" chapter.
Water flows inside the refriger-
ator.
Food products prevent the wa-
ter from flowing into the water
collector.
Make sure that food products
do not touch the rear plate.
The water outlet is clogged. Clean the water outlet.
Water flows on the floor. The melting water outlet is not
connected to the evaporative
tray above the compressor.
Attach the melting water outlet
to the evaporative tray.
The temperature in the appli-
ance is too low/too high.
The temperature is not set cor-
rectly.
Set a higher/lower tempera-
ture.
The door is not closed correct-
ly.
Refer to "Closing the door"
section.
The food products' tempera-
ture is too high.
Let the food products temper-
ature decrease to room tem-
perature before storage.
Many food products are stored
at the same time.
Store less food products at the
same time.
The thickness of the frost is
greater than 4-5 mm.
Defrost the appliance.
The door has been opened of-
ten.
Open the door only if necessa-
ry.
13

Problem Possible cause Solution
There is no cold air circulation
in the appliance.
Make sure that there is cold air
circulation in the appliance.
Refer to "Hints and Tips" chap-
ter.
If the advice does not lead to the
desired result, call the nearest
Authorized Service Centre.
REPLACING THE LAMP
The appliance is equipped with a longlife LED
interior light.
Only service is allowed to replace the lighting
device. Contact your Authorised Service Centre.
CLOSING THE DOOR
1. Clean the door gaskets.
2. If necessary, adjust the door. Refer to
"Installation" chapter.
3. If necessary, replace the defective door
gaskets. Contact the Authorised Service
Centre.
NOISES
SSSRRR!
CLICK!
HISSS!
BRRR!
BLUBB!
14

TECHNICAL DATA
The technical information is situated in the rating
plate on the internal side of the appliance and on
the energy label.
The QR code on the energy label supplied with the
appliance provides a web link to the information
related to the performance of the appliance
in the EU EPREL database. Keep the energy label
for reference together with the user manual and all
other documents provided with this appliance.
It is also possible to find the same information in
EPREL using the link https://eprel.ec.europa.eu
and the model name and product number that you
find on the rating plate of the appliance.
See the link www.theenergylabel.eu for detailed
information about the energy label.
INFORMATION FOR TEST INSTITUTES
Installation and preparation of the appliance for any
EcoDesign verification shall be compliant with EN
62552. Ventilation requirements, recess
dimensions and minimum rear clearances shall be
as stated in this User Manual at Chapter 3. Please
contact the manufacturer for any other further
information, including loading plans.
ENVIRONMENTAL CONCERNS
Recycle materials with the symbol . Put the
packaging in relevant containers to recycle it. Help
protect the environment and human health by
recycling waste of electrical and electronic
appliances. Do not dispose of appliances marked
with the symbol with the household waste.
Return the product to your local recycling facility or
contact your municipal office.
15
*

804182791-E-202022
This manual suits for next models
1
Table of contents
Other FAURE Refrigerator manuals