Faust ALT User manual

ALT by Keiji Takeuchi
Aufbauanleitung
Assembly instructions
ALT S
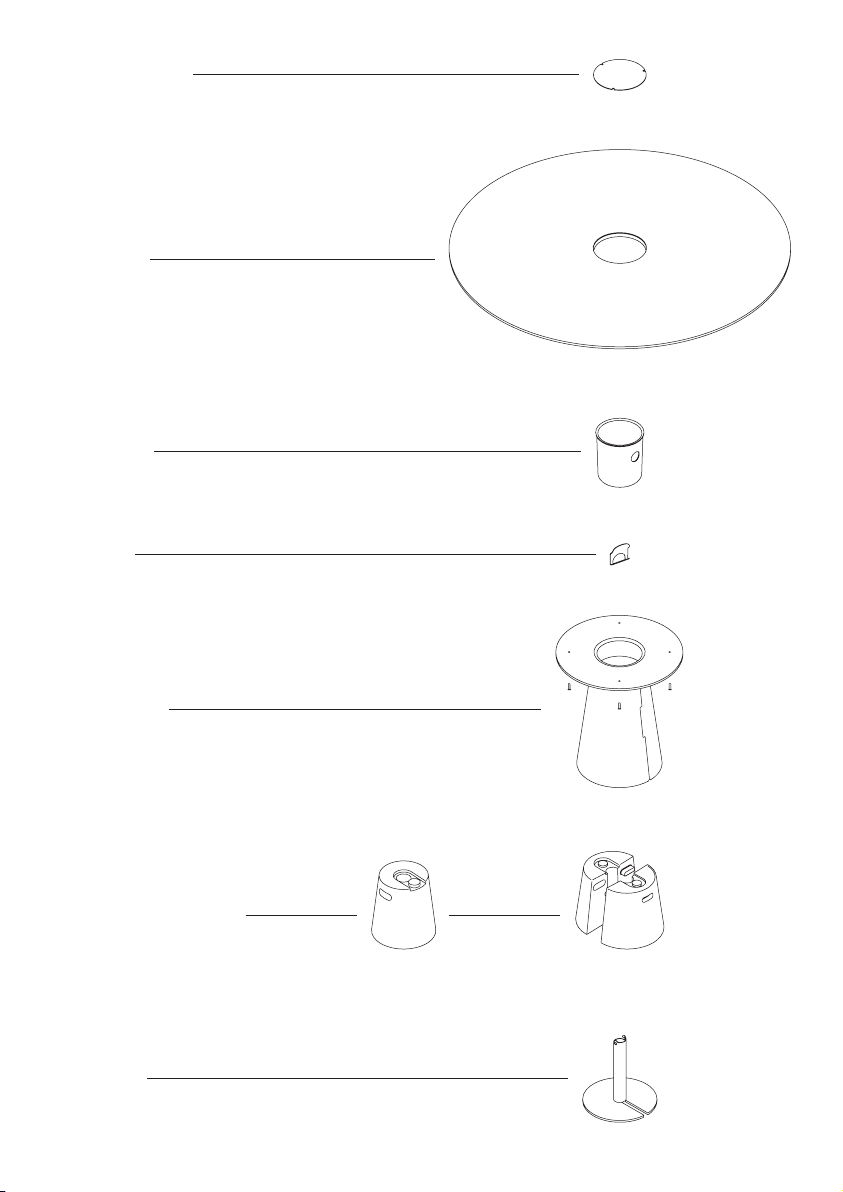
Metallbasis
Metal base
Tischplatte
Tabletop
(optional)
Kabelbehälter
Cable tray
(optional)
Klammer
Clamp
4 x Schrauben
4 x Screws
Konus
Column
Tragbarer Gewichtstank
Portable weight tank
ALT L
Kabeldeckel
Cable lid
(optional)

Ø 36 cm
72 cm 72 cm
ALT S ALT L
Ø 45 cm
Abmessungen / Dimensions
Product information
The ALT table system by Keiji Takeuchi features
a unique conical base lined with rolled-up
linoleum. This base embeds a portable weight
tank which when filled with water or sand, ensures
stability while reducing the overall weight during
transportation, and so minimizing environmental
impact. With two sizes of cone-shaped bases to
choose from, the ALT system offers a wide range of
table configurations.
Weight
S (20 kg); Water filled (36 kg) / Sand filled (48 kg)
L (33 kg); Water filled (58 kg) / Sand filled (77 kg)
Materials
Tabletop (optional): Wood, Linoleum
Table column:
Linoleum, Recycled leather, Valchromat
Portable weight tank:
PE-LLD (100% recycled plastic)
Metal base: Powder coated steel
Cable tray (optional): ABS (100% recycled plastic)
Cable lid (optional): Anodised aluminium, Linoleum
Optionals
The table can be optionally equipped with
integrated cable management features. These
include a cable tray and a cable hole at the base, as
well as a linoleum-covered lid that sits flush with the
table surface and helps guide cables as needed.
These discreet details add functionality to the table
surface, lending ALT as readily to working and
studying as to dining and meeting, in both private
and public spaces.
Produktinformation
Das ALT-Tischsystem von Keiji Takeuchi zeichnet
sich durch einen einzigartigen konischen Unterbau
aus, der mit Linoleum beschichtet ist. Dieser Konus
beinhaltet einen tragbaren Gewichtstank, der,
wenn er mit Wasser oder Sand gefüllt ist, Stabilität
gewährleistet. Dadurch wird das Gesamtgewicht
während des Transports und somit auch der CO2-
Fußabdruck reduziert.Das ALT-System bietet mit
seinen zwei verschiedenen Konusgrößen eine breite
Palette von Tischkonfigurationen.
Gewicht
S (20 kg); Mit Wasser gefüllt (36 kg) /
Mit Sand gefüllt (48 kg)
L (33 kg); Mit Wasser gefüllt (58 kg) /
Mit Sand gefüllt (77 kg)
Materialien
Tischplatte (optional): Holz, Linoleum
Konus:
Linoleum, Recyceltes Leder, Valchromat
Tragbarer Gewichtstank:
PE-LLD (100% recycelter Kunststoff)
Metallbasis: Pulverbeschichteter Stahl
Kabelbehälter (optional):
ABS (100% recycelter Kunststoff)
Kabelabdeckung (optional):
Eloxiertes Aluminium, Linoleum
Optionales
Der Konus ist optional mit einer integrierten
Kabelmanagement-Lösung erhältlich. Diese Option
beinhaltet einen Kabelbehälter im Inneren und eine
Kabeldurchführung am unteren Ende des Konus.
Zur Abdeckung wird ein mit Linoleum beschichteter
Deckel mitgeliefert, der flächenbündig in die
Tischplatte integriert ist und die Kabel in die
gewünschte Richtung führt. Dieses dezente Detail
verleiht der Tischoberfläche mehr Funktionalität
und verwandelt ALT in ein System, das sowohl für
Arbeit und Studium als auch für Essen und Treffen
geeignet ist. Es kann sowohl in privaten als auch in
öffentlichen Räumen genutzt werden.

1.
Unwrap the tabletop packaging, taking care not
to damage the cardboard guide.
2.
Position the cardboard guide on the floor at the
exact location where the table will be mounted.
Mind, that once the table is assembled, it should
only be lifted or moved carefully.
Note: If your table includes a cable management
set, orient the cardboard cutout towards the
nearest outlet.
3.a
Place the metal base onto the cardboard guide.
Note: If your table includes a cable management
set, make sure that the opening of the base lines
up with the cardboard cutout. Here is where the
cable will come out from the table leg (see step 12).
3.b
When setting up a two-legged table with a cable
management solution, you can choose to position
the base opening in any of the four quadrants of
the circle. Please avoid placing it between the
quadrants.
1.
Packen Sie die Tischplatte sorgfältig aus und
achten Sie darauf, die Pappschablone nicht zu
beschädigen.
2.
PlatzierenSie diePappschablone genauan derStelle auf
dem Boden,wo derTisch montiert werdensoll.Beachten
Sie, dass der Tisch nach der Montage nur vorsichtig
angehobenundverschoben werden sollte.
Hinweis:WennIhr TischeineKabelmanagement-Lösung
enthält,richtenSieden AusschnittderPappschablone
aufdienächstgelegene Steckdoseaus.
3.a
Setzen Sie die Metallbasis auf die Pappschablone.
Hinweis: Wenn Ihr Tisch eine Kabelmanagement-
Lösung enthält, stellen Sie sicher, dass die Öffnung
der Metallbasis genauso ausgerichtet ist wie der
Ausschnitt in der Pappschablone. Hier wird das
Kabel aus dem Tischbein herausgeführt
(siehe Punkt 12).
3.b
Wenn Sie einen Tisch mit zwei Beinen und einer
Kabelmanagement-Lösung aufstellen, können
Sie die Öffnung der Metallbasis in einem der vier
Quadranten des Kreises positionieren.
Bitte vermeiden Sie es, die Öffnung zwischen den
Quadranten zu platzieren.
1. 2.
3. a
3. b

4. 5. ALT S 5. ALT L
6.
4.
Fill the portable weight tank with water.
Note: for larger tabletops with a depth of 160-180 cm
it is advisable to use sand instead.
5.
Next, position the tank onto the metal base.
6.
Position the table cone onto the base ensuring
that the linoleum seam line is aligned with the
metal leg opening.
4.
Füllen Sie den tragbaren Gewichtstank mit Wasser.
Hinweis: Für größere Tischplatten mit einer Tiefe
von 160-180 cm ist es ratsam, stattdessen Sand zu
verwenden.
5.
Setzen Sie den Gewichtstank anschließend auf die
Metallbasis.
6.
Setzen Sie den Konus auf die Basis und achten Sie
darauf, dass die Nahtlinie des Linoleums mit der
Öffnung der Metallbasis übereinstimmt.
7.
Tear off the cardboard guide.
8.
Connect the base to the cone using the metal clamp.
Begin by inserting the clamp into the opening of the
metal tube, then apply significant pressure to rotate
it of 90 degrees and push it in place.
Skip these steps if your table does not include the
cable management option.
Überspringen Sie diese Schritte, wenn Ihr Tisch
keine Kabelmanagement-Lösung enthält.
7.
Reißen Sie die Pappschablone ab.
8.
Verbinden Sie die Basis mit dem Konus, indem
Sie die Klammer in die Öffnung des Metallrohrs
einführen, sie dann mit Druck um 90 Grad drehen
und festdrücken.
7.
9. 10. 11. 12.
8.

13.
Position the tabletop on the cone until it rests
securely. If you have acquired a Faust tabletop,
it will have recesses designed to fit snugly onto
the protrusions of the base.
14.
Screw the tabletop to the cone by using the Allen
key.
15. If your table includes the cable management
option, place the cable lid flush on the opening
of the table top. Enjoy your table!
13.
Positionieren Sie die Tischplatte auf dem Konus, bis
sie sicher aufliegt. Wenn Sie eine Faust-Tischplatte
erworben haben, ist diese mit Aussparungen verse-
hen, die genau auf die Vorsprünge der Basis passen.
14.
Schrauben Sie die Tischplatte mit Hilfe des
Inbusschlüssels an den Konus.
15.
Wenn Ihr Tisch mit der Kabelmanagement-Lösung
ausgestattet ist, setzen Sie die Kabelabdeckung
bündig auf die Öffnung der Tischplatte. Viel Freude
mit Ihrem Tisch!
13. 14.
15.

Faust Linoleum GmbH & Co. KG
Weidenstraße 30, D-82386 Huglfing
Tel +49 8802 907 3383
info@faustlinoleum.de
faustlinoleum.de
Popular Indoor Furnishing manuals by other brands

Regency
Regency LWMS3015 Assembly instructions

Furniture of America
Furniture of America CM7751C Assembly instructions

Safavieh Furniture
Safavieh Furniture Estella CNS5731 manual

PLACES OF STYLE
PLACES OF STYLE Ovalfuss Assembly instruction

Trasman
Trasman 1138 Bo1 Assembly manual

Costway
Costway JV10856 manual


