FAZLEY FKB-050 User manual

FKB-050
61-key keyboard
User manual
The information in this user manual is subject to change at any time without notice.
Version:
1.0
Date of creation and author's initials:
12-03-2019RV
Revision date and author's initials: -

Introduction
Thank you for purchasing this Fazley keyboard. We advise that you read this user manual
in its entirety before unpacking the contents of the box, so that you are familiar with all of
the functionality that this product has to offer. Please be sure to check that all of the parts
and accessories listed below under Box contents are included in the package. In the event
that the FKB-050 does not function properly, or if you have any issues while operating it,
please remove the plug from the power socket and contact your dealer for assistance.
Box contents:
- Fazley FKB-050 keyboard
- power adapter
- sheet music holder
- microphone
Please inspect t e device and t e included accessories.
Should you discover that either the device or any of the included parts have been damaged
or rendered defective while in transit, please contact your dealer directly.
Please note that the pictures in this user manual serve illustrative purposes only and may
differ slightly from the product you receive.
Contact:
Fazley musical instrument products and accessories
Verrijn Stuartweg 18
4462 GE Goes
The Netherlands
Please do not send any products to this correspondence address.
Should you wish to send in a product for repair or for a refund, please contact your dealer
for an RMA re uest (Return Merchandise Authorisation).
The information in this user manual is subject to change at any time without notice.
Version:
1.0
Date of creation and author's initials:
12-03-2019RV
Revision date and author's initials: -

Safety instructions
Everyone involved with the installation, operation and maintenance of this device must:
- Be qualified
- Be skilled
- Have read the instructions in this user manual
- Be sure that neither the device nor the included accessories are damaged. Should the
device or the included accessories be damaged, please contact your dealer for more
information.
- Ensure that the device is in good working condition and safe to operate. Please follow the
advice and instructions as they are described in this user manual.
Damage caused by misuse and/or modifications made to the device are not covered by the
warranty.
This device does not contain any parts that need to be repaired or replaced by the user.
Should maintenance or repairs be necessary, they must be handled by a qualified
technician.
Important information regarding ealt and safety:
- Do not remove any labels or stickers from this device.
- Do not leave any cables lying around.
- The device should not be opened up, and any hardware or software that may be present
should not be modified.
- To achieve optimal performance, inputs on this device should not be fed with a signal
higher than necessary.
- The outputs on this device should not be overloaded.
- The device should only be used indoors; contact with moisture, water and rain should
always be avoided. Do not place any objects containing liquids on top of the device.
- Remove the device from any nearby flames or heat sources; do not place it near
flammable fluids, gasses or objects.
- Disconnect this device from the power supply if it will not be used for a longer period of
time, if maintenance is necessary, or if the device needs to be cleaned.
- Do not pull on the cable to remove a connector, as this could cause damage.
- Do not use any cables other than the ones described in this manual. Do not use defective
cables. Please contact your dealer if the included or necessary cables do not function
The information in this user manual is subject to change at any time without notice.
Version:
1.0
Date of creation and author's initials:
12-03-2019RV
Revision date and author's initials: -
WARNING!
Keep t is device away from moisture, water and rain to avoid t e c ance
of electric s ocks.

properly with this device.
- In the event that the device is exposed to extreme temperature changes (e.g. transported
through a cold outdoor environment into a warm indoor environment), it should not be
turned on until it has reached room temperature. This is necessary because moisture can
form in the device, which could lead to electric shocks.
- Ensure that the AC/DC power adapter remains accessible at all times so that it can be
quickly disconnected from the mains power socket, if required.
- Ensure sufficient space around the AC/DC adapter so that the warmth it generates can
easily dissipate. Make sure that articles like curtains, cushions and other objects don t touch
the AC/DC adapter.
Guidelines and operation of t is device:
- This device is intended for indoor use by adults.
- This device can be used by children if accompanied by and/or supervised by an adult.
- This device should only be used in a suitable environment where no damage to the device
can occur. Do not use the device in moist or dusty environments such as:
- indoor swimming pools where chlorine is used
- beaches where there is sand and salt
- outdoors
- indoors in spaces where intense heat sources are present, or where it reaches
temperature levels that would be considered uncomfortable for a person
- Avoid impacts and collisions during use and transport. Do not transport the device while it
is in use. Avoid using excessive force when installing and operating the device.
- The user should become familiar with the functions of the device before using it.
- Should the device not be used in the manner described in this user manual, damages or
even injuries could occur. Fazley cannot be held responsible for any injuries or damages
that occur as a result of improper use of this product.
Storage and transport:
This product is designed for mobile use. It should not be transported on its own, however,
but either in its original packaging or in a suitable bag or flight case that protects it against
impacts, shocks and bumps.
- This device is not designed for permanent (24/7) use. The expected lifespan of the device
will not be affected by occasionally turning the device off. Disconnect the device or turn off
the power when it is not actively in use.
- If the device will not be used for a longer period of time, it should be disconnected and
stored in a dust-free environment.
- Do not expose the device to extreme temperature differences.
Housing
- Inspect the device s housing frequently, and always just before use. Avoid operating the
device if there are large dents or cracks, or if screws are missing. Do not use the device if
the housing is not in good condition. Contact your dealer or a qualified technician if you are
unsure about the state of the device.
- Check the device and the screws for corrosion. Corrosion must not be present on this
device. Contact your dealer or a qualified technician if you find any corrosion on the screws.
The information in this user manual is subject to change at any time without notice.
Version:
1.0
Date of creation and author's initials:
12-03-2019RV
Revision date and author's initials: -

- Every power and signal connector should be securely mounted. Do not use the device if
the connectors are not secure.
- Avoid dust and dirt build-up. Clean the device once a month by disconnecting it from the
power supply and wiping it down with a dry or slightly moist cloth. If the device is used
frequently, the cleaning intervals should increase.
Symbol explanation:
WEEE: Ensure that this device is disposed of properly. This product falls under
the WEEE (Waste Electrical and Electronic Equipment) directive. The
requirements of this directive apply to all manufacturers and producers of
electronic devices in the EU. Do not throw this product away with regular
household waste. Please contact your local authority for more information
about how to recycle and dispose of these products in your region. By
recycling this product in the proper manner, we can work together to ensure
that we can continue to enjoy these kinds of products and still protect the
environment as much as possible from pollution.
CE: The CE logo indicates that this product meets the European directives and
regulations to which it must legally conform.
Only suitable for indoor use: this product was only designed for indoor use.
The maximum environmental temperature must not exceed 40 degrees
Celsius (104 degrees Fahrenheit).
Battery danger:
CAUTION
Danger of explosion if battery is incorrectly replaced.
Replace only with the same or equivalent type of battery.
Do not expose batteries to excessive heat such as sunshine, fire and the like.
Do not leave batteries in an extremely high-temperature environment, as this may cause
explosions or leakage of flammable liquids or gas.
Do not burn batteries, do not place batteries in a hot oven, and do not crush or cut
batteries, as this may cause explosions.
Do not subject batteries to extremely low air pressure (high altitudes), as this may cause
explosions or leakage of flammable liquids or gas.
When equipment is not used for an extended period of time (e.g. a few months), batteries
should be removed.
Instantly remove empty batteries from the equipment.
Replace all batteries at the same time. Mixing old and new batteries or mixing different
types (such as alkaline and zinc-carbon) will reduce overall performance and may cause
leakage or rupture.
The information in this user manual is subject to change at any time without notice.
Version:
1.0
Date of creation and author's initials:
12-03-2019RV
Revision date and author's initials: -

Do not store loose batteries or carry them in your pocket or purse. Contact with metal
objects like coins and keys, etc. may cause them to leak, rupture or short-circuit.
Keep batteries out of reach of children.
Recycling:
Do not dispose of batteries in general household waste. Batteries can contain substances
that may harm the environment. If they are properly recycled, used batteries are a valuable
source of reusable materials. Contact your local government for information on battery
disposal.
The information in this user manual is subject to change at any time without notice.
Version:
1.0
Date of creation and author's initials:
12-03-2019RV
Revision date and author's initials: -

Guidelines and operation of t is device
1. Speakers
2. On/Off
3. Keyboard percussion
4. Tempo
5. Accompaniment volume
6. Master volume
7. Sync
8. Fill-in
9. Start/stop
10. Sustain
11. Vibrato
12. One-key
13. Follow
14. Ensemble
15. LED display
16. Single chord
17. Fingered chord
18. Record
19. Program
20. Play
21. Sound
22. Rhythm
23. Demo song
24. Number keys
25. Percussion
26. Chord section
The information in this user manual is subject to change at any time without notice.
Version:
1.0
Date of creation and author's initials:
12-03-2019RV
Revision date and author's initials: -

LED display section
The 7-segment LED screen on the FKB-050 helps the user to select sounds and rhythms,
set the tempo and use the accompaniment functions.
Rear connection panel
27. Audio input (3.5 mm mini jack)
28. Mic input (3.5 mm mini jack)
29. Headphone/line output (3.5 mm mini jack)
30. DC 9V power connector
The information in this user manual is subject to change at any time without notice.
Version:
1.0
Date of creation and author's initials:
12-03-2019RV
Revision date and author's initials: -

Operating t e device
The Fazley FKB-050 is equipped with all of the features a beginning keyboardist needs to
become familiar with playing the keyboard. It has a large range of sounds to choose from
and accompaniments in lots of different music styles.
Follow the steps and instructions below to get the best out of the FKB-050.
Preparation
Practical information before playing
- If two people wish to play at the same time without using the built-in speakers, a
headphone splitter should be connected to the headphone socket so that two pairs of
headphones can be used.
- Ensure that the power adapter cable isn’t taut and doesn t get tangled, bent too
excessively or damaged by sharp edges.
Keyboard positioning
It s important to place the FKB-050 on a stable surface at the correct height to ensure a
comfortable playing experience without causing any physical discomfort.
Fazley recommend investing in a good keyboard stand so that playing while standing or
sitting can both be done in comfort.
Placing the keyboard on a table, desk or similar surface may result in an uncomfortable
playing experience that could lead to physical discomfort.
A good playing position can be defined as follows:
- arms should hang freely next to the sides of the body (avoid tension in the shoulders to
create more arm height)
- forearms should be horizontal to the floor
- hands and fingers should be in the same sort of position as they naturally are when your
arms are hanging by your side
- elbows should be pushed forwards slightly towards the keyboard so that they are not
completely parallel to the body
The ideal playing position is very similar to the position that should be used when sitting
behind a desk and working with a computer. A keyboard like the FKB-050 is higher than a
computer keyboard, however, so it’s very important to make the necessary height
adjustments.
This playing position should be used regardless of whether you’re sitting or standing. That’s
why it’s a good idea to choose a keyboard stand that’s suitable for both.
If you’re planning on playing sitting down, you should use a keyboard bench or stool that’s
height adjustable so that you can find the perfect playing height. Ideally, it should have
The information in this user manual is subject to change at any time without notice.
Version:
1.0
Date of creation and author's initials:
12-03-2019RV
Revision date and author's initials: -

some padding and be flat to help you keep your back straight.
Connecting t e keyboard
The FKB-050 comes with a power adapter that needs to be plugged into the keyboard and
a power socket with the correct voltage. Only the adapter that comes with the keyboard
should be used to power it.
Ensure that connected cables are not in a place that someone could trip over them. Also
ensure that cables are not subjected to excessive forces. If necessary, an extension cable
can be used or, alternatively, the keyboard could be placed closer the available power
socket. Cable binders should be used to control any excess cable. Under no circumstances
should knots be tied in cables.
Batteries
The FKB-050 can be powered by 6 AA (1.5V) batteries. They need to be inserted correctly
according to the polarity shown in the battery compartment.
Using t e (built-in) speakers or eadp ones
The FKB-050 is equipped with built-in speakers that instantly play back whatever is played
on the keyboard. Whenever you want to practise in silence, however, a set of headphones
can be connected to a socket on the back.
The socket is suitable for virtually all headphones that are designed for listening to music. In
the event that your headphones have a connector of a different size, an adapter can be
purchased. Consult your dealer for advice if you’re unsure about what you need.
Before you put on your headphones and start playing, check the volume level. Pay
particular attention to the volume level before allowing children to play the keyboard while
wearing headphones. It s best to lower the volume on the keyboard before putting
headphones on and only raising it to the volume necessary to hear what you re playing.
This will greatly reduce the chance of any damage to hearing.
The volume can be adjusted using the Master vol buttons.
It s best to take regular breaks to give your hearing a rest and not play for hours on end.
It s also possible to connect external (active) speakers to the socket on the back for
performance purposes, for instance. Again, it s recommend to lower the volume on the
keyboard (and the speakers) before connecting them. Once connected, the volume levels
on the keyboard and the speakers can be adjusted as required. It s best to ensure that the
output level on the keyboard is not too low (around 50% is recommended), so that you re
not relying entirely on the external speakers to boost the signal. The internal speakers on
the keyboard are not designed to be used continuously at full power and in fact, doing so
may result in a distorted sound and damage to the speakers.
Microp one
The FKB-050 comes with a microphone that has a mini jack connector. It can be connected
The information in this user manual is subject to change at any time without notice.
Version:
1.0
Date of creation and author's initials:
12-03-2019RV
Revision date and author's initials: -

to the mic input on the back of the keyboard so that you can sing along while you play.
Investing in a microphone stand is also a good idea.
Turing t e keyboard on
The keyboard can be turned on and off using the On/Off button. It should be turned off
whenever you re finished playing.
Sound selection
Selecting a Sound
The FKB-050 has 255 sounds on board that can be selected using the number keys on the
right hand side of the keyboard, or alternatively, scrolled through using the plus and minus
buttons.
The first 105 sounds are described on the top of the keyboard itself, while the descriptions
of the other sounds can be found later on in this manual.
Rhythm and accompaniments
R yt m selection
The keyboard has many percussive accompaniment rhythms in lots of different styles.
Pressing the Rhythm button allows one of the accompaniment rhythms to be selected.
This can be done by using the number keys on the right hand side of the keyboard, or
alternatively, you can use the plus and minus buttons to scroll through all of the available
options. There are a total of 255 different rhythms to choose from and a description and
associated number can be found on the top of the keyboard.
To start an accompaniment, press the Start/Stop button and press the same button again to
stop it.
The information in this user manual is subject to change at any time without notice.
Version:
1.0
Date of creation and author's initials:
12-03-2019RV
Revision date and author's initials: -

Sync
The Sync function can be used to start an accompaniment at the same time you start
playing. First select the accompaniment you want to use and then press the Sync button.
Syn will appear on the display and the accompaniment will start playing automatically as
soon as one of the first nineteen keys is pressed.
Demo song
In order to show you the full potential of the keyboard, it s equipped with 24 demo songs.
They can be switched between using the number keys and the plus and minus buttons.
Operation, functions and effects
Master volume
The volume level can be adjusted using the Master vol plus and minus buttons. They
adjust the volume level of all the sounds being produced on the keyboard. The default level
is 10 out of 16 and this level can be returned to easily at any time by pressing the plus and
minus buttons simultaneously.
Accom. volume
The Accom. volume buttons are used to adjust the volume of the accompaniment rhythm
only. This ensures you can find the right balance for the song you re playing.
Percussion
There are eight buttons at the bottom of the control panel that each have a different
percussion sound. Icons underneath show you whether the button is a snare, a kick, a rim,
a closed hi-hat, an open hi-hat, a crash, a clap or a tom.
All 61 of the keyboard s keys can also be used to play percussion sounds after the
Keyboard percussion button has been pressed.
Tempo
The Tempo buttons allow the tempo of the accompaniment rhythms and demo songs to be
adjusted. The default is 120 BPM (beats per minute). Once the tempo has been changed,
these settings will remain until they re changed again or the keyboard is switched off. When
it s switched on again, the default tempo will again be 120 BPM.
Press the Tempo + button once to increase the tempo by 10 BPM and press the Tempo -
button once to decrease the tempo by 10 BPM.
Pressing the Tempo + and Tempo - buttons at the same time will reset the tempo to 120
BPM.
Fill in
Pressing the Fill In button adds a fill to the accompaniment rhythm of the song you re
playing. The fill played is determined by the accompaniment rhythm selected and provides
a short variation which is ideal for indicating a new section of the song is about to be
The information in this user manual is subject to change at any time without notice.
Version:
1.0
Date of creation and author's initials:
12-03-2019RV
Revision date and author's initials: -
played, for instance. As soon as the fill has finished, the rhythm that was playing before the
fill will resume again automatically.
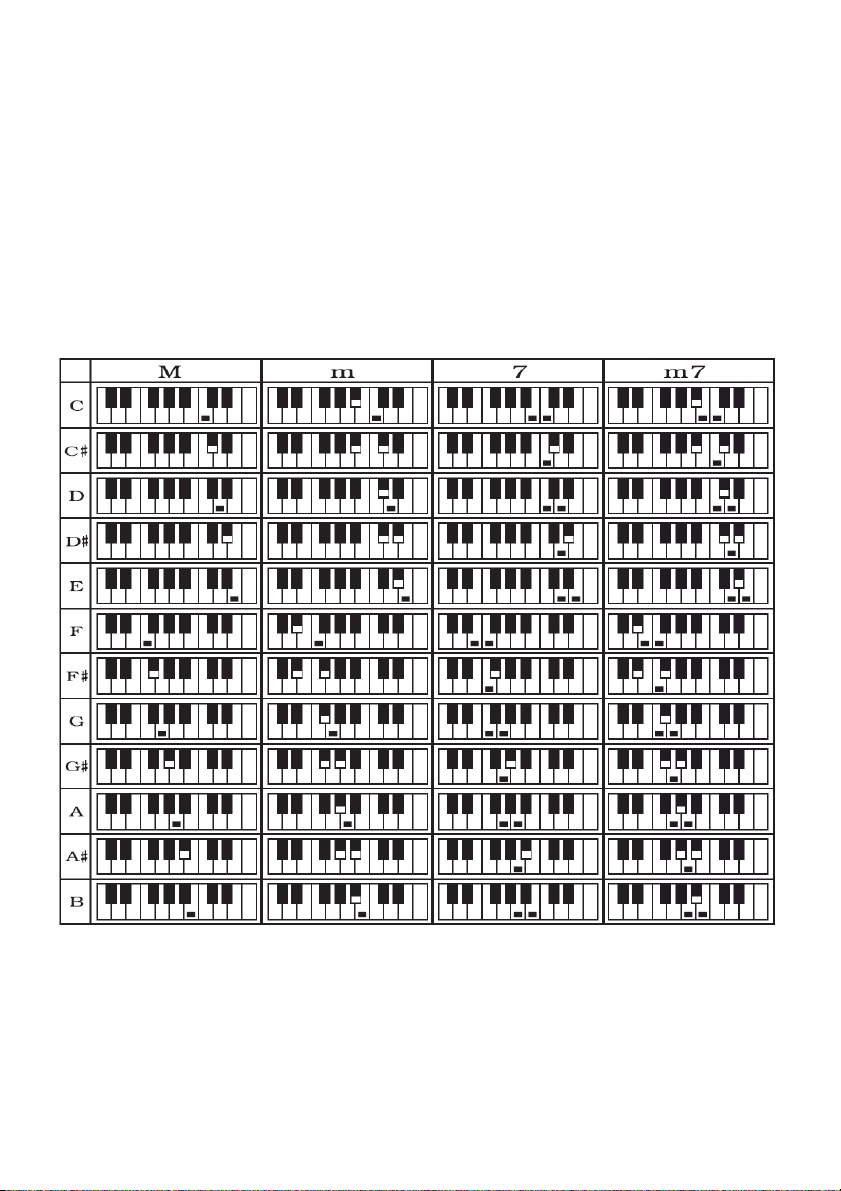
Single c ord
When an accompaniment rhythm is activated, you can make use of Single Chord mode.
When you press the Single Chord button, Sin will appear on the display and pressing any
of the first nineteen notes will result in the appropriate chord being generated. Pressing a C
note, for instance, will result in a C major chord being played along with the selected
accompaniment rhythm. Another chord can be selected at any time by pressing another
note and Single Chord mode can be exited by pressing the Single Chord button again.
In Single Chord mode, it s possible to generate major (M), minor (m), seventh (7) and minor
seventh (m7) chords. The different types of chords can be made by pressing different
combinations of keys as shown in the chart below:
Fingered c ord
With Fingered Chord mode, you only need to play a chord once and it will continue playing
automatically along with the selected accompaniment rhythm until you play a different chord
The information in this user manual is subject to change at any time without notice.
Version:
1.0
Date of creation and author's initials:
12-03-2019RV
Revision date and author's initials: -

or exit Fingered Chord mode by pressing the Fingered Chord button again. The following
chart shows different examples of C chords that can be played.
Sustain
Pressing the Sustain button adds a sustain effect to the notes being played. This results in
the sound of the notes lasting longer.
Vibrato
Pressing the Vibrato button adds a vibrato effect to the notes being played. This results in
the sound of notes slightly varying in pitch making them more expressive.
Record function
The FKB-050 has a recording function so that you can record yourself playing. Pressing the
Rec button gets the keyboard ready to record and as soon as you play the first note, it will
start recording.
When you re finished playing, the recording will stop. Pressing the Play button will let you
hear the recording. When the internal memory is full, FUL will appear on the display.
When the recording is playing, PLA will appear on the display.
Program function
Pressing the Prog button allows you to use the program function and you ll see PRG
appear on the display. You can then enter a percussion rhythm of up to 32 quarter notes
using the notes on the keyboard and press the Play button to hear the rhythm you ve
created. The rhythm will be adjusted to the current BPM setting on the keyboard and can be
changed using the Tempo plus and minus buttons.
The information in this user manual is subject to change at any time without notice.
Version:
1.0
Date of creation and author's initials:
12-03-2019RV
Revision date and author's initials: -

Extra accompaniment options
Playing along wit external music
It s possible to connect an external audio device thanks to the mini jack audio input on the
back of the keyboard. This means you can play along with any music you like in addition to
the accompaniments on the keyboard itself.
One key
Pressing the One key button will allow you to play along with any selected song pressing
any keys! The song you want to play along to can be selected using the number keys or
plus and minus buttons. The song being played will automatically adjust to the tempo of
your key presses and the melody will play correctly no matter what keys you press.
Follow
Pressing the Follow button will activate Follow mode. Again, the
song you want to play along to can be selected using the number
keys or plus and minus buttons. In this mode, the song will only
continue to play when the correct notes are played. The notes to be
played will appear on the display. A small b before the note indicates
a flat. In the following example, therefore, a G flat at the fifth octave is
indicated.
Pressing the Follow button again or pressing the Start/stop button will exit Follow mode.
Ensemble
Pressing the Ensemble button activates Ensemble mode. In this mode, the player is
required to play the right notes at the right tempo in order for the demo song to play
smoothly. If the correct note isn t played within 3 seconds, the accompaniment will take
over, allowing you to follow along. Pressing the Ensemble button again or pressing the
Start/stop button will exit Ensemble mode.
The information in this user manual is subject to change at any time without notice.
Version:
1.0
Date of creation and author's initials:
12-03-2019RV
Revision date and author's initials: -

Built-in sounds
The information in this user manual is subject to change at any time without notice.
Version:
1.0
Date of creation and author's initials:
12-03-2019RV
Revision date and author's initials: -

The information in this user manual is subject to change at any time without notice.
Version:
1.0
Date of creation and author's initials:
12-03-2019RV
Revision date and author's initials: -
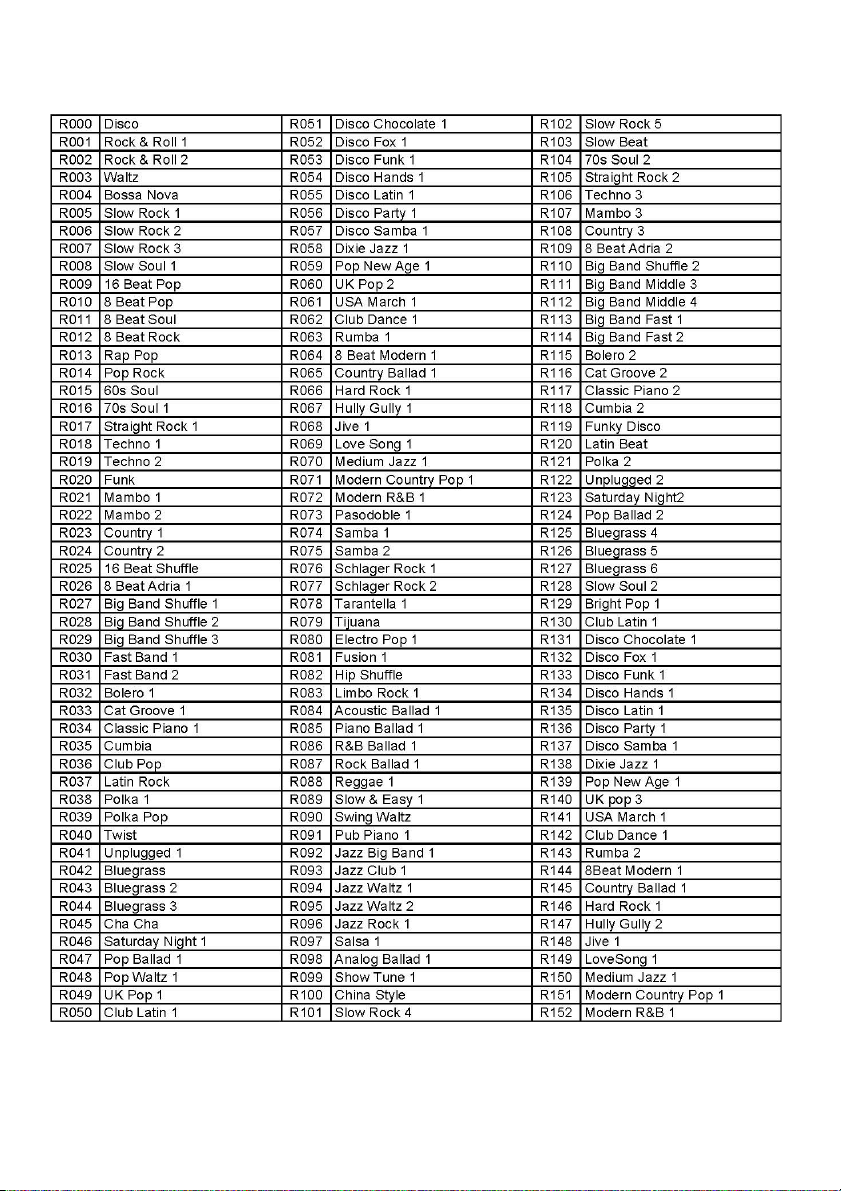
Built-in r yt ms
The information in this user manual is subject to change at any time without notice.
Version:
1.0
Date of creation and author's initials:
12-03-2019RV
Revision date and author's initials: -

The information in this user manual is subject to change at any time without notice.
Version:
1.0
Date of creation and author's initials:
12-03-2019RV
Revision date and author's initials: -

Solving keyboard problems
If you have a problem with your keyboard, please consult this troubleshooting section for
possible solutions. If, after consulting this section, the problem remains unresolved, please
contact your dealer for more information and/or help.
This troubleshooting section contains information on how to solve the most common
keyboard problems, but it does not and cannot cover every eventuality. It is possible that
you won t find your problem, cause and solution in this section.
Problem Possible cause Solution
Keyboard won t turn on Power adapter not
connected (properly)
Make sure the included
power adapter is connected
properly to the keyboard and
an active power socket.
Keyboard not switched on Press the ON/OFF button to
turn the keyboard on.
Faulty power adapter If the power adapter is
connected properly to the
keyboard and an active
power socket, but the
keyboard won t turn on, the
power adapter could be
faulty. If you suspect that this
is the case, try powering the
keyboard with batteries
and/or contact your dealer
for assistance.
Batteries not installed, not
installed correctly or empty
If you re trying to power the
keyboard with batteries,
ensure you have 6 full 1.5V
AA batteries inserted
correctly according to the
polarity shown in the battery
compartment.
No sound audible Volume too low Turn up the master volume
and/or accompaniment
volume.
Headphones connected Check whether headphones
are connected or not. When
a set of headphones is
The information in this user manual is subject to change at any time without notice.
Version:
1.0
Date of creation and author's initials:
12-03-2019RV
Revision date and author's initials: -
This manual suits for next models
1
Table of contents
Other FAZLEY Electronic Keyboard manuals


