Feider Machines FTDT4640ES User manual

1
ORIGINAL INSTRUCTIONS
GASOLINE LAWN MOWER
FTDT4640ES
WARNING: READ THE INSTRUCTIONS BEFORE USE THE TOOL
FEIDER
32, rue Aristide Bergès - ZI 31270 Cugnaux – France
Made in China 2020

2
1. DESCRIPTION OF SYMBOLS
Symbols are used in this manual to attract your attention to possible risks. The
safety symbols and the explications which accompany them must be perfectly
understood. The warning themselves do not prevent the risks and can not be a
substitute for proper methods of avoiding accidents.
This symbol, before a safety comment, indicates a precaution, a warning or a
danger. Ignoring this warning can lead to an accident for yourself or for others.
To limit the risk of injury, fire or electrocution always applies the
recommendations indicated.
Before any use, refer to the corresponding paragraph in the present
manual.
Keep other people out of the dangerous area.
Remove the ignition cable before all maintenance work, and read
the instructions for use.
Wear hearing protection and eye protection when using the device.

3
Warning - Moving blades. Keep hands and feet away when the
machine is operated. Do not attempt to clear grass from the rear
chute area while the blade is still rotating. The exhaust and other
parts of the engine will get very hot during use, do not touch.
Fuel is flammable, keep fire away. Do not add fuel with running
machine.
Caution– hot surface - Do not touch hot surfaces - Danger of
burns!
Danger! Do not near the operational machine!
Guarantee sound power level

4
2. SAFETY INSTRUCTIONS
Training
a) Read the instructions carefully. Be familiar with the controls and the proper
use of the equipment.
b) Never allow children or people unfamiliar with these instructions to use the
lawnmower. Local regulations can restrict the age of the operator.
c) Never mow while people, especially children, or pets are nearby.
d) Keep in mind that the operator or user is responsible for accidents or
hazards occurring to other people or their property.
Preparation
a) While mowing, always wear substantial footwear and long trousers. Do not
operate the equipment when barefoot or wearing open sandals.
b) Thoroughly inspect the area where the equipment is to be used and remove
all objects which can be thrown by the machine.
c) WARNING —Petrol is highly flammable:
—Store fuel in containers specifically designed for this purpose;
—refuel outdoors only and do not smoke while refuelling;
—add fuel before starting the engine. Never remove the cap of the fuel tank
or add petrol while the engine is running or when the engine is hot;
—If petrol is spilled, do not attempt to start the engine but move the machine
away from the area of spillage and avoid creating any source of ignition until
petrol vapors have dissipated;
—replace all fuel tank and container caps securely.
d) Replace faulty silencers.
e) Before using, always visually inspect to see that the blades, blade bolts and
cutter assembly are not worn or damaged. Replace worn or damaged
blades and bolts in sets to preserve balance.
f) On multi-bladed machines, take care as rotating one blade can cause other
blades to rotate.
Replace defective mufflers.
Before use, always inspect visually that the blades, blade assembly and
blade lock are not worn or damaged. Replace blades and blade assemblies
that are not in good condition to maintain balance. Always use

5
recommended blades. Contact the manufacturer or your dealer in order to
have a list of recommended blades. Non-recommended blades can give a
risk of malfunctions, injuries and accidents.
The blades must be balanced to ensure proper operation and to be able to
work safely.
Operation
a) Do not operate the engine in a confined space where dangerous carbon
monoxide fumes can collect.
b) Mow only in daylight or in good artificial light.
c) Avoid operating the equipment in wet grass, where feasible.
d) Always be sure of your footing on slopes.
e) Walk, never run.
f) For wheeled rotary machines, mow across the face of slopes, never up and
down.
g) Exercise extreme caution when changing direction on slopes.
h) Do not mow excessively steep slopes.
i) Use extreme caution when reversing or pulling the lawnmower towards you.
j) Stop the blade(s) if the lawnmower has to be tilted for transportation when
crossing surfaces other than grass, and when transporting the lawnmower to
and from the area to be mowed.
k) Never operate the lawnmower with defective guards, or without safety
devices, for example deflectors and/or grass catchers, in place.
l) Do not change the engine governor settings or over speed the engine.
m) Disengage all blades and drive clutches before starting the engine.
n) Start the engine or switch on the motor carefully according to instructions
and with feet well away from the blade(s).
o) Do not tilt the lawnmower when starting the engine or switching on the
motor, except if the lawnmower has to be tilted for starting. In this case, do
not tilt it more than absolutely necessary and lift only the part which is away
from the operator.
p) Do not start the engine when standing in front of the discharge chute.
q) Do not put hands or feet near or under rotating parts. Keep clear of the
discharge opening at all times.

6
r) Never pick up or carry a lawnmower while the engine is running.
s) Stop the engine and disconnect the spark plug wire, make sure that all
moving parts have come to a complete stop and, where a key is fitted
remove the key:
—Before clearing blockages or unclogging chute;
—Before checking, cleaning or working on the lawnmower;
—After striking a foreign object. Inspect the lawnmower for damage and
make repairs before restarting and operating the lawnmower;
—If lawnmower starts to vibrate abnormally (check immediately).
t) Stop the engine and disconnect the spark plug wire, make sure that all
moving parts have come to a complete stop and, where a key is fitted
remove the key:
—Whenever you leave the lawnmower;
—Before refuelling.
u) Reduce the throttle setting during engine shut down and, if the engine is
provided with a shut-off valve, turn the fuel off at the conclusion of mowing.
v) Go slow when using a trailing seat.
Maintenance and storage
a) Keep all nuts, bolts and screws tight to be sure the equipment is in safe
working condition.
b) Never store the equipment with petrol in the tank inside a building where
fumes can reach an open flame or spark.
c) Allow the engine to cool before storing in any enclosure.
d) To reduce the fire hazard, keep the engine, silencer, battery compartment
and petrol storage area free of grass, leaves, or excessive grease.
e) Check the grass catcher frequently for wear or deterioration.
f) Replace worn or damaged parts for safety.
g) If the fuel tank has to be drained, this should be done outdoors.
Special safety instructions
Always use the mower with its pick-up bag and / or deflector in the intended
position.

7
Switch off the engine before emptying the pick-up bag or before changing
the cutting height.
While the engine is running, never put your hands or feet under the mower
or under the grass ejection area.
Before mowing, remove all foreign objects from the grass that can be
propelled by the machine.
Keep children and pets at a safe distance while using the mower.
Never lift the mower when the engine starts.
Alcohol, drug, as well as illness, fever and fatigue affect your ability to
respond. Do not use power tools in such circumstances.
Never change the rated speed of the motor.
Never lift or carry the tool while the engine is running.
Before starting the engine, release the drawbar.
Before mowing, install the collection bag in its intended position.
Do not use the mower in the event of rain or when the grass is wet.
Never lift the rear of the mower when starting the engine and never place
your hands or feet under the mower deck or in the rear ejection port while
the engine is running.
Turn off the engine and remove the spark plug cap in the following cases:
oBefore operating under the mower deck or near the ejection opening.
oBefore any maintenance, repair or verification.
oBefore transporting, lifting or storing the mower.
oIf you leave the mower unattended or change the cutting height.
oTo remove and empty the collection bag.
After striking a foreign object, turn off the engine and carefully inspect the
mower for damage. Take the lawnmower to an authorized service center
for repair if necessary.
If the mower vibrates abnormally, try to understand the reason and bring
your lawnmower to an authorized repair center.
Regularly check that the bolts, nuts and screws are properly tightened for
safe use of the mower.
Do not use the tool where there is a risk of lighting.
Use the tool on daylight or under a good lighting. Always keep bystanders
away.

8
Warning: Take an extreme precaution when operating the lawnmower in
slopes and near drop-offs, ditches or embankments; always be sure of your
footing and stay in alert.
the lawnmower safety systems or features shall not be tampered with or
disabled;
the operator should not alter or tamper with any sealed adjustments for the
engine speed control;
The operator must have, before using the tool for the first time, an
adequate training with an experienced people.
Warning: do not use of the unit while being tired, ill or under influence of
alcohol or other drugs;
Park safely the tool before leave it. The tool must be switched off.
The lawnmower shall not be operated without either the entire grass
catcher or self-closing discharge opening guard in place;
Warning: be careful about exhaust gas. Do not inhale them.
Wear adequate clothing such as long trousers and a protective equipment:
slip-resistant foot protection, hearing protection, eyes protection and
gloves.
To avoid health issues, limit the time of operation. Take enough rest.
Exposure to noise and vibrate can have bas consequences on health.
WARNING: There is a danger about moving blade assemblies. Always
handle blades when they are in a complete stop and wear protective
gloves.
Fuel Handling
Use caution when handling fuels. They are flammable and the vapours are
explosive.
Use only an approved container.
Never remove the fuel cap or add fuel while the machine is on. Turn off the unit
and allow the engine and exhaust components to cool down before refuelling.
Do not smoke.
Never refuel inside a room.
Never store the tool and the fuel tank indoors where there is a naked flame,
such as near a water heater.

9
If fuel has spilled, do not attempt to start the machine, but move it away from
the spill before starting to use it. Please clean up any spills.
Replace and tighten the fuel tank cap after refuelling.
Follow strictly the instructions in this manual for filling the tool with fuel.
During maintenance and storage
Switch off the tool and wait until it stops completely. Make sure that all moving
parts are stopped.
Allow the machine to cool before performing inspection, adjustments,
maintenance, servicing and storage.
Store the tool where fuel vapour will not reach a flame or spark.
The transport of the tool must be secured in order to avoid fuel spillage,
accidents and injuries.
Residual risks
Even if you use this product in compliance with all safety requirements, the
potential risks of injury and damage remain. The following hazards may arise
in the structure and design of this product:
There are risks of injury and property damage due to attachments or broken
the sudden impact of hidden objects when using cutting.
There are risks of injuries and accidents caused by flying objects.
Prolonged use of this product exposes the operator to vibrations and can
produce so-called "white finger" disease. To reduce the risk, wear gloves and
keep your hands warm.
If any of the symptoms of "white finger syndrome" occur, seek immediate
medical attention.
Symptoms of "white finger" include numbness, loss of sensitivity, tingling, pain,
loss of strength, colour changes or skin condition. These symptoms usually
appear on the fingers, hands or wrists. Risk increases at low temperatures.
A long exposition to noise can affect the health of the operator. A hearing
protection must be always used when operating the tool. The operation of the
tool must be limited and some rest must be taken between two sessions (e.g.
10min of operation and 20min of rest).
10
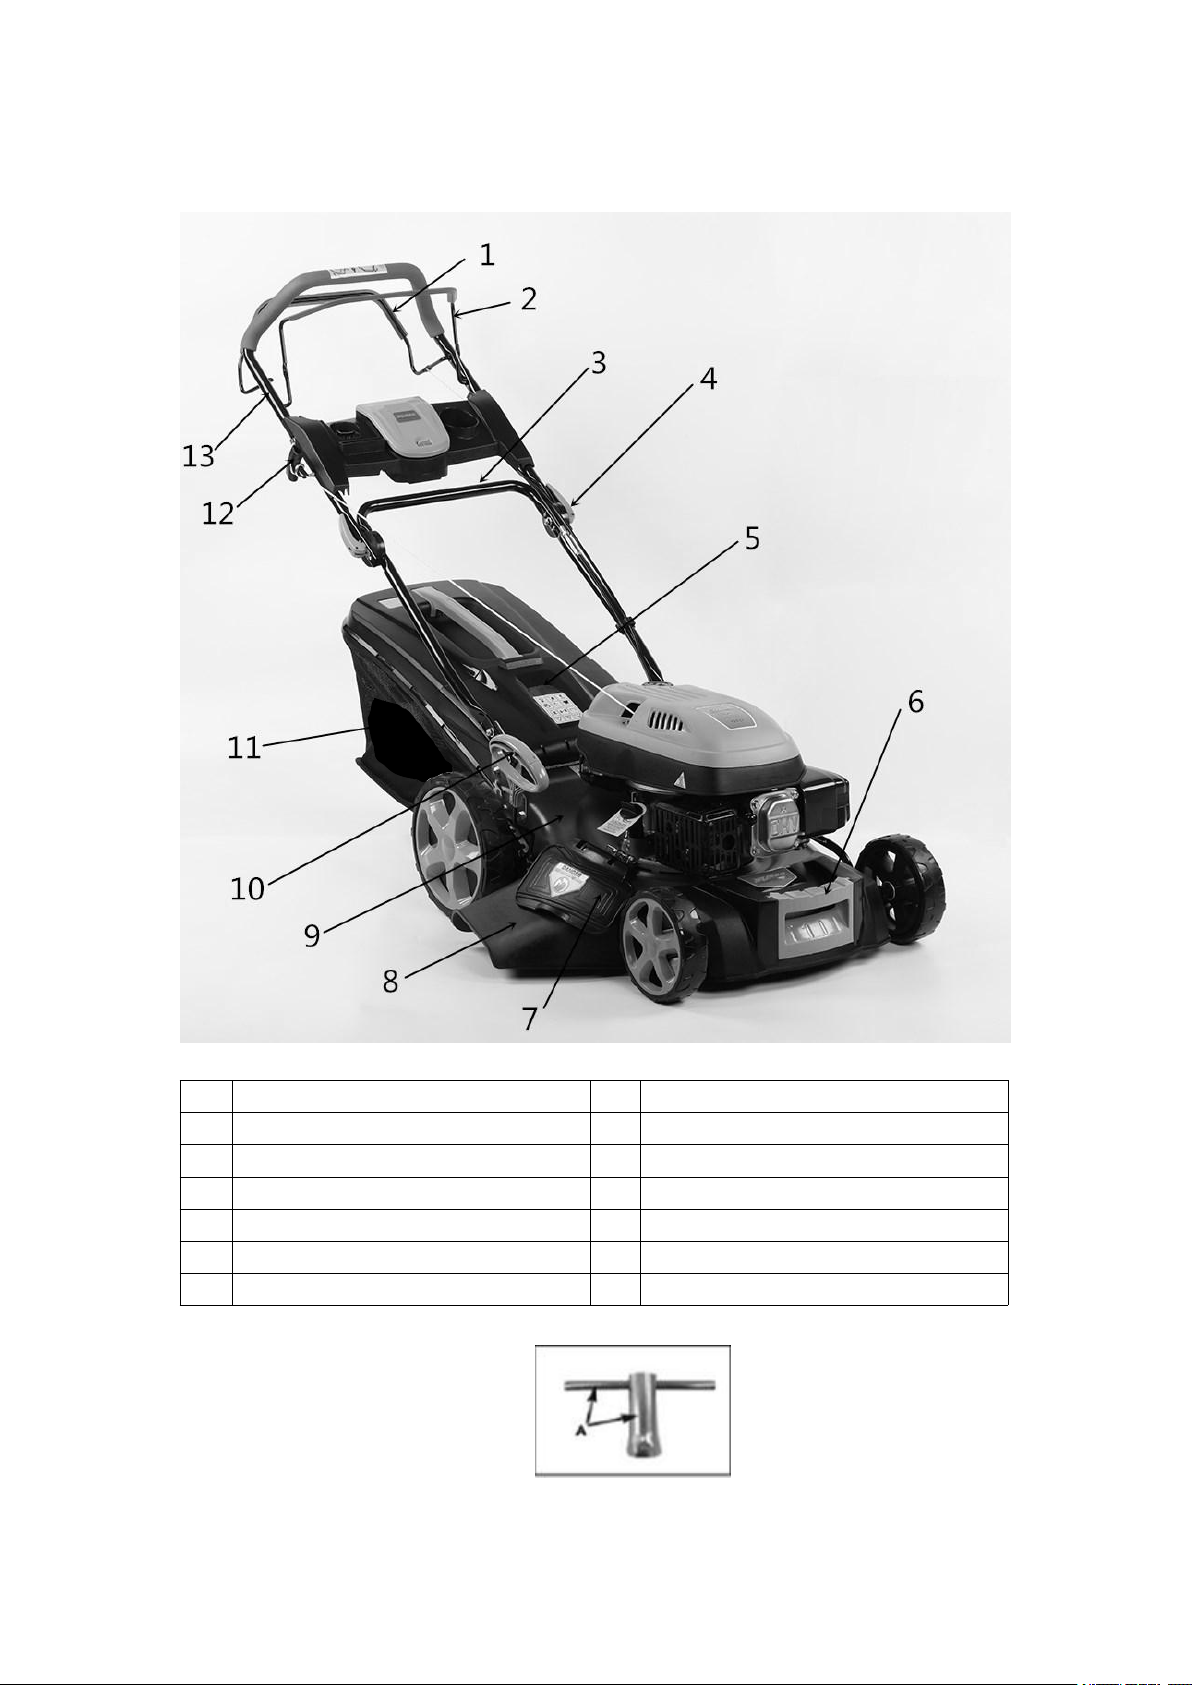
3. COMPONENT LIST
1
Coupling lever
2
Brake lever
3
Lower handle
4
Knob
5
Rear cover
6
Front handle
7
Side discharge cover
8
Side discharge air path
9
Deck
10
Height adjustment handle
11
Grass catcher bag
12
Recoil starter handle
13
Upper handle
Accessories box
Socket spanner: 1 set

11
4. SPECIFICATIONS
Engine model
FTDT4640ES
Engine displacement
139 cm3
Engine max. motor power
2.7kW
Equipment mobility
Self-propelled
Volumes of fuel tank
1 L
Volumes of lubricating oil tank
0.6 L
Cutting width
460mm
Rated speed
Max. 2800/min
Net weight (including engine)
32,5kgs
Guarantee sound power level
=LWA
96 dB(A)
Measured sound power level
93,7 dB(A) K=1,6dB(A)
Measured sound pressure level
82,1 dB(A) K= 3 dB(A)
Vibrations (L,R)
Left: Max 3,011m/s2K =1,5 m/s2
Right: Max3,024m/s2K =1,5 m/s2
Adjustable height
25-75 mm
5. Intended use
This lawn mower has been designed for cutting grass. Any other use
is not permitted.
The lawn mower is suitable for private use in the garden only, lawn mowers for
private use are those which are used for cutting grass and lawns in the garden,
however not for cutting grass in public parks, playing fields or on farms or in
forest.
Non-permitted users:
Persons who are not familiar with the operating manual, children, young
people under the age of 16 as well as persons under the influence of alcohol,
drugs or medication must not operate the unit.
Working hours for gasoline lawn mower
While it is permitted to use a lawn mower at any time, operators should always
show due consideration to others living nearby.

12
6. Assembly
When assembling this machine, please follow the instructions for assembly
printed.
1) Fit the lower handle on the machine with four bolts as per below three
picture. First, release bolts, and then fit the lower handle on the brackets,
last ensure bolts that it does tighten enough. Note the bolts should be fixed
as below photo and on both sides.
2) Connect the throttle wire and self-propelled wire on Bail arm lever. Take the
wire head into the hole of starting bail arm lever. Follow below pictures to
assemble and ensure the wire won ’t be loose (throttle wire and
self-propelled wire pre-assembled).
3) Fit the Upper handle to lower handle. Release two wing nuts on lower
handle, as below picture, and then fit the upper handle on lower handle.
Ensure the wing nuts are tightened enough.
4) There are 8 working position for each wheel, adjust the handle according to
below picture.

13
5) Electric start model
- Take out the plastic panel from the box.
- Loosen the nut on the upper handle and buckle the plastic panel.
- Align the mounting holes on the plastic panel with the mounting holes on the
upper-handle
- Fix the plastic panel with the bolts and nuts and provided.
- Connect the engine cable and battery.
- When charging the battery use the charge socket for 6 hours before use.
Charging socket

14
Grass Bag Assembly

15
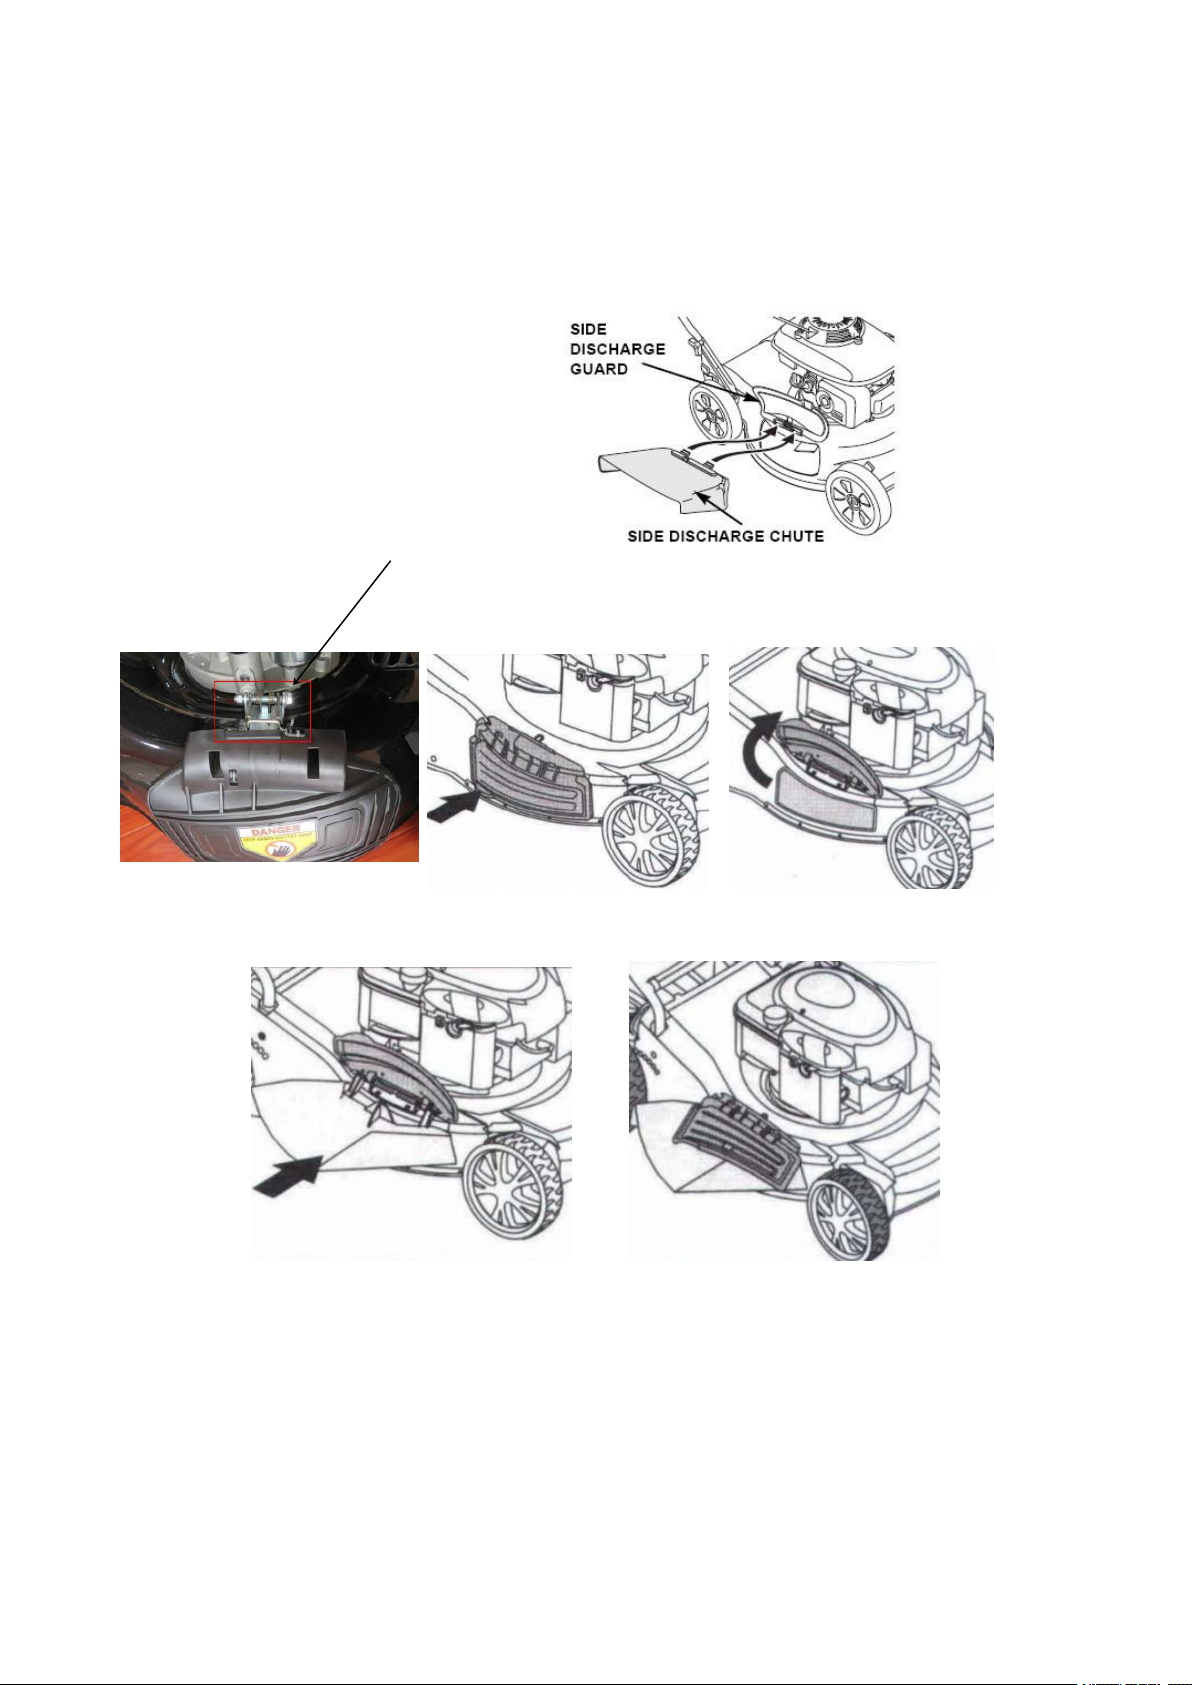
Mulching plug
The mulching plug helps to curve the inside of the mower deck for more efficient mulching.
Install and remove the mulching plug by raising the rear discharge guard as shown. The
mulching plug only fits one way. Remove the mulching plug when using a grass bag.
16
Side Discharge Cover Assembly
Release the lock of side discharge before lifting the side discharge guard, and then install
the side discharge cover on product.
.
Release the lock of side discharge

17
7. Use, maintenance and precautions
Filling with fuel
Unscrew the tank cap and remove it.
-Unscrew the tank cap and remove it.
–Pour in the fuel carefully (max.1.5L.). Avoid spilling!
–Screw the tank cap on firmly by hand.
Draining fuel
–Hold a collection container beneath the fuel drain bolt.
–Unscrew the tank cap and remove it.
–Take the machine to bottom up, and drain it. Or take special pumping
equipment to empty the jug of gasoline fuel.
–Re do above after several minutes.
–Allow the fuel to run out completely.
Filling with motor oil
Unscrew the motor oil filling bolt and remove it.
Danger of injury!
Fuel is explosive!
DANGER! - Turn off and cool the motor down before filling the tank with fuel.
- You must observe all safety instructions relating to handing fuel.
Risk of device damage!
The device is supplied without motor or gearbox oil.
ATTENTION! Before operating, you must fill it with motor and gearbox oil.

18
–Carefully pour in motor oil (approx. 600 ml). Avoid spilling!
–Check the oil level. The oil level must between the ADD and FULL marks on
the dipstick. If near the lower level, fill to upper level.
–Tighten the motor oil filling bolt again by hand.
Draining motor oil
Unscrew fuel tank cap, with a special pumping the oil out or completely to the
right side of the machine home, so long into the oil container.
Start on the unit
Do not start the unit until it has been completely assembled.
Before switching on the unit, always check the oil.
Check before use!
Check the safe condition of the device:
Check the device for leaks.
Check the device for visual defects.
Check that all parts of the device have been securely fitted.
Check that all safety devices are in proper condition.
Once the machine has been set up properly, start the engine as follow:
1)Before start the machine ,please put the handle bar to “ Start” position
Danger of injury!
Do not operate the device unless you did not find any faults. If a part has
DANGER! become defective, make sure to replace it before you use the device again.
Danger of injury!
Before starting work, always check the ground and remove all objects
DANGER! which could be thrown by the device.

19
2) Close the starting bail arm lever, as following picture.
3) Pull on the recoil starter handle until you can feel resistance and then pull
harshly.
4)When the lawn mower is working ,put the Handle bar to “Run” position
If the engine is in hot standby mode, the engine can start directly.
Do not start the motor in tall grass.
While mowing, lay the connection cable safely on footpaths and on areas
which have already been mown.
4) Press the drive rod. The lawnmower runs without any intervention at a rate
of about 3.6 km / h.
Release the drive rod off, and the mower stops.

20
When the engine has been switched off, the cutter continues running
for several seconds therefore do not touch the underside of the mower
until the cutter has come to a standstill!
Bring regular maintenance to the tool. Before performing any
maintenance or cleaning work, turn the engine. Check after each use the
condition of the tool as explained below. Improper maintenance will
reduce the lifetime of the tool, create accidents and injuries and bring
bad working results.
1. Do not spray the unit with water. Ingress of water may damage the engine
and electrical connection.
2. Clean the unit with a cloth, hand brush, etc.
Maintenance schedule
12 hours of use
24hours of use
36hours of use
Air filter
clean
clean
replace
Spark plug
check
clean
replace
Engine oil
check
replace
check
Expert inspection is required:
a) If the lawn mower strikes an object.
b) If the motor stops suddenly
c) If the blade is bent (do not align!)
d) If the gears are damaged.
Replacing and re-sharpening the mowing blade at the end of the mowing
season always re-sharpen the mowing blade or, if required, replace the
mowing blade with a new one. Always have the mowing blade re-sharpened or
replaced by a customer service centre (measurement of imbalance).
Unbalanced blades will cause the lawn mower to vibrate violently-risk of
accident!
Change the blade
To remove the blade, unscrew the screw, check the blade support and change
all spare parts if they are worn out or damage.
Table of contents
Other Feider Machines Lawn Mower manuals

Feider Machines
Feider Machines FTDT461ZT User manual

Feider Machines
Feider Machines FTDT5175ES User manual

Feider Machines
Feider Machines FTDT5070 User manual

Feider Machines
Feider Machines FTDT511ZT-A User manual

Feider Machines
Feider Machines FRT7550M Operation instructions

Feider Machines
Feider Machines FTDTR5220 User manual

Feider Machines
Feider Machines FTDT561ZT User manual

Feider Machines
Feider Machines FTDT5096ES User manual

Feider Machines
Feider Machines FST212 User manual

Feider Machines
Feider Machines FTDTR4240 User manual


