Feider Machines FTDTR4240 User manual

ORIGINAL INSTRUCTIONS
1
LAWN MOWER
OWNER’S MANUAL
FTDTR4240 /FTDTR4240ES
CAUTION: Read and follow all Safety Rules and Instructions before operating this equipment
BUILDER SAS
32, rue Aristide Bergès - ZI 31270 Cugnaux - France
MADE IN PRC

ORIGINAL INSTRUCTIONS
2
1. SAFETY INSTRUCTIONS
Instructions
Read the instructions carefully. Be familiar with the controls and proper use of the
equipment.
Never allow children to use this mower. If the mower is given to an other people, also give
this manual. Also make sure that this person uses this device only after receiving the
necessary instructions. Local laws may restrict the age of the user.
Never mow while people, especially children, or animals are nearby.
Keep in mind that the operator or user is responsible for accidents or risks that may occur
to other persons or their properties.
If necessary, have training with an experienced person in order to use in a safe way this
tool.
Preparation
During mowing, always wear slip-resistant foot protection and long pants. Do not use the
equipment barefoot or wearing sandals open.
Wear personal protective equipment including at least: clothes of protection, gloves, foot
protection, mask, ocular and hearing protection
Carefully inspect the area where equipment and remove all foreign objects such as stones,
toys, stick and wires.
WARNING - Gasoline is extremely flammable.
oAdd fuel before starting. Do not remove the fuel tank cap while the machine is running
or when it is hot.
oIf the fuel has spilled or leaked, do not attempt to start the machine but move the
machine away from the leakage area and avoid creating a source of ignition until the
gasoline vapours has dissipated.
oRefuel only outside and do not smoke during refuelling.
oStore fuel in tanks specifically designated for this purpose.
oReplace the fuel tank or the defective gasoline plug securely.
Replace defective mufflers.
Before use, always inspect visually that the blades, blade assembly and blade lock are not
worn or damaged. Replace blades and blade assemblies that are not in good condition to
maintain balance. Always use recommended blades. Contact the manufacturer or your
dealer in order to have a list of recommended blades. Non-recommended blades can give
a risk of malfunctions, injuries and accidents.
The blades must be balanced to ensure proper operation and to be able to work safely.
Operation
Do not use the machine in a confined space or hazardous carbon monoxide emissions
can be collected.
Mow only under daylight or under good artificial light. Always have a good visibility.
Avoid using the equipment on greasy grass, where possible.
Always be sure of your walking on the slopes.

ORIGINAL INSTRUCTIONS
3
Walk, never run.
For lawn mowers, mow across slopes, never from top to bottom.
Exercise extreme caution when changing direction on slopes.
Stop the blades if the mower is to be tilted during transport when crossing surfaces other
than grass, and when transporting the mower due to the area to be mowed.
Do not mow on steep slopes.
Use extreme caution when tipping or pulling the mower towards you.
Never use the mower with defective guards, or without safety devices such as baffles and
or collection bins, which are not in place.
Do not change the motor configuration or increase the speed.
For starting, disengage all blades, the gears must be in neutral, the traction control lever
must be released. Set foot well away from the blades.
Before starting the engine or starting the engine, carefully read and understand all
instructions.
Do not tilt the mower when starting the machine or turn on the engine, unless the mower
needs to be tilted for starting. In this case, do not tilt it more than absolutely necessary and
lift only the part that is furthest away from the user.
Do not start the machine by standing in front of the ejection
Do not place hands or feet near or under rotating parts. Keep clean the mouth of the grass
extractor.
Never take or carry the mower while the machine is running.
Stop the machine and remove the ignition key, disconnect the spark plug from the spark
plug:
oBefore cleaning or unclogging the grass extractor.
oBefore checking, cleaning, and working on the mower.
oAfter hitting an object. Inspect the mower for damage and repair before re-using the
mower.
oIf the mower begins to vibrate abnormally, stop the engine immediately and check
according to previous recommendations.
The controls must be always checked if they are functioning correctly. In case of
malfunction, do not use the tool and bring to a service agent for inspection.
Stop the engine immediately:
oEvery time you leave the tool alone and the working area
oBefore refuelling.
When the tool is stopped, park it in a safe place.
Move slowly when moving.
The lawnmower should not be used in slopes and near drop-offs, ditches or embankments;
if the tool must be used in these kinds of emplacements, take an extreme precaution and
operate carefully the tool.
The lawnmower safety systems or features shall not be tampered with or disabled;
The operator should not alter or tamper with any sealed adjustments for the engine speed
control.

ORIGINAL INSTRUCTIONS
4
Maintenance and storage
Check and tighten all bolts and screws to ensure that the equipment is in safe operating
condition.
Never keep the mower with gasoline in the tank in a building or vapours can cause a bright
flame or spark.
Allow the machine to cool before storing it in an enclosed area.
To reduce the risk of fire, keep the machine clean without grass, without grease, the
muffler and the engine cools, disconnect the battery if necessary and empty the fuel tank
Check the grass catcher frequently, its condition or deterioration.
Replace worn and damaged parts for safety.
If the fuel tank is to be drained, it must be made outdoors.
Special safety instructions
Always use the mower with its pick-up bag and / or deflector in the intended position.
Switch off the engine before emptying the pick-up bag or before changing the cutting
height.
While the engine is running, never put your hands or feet under the mower or under the
grass ejection area.
Before mowing, remove all foreign objects from the grass that can be propelled by the
machine.
Keep children and pets at a safe distance while using the mower.
Never lift the mower when the engine starts.
Alcohol, drug, as well as illness, fever and fatigue affect your ability to respond. Do not use
power tools in such circumstances.
Never change the rated speed of the motor.
Never lift or carry the tool while the engine is running.
Before starting the engine, release the drawbar.
Before mowing, install the collection bag in its intended position.
Do not use the mower in the event of rain or when the grass is wet.
Never lift the rear of the mower when starting the engine and never place your hands or
feet under the mower deck or in the rear ejection port while the engine is running.
Turn off the engine and remove the spark plug cap in the following cases:
oBefore operating under the mower deck or near the ejection opening.
oBefore any maintenance, repair or verification.
oBefore transporting, lifting or storing the mower.
oIf you leave the mower unattended or change the cutting height.
oTo remove and empty the collection bag.
After striking a foreign object, turn off the engine and carefully inspect the mower for
damage. Take the lawnmower to an authorized service center for repair if necessary.
If the mower vibrates abnormally, try to understand the reason and bring your lawnmower
to an authorized repair center.
Regularly check that the bolts, nuts and screws are properly tightened for safe use of the
mower.
Do not use the tool where there is a risk of lighting.

ORIGINAL INSTRUCTIONS
5
Use the tool on daylight or under a good lighting. Always keep bystanders away.
Warning: Take an extreme precaution when operating the lawnmower in slopes and near
drop-offs, ditches or embankments; always be sure of your footing and stay in alert.
the lawnmower safety systems or features shall not be tampered with or disabled;
the operator should not alter or tamper with any sealed adjustments for the engine speed
control;
The operator must have, before using the tool for the first time, an adequate training with
an experienced people.
Warning: do not use of the unit while being tired, ill or under influence of alcohol or other
drugs;
Park safely the tool before leave it. The tool must be switched off.
The lawnmower shall not be operated without either the entire grass catcher or self-closing
discharge opening guard in place;
Warning: be careful about exhaust gas. Do not inhale them.
Wear adequate clothing such as long trousers and a protective equipment: slip-resistant
foot protection, hearing protection, eyes protection and gloves.
To avoid health issues, limit the time of operation. Take enough rest. Exposure to noise
and vibrate can have bas consequences on health.
WARNING: There is a danger about moving blade assemblies. Always handle blades
when they are in a complete stop and wear protective gloves.
Fuel Handling
Use caution when handling fuels. They are flammable and the vapours are explosive.
Use only an approved container.
Never remove the fuel cap or add fuel while the machine is on. Turn off the unit and allow the
engine and exhaust components to cool down before refuelling.
Do not smoke.
Never refuel inside a room.
Never store the tool and the fuel tank indoors where there is a naked flame, such as near a
water heater.
If fuel has spilled, do not attempt to start the machine, but move it away from the spill before
starting to use it. Please clean up any spills.
Replace and tighten the fuel tank cap after refuelling.
Follow strictly the instructions in this manual for filling the tool with fuel.
During maintenance and storage
Switch off the tool and wait until it stops completely. Make sure that all moving parts are
stopped.
Allow the machine to cool before performing inspection, adjustments, maintenance, servicing
and storage.
Store the tool where fuel vapour will not reach a flame or spark.
The transport of the tool must be secured in order to avoid fuel spillage, accidents and injuries.

ORIGINAL INSTRUCTIONS
6
Residual risks
Even if you use this product in compliance with all safety requirements, the potential risks of
injury and damage remain. The following hazards may arise in the structure and design of this
product:
There are risks of injury and property damage due to attachments or broken the sudden
impact of hidden objects when using cutting.
There are risks of injuries and accidents caused by flying objects.
Prolonged use of this product exposes the operator to vibrations and can produce so-called
"white finger" disease. To reduce the risk, wear gloves and keep your hands warm.
If any of the symptoms of "white finger syndrome" occur, seek immediate medical attention.
Symptoms of "white finger" include numbness, loss of sensitivity, tingling, pain, loss of strength,
colour changes or skin condition. These symptoms usually appear on the fingers, hands or
wrists. Risk increases at low temperatures.
A long exposition to noise can affect the health of the operator. A hearing protection must be
always used when operating the tool. The operation of the tool must be limited and some rest
must be taken between two sessions (e.g. 10min of operation and 20min of rest).
Symbols
Read the instructions
Watch out for projections! Keep viewers away from
work area
Danger! Keep your hands and feet away from the
cutting element
Warning – Exhaust gas. Do not be exposed to
exhausted gas and do not use the tool in a confined
place

ORIGINAL INSTRUCTIONS
7
Fuel is flammable, keep it away from fire. Do not add
fuel while the machine is running
During repair work, remove the spark plug and repair
according to the operating manual
Wear protective equipment. Wear eye and hearing
protection when using the tool
Warning – The engine is hot during the use
Guarantee sound power level
Do not use the machine in the rain and do not leave it
outside when it rains.
Wait until all machine components have come to a
complete stop before touching them. The blades
continue to rotate after the machine has stopped, a
rotating blade can cause injury.
Intended use
This model of thermal mower is designed for mowing natural grass. Any other use is
prohibited.
It is only suitable for private use in a garden or a plot. Lawn mowers designed for private plots
or gardens are those used for the maintenance of grassy areas and private turf and should not
be used in public areas, parks, sports, agricultural or forestry areas.

ORIGINAL INSTRUCTIONS
8
2. DESCRIPTION
a. Product

ORIGINAL INSTRUCTIONS
9
1 - Handle
2 - Drive Control (Self Propelled) Lever
3 - OPC (Operator Presence Control) Lever
4 - Knob
5 - Fuel Filler Cap
6 - Air Filter
7 - Primer Bulb (If Applicable)
8 - Spark Plug
9 - Exhaust
10 - Rear Roller
11 - Cutting Height Adjustment Lever
12 - Oil Filler Cap
13 - Grass Collector
14 - Recoil Starter Handle
15 - Electric start button (only for model FTDTR4240ES)
16.-Battery (only for model FTDTR4240ES)
b. Technical data
FTDTR4240
FTDTR4240ES
nominal power
2,6 kW
2,6 kW
Cutting width
420 mm
420 mm
speed
2800/min
2800/min
sound power level
LWA = 93.97dB(A) K=1.75
dB(A)
LWA = 93.97dB(A)
K=1.75 dB(A)
sound pressure level
LpA = 82.1 dB(A). K=2.5dB(A)
LpA = 82.1 dB(A).
K=2.5dB(A)
guaranteed sound
power level
96 dB(A)
96 dB(A)
vibration
5.361m/s² K=1.5m/s²
5.361m/s² K=1.5m/s²
machine mass
30,8 kg
33,8 kg
ORIGINAL INSTRUCTIONS
10
3. ASSEMBLY
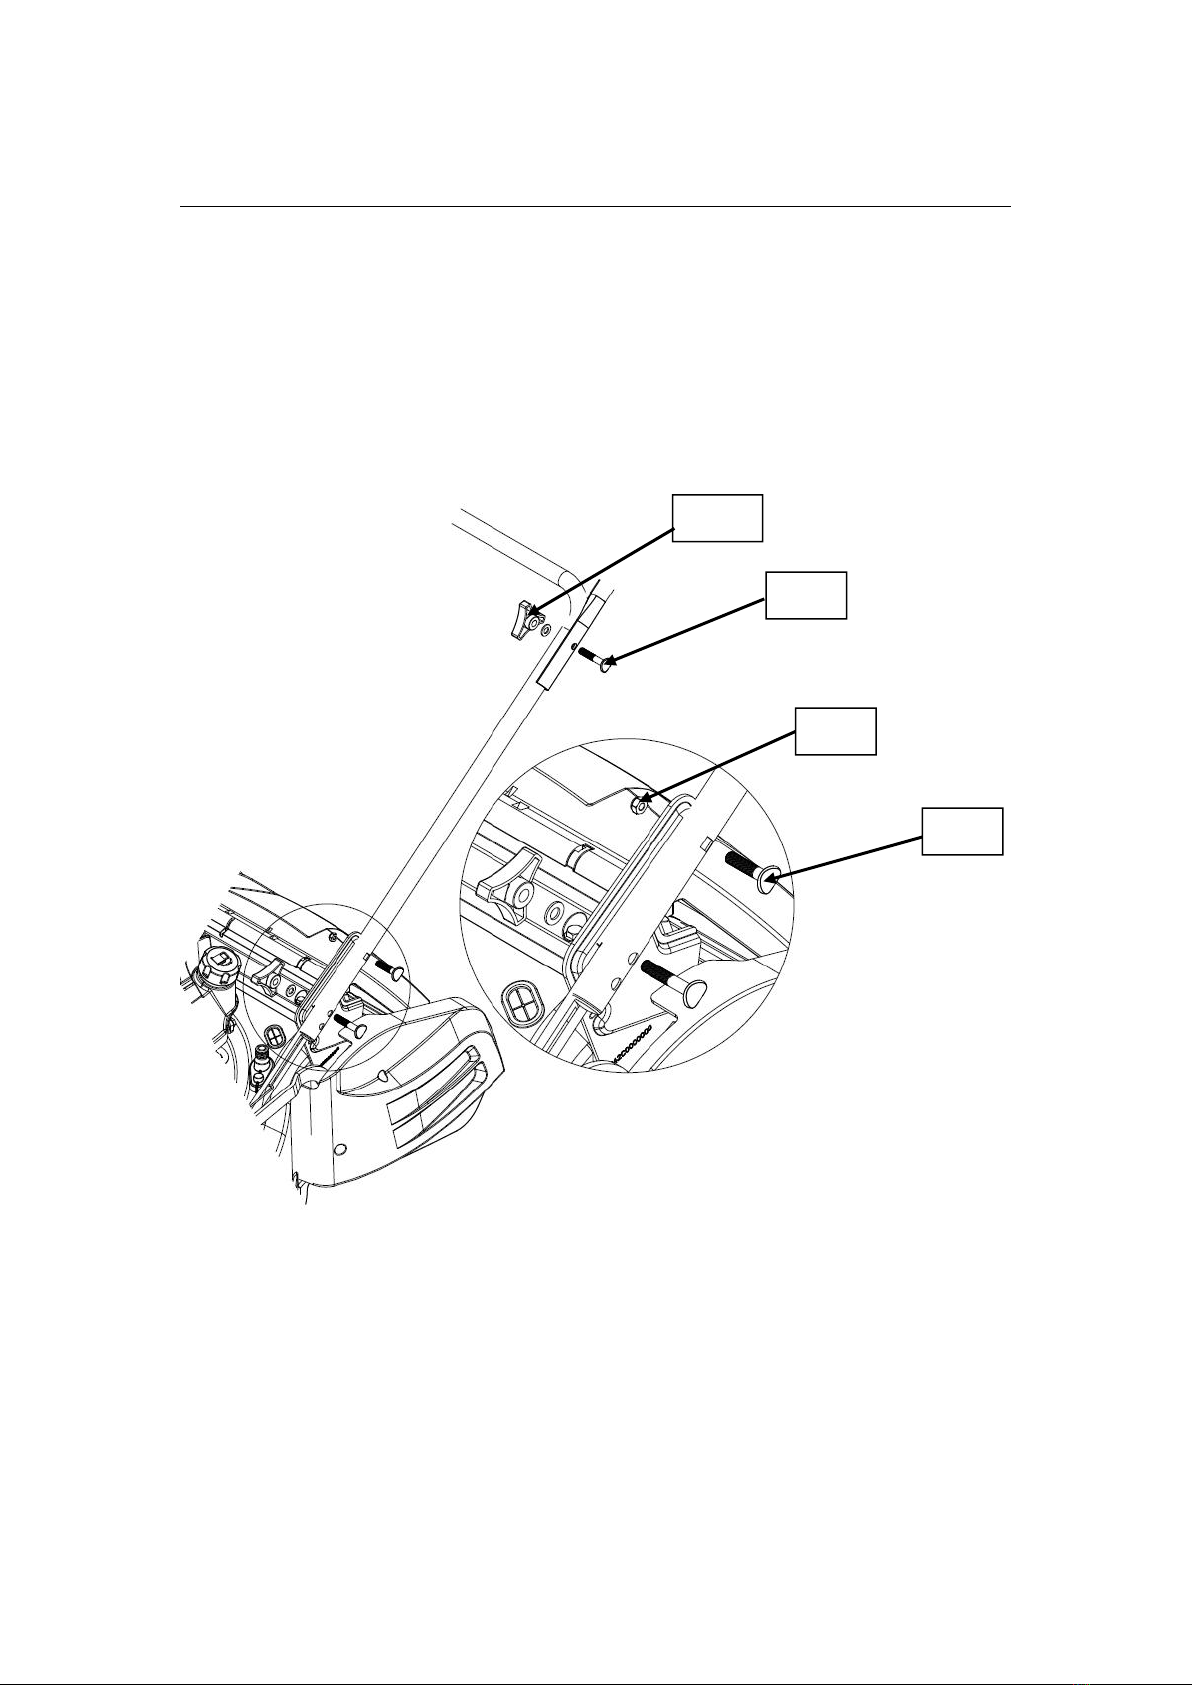
Handle Setup and Height Adjustment
Screw the lower bar to the tool with the two nuts and Bolts and with 2 knobs and bolts (in the
adjustment height location)
Screw the upper bar on the lower bar with the four knobs and bolts.
Put the recoil starter on the right of the handle and fix the cable with the plastic collar.
Introduce the rope of the recoil starter handle on its support guide rope.
If you want to adjust height of the handle bar, you can choose” L” or “H” two holes in left-right
Bracket to fix the handle bar with screws and knobs.
The “H” hole is high position of the handle bar, and the “L” hole is low position of the handle bar.
Knob
Bolt
Nut
Bolt
ORIGINAL INSTRUCTIONS
11
Brake Cable Setup
Put the brake cable and Clutch cable to the hole of brake lever and Clutch lever. (see the arrow
mark)
Brake Cable
Clutch Cable

ORIGINAL INSTRUCTIONS
12
Grass catcher
Lift the rear discharge guard and install the grass bag.
To remove the grass bag, lift the rear discharge guard and remove the grass bag.
ORIGINAL INSTRUCTIONS
13
4. FILLING FUEL AND OIL TANK
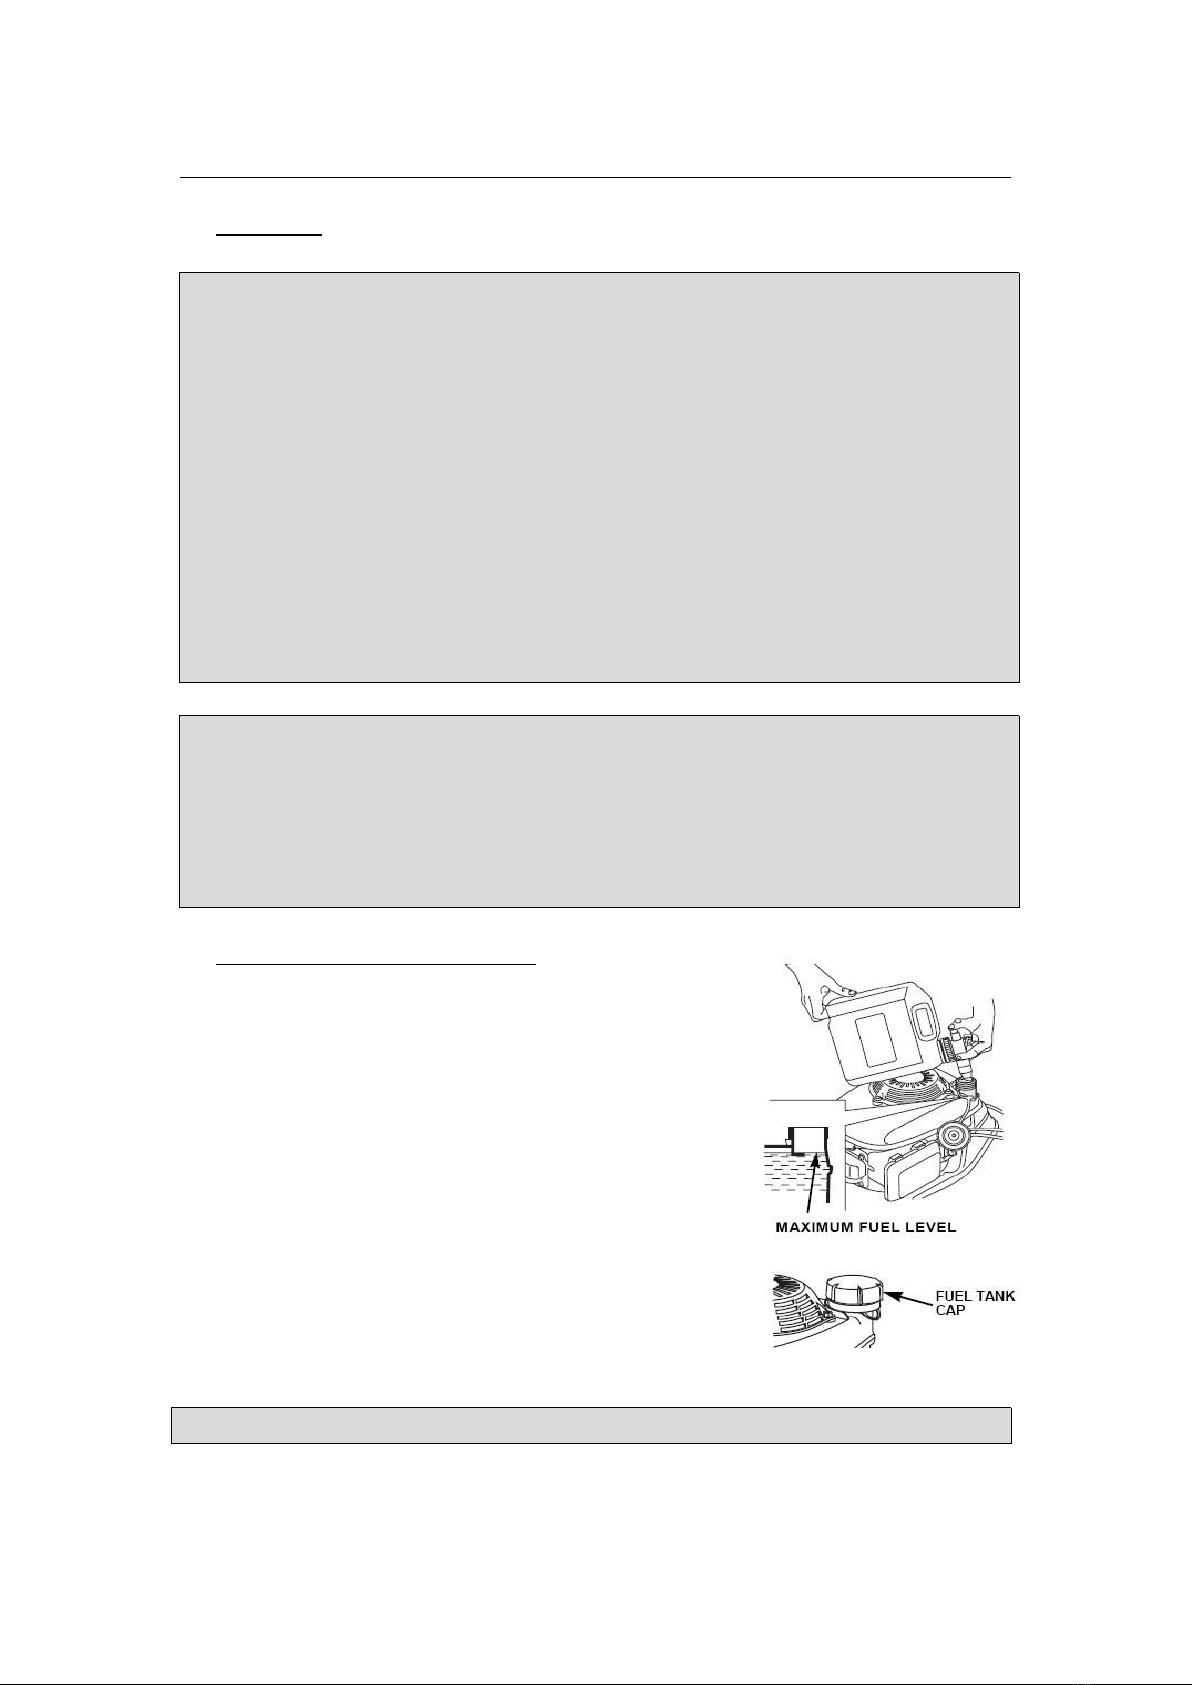
A) Filling tank
WARNING! Gasoline is extremely flammable.
Store fuel in specially designed cans for this purpose.
Fill the fuel tank only outdoors and before starting the engine. Do not smoke when
filling the fuel tank or handling fuel.
Never open the fuel tank cap and never add fuel while the engine is running or when it is
hot.
If fuel has spilled, do not start the engine any further, move the tool away from where
the fuel has been spilled, and be careful not to create a spark or flame until the fuel
vapors have dissipated.
Fully close all fuel tank and fuel canisters.
Before tilting the mower to maintain the blade or drain the oil, empty the fuel tank.
WARNING: Never fill the fuel tank indoors, while the engine is running, or before the
engine has cooled down for at least 15 minutes after use.
CAUTION: Do not use unapproved gasoline, such as E15 and E85. Do not mix the oil
with gasoline or modify the engine to operate with alternative fuels. The use of
unapproved fuels will damage the engine parts and will void the engine warranty. To
protect the fuel system from scale formation, add a fuel stabilizer to the fuel. All fuels
are not identical. If startup or performance problems occur, change supplier or fuel
brand.
Fuel must meet the following criteria:
-Clean, new and lead-free gasoline.
-A minimum octane rating of 87/87 AKI (91 RON).
-A gasoline containing up to 10% ethanol is acceptable.
-Remove the fuel tank cap. Add fuel.
-Close the fuel tank with the cap.
Do not overfill. Wipe off any fuel that has overflowed before starting the engine.
ORIGINAL INSTRUCTIONS
14
a. Engine oil
Recommended oil: We recommend the use of high quality detergent oil classified for SF,
SG, SH, SJ or higher. Do not use special additives.
Filling oil tank
-Open the oil tank.
-Fill directly the oil in the tank. Do not overfill
-Close the oil tank. Wipe any spillage.
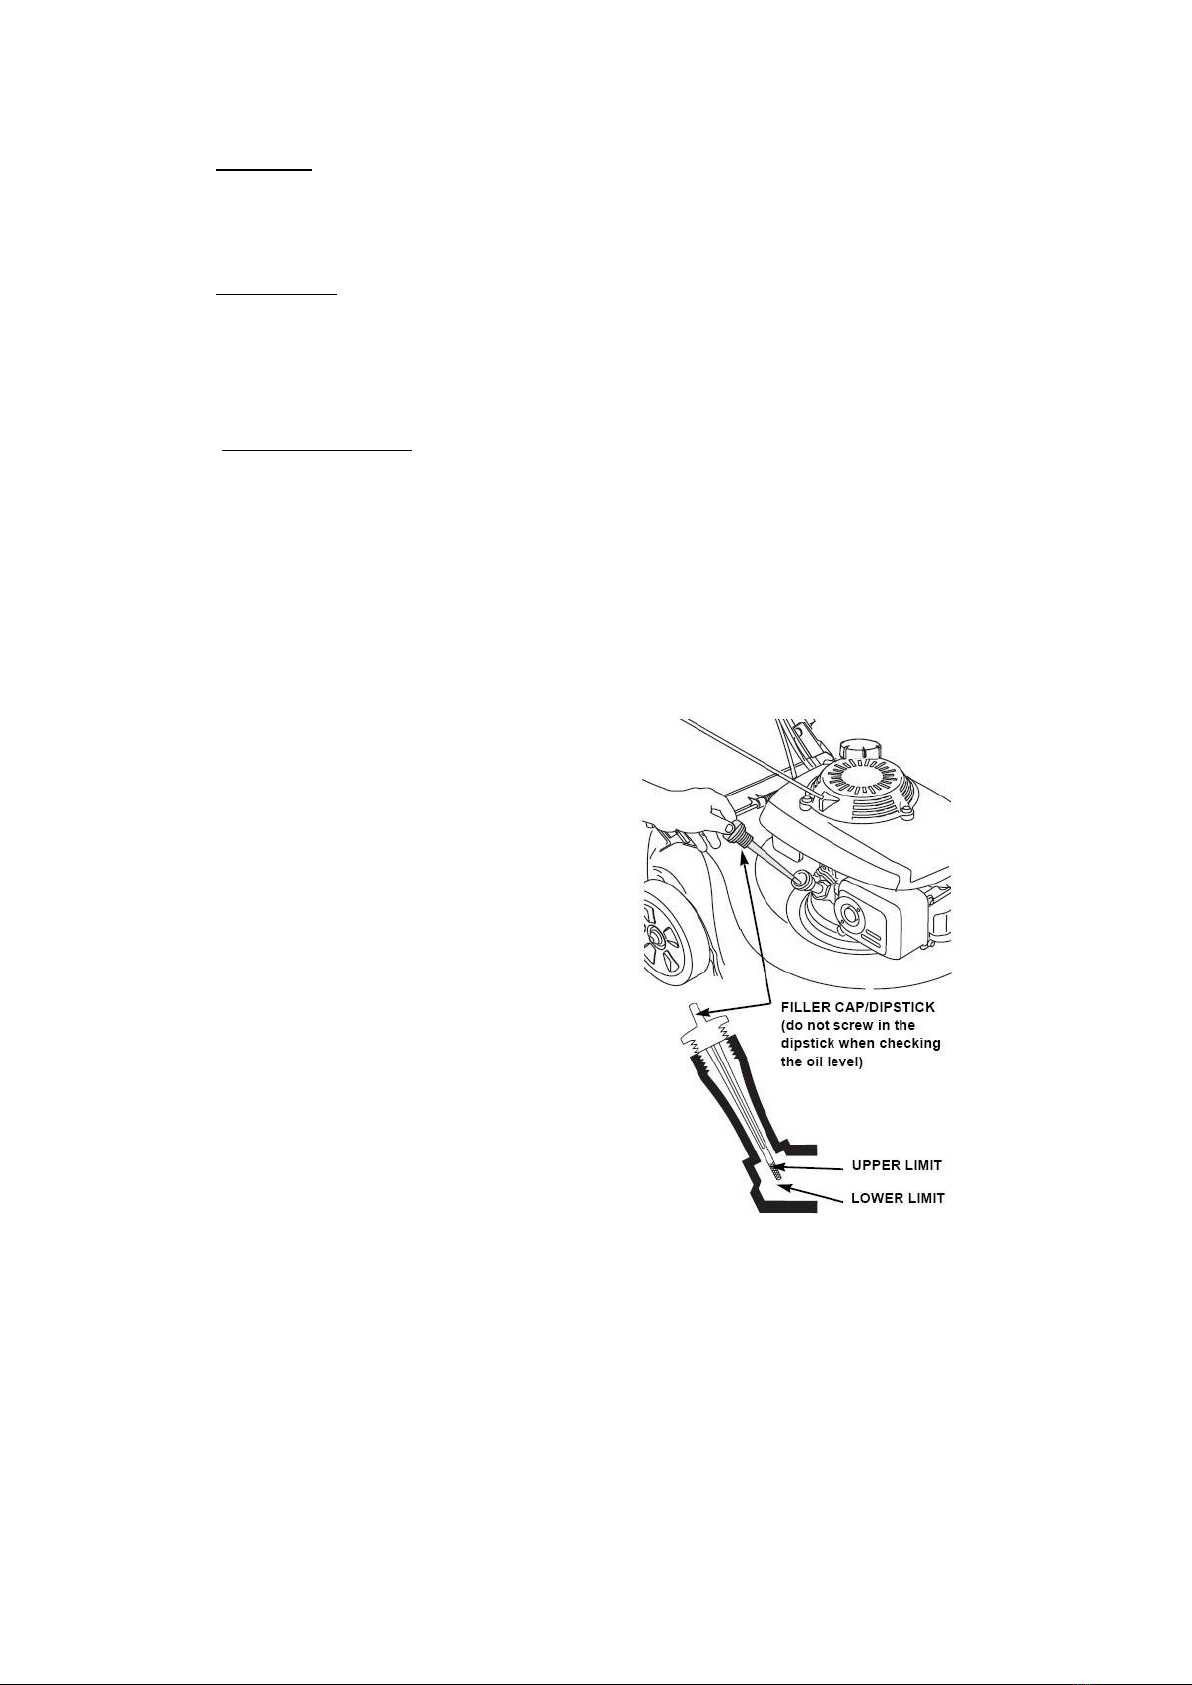
Checking the oil level
-Check the oil level when the engine is off and horizontal.
-Remove the plug / dipstick from the oil tank and wipe it off.
-Insert the oil tank plug / dipstick into the tank neck as shown, without screwing it in, and
then remove it to check the oil level.
-If the oil level is near or below the lower limit of the dipstick, remove the dipstick and fill the
recommended oil reservoir up to the upper limit of the dipstick (bottom edge of the
dipstick). Do not overfill.
-Replace the oil tank plug / dipstick.
.

ORIGINAL INSTRUCTIONS
15
Charge The Battery (only for the model FTDTR4240ES)
Charge the battery before use the electric start function is used, the battery must be charged for
5 hours. Put the charger plug into the hole in the battery and connect the charger to a power
supply.
Cutting Height Adjustment
To set the cutting height, pull the cutting height lever and push it backward or forward to adjust
the cutting height.

ORIGINAL INSTRUCTIONS
16
The blade can cause serious injury. Stop the engine before
adjusting cutting height.
5. OPERATION
FOR MODEL FTDTR4240
a) Starting the engine
-Place the mower in a clear, level area.
-Push the primer bulb several times (at least 8 times).
-Pull back on the operator control lever and hold it against the handle (the
clutch lever must not be activated)
-With the starter handle in its support, take the starter handle with your right hand and
pull slowly as far as to have a resistance, and then pull energetically on the starter
handle with starter rope through the support.
FOR MODEL FTDTR4240ES
a) Starting the engine
Manually
-Place the mower in a clear, level area.
-Push the primer bulb several times (at least 8 times).
-Pull back on the operator control lever and hold it against the handle (the
clutch lever must not be activated)
-With the starter handle in its support, take the starter handle with your right hand and
pull slowly as far as to have a resistance, and then pull energetically on the starter
handle with starter rope through the support.
OPERATOR CONTROL
LEVER
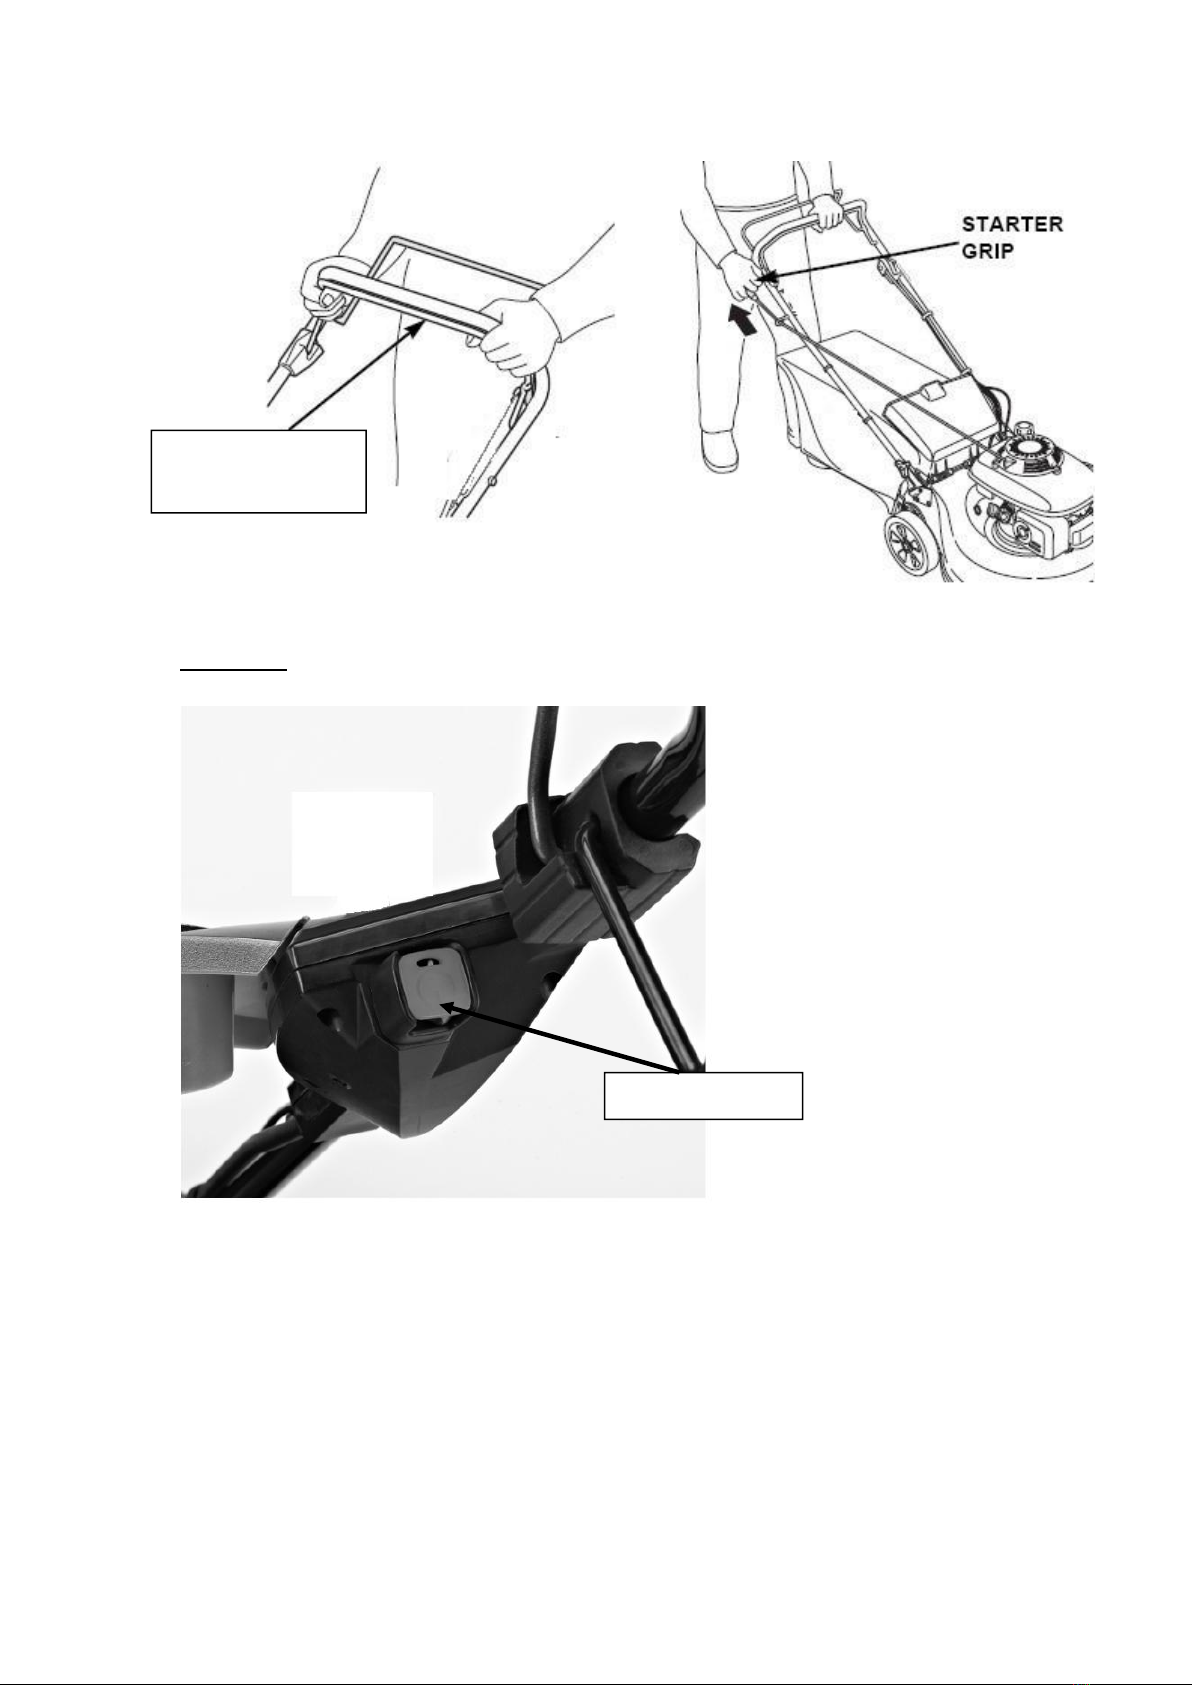
ORIGINAL INSTRUCTIONS
17
Electrically
-Pull back on the operator control lever and hold it against the handle (the
clutch lever must not be activated).
-Push the E-starting button to start the machine.
OPERATOR CONTROL
LEVER
E-starting button

ORIGINAL INSTRUCTIONS
18
b) Operation (for all models)
Blade is in action as soon as engine started. While the machine is working maintain the security
handle in working position. The engine will stop as soon as you release the engine control bar.
Release the lever to stop the engine whenever you need to leave the mower.
Clutch Lever
Push the clutch lever forward and hold it against the handlebar to propel the mower forward.
Release the clutch lever to stop the mower’s forward movement.
Always release the clutch lever before starting the engine. If the clutch is engaged, the mower
will move forward.
Operate the clutch lever with a quick and complete motion, so the clutch is either fully engaged
or fully released. Hold the clutch lever against the handlebar during self-propelled mowing. This
will help to extend the service life of the clutch mechanism.
Stop Engine
Release the clutch lever.
Release the brake lever.
The blade will continue to rotate for a few seconds after the engine has
stopped. Disconnect the spark plug cap if the lawnmower is to be left
unattended.
BRAKE LEVER
CLUTCH LEVER

ORIGINAL INSTRUCTIONS
19
6. Maintenance
IMPORTANT Regular, careful maintenance is essential for keeping the safety level
and original performance of the machine unchanged in time.
Keep all nuts, bolts and screws tight to be sure the equipment is in safe working condition.
Regular maintenance is essential for safety and performance.
Never store the equipment with fuel in the tank inside a building where vapour may reach a
flame or a spark or a source of extreme heat.
Allow the engine to cool before storing in an enclosed space.
To reduce the fire hazard, keep the engine, exhaust silencer, battery compartment and fuel
storage area free of grass, leaves, or excessive grease. Do not leave containers with grass
cuttings in rooms.
For reasons of safety, do not use the equipment with worn or damaged parts. Parts are to be
replaced and not repaired. Use genuine spare parts (blades should always bear the symbol).
Parts that are not of the same quality can damage the equipment and be dangerous for your
safety.
If the fuel tank has to be drained, this should be done outdoors and when the engine is cool.
Wear strong work gloves when removing and reassembling the blade.
Check the blade’s balance after sharpening.
Check the self-closing guard and grass-catcher frequently for wear and deterioration.
Whenever the machine is to be handled, transported or tilted you must:
-Wear strong working gloves;
-Grasp the machine at the points that offer a safe grip, taking account of the weight and its
distribution.
Blade
Inspection
Tilt the mower to the right, so the air cleaner side is up. This will help to prevent fuel leakage
and hard starting.
Inspect the blade for damage, cracks and excessive rust or corrosion.
A dull blade can be sharpened, but a blade that is excessively worn, bent, cracked, or
otherwise damaged must be replaced.
A torque wrench must always be used when installing the blade.
Check that the blade bolts are tight.
Removal and installation
If you remove the blade for sharpening or replacement, you will need a torque wrench for
installation. Wear heavy gloves to protect your hands.
Remove the bolt with a socket wrench. Use a wooden block to prevent the blade from
turning when removing the bolt. Then remove the blade.
Install the blade using the blade bolt and special washers. Be sure to install the special
washers with the concave side toward the blade and the convex side toward the bolt.
ORIGINAL INSTRUCTIONS
20
Tighten the blade bolt with a torque wrench. Use a wooden block to prevent the blade from
turning when tightening the bolt.
Grass Bag Cleaning and Replacement
Cleaning
Wash the bag with a garden hose, and allow it to dry completely before use; a wet bag will clog
quickly.
Replacement
Unclip the plastic edges of the bag from the frame, remove
the frame from the bag.
Insert the frame into the bag, clip the plastic edges of the
bag onto the frame.
BLADE ADAPTOR
BLADE
WASHER
BOLT
This manual suits for next models
1
Table of contents
Other Feider Machines Lawn Mower manuals

Feider Machines
Feider Machines FTDT461ZT User manual

Feider Machines
Feider Machines FTDT5096ES User manual

Feider Machines
Feider Machines FTDT5170ZT User manual

Feider Machines
Feider Machines FTDT5175ES User manual

Feider Machines
Feider Machines FTDTR5220 User manual

Feider Machines
Feider Machines FTDT4640ES User manual

Feider Machines
Feider Machines FRT6224 User manual

Feider Machines
Feider Machines FRT7550M Operation instructions

Feider Machines
Feider Machines FTDT511ZT-A User manual

Feider Machines
Feider Machines FTDT5070 User manual


