Feider Machines FMP1250 User manual

Original instructions
ROTARY HAMMER
FMP1250
READ THESE INSTRUCTIONS BEFORE USE THE TOOL
BUILDER SAS
32, rue Aristide Bergès -ZI 31270 Cugnaux –France
Made in PRC
01

SAFETY INSTRUCTIONS
General Power Tool Safety Warnings
WARNING Read all safety warnings and all instructions. Failure to follow the
warnings and instructions may result in electric shock, fire and/or serious injury.
Save all warnings and instructions for future reference. The term "power tool" in the
warnings refers to your mains-operated (corded) power tool or battery-operated (cordless)
power tool.
1) Work area safety
a) Keep work area clean and well lit.Cluttered or dark areas invite accidents.
b) Do not operate power tools in explosive atmospheres, such as in the presence of
flammable liquids, gases or dust. Power tools create sparks which may ignite the dust or
fumes.
c) Keep children and bystanders away while operating a power tool. Distractions can
cause you to lose control.
2) Electrical safety
a) Power tool plugs must match the outlet. Never modify the plug in any way. Do not
use any adapter plugs with earthed (grounded) power tools. Unmodified plugs and
matching outlets will reduce risk of electric shock.
b) Avoid body contact with earthed or grounded surfaces, such as pipes, radiators,
ranges and refrigerators. There is an increased risk of electric shock if your body is earthed
or grounded.
c) Do not expose power tools to rain or wet conditions. Water entering a power tool will
increase the risk of electric shock.
d) Do not abuse the cord. Never use the cord for carrying, pulling or unplugging the
power tool. Keep cord away from heat, oil, sharp edges or moving parts. Damaged or
entangled cords increase the risk of electric shock.
e) When operating a power tool outdoors, use an extension cord suitable for outdoor
use. Use of a cord suitable for outdoor use reduces the risk of electric shock.
f) If operating a power tool in a damp location is unavoidable, use a residual current
device (RCD) protected supply. Use of an RCD reduces the risk of electric shock.
3) Personal safety
a) Stay alert, watch what you are doing and use common sense when operating a
power tool. Do not use a power tool while you are tired or under the influence of drugs,
alcohol or medication. A moment of inattention while operating power tools may result in
serious personal injury.
b) Use personal protective equipment. Always wear eye protection. Protective equipment
such as dust mask, non-skid safety shoes, hard hat, or hearing protection used for appropriate
conditions will reduce personal injuries.
c) Prevent unintentional starting. Ensure the switch is in the off-position connecting to
power source and/or battery pack, picking up or carrying the tool. Carrying power tools
with your finger on the switch or energizing power tools that have the switch on invites
accidents.
d) Remove any adjusting key or wrench before turning the power tool on. A wrench or a
key left attached to a rotating part of the power tool may result in personal injury.
e) Do not overreach. Keep proper footing and balance at all times. This enables better
control of the power tool in unexpected situations.
02

f) Dress properly. Do not wear loose clothing or jewellery. Keep your hair, clothing and
gloves away from moving parts. Loose clothes, jewellery or long hair can be caught in
moving parts.
g) If devices are provided for the connection of dust extraction and collection facilities,
ensure these are connected and properly used. Use of dust collection can reduce dust-
related hazards.
4) Power tool use and care
a) Do not force the power tool. Use the correct power tool for your application. The
correct power tool will do the job better and safer at the rate for which it was designed.
b) Do not use the power tool if the switch does not turn it on and off. Any power tool that
cannot be controlled with the switch is dangerous and must be repaired.
c) Disconnect the plug from the power source and/or the battery pack from the power
tool before making any adjustments, changing accessories, or storing power tools.
Such preventive safety measures reduce the risk of starting the power tool accidentally.
d) Store idle power tools out of the reach of children and do not allow persons
unfamiliar with the power tool or these instructions to operate the power tool. Power
tools are dangerous in the hands of untrained users.
e) Maintain power tools. Check for misalignment or binding of moving parts, breakage
of parts and any other condition that may affect the power tool’s operation. If damaged,
have the power tool repaired before use. Many accidents are caused by poorly maintained
power tools.
f) Keep cutting tools sharp and clean. Properly maintained cutting tools with sharp cutting
edges are less likely to bind and are easier to control.
g) Use the power tool, accessories and tool bits etc. in accordance with these
instructions, taking into account the working conditions and the work to be performed.
Use of the power tool for operations different from those intended could result in a hazardous
situation.
5) Service
a) Have your power tool serviced by a qualified repair person using only identical
replacement parts.This will ensure that the safety of the power tool is maintained.
Hammer safety warnings
– Wear ear protectors.Exposure to noise can cause hearing loss.
– Use auxiliary handle(s), if supplied with the tool.Loss of control can cause personal
injury.
– Hold power tool by insulated gripping surfaces, when performing an operation where
the cutting accessory may contact hidden wiring or its own cord.Cutting accessory
contacting a "live" wire may make exposed metal parts of the power tool "live" and could give
the operator an electric shock.
For your safety, do not plug in your Power tool until you have read and understood this
manual.
WEAR EYE PROTECTION. Use face or dust mask along with safety goggles. Use
hearing protection, particularly during extended periods of operation, wear safety shoes,
wear hard hat
DO NOT wear gloves, jewellery, neckties or loose clothing.
DO NOT drill pieces too small to be securely held.
ALWAYS keep hands out of the path of the drill bit. Avoid awkward hand positions where
a sudden slip could cause your hand to move into the path of the drill bit or saw blade.
03

SECURE WORKPIECE. Use clamps or a vice to hold the work when practical. It is safer
than using your hand and it frees both hands to operate the tool.
MAKE SURE there are no nails or foreign objects in the part of the workpiece to be cut
drilled or sanded.
TO AVOID INJURY from accidental starting always removes the plug from the electrical
socket before installing or removing a chisel bit.
When using electric hammer chisel only Use bits that are configured with the
correct slots for this chuck.
BEFORE STARTING the operation, jog the chisel switch to make sure the chisel bit does
not wobble or vibrate
MAKE SURE the spindle has come to a complete stop before touching the chuck or
attempting to change the chisel bit also beware that the bit will be hot, let it cool down
before changing as it could burn and cause injury.
ALWAYS MAKE SURE THE CHISEL OR DRILL IS FIRMLY SEATED IN THE CHUCK
before starting the job.
SYMBOLS
Read the instructions manual
Class II Product (double insulation)
04
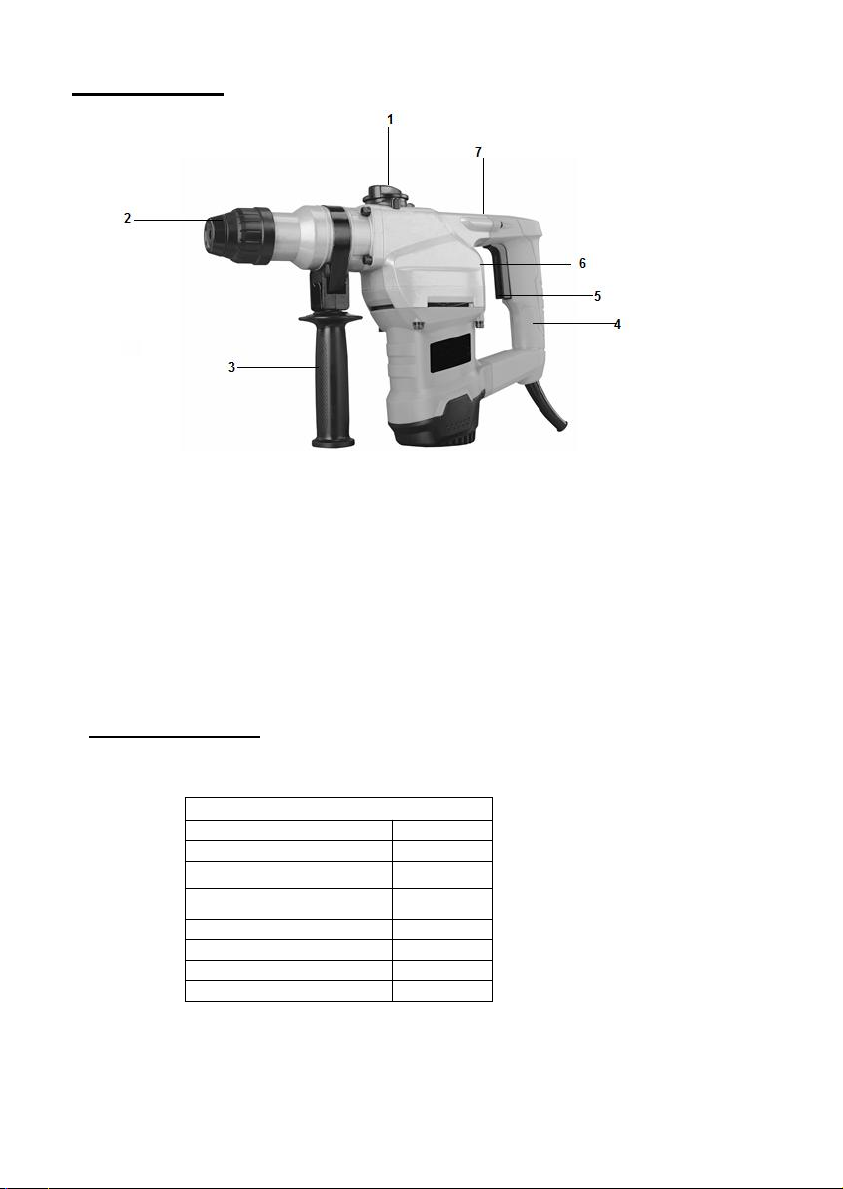
THE PRODUCT
1- Rotary switch and locking button
2- SDS chuck
3- Auxiliary handle
4- Rear handle
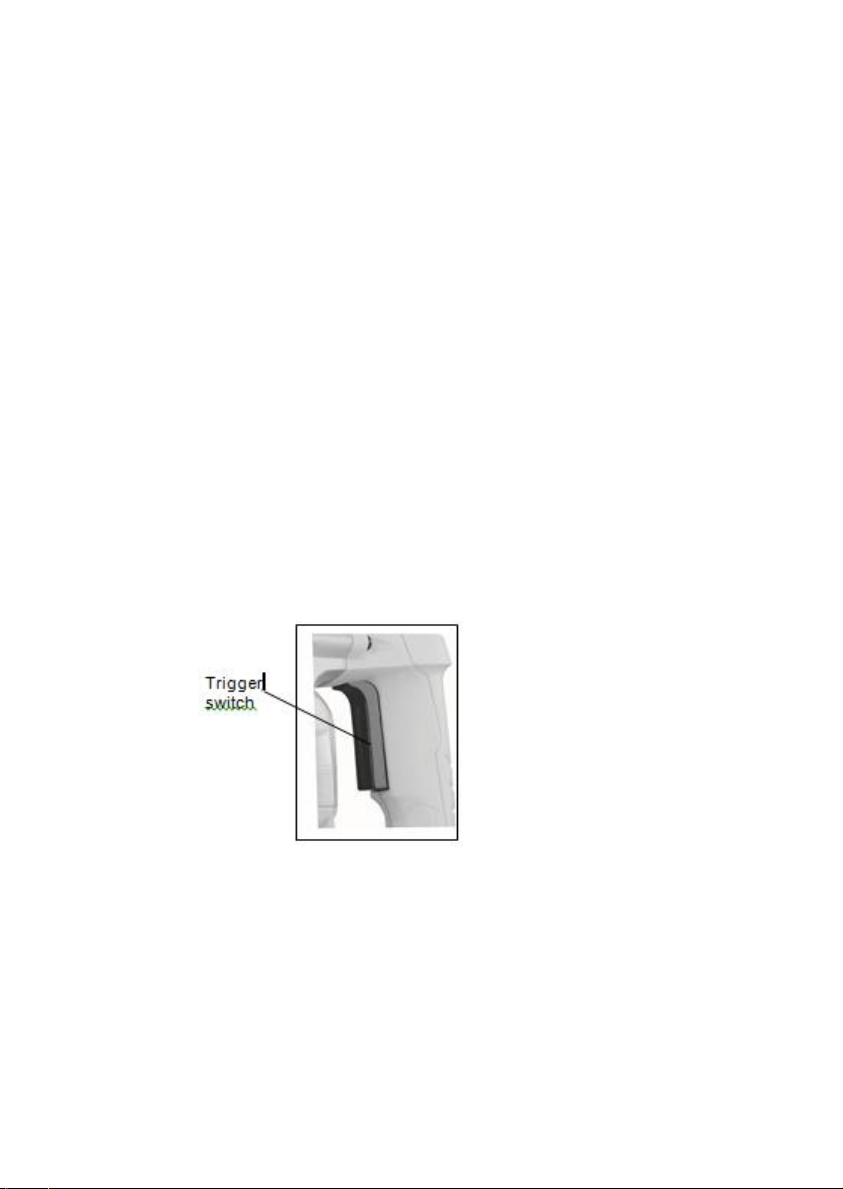
5- Trigger switch
6- Rotary switch and percussion stop
7- Lubrication oil tank
CARTON CONTENTS
ROTARY HAMMER
DESCRIPTION
QTY
ROTARY HAMMER
1
Chisels
2
Drill bits
3
Tube of lubrication oil
1
Carry case
1
Anti-dust cover
1
Depth stop
1
05

AVAILABLE ACCESSORIES
Use only accessories recommended for this electric hammer. Follow instructions that
accompany accessories. Use of improper accessories may cause injury to the operator
or damage to the hammer.
Do not use any accessory unless you have completely read the instructions or Owner’s
Manual for that accessory.
If any part is missing or damaged, do not plug the chisel into the power source until the
missing or damaged part is replaced.
Carefully unpack the tools see “Components chart” at right hand side of this page
NOTE: See illustration of components on Page 9.
To avoid fire or toxic reaction, never use gasoline, naphtha, acetone, lacquer
thinners or similar highly volatile solvents to clean the tool.
SPECIFICATIONS TECHNIQUES
Chuck
28 mm
Voltage
230 V˜ 50 Hz
Input power
1200 W
Impact hammer action
850/min
Weight
4.8 kg
Sound power level
Sound pressure level
Vibration
WARNING
!
WARNING
!
WARNING
!
06

Information:
The declared vibration total value has been measured in accordance with a
standard test method and may be used for comparing one tool with another;
The declared vibration total value may also be used in a preliminary assessment
of exposure.
Warning:
the vibration emission during actual use of the power tool can differ from the
declared total value depending on the ways in which the tool is used;
it is necessary to identify safety measures to protect the operator that are based
on an estimation of exposure in the actual conditions of use (taking account of all
parts of the operating cycle such as the times when the tool is switched off and
when it is running idle in addition to the trigger time).
Wear hearing protection.
ASSEMBLY & OPERATION
Always make sure the power tool is isolated from the power supply before
fitting any attachment
Auxiliary handle
The position of the front handle can be changed, according the work to do and the position of
the operator. Unscrew it (but it cannot be removable) and change its position. Screw the
handle to fix it in place.
Assembly of bit/chisel SDS
The tool must be switched off and unplugged when assembly a bit on the tool.
Install the correct chisel or bit according to the intended operation.
- Pull and hold the chuck rearward.
- Insert the bit/chisel in the hole on the front cover.
- Adjust the groove position while turning the bit, and furthermore insert it until it hits the end of
the hole.
- Release the chuck. Pull the tool to make sure that it is locked completely.
WARNING
!
07

Function selection
Choose the function according the operation to do by using the function buttons (part 1 and 6
on the drawing of description).
For the function button localized on the top of the tool, push the lock button and then turn the
knob to the desired position
For the function button which is on the rear of the tool, turn the scroll wheel on the left or on
the right to select the function.
Depth stop installing
Unscrew the locking auxiliary handle and fit the depth stop.
Set the depth stop to the same level as the drill bit.
Retighten the auxiliary handle.
This electric hammer chisel does not have reverse direction, so always take care not to
force the chisel in case the chisel bit gets stuck. Always make sure you keep the chisel
going in and out to remove debris.
This chisel does not have torque facility. It is not recommended to use any other bit
other than drill bit or chisels. Do not use metal cutting drills, this could cause serious
injury
NOTE: chiseling for an extended period of time may cause the chisel motor to
overheat. If the chisel gets hot, stop chiseling and allow it to cool for at least
15 minutes.
Precautions on using electric hammer chisel.
1/ Before using the electric hammer chisel always make sure the oil supply is to the full
level and the screw is tight.
2/ This electric hammer chisel has a fixed handle always make sure the screws holding
the handle are secure before operation takes place. Always use both hands when using
this chisel failure to adhere to this could invite injuries.
3/ Safe operation, always make sure you have a stable posture and safe footing before
operating the electric hammer chisel.
Function
Rotary switch
with locking
button (1)
Rotary
switch with
percussion
stop (6)
Chuck
Application
Drill with
percussion SDS
Drill bit
Drilling with
percussion (concrete,
brick)
Chiselling SDS
Chisel
Chiselling (brick,
concrete)
Drill without
percussion
Drill bit
Drilling (wood, metal,
plastic)
08
4/ When working at a high level, always make sure that no person or persons are below
you, as this could invite injuries to those persons under you.
5/ Before starting any job like breaking, chipping a wall, floor or ceiling, thoroughly
confirm that no items such as an electric cable, water pipe or conduit are buried inside as
this could cause injury or flooding.
6/ Properly set the bit holder.
7/ The bit can become very hot during operation exercise extreme caution as this could
cause injury.
8/ Always wear protective safety glasses.
9/ Always wear ear defenders or earplugs.
10/ Always wear suitable dust mask.
11/ Always wear protective footwear.
12/ Always wear hardhat.
Using the hammer
- Place the bit you are going to use to do the job
- Push the trigger switch after applying the chisel bit tip to the chiseling position.
- It may be necessary to punch the bit against the crushing position forcibly in order to
begin the striking stroke.
- By utilizing the weight of the machine and by firmly holding the hammer chisel with
both hands, one can effectively control the subsequent recoil motion.
- Proceed at a moderate work rate, the use of too much force will impair efficiency.
09

CAUTION
Sometimes the tool does not begin the striking stroke even when the motor rotates this
may be because the oil has become thick
Due to low temperature or has been standing idle for long period. Run the chisel for
approx. 5 minutes to bring the oil temperature up.
Fig 5
WARNING
The electric hammer chisel continues for a few second after the trigger has been
release, be careful when putting it down.
Anti-dust cover
The bit must be already installed on the tool. Slide the cover on the bit. It will protect the
operator and the tool against dust.
MAINTENANCE
Oil feeding
This tool is of full air-tight construction to protect against dust and to prevent lubricant
leakage. This machine can be used without grease supplement for an extended period of
time. However, perform the grease replacement to maintain the service life. Replace the
grease as described below:
- Check the quantity of grease and when you change the carbon brush.
- Use the provided lubricant tube. If finish, use a recommended lubricant. See your
dealer for advice.
The tool must be switched off and unplugged before the replacement.
- Open the crank cover with a wrench (not provided).
- Wipe off the old grease inside.
- Put the grease into the crank case. Do not overfill
- Clean any overfilled grease.
- Reinstall the crank cover in place.
- Check the oil level once daily, confirming that oil is filled.
Fig 6
10
Maintenance and inspection
1. Inspecting the tool
When using dull tool bits this can cause motor malfunction and degraded efficiency.
Always replace dull bits with new ones without delay when abrasion is noted.
2. Inspecting the mounting screws
Regularly inspect all mounting screws and ensure that they are properly tightened.
Should any of the screws be loose, retighten them immediately. Failure to do so could
result in serious injury.
3. Maintenance of the motor.
The motor unit winding is the very “heart” of the power tool. Exercise due care to ensure
the winding does not become damaged and/or wet with oil or water.
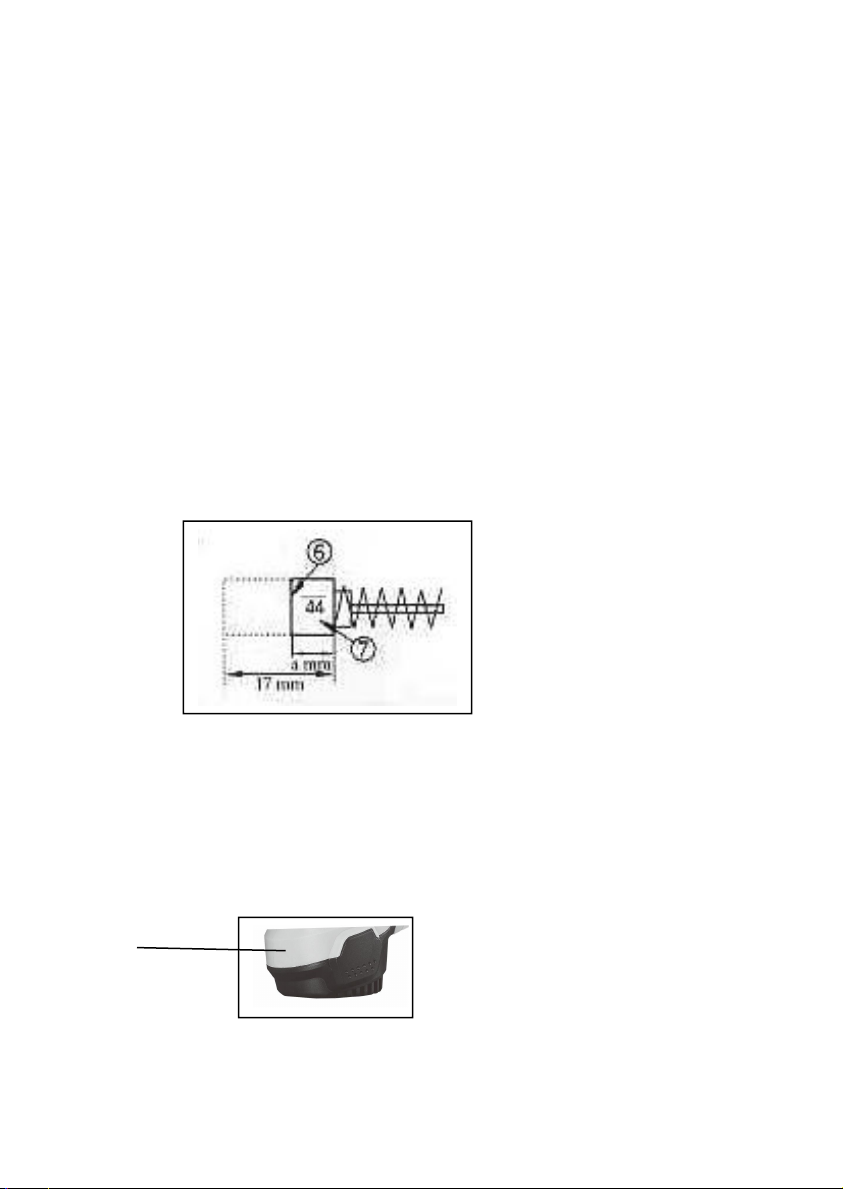
4. Inspecting the carbon brushes.
Two carbon bushes are provided.
The motor employs carbon brushes that are consumable parts; when an excessively
worn carbon brush could result in motor trouble, replace the carbon brush. The carbon
brushes must be only replaced by a qualified service. Wear limiter (6) No of carbon brush
(7). (See Fig 7)
Fig 7
Always keep carbon brushes clean and ensure that they slide freely within the brush
holders.
Replacement
The carbon brush can be removed by removing the cap cover (9), cap rubber and brush
cap in that order at the interior (See Fig 8)
brush
carton
Fig 8
To replace carbon brush, reverse order of removal.
11

GENERAL
When servicing, use only identical replacement parts. Use of any other part may create
a hazard or cause product damage.
DO NOT use solvents when cleaning plastic parts. Most plastics are susceptible to damage
from various types of commercial solvents and may be damaged by their use. Use clean cloth
to remove dirt, dust, oil, grease etc.
Do not at any time allow brake fluids, gasoline, petroleum-based products, penetrating
oils, etc. to come in contact with plastic parts. They contain chemicals that can damage,
weaken or destroy plastic.
DO NOT abuse power tools. Abusive practices can damage the tool as well as the workpiece.
DO NOT attempt to modify tools or create accessories not recommended. Any such
alteration or modification is misuse and could result in a hazardous condition leading
to possible serious injury. It will also void any warranty given.
Electrical products should not be discarded with household products.
According to the European Directive 2012/19/EU on waste electrical
and electronic equipment and its implementation into national law,
electrical products used must be collected separately and disposed
of at collection points provided for this purpose. Talk with your local authorities
or dealer for advice on recycling.
12

Declaration of conformity
BUILDER SAS
ZI, 32 RUE ARISTIDE BERGES – 312070 CUGNAUX – FRANCE
Declares that the machinery designated below:
Rotary Hammer
Model: FMP1250
Serial number: 20211001723-20211002223
Complies with the provisions of the Directive “machinery” 2006/42/CE and
national laws transposing it:
Also complies with the following European directives:
EMC Directive 2014/30/EU
ROHS Directive (EU)2015/863 amending 2011/65/EU
and complies with the following applicable harmonized standards:
EN60475-1:2009+A11:2010
EN60475-2-6:2010
EN55014-1:2017
EN55014-2:2015
EN61000-3-2:2014
EN61000-3-3:2013
Responsible for the technical file: Michel Krebs
Cugnaux, 22/07/2021
Philippe MARIE/PDG
13

WARRANTY
The manufacturer guarantees the product against defects in material and workmanship for a period of 2
years from the date of the original purchase. The warranty only applies if the product is for household use.
The warranty does not cover breakdowns due to normal wear and tear.
The manufacturer agrees to replace parts identifed as defective by the designated distributor. The
manufacturer does not accept responsibility for the replacement of the machine, in whole or in part , and/or
ensuing damage.
The warranty does not cover breakdowns due to:
• insufcient maintenance.
• abnormal assembly, adjustment or operations of the product.
• parts subject to normal wear and tear.
The warranty does not extend to:
• shipping and packaging costs.
• using the tool for a purpose other than that for which it was designed.
• the use and maintenance of the machine done in a manner not described in the user manual.
Due to our policy of continuous product improvement, we reserve the right to alter or change specifcations
without notice. Consequently, the product may be diferent from the information contained therein, but a
modifcation will be undertaken without notice if it is recognized as an improvement of the preceding
characteristic.
READ THE MANUAL CAREFULLY BEFORE USING THE MACHINE.
When ordering spare parts, please indicate the part number or code, you can fnd this in the spare parts list
in this manual. Keep the purchase receipt; without it, the warranty is invalid. To help you with your product,
we invite you to contact us by phone or via our website:
• +33 (0)9.70.75.30.30
• https://services.swap-europe.com/contact
You must create a "ticket" via the web platform.
• Register or create your account.
• Indicate the reference of the tool.
• Choose the subject of your request.
• Describe your problem.
• Attach these fles: invoice or sales receipt, photo
of the identifcation plate (serial number), photo
of the part you need (for example: pins on the
transformer plug which are broken).
WARRANTY
14

WHAT TO DO IF MY MACHINE BREAKS DOWN?
the repairer will refuse the machine.
Go to the store with the complete machine and with the receipt or invoice.
the repairer will refuse the machine.
c) Create a SWAP-Europe service ticket on the site: https://services.swap-europe.com When making the
request on SWAP-Europe, you must attach the invoice and the photo of the nameplate (serial number).
d) Contact the repair station to make sure it is available before dropping of the machine.
Go to the repair station with the complete machine packed, accompanied by the purchase invoice and the
station support sheet downloadable after the service request is completed on the SWAP-Europe site
For machines with engine failure from manufacturers BRIGGS & STRATTON, HONDA and RATO, please
refer to the following instructions.
Repairs will be done by approved engine manufacturers of these manufacturers, see their site:
• http://www.briggsandstratton.com/eu/fr
• http://www.honda-engines-eu.com/fr/service-network-page;jsessionid=5EE8456CF39CD572AA2AEEDFD
290CDAE
• https://www.rato-europe.com/it/service-network
Please keep your original packaging to allow for after-sales service returns or pack your machine
with a similar cardboard box of the same dimensions.
For any question concerning our after-sales service you can make a request on our website https://
services.swap-europe.com
Our hotline remains available at +33 (9) 70 75 30 30.
If you bought your product on a website:
a) Empty the fuel tank if your product has one.
b) Make sure that your machine is complete with all accessories supplied, and clean! If this is not the case,
If you bought your product in a store:
a) Empty the fuel tank if your product has one.
b) Make sure that your machine is complete with all accessories supplied, and clean! If this is not the case,
PRODUCT FAILURE
15

THE WARRANTY DOES NOT COVER:
• Start-up and setting up of the product.
• Damage resulting from normal wear and tear of the product.
• Damage resulting from improper use of the product.
• Damage resulting from assembly or start-up not in accordance with the user manual.
• Breakdowns related to carburetion beyond 90 days and fouling of carburetors.
• Periodic and standard maintenance events.
• Actions of modifcation and dismantling that directly void the warranty.
• Products whose original authentication marking (brand, serial number) has been degraded, altered or
withdrawn.
• Replacement of consumables.
• The use of non-original parts.
• Breakage of parts following impacts or projections.
• Accessories breakdowns.
• Defects and their consequences linked to any external cause.
• Loss of components and loss due to insufcient screwing.
• Cutting components and any damage related to the loosening of parts.
• Overload or overheating.
• Poor power supply quality: faulty voltage, voltage error, etc.
• Damages resulting from the deprivation of enjoyment of the product during the time necessary for repairs
and more generally the costs related to the immobilization of the product.
• The costs of a second opinion established by a third party following an estimate by a SWAP-Europe repair
station
• The use of a product which would show a defect or a breakage which was not the subject of an immediate
report and/or repair with the services of SWAP-Europe.
• Deterioration linked to transport and storage*.
• Launchers beyond 90 days.
• Oil, petrol, grease.
• Damages related to the use of non-compliant fuels or lubricants.
* In accordance with transport legislation, damage related to transport must be declared to carriers within 48
hours maximum after observation by registered letter with acknowledgement of receipt.
This document is a supplement to your notice, a non-exhaustive list.
Attention: all orders must be checked in the presence of the delivery person. In case of refusal by the
delivery person, it you must simply refuse the delivery and notify your refusal.
Reminder: the reserves do not exclude the notifcation by registered letter with acknowledgement within 72
hours.
Information:
Thermal devices must be wintered each season (service available on the SWAP-Europe site). Batteries must
be charged before being stored.
WARRANTY EXCLUSIONS
16
Table of contents
Other Feider Machines Rotary Hammer manuals


Popular Rotary Hammer manuals by other brands


Panasonic
Panasonic EY6812 - HAMMER COR.DRILL&DR Service manual

Hitachi
Hitachi DH 24DV Handling instructions

Milwaukee
Milwaukee 5316-20 Operator's manual

Panasonic
Panasonic EY7880 - 28.8V ROTARY HAMMER operating instructions

Hilti
Hilti TE 4-A18 operating instructions

Berner
Berner BHD-2/24 SDS+ BC+2 Original instructions


