Felix Storch FX-364 User manual

INSTRUCTION MANUAL
Ο∆ΗΓΙΕΣ ΧΡΗΣΗΣ
FX - 364
It is important to read this user manual prior to using your new product for the first time.
Κ. Ι. ΤΑΟ ΣΙΑΝΗΣ Α.Ε.
ΜΙΧΑΛΑΚΟΠΟΥΛΟΥ 7 – 115 2 ΑΘΗΝΑ
ΤΗΛ. ΚΕΝΤΡΟ 210 77 02 332 FAX: 210 77 54 529
E-mail: info@taousianis.gr www.taousianis.gr

ΕΓΧΕΙΡΙ∆ΙΟ ΧΡΗΣΗΣ FX-364 ΡΑ∆ΙΟ-CD/MP3
Αγαπητέ αγοραστή, διάβασε προσεχτικά τις οδηγίες χρήσης προτού εγκαταστήσεις
την συσκευή , έτσι ώστε να αποφευχθεί βλάβη λόγω εσφαλµένης χρήσης.
1.POWER/MODE : Ενεργοποίηση/Απενεργοποίηση/
Aλλαγή λειτουργίας
2.VOL/SEL: Αυξοµείωση Έντασης/ Επιλογέας Λειτουργιών
3.MIC : Μικρόφωνο(δεν εµπεριέχεται)
4.MUT: Σίγαση
5.1/ : Προεπιλεγµένος Σταθµός 1/Αναπαραγωγή/Παύση
6.2/INT: Προεπιλεγµένος Σταθµός 2/Εισαγωγή κοµµατιού
7.3/RPT: Προεπιλεγµένος Σταθµός 3/ Επανάληψη κοµµατιού
.4/RDN: Προεπιλεγµένος Σταθµός 4/ Τυχαία αναπαραγωγή
9.5/+10: Προεπιλεγµένος Σταθµός 5/ ∆έκα κοµµάτια µπροστά
10.6/-10: Προεπιλεγµένος Σταθµός 6/ ∆έκα κοµµάτια πίσω
11.ΕQ Equalizer
12.RES Επαναφορά ρυθµίσεων
13.SD Κάρτα SD
14.AUX IN
15.BAND/AMS Εναλλαγή µπάντας/Αυτόµατη αποθήκευση
σταθµών
16.USB Είσοδος συσκευής USB
17. Αισθητήρας σήµατος τηλεχειριστηρίου
1 .Οθόνη LCD
19.Υποδοχή CD
20. Προηγούµενο κοµµάτι/Σκανάρισµα προς τα κάτω
21. Επόµενο κοµµάτι/Σκανάρισµα προς τα πάνω
22.EJ Έξοδος CD

Γενικές Λειτουργίες
Ενεργοποίηση της Μονάδας (Power On/Off)
Πιέστε οποιοδήποτε πλήκτρο για να ενεργοποιήσετε συσκευή. Για να
απενεργοποιήσετε πιέστε POWER.
Αυξοµείωση Έντασης / Επιλογή Λειτουργίας
Κυλήστε την αυξοµείωση έντασης SEL για να ρυθµίσετε την επιθυµητή ένταση
λειτουργίας.
Πιέζετε στιγµιαία προς τα µέσα τον επιλογέα λειτουργιών για να πλοηγηθείτε µέσα
από τις λειτουργίες Volume (VOL), Bass (BAS), Treble (TRE), Balance (BAL),
Fader (FAD), Loudness LOUD. Αν µετά από λίγα δευτερόλεπτα δεν έχετε επιλέξει
επιθυµητή λειτουργία, τότε η οθόνη θα επανέλθει στην αρχική της κατάσταση.
Πληροφορίες οθόνης
Εµφανίζονται οι πληροφορίες προγραµµάτων στην οθόνη.
Λειτουργία Ραδιοφώνου
Πιέστε MOD έως ότου εµφανιστεί η ένδειξη RADIO
Επιλογή Μπάντας Συχνοτήτων
Πατήστε επανειληµµένα BAND για να επιλέξετε την επιθυµητή µπάντα
συχνοτήτων ως εξής: FM1 → FM2 → FM3
Χειροκίνητη Εύρεση Σταθµών
Για να ενεργοποιήσετε την λειτουργία χειροκίνητης εύρεσης σταθµών, πιέστε /
για δυο δευτερόλεπτα και η ένδειξη “MANUAL” θα εµφανιστεί στην οθόνη LCD.
Εάν δεν πιέσετε κάποιο από τα κουµπιά για µερικά δευτερόλεπτα ενεργοποιείτε η
αυτόµατη αναζήτηση σταθµών και η ένδειξη “AUTO” θα εµφανιστεί στην οθόνη
LCD
Αυτόµατη Επιλογή-Αποθήκευση Σταθµών
Πιέστε AMS για δυο δευτερόλεπτα και αυτοµάτως η µονάδα θα αρχίσει την
λειτουργία αυτόµατης επιλογής-αποθήκευσης σταθµών αρχίζοντας από την
συχνότητα στην οποία βρίσκεται κάνοντας έναν πλήρη κύκλο στις συχνότητες.
Όταν τελειώσει, θα έχουν επιλεχθεί 6 σταθµοί µε το πιο δυνατό σήµα στις
αντίστοιχες θέσεις 1-6 .
Αυτόµατη Επισκόπηση Αποθηκευµένων Σταθµών
Πιέστε AMS και η µονάδα θα αναπαράγει για 5 δευτερόλεπτα κάθε έναν από τους
προαποθηκευµένους σταθµούς.
Αποθήκευση Σταθµών
Πιέζοντας τα αριθµητικά πλήκτρα 1 - 6 για δυο δευτερόλεπτα αποθηκεύετε τον
σταθµό της επιλογής σας στην αντίστοιχη θέση.
Λειτουργία CD
Εισαγωγή CD
Εισάγεται προσεκτικά το CD στην αντίστοιχη .Η αναπαραγωγή CD θα ξεκινήσει
αυτόµατα.
Αναζήτηση κοµµατιού
Πιέστε στιγµιαία το πλήκτρο ή για αναπαραγωγή του επόµενου ή
προηγούµενου κοµµατιού αντίστοιχα.
Πιέστε παρατεταµένα το πλήκτρο ή για µεταφορά προς τα µπροστά ή
προς τα πίσω στο συγκεκριµένο τραγούδι.

Εξαγωγή CD
Πιέστε το πλήκτρο EJ για εξαγωγή. Η λειτουργία θα αλλάξει αυτόµατα σε Ράδιο.
Επανάληψη
Πιέστε το πλήκτρο RPT για επανάληψη του επιλεγµένου κοµµατιού. Η
λειτουργία επανάληψης απενεργοποιείται όταν ξαναπατήσετε το πλήκτρο
Προεπισκόπηση
Πιέστε το πλήκτρο INT για προεπισκόπηση των κοµµατιών για µερικά
δευτερόλεπτα. Πιέστε ξανά για διακοπή προεπισκόπησης και αναπαραγωγή του
τρέχοντος κοµµατιού.
Τυχαία Αναπαραγωγή
Πιέστε το πλήκτρο RDM για τυχαία αναπαραγωγή κοµµατιών. Πιέστε ξανά
για ακύρωση αυτής της λειτουργίας
Αναζήτηση Επόµενου/Προηγούµενου Φακέλου: (Φάκελοι MP3/WMA)
Για µετάβαση σε επόµενο/προηγούµενο φάκελο πιέστε παρατεταµένα για 3
δευτερόλεπτα τα πλήκτρα ‘’5’’ ή ‘’6’’ αντίστοιχα
Λειτουργία USB/SD/CD
Πιέστε το πλήκτρο MOD έως ότου εµφανιστεί η ένδειξη USB.Συνδέστε τη συσκευή
USB στην υποδοχή USB. Αυτόµατα ενεργοποιείται η αναζήτηση και η
αναπαραγωγή αρχείων MP3 και WMA. Οι επιλογές λειτουργίας είναι ίδιες µε τις
επιλογές λειτουργίας CD.
Εναλλαγή Φακέλων
Για µετάβαση σε επόµενο/προηγούµενο φάκελο πιέστε παρατεταµένα για 3
δευτερόλεπτα τα πλήκτρα ‘’5’’ ή ‘’6’’ αντίστοιχα
Λειτουργία Aux In
Για την αναπαραγωγή ήχου µέσω της µονάδας από µια εξωτερική συσκευή,
εισάγετε χρησιµοποιώντας το αντίστοιχο καλώδιο στην είσοδο AUX ή στην είσοδο
USB αντίστοιχα

Επίλυση Προβληµάτων
.
Πριν αναζητήσετε λύση στον παρακάτω πίνακα, ελέγξτε τη σύνδεση καλωδίωσης. Για
περαιτέρω πληροφορίες συµβουλευθείτε το κατάστηµα αγοράς του προϊόντος.
ΠΡΟΒΛΗΜΑ
ΑΙΤΙΑ
Λ ΣΗ
Η συσκευή δεν
λειτουργεί Το αυτοκίνητο είναι σβηστό
Στρίψτε το κλειδί του
αυτοκινήτου στη θέση “ACC”
της µίζας
Η ασφάλεια έχει καεί
Αλλ
άξτε την ασφάλεια
∆εν ακούγεται ήχος
Ο ήχος
παραµορφώνεται
Η ένταση ήχου είναι στο
minimum
Ρυθµίστε τον ήχο στην
επιθυµητή έ
νταση
∆εν έχει γίνει σωστή
σύνδεση καλωδίωσης
Ελέγξτε τη σύνδεση
καλωδίωσης
Το ράδιο δεν
ενεργοποιείται.
Η αυτόµατη
αποθήκευση
σταθµών δεν
ενεργοποιείται.
Η κεραία δεν είναι
συνδεδεµένη Συνδέστε την κεραία
Το σήµα είναι αδύναµο Επιλέξτε έναν σταθµό
χειροκίνητα.
Εγγύηση και εξυπηρέτηση
.Η εγγύηση που σας παρέχουµε έχει χρονική διάρκεια 1 έτους από την στιγµή που
αγοράσατε τη συσκευή. Κατά τη διάρκεια αυτής της περιόδου, αναλαµβάνουµε την
επισκευή της συσκευής εάν το πρόβληµα δεν οφείλεται σε λανθασµένο τρόπο λειτουργίας
της συσκευής από τον αγοραστή. Επίσης η εγγύηση παύει να ισχύει εάν η συσκευή
επισκευασθεί από µη εξουσιοδοτηµένο πρόσωπο.
Το παρόν προϊόν δεν θεωρείται αστικό απόβλητο και η απόρριψη του πρέπει να γίνεται σε
κάδους ανακύκλωσης.
Σηµ.: Η τοποθέτηση – εγκατάσταση της συσκευής θα πρέπει να γίνει πάντοτε από
εξειδικευµένο ηλεκτρολόγο εγκαταστάτη αυτοκινήτου. Σε καµία περίπτωση δεν θα πρέπει
να γίνεται τοποθέτηση από αναρµόδια άτοµα καθώς ελλοχεύει κίνδυνος ηλεκτροπληξίας ή
άλλων ζηµιών λόγω λανθασµένης συνδεσµολογίας και τροφοδοσίας.

ATTENTIONS OF INSTALLATION
1. This player should be installed by professional technician.
2. Please read the instruction and operation of equipment carefully before
installing.
3. Make sure to connect other wires before power connection.
4. To avoid short circuit, please make sure all the exposed wire are insulating.
5. Please fix all the wires after installation.
6. Please make connection to the player accordingly to this instruction manual,
wrong connection may cause damage.
7. This player just only fit for 12V DC device and please make sure your car
belongs to this kind of cathode grounding electrical system.
. Please connect the wires rightly. Wrong connection will cause malfunction
damage the car electrical system.
NOTE:
Please keep the disk access clean. Please make cleaning with soft cloth if any
dust on
the disk. If the dirty disk be loaded, it would damage the mechanism, and this
circumstance will be not included in the guarantee.
INSTALLING PROCESS
1.Overall
2.Theft proof frame
3.Dashboard
4.Erection bolt
5.Spring
6.M5X15 hexagonal nut
7.Car diaphragm
.The fixed iron rod
9.Tapping screw

WIRING DIAGRAM
1.This equipment can only be used by the 12V DC cathode grounding
electrical system.
2.To avoid short circuit, don't connect the terminals of the car battery until the
player is absolutely with well erection joint.
3.Please make sure to connect the yellow wire to the positive of the battery(+)
or the terminal of the BAT.
4.When change the fuse, please make sure the specifications are same.
5.Using good quality speaker with 4- ohm can result in the best effect of the
equipment.

PANEL FUNCTION DIAGRAM:
1. POWER button : Press Power key to power on unit
MODE button: exchange mode after power on unit
2. VOL/SEL Button: Volume adjusting/multifunctional adjusting
3. Built-in Microphone(optional for Bluetooth function)
4. MUT button: Mute on/off
5. 1/>ll button : Preset station/ pause/play
6. 2/INT button : Preset station/songs display
7. 3/RPT button : Preset station under Tuner mode ; or repeat one / all /songs
. 4/RDN button: Preset station under Tuner Mode; or Random playback
9. 5/-10 button: Preset station / previous ten playing
10. 6/+10 button: Preset station/next ten playing
11. EQ button: Equalizer mode.
12. RES button: Press for reset
13. SD card slot
14. AUX IN Jack
15. BAND/AMS : Short press for FM band selecting; Press and Hold for auto scanning
station to save preset station:
16. USB port
17. Remote receiver(optional for remote control function)
1 . LCD Display.
19. Disk Entrance
20. l<< button: previous/automatic up scanning
21. >>I button : Skip to next track during playback ; or automatic scanning down to next
FM station.
22. EJ Button: disk pop up

PART I OPERATING INSTRUCTION
POWER ON/OFF
Radio will be considered as default setting for first time using; next time will automatic go
to the memorized position (CD, USB, SD, Radio position) unless AC off.
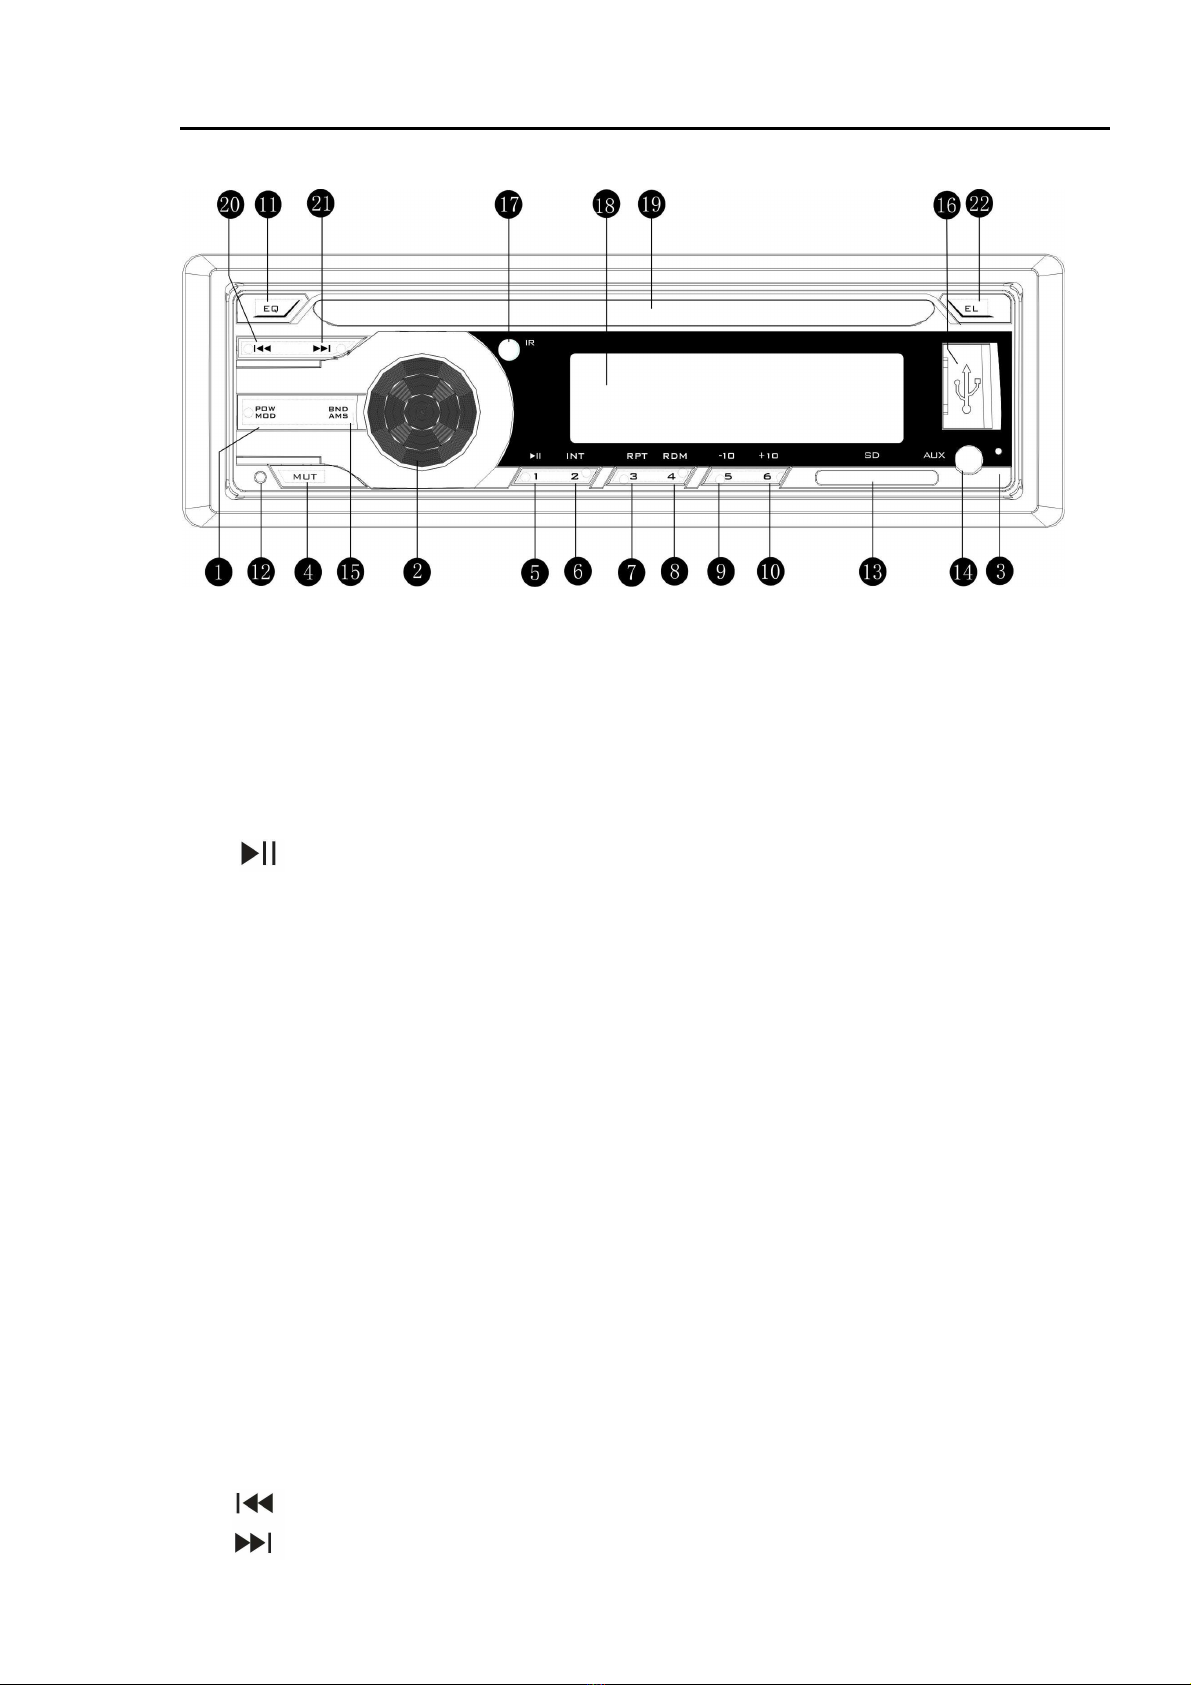
(1) Power on: Press the power button to turn the unit on when the ignition switch is on.
(2) Power off: Press and hold the power button to turn the unit off during playing position
MODE CONVERSION
Press MOD button to select a different mode of operation as indicated on the display
panel. Available modes include Radio, Disc, USB, SD and Auxiliary Input. Press MOD
button to change the playing mode in following order: RADIO-CD-USB-SD-AUX IN
Note : it can’t show USB/ SD mode if no these connection.
VOLUME KNOB CONTROL
When power on, the unit will be in memorized volume level. Rotate the VOLUME knob and
volume level mark (from level 0 to 40) will display on the screen. Press any button to
escape from volume operation.
(1) Increase volume: Rotate the volume button clockwise and the volume increases
gradually till reach level 40
(2) Decrease volume : Rotate the volume button Anticlockwise and the volume decreases
gradually till reach level zero
Press the VOLUME knob to step through the menu of audio function: BAS(bass),
TRE(treble), BAL(balance), FAD(fader), LOUD, EQ. When adjusting audio functions, the
unit will automatically exit select mode and return to the normal display after five seconds
or when another function is activated.
Bass
Press VOLUME knob till "BAS" display on the screen, then within 5 seconds rotate volume
knob to adjust bass from "-7" to "7", the bass level will be shown on the display for five
seconds or until another function is activated.
Treble
press VOLUME knob two times till "TRE" display on the screen, then within 5 seconds
rotate volume knob to adjust treble from "-7" to "7", the treble level will be shown on the
display for five seconds or until another function is activated.
Balance
press VOLUME knob three times till "BAL" display on the screen, then within 5 seconds
rotate volume knob to adjust balance between the right and left speakers from "BAL
10R(full right)" to "BAL 10L"(full left). "BAL L=R" represents an equal balance level
between the right and left speakers. The balance position is shown on the display for five
seconds or until another function is activated.
Fader
press VOLUME knob four times till "FAD" display on the screen, then within 5 seconds
rotate volume knob to adjust fader between the front and rear speakers from "FAD 10F(full
front)" to "FAD 10R"(full rear). "FAD F=R" represents an equal balance level between the
front and rear speakers. The fader position is shown on the display for five seconds or until
another function is activated.
LOUDNESS
Press VOLUME knob five times till LOUD display on the screen then within five seconds
rotate the volume knob to change the mode from "LOUD ON" and "LOUD OFF". When
listening to music at low volume levels, this feature will boost the bass and treble ranges to
compensate for the characteristics of human hearing.

EQ(EQUALIZER SELECTOR)
The equalizer function applies preset sound effects to the unit's audio output signal. Press
VOLUME knob six times till EQ display on the screen then within five seconds rotate the
volume knob to change the mode from following modes: CLASSIC-POP-ROCK-EQ OFF ,
When the equalizer function is activated, the most recently selected BASS/TREBLE levels
are ignored. When the equalizer function is not active, the unit will return to the most
recently selected BASS and TREBLE levels.
TIME SETTING
Press and hold volume knob for 3 seconds and till HOUR setting twinkle, rotate volume
knob to adjust hour setting .When finish hour setting, immediately press volume knob, the
MINUTE setting twinkle in the display, rotate volume knob to adjust minute setting. After all
setting finished, press volume knob to confirm.
LCD DISPLAY
The liquid crystal display(LCD) panel display the frequency, time and activated functions of
the unit.
NOTE: After being subjected to cold temperature, LCD panels may take longer to
respond and visibility of numbers on the LCD may decrease slightly. The LCD
display will return to normal when the temperature increases to a normal range.
PART II TUNER/CD/USB/SD/AUX IN OPERATION
FM BAND SELECTOR
1 FM stations for maximum setting (6stations for FM1
FM2
FM3 each)
Band operation
On radio position, press BND button to change bands in following order: FM1-FM2-FM3
and those markings("FM1","FM2","FM3") will display on the screen in tums
Automatic tunning
On radio position, press and hold AMS button three seconds, unit will scan the radio
stations from lowest frequency and the stations will be presented and memorized till full
memory or reach highest frequency, the unit will play the first presented station.
Manual tunning
On radio position, press and hold button ">>
"or"
<<" for more than 2 seconds to select
manual tuning mode. "MANUAL" will appear on the display. Press up and down tuning
buttons to mover radio frequency up or down. Press and hold the up or down tuning
buttons to quickly advance to a certain frequency. Release when desired frequency is
reached. to adjust the frequency to select the desired station. Press any button to
escape(except"MUT"button)and the unit will stay in the current frequency and play.
Preset stations
Up to six stations on each band can be stored as presets and can then be instantly
recalled by pressing the associated preset button on the front panel ore remote control. To
store a station, turn the radio on and select the desired band and station. Press and hold
the desired preset station for more than two seconds. When stored, the preset number will
appear in the display. The station is now stored and can be recalled at any time by
pressing the corresponding preset button. Repeat for the remaining five presets on the
current band and for all presets on the other bands.
CD/MP4/MP3 OPERATIONS(CD disc, USB/SD slot)
Play/Pause
Press "▶II" button to pause current playing. Press this button again to resume play.

Track Select
Press">>
"or"
<<" to skip to next Previous track ; or Press "5" or "6" button for previous
10 track or next 10 track if total tracks No.s is over 10 tracks.
Press and Hold ">>
"or"
<<" to fast search Music file.
Press and hold button BND/AMS till TRK display on LCD screen, then rotate the volume
knob to select the playing list from 1 2, 3, 4......., then press volume knob to confirm.
Intro Scan(INT)
During CD/USB/SD play, press button INT to play the first 10 seconds of each track on the
device. When the desired track is reached, press INT button again to end the scan and
play the selected track.
Repeat(RPT)
Press RPT button to REPET ONE to play current track, it will show “RPT “icon on display ;
Press RPT button again to repeat all tracks in the CD/USB/SD devices.
Random(RDM)
Press RDM button to randomly play all files on the CD/USB/SD devices. Press this button
again to resume normal playback.
MP3/WMA/ file or folder search
Press and hold button "5" for 3 seconds to search previous folder, press and hold button
"6" for 3 seconds to search next folder.
USB/SD CARD/CD LOADING
After insert an USB or SD,CD device containing MP3 files, "USB" ,"SD" or "CD" icon will
appear on the display and the unit will automatically scan the device for music files and
begin playback.
To eject the USB or SD or CD device, press MOD button to select a different source. Pull
the USB or SD or CD device out and return the cover of Radio.
(IMPORTANT NOTE:This product supports most common MP3 interface but we cannot
guarantee 100%, because there are too many formats that continue changing in the
market.)
AUX OPERATION
Press "MODE" button and enter into AUX playing mode; and "AUX" display on the screen,
Use one AUX IN cable ( not included ) to connect with external device , On AUX IN mode ,
you can press "MOD" button to change playing mode.
Note: Suggest to adjust connective device volume to one certain level..
NOTE:
1.If make wrong connecting to the antenna lighting(blue/white wire) or touch ground will
result in the phenomenon of burn in or no power on.
2.If make wrong connecting to power wire(yellow wire) or touch ground will result in the
phenomenon of burn in or no power on.
3. If make wrong connecting to memory wire(red line) or touch ground will result in the
phenomenon of burn in or no power on or can not turn off the equipment after take off the
key of the car.
4.Make sure to connect the wires with speakers correctly, otherwise it will cause burning to
the speakers and amplifier IC, or no voice.
5.Always keep the disc entrance clean, clean the dust disc with soft cloth before put in the
disc. Otherwise the dust will cause damage to the laser head.

PART III FAULTS & SOLUTION
If any faults happen, please read the manual carefully and refer below table for Inspection,
or please contact the close dealer directly if faults or problems are not mentioned. This will
help you to solve the problems
FAULTS
CAUSES & SOLUTION
POWER OFF 1.Check if the voltage is working normally.
Equipment can not work with unstable voltage.
NO VOICE 1.Check if the volume is on normal position, refer to
manual.
NOISE 1.Check if the antenna connects to the unit tightly;
2.Car is far away from radio station ,no signal
received;
3.Wrong frequency ,adjust frequency manually or
automatically;
LOW VOLUME 1.Check speakers and if they are short circuit;
2.Environment temperature too high, let it down and
retry
USB/MMC/SD POSITION
UNAVAILABLE
1. Reinsert USB/MMC/SD cards;
2. Check USB/MMC/SD cards and if they are
mangled;
Table of contents
Languages: