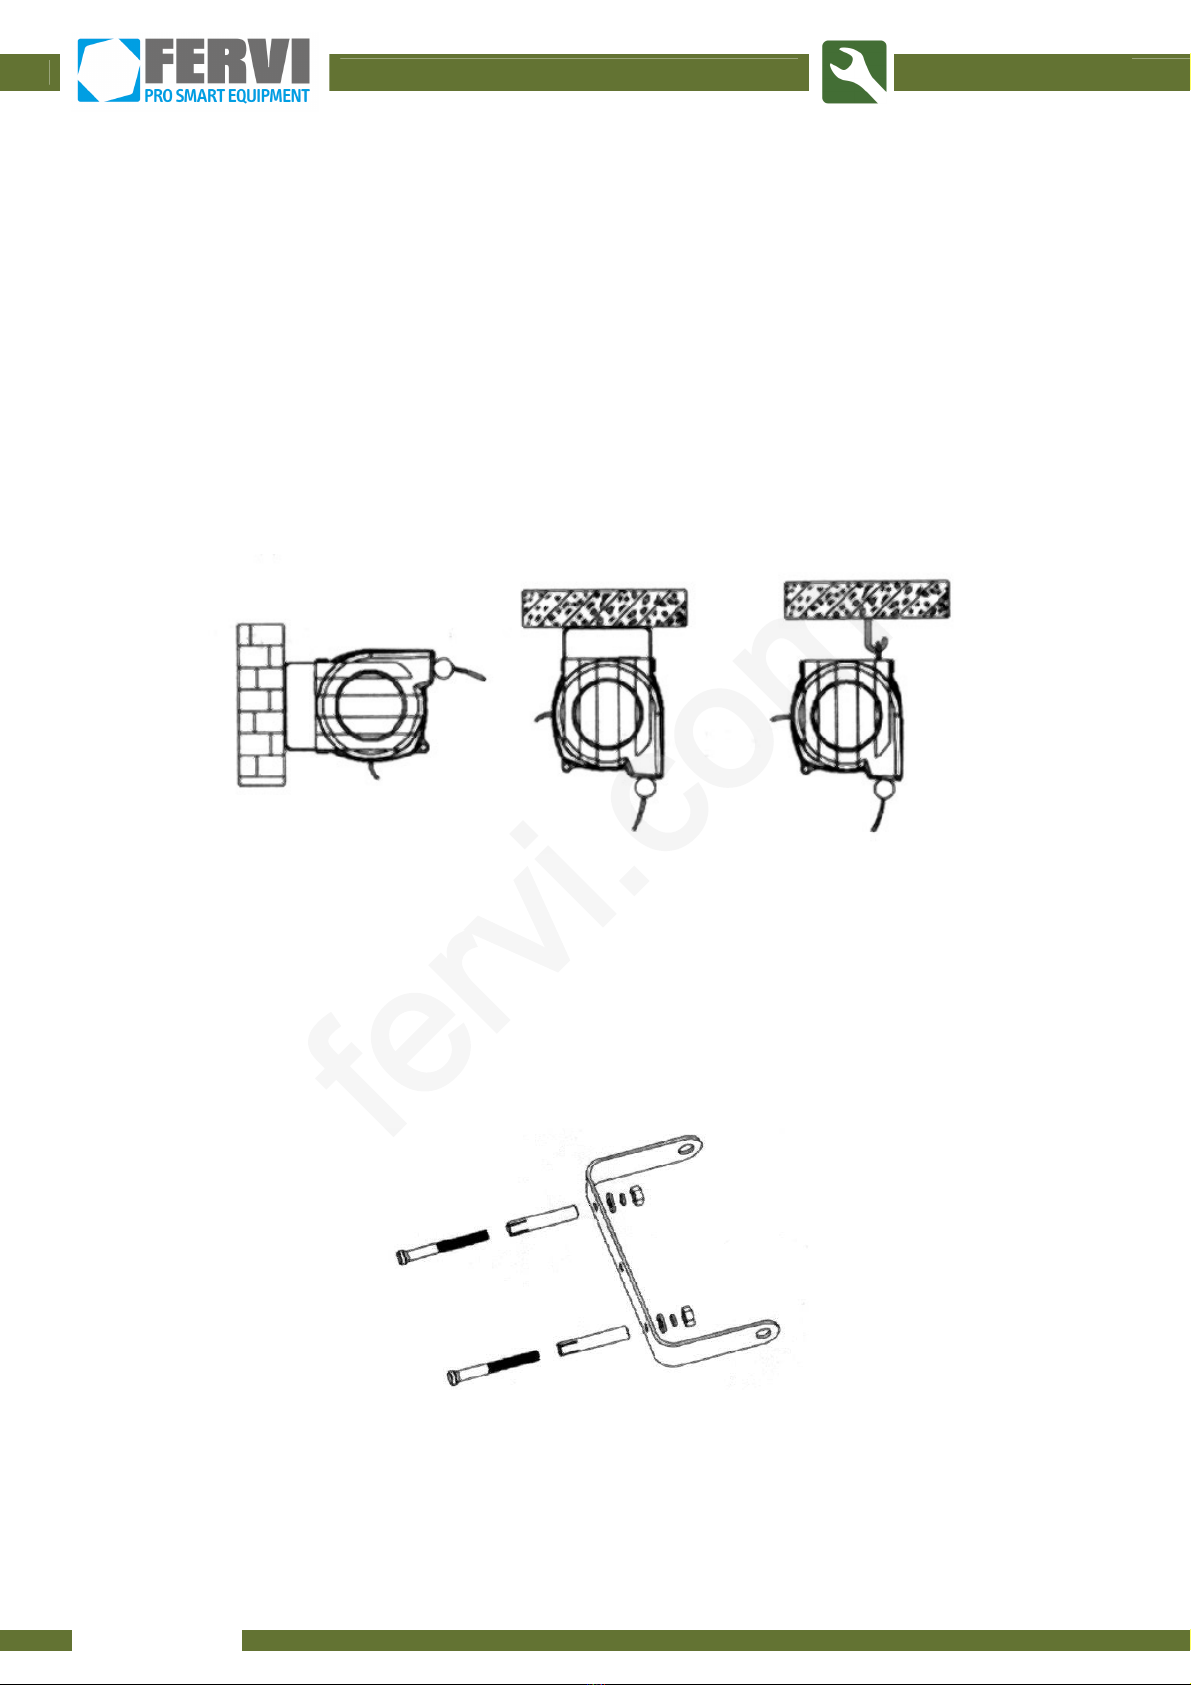
Fervi 0621 User manual

USE AND
MAINTENANCE MANUAL
Auto re-entering cable reel
Art. 0621/A3
TRANSLATION OF THE ORIGINAL INSTRUCTIONS
fervi.com

HARDWARE
Page 2 of 14
All rights are reserved of reproduction and dissemination of this Technical Manual and documentation cited and/or attached. It is expressly forbidden to reproduce, publish or distribute any information from this Manual. Copyright by FERVI
FOREWORD
Read this manual before any operation
ORIGINAL INSTRUCTIONS
Before starting any operation it is compulsory to read this instruction manual. The guarantee
that the trolley will function and perform properly is strictly dependent upon the application of
all the instructions contained in this manual.
Operator Qualification
The operators assigned to using this trolley must
be supplied with all of the necessary
information and instruction and should be provided with adequate training regarding
safety in pertaining to:
a) The conditions of use of the equipment;
b) Foreseeable abnormal situations, pursuant to Article 73 of Legislative Decree
81/08.
We guarantee the Machine's conformity to the specifications and technical instructions
described in the Manual on the date of issuance and listed herein; On the other hand,
the machine may also be subject to important technical changes in the future, without
the manual being updated.
Therefore, see FERVI for information about modifications that could be implemented.
REV. 2 February 2014
fervi.com

HARDWARE
Page 3 of 14
All rights are reserved of reproduction and dissemination of this Technical Manual and documentation cited and/or attached. It is expressly forbidden to reproduce, publish or distribute any information from this Manual. Copyright by FERVI
CONTENTS
1 GENERAL SAFETY INSTRUCTIONS............................................................. 4
1.1 Personal protective equipment .....................................................................................4
1.2 Technical support..........................................................................................................4
2 DESCRIPTION OF THE CABLE REEL AND INTENDED USE ........................... 5
3 TECHNICAL SPECIFICATIONS ................................................................... 6
4 IMPROPER USE AND CONTRAINDICATIONS.............................................. 7
5 COMMISSIONING...................................................................................... 8
5.1 Installation ...................................................................................................................8
5.1.1 Fastening using the bracket ........................................................................................ 8
5.1.2 Mounting using a hook................................................................................................ 9
5.2 Power supply / electrical connection ............................................................................9
6 HOW TO USE ........................................................................................... 10
6.1 How to unwind the cable.............................................................................................10
6.2 How to rewind the cable .............................................................................................10
7 MAINTENANCE AND CLEANING............................................................... 11
8 DECOMMISSIONING ............................................................................... 13
9 BILL OF MATERIALS AND SPARE PARTS.................................................. 14
fervi.com

HARDWARE
Page 4 of 14
All rights are reserved of reproduction and dissemination of this Technical Manual and documentation cited and/or attached. It is expressly forbidden to reproduce, publish or distribute any information from this Manual. Copyright by FERVI
1 GENERAL SAFETY INSTRUCTIONS
1. Prolonged use, as well as electrical overloading, lead to overheating with the resulting risk
of fire.
2. Periodically check the condition of the cable.
3. Always check the efficiency and integrity of the cable reel.
4. Never disassemble or modify any part of the cable reel.
5. Always perform maintenance operations after disconnecting the power supply.
6. Do not use the cable reel in places at risk of fire or explosion.
7. Do not use the cable reel in damp or wet environments.
If water comes into contact with the cable reel, unplug the power plug
immediately and contact Technical Support as soon as possible.
8. Do not use the cable reel outdoors, exposed to the weather and sunlight.
9. Keep unqualified people, children, etc. away from the work environment where the cable
reel is installed.
1.1 Personal protective equipment
When using the cable reel, always wear the following:
Safety shoes (with rubber
soles) Work gloves
1.2 Technical support
For any problem or request for clarification, please do not hesitate to contact the support
service of the retailer from whom you purchased the product.
ATTENTION
Use the cable reel ART. 0621/A3 only for the connection of lamps or
electric devices with double insulation, which do not require
protective cable (ground).
fervi.com

HARDWARE
Page 5 of 14
All rights are reserved of reproduction and dissemination of this Technical Manual and documentation cited and/or attached. It is expressly forbidden to reproduce, publish or distribute any information from this Manual. Copyright by FERVI
2 DESCRIPTION OF THE CABLE REEL AND
INTENDED USE
The auto re-entering cable reel (Art. 0621/A and Art. 0621/A24V) are devices equipped,
with a "spring-loaded" rotating drum that allows the electrical cord to be re-wound
automatically.
The cable reel is made up of the following parts (see Figure 1):
1. casing made of insulating material, with the rotating drum inside;
2. bracket for fixing to the wall or other supporting structure;
3. flexible and extendible electric cord, which is wound on the drum;
4. cord ball stop made of insulating material;
Figure 1 - General view and main parts of the cable reel.
1Body 3Flexible cord
2Bracket for mounting 4Cord ball stop
1
2
3
4
fervi.com

HARDWARE
Page 6 of 14
All rights are reserved of reproduction and dissemination of this Technical Manual and documentation cited and/or attached. It is expressly forbidden to reproduce, publish or distribute any information from this Manual. Copyright by FERVI
3 TECHNICAL SPECIFICATIONS
Description Art. 0621/A3
Connected device ---
Type of cable H05VV-F (2 x 1.00 mm2)
Cable length 10 m
Voltage from 12 V to 240 V
fervi.com

HARDWARE
Page 7 of 14
All rights are reserved of reproduction and dissemination of this Technical Manual and documentation cited and/or attached. It is expressly forbidden to reproduce, publish or distribute any information from this Manual. Copyright by FERVI
4 IMPROPER USE AND CONTRAINDICATIONS
IT IS STRICTLY FORBIDDEN TO!
Allow the cable reel to be used by untrained personnel and those who have not read the
instruction manual;
Use the cable reel for different purposes and uses other than those for which it was
designed.
Supply the cable reel with electrical power that is different from that envisaged, leading to
the electrical overloading of the appliance.
Use the cable reel in a continuous and prolonged way, resulting in the overheating of the
device.
Install and use the cable reel in humid or damp conditions, explosive atmospheres or near
flammable surfaces or gases.
Install and use the cable reel outdoors, exposed to the weather and sunlight.
Install and use the cable reel on walls or pillars that are not strong enough to support its
weight;
Install and use the cable reel on easily flammable surfaces;
Use the cable reel without wearing appropriate PPE such as rubber-soled shoes and work
gloves.
Perform maintenance on the cable reel without disconnecting the power supply.
Modify and/or tamper with the cable reel;
Use the cable reel with the side covers or other parts removed.
Throw water on the cable reel and/or touch it with wet hands.
Use the cable reel for the connection of electrical devices not equipped with double
insulation.
fervi.com

HARDWARE
Page 8 of 14
All rights are reserved of reproduction and dissemination of this Technical Manual and documentation cited and/or attached. It is expressly forbidden to reproduce, publish or distribute any information from this Manual. Copyright by FERVI
5 COMMISSIONING
5.1 Installation
Are several possible ways of mounting the cable reel, depending on the operation which the
user has in mind and the position in which it must be installed.
Generally, the most appropriate position is mounted on the wall in a horizontal position at a
height of about 1 metre above the ground. Fastening is obtained using the rear bracket and
the wall plugs provided (Figure 2/A).
Alternatively, the cable reel can be fixed in a vertical position, when it is mounted in a higher
position (above the user's head). Fastening is obtained by using either the rear bracket and
the wall plugs provided (Figure 2/B), or the rear ring and a hook (Figure 2/C).
Figure 2 - Methods for mounting the cable reel.
5.1.1 Fastening using the bracket
1. Using a drill with a 12 mm bit, drill 2 holes into the wall spaced about 130 mm apart at
the point where the cable reel is to be installed.
2. Insert the screws and the bushings of the wall plugs, into the two holes at the ends of
the bracket as shown in figure 3. With each screw, use a flat washer, a spring lock
washer and screw on a locking nut.
Figure 3 - Assembly of the plugs on the bracket.
3. Insert the plugs into the holes drilled in the wall, then tighten the locking nuts using a
13 mm wrench.
A B C
fervi.com

HARDWARE
Page 9 of 14
All rights are reserved of reproduction and dissemination of this Technical Manual and documentation cited and/or attached. It is expressly forbidden to reproduce, publish or distribute any information from this Manual. Copyright by FERVI
5.1.2 Mounting using a hook
1. Attach the hook for mounting to the wall, at the point where the cable reel is to be
installed.
2. Attach the rear ring of the cable reel to the hook, as shown in Figure 2/C.
5.2 Power supply / electrical connection
The cable reel is not connected to any user device, so both ends of the power cable are
disconnected.
1. Connect the end of the power cable exiting from the cable reel, to the electric appliance
you want to use, connecting the two wires to the terminals of the device.
Electrocution / Electric Shock
Do not connect electrical appliances fitted with protective conductors (earth wire), not
equipped with double insulation, via the cable reel.
The ground wire of the device would be disconnected, with the consequent risk of
electrocution and electric shock.
Which may result in serious injury or death!
2. Attach the end of the electrical cable of the cable reel to an approved plug type.
3. Plug the power cord into a suitable socket, after checking that the power supply is the
same as that reported on the information plate.
fervi.com

HARDWARE
Page 10 of 14
All rights are reserved of reproduction and dissemination of this Technical Manual and documentation cited and/or attached. It is expressly forbidden to reproduce, publish or distribute any information from this Manual. Copyright by FERVI
6 HOW TO USE
6.1 How to unwind the cable
As mentioned, the cable reel is equipped with a "spring-loaded" rotating drum onto which the
electrical cord is wound.
The drum also has a pawl and a ratchet system for locking the cable reel in certain positions.
To unwind the cable, hold it with one hand and pull it out, away from the casing of the cable
reel. While pulling out the cable, the drum is spinning and it is possible hear the typical
"CLACK-CLACK" sound made by the pawl moving over the ratchet teeth.
After having unwound enough cable, lock the cable by releasing it while it is possible hear the
typical "CLACK-CLACK" sound made by the pawl.
Precautions for use
When using the cable reel unroll the cable completely or it may overheat and catch fire.
Keep the cable away from surfaces that are damp, wet, oiled or have sharp edges as well
as heat sources and fuels.
Never walk underneath the cable, you could cut it, be aware of its position at all times.
6.2 How to rewind the cable
After use, to retract the cable and re-wind it onto the cable reel drum, pull it out to about 265
mm and then, when you can not hear the typical "CLACK-CLACK" sound of the pawl any
more, release it. The cable retracts automatically.
Precautions for use
During the re-entry of the cable, always hold it with your hand and follow the operation
until it is has finished.
This is to prevent collisions with persons or damage to the cable insulation caused by
excessive retraction speeds.
When disconnecting the power cord from the wall outlet, always hold the plug. Do not try
to pull the plug by pulling on the power cord!
fervi.com

HARDWARE
Page 11 of 14
All rights are reserved of reproduction and dissemination of this Technical Manual and documentation cited and/or attached. It is expressly forbidden to reproduce, publish or distribute any information from this Manual. Copyright by FERVI
7 MAINTENANCE AND CLEANING
Disconnect the electrical power
Always unplug the cable reel from the power supply before performing maintenance on
the device.
Do not disassemble the cable reel casing or other parts while it is powered!
The purpose of this section is to provide all the information on the maintenance procedures
and frequency that the Auto re-entering cable reel requires.
INTERVENTION Frequency
Daily Weekly Monthly
1. General visual inspection X
2.
Check that plates are clearly visible
and
legible X
3. Check the flexible electrical cable X
4. General cleaning X
5. Restoring the pull of the spring If necessary
1. General visual inspection: check the overall condition of the device, particularly the plastic
casing, the cage drum, etc., for any damaged or missing parts.
2. Checking the legibility of the plates and labels: the plates and labels on the device must
be perfectly legible; therefore, it necessary to keep them clean and ask for a replacement
if they are illegible.
3. Check the flexible electrical cable: regularly check the efficiency and the state of
conservation of the power cord. Check that there are no points which are not isolated and
that everything works properly. Check if there are signs of damage or ageing.
If it is not in good condition do not use the cable reel but have it repaired by Technical
Support personnel.
4. General cleaning: cleaning is necessary to free the casing and individual parts from the
accumulation of dust or dirt.
Cleaning
The cable reel is made of plastic materials. Applying organic solvents (such as benzene),
or other chemicals for cleaning may cause deformation or discolouration.
Clean the device gently, using a soft dry cloth.
fervi.com

HARDWARE
Page 12 of 14
All rights are reserved of reproduction and dissemination of this Technical Manual and documentation cited and/or attached. It is expressly forbidden to reproduce, publish or distribute any information from this Manual. Copyright by FERVI
5. Restoring the pull of the spring: If the cable does not return properly, maybe the spring is
worn from use. In this case, it is possible to try to restore the pull of the spring, as
follows:
remove the left cover, using a Phillips head screwdriver (Figure 5/A).
remove the spring head from the drum.
rotate the drum in an anti-clockwise direction for 1-2 turns, then reposition the spring
head on the drum and replace the cover.
Figure 5 – Removing the cover and position of the spring.
A
B
fervi.com

HARDWARE
Page 13 of 14
All rights are reserved of reproduction and dissemination of this Technical Manual and documentation cited and/or attached. It is expressly forbidden to reproduce, publish or distribute any information from this Manual. Copyright by FERVI
8 DECOMMISSIONING
If the device is to be scrapped, its parts must be disposed of separately.
Respect the environment!
Contact a specialist centre for the collection of the materials.
In this regard, divide the materials according to their nature, with the assistance of
specialist companies authorized for waste disposal, in compliance with the requirements of
the law.
fervi.com

HARDWARE
Page 14 of 14
All rights are reserved of reproduction and dissemination of this Technical Manual and documentation cited and/or attached. It is expressly forbidden to reproduce, publish or distribute any information from this Manual. Copyright by FERVI
9 BILL OF MATERIALS AND SPARE PARTS
Ref. Description Ref. Description
0621/A3/01 Left casing 0621/A3/14 Insulator B
0621/A3/02 Right casing 0621/A3/15 Fin
0621/A3/03 Control ring 0621/A3/16 Insulator A
0621/A3/04 Central shaft 0621/A3/17 Sphere
0621/A3/05 Fixed insulating plate 0621/A3/18 Cable
0621/A3/06 Ratchet 0621/A3/19 Guide
0621/A3/07 Window gasket support 0621/A3/20 Fastening bracket
0621/A3/08 Hook 0621/A3/21 Bracket support pins
0621/A3/09 Steel bolt 0621/A3/22 Spring
0621/A3/10 Spring-pressing plate 0621/A3/23 Inserter
0621/A3/11 Gasket 0621/A3/24 Spring
0621/A3/12 Right cover 0621/A3/25 Power supply cable
0621/A3/13 0621/A3/26 Cable coupling
fervi.com
This manual suits for next models
1
Table of contents
Popular Cables And Connectors manuals by other brands

PCB Piezotronics
PCB Piezotronics IMI SENSORS 042M35 Installation and operating manual

Solwise
Solwise HDF-200 quick start guide

A.Y. McDonald
A.Y. McDonald 6619-028 Replacement instructions

Philips
Philips SWV2016 Specifications

Philips
Philips SWV2534W Specifications

Hyperkin
Hyperkin M07411 quick start guide