FIBERGLASS SPECIALTIES EQAS-CH Operation manual

Installation, Operation & Service Procedures
Baptistry Heater System Model EQAS-CH
REV.02 85-0139-C 08/12
HEATER ONLY PT#: 04-10029

TABLE OF CONTENTS
TABLE OF CONTENTS/WARRANTY 1
IMPORTANT SAFETY INSTRUCTIONS 2-3
PRODUCT DESCRIPTION 4
TYPICAL PLUMBING LAYOUT 5
PLUMBING DRILL GUIDE 6
ASSEMBLY 7
WIRING 8
START-UP/OPERATION 9
TROUBLESHOOTING 10
1
Fiberglass Specialties, Inc warrants this heater to be free from defects in workmanship and materials,
and we will, within one year from date of installation, but no later than six months from
time of shipment from the FSI factory, for the original purchaser, repair, or, at our option, replace
any defective part. If your system is damaged or destroyed by improper maintenance,
excessive water harshness, incorrect water chemistry, or freezing, this warranty is void. Costs
associated with removal or reinstallation of the parts, returning parts to the factory, or other
incidental costs will not be covered under this warranty. Liability shall be limited to the original
purchase price of the heater system. Fiberglass Specialties, Inc shall not be liable for any consequential
Damages resulting from use of this product.
Limited Warranty

IMPORTANT SAFETY INSTRUCTIONS
WHEN INSTALLING AND USING THIS EQUIPMENT, BASIC SAFETY PRECAUTIONS SHOULD ALWAYS
BE FOLLOWED, INCLUDING THE FOLLOWING:
READ AND FOLLOW ALL INSTRUCTIONS
INSTALLATION CONSIDERATIONS
1. A bonding lug has been provided on the outside of the equipment system electrical controls box. This lug
permits the connection of a No. 8 AWG solid copper bonding conductor between the equipment system and all
other electrical equipment and exposed metal in the vicinity, as may be needed to comply with local
regulations.
2. The equipment system must be installed to provide adequate drainage, and to prevent water from entering the
electrical equipment area. When installing the equipment system indoors, the floors and structures beneath the
installation area must be protected against water run off.
3. The electrical supply for permanently connected equipment systems that do not have an internal disconnect
must include a suitably rated switch or circuit breaker to open all ungrounded supply conductors to comply
with section 422-20 of the (NEC) National electric code, ANSI/NFPA 70-1987. The disconnect means must be
readily accessible to the tub occupant but at least 5 feet (1.5m) from the tub water. The electrical supply for
permanently connected equipment systems must also include a suitably rated ground fault circuit interrupter
(GFCI) to comply with article 680-42 of the national electric code, ANSI/NFPA 70.
4. DANGER - Risk of injury (For cord and plug connected units only).Do not use an extension cord. The
equipment system must be located close enough to the electrical outlet that an extension cord shall not be
required. Use of an extension cord will seriously degrade the equipment system performance, and can create a
serious electrical hazard. Never bury the power cord. To reduce the risk of electric shock, replace a frayed or
damaged power cord immediately. Connect only to a grounded, grounding type receptacle rated at 120 volts,
20 amperes. Never modify the attachment plug to fit other than a grounded, 120 volt, 20 ampere receptacle.
5. DANGER - RISK OF ELECTRIC SHOCK. Do not permit any electrical such as a light, telephone, radio, or
television, within 5 feet of the tub.
6. DANGER - to reduce the risk of injury, do not permit children to use this product unless closely supervised at
all times.
7. WARNING - RISK OF CHILD DROWNING. Exercise extreme caution to prevent unauthorized access by
children. To avoid accidents, ensure that children cannot use the tub unless they are closely supervised at all
times.
8. WARNING - TO REDUCE THE RISK OF INJURY
A. The water in a tub should never exceed 100F (38C). Before entering the tub the user should measure the
water temperature with an accurate thermometer, since the tolerance of water temperature-regulating
devices may vary as much as +/- 5F (3C). A water temperatures of 100F (38C) is considered safe for a
healthy adult. Lower water temperatures are recommended for extended use (exceeding 10-15 minutes)
and for young children.
B. Since excessive water temperatures have a high potential for causing fetal damage during the early months
of pregnancy, pregnant or possibly pregnant women should limit tub water temperatures to 100F ( 38C ).
C. The use of alcohol, drugs, or medication before or during tub use may lead to unconsciousness with the
possibility of drowning.
D. Persons suffering from obesity or with a medical history of heart disease, low or high blood pressure
should consult a physician before using a hot tub.
E. Persons using medication should consult a physician before using a hot tub since some medication may
induce drowsiness while other medication may affect heart rate, blood pressure, and circulation.
F. Because occasional users of the tub may not be aware of all of the potential risks associated with tub usage,
they should be made aware of these important safety features.
G. The very young, or aged, those with illness, heart conditions or under doctor's care should not use the tub
unattended. Infants should not be permitted in water temperatures more than 100F.
2

H. Prolonged immersion in water that is warmer than normal body temperature can result in a dangerous
condition known as HYPERTHERMIA. The causes, symptoms, and effects of hyperthermia may be
described as follows: hyperthermia occurs when the internal temperature of the body reaches a level
several degrees above the normal body temperature of 98.6f. The symptoms of hyperthermia include
dizziness, fainting, drowsiness, lethargy, and an increase in the internal body temperature. The effects of
hyperthermia include: (1) unawareness of impending hazard, (2) failure to perceive heat, (3) failure to
recognize the need to exit the hot tub, (4) physical inability to exit the hot tub, (5) fetal damage in pregnant
women, and (6) unconsciousness resulting in a danger of drowning. WARNING: the use of alcohol, drugs,
or medication can greatly increase the risk of fatal hyperthermia.
9. DANGER - to reduce the risk of injury to persons in the tub, never remove, or alter in any way, the grates or
covers on the suction fittings in the tub. Never operate the equipment system if the grates or covers on the
suction fittings are broken or missing. The water should always flow freely from the hydrotherapy jets within
the tub. Any blockage or restriction of water flow by persons or objects may damage the system components,
create an electrical shock hazard, and/or cause water damage to the surrounding area. To avoid damage to the
pump and heater, the equipment system must never be operated unless the tub is filled with water to the
operating level.
10. WARNING - the equipment system may be equipped with a ground fault circuit interrupter (GFCI), mounted
on the electrical control box. This GFCI protects against electrical shock hazard by sensing electrical fault
conditions and interrupting the electric power applied to the equipment system.Before each use of the tub the
GFCI, if provided, should be tested in the following manner: Turn electric power on, Push the test button. The
reset button should pop outward, indicating that the GFCI is functioning properly. Push the reset button all the
way in, restoring electrical power to the equipment system. If the reset button does not pop outward when the
test button is pushed, a loss of GFCI protection is indicated. Should this occur, immediately disconnect
electrical power from the equipment system, and discontinue use of the tub until a qualified technician has
identified and corrected the problem.
11. DANGER - risk of electrical shock. Install at least 5 feet (1.5m) from all metal surfaces. A tub may be
installed within 5 feet of metal surfaces if each metal surface is permanently connected by a solid copper
conductor attached to the wire connector on the control box that is provided for this purpose. A pressure wire
connector is provided on the control box to permit connection of a minimum No. 8 AWG (8.4mm) solid copper
bonding conductor. The bonding conductor should not be smaller the service conductors supplying the
equipment. Connect this point to any metal enclosures of electrical equipment, metal water pipes, or conduit
within 5 feet (1.5m) of the unit as needed to comply with local requirements.
SAVE THESE INSTRUCTIONS
3

4
HEATER RETURN
HEATER INDICATOR
LIGHT
HIGH-LIMIT RESET
THERMOSTAT
PUMP AIR SWITCH
CONTROL BOX
POWER INLET
PUMP
PLUG/RECEPTACLE
PUMP CORD
SENSOR PROBES
PUMP
BONDING WIRE
PUMP INLET
BONDING LUG
BONDING LUG
Product Description
POWER LEADS
BASE
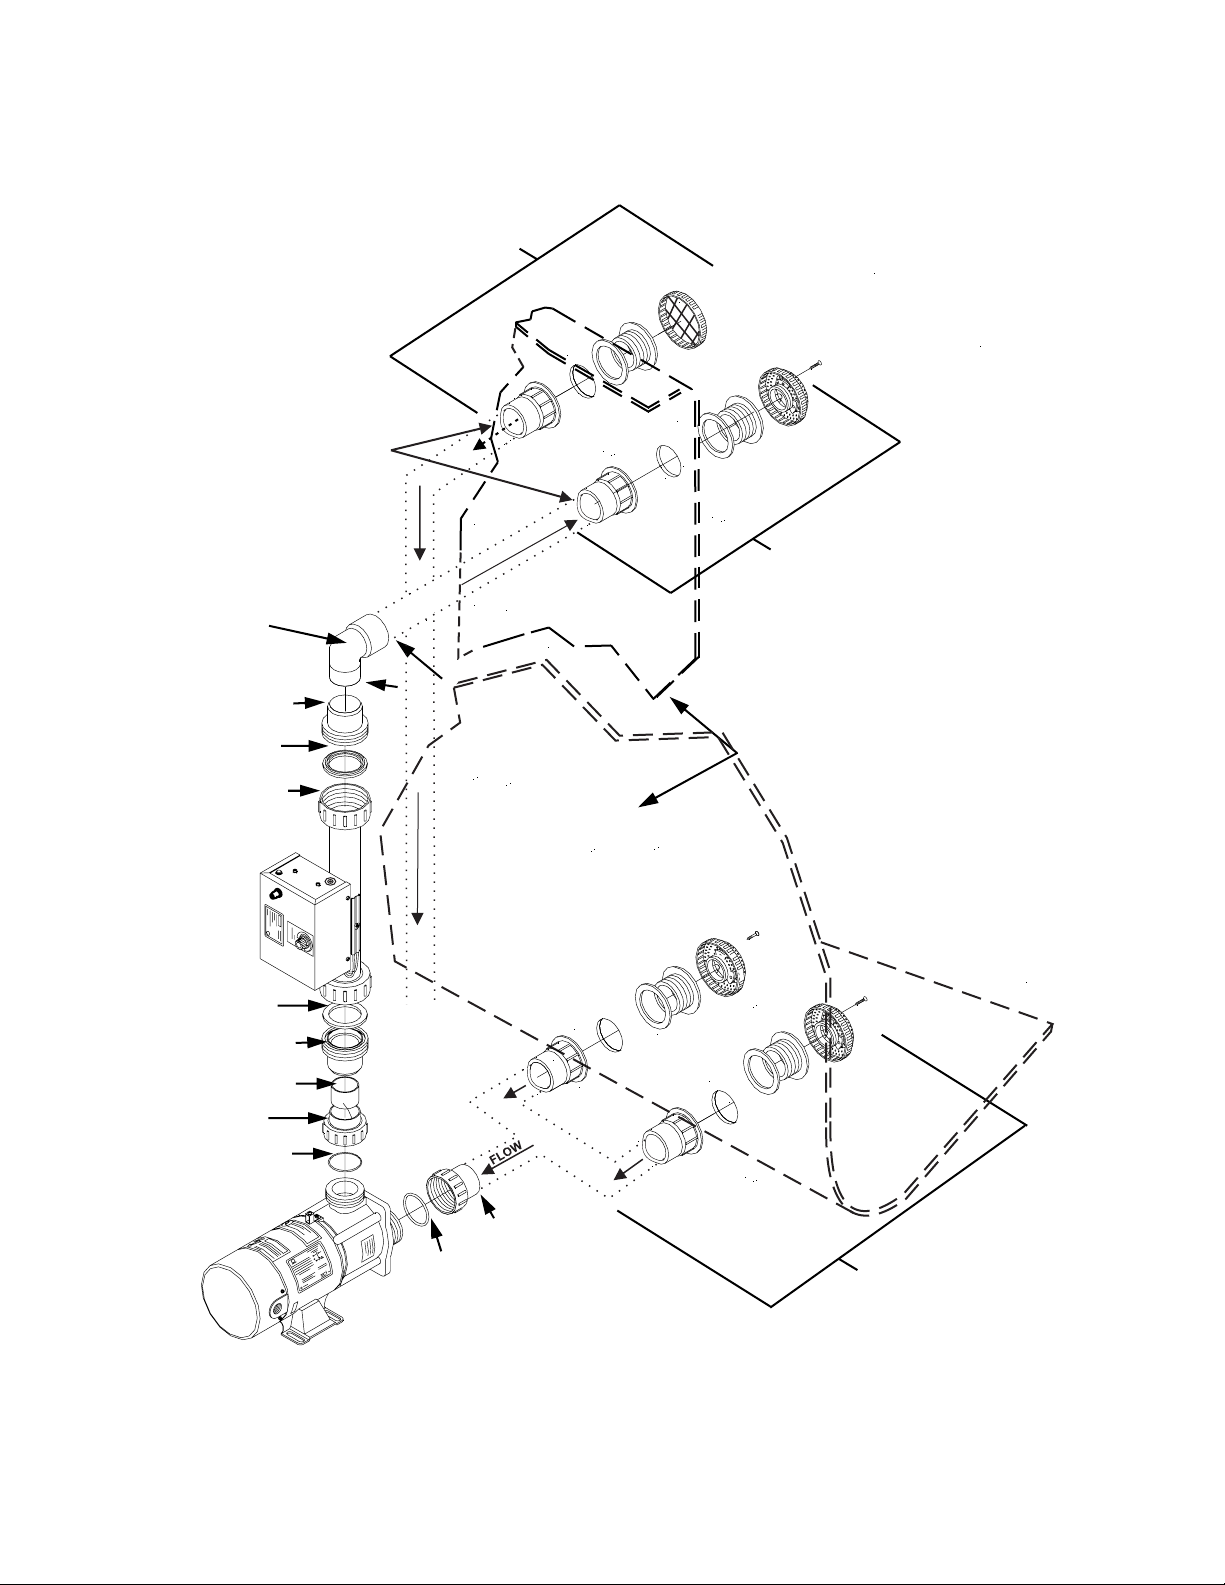
Figure 1
Washer (Heater Union)
Washer (Heater Union)
“O” Ring (Pump Union)
Baptistry Wall
Union Nut (Heater)
“O” Ring (Pump Union)
Half Union (Pump)
Union Male Connector
Union Connector (Heater)
1 1/2” 90 Slip x Spigot
Suction Fitting Assemblies
Return Fitting Assembly
1 1/2” Sch. 40 PVC Pipe
Half Union (Pump)
Glue Joint
Glue Joint
TO DRAIN
SUCTIONS X2
W
O
L
F
FLOW
Over-Flow Fitting Assembly
RIGID PVC
RIGID PVC
RIGID PVC
5
Typical Plumbing Layout

Plumbing Drill Guide
APPROX 28”
APPROX 6”
APPROX 4 1/2”
APPROX 4”
WATER LEVEL
HEATER
RETURN
PUMP INTAKES (X2)
MIN 36” SEPARATION*
OVERFLOW
FITTING PART NUMBER HOLE SIZE
PUMP INTAKE 42-0004 2 3/8”
HEATER DISCHARGE 42-0004 2 3/8”
OVERFLOW 42-0074A 2 3/8”
HOLE SIZE CHART
TOP LIP OF BAPTISTRY
GROUND LEVEL
*TO COMPLY WITH AMSE/ANSI A112.19.8M-1987,ASME A112.19.8-2007*TO COMPLY WITH AMSE/ANSI A112.19.8M-1987,ASME A112.19.8-2007
HOLE LEGEND
- Required
- Suggested
R
R
R
S
S
R
6

Note:
This heater is designed to be used with water only, as furnished by municipal water distribution systems.
The warranty does not cover its use with mineral, sea, salt, or any other non-potable water. The minimum
piping to be used in the suction and return connections of the heater to the baptistry is to be 1.5” Schedule
40PVC.
HEATER MUST BE INSTALLED VERTICALLY
1. Locate the EQAS system in an accessible area adjacent to the baptistry tank. The area should be at the
same elevation as the tank itself, or as near as possible. Installation must be in a manner that no person can
touch the water or any source of electrical power. Electrical power considered accessible when they can be
touched by a person having a 6’ reach (1.83m) from inside the tank. This is only necessary if the heater
assy and the tank ARE NOT divided by a solid wall or partition which would make physical contact
impossible.
Ÿ The system must be located in an indoor location only, with a minimum clearance of six (6) inches to
all combustible construction.
ŸFor best efficiency, the heater should be located within five (5) feet of the baptistry.
ŸMaintain adequate access clearance for servicing the heater in the event of a problem.
ŸThe heater assembly must not be installed on a combustible surface.
ŸLocate the heater in a manner that should any connections between the heater and the tank leak water
damage cannot occur.
2. Position the heater/pump assembly in its approximate location. The centerline of the suction fittings and
inlet to the pump should be 3”- 4” above the bottom of the tank floor.
ŸMark the locations of the suction fittings, a minimum of 36” apart or on separate walls of the tank.
ŸUsing a 2 3/8” hole saw drill holes into the fiberglass shell and install the fittings.
ŸThe return fitting should be located directly above and inline with the heater/pump vertical centerline as
far down the tank wall as possible.
ŸMark the location of the return fitting then using a 2 3/8” hole saw drill the fiberglass and install the
fitting.
3. With the heater/pump assembly positioned in its approximate desired final location, in line and level
with the suction fittings. Determine the exact pump mounting position by preassembling the plumbing as
shown in Figure 1. Be sure to align the pump in such a way that the plumbing is not applying
tension/stress to the baptistry wall. Allowing such tension will cause unnecessary noise/vibration and
can cause leaks.
4. After all parts have been pre-assembled and aligned with the holes, dis-assemble the unit and glue the
necessary connections as shown in Figure 1.
5. Once all glued parts are dry, re-assemble, making sure all gaskets and o’rings are in place on all union
type connections. Union connections should be hand tight only! Over tightening these connections can
cause them to crack and leak.
6. Determine a location for the power air button in a convienent location above water level within 20’ of the
heater. Drill a 1 1/4” hole and mount the air button, route the air hose back to the heater and connect to the
air switch. Use caution not to kink or pinch the air hose.
7
Assembly

Wiring
Attention: Due to the risk of electrical shock a licensed electrician experienced in spa, baptismal and
pool heaters should install this unit is strict compliance with the National Electric Code and any state or
local laws in effect which may apply. For units intended for use in other than single family dwellings a
clearly labeled emergency switch shall be provided as part of the installation. The switch shall be readily
accesible to the occupants and shall be installed at least 5 feet (1.52m) away, adjacent to, and within sight
of the unit.
The EQAS System has been completely factory wired for proper operation and requires only field
connection to the branch circuits. Field wiring, power supply conductors and branch circuit protectors
must be installed by a qualified electrician on accordance with Article 680 of the National Electric Code
ANSI/NFPA No. 70-1981 and in accordance with local codes and/or utility requirements.
Operation of the heater is controlled primarily by the thermostat; however, a built in pressure switch is
incorporated to prevent the heater from activation if there is insufficient water pressure detected in the
heater. The pump is connected to a 4-pin connector on the bottom of the control box on the heater and
can be powered on and off remotely via a pneumatic air switch on the top of the control box.
CONNECTING POWER TO HEATER: Note that the heater is supplied with preinstalled/color coded
leads to simplify installation. Connect the wires to a GFCI protected power source as follows:
208V-240V/40A Operation:
Black = Line 1
Blue = Line 2
White = Neutral
Green/Bonding Lugs = Ground
120V/20A Operation:
Black = Line 1
Blue & White Connected = Neutral
Green/Bonding Lugs = Ground
CONNECTING/BONDING PUMP TO HEATER: A cord and plug has been provided on the pump
assembly to allow easy connection to the heater control box. Connect to the receptacle on the bottom the
control box and complete this step by using the solid #8 copper bonding wire to BOND the pump to the
heater assy utilizing the bonding lug on each component.
VERIFY PROPER OPERATION:
1. Fill the tank with water above the return fitting.
2. Turn the thermostat to its lowest setting
3. Apply power to the system - The heater should not come on, if it does immediately turn the power
off to the system and do not continue until this issue is corrected - See troubleshooting section Page
#10, correct and move to next step.
4. Connect the supplied air tubing to the air switch on the top of the heater control box and the other end
to the supplied air button. Pressing this air button will activate and deactivate the pump.
5. Activate the pump by pressing the air button, the pump should activate and water should now be
flowing out of the return fitting.
6. Once all the air has been evacuated from the plumbing you can safely turn the thermostat up, the
heater indicator light should illuminate indicating power is now applied to the heater.
7. Now press the air button to de-activate the pump and assure the heater shuts off when the pump does.
If the heater does not shut off then immediately reactivate the pump then proceed to the
troubleshooting section on page #8.
8

Start-up & Operation
1. Fill the baptistry to the proper level.
2. Turn the thermostat to its lowest setting
3. Apply power to the system
4. If the pump is connected to the control box, connect the supplied air tubing to the air switch on the top
of the heater control box and the other end to the supplied air button. Pressing this air button will
activate and deactivate the pump only if connected to the control box.
5. Activate the pump by pressing the air button or whatever means are present for activating the pump,
water should now be flowing out of the return fitting.
6. Once all the air has been evacuated from the plumbing you can safely turn the thermostat up, the
heater indicator light should illuminate indicating power is now applied to the heater.
Pump Only Mode:
The EQAS System is designed to allow the pump to run independently of the heater, simply turn the
thermostat to its lowest position and activate the pump as desired.
Warnings:
FWe recommend that the power to the heater be shut off when anyone enters the baptistry
FAlways turn the power off to the system before draining the baptistry
FRemember there are live electrical connections inside the heater and pump assy.
FNever attempt any service unless power is turned off to the system.
FDo not operate the system unless the water is above the return fitting Operating without a proper
level may cause the heater to operate at a higher internal temperature causing premature failure of
the heater element and/or other components
FDo not heat the water above 100°F. A temperature of 100°F is considered safe for a healthy adult,
hotter water increases the risk of hyperthermia. Special caution is suggested for young children,
aged persons, persons having medical problems and/or on medication.
FPregnant women need to be alerted to the danger of fetal damage and should consult their
physicians before being baptized.
FBefore entering the baptistry users should check the water temperature with an accurate
thermometer; thermostats may vary by as much a 4°F.
FDo not tamper with the controls as scalding can result if safety controls are not in proper order
and/or altered in anyway
High-Limit Protection:
The heater is equipped with a high-limit protection device to disable the heater in the event of water
temperature overheat. If this device trips, reset by pressing the red reset button on the front of the
control box. If the switch trips repeatedly turn the power off to the system and contact a service agent.
DO NOT USE BAPTISTRY UNTIL ISSUE IS CORRECTED
Winterization / Freezing:
If your system is going to be shut off and exposed to freezing temperatures, it must be drained. Water,
when frozen expands and will permanently damage the heater, pump, and plumbing. Turn off the
electrical supply prior to draining and always follow the start-up and filling instructions before re-
applying power to the heater. Damage caused by freeze damage is not covered by the limited warranty.
FDrain the pump fully by disconnection the suction union and allowing water to drain completely
FUse a submersible pump to remove the remaining water from the baptistry vessel.
9

Equipment system will not operate:
1.
trips repeatedly, contact a service technician to correct the problem.
2. Check the Ground Fault Circuit Interrupter, if equipped, to see if the reset button has popped out. If it has, press
reset button inward. If the GFCI trips repeatedly, contact a service technician to correct the problem.
3. Make sure the Power Air Switch is turned “ON”
4. For cord connected units check the receptacle.
5. Make sure the high-limit has not tripped. Push to reset.
Pump will run but there is no water flow:
1. Make sure system is installed below water level.
2. Check the suction fittings to make sure that they are not clogged with debris.
3. Check the water level and make sure it is above the jets and at the proper level on the skimmer opening.
4. Check the pump for trapped air. With the pump running, loosen the union at the pump outlet to release any
trapped air. You may need to use a sponge to collect the water released during this procedure.
Pump runs and there is water flow but no heat:
1. Turn the thermostat to a higher temperature setting. Do not expect to feel hot water coming from the jets.
2. Check to see if the high limit switch reset button, located on the front of the control box, has popped outward.
If so, reset by pressing inward.
3. Check to make sure that all the valves are open and that there is full flow. Limited water flow may not activate
the pressure switch to allow the heater to come on.
The water will not maintain the desired temperature:
1. A thermal cover is required to maintain the water temperature.
2. Turn the thermostat to a higher setting.
Pressure Switch adjustment:
With pump running and thermostat calling for heat if no heat indicator is illuminated perform the following:
1. Insure flow is moving into tub from equipment and that no air bubbles are present at tub return fitting (if air
present open pump bleed valve on face to let air escape).
2. Insert flat tip screwdriver into slot on top of pressure switch and adjust CCW until heat engages (if heat
indicator flickers continue adjusting until it remains steady).
3. Once heat indicator remains on steadily adjust the pressure switch knob an additional ½ turn CCW.
4. Disconnect pump power by unplugging it from the control box. Insure that heat indicator does not come on
with the thermostat turned up. If indicator does illuminate immediately disconnect power, reconnect pump, and
repeat steps 1-3 until proper operation is observed.
Check the main circuit breaker panel. If the circuit breaker has tripped reset the breaker. If the circuit breaker
Troubleshooting
10

REV.02 85-0139-C 08/12
Table of contents
Popular Heater manuals by other brands


Jevi
Jevi 3000T Installation instruction

Avenger
Avenger BLUE FLAME FDT1IR BLUE FLAME FDT2IR OWNER'S OPERATION AND INSTALLATION MANUAL

Ryonet
Ryonet Rotating Pallet quick guide

Thermor
Thermor Riva 4 mixte Installation and operating manual

Toolland
Toolland TC78020 user manual

Rinnai
Rinnai RHFE-1510F Operating and installation instructions


