Filo Mille222 User manual
3
Montaggio: 2 persone
Assembly: 2 people
Montage: 2 personnes
Montage: 2 personen
Spegnere interruttore principale
Turn off main breaker
Couper le disjoncteur général
Ausschalten Leitungsschultzschalter
5
2
4
1
711
Touch
dimmer
ON/OFF
6
109
8

WARNING: Always disconnect the plug of the luminaire from the power socket/mains before beginning installation or any sort
of maintenance work. If the cables or cords of this luminare are damaged, they shall be replaced exclusively by the
manufacturer, or its after-sales service, or equivalent qualified personnel.
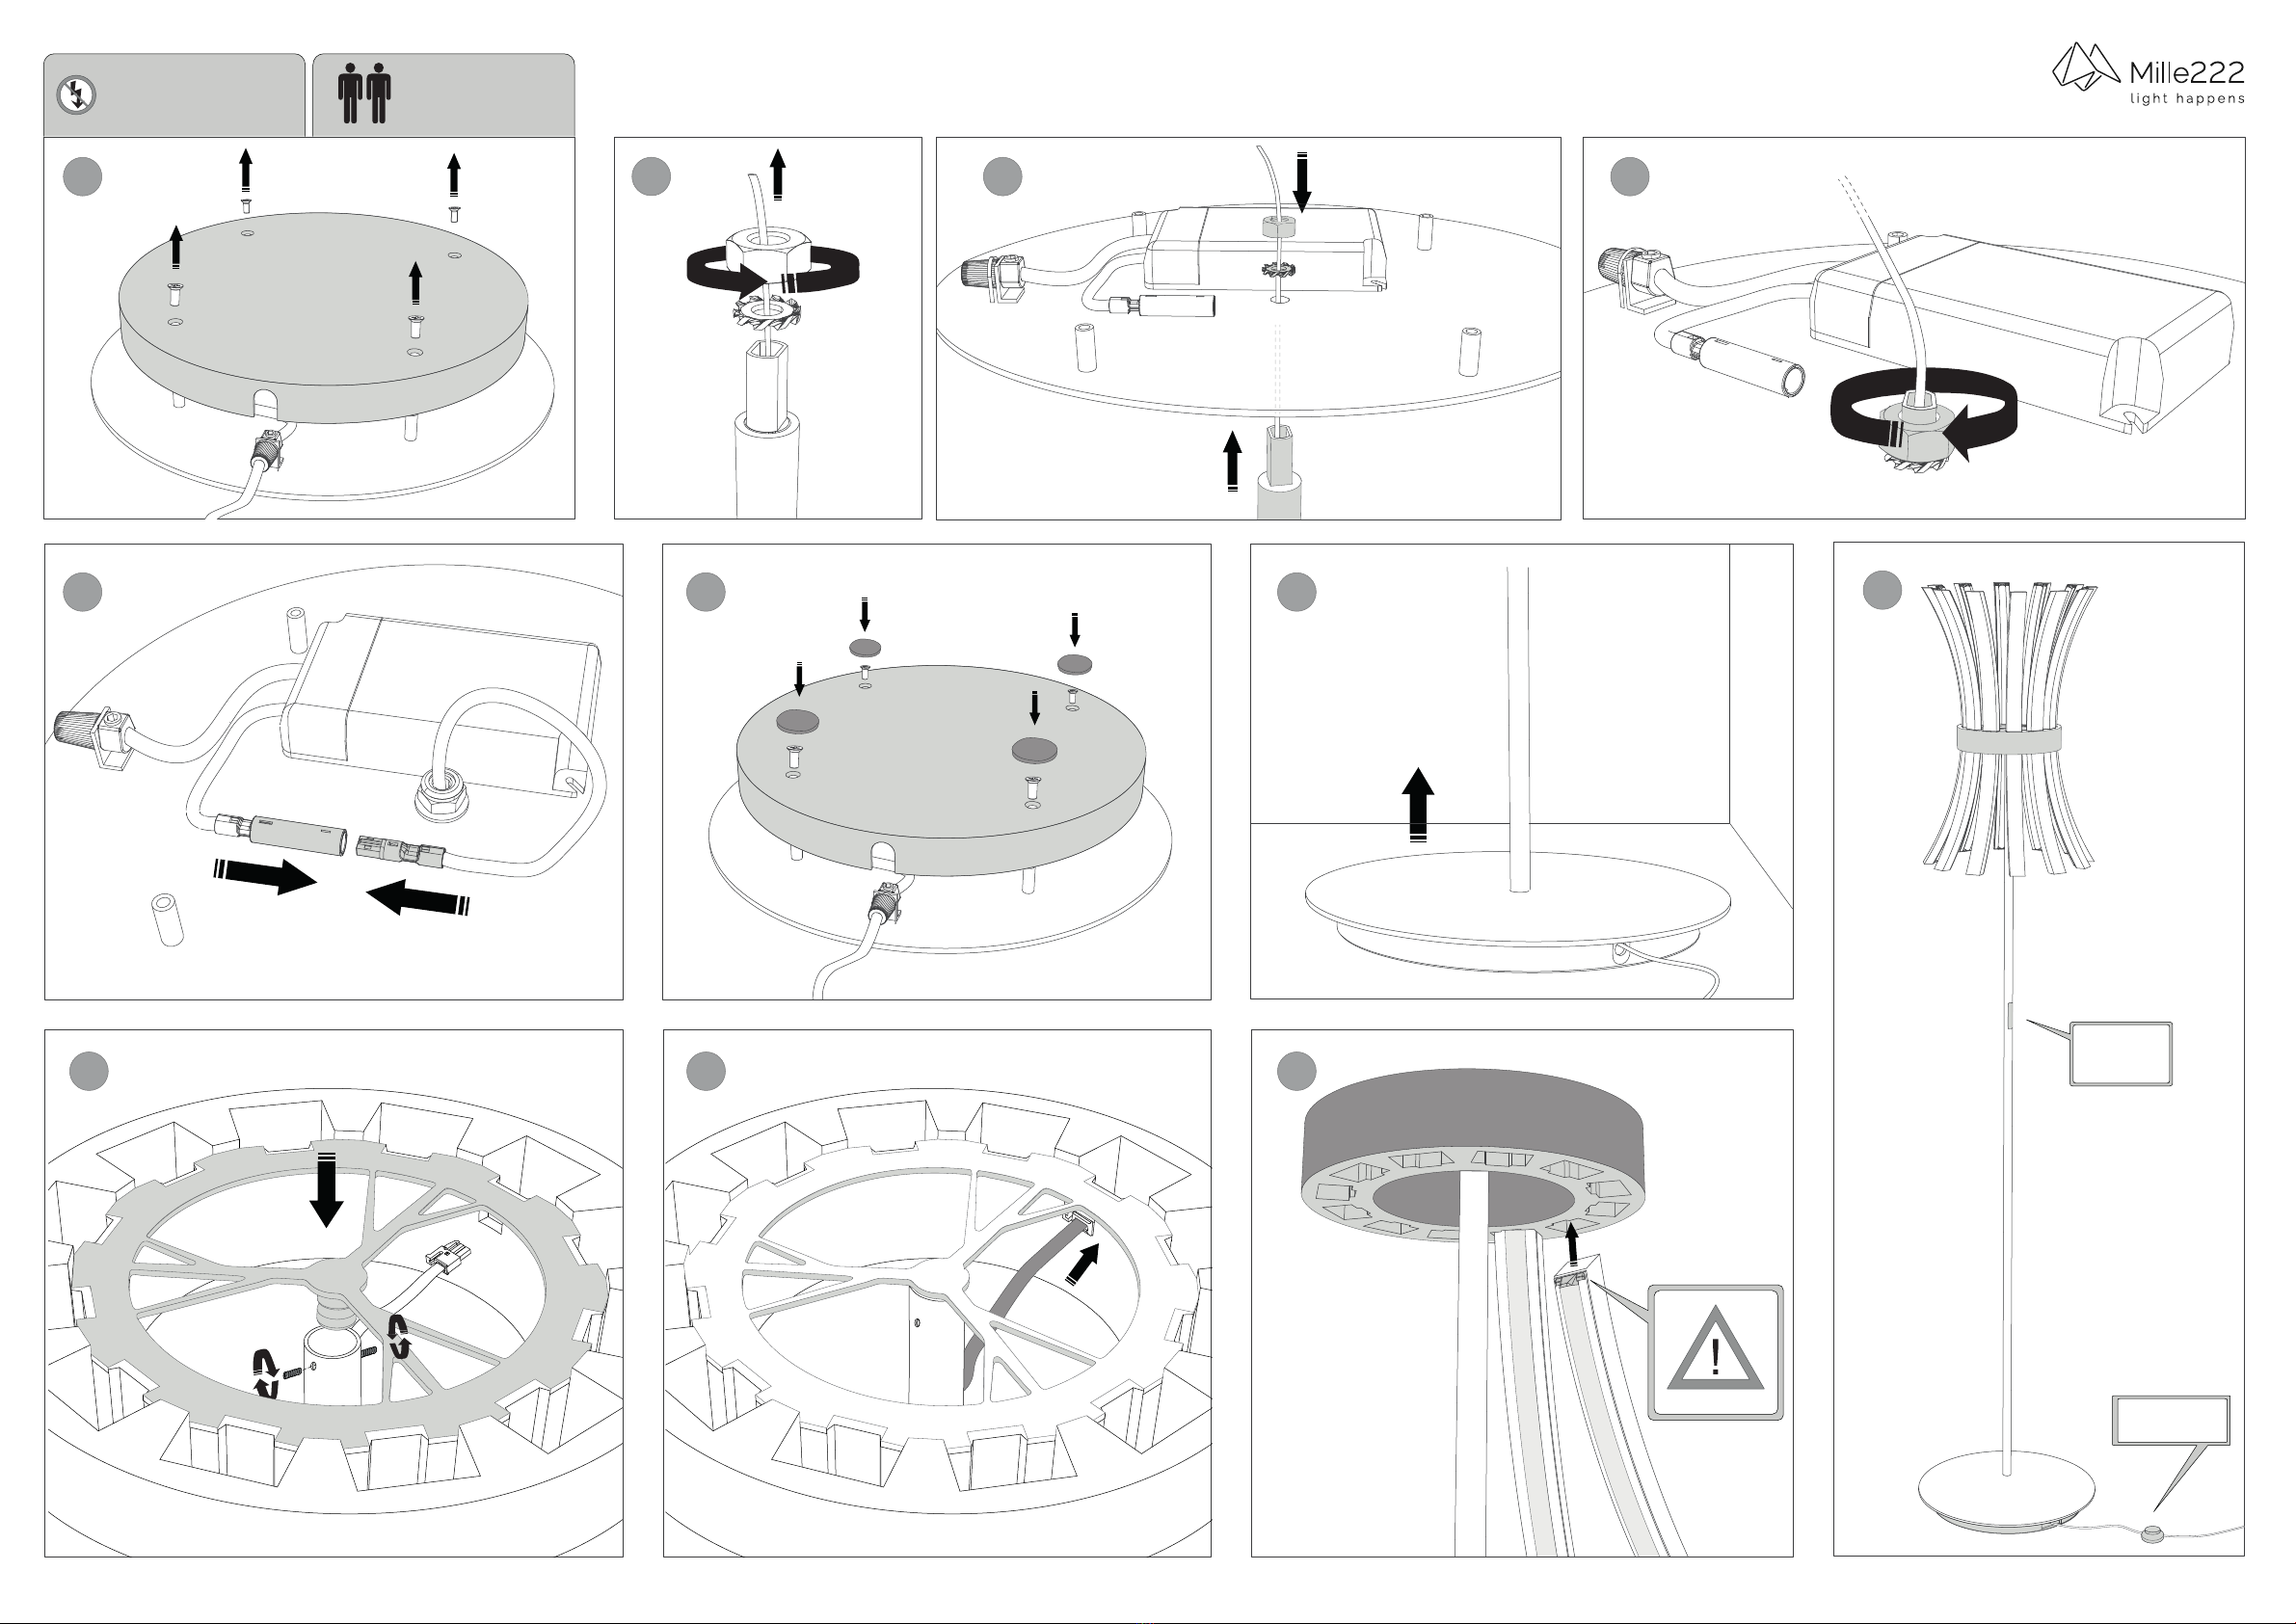
1–Turn upside down the base of the floor-lamp, unscrew the four screws and open the cover.
2–Unscrew the hexagonal nut placed at the end of the tube.
3–Insert the floor-lamp tube in the central hole of the base and insert the cable in the washer and in the hexagonal nut.
4–Fix the hexagonal nut to the end of the tube.
5 – Connect the plug connectors until the click.
6–Close the cover of the base and screw the four screws.
7–Straighten the floor-lamp.
8 – Insert the pin of the central metal support inside the top of the tube; fix it to the floor-lamp tube, by screwing the two
lateral grub screws.
9 – Connect the cable to the connector located on the central wooden crown.
10 – Insert the wooden arches bottom-up, paying attention to keep the stop side of the arch on the top.
11 – Adjust the wooden arches as you wish.
The main ON/OFF switch is on the cable of the luminaire.
By touching the wooden insert placed in the floor lamp tube it is possible to switch on and off the lamp (short touch),
or adjust the light intensity (long touch)
ISTRUZIONI DI MONTAGGIO ASSEMBLY INSTRUCTION
ATTENZIONE: la sicurezza dell’apparecchio è garantita solo se le seguenti istruzioni sono rispettate sia in fase di installazione sia in fase di
utilizzo, pertanto è necessario conservarle.
- Togliere tensione ogni volta che si interviene sull’apparecchio, anche in fase di installazione e di pulizia.
- L’apparecchio non deve essere installato in posizioni diverse da quelle indicate nelle istruzioni di montaggio.
- Le operazioni di montaggio o manutenzione devono essere eseguite con la massima attenzione per non danneggiare i componenti.
- Le parti in legno possono essere pulite con un panno morbido, leggermente inumidito con un detergente neutro e acqua; è possibile pulire i
contatti in oro degli archetti con un panno leggermente umido, soltanto dopo averli estratti dalla lampada. Lasciare asciugare completamente
gli archetti prima di reinserirli nelle loro sedi.
- Le sorgenti luminose LED di questa lampada non sono sostituibili; quando la sorgente luminosa raggiunge il fine vita l’intero archetto deve
essere sostituito. La sorgente luminosa contenuta in questa lampada può essere sostituita soltanto dal produttore o dal servizio clienti o da
personale qualificato.
ATTENZIONE: non utilizzare alcool o solventi.
- LIGHTCUBE non può procedere alla riparazione/sostituzione dei propri articoli difettati 1) se questi non verranno restituiti tramite rivenditore
autorizzato, 2) se la natura dei difetti non è stata verificata da personale di LIGHTCUBE, e 3) se il difetto non è imputabile alla fabbricazione, 4)
se sono scaduti i termini di garanzia, 5) se la lampada è stata modificata.
- L'apparecchio non può in alcun modo essere modificato o manomesso; ogni modifica ne può compromettere la sicurezza rendendolo
pericoloso. LIGHTCUBE declina ogni responsabilità per i prodotti modificati.
- Per un funzionamento corretto e sicuro è necessario che questo apparecchio sia collegato ad un efficiente impianto di messa a terra.
- Data la naturalità delle parti in legno, i colori e le venature possono variare leggermente da lampada a lampada. Tali irregolarità non sono da
considerare difetti, bensì caratteristiche che rendono unica e autentica ogni nostra lampada.
- Questo apparecchio dev’essere utilizzato solo in ambienti interni, e in luoghi asciutti.
- Questo prodotto è conforme alla Direttiva 2012/19/UE. Il simbolo del cestino barrato riportato sull’etichetta dell’apparecchio indica che il
prodotto, alla fine della propria vita utile, dovendo essere trattato separatamente dai rifiuti domestici, deve essere conferito in un centro di
raccolta differenziata per apparecchiature elettriche ed elettroniche oppure riconsegnato al rivenditore al momento dell’acquisto di una nuova
apparecchiatura equivalente. l’utente è responsabile del conferimento a fine vita alle appropriate strutture di raccolta. L’adeguata raccolta
differenziata per l’avvio successivo dell’apparecchio dismesso al riciclaggio, al trattamento e allo smaltimento ambientalmente compatibile
contribuisce ad evitare possibili effetti negativi sull’ambiente e sulla salute e favorisce il riciclo dei materiali di cui è composto il prodotto. Lo
smaltimento abusivo del prodotto da parte dell’utente comporta sanzioni amministrative stabilite per legge. Per ulteriori informazioni inerenti i
sistemi di raccolta disponibili, rivolgersi al servizio locale di smaltimento rifiuti, o al negozio in cui è stato effettuato l’acquisto.
ITALIANO
Lightcube srl - Viale della Navigazione Interna, 51 - 35129 Padova (PD) - Tel.+39 327 9055881 - www.light-cube.com - [email protected] REV_20210312
Design di Laura Modoni
FILÓ
PIANTANA/TAVOLO
Design by Laura Modoni
FILÓ
FLOOR /TABLE LAMP
ENGLISH
ATTENZIONE: Scollegare l'apparecchio dalla presa di corrente prima dell'installazione o di qualsiasi operazione di
manutenzione. In caso di danneggiamento dei cavi, questi devono essere sostituiti esclusivamente dal costruttore, dal suo
servizio assistenza, o da personale qualificato.
1–Capovolgere la base della piantana, svitare le quattro viti di fissaggio e aprire il coperchio.
2–Svitare il dado esagonale posizionato all'estremità del tubo della piantana.
3 – Inserire il tubo della piantana all'interno del foro centrale della base e infilare il cavo nella rondella e nel dado esagonale.
4–Fissare il dado all'estremità del tubo della piantana.
5 – Collegare i due connettori a spinetta fino allo scatto.
6–Chiudere il coperchio della piantana e riavvitare le quattro viti.
7–Raddrizzare la piantana.
8–Inserire il perno nella parte superiore del tubo della piantana e fissarlo avvitando i due grani laterali.
9–Collegare il cavo al connettore della corona centrale di legno.
10 – Inserire gli archetti dal basso verso l’alto, avendo cura di inserire prima l’estremità di blocco.
11 – Regolare gli archetti a piacimento.
L’interruttore principale ON/OFF è posizionato sul cavo della piantana.
Toccando l’inserto in legno nel tubo della piantana è possibile accendere e spegnere la lampada (tocco breve),
oppure regolare l’intensità della luce (tocco lungo).
50W LED 200-240 V 50/60Hz 4800lm CRI>80 3000k
WARNING: the safety of this fixture can only be guaranteed if these instructions are observed during both installation and use; for this
reason this instruction card must be preserved safely.
- Always disconnect power when operating on the fixture, also during installation and cleaning.
- The fixture must not be installed in any position other than that shown in instructions.
- Assembly and maintenance of the fixture must be performed carefully, to prevent any damage to the components.
- Wooden components may be cleaned with a soft cloth slightly dampened with a mild detergent and water; it is possible to clean the gold
contacts of the arches by means of a slightly damp cloth, only after taking them out of the lamp. Dry the components completely before
putting them back in their position.
- The LED light source of this luminaire is not replaceable; when the light source reaches its end of life the whole arch shall be replaced. The
light source contained in this luminaire shall only be replaced by the manufacturer or his service agent or a similar qualified person.
WARNING: do not use alcohol or solvents.
- LIGHTCUBE can not repair or replace any defective component 1) if the same is not returned through an authorized vendor,2) if the nature
of the defect has not been verified by LIGHTCUBE personnel, and 3) if the defect is not due to fabrication, 4) if warranty has expired, 5) if
the lamp has been modified/tampered with.
- The lamp may in no way be modified or tampered with; any modification may compromise safety causing the appliance to become
dangerous. LIGHTCUBE declines all responsibility for products that have been modified.
- To guarantee the correct and safe operation of the light fixture, it is necessary that it is connected to earth/ground.
- Wood is a natural raw material; variations in grain/veining and color may be present from lamp to lamp. These differences are not to be
considered defects, but rather features that make each lamp unique and authentic.
- This product in for use in indoor and dry environment only.
- This product complies with the Directive 2012/19 /EU. The crossed bin symbol on the appliance indicates that the product, at the end of
its life, must be disposed of separately from domestic waste, either by taking it to a separate waste disposal site for electrical and electronic
appliances or by returning it to your dealer when you buy another equivalent similar appliance. The user is responsible for the taking the
appliance to a special waste disposal site at the end of its life. If the disused appliance is collected correctly as separate waste, it can be
recycled, treated and disposed of ecologically; this avoids a negative impact on both the environment and health, and contributes towards
the recycling of the product’s materials. For more information regarding the waste disposal services available, contact your local waste
disposal agency or the shop where you bought the appliance.
Prodotto conforme alle direttive della Comunità Europea.
This product complies with European legislation.
Popular Outdoor Light manuals by other brands


LIGMAN
LIGMAN LIGHTALK 14 instruction manual

HEPER
HEPER LL2030.861-US Installation & maintenance instructions

Daintree
Daintree GE Current Lumination Tetra Contour 74917... installation guide

Home Decorators Collection
Home Decorators Collection IZC1501LX-01/BK Use and care guide

Schrack Technik
Schrack Technik ZELDA LED Round Large Series Assembly instructions

Endon
Endon EL- 40094 instruction manual