FINO DUSTEX VARIO L Operation manual
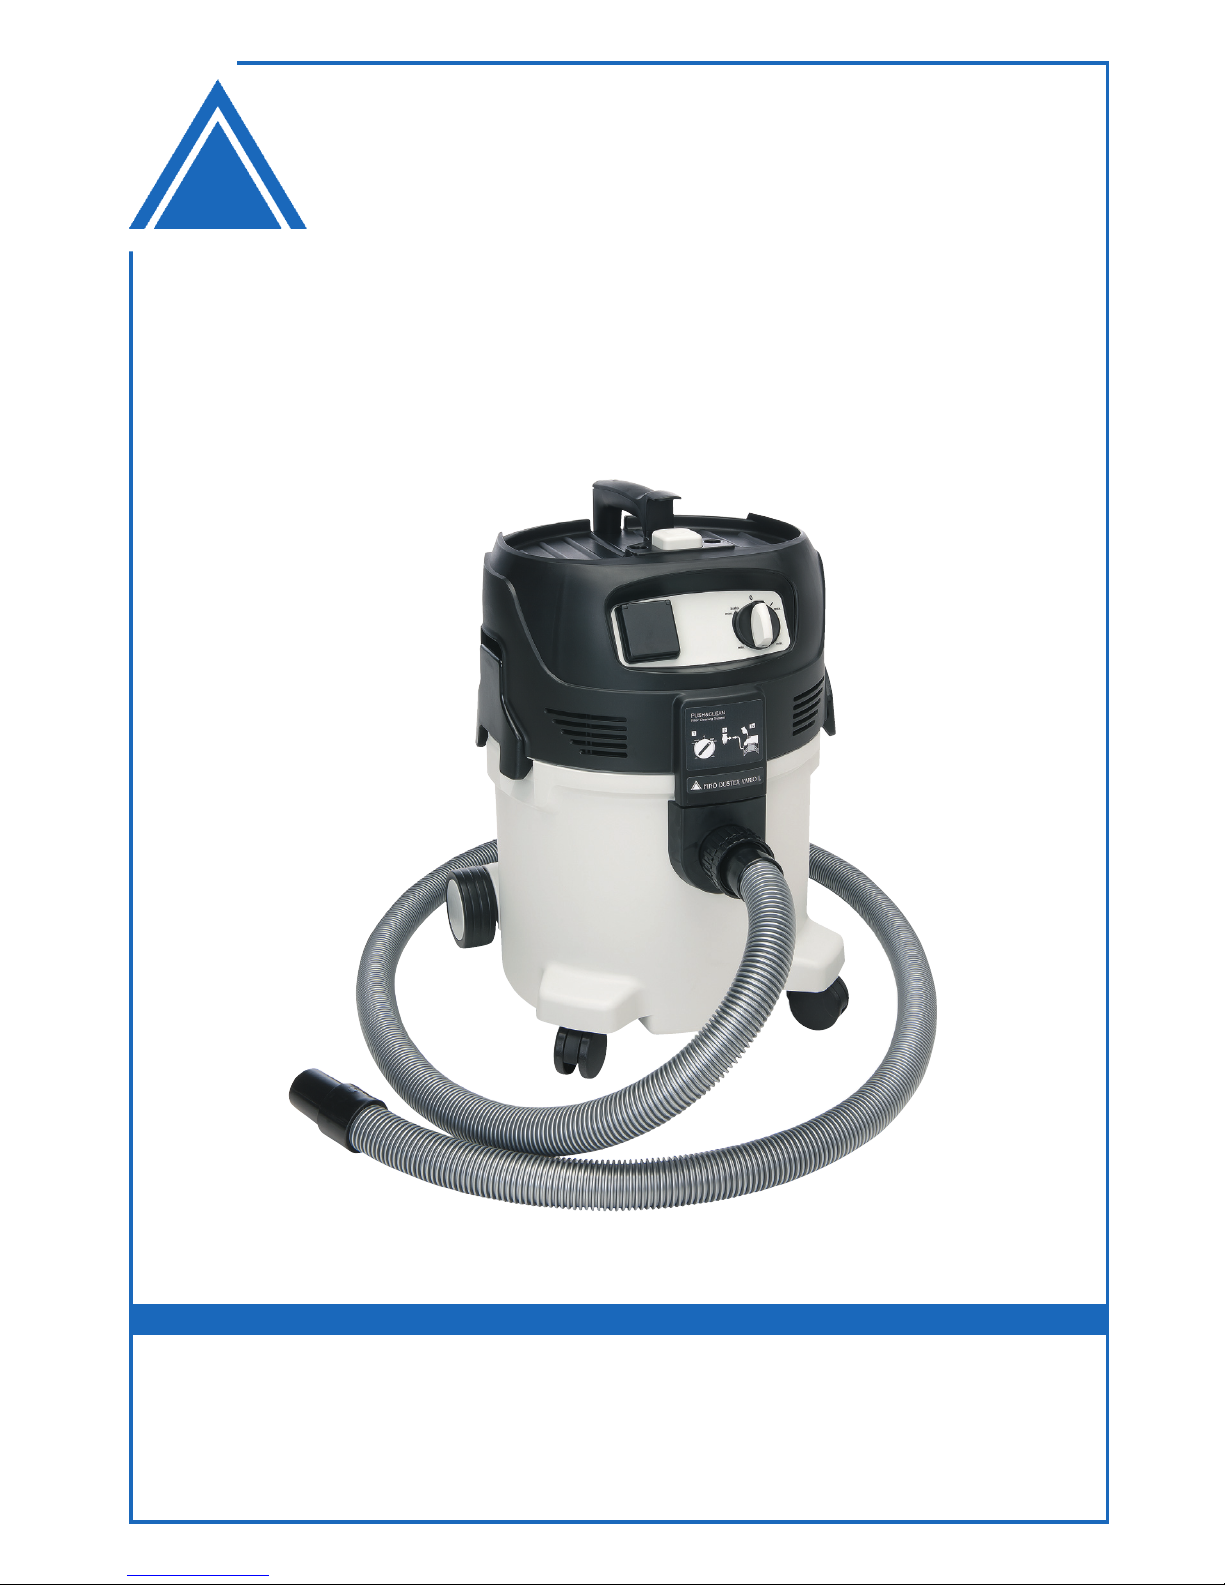
FINO DUSTEX VARIO L
50919
Original FINO
Germany
Absaugung
Extraction Unit
Aspiration
Aspiración
Aspiratore
Gebrauchsinformation•User Information•Mode d’emploi
Información sobre el uso•Informazioni d’uso
Gebruiksaanwijzing•Instrukcja stosowania
FINO
•der feine Unterschied•the fine difference•la fine différence•la fina diferencia•la fine differenza

Version 1/2014. Read the user manual before you start operating the unit!
1. Important safety instructions 3
2. Description 5
• Operating elements • Operating panel
3. Before starting the cleaner 6
• Assembling the vacuum cleaner• Inserting the filter bag
4. Control/Operation 6
• Connections • Switching on the vacuum cleaner • Cleaning the filter element
5. Applications and techniques 8
• Techniques
6. After finishing work 9
• Switching the vacuum cleaner off and storage
7. Maintenance 9
• Maintenance plan • Maintenance work
8. Troubleshooting 12
9. Further information 13
• Recycling the cleaner • Guarantee • Tests and approvals
• Technical data • Optional accessories
INDEX
2

3
1. Do not use any unsafe work techniques.
2. Never use the vacuum cleaner without a filter.
3. Switch off the appliance and disconnect the
mains plug in the following situations:
– Prior to cleaning and servicing
– Prior to replacing components
– If foam develops or liquid emerges
Besides the operating instructions and the binding
accident prevention regulations valid in the country
of use, observe recognised regulations for safety
and proper use.
When dust removers are used, the rate at which air
is exchanged in the room must be adequate if the
exhaust air from the vacuum cleaner is blown into
the room (please observe regulations valid in your
country).
Before starting work, the operating staff must be
informed on
– use of the vacuum cleaner
– risks associated with the material to be picked up
– safe disposal of the picked up material.
Purpose and intended use
The vacuum cleaners described in this operating
manual are suitable for
• for separation of dust with an exposure limit
of greater than 1 mg/m³, (dust class L).
• commercial use, e.g. in laboratories, hotels,
schools, hospitals, factories, shops, offices
and rental businesses.
Any other use is considered as improper use. The
manufacturer accepts no liability for any damage
resulting from such use. The risk for such use is
borne solely by the user.
Proper use also includes proper operation, servicing
and repairs as specified by the manufacturer.
1. Important safety instructions
Symbols used to mark instructions
Prior to using the appliance for the first time, be sure
to read this document through and keep it ready to
hand.
DANGER!
Indicates an imminently dange-
rous situation which might be fatal
or might lead to serious injuries if
not avoided.
WARNING!
Indicates a possibly dangerous
situation which might be fatal or
might lead to serious injuries if not
avoided.
CAUTION!
Indicates a possibly dangerous
situation which might cause minor
or slight injuries if not avoided.
The appliance must
• only be used by persons, who have been
instructed in its correct usage and explicitly
commissioned with the task of operating it
• only be operated under supervision
• not be used by children
This appliance is not intended for use by persons
(including children) with reduced physical, sensory
or mental capabilities, or lack of experience and
knowledge.
Children should be supervised to ensure that they do
not play with the appliance.
ENU

Transport
1. Before transporting the dirt tank,
close all the locks.
2. Do not tilt the cleaner if there is liquid
in the dirt tank.
3. Do use a crane hook to lift the cleaner.
Storage
1. Store the appliance in a dry place,
protected from frost.
Electrical connection
1. It is recommended that the vacuum cleaner
should be connected via a residual current
circuit breaker.
2. Arrange the electrical parts (sockets, plugs
and couplings) and lay down the extension lead
so that the protection class is maintained.
3. Connectors and couplings of power supply cords
and extension leads must be watertight.
Extension lead
1. As an extension lead, only use the version
specified by the manufacturer or one of
a higher quality.
2. When using an extension lead, check the
minimum cross-sections of the cable:
Maintenance, cleaning and repair
Electrical tests must be performed in accordance
with the provisions of safety regulations (BGV A3)
and to DIN VDE 0701 Part 1 and Part 3. In accordance
with DIN VDE 0702 these tests must be performed at
regular intervals and after repairs or modifications.
Cable length Cross section
< 16 A < 25 A
up to 20 m 1,5 mm22,5 mm2
20 to 50 m 2,5 mm24,0 mm2
During maintenance and cleaning, handle the
vacuum cleaner in such a manner that there is no
danger for maintenance staff or other persons.
In the maintenance area
• use filtered compulsory ventilation
• wear protective clothing
• clean the maintenance are so that no harmful
substances get into the surroundings.
Risks
Electrical components
DANGER! Electric shock due to
faulty mains connecting lead.
Touching a faulty mains connecting lead can result in
serious or even fatal injuries.
1. Do not damage the mains power lead
(e.g. by driving over it, pulling or crushing it).
2. Regularly check whether the power cord is
damaged or shows signs of ageing.
3. Have the faulty mains connecting lead replaced
by your FINO service representative or a qualified
electrician prior to using the appliance again.
DANGER!
The upper section of the vacuum
cleaner contains live components.
Contact with live components leads to serious or
even fatal injuries.
1. Never spray water on to the upper section of the
vacuum cleaner.
CAUTION! Damage due to unsuitable
mains voltage.
The appliance can be damaged as a result of being
connected to an unsuitable mains voltage.
1. Ensure that the voltage shown on the rating plate
corresponds to the voltage of the local mains
power supply.
4

CAUTION!
Application socket.
The appliance socket is only designed for the purpo-
ses defined in the operating instructions. The con-
nection of different appliances can result in damage.
1. Prior to plugging in an appliance, always switch
off the vacuum cleaner and the appliance that is
to be connected.
2. Read the operating instructions to the appliance
to be connected and observe the safety notes
contained in these.
Vacuuming materials
WARNING!
Hazardous materials.
Vacuuming up hazardous materials can lead
to serious or even fatal injuries.
1. The following materials must not be picked up
by the vacuum cleaner:
– hazardous dust
– hot materials (burning cigarettes, hot ash, etc.)
– flammable, explosive, aggressive liquids
(e.g. petrol, solvents, acids, alkalis, etc.)
– flammable, explosive dust
(e.g. magnesium or aluminium dust, etc.)
Picking up liquids
CAUTION!
Picking up liquids.
If foam develops or liquid emerges, stop work imme-
diately and empty the dirt tank.
1. Regularly clean the built in float or level indicator
hose to limit the water level and check that they
are not damaged.
2. See section 5 for information on handling liquids
and (hazardous) dust.
Emptying dirt tank
WARNING! Picking up environmentally
hazardous materials.
Materials picked up can present a hazard to the
environment.
1. Dispose of the dirt in accordance with legal
regulations.
Spare parts and accessories
CAUTION!
Spare parts and accessories.
The use of non-genuine spare parts and accessories
can impair the safety of the appliance.
1. Only use spare parts and accessories from FINO.
2. Use only the brushes supplied with the vacuum
cleaner or specified in the operating manual.
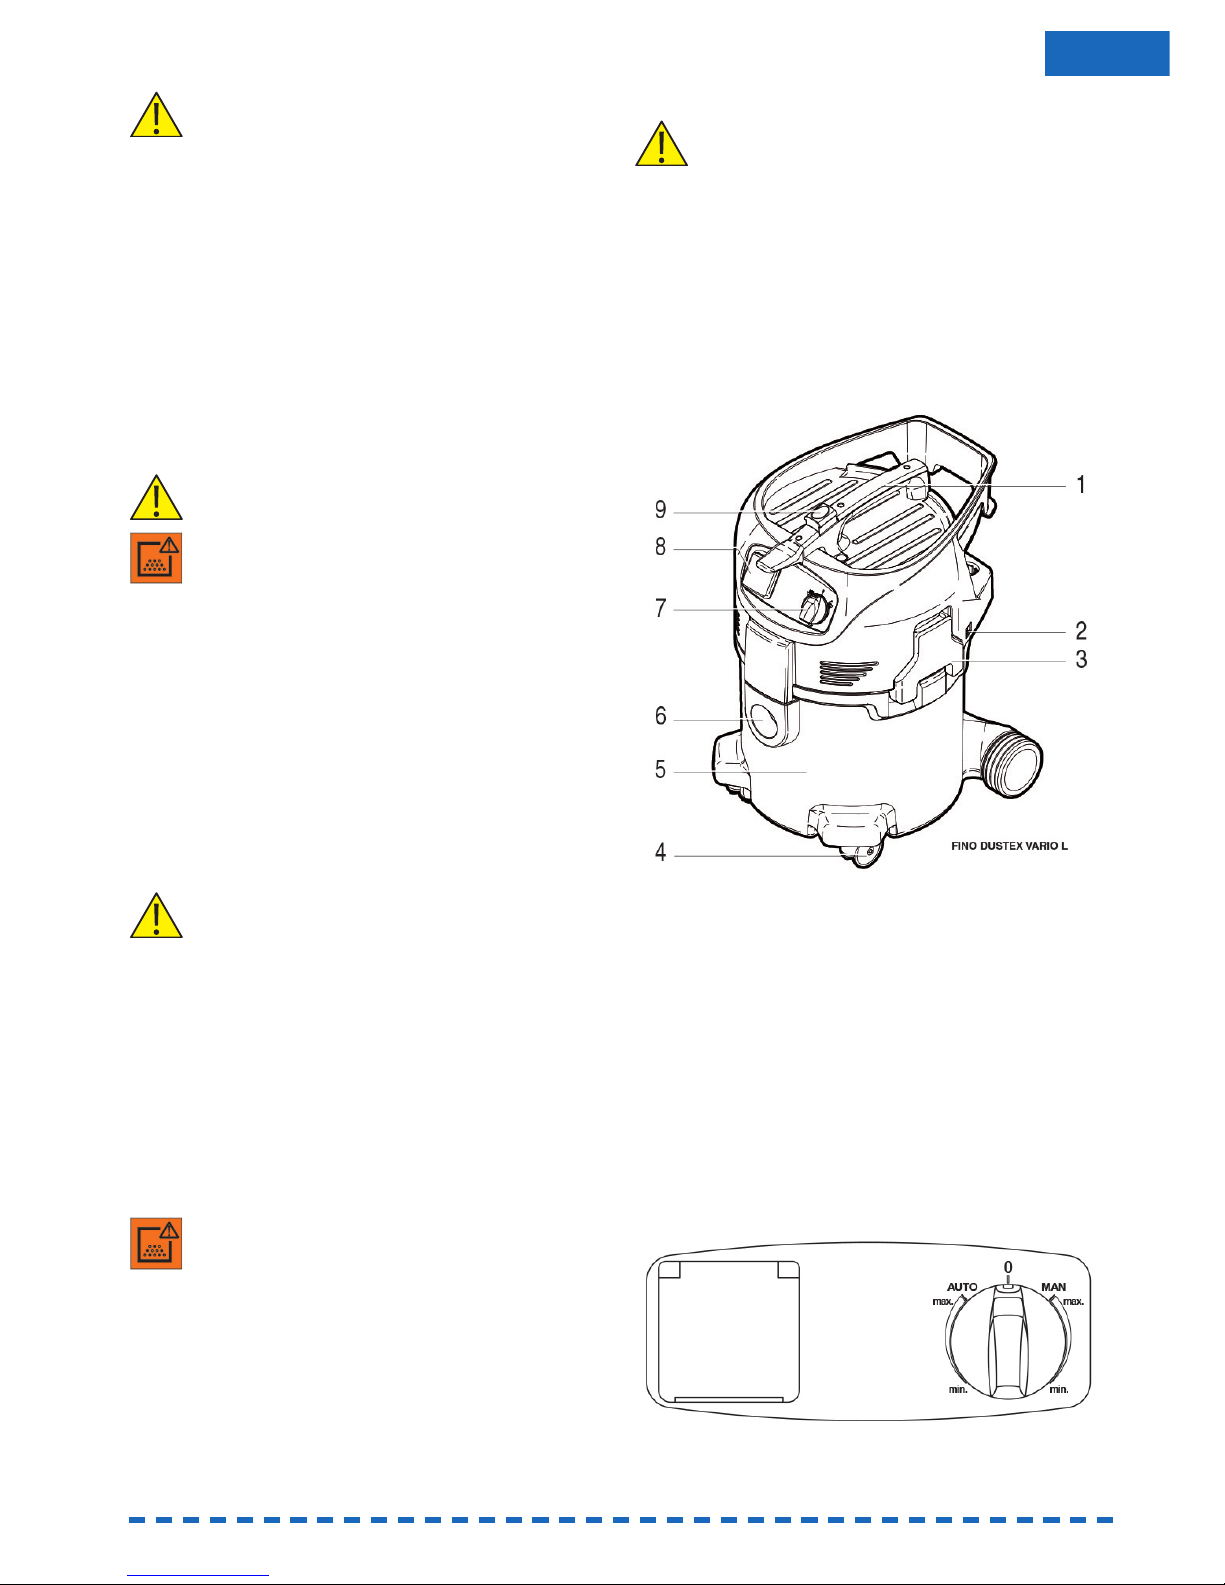
2. Description
2.1 Operation elements
1 Handle with receptacle for electrical lead
2 Fixing point for suction pipe holder
3 Retaining clamp
4 Castor
5 Dirt tank
6 Inlet fitting
7 Appliance switch
8 Appliance socket
9 Operating knob for filter cleaning
2.2 Operating panel
5
ENU

3. Before starting the cleaner
3.1 Assembling the vacuum cleaner
1. Take vacuum cleaner and accessories
out of the packaging.
2. The mains plug should not yet be inserted
into a socket.
3. Open the retaining clamps (B) and remove
the upper section of the vacuum cleaner.
4. Take the filter bag out of the dirt tank.
3.2 Inserting the filter bag
1. Insert the filter bag into the dirt tank.
2. Press the filter bag connection firmly on to
the inlet fitting. Attach the upper section of
the vacuum cleaner.
3. Close the retaining clamps (A).
4. Ensure that the retaining clamps fit properly.
4. Control/Operation
4.1 Connections
4.1.1 Connecting the suction hose
1. Connecting the suction hose.
6

4.1.2 Electrical connection
The operating voltage shown on the rating plate
must corres pond to the voltage of the mains power
supply.
1. Ensure that the cleaner is switched off.
2. Insert the power cord into a properly installed
and fused socket with earthing contact.
4.2 Switching on the vacuum cleaner
4.2.1 Switch „auto-0-I“
4.2.2 Suction power control
Switch position Function
0 Off
auto
Auto On/Off
I On/manual mode
Switch position Function
The suction power
control switch allows
precise adaptation of
the suction power for
different cleaning tasks.
4.2.3 Auto-On/Off-Operation –
„auto“ switch position
The vacuum cleaner is switched on and off by the
power tool connected. Dirt is picked up from the
source of dust immediately.
To comply with regulations, only approved dust
producing tools should be connected.
The maximum power consumption of the connected
electrical appliance is stated in section „Technical
data“.
Before switching the switch to position „auto“,
ensure that the tool connected to the appliance
socket is switched off.
1. Switch off the vacuum cleaner.
2. Switch off the power tool.
3. Connect the power tool and the vacuum cleaner
with a suction hose.
7
ENU

4. Insert the plug of the power tool into the tool
socket on the operating panel of the vacuum
cleaner.
5. Switch on the vacuum cleaner.
Switch in „auto“ position.
6. Switch on the power tool.
The vacuum cleaner motor starts when the connected
power tool is switched on.
When the power tool is switched off, the vacuum
cleaner continues to run for a short moment so that
any dust in the suction hose is conveyed to the filter
bag.
4.3 Cleaning the filter element
Only for vacuum cleaning without a filter bag.
If suction performance drops:
1. Turn switch to position „I“
(maximum suction power).
2. Close the nozzles or suction hose opening
with the palm of your hand.
3. Press the button to start filter cleaning three
times. The resulting stream of air removes atta-
ched dust from the slats of the filter elements.
5. Applications and techniques
5.1 Techniques
If used correctly, additional accessories, suction
nozzles and suction hoses can enhance the cleaning
action and reduce the cleaning effort.
Effective cleaning is achieved if you follow just a few
guidelines in combination with your own practical
experience in special fields.
Here are some basic tips.
5.1.1 Picking up dry substances
Before picking up dry substances, always ensure
that a filter bag is inserted in the tank (see section
„Accessories“ for order number). Disposal of the
picked up material is then simple and hygienic.
After picking up liquids, the filter element is wet. A
damp filter element clogs more quickly when dry
substances are picked up. For this reason the filter
element should be washed and dried or replaced by
a dry element before dry substances are picked up.
5.1.2 Picking up liquids
Before liquids are picked up, always remove the filter
bag/disposal bag.
The use of a separate filter element or filter screen is
recommended.
If foam appears, stop work immediately and empty
the tank.
8

6. After finishing work
6.1 Switching the vacuum cleaner off
and storage
1. Switch off the cleaner and pull the mains plug out
of the socket.
2. Wind up the power cord onto the handle (A).
Begin winding up the cord at the cleaner end
and not the plug end to prevent the power cord
from tangling up.
3. Empty the dirt tank and clean the vacuum
cleaner.
4. After picking up liquids: Store the upper section
of the vacuum cleaner separately so that the
filter element can dry.
5. Store the cleaner in a dry room where it is
protected from unauthorized use.
7. Maintenance
7.1 Maintenance plan
7.2.1 Emptying dirt tank » After finishing
work
7.2.2 Replacing filter bag » When required
7.2.3 Replacing filter element » When required
7.2 Maintenance work
7.2.1 Emptying the dirt tank
After emptying the tank: clean the rim of the tank and
the seals in the intermediate ring and the upper
section of cleaner before refitting them.
If the seal or groove is dirty or damaged, the suction
performance will be reduced.
Before reinserting the suction hose: clean the inlet
fitting and hose collar.
1. Switch off the vacuum cleaner and pull the
mains plug out of the socket.
2. Open the retaining clamps (A) and remove
the upper section of the vacuum cleaner.
3. Tip out the collected dirt.
4. Dispose of the dirt in accordance with
legal regulations.
9
ENU

5. Attach the upper section of the vacuum cleaner.
Close the retaining clamps (B).
6. Ensure that the retaining clamps fit properly.
7.2.2 Replacing the filter bag
1. Switch off the vacuum cleaner and
pull the mains plug out of the socket.
2. Open the retaining clamps (A) and remove
the upper section of the vacuum cleaner.
Removing the filter bag:
3. Carefully remove the filter bag connection
from the inlet fitting (C).
4. Close the filter bag connection (D)
with the slider.
5. Dispose of the filter bag in accordance
with legal regulations.
Inserting the filter bag:
6. Clean the dirt tank.
7. Insert the filter bag in the dirt tank.
8. Press the bush of the new filter bag
firmly on to the inlet fitting (C).
9. Attach the upper section of the vacuum cleaner.
10. Close the retaining clamps (B).
Ensure that the retaining clamps fit properly.
7.2.3 Replacing filter element
Never use the vacuum cleaner without a filter!
1. Switch off the vacuum cleaner and
pull the mains plug out of the socket.
2. Open the retaining clamps (A) and remove
the upper section of the vacuum cleaner.
10

Removing the filter element:
3. Turn the filter holder anticlockwise and remove it.
4. Carefully remove the filter element.
5. Clean the filter seal (B).
Check it for damage and replace it if necessary.
Inserting the filter element:
6. Fit the filter holder and turn it clockwise
to secure it.
7. Fit the filter holder and turn it clockwise
to secure it.
8. Dispose of the used filter element
in accordance with legal regulations.
9. Attach the upper section of the vacuum cleaner.
10. Close the retaining clamps (A).
Ensure that the retaining clamps fit properly.
11
ENU

8. Troubleshooting
12
Fault Cause Remedy
‡ Motor does not start.
‡ Motor does not run
in automatic mode.
‡ Reduced suction power.
‡ No suction power during
wet cleaning.
> Tank is full. • Switch off the cleaner.
Empty the tank.
‡ Voltage fluctuations. > Impedance of power supply
is too high.
• Connect the cleaner to another
socket closer to the fuse box.
Voltage fluctuations over 7%
should not occur if the
impedance at the transfer
point is ≤ 0.15 Ω.
> Suction power selected with
suction power control is too low.
> Clogged suction hose/nozzle.
> Tank, disposal bag or
filter bag is full.
> Filter element is clogged.
> Seal between tank and upper
section of vacuum cleaner is
faulty or missing.
> Cleaning mechanism
is defective.
• Set suction power in
accordance with section
„Setting suction power“.
• Clean suction hose/nozzle.
• See „Emptying tank“ or
„Replacing disposal bag,
filter bag“ sections.
• See section
„Cleaning filter element“ and
„Replacing filter element“.
• Replace seal.
• Contact FINO Service.
> Fuse of the mains socket
has blown.
> Overload protection switch
has tripped.
> Motor is faulty.
• Connect mains fuse.
• Switch off the vacuum cleaner
and allow it to cool for approx.
5 minutes. If the cleaner cannot
be started again, contact the
FINO service department.
• Have motor changed by
FINO Service.
> Power tool/pneumatic tool
is defective or not connected
properly.
> The power rating of the
electrical tool is too low.
• Check that the power tool
works or that the plug
is inserted correctly.
• Note that minimum power
rating is P >40 W.

9. Further information
9.1 Recycling the cleaner
Make the old cleaner unusable immediately.
1. Unplug the cleaner.
2. Cut the power cord.
3. Do not discard of electrical appliances
with household waste.
This unit must not be disposed of with house-
hold waste! Please contact the manufacturer
or your supplier!
9.2 Guarantee
Unauthorised modifications to the appliance, the use
of incorrect brushes in addition to using the applian-
ce in a way other than for the intended purpose
exempt the manufacturer from any liability for the
resulting damage.
Our technical recommendations of application are
based on our own experiences and tests and should
only be regarded as guidelines. It rests with the skills
and experience of the user, to verify that the
products supplied by us are suitable for the intended
procedures and purposes. Our products are under-
going a continuous further development. We reserve
the right of changes in construction and compo-
sition. It is understood that we guarantee the impec-
cable quality of our products.
9.3 Tests and approvals
The vacuum cleaner has been approved in accordan-
ce with IEC/EN 60335-2-69.
9.4 Technical data
Voltage 230 V
Mains frequency 50/60 Hz
Fuse 16 A
Power consumption IEC 1200 W
Connected load for
appliance socket 2400 W
Total connected load 3600 W
Air flow rate max. 222 m³/h
(3700 l/min)
Vacuum max. 250 hPa
(250 mbar)
Sound pressure level LpA at
a distance of 1 m, EN 60704-1 62 ±2 dB(A)
Sound level 59 ±2 dB(A)
Power cord: Length 7,5 m
Power cord: Type H05RR-F 3G1,5
Protection class 1
Type of protection IP X4
Radio interference level EN 55014-1
Tank volume 30 l
Width 380 mm
Depth 450 mm
Height 595 mm
Weight 12 kg
9.5 Optional accessories
FINO DUSTEX Fleece filter bag 30 l,
(5 pcs.), 50930
FINO DUSTEX VARIO Fleece filter bag 40 l,
(5 pcs.), 50931
FINO DUSTEX VARIO stainless steel tank 40 l,
50921
FINO DUSTEX Filter element (Type 302000461),
50892
FINO DUSTEX Y-connector, 50896
FINO DUSTEX Closure for Y-connector, 50907
13
ENU

FINO GmbH
Mangelsfeld 18
D-97708 Bad Bocklet
Tel +49-97 08-90 94 20
Fax +49-97 08-90 94 21
Table of contents