Fioresso Espresso machine User manual


Machine overview 2
Important safeguards 3
Use and care 3
First Installation / Start up 4
Using the appliance 4
Switching on and o 4
Preparing the coee 5
Change settings 7
Cleaning and maintenance 8
In case of malfunctioning 8
To rinse the machine 9
Disposal 10
Technical data 11
Trouble shooting 12
Warranty limitations 14
GENERAL OPERATING RULES
Carefully read the instruction manual and warranty limitations before using the machine.
The machine must be connected to a grounded power outlet.
The machine must be cleaned by regularly washing the drainage grid, the drip tray, the capsule con-
tainer and the tank.
Maintenance may only be performed while the machine is o.
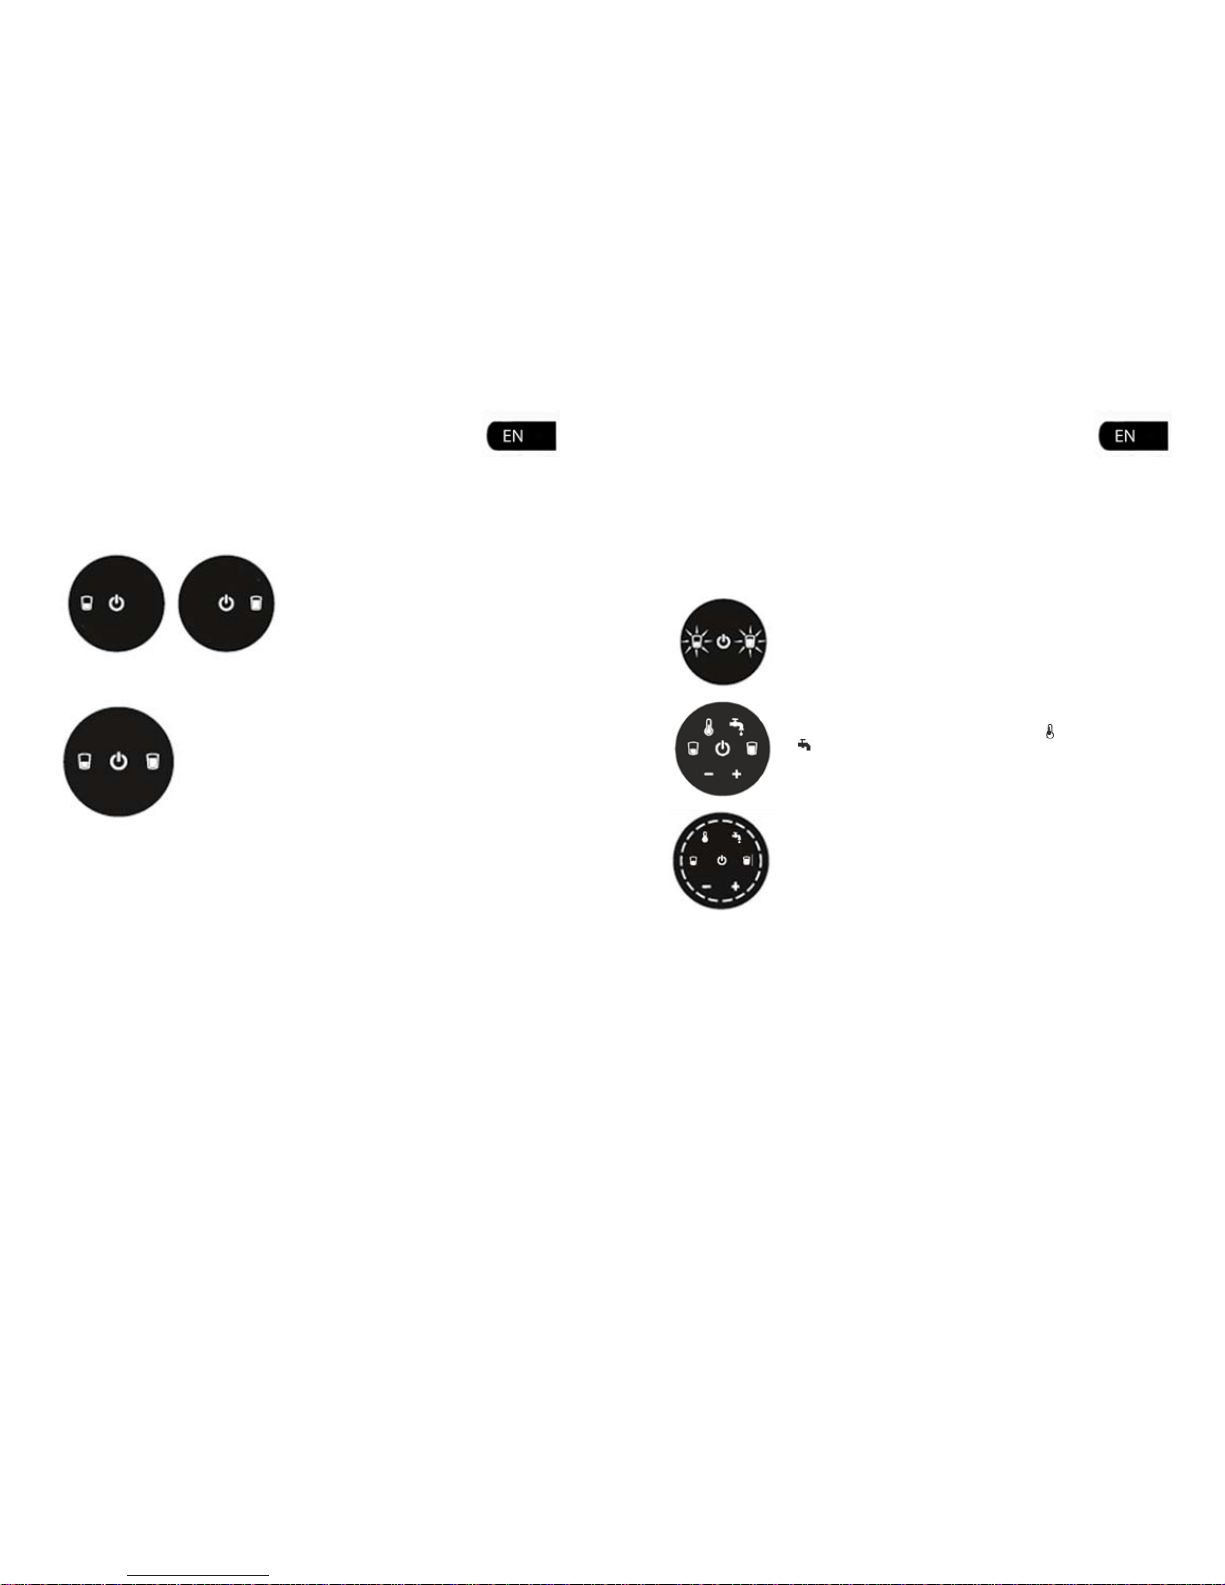
CONTROL PANEL
On/o button
Small cup sign
Large cup sign
Water sign
Temp. sign
TABLE OF CONTENTS
1
2
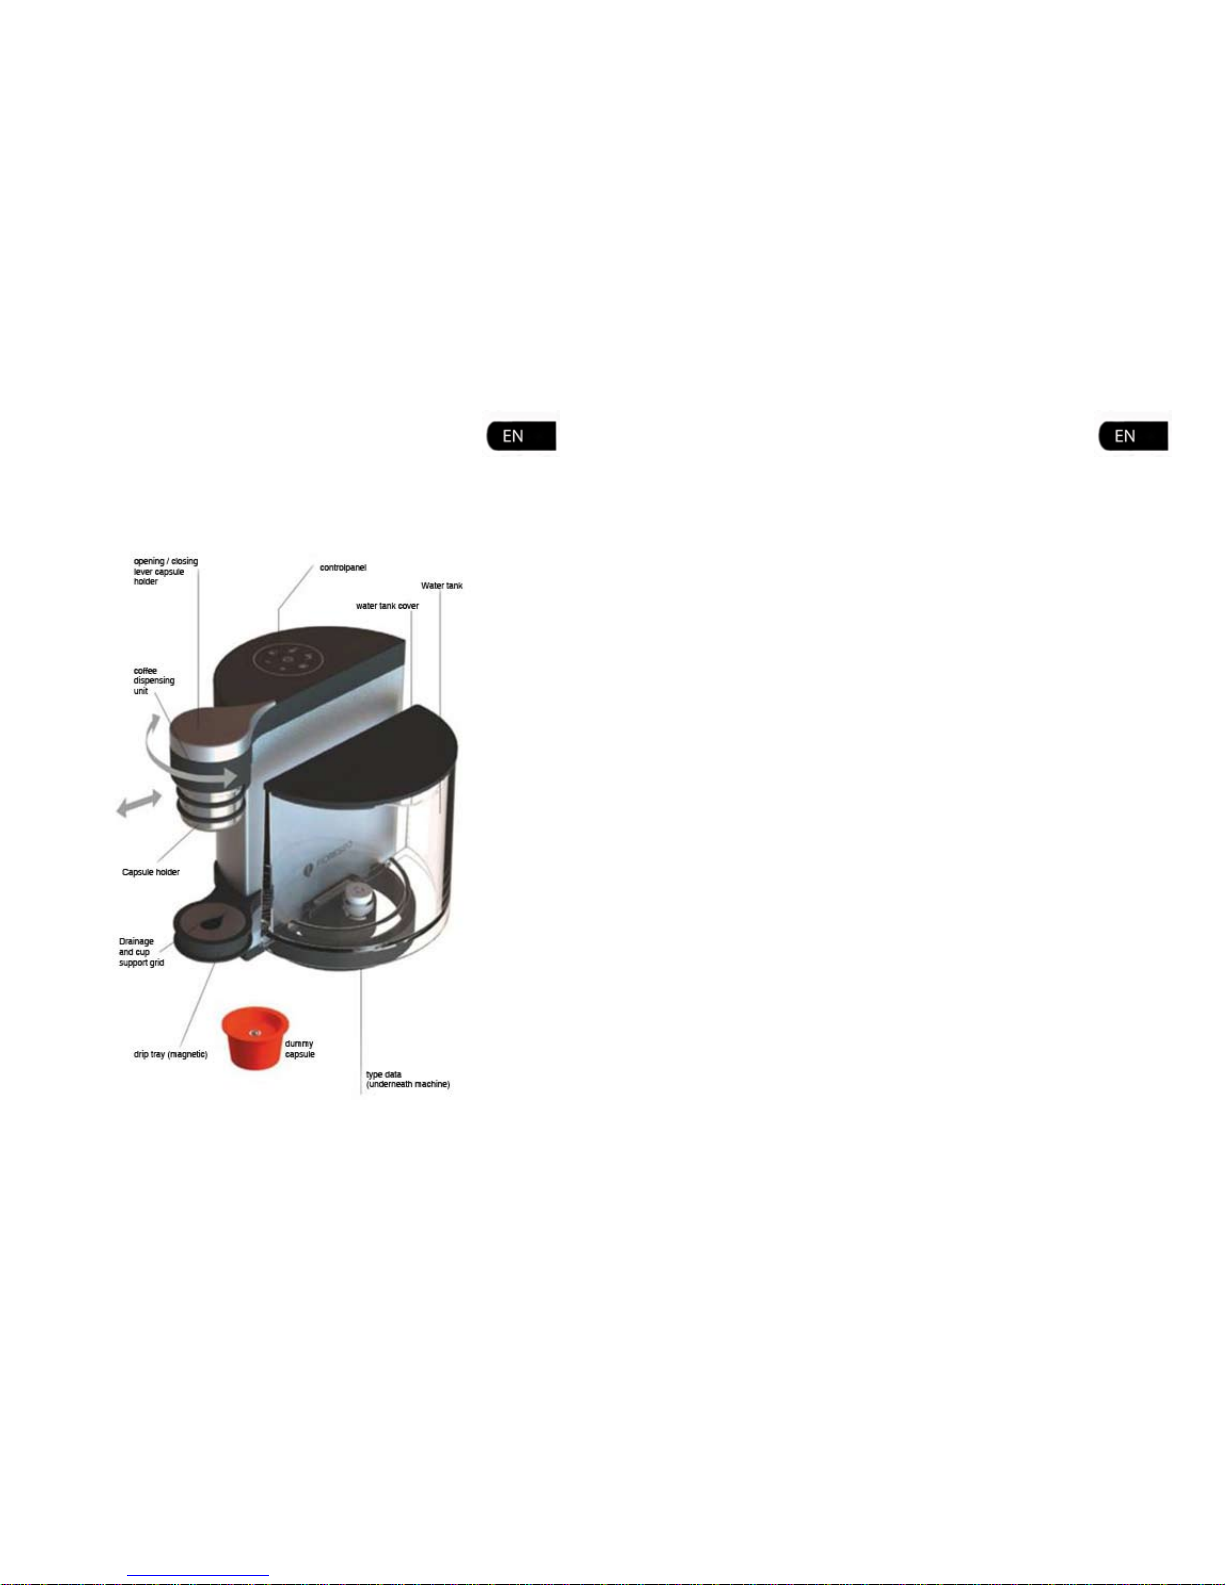
MACHINE OVERVIEW IMPORTANT SAFEGUARDS
When using an electric appliance, basic safety precautions should always be adhered to. These include
the following:
Before connecting the machine to the power outlet make sure the water tank is lled with water.-
Never use the machine if the water tank is empty.-
Never use the machine without capsule.-
Connect the machine to earthed power outlet only.-
Read all the instructions before using the machine.-
Never immerse the machine in water.-
Never put the machine in the dishwasher.-
Change the water contained in the tank regularly.-
Do not place the machine on, or near, electrical or gas burners or inside a hot oven.-
The appliance must be used by adults only.-
To protect against re, electric shock or personal injury do not immerse the cord, plug or the body of-
the machine in water or any other liquid.
Do not use the machine for purposes other than those for which it was designed.-
Using accessories not recommended by the manufacturer may result in re, electric shocks or-
personal injury.
Using other capsules than Fioresso espresso capsules may cause damage to the espresso machine.-
WARNING: To reduce risks or electric shock or personal injury, repairs should lways be done by-
authorized personnel only. No user serviceable parts are inside.
After changing the water, insert the tank in the machine and check that it is positioned correctly.
We recommend descaling the machine at least once per year or after 500 espressos. For descaling use a
liquid descaling agent for coee machines suitable for contact with foodstus. Do not throw away the
dummy capsule provided in the packaging; you will need it for the next descaling cycles. See the instruc-
tions in the Descaling chapter.
It is advisable to keep the original packaging (at least for the duration of the warranty period) in order to
ship the machine to a service center for repair or servicing if necessary. Any damage caused by transport
without adequate packaging will not be covered by the warranty.
3
USE AND CARE
Remove the packaging, and check that the machine is in perfect condition before starting the installa-
tion. If not, please contact your supplier. Read the safety safeguards before proceeding.
Install the machine in a place with a temperature between 5°C and 40°C, and away from water taps and
sinks. Unwind the power cord. Plug the power cord into the duly earthed power socket with a power of
between 220V and 240V. In case the plug and power socket are not compatible have the plug replaced
with a proper one by an authorized servicer.

FIRST INSTALLATION / START UP
Read the instructions carefully.
Install the appliance in a place with a temperature between 5°C and max. 40°C.
Check that the voltage of the power mains is the same as indicated on the data plate of the appliance
(located on the rear of the machine).
Connect the appliance to a power socket that guarantees a minimum supply of 10A if fed between 220
V and 240 V and eciently earthed.
If the plug and outlet are not compatible, have the plug replaced with a proper one by an authorized
service center.
Place the machine on a countertop away from water taps and sinks.
After removing the packaging, check that the appliance is in perfect condition before installation.
USING THE APPLIANCE
This machine has been developed to make perfect ristrettos and espressos, using Fioresso espresso
capsules only.
The drip tray is removable from the base in order to allow for a taller cup.
4
SWITCHING ON AND OFF
To switch on the machine, press the on/o button in the center of the control panel. The small
cup sign and the large cup sign light up with a xed white light.
The machine is ready to dispense a ristretto or an espresso coee.
The machine starts heating only after you have selected the small cup (ristretto) or the large cup
(espresso).
After 2 minutes without using, the machine switches o automatically. The two luminous cups
signs switch o.
PREPARING THE COFFEE
Always take care to turn the opening/closer lever suciently to the right.
Press the small cup sign to dispense a ristretto or the large cup sign to dis-
pense an espresso.
The cup sign selected lights up with a xed white
light, while the perimeter of the control panel is lit
up gradually.
The machine is reaching the necessary temperature
and will start to dispense the espresso after about
30 seconds.
The Fioresso espresso machine has been
developed for the exclusive use of Fioresso
espresso capsules.
Place a cup on the cup support grid.
Insert the capsule in the capsule holder.
Insert the capsule holder in the coee
dispensing unit.
Turn the opening/closing lever to the
right until the stripe on the lever and the
machine align with each other.
5
When the light in the perimeter of the control panel
switches o, the selected cup remains lit with a xed
white light and the espresso is dispensed
Immediately afterwards, the machine starts loading water for the next
coee.
Wait until the loading cycle is nished before removing the used capsule.
At the end of the cycle, the two cups are lit with a xed white light: the
machine is ready to prepare other coee.
Note: Drip tray is removable from the base in order to place a bigger cup.
6
To prepare multiple coees proceed as follows:
Check the water level in the tank. If the tank icon on the control panel is lit with a xed white light
this indicates that the tank is empty.
Turn the opening/closing lever of the capsule holder to the left. Remove the used capsule from the
capsule holder, insert a new capsule and repeat the procedure described above.
Attention:
The machine is provided with an automatic stop, but dispensing of coee can be stopped at any time by
pressing the same cup sign already selected.
To enjoy the perfect espresso it is recommended to change the water in the tank regularly and to use the
exclusive Fioresso glass cups to preserve the required temperature.
Distilled or highly ltered water is not suitable for making coee.
CHANGE SETTINGS
To modify the amount of water dispensed and/or the temperature, proceed as follows:
Press and hold the on/o button for at least 5 seconds.
The small cup icon and the large cup icon light up with blinking white lights.
Press the cup icon from which you want to change the setting.
The two icons with the symbol of the thermometer and the water tank
start to blink with a white light.
Press the icon from which you want to change the setting (temperature level
or cup volume).
The number of marks on the circular perimeter indicates the current setting.
Choose the new value by pressing the + or – symbol.
Press the cup icon selected previously to return to the previous selection,
otherwise press the cup icon a second time to leave the programming.
The changes have been saved.
7
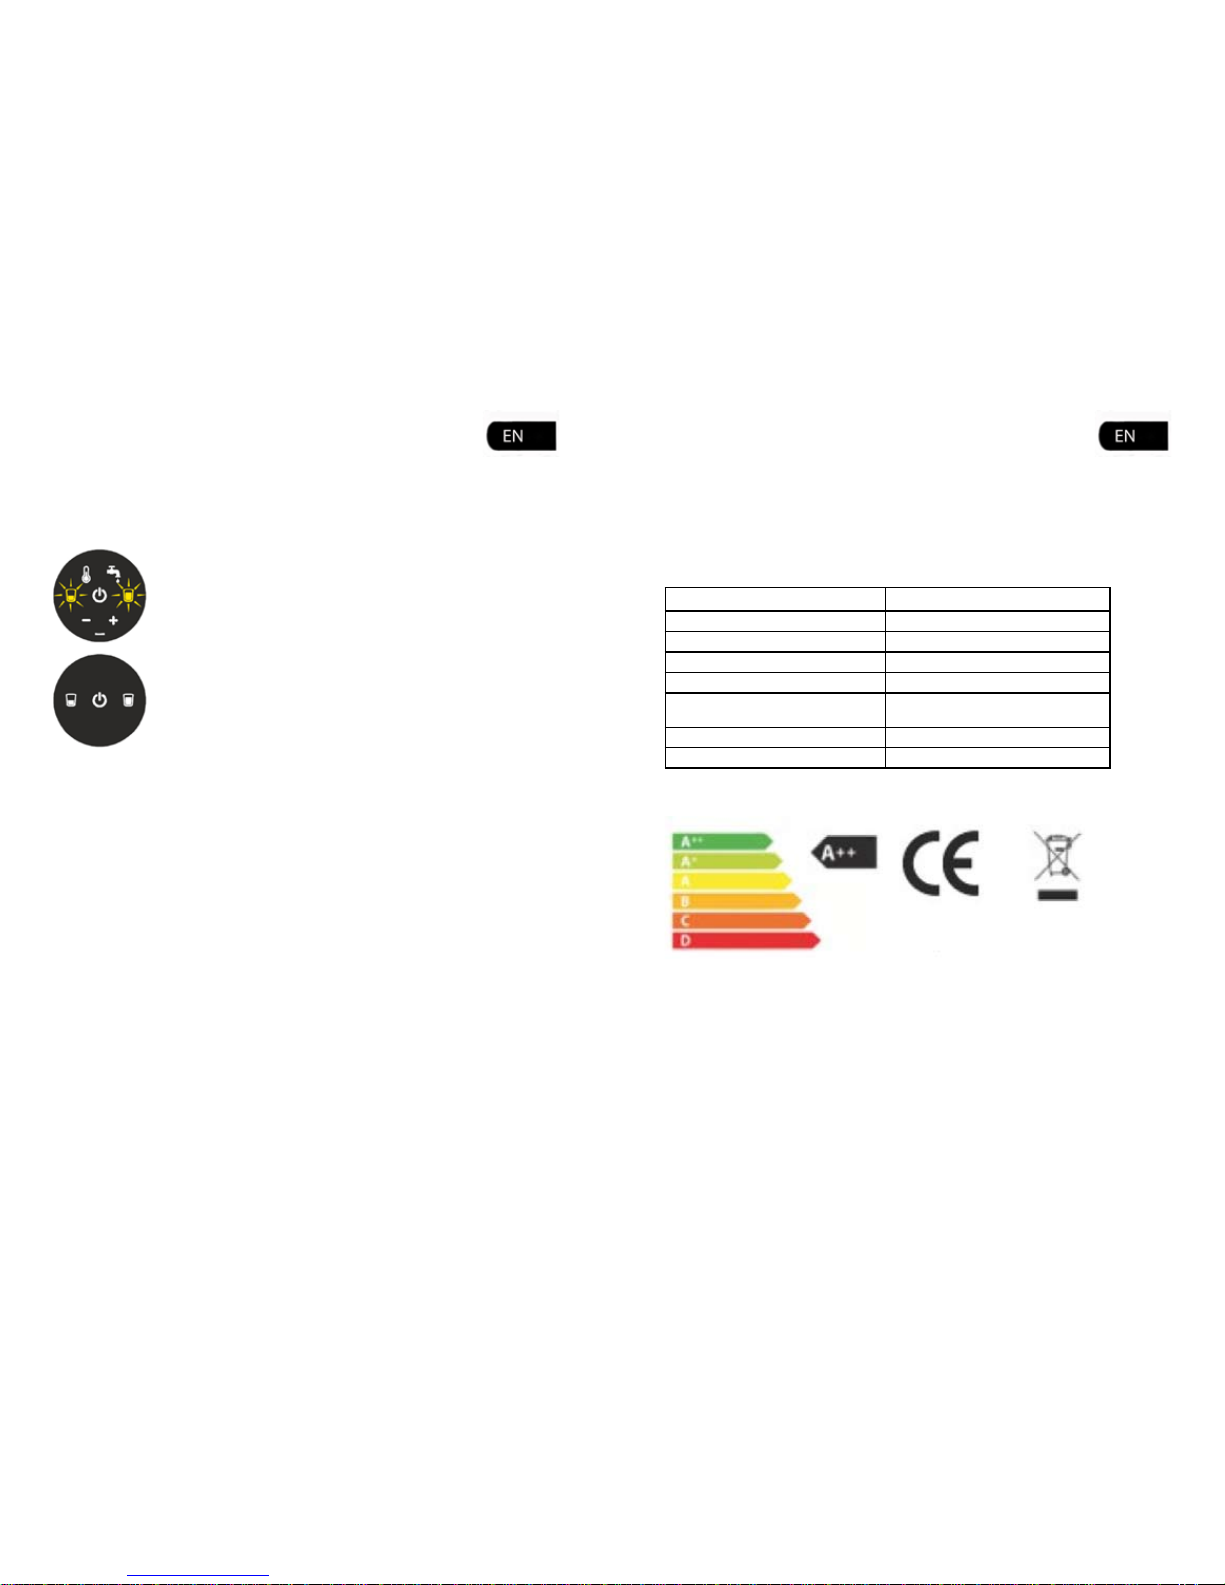
To restore the default factory settings, proceed as follows:
Press and hold the on/o button for 5 seconds. The small cup icon and the large cup icon light up with
blinking white lights. Press the thermometer icon and the water tank icon at the same time. Both icons
light up in red, then in blue.
At this point reset is completed.
CLEANING AND MAINTENANCE
How to clean
Remove the plug from the socket before cleaning the machine.
Wait until the machine has cooled before cleaning.
Clean the body and attachments with a wet cloth and then wipe with a non-abrasive dry cloth. Do not
use detergents.
Do not expose the machine to extended jets of water or immerse it in water, neither partially nor fully.
Capsule holder and grid can be washed in the dishwasher. The water tank may not be washed in the
dishwasher.
IN CASE OF MALFUNCTIONING
Do not use the appliance if the cord or plug are damaged or if the appliance shows signs of
malfunctioning or has been damaged in any way. If the power cord is damaged it must be replaced.
In case of damage or malfunction, turn o the appliance and do not tamper with it.
For repairs contact your local sales representative for an authorized service center and request the use of
original spare parts only.
Failure to comply with these instructions may compromise the safe operation of the machine and will
result in the forfeiture of warranty rights.
8
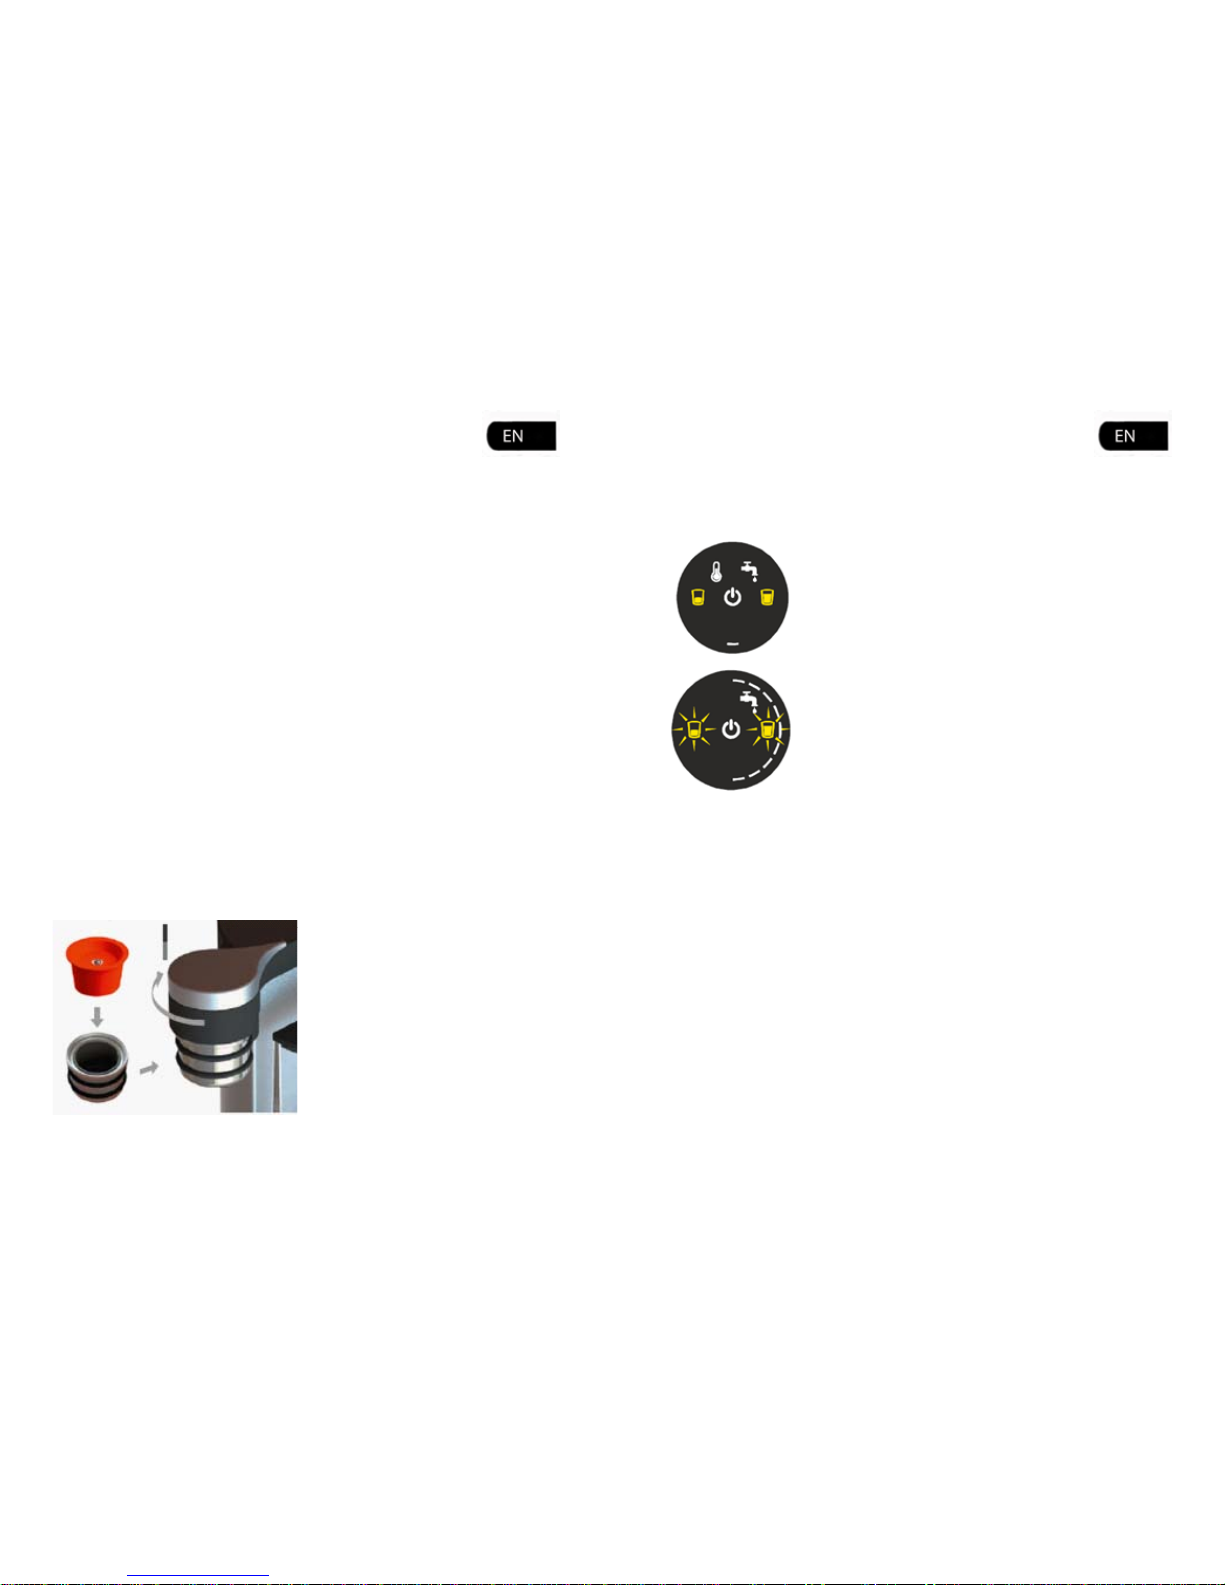
Dummy capsule
Empty the tank.
Insert the dummy capsule provided for cleaning in
the capsule holder.
Fill the tank half with the product indicated for
descaling (liquid scale remover for coee machines
suitable for contact with foodstus) and half with
tap water.
Place a plastic container with a capacity of at least
half a liter under the capsule holder.
9
Start of process:
Press and hold the thermometer and water tank icons at the same time for
about 3 seconds.
The thermometer and water icons light up with xed yellow lights. The
descaling cycle has begun.
The liquid that comes out is collected in the container you put into posi-
tion.
Place the container in such a way as to prevent splashing.
The descaling cycle is nished when the small cup and large cup icons
light up with blinking yellow lights and the water icon lights up with
blinking white light. Before dispensing coee again the machine should be
thoroughly rinsed.
If the descaling cycle is interrupted due to a power failure or because the machine is switched o by
mistake, the entire operation must be repeated before the machine can be used: plug in the machine
and proceed as described from“Start of process”.
Attention:
Do not throw out the dummy capsule provided in the packaging; you will need it for the next descaling
cycles.
The liquid that comes out of the dispensing unit during the process may be warm. Only use liquid scale
remover for espresso coee machines suitable for contact with foodstus.
TO RINSE THE MACHINE
When the descaling cycle is complete, you must proceed as follows:
Rinse the tank with tap water.
Fill the tank with fresh tap water.
The empty capsule remains inserted in the capsule holder and the lever remains closed.
10 11
Press one of the yellow blinking cups (small or large). The rinse cycle has begun.
Repeat the operation 1-2 times to rinse the machine thoroughly.
The rinse cycle is ended when the yellow lights on the two cups (small and
large) switches to a xed white light.
Remove the dummy capsule and enjoy your next coee.
Attention:
Vinegar, detergent containing vinegar, lye, salt, formic acid, etc. cause damage to the machine.
Never leave the liquid scale remover too long in the machine!
Water with added scale removing substances cannot be drunk or used in any other way.
DISPOSAL
Important information for correct disposal of the product in accordance with EC directive
Disposal of end-life electric equipment by private households in the European Union.
The WEEE symbol used on this product means that it must not be disposed of together with other
domestic waste and should be collected separately. Consumers have the opportunity to hand in their
used appliance to their local sales representative free of charge on a 1:1 basis when they purchase a new
product.
For further information about the collection of appliances to be scrapped, please contact the local
authority in your town of residence or the local waste disposal service.
Consumers are responsible for disposing of end-of-life appliances in accordance to the current provi-
sions of law and non-compliance therewith.
The correct disposal of this product will contribute to protecting the environment, natural resources and
human health.
TECHNICAL DATA
Structure material anodized aluminum
Water tank 0,7 liter
Pump with continuous water ow, vibration-fee
Weight of machine 3,1 kg (without packaging)
Voltage 220 - 240 V, 50/60 Hz
Power 900 W
Standby 0,6 Wh , Sleep 0,3 Wh
Temperature environment 5° C to 40° C
Dimensions diameter 160 mm, height 210 mm
The manufacturer reserves the right to make changes or improvements without notice.

TROUBLE SHOOTING, MALFUNCTION, DIAGNOSTIC
The machine
dispenses no coee,
without error signal.
During coee
dispensing, the
small and large cup
signs are lit with a
xed red light, and
accompanied by an
acoustic signal.
The small and large
cup signs are lit
with a xed red
light, and the rst
mark in the circular
perimeter (white
stripe in picture) of
the control panel is
lit with white xed
light.
The small and large
cup signs are lit with
a xed red light, and
the third mark in the
circular perimeter
(white stripe in the
picture) of the control
panel is lit with white
xed light.
Process error
The pressure
measured in
the system is
too high
No water in the pump. Check if the water tank is clean and
lled with fresh water, check its posi-
tion on the machine.
Never use the machine without
capsule.
Press again on the small or large cup
sign to dispense coee.
If the problem persists, contact your
local sales representative.
The closing lever of
the capsule holder is
open or not closed
properly.
The capsule is defec-
tive.
Close the lever capsule holder and
press again the small or large cup to
dispense coee.
Insert a new capsule and press again
the small or large cup to dispense
coee.
Level sensor
problem
The level sensor is
defective.
The thermal sensor of
the heating system is
switched o, meaning
an overheating.
Disconnect the power cable and
wait for about 30 seconds, then
reconnect the power cable.
Disconnect the power cable and
wait for about 10 minutes, then
reconnect the power cable.
If the problem persists, contact your
local sales representative.
__________________________________________________________
Thermal sensor
problem
Press again on the small or large cup
sign to dispense coee.
If the problem persists, contact your
local sales representative.
_________________________________________________________
_________________________________________________________
_________________________________________________________
Action
Diagnostic
Cause
Trouble,
malfunction
indication
12
The small and large
cup signs are lit with a
xed red light, and the
fourth mark in the cir-
cular perimeter (white
stripe in picture) of the
control panel is lit with
white xed light.
The small and large
cup signs are lit with a
xed red light, and the
fth mark in the circu-
lar perimeter (white
stripe in picture) of the
control panel is lit with
white xed light.
Position sensor
problem
The position
sensor did
not detect the
position of the
piston pump
during a due
time.
Disconnect the power cable and wait
for about 10 seconds the reconnect the
power cable.
Insert the dummy capsule in the capsule
holder and close the lever.
Ensure the water tank is lled and press
the + and – button at the same time.
Wait around 1 minute for the two cup
signs to turn white again.
If the problem persists, contact your local
sales representative.
Heating
problem
The thermal fuse
is open, due to an
overheating.
Contact your local sales representative.
ATTENTION:
Before packing the machine, proceed as follows: Connect the machine to the power mains.
Remove the water tank. Insert the capsule holder in the coee dispensing unit without capsule.
Place a high cup on the cup support grid.
Press the on/of button on the touch panel: both cup icons are lit with a xed white light.
Simultaneously press and hold the + and - symbols, until both cups lit with a red xed light (between 5
and 10 seconds).
Wait until the machine stops dispensing water. Then unplug the machine.
__________________________________________________________
_________________________________________________________
13

WARRANTY LIMITATIONS
The warranty does not cover damage or malfunctions caused by:
• failure to carry out periodic descaling
• operation with a voltage that diers from the rating shown on the data plate
• improper use or use that is not compliant with the instructions
• damage due to handling by third parties and repair costs caused by handling by unauthorized service
centers are at
the customer’s expense.
It is advisable to keep the original packaging (at least for the duration of the warranty period) in order to
ship the machine to a service center for repair if necessary. Any damage caused by transport without
adequate packaging will not be covered by the warranty.
Any operation, cleaning and care other than normal use must be undertaken by authorized technical
service center approved by Fioresso International BV. The Fioresso machine has been produced by Gotec
S.A.
14
Table of contents
Popular Coffee Maker manuals by other brands

La Pavoni
La Pavoni EUROPICCOLA EPBB-8 instruction manual

Nespresso
Nespresso Gemini 220 user manual

de Jong Duke
de Jong Duke Zia 1.000 Series user manual

Ninja
Ninja DualBrew Pro Specialty Coffee System quick start guide

WMF
WMF PERFECTION 800L Series operating instructions

Gaggia Milano
Gaggia Milano ANIMA CLASS Series operating instructions


