Fiori E81 AQUA User manual

Model E81 AQUA
Model E83 KEYLINE
CANOPY HOODS

2

3

4
Ins tallation
When installed, the distance between hood and burners must be not
less than 65 cm. above electric burners or 75cm above gas or
mixed- fuel burners
Electric connection
Before completing any connection, make sure the house voltage
corresponds with the voltage indicated onthe label affixed inside
the hood. It is advisable to call a qualifed technician to make the
electricalconnection
Appliance fitted with plug.
Connect it to a socket which conforms with current regulations.
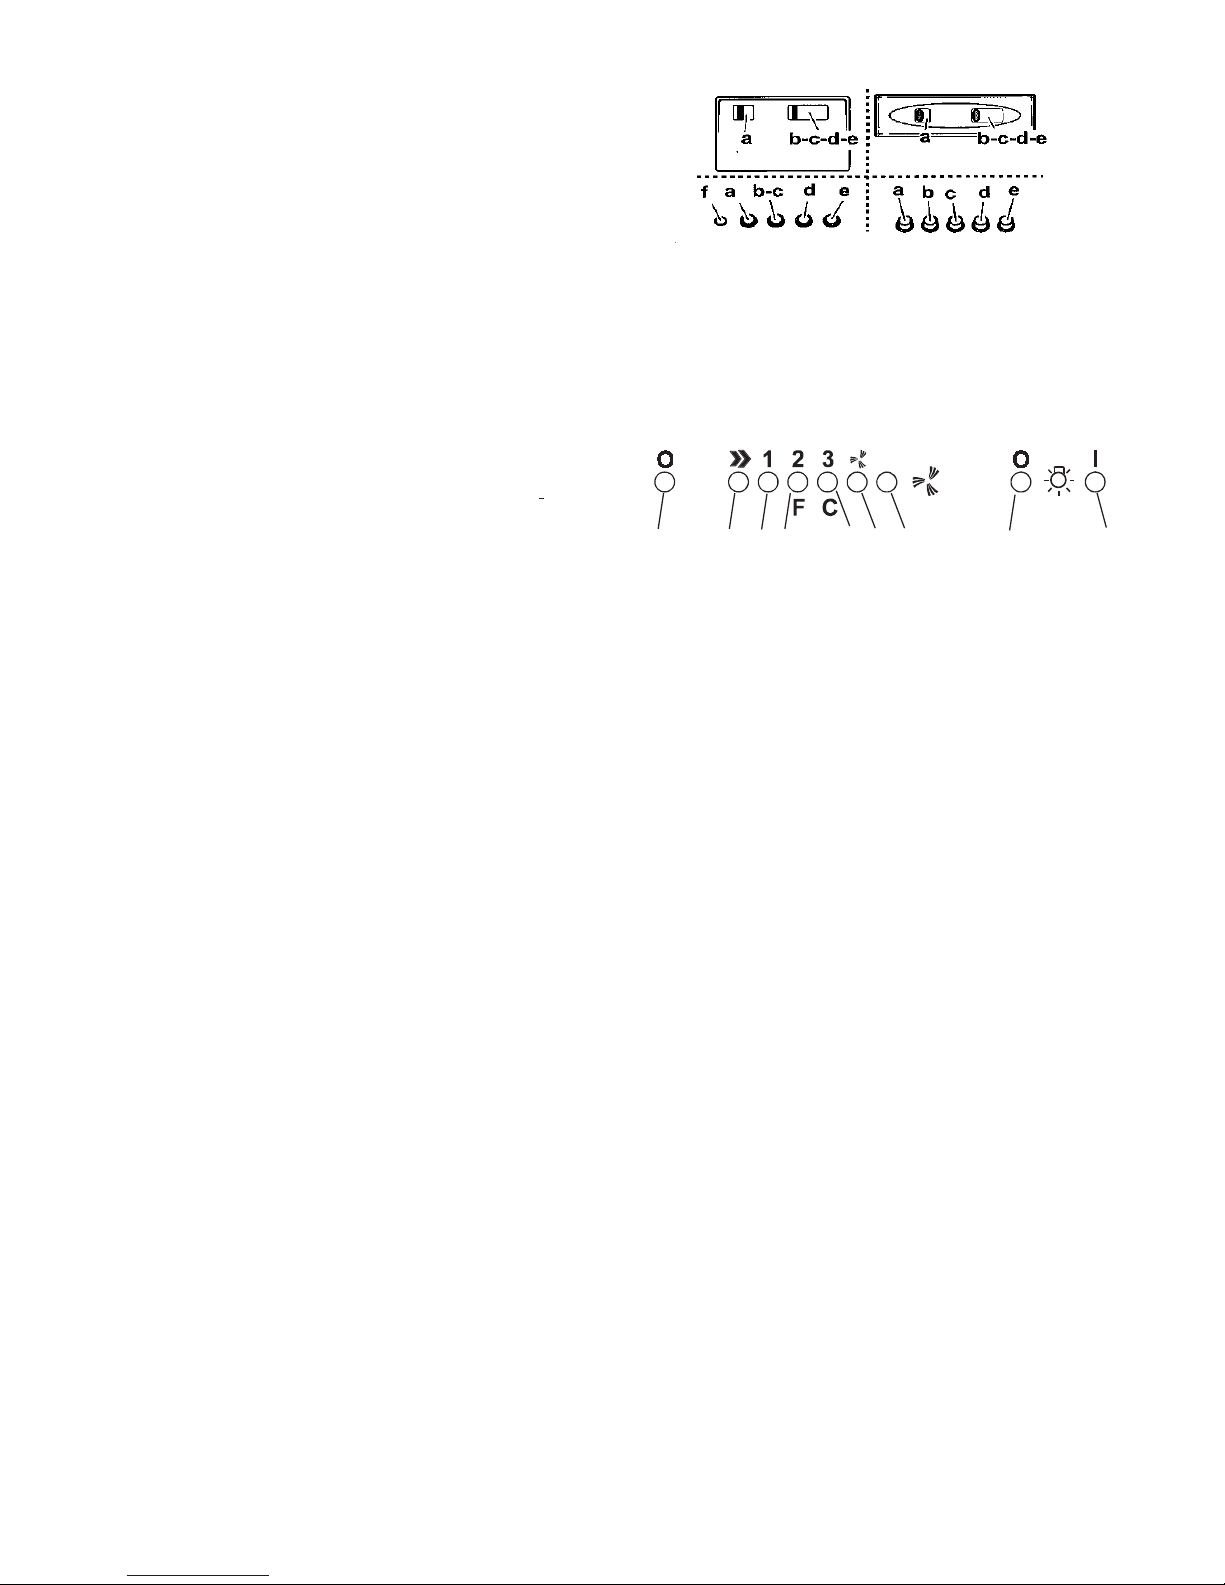
Electronic control panel
1-MotorOFFbutton
2-Onbuttonand motor speed selection button 1
- 2 - 3 - 1 - 2 - . . . .
3-Speed1LED
4-Speed2LEDandmetal greasefilter saturation
LED(inthelattercase,theLEDwillflash-See
instructions on grease filter cleaning).
5-Speed3LED and carbon filter saturation LED
(in this latter case, the LED will flash - See
instructions on active carbon filter
replacement).
Warning!
The active carbon filter saturation LED is not activated
In order to activate the carbon filter saturation indicator
press buttons 2 and 7 simultaneously for 3 seconds.
Initially, only LED 4 will flash, then after the 3 seconds have
passed, LED 5 will also start flashing, indicating that the
1234 56789
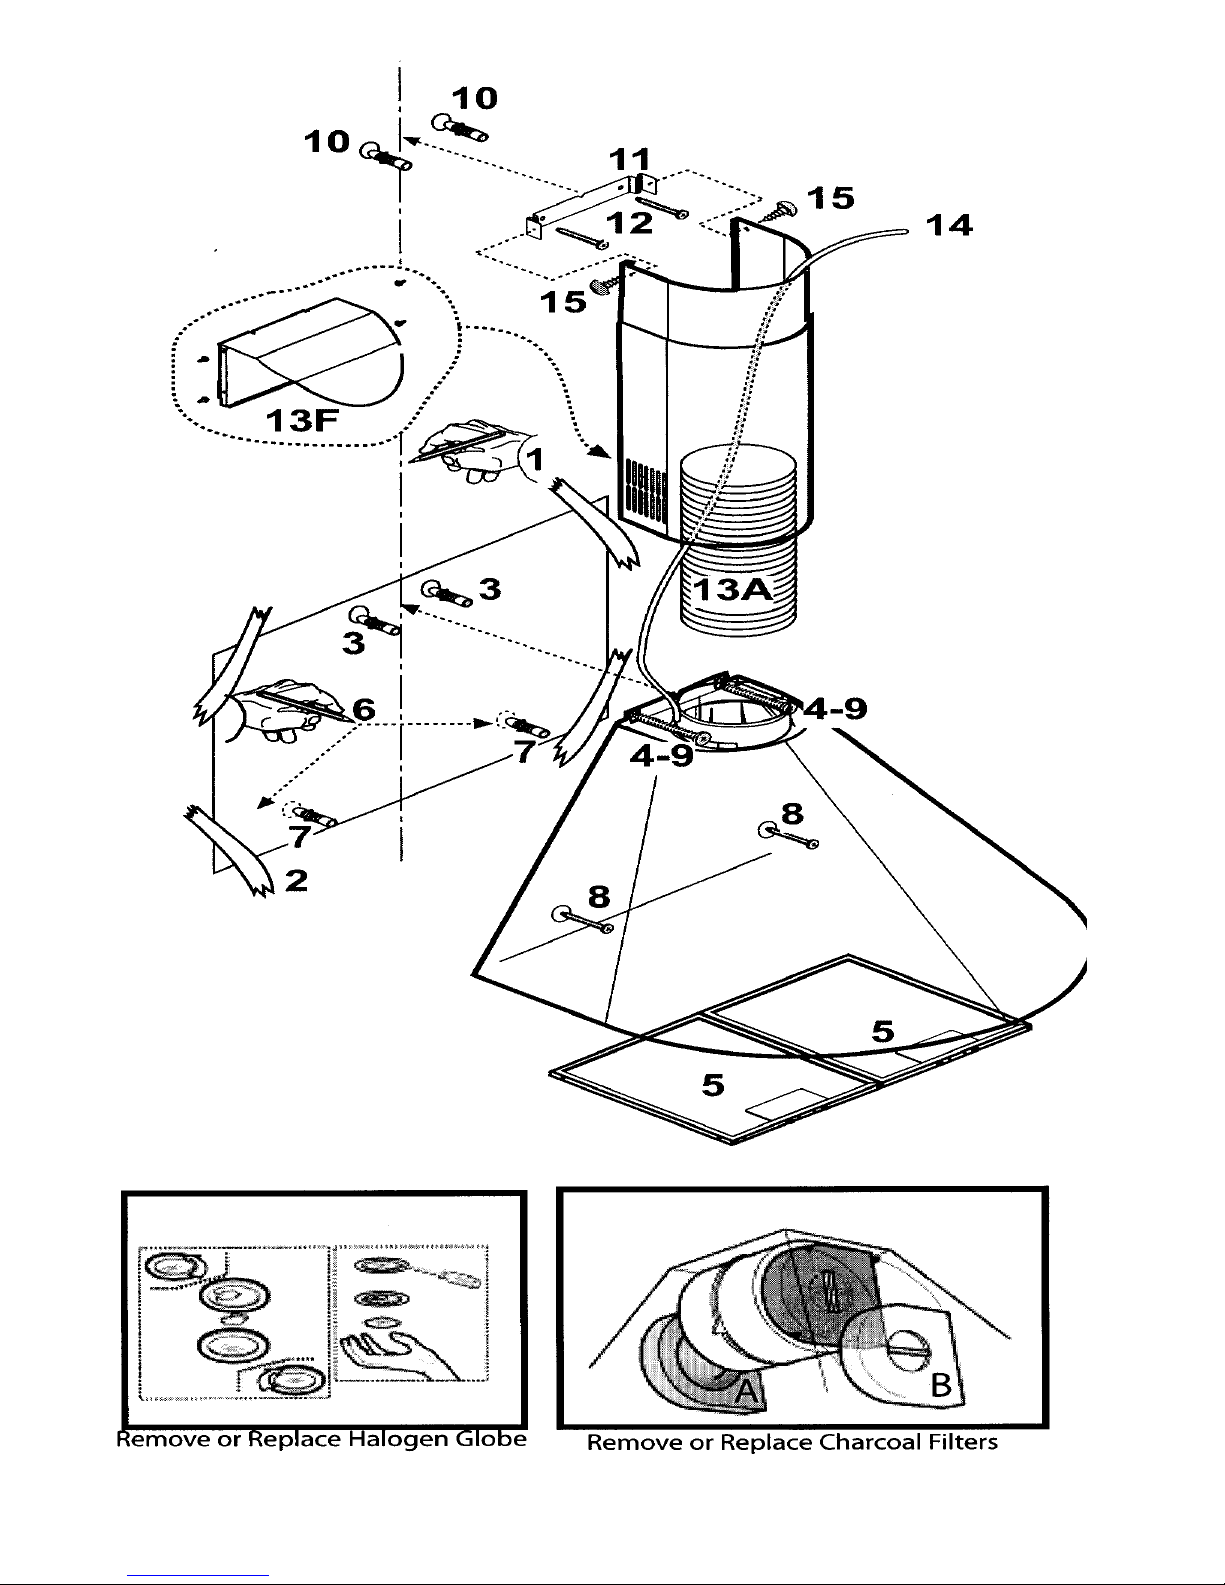
The exhausting pipe is not supplied and must be purchased apart.
The manufacturer only recommends the use of smooth bore
ducting. As this does not restrict air flow during use.
Do not tile or grout or silicone the appliance to the wall. Suface
mounting only.
Do not fix the chimeny flue to furniture or shelves unless the
chimney flue can be easily removed in case maintenence is
ever required.
USE
The cooker hood is provided with an upper air exit, B- for
discharging fumes externally for models including chimney
flue C- (Suction version A- exhaust pipe 13A not supplied)
In the instance where it is not possible to discharge cooking
fumes and vapours externally even if utilising the model with
chimney flue. C- the cooker hood may be used in the filter
version F- by mounting two active carbon filters E- the fumes
and vapours are the recycled via the upper grill G- (depending
on the model the grill may be directly plcaed on the chimney
flue or via the mounting of two small grills if in possesion
of a model with grill placed on chimney flue the two H exten
-sions must be placed on the deflector 13F The models provided
with small dome D may only be used in the filter version F
The models without suction motor operate only in the suction
version and must be connected to a peripheral suction unit (not
supplied)
Operation
The cooker hood is provided with a key or pushbutton control
panel situated of the frontal part of the cooker hood type in
possession. for proper operation consult the text below and the
relative illustration:
a. ON/OFF lighting b. OFF motors
c-d-e. Minimum suction power (c) medium (d) maximum (e)
(f) Operation warning light (where present)
carbon filter saturation control system is active. To switch
off the system, re-press the same two buttons after 3
seconds LED 5 will stop fladhing and the device will be
switched off
6- Intensive speed LED
7- Intensive speed ON switch. This speed should be used
when the concertration of cooking fumes or odours is
particularly strong (for when frying , cooking fish etc).
The fast speed will run for about for about 5 minutes and then
return to the speed previously set automatically (1, 2 or 3),
or switch off the fast speed before the end of the 5 minutes,
press button 1 or button 2 (see page 13 ).
8 - OFF lamp button
9 - ON lamp button
If the hood fails to operate correctly, briefly disconnect it from
it from the mains supply for almost 5 sec .by pulling out the plug.
Then plug it in again and try once more before contacting
the Technical Assistance
Consult the designs in the front pages referenced in the text by
alaphet letters. Closely follow the instructions set out in this
manual. All responsibility for any eventual inconviences
damages or fires caused by not complying with the instructions
in the manual is declined.
Use the high suction speed in cases of concentrated kitchen
vapours. It is recommended that the cooker hood suction is
switched on for 5 minutes prior to cooking and to leave in
operation during cooking and for another 15 minutes approx-
imatley after terminating cooking.

5
If the hood fails to operate correctly, briefly
disconnect it from the mains power supply for
almost 5 sec. by pulling out the plug. Then plug it
in again and try once more before contacting the
Technical Assistance Service.
Warning!
— The hood cannot be connected to flues of
other appliances that run on energy sources
other than electricity.
— When the hood is used at the same time of
other appliances that run on energy sources
otherthan electricity,provision mustbe made
for an adequate supply of air.
— No food must be cooked flambeé underneath
the hood.
Theuse ofan unprotectedflame isdangerous
for the filters and could cause fires.
Therefore,never usean openflame underthe
hood.When frying foods,never leavethe pan
alone because the cooking oil could flare up.
— Please, keep to the provisions of official
directives regarding the question of fume
discharge.
— The manufacturers refuse to accept any
responsibility for damage to the hood or its
catching on fire because of failure to observe
the above instructions.
Maintenance
Before performing any maintenance operation,
isolate the hood from the electrical supply by
switching off at the connector and removing the
connector fuse.
Or if the appliance has been connected through
aplug andsocket,then theplugmust beremoved
from the socket.
Metal grease filter (2 or 3 pieces)
The metal grease filter lasts forever and must be
washed either by hand or in the dishwasher
(65°C)with suitable detergents.
The metal grease filters must be washed at least
once a month and anyhow whenever LED 4
indicates the saturation of the filter.
This LED warns you when the metal grease filter
needs to be cleaned.
This LED flashes to warn you that the metal
grease filters must be cleaned.
Generally, these must be cleaned after 40 hours
of use.
Once thegrease filters have been cleaned, press
button 1for some seconds until you hear the
acoustic signal (beep): the LED 4 will now stop
flashing.
When washed in a dish washer, the grease filter
may discolor slightly, but this does not affect its
filtering capacity.
Remove the filter using the handles designed
for this purpose by pulling the filter backwards
and then downwards (Fig. 1).
Let thefilter dry without damaging it before putting
it back into place.
Carry out the above steps in reverse order to put
the filters back after having washed them.
Carbon filter (2 pieces)
This filter dissolves cooking odors.
The carbon filter must never be washed.
The carbon filter should be replaced every 4
monthsunder normaluseand anyhow whenever
LED 5 indicates the saturation of the filter.
This LED indicates carbon filter needs to be
replaced.
This led flashes to warn you that the carbon filter
must be replaced.
Thismust bedone afterapproximately 160hours
of use.
Once you have replaced the carbon filter, press
button 1for about 3 seconds until you hear the
acoustic signal (beep).
The LED 5 will now stop flashing.
Using the hood—
Thehood is provided with a motor with severalspeeds.
For the best performance,we recommend using
the low speeds in normal conditions and the high
speeds in particular cases of strong odour and
vapor concentration.—We recommend starting
up the hood a few minutes before cookingand
keeping it running until all the odors have been eliminated.

6
Mounting and replacing the carbon filter:
a) Disconnect the hood from the electricity.
b) Remove the metal grease filters (Fig. 1).
c) If thefilters havenot beeninstalled, placeone
filteroneachsideso that they cover the grates
protectingthe rotor on the motor. Then turn the
center handle for the filters in the clockwise
direction (Fig. 2).
d) If the charcoal filters have already been
installed (covering the grates protecting the
rotoronthe motor) and must be replaced, turn
the central handle in the counter-clockwise
direction until the filters are unlocked.
e) Refit the the metal grease filters.
Cleaning
To clean the outside of the hood use a cloth
moistenedwith denatured alcoholorneutralliquid
detergents. Never use products containing
abrasive.
Wipebrushed stainlesssteelin the samedirection
as the brushing to avoid scratching.
Attention
Failure to observe the rules for cleaning the
appliance and changing and cleaning the filters
may cause fires.
Therefore, we recommend observing these
instructions.
Replacing the lamp
a) Disconnect the hood from the electricity.
b) Unscrew the light shield (Fig. 3).
c) Replace thedamagedlampwithanewhalogen
lamp of 20 Watt max.
d) Refit the the metal grease filters and the light
shield.
e) Before calling for repair service because the
hood fails to light up, make sure the bulbs are
screwed in tightly.
Use:Two systems are available
Exhaust mode (S)
Vapors are extracted outside through an exhausting pipe that is
affixed to the connectionring above the hood.Diameterofthe
exhaustingpipemustbeequaltothat of the connection ring.
Attention!
If the hood is supplied with carbon filter,then it must be removed.
Filter version (K)
The air is filtered through a carbon filter (for itsinstallation see
paragraph "Carbon filter") andrecirculated into the room through
the grating onthe lower side of the chimney.
Attention!
If the hood is not supplied with carbonfilter, then it must be
ordered and mounted.
This version is used when there is no exhaustductfor venting
outdoorsor when it is impossibleto install one.

Warranty Certificate (Australia)
Fiori Holdings Pty Ltd ABN 11 089 098 297
PO Box 45, Marayong NSW 2148 PH 02 9831 5594 Fax 02 9831 3803
The benefits conferred hereunder are in addition to all other rights and remedies in respect of the
product which the purchaser has by virtue of the Trade Practices Act 1974,and similar State and
Territory legislation and nothing contained in this Certificate shall in any way limit the purchaser’s
rights under such legislation
Fiori Holdings Pty Ltd warrants this product against manufacturing defects and faulty materials, for a
period of 24 months from date of purchase.
This warranty is limited to the repair or replacement free of charge within the warranty period of any
component or part, which Fiori Holdings Pty Ltd at its discretion determines to be faulty. Such warranty
is subject to the terms and conditions set out below.
TERMS AND CONDITIONS
The following conditions apply in respect of the warranty given in this certificate,
1. The warranty applies within the Commonwealth of Australia and only if the product is
used for domestic purposes and where normal vehicular access is provided.
2. The warranty does not apply for the following:
(a) Light globes
(b) To paint finishes and glass.
(c) If defect is caused by misuse - wear and tear - dirt - fire - accidental damage or faulty
electrical connection
(d) If the product has been repaired or serviced by an unauthorized person
(e) If installed contrary to Fiori Holdings Pty Ltd instructions
3 For warranty service outside of Capital City metropolitan area or outside the normal service
area of the nearest authorized service provider the purchaser shall be liable for traveling
expenses and cost of transport of the product or parts to and from the Service Provider. NOTE:
A charge shall be made if the service person finds the product is functioning correctly.
4 The purchaser must produce proof of the date of purchase together with this Warranty
Certificate when making a claim.
5To abide by the guarantee please complete the details below and keep with your purchase
invoice.
For details of your nearest Service Provider please select from the Service Provider list or
contact the warranty administrator, Data Works Administration on 02 9674 2361
-----------------------------------------------------------------------------
Guarantee Record
Name of Purchaser: ________________________________________________
Address: ___________________________________________________________
Date of Purchase: _________Model No: ___________Serial No: _______
Name of Supplier: __________________________________________________
Address: ________________________________________________________
Invoice No: ______________________________________________________
Complete but do not post
7

8
LI19UBEd. 03/07
This manual suits for next models
1
Table of contents
Other Fiori Ventilation Hood manuals
Popular Ventilation Hood manuals by other brands

Siemens
Siemens LC55SK950W Operation and installation instructions

Kontor-Hermsen
Kontor-Hermsen KH-M-60KH instruction manual

Chef
Chef CRF610WA Installation and user manual

Beko
Beko HNU51311SH user manual

Miele
Miele DA 3366 Operating and installation instructions

Windster
Windster Under Cabinet Series user manual