Fiori E88IS ICEBERG ISLAND Technical manual

Model E88IS ICEBERG ISLAND

F ig. 1 F ig. 2
F ig. 3
Instruction on mounting and use
2
Remove-Replace Ha;ogen Globes
Remove Alum Filters Remove Charcoal Filter

Mounting the hood -Follow the numerical sequence (1ð2ð3ð.....)
13
14
15
16
front side - rear side
6
8
1
2
2
2
2
3
444
4
555+5
6
7
7
7
79
12
12
12
12
9
10*
11
10* To be used only for exhausting pipe Ø120/125mm
K
K : Only for F ilter vers ion
Smooth Bore
Ducting
Smooth
Bore Ducting
3

Use:Two systems are available
Exhaust mode
Vapors areextractedoutsidethroughanexhaustingpipe
thatis affixedtothe connectionringabove the hood.
Diameter ofthe exhaustingpipe mustbe equal tothatof
theconnectionring.
In the horizontal runs the duct must be slightly slanted
(about10°)anddirectedupwards toventtheaireasilyfrom
the roomtothe outside.
Attention!
If the hood is supplied with carbon filter, then it must
be removed.
Filter version (K)
Theairis filteredthrougha carbonfilter(forits installation
see paragraph "Carbon filter") and recirculated into the
roomthroughthe gratingof the chimney.
Attention!
If the hood is not supplied with carbon filter, then
it must be ordered and mounted.
This version is used when there is no exhaust duct for
venting outdoors or when it is impossible to install one.
Installation
Wheninstalled, the distance betweenhoodandburners
mustbenotless than65cm. aboveelectric burners or75
cm. above gas or mixed-fuel burners.
Theexhaustingpipeis notsuppliedandmustbepurchased
apart.The manufactureronlyrecommendstheuseofa
smoothboreductingasthis doesnotrestricttheflowofair
withintheducting.
Electric connection
Beforecompletinganyconnection, make sure the house
voltagecorresponds withthevoltageindicatedonthelabel
affixedinside the hood
It is advisable to call a qualified electrican make the
connection
Appliance fitted with plug: Connectittoa socket
conforms withcurrentregulations.
If you intend to connect it directly to the electric mains,
remove the plug and fit an approved bipolar switch with
a minimumcontact opening of no less than 3mm.
If the plugis notaccessible once ithas been insertedin
thesocket, itwillhoweverbenecessarytofitanapproved
bipolarswitchwitha minimumcontactopeningofnoless
than 3mm.
Appliance without plug
: Fit an approved plug or an
approvedbipolarswitchwithaminimumcontactopening
of not less than 3mm.
Themanufacturers arenotliableforanyproblems caused
by the user’s failure to observer the above instructions.
Using the hood
— The hood is provided with a motor with several
speeds. For the best performance, we recommend
usingthelowspeeds innormalconditions andthehigh
speeds inparticularcases ofstrongodorandvapor
concentration.
— We recommend starting up the hood a fewminutes
before cooking and keeping it running until all the
odors have been eliminated.
Electronic control panel
1- MotorOFF button
2- Onbuttonandmotor speedselectionbutton1 - 2 - 3
- 1 - 2 - . . . .
3- Speed1LED
4- Speed2 LED andmetal grease filter saturationLED
(inthis lattercase, theLEDwillflash-Seeinstructions
ongrease filter cleaning).
5- Speed3LEDandcarbonfiltersaturationLED (inthis
latter case, the LED will flash - See instructions on
active carbonfilter replacement).
Warning!
The active carbon filter saturationLED is notactivated.
In order to activate the carbon filter saturation indicator,
press buttons 2 and 7 simultaneously for 3 seconds.
Initially, onlyLED4willflash, thenafterthe3seconds have
passed, LED 5 will also start flashing, indicatingthatthe
carbon filter saturation control systemis active.
Toswitchoff the system, repress the same twobuttons:
after3seconds LED5willstopflashingandthedevicewill
be switched off.
6 - Intensive speedLED
7 - Intensive speed ON switch: This speed should be
used when the concentration of cooking fumes or
odors is particularlystrong(forexamplewhenfrying,
cookingfishetc.). The fastspeedwill runfor about5
minutes and then return to the speed previously set
automatically(1, 2 or3), orswitchoffifnospeedwas
selected. Toturnoffthe fastspeed, before theendof
the 5 minutes, press button1 or button2.
8-OF F lamp button
9-ON lamp button
If the hoodfails tooperate correctly, briefly disconnectit
fromthe mains power supply for almost5 sec. by pulling
outtheplug. Thenplugitinagainandtryoncemorebefore
contacting the Technical Assistance Service.
123OOI
FC
1234 56789
4
which

Warning!
This appliance is designed to be operated by adults.
Childrenshouldnotbeallowedtotamperwiththecontrols
or play with the appliance .
Thehoodcannotbeconnectedtoflues ofotherappliances
that run on energy sources other than electricity.
Whenthehoodis usedatthesametimeofotherappliances
thatrunonenergysources otherthanelectricity, provision
must be made for an adequate supply of air.
Nofoodmustbe cookedflambe underneaththe hood.
Theuseofanunprotectedflameis dangerous forthefilters
andcouldcausefires. Therefore, neveruseanopenflame
under the hood. Whenfryingfoods, never leave the pan
alone because the cookingoil couldflare up.
Please, keep to the provisions of official directives
regardingthe questionoffume discharge.
Themanufacturers refusetoacceptanyresponsibilityfor
damagetothehoodorits catchingonfirebecauseoffailure
to observe the above instructions.
Maintenance
Beforeperforminganymaintenanceoperation, isolatethe
hood from the electrical supply by switching off at the
connector andremovingthe connector fuse.
Oriftheappliancehas beenconnectedthroughaplugand
socket, thenthe plugmustbe removedfromthe socket.
Metal grease filter
Thegreasefilterserves totrapparticles ofgreasethrough
suspension.
Themetalgreasefilterlasts foreverandmustbewashed
either by handor inthe dishwasher (65°C) withsuitable
detergents.
When washed in a dish washer, the grease filter may
discolor slightly, but this does not affect its filtering
capacity.
The metal grease filters mustbe washedatleastonce a
month and anyhowwhenever the LED 4 indicates the
saturation of the filter (see previous page).
This LEDflashes towarnyouthatthemetalgreasefilters
must be cleaned.
Generally, these mustbe cleanedafter 40 hours of use.
Once the grease filters have beencleaned, press button
1for about3 seconds until you hear the acoustic signal
(beep): the LED 4 will nowstop flashing.
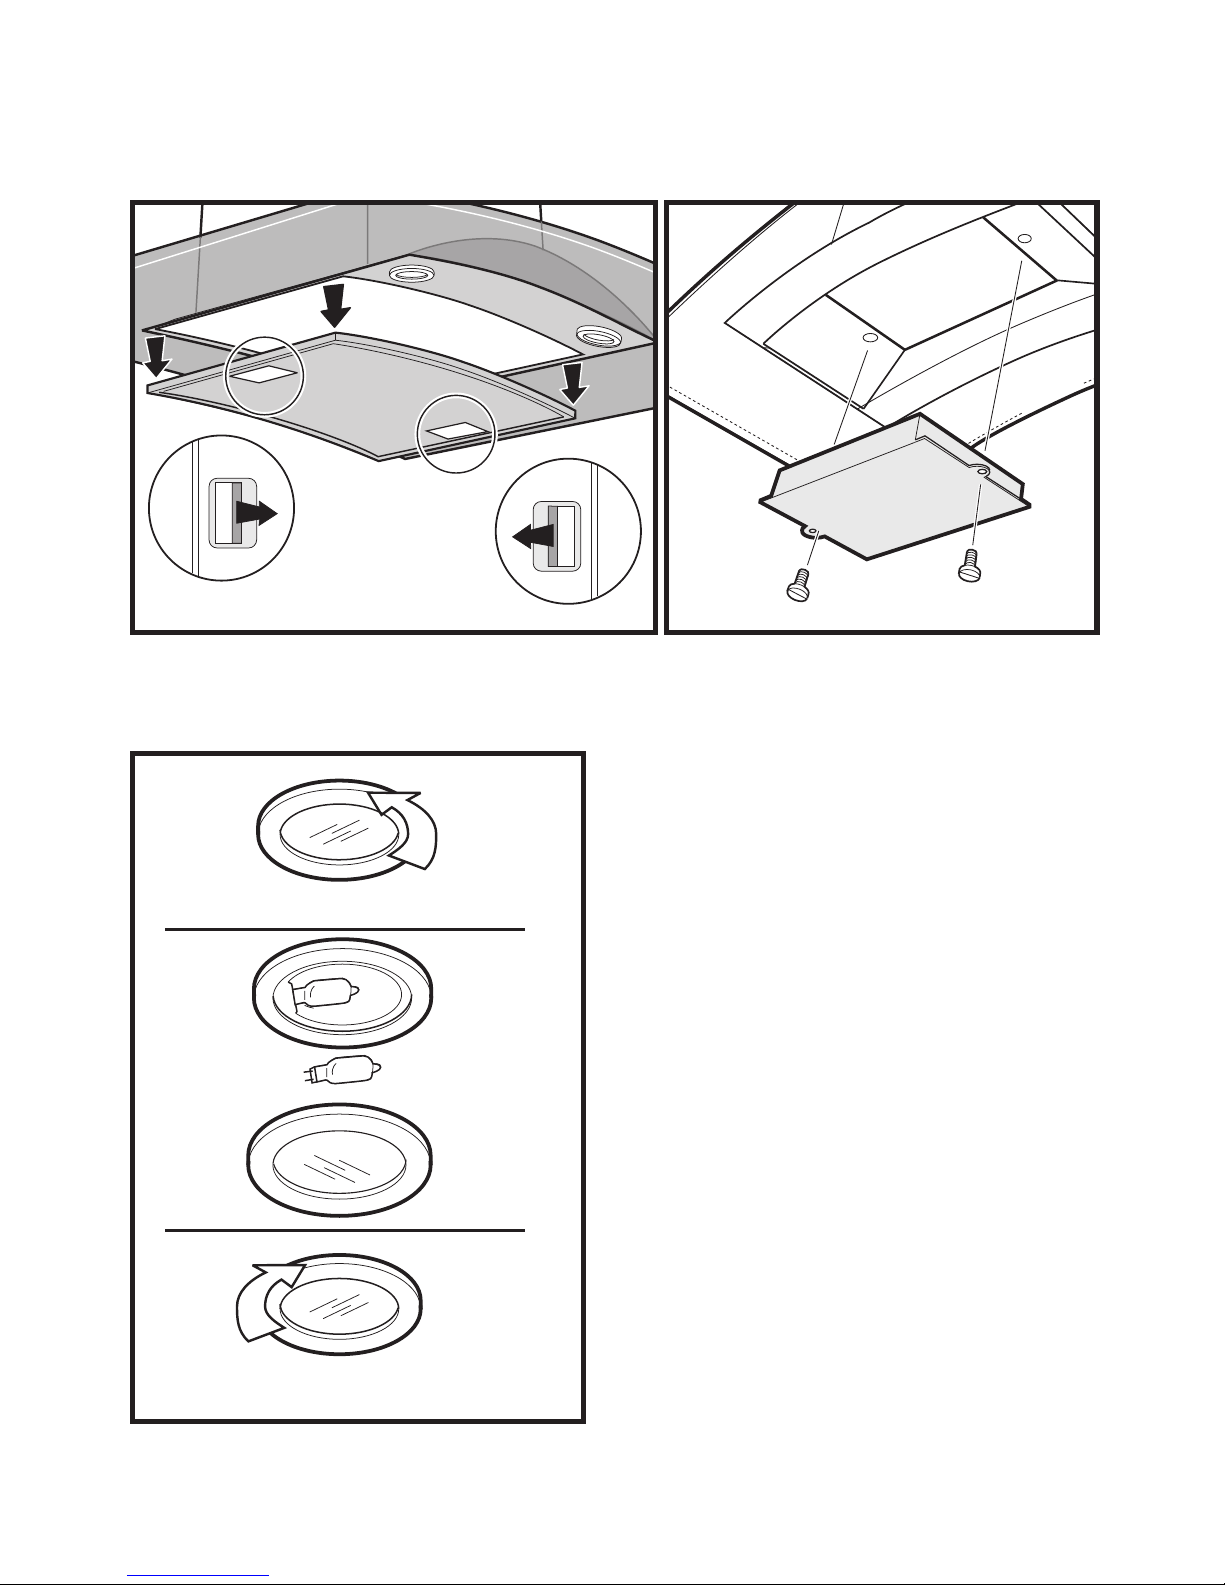
To remove the metal grease filter - Fig. 1:
1. Disconnectthe hoodfromthe electricity.
2. a - push toward the centre
b- pull the filters downwards.
Letthefilterdrywithoutdamagingitbeforeputtingitback
intoplace.
Carryouttheabovesteps inreverseordertoputthefilters
back after having washed them.
Carbon filter
This filter dissolves cooking odors.
The carbon filter must never be washed.
Thecarbonfiltershouldbereplacedevery4months under
normal use andanyhowwhenever LED 5 indicates the
saturation of the filter (see previous page).
This LED flashes towarn youthatthe carbonfilter must
be replaced.
This mustbe doneafter approximately 160 hours ofuse.
Once youhave replacedthe carbonfilter, press button1
for about 3 seconds until you hear the acoustic signal
(beep). The LED 5 will now stop flashing.
To fit the carbon filter - Fig. 2:
1. Disconnectthe hoodfromthe electricity.
2. Remove the metal filters.
3. Fitthecarbonfilterandfixittothebodyofthehoodwith
two supplied screws
4. Putthe metal filter back intoplace.
To replace the carbon filter - Fig. 2:
1. Disconnectthe hoodfromthe electricity.
2. Remove the metal filters.
3. Remove the old carbon filter andreplace it.
4. Putthe metal filter back intoplace.
Cleaning
To clean the outside andinside of the hood use a cloth
moistened with denatured alcohol or neutral liquid
detergents.
Never use products containing abrasive.
Wipebrushedstainless steelinthesamedirectionas the
brushing to avoid scratching.
Cleantheexternalandinternalsurfaceofthecookerhood
almost once every 10 days.
Attention
Failuretoobservetherules forcleaningtheapplianceand
changingand cleaningthe filters may cause fires.
Therefore, we recommendobservingthese instructions.
Replacing the lamp
a) Disconnectthe hoodfromthe electricity.
b) Unscrew the light shield (Fig. 3).
c) Replacethedamagedlampwitha newhalogenlamp
of 20Wattmax.
d) Refitthe the lightshield.
e) Beforecallingforrepairservicebecausethehoodfails
tolightup, makesurethebulbs arescrewedintightly.
5

Warranty Certificate (Australia)
Fiori Holdings Pty Ltd ABN 11 089 098 297
PO Box 45, Marayong NSW 2148 PH 02 9831 5594 Fax 02 9831 3803
The benefits conferred hereunder are in addition to all other rights and remedies in respect of the
product which the purchaser has by virtue of the Trade Practices Act 1974,and similar State and
Territory legislation and nothing contained in this Certificate shall in any way limit the purchaser’s
rights under such legislation
Fiori Holdings Pty Ltd warrants this product against manufacturing defects and faulty materials, for a
period of 24 months from date of purchase.
This warranty is limited to the repair or replacement free of charge within the warranty period of any
component or part, which Fiori Holdings Pty Ltd at its discretion determines to be faulty. Such warranty
is subject to the terms and conditions set out below.
TERMS AND CONDITIONS
The following conditions apply in respect of the warranty given in this certificate,
1. The warranty applies within the Commonwealth of Australia and only if the product is
used for domestic purposes and where normal vehicular access is provided.
2. The warranty does not apply for the following:
(a) Light globes
(b) To paint finishes and glass.
(c) If defect is caused by misuse - wear and tear - dirt - fire - accidental damage or faulty
electrical connection
(d) If the product has been repaired or serviced by an unauthorized person
(e) If installed contrary to Fiori Holdings Pty Ltd instructions
3 For warranty service outside of Capital City metropolitan area or outside the normal service
area of the nearest authorized service provider the purchaser shall be liable for traveling
expenses and cost of transport of the product or parts to and from the Service Provider. NOTE:
A charge shall be made if the service person finds the product is functioning correctly.
4 The purchaser must produce proof of the date of purchase together with this Warranty
Certificate when making a claim.
5To abide by the guarantee please complete the details below and keep with your purchase
invoice.
For details of your nearest Service Provider please select from the Service Provider list or
contact the warranty administrator, Data Works Administration on 02 9674 2361
-----------------------------------------------------------------------------
Guarantee Record
Name of Purchaser: ________________________________________________
Address: ___________________________________________________________
Date of Purchase: _________Model No: ___________Serial No: _______
Name of Supplier: __________________________________________________
Address: ________________________________________________________
Invoice No: ______________________________________________________
Complete but do not post
6

7

8
LI19YA Ed. 10/03
Table of contents
Other Fiori Ventilation Hood manuals
Popular Ventilation Hood manuals by other brands

Electrolux
Electrolux EFC 9441 Operating and installation instructions

DCS
DCS EH-30SS Use and care guide

AEG
AEG DM 8700 Operating and installation instructions

AIRLUX
AIRLUX XHD905C User instructions

Fisher & Paykel
Fisher & Paykel HP24IDCHX4 installation guide

Ancona
Ancona WPW430 User's manual & installation instructions