FireClass FC700 Series Instruction Manual

FIRECLASS Fire detection system Panel Accessories
Fixing instructions Doc. version 1.0 1/12
Installing the FireClass FC700 Series
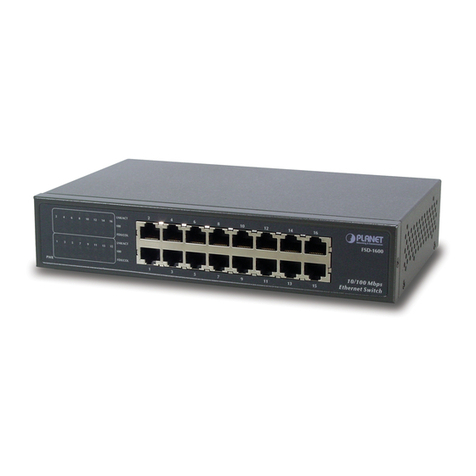
POS800/PCS800 Ethernet Switch
Introduction
This leaflet covers the installation of an Ethernet
Switch (an optional accessory) on the following
FireClass panels:
FC708D
FC718D
FC702D
FC702S (PCS800 only)
Table 1 outlines the three Ethernet switch types
available.
The FireClass POS800-S and POS800-M
Ethernet switches are used to connect devices
(for example a panel and an AC repeater) with a
single, redundant optical or metallic layer.
The POS800-S/POS800-M Ethernet switch has
four 10/100Base-T(X) RJ45 ports that connect it
to the FC-FI board, the primary graphical user
interface (GUI) and additional AC/ DC repeaters.
The switch also has two optical ports that can
connect an AC repeater using a redundant (or a
single) optical path if you require redundant wir-
ing or long distance wiring. After you connect the
Ethernet switch, configure it. Refer to the “Con-
figuring the POS800-S and POS800-M Ethernet
switches” section.The total maximum number
of devices on the network is 254 and this is split
between all devices (repeaters, the FC-FI board
and Ethernet switches). For the maximum num-
ber of LNET GUI repeaters, refer to the latest
FireClass Express documentation.
The FireClass PCS800 Ethernet switch provides
five 10/100Base-T(X) RJ45 ports that connect it
to the FC-FI board, the primary GUI and addi-
tional AC/DC repeaters. The PCS800 does not
require additional configuration.
Refer to Table 2 for limiting distances for each
type of cable.
Ethernet Switches allow the use of a dual power
supply to provide backup power in the event of,
for example, a component failure or a blown
fuse. Note that there is one power rail in the
panel.
Switch
Type
Optical Ports Copper
Ports
POS800-S 2x 100Base-FX
(Single Mode)
4x 10/
100Base-T(X)
RJ45 Ports
POS800-M 2x 100Base-FX
(Multi-Mode)
4x 10/
100Base-T(X)
RJ45 Ports
PCS800 - 5x 10/
100Base-T(X)
RJ45 Ports
Table 1: Ethernet switch types
Switch
Type
Limiting Dis-
tance (Opti-
cal)
Limiting Dis-
tance (Cop-
per)[1]
POS800-S 30km 100m
POS800-M 2km 100m
PCS800 - 100m
Table 2: Limiting distances
[1] Limiting distances without a repeater. The distance
can increase if a switch or a repeater is used.
CAUTION
Before you install an Ethernet switch,
ensure that the panel is isolated from
the mains supply and it is not running on
batteries.

2/12 Fixing instructions Doc. version 1.0
Panel Accessories FIRECLASS Fire detection system
Installing the Ethernet
Switch (POS800/PCS800) on
a FireClass Panel
1 Slide the Ethernet switch (refer to item 1 in
Fig. 1) into the slot cage holder (item 2).
2 Align the back of the Ethernet switch with the
back of the slot cage holder and secure it with
the screws supplied (item 3).
3 Prepare the power supply cables and feed
them through the top of the slot cage holes
(refer to item 4 in Fig. 2). Connect the wires
into the terminal block on the Ethernet
switch. Observe the correct polarity. If you
require redundant power supply wiring, fol-
low the same procedure.
4 Fit the other end of the cable to the FC-FI
board (XT6 or XT7 connectors) using the con-
nector supplied with the FC-FI. Refer to Table
3. Use both XT6 and XT7 connectors on the
FC-FI board for a redundant power supply.
5 The POS800 Ethernet switch also provides a
volt-free relay contact to which you can con-
nect the FC-FI isolated inputs (ISOLIN 1, ISO-
LIN 2) for fault monitoring. If required, con-
nect a bypass wire from V1+ (pin 5) on the
Ethernet switch connector to pin 4 on the
same connector. Additionally, connect the
wire from pin 3 on the Ethernet switch to
ISOL IN+ on the FC-FI board and from V1- on
the Ethernet switch to ISOL IN– on the FC-FI.
Refer to Fig. 3. Use a minimum 16/0.2 wire
(not supplied).
Note: Using a volt-free relay contact on the
Ethernet switch allows the panel to see faults
which would otherwise go undetected (for
example, a power port failure or an Ethernet
port downlink). You can select situations in
which the relay will actuate in configuration
on an individual basis (see the section, “Con-
figuring the POS800-S and POS800-M Ether-
net switches”). Each Ethernet switch reports
only faults related to its own ports.
6 Plug the power supply connector into the
Ethernet switch.
7 Fit the fibre-optic modules into the Ethernet
switch and connect the optical cables
(POS800 only).
8 Slide the slot cage holder (refer to item 2 in
Fig. 2) into the slot cage in the panel.
9 If the switch is a POS800, attach the fibre-
optic holder (item 5) into the slot cage and
secure it with screws (item 3).
10 Connect the metallic cables from the GUI and
the FC-FI board to the Ethernet port on the
switch.
A redundant cable is not provided. If
required, use a minimum 16/0.2 wire.
XT6, XT7 Ethernet Switch
+24V V1+
-V1-
Table 3: FC-FI connections
Fig. 1: Mounting the Ethernet switch to the slot cage
holder
1– Ethernet switch
2– Slot cage holder
3– Screws
1
2
1
1
2
3

FIRECLASS Fire detection system Panel Accessories
Fixing instructions Doc. version 1.0 3/12
Fig. 2: Mounting the Ethernet switch and slot cage
holder into the slot cage.
1– Ethernet switch
2– Slot cage holder
3– Screws
4– Slot cage holes
5– Fibre-optic holder
4
1
23
123
4
5
+24V
(&Ͳ&/-XT7)
-
-
ISOL IN +
ISOL IN -
+24V
(&Ͳ&/-XT6)
Pin 1
Pin 6
Reset
buƩon[1]
Fig. 3: POS800 connectors overview
The dashed line indicates optional switch fault
monitoring.
[1] Press the reset button for 10 seconds to restore the
switch to the factory default configuration.

1
Fig. 4: Installing the Ethernet switch on a FC8AS AC repeater
1– Earth cable screw (optional)
4/12 Fixing instructions Doc. version 1.0
Panel Accessories FIRECLASS Fire detection system
Installing the Ethernet Switch on a FC8AS AC
Repeater
To mount the Ethernet switch on an FC8AS
repeater, complete these steps:
1 Ensure that the panel is isolated from the
mains and it is not running on batteries.
2 Mount the fixing elements (refer to item 2 in
Fig. 4) with screws (supplied) on the Ethernet
switch housing.
3 Connect the DC power supply to the Ethernet
switch connector (refer to item 4 in Fig. 4),
observing the correct polarity. If you require a
redundant power supply, connect a minimum
16/0.2 wire (not supplied).
4 Connect the other end of the DC supply cable
to the PMM800 board. Refer to Table 4.
5 If you require a redundant supply, use the
other pins on the same terminals on the
PMM800 board and connect to V2+ and V2-
on the Ethernet switch.
6 Fit the fibre-optic modules on to the Ethernet
switch and connect the optical cables.
7 Connect the metallic cable from the GUI to
the Ethernet port on the switch.
PMM800 Ethernet switch
24V (TB6) V1+
0V (TB4) V1-
Table 4: Power supply wiring connection

FIRECLASS Fire detection system Panel Accessories
Fixing instructions Doc. version 1.0 5/12
Installing the PCS800 on a
FireClass FC702S Panel
To install the PCS800 Ethernet switch on a
FC702S panel, complete these steps:
1 Mount the fixing elements (refer to item 3 in
Fig. 5) with the screws provided on to the
Ethernet switch housing.
2 Fix the Ethernet switch on to the chassis
studs with nuts and washers (item 2).
3 Fix the Earthing cable (item 5) supplied with
the switch accessories to the top of the
Ethernet switch. Secure the cable with a fix-
ing screw (item 4) and connect the other end
to the housing earthing bar.
4 Connect the DC power supply cable to the
FC-FI connector. Refer to Table 4. Connect to
XT6 or XT7, (or both if you require a redundant
supply) and to the PCS800 connector.
5 If you require a redundant supply, use the
same terminals on the PMM800 board and
connect to V2+ and V2-.
6 Plug the DC power supply into the Ethernet
switch.
7 Connect the Ethernet cabling.
Configuring the POS800-S
and POS800-M Ethernet
switches
To configure a POS800-S or a POS800-M Ether-
net switch, complete these steps:
1 Configure the DIP switch on the front of the
Ethernet switch. Refer to Table 5.
Fig. 5: Installation of the PCS800 to the FireClass
FC702S panel
1– Ethernet switch
2– Washers and nuts
3– Fixing elements
4– Earth cable fixing screw
5– Earthing cable
1
3
2
4
5
2
3
1
3
4
5
CAUTION
Before configuring an Ethernet switch,
ensure that you disconnect all devices
that are connected to it (apart from your
computer).
Redundant
optical
connection
Redundant
metallic
connection*
Single line
connection
Ethernet
switch no.1:
Position1 -
OFF. Position
2,3,4 - ON
Ethernet
switch no. 1:
Position 1,4 –
OFF. Position
2,3 – ON
All positions
OFF
Ethernet
switch no.
2,3,...:
Position 1,3 -
OFF. Position
2,4 - ON
Ethernet
Switch no.
2,3...:
Position 1,3,4 –
OFF. Position 2
– ON
-
Table 5: POS800-S/POS800-M configuration
* Supported on port 1 and 2 only

6/12 Fixing instructions Doc. version 1.0
Panel Accessories FIRECLASS Fire detection system
2 Connect a PC to one of the Ethernet ports.
Configure the PC Ethernet adapter with an IP
address: 192.168.10.253 (subnet
255.255.0.0).
3 Open a web browser. In the address bar, type
in the IP address 192.168.10.1 and press
Enter.
User name: admin
Password: admin
4 In the left menu, select “Basic setting” and
then “admin password”. Change these to
non-default and make a note of them.
5 Under “Basic setting”, select “IP setting”
and set the address:
First switch IP address: 192.168.1.254
Second switch IP address: 192.168.1.253
Note: To configure additional switches,
decrease the final byte of the IP address by 1,
for example, 192.168.1.252 or
192.168.1.251. The subnet mask is
255.255.255.0 in all instances. For the maxi-
mum number of LNET repeaters, refer to the
latest of FireClass Express documentation.
Set the IP address of the LNET repeaters in
FireClass Express and avoid conflicts with
Ethernet switch IP addresses.
6 To configure the fault relay to report multiple
situations such as power supply faults or
Ethernet port link faults, tick all the ports you
want to monitor under “Port Link Down/Bro-
ken”. Move DIP switch 1 to “ON” to monitor
the power supply. Ensure you connect the
fault contact to an isolated input on the FC-FI.
Configure the input using FireClass Express.
7 To save to the Flash memory, click “Save
Configuration” in the left column, and then
click “Save”.

FIRECLASS Fire detection system Panel Accessories
Fixing instructions Doc. version 1.0 7/12
ON
1234
P1 P2 FAULT
RING R.M.
P.F.
R.E.
R.M.
R.S.
P1/P2 P5/P6
2
34
5
6
7
8
9
10
11
Fig. 6: POS800/PCS800 Ethernet switch
1– LED for PWR1, LED for PWR2
2– LED for fault relay
3– LED for ring
4– LED for R.M. (ring master)
5– DIP switch setting:
P.F.: Power fault warning (ON for enable, OFF for
disable)
R.E.: Ring topology (ON for enable, OFF for
disable)
R.M.: Ring Master (ON for enable, OFF for
disable)
R.S.: Ring Select (P1/P2L Port 1 and Port 2, P5/P6:
Port 5 and Port 6)
6– 100 base fibre port on SFP (Port 6)
7– LED for SFP LINK/ACT
8– 100 base fibre port on SFP (Port 5)
9– 10/100Base-T(X) Ethernet ports
10–LED for Ethernet ports ACT status
11–LED for Ethernet ports LINK status
12
34
5
6
7
8
9
10
11

8/12 Fixing instructions Doc. version 1.0
Panel Accessories FIRECLASS Fire detection system
LED Status Description
P1 On PWR 1 active
P2 On PWR 2 active
R.M. On Ring master
Ring Slow blinking Ring enabled, topology problem
On Ring working normally
Fault On Fault relay active. Power failure or port failure
10/100Base-T(X) Fast Ethernet ports
LNK/ACT On Port link up
Blinking Data transmitted
LINK On Link LED
100Base Fibre port on SFP
LINK/ACT On Port link up
Blinking Data transmitted
Table 6: Ethernet switch LED status

FIRECLASS Fire detection system Panel Accessories
Fixing instructions Doc. version 1.0 9/12
Cable Examples
Table 9 shows recommended cables for fibre-optic modules which accept LC style connectors.
Manufacturer Type Description
Tight buffered cables Belden GUMT202 2x50/125,OM2-fibre, multi-
mode
Belden GUMT102 2x62.5/125,OM1-fibre, multi-
mode
Loose tube cables (with
jelly-filled loose tube)
Belden GUSN202 2x50/125,OM2-fibre, multi-
mode
Belden GUSN102 2x62.5/125,OM1-fibre, multi-
mode
Table 7: Recommended cables for the POS800-M Ethernet switch
Manufacturer Type Description
Tight buffered cables Belden GUMT802 2 x 9/125, G.652D, single
mode
Loose tube cables (with
jelly-filled loose tube)
Belden GUSN802 2 x 9/125, G.652D, single
mode
Table 8: Recommended cables for the POS800-S Ethernet switch
Pig tail type MPN Manufacturer Length
OS2, tight buffered (single mode) FTSLC900PS01 Belden 2 m
OM3, tight buffered (multi-mode) FT3LC900PS01 Belden 2 m
Table 9: Recommended pig-tails
Cable Type Min. Category
STP 5e
Table 10: Recommended metallic cables for POS800 and PCS800 Ethernet switches

10/12 Fixing instructions Doc. version 1.0
Panel Accessories FIRECLASS Fire detection system
Fig. 7: Example of Ethernet switches configured in a ring topology
ON
1234
ON
1234
ON
1234
Switch 1
Switch 2 Switch 3

FIRECLASS Fire detection system Panel Accessories
Fixing instructions Doc. version 1.0 11/12
Panel
GUI
&Ͳ&/
GUI
Panel AC repeater 1
GUI
TO ADDITIONAL REPEATERS
AC repeater 2
ON
1234
Fig. 8: Wiring example - single optical connection

120.515.889_FC-FC700-AP-PCS800-POS800-F, doc. version 1.0, 20. May 2019
© 2019 Johnson Controls. All rights reserved. All specifications and other
information shown were current as of document revision date and are subject to
change without notice.
www.fireclass.net
Tyco Fire & Security GmbH, Victor von Bruns-Strasse 21, 8212 Neuhausen am
Rheinfall, Switzerland
Panel Accessories FIRECLASS Fire detection system
This manual suits for next models
8
Table of contents
Popular Switch manuals by other brands

Black Box
Black Box LB8418A user manual
Black Box
Black Box ServSelect III manual
Blackmagicdesign
Blackmagicdesign Universal Videohub 288 Installation and operation manual
HYDACELECTRONIC
HYDACELECTRONIC HFS 2500 operating instructions

Black Box
Black Box ACX576 quick start guide
Abus
Abus ITAC10120 user manual

