Firenzi FCA 550 User manual

INSTRUCTION BOOKLET
COOKER HOOD
FCA 550
GB

2

3
Contenents
1 -GENERAL INFORMATION ............................................................................................................................. 4
2 -SAFETY WARNINGS ...................................................................................................................................... 4
3 - INSTALLATION .............................................................................................................................................. 4
3.1 - Installation of the fitted group .................................................................................................................. 5
3.2 - Ducting or recirculation fitting .................................................................................................................. 6
3.3 - Electrical connection and working test .................................................................................................... 6
1 -SAFETY WARNINGS ...................................................................................................................................... 7
2 -USE 7
3 - MAINTENANCE ............................................................................................................................................. 7
3.1 - S nthetic filters ........................................................................................................................................ 8
3.2 - Charcoal filters ......................................................................................................................................... 8
3.3 - Lighting .................................................................................................................................................... 8
3.4 - Cleaning .................................................................................................................................................. 9

4
Part 1 - INSTALLATION INSTRUCTIONS
1 - GENERAL INFORMATION
This canopy hood is designed to e fitted into ca inets or chimney cooker hoods,
placed a ove a hotplate. It can e used either in the extraction mode (ducted to the
outside) or in the recirculation mode (internal recycling). Before st rting the
inst ll tion, consider tion should be given to the difficulties to be found during
inst ll tion. The inst ll tion work must be undert ken by qu lified nd
competent person in conformity to the rules concerning the ev cu tion of
cont min ted ir. The m nuf cturer discl ims ll li bility for ny d m ge or
injury c used s result of not following the instructions for inst ll tion
cont ined in the following text.
2 - SAFETY WARNINGS
2.1 - When used in the extr ction mode, the cooker hood ducting must not be connected to
flue which is used for exh usting fumes from ppli nces supplied with energy other
th n electric, such s centr l he ting flue or w ter he ting flue.
2.2 - Before connecting to the m ins supply ensure th t the m ins volt ge corresponds with
the volt ge on the r ting pl te inside the hood.
2.3 - Connect the cooker hood to the m ins vi bipol r switch which h s 3mm cle r nce
between the cont cts.
2.4 - The device does not require e rthing, s it is double-insul ted.
2.5 - When inst lled, the hood must be positioned t le st 65 cm bove the hotpl te.
2.6 - Never do fl mbé cooking under this cooker hood.
2.7 - Never le ve frying p ns un ttended during use s overhe ted f t nd oil m y c tch fire.
2.8 - Before c rrying out ny kind of m inten nce or cle ning, disconnect the hood from the
m ins supply.
2.9 - If the room where the cooker hood is to be used cont ins fuel burning ppli nce such
s centr l he ting boiler then this must be of the room se led or b l nced flue type.
If other types of flue or ppli nce re fitted, ensure th t there is n dequ te supply of
ir into the room. When the cooker hood is used in conjunction with ppli nces supplied
with energy other th n electric, the neg tive pressure in the room must not exceed 0,04
mb r to prevent fumes being dr wn b ck into the room by the cooker hood.
3 - INSTALLATION
The following scheme has to e o served:
3.1 - Installation of the uilt-in group
3.2 - Set the hood for recirculation or evacuation
3.3 - Connect the hood to the mains supply and ensure that it works properly

5
Part 1 - INSTALLATION INSTRUCTIONS
3.1 - Installation of the fitted group
1 - Make a
rectangular
opening in the
ase of the
overhead
cup oard or
hood, leaving a
minimum of 13 mm from the
outer edges according to the
dimensions indicated in the
ta le.
2 - Drill a hole into the upper side
of the ca inet in accordance
with the dimensions of the
duct used for oth the
evacuation and recirculation
mode.
3 - Dismantle the ducting support
(version with grill or version
with filters), pulling the two
pommels A (fig. 1)
simultaneously:
a) Fixing frame with screws:
Fix the fitted group to the hood
or cup oard, using the self-
threading screws (No. 10)
provided with the
accessories (fig. 2).
) Rapid fixing with side
supports:
The device B is set up
to deal with a panel
thickness of from 15
mm to 30 mm. Insert
the group into the
opening until the two
devices B connect. Lock
the adjustment screw C
until the fitted group adheres
tightly to the surface (fig. 2).
1
2

6
Part 1 - INSTALLATION INSTRUCTIONS
4 - Close the ducting support y pushing and connecting the two pommels A (fig. 3).
3.2 - Ducting or recirculation fitting
1 - Ducting fitting:
a) The hood can e ducted to the outside
using either a rigid or a flexi le Ø 100
or 120 mm duct to e fixed with
suita le clamps, not provided
(fig. 4).
) If the hood is provided with the
charcoal filters fitted, the filters
should e removed (see par.3.2
part 2).
2 - Recirculation fitting:
a) When used in the recirculation mode,
the charcoal filters must e fitted
into the cooker hood (see par. 3.2
part 2).
) The air is recirculated into the
kitchen through the opening
located on the upper side of the
ca inet or of the hood (fig. 4).
3.3 - Electrical connection and working test
1 - The safety measures 2.2, 2.3 and
2.4 of paragraph 2 are to e strictly
o served.
2 - Once the electrical connection has
een completed, check that the
worktop illumination, motor and
speeds work properly.
3
4
7
Part 2 - USE AND MAINTENANCE INSTRUCTIONS
1 - SAFETY WARNINGS
It is most import nt th t ll the w rnings shown in p r gr ph 2 of the Inst ll tion
Instructions re strictly observed. Moreover, speci l ttention must be p id to the
following w rnings during the use nd m inten nce of the cooker hood:
1.1 - The gre se filters nd the ch rco l filters should be cle ned or repl ced s recommended
by the m nuf cturer or more frequently if the hood is used consistently (more th n 4
hours per d y).
1.2 - When using g s hob in connection with the cooker hood never le ve the burners of
the hob uncovered while the hood is in use or when the p ns h ve been removed.
Switch off the g s before removing the p n or for just short periods nd never le ve
the hob un ttended.
1.3 - Alw ys ensure th t the ppli nce is kept t the correct intensity to prevent the fl me
from licking round from the bottom of the p n; this will s ve energy nd will void
d ngerous concentr tion of he t.
1.4 - Alw ys ensure th t the ppli nce is used in ccord nce with the m nuf cturer’s
instructions for the remov l of cont min ted odours during cooking.
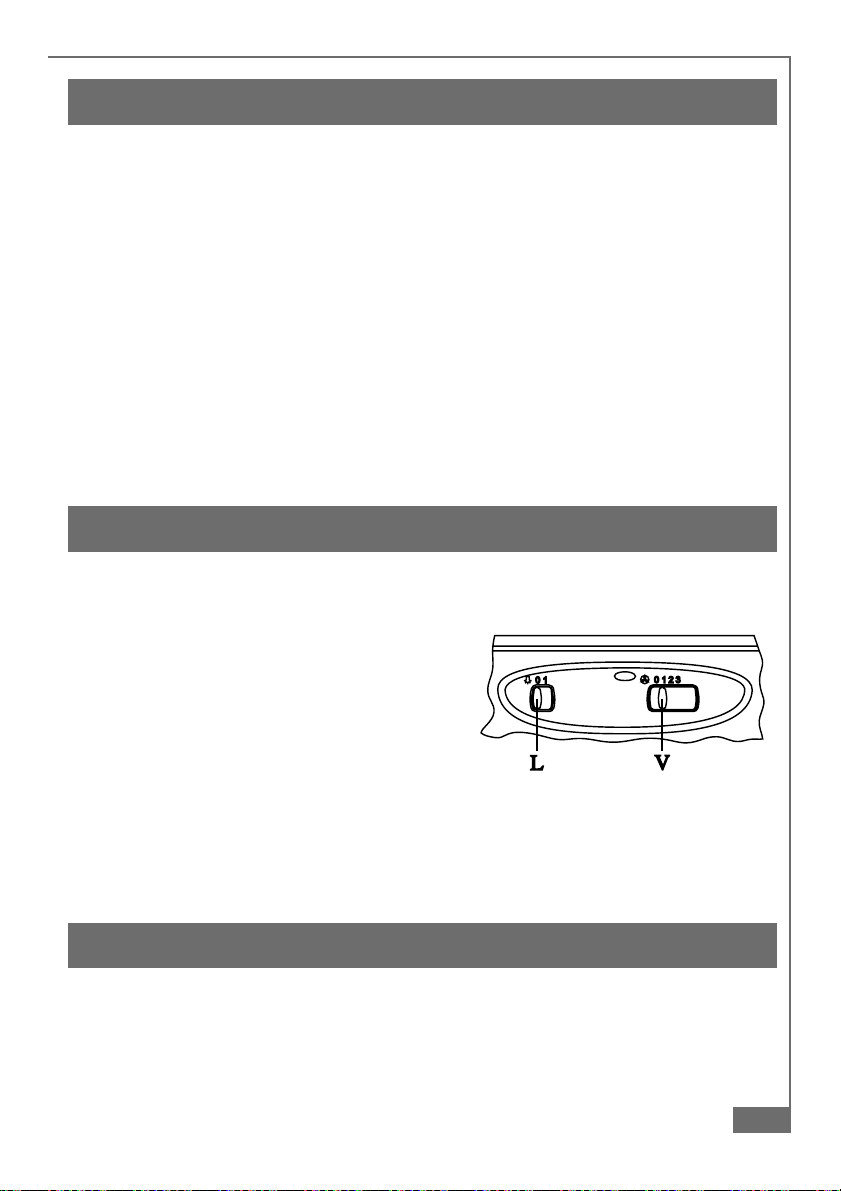
2 - USE
Control p nel
The cooker hood can e operated as follows:
LIGHT SWITCH L = controls the worktop
illumination;
MOTOR SWITCH V = controls the power to
the motor and the fan speed:
Position 1 = low speed, should e selected
when simmering or using only
one pan: the noise level is kept
to the minimum.
Position 2 = medium speed, should e selected for normal cooking. This speed
offers the est ratio etween air capacity and noise level.
Position 3 = top speed, should e selected when frying or cooking food with strong
odours, even for a long period.
3 - MAINTENANCE
Regular maintenance and cleaning will ensure good performance and relia ility, while
extending the working life of the hood. Special attentions should e paid to the grease
filters and to the charcoal filters when the hood is used in the recirculation mode.
5

8
Part 2 - USE AND MAINTENANCE INSTRUCTIONS
3.1 - Synthetic filters
1 - This filter cannot e washed and should
e replaced every two months. If the filter
is provid ed with a saturation indicator,
replace when the violet color of the dots
which are visi le from the outside is
spread over the whole surface of the filter.
2 - Replacement:
a) Remove the ducting grill, referring to
paragraph 3.1.3. on installation.
) After having taken off the ducting grill,
remove the filter stops (1). Replace the
grease filter (2) (fig. 6).
c) Close the ducting grill up again.
3.2 - Charcoal filters
1 - Functioning
In the recycling mode the charcoal
filters a sor smell and odours.
The charcoal filter cannot e
washed or regenerated and should
e replaced every 2 months or
more frequently if the hood is used
consistently.
2 - Replacement:
a) Remove the ducting grill, referring to paragraph 3.1.3. on installation.
) Replace the active charcoal filter (fig. 7).
3.3 - Lighting
1 - This is provided y two 40 W lamps . If the lamps do not work, open the suction grille
and check that they are properly fitted. If the lamps have urned out they must e
replaced using others of equivalent voltage
and power.
2 - Replacement:
a) 40 W lamp (fig.8), unscrew the urned out
lamp and fit the new one.
3 - Replace the suction grille.
6
7
8

9
Part 2 - USE AND MAINTENANCE INSTRUCTIONS
3. - Cleaning
When cleaning the hood:
- Never use a wet cloth or sponge, or running water.
- Never use thinners or products containing alcohol, as they might damage the
paintwork.
- Never use a rasive cleaning materials, in particular when cleaning stainless steel
surfaces.
It is recommended to use d mp cloth nd mild liquid household cle ner.

SERVICE AND SPARE PARTS
In the event of your appliance requiring service, or if you wish to purchase spare parts, please
contact your local Service Force Centre by telephoning:-
08705 929929
Your telephone call will be automatically routed to the Service Force Centre covering your
post code area.
For the address of your local Service Force Centre and further information about Service
Force, please visit the website at www.serviceforce.co.uk
Before calling out an engineer, please ensure you have read the details under the heading
“Something Not Working.”
When you contact the Service Force Centre you will need to give the following details:
1. Your name, address and post code
2. Your telephone number
3. Clear and concise details of the fault
4. The model and serial number of the appliance (found on the rating plate)
5. The purchase date
Please note that a valid purchase receipt or guarantee documentation is required for
in-guarantee service calls.
CUSTOMER CARE DEPARTMENT
For general enquiries concerning your appliance, please contact our Customer Care
Department by letter or telephone at the address below:
Customer Care Department
EHP
55-77 High Street
Slough
Berkshire
SL1 1DZ
08705 950950 (*)
* calls to this number may be recorded for training purposes.

Standard guarantee conditions
We, EHP, undertake that if within 12 months of the date of purchase this Firenzi appliance or any part
thereof is proved to be defective by reason only of faulty workmanship or materials, we will, at our option repair
or replace the same FREE OF CHARGE for labour, materials or carriage on condition that:
■The appliance has been correctly installed and used only on the electricity supply stated on the rating plate.
■The appliance has been used for normal domestic purposes only, and in accordance with the
manufactuer's instructions.
■The appliance has not been serviced, maintained repaired, taken apart or tampered with by any person not
authoried by us.
■All service work under this guarantee must be undertaken by a Service Force Centre.
■Any appliance or defective part replaced shall become the Company's property.
■This guarantee is in addition to your statutory and other legal rights.
Home visits are made between 8.30am and 5.30pm Monday to Friday. Visits may be available outside these
hours in which case a premium will be charged.
Exclusions
This guarantee does not cover:
■Damage or calls resulting from transportation, improper use or neglect, the replacement of any light bulbs or
removable parts of glass or plastic.
■Costs incurred for calls to put right an appliance which is improperly installed or calls to appliances outside
the United Kingdom.
■Appliances found to be in use within a commercial environment, plus those which are subject to rental
agreements.
European Guarantee
If you should move to another country within Europe then your guarantee moves with you to your new home
subject to the following qualifications:
■The guarantee starts from the date you first purchased your product.
■The guarantee is for the same period and to the same extent for labour and parts as exists in the new
country of use for this brand or range of products.
■This guarantee relates to you and cannot be transferred to another user.
■Your new home is within European Community (EC) or European Free Trade Area.
■The product is installed and used in accordance with our instructions and is only used domestically, i.e. a
normal household.
■The product is installed taking in account regulations in your new country.
Before you move please contact your nearest Customer Care centre, listed below, to give them details of your
new home. They will then ensure that the local Service Organisation is aware of your move and able to look
after you and your appliance.
France Senlis +33 (0) 344 62 2013
Germany Nurenberg +49 (0) 800 234 7378
Italy Pordenone +39 (0) 800 11 7511
Sweden Stockholm +46 (0) 20 78 77 50
UK Slough +44 (0) 1753 219898
GUARANTEE CONDITIONS

This appliance conforms to European Low Voltage Directive 73/23/CEE governing electrical safety, European Directive 89/
336/CEE on Electromagnetic Compatibility and Directive 93/68/CEE regarding CE Marking.
436001866_01 - 030924
Table of contents
Popular Ventilation Hood manuals by other brands

Pyramis
Pyramis 065941101 Instruction on mounting and use

AVG
AVG AVI-366IS3 INSTALLATION GUIDE / USE AND CARE MANUAL

Zephyr
Zephyr Twister AK8000AS Use, care and installation guide

Faber
Faber Eurolux INTEGRA HIP NF GR A52 user manual

Hanseatic
Hanseatic SY-103D1-E3-C25-L12-900 user manual

Indesit
Indesit H 361 manual


Frico
Frico AGS5500 Original instructions

THERMEx
THERMEx Integro 51 II manual

KitchenAid
KitchenAid KWCU300WSS0 Installation & use manual

Zephyr
Zephyr Tidal I AK7300AS Use, care and installation guide

KOBE
KOBE CHX9130SB Installation instructions and operation manual

AEG
AEG Perfekt Glide-24 instruction manual