Fisher & Paykel 7 Series User manual

HB1200E
RANGEHOOD EXTERNAL BLOWER
INSTALLATION GUIDE
NZ AU

2
SAFETY AND WARNINGS
WARNING!
To reduce the risk of fire, injury to persons or damage when using the appliance, follow the
important safety instructions listed. Read all guidance before using the appliance.
Servicing
z Do not repair or replace any part of the appliance unless specifically recommended in the
installation or user guide. All other servicing should be undertaken be a Fisher & Paykel
trained and supported service technician or qualified person.
Installation
z Please make this information available to the person installing the appliance.
z When cutting or drilling into wall or ceiling, do not damage electrical wiring and other
hidden utilities.
z This blower must be installed with a compatible Fisher & Paykel rangehood, failure to do
so can void your warranty.
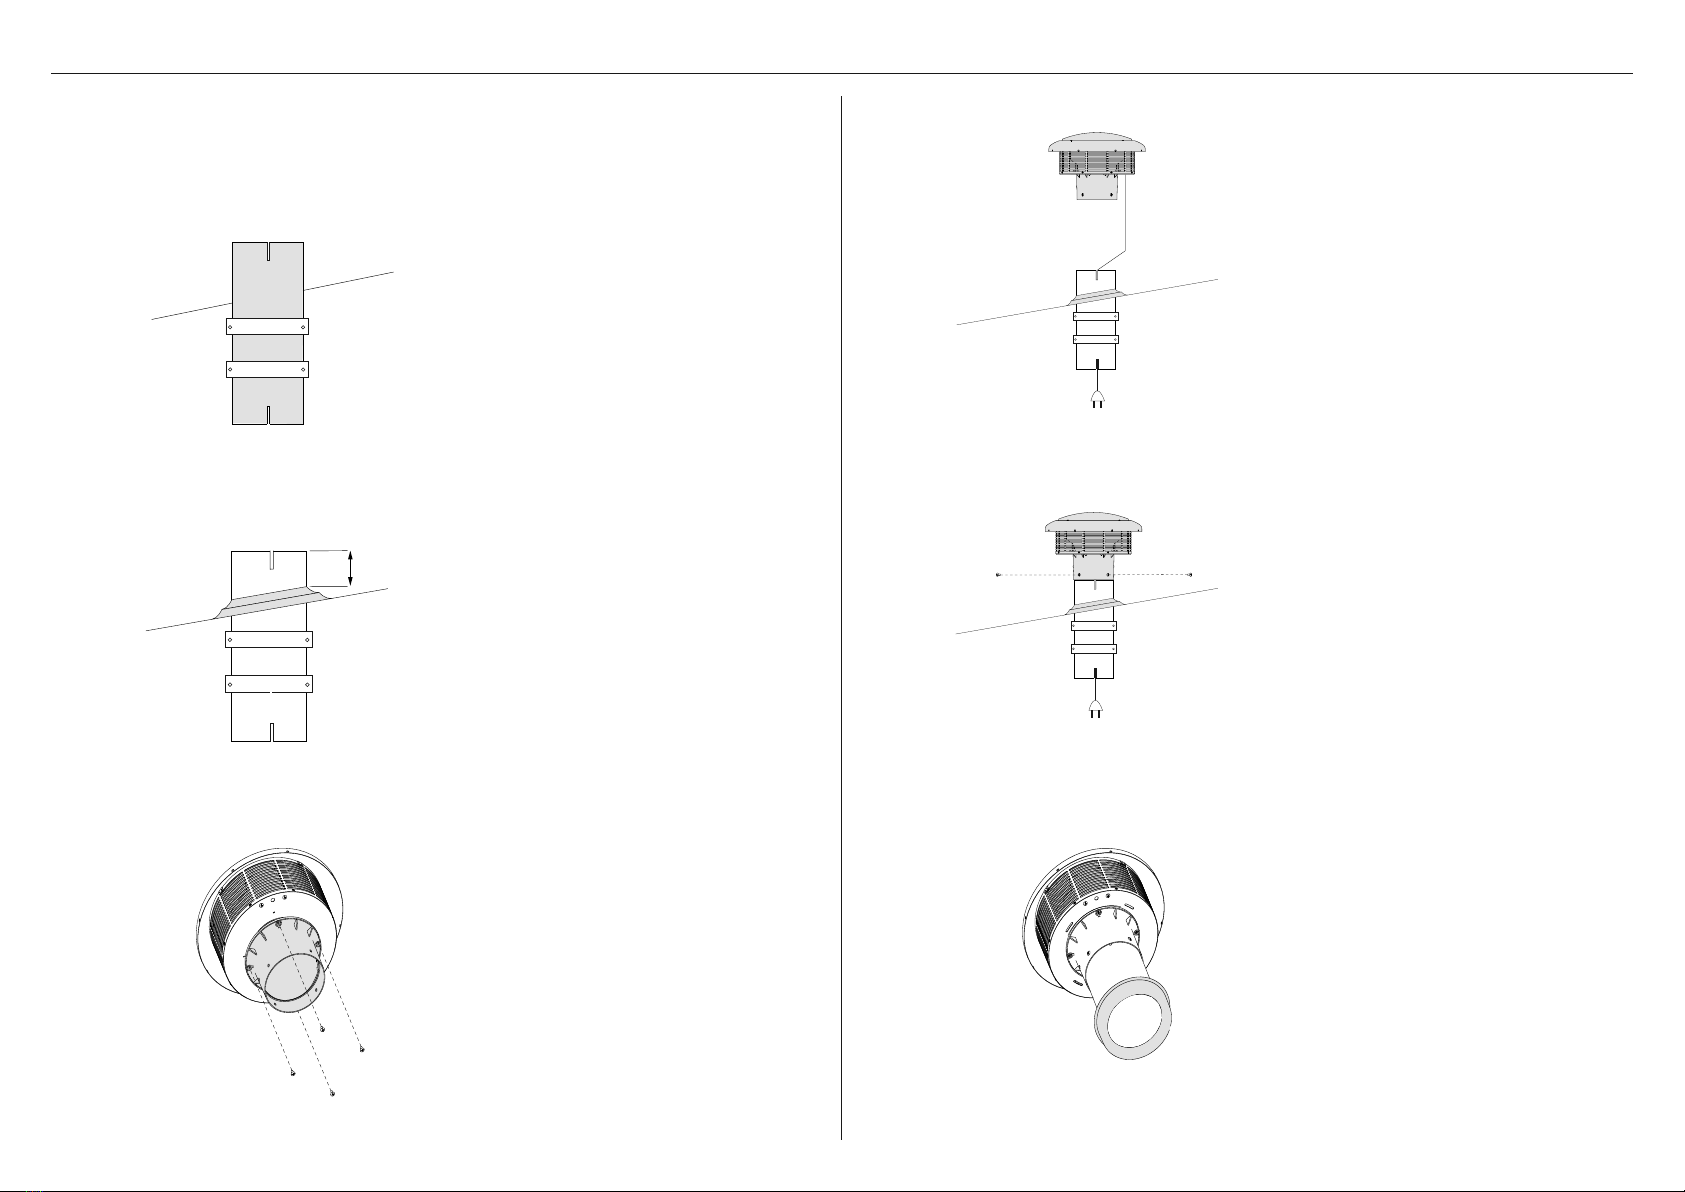
z This external blower unit is intended to be installed on the roof only.
z To comply with electrical safety regulations, the rangehood which controls the blower
must be plugged into a socket near the appliance. The socket must be accessible, or have
an accessible isolating switch, to enable the end user to isolate the appliance from the
power for the purpose of internal cleaning or maintenance.
z Always switch the power off prior to installation, servicing or cleaning of the appliance.
z All ducting must comply with local requirements and building codes.
z Attention should be given to ensure that any applicable regulations concerning the
discharge of exhaust air are fulfilled.
z To reduce the risk of fire and electric shock, install this appliance only with rangehood
models specified.
z Ensure the supply cord is not exposed to heat, chemicals or sharp objects. If the supply
cord is damaged it must be replaced by a Fisher & Paykel trained and supported service
technician or suitably qualified person in accordance with all applicable codes and
standards, including fire-rated construction.
z In order to avoid a hazard due to inadvertent resetting of the thermal cut-out, this
appliance must not be supplied through an external switching device, such as a timer, or
connected to a circuit that is regularly switched on and off by the utility.
General
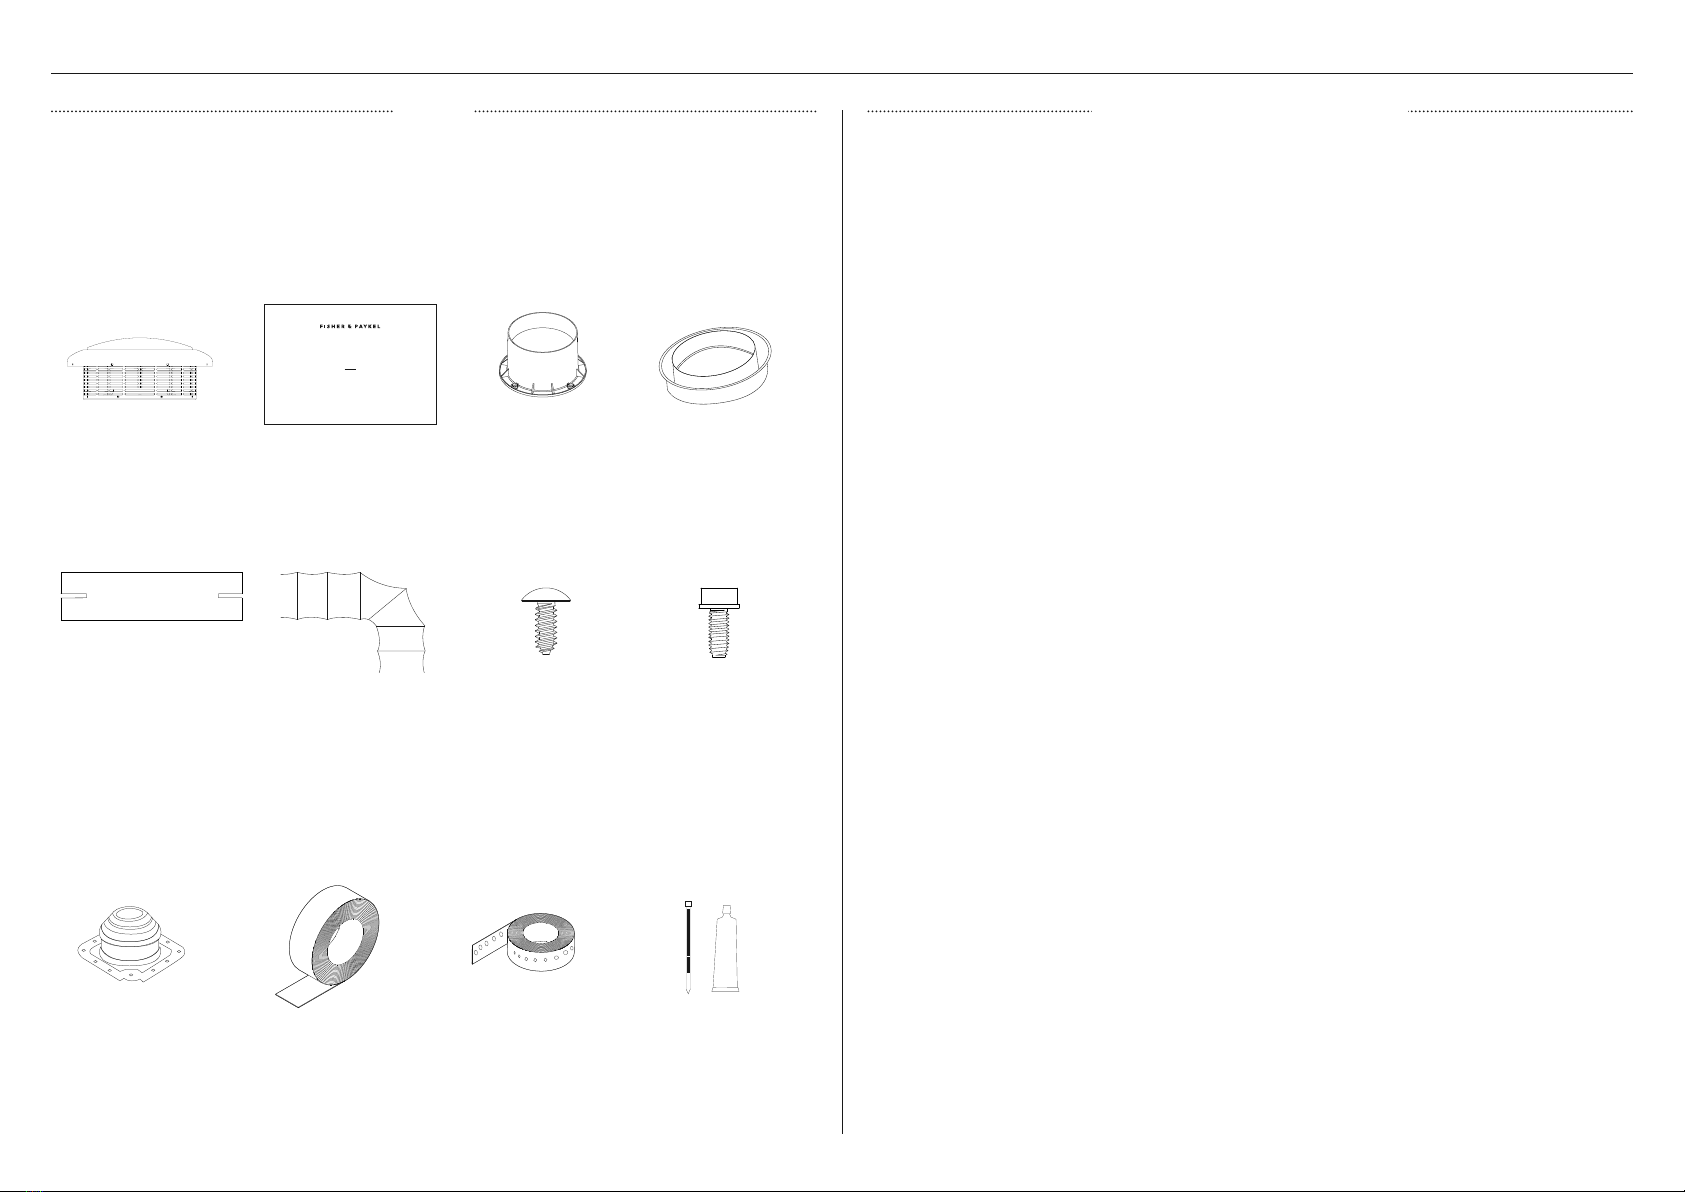
z Remove all packaging, including protective wrappings, before use.
z This appliance incorporates an earth connection for functional purposes only.
z To reduce risk of fire and to properly exhaust air, be sure to duct air outside — Do not vent
exhaust air into spaces within walls or ceilings or into attics, crawl spaces, or garages.
z For information on environmental noise limit and conditions please contact your local
authority.
z The unit cannot be used in conjunction with a recirculation unit.
!WARNING!
Electric Shock Hazard
Failure to follow this advice may result in
electric shock or death.
• Installation and electrical wiring must be
completed by qualified person(s) in accordance
with all applicable codes and standards, including
fire-rated construction.
• Always disconnect the appliance from the
mains power supply before carrying out any
maintenance or repairs.
!WARNING!
Weight Hazard
Failure to follow this advice may result in
damage or personal injury.
• The appliance is heavy. Please ensure adequate
care is taken when installing the appliance.
• Product weight: 5.8kg.
!WARNING!
Cut Hazard
Failure to use caution could result in injury.
• Take care: some edges are sharp.
• Wear gloves to protect against sharp edges.
READ AND SAVE THESE INSTRUCTIONS

3
COMPONENTS REQUIRED
z Keep all packing materials until the unit has been inspected.
z Inspect the product to ensure there is no shipping damage. If any damage is detected
contact the dealer or retailer you bought the product from to report the damage.
z Fisher & Paykel is not responsible for shipping damage.
External Blower (1) Back draft damper
assembly (1)
Roof seal kit
150mm Internal diameter
500mm PVC roof pipe (1)
Technical content (1)
Aluminium tape
(DO NOT use duct tape)
200mm diameter Flexible
ducting 6m (1)
12mm Plastic self-tapping
screws (4)
Support straps/brackets
for PVC roof pipe
150 – 200mm Duct
connection adapter (1)
12mm Sheet metal screws
(4)
Zip ties and sealant
Supplied
Not supplied
Your external blower must be installed with a compatible rangehood. Refer to the range
hood installation guide. A list of external blower compatible rangehoods can be found at
fisherpaykel.com.
HB1200E Models
RANGEHOOD EXTERNAL BLOWER
INSTALLATION GUIDE
NZ AU
PARTS COMPATIBLE RANGEHOODS

4
Roof
Ducting
Ceiling
External blower
Power cords
PRODUCT DIMENSIONS
PROFILE
SHOWN WITH HP60IDCHEX3 (Compatible Rangehood)
PRODUCT DIMENSIONS
HB1200E MODELS
MM
A Overall height 755
B Overall diameter 400
C Height of blower unit 174
D Height of external blower and backdraft damper 275
E Outer diameter of roof pipe 160
F Diameter of ducting outlet 200
G Diameter of grill 315
Length of power cord 6000
Actual product dimensions may vary by ± 2 mm.
a
c
d
gØ
EØ
FØ
BØ

5
VENTING REQUIREMENTSELECTRICAL REQUIREMENTS
For optimum performance of this blower:
1 Identify roof location where blower noise will be acceptable. This will depend on
the following:
z Distance from outdoor living areas.
z Transmission of noise through ceiling or windows located near the blower.
2 Mount the blower with 4-6m of ducting.
3 Mount the blower 4-6m from the rangehood.
4 Use only the supplied Fisher & Paykel flexible ducting.
5 Extend ducting and cut to required length. If additional ducting is required this can be
purchased from Fisher & Paykel. Refer to ‘Parts and Accessories’ for details.
6 Bends in ducting should be smooth, gradual and have a radius of at least two times the
duct diameter.
7 Ducting from rangehood to blower has at least 2 bends. The bends in the ducting help to
reduce the transmission of noise from the external blower to the rangehood.
Before connecting the external blower to the power supply, ensure the voltage and frequency
indicated on the rating plate match that of the installation location:
MODEL FREQUENCY VOLTAGE
HB1200E 50 Hz 230 V
Rating plate
location
Roof
Ducting
Ceiling
External blower
Power cords
Do not crush or kink the ducting.

6
1
5
63
4
Create a hole in the roof for the
PVC pipe.
Mount the PVC roof pipe securely to
a sufficiently strong internal house
structure. Ensure the pipe is vertical.
Fit the back draft damper to the pipe
using the 12mm plastic self-tapping
screws (4) provided.
Seal around the power cord slot with
sealant as required.
Attach the duct connection
adapter to the end of the pipe with
aluminium tape.
Attach back draft damper assembly
to the external blower using the 12mm
sheet metal screws (4) provided.
Pass the power cord and plug through
the slot in the roof pipe and out the
slot in the other end.
50mm
50mm
INSTALL EXTERNAL BLOWER
2Seal the pipe with appropriate roof
sealing kit. Ensure the pipe protrudes a
mimimum of 50mm from the seal.
50mm
z When cutting or drilling into wall or ceiling, do not damage electrical wiring and other
hidden utilities.
z WARNING! Failure to install the screws or fixing device in accordance with these
instructions may result in electrical hazards.

7
Roof
Ducting
Ceiling
External blower
Power cord
1
2
Connect the external blower to the
rangehood using the flexible 200mm
diameter 6m ducting provided.
Ensure the ducting is:
z Taut, remove excess ducting by
trimming to length.
z Has at least 2 bends with
recommended radius.
z Is not crushed or kinked in
any location.
Install the rangehood (if not already
installed) refer to rangehood
installation guide.
Connect the plug from the external
blower to the rangehood and plug
the rangehood in.
Ensure the cable from the external
blower has a low point in the routing.
CONNECT EXTERNAL BLOWER
Roof
Ducting
Ceiling
External blower
Power cord
PARTS AND ACCESSORIES
ITEM REFERENCE NUMBER
Flexible ducting 200mm (6m) 792961

8
INSTALLER CHECKLIST
Complete and keep for safe reference:
Model
Serial No.
Purchase Date
Purchaser
Dealer Address
Installer’s Name
Installer’s Signature
Installation Company
Installation Date
TO BE COMPLETED BY THE INSTALLER
Ensure that:
Rangehood is correctly installed
All connections are secure
The external blower is fitted correctly and securely
The ducting is not bent or crushed in any areas
There are at least two bends in the ducting
Roof is sealed appropriately
External blower is at least 4m away from the rangehood and in a location where
the external noise is acceptable
All local roofing regulations have been met
Operation has been tested (refer to rangehood user guide)


10595A 05.20
FISHERPAYKEL.COM
© Fisher & Paykel Appliances 2020. All rights reserved.
The models shown in this guide may not be available in all markets
and are subject to change at any time.
The product specifications in this guide apply to the specific products and
models described at the date of issue. Under our policy of continuous product
improvement, these specifications may change at any time.
For current details about model and specification availability in your country,
please go to our website or contact your local Fisher&Paykel dealer.
Other manuals for 7 Series
7
This manual suits for next models
1
Table of contents