Fisher-Price Direct Link Privacy Monitor User manual
Direct Link
Privacy Monitor
Please read these instructions and keep them for future reference.
Includes two AC adaptors to power the transmitter and receiver.
The transmitter and receiver also run on battery power.
(Transmitter requires four size “C” alkaline batteries. Receiver requires one
9V alkaline battery. Batteries are not included.)
Model Number: 71566
™
Consumer Information
Occasionally a consumer may experience a problem with one of our products. If this should happen, please call us
toll-free rather than return this product to the store. Usually we can solve the problem over the telephone or by sending
you replacement parts. Please call Fisher-Price®Consumer Affairs, toll-free at 1-800-432-KIDS, between 8 AM - 6 PM EST,
Monday through Friday. Hearing-impaired consumers using TTY/TDD equipment, please call 1-800-382-7470. Or, write to
Fisher-Price®Consumer Affairs, 636 Girard Avenue, East Aurora, New York 14052.
A
2
• Use only the AC adaptors provided with your Direct
Link Privacy Monitor
TM
. Use of any others may damage
the transmitter and/or receiver.
• Insert the AC adaptor plugs into standard household
outlets (120V AC ).
• For a good electrical connection, make sure the
AC adaptor plug blades maintain a tight fit in the outlet.
If the AC adaptor plug-to-outlet connection is loose,
choose another outlet location for the AC adaptor plug.
• Position AC adaptor cords so that they are not walked
on or pinched by items placed upon or against them.
• Do not use more than one transmitter and one receiver
at the same time in the same house.
• Never use the transmitter or receiver near water. For
example, do not use near a bathtub, sink, laundry tub,
kitchen sink, or wet basement, etc.
• Place the transmitter, receiver and AC adaptors where
there is adequate ventilation.To prevent overheating,
keep the transmitter, receiver and AC adaptors away
from heat sources such as radiators, heat registers, direct
sunlight, stoves, amplifiers, or other appliances which
produce heat.
• Always remember that you are using public airwaves
when you use the Direct Link Privacy Monitor
TM
. The
coded scrambling system blocks out listeners outside
your house to protect your privacy. To further enhance
the privacy of your home, always turn the transmitter
off when not in use.
• The Direct Link Privacy Monitor
TM
is not designed for
consumer repair. If your Direct Link Privacy Monitor
TM
is not working properly, please refer to the Problems
and Solutions Guide , beginning on page 10.
L
• Read and follow all instructions in this booklet and on
the product for proper use of this product.
•
This product is not intended to be used as a medical
monitor and its use should not replace adult supervision.
It is important that an adult stay within the range of the
Direct Link Privacy MonitorTM at all times during use.
• This product does not detect non-audible functions,
such as a child moving.
• It is very important to test the sound reception of the
Direct Link Privacy Monitor
TM
before first-time use and
every time you change the location of the transmitter.
Please see Sound Reception , on page 8.
• To prevent entanglement, never place the transmitter
in a crib or playpen. Place the transmitter, receiver and
AC adaptor cord(s) out of baby’s reach.
• To prevent entanglement, do not use extension cords
with the AC adaptors.
• Batteries (if used) should be removed and the AC
adaptors should be unplugged from wall outlets when
the Direct Link Privacy Monitor
TM
is not used for a long
period of time.
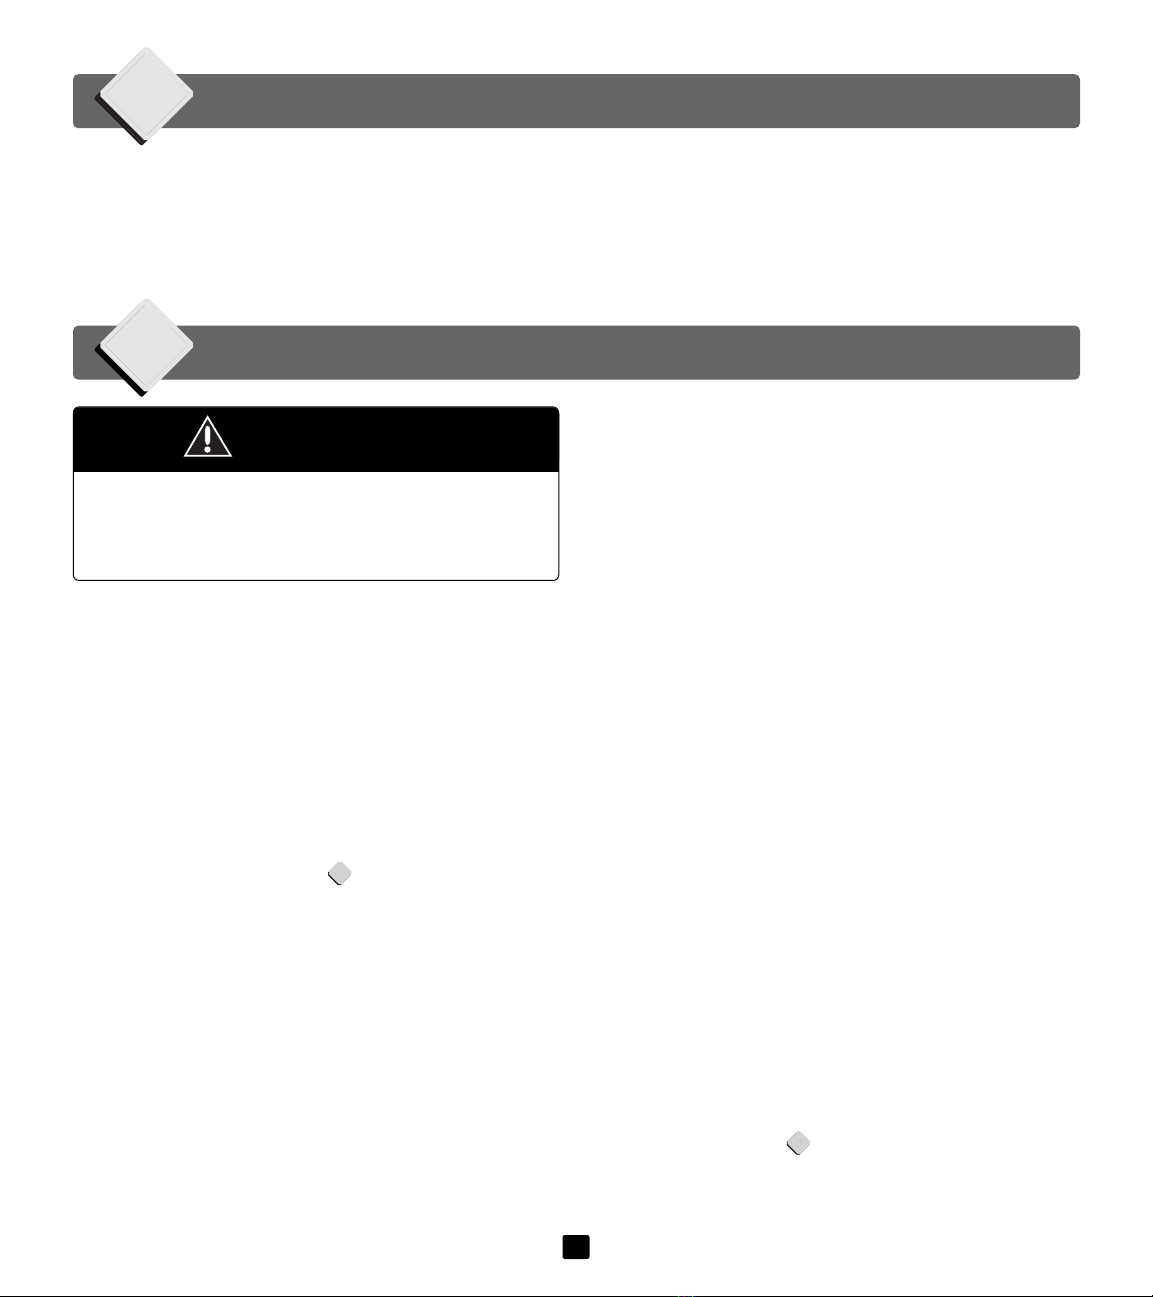
H
CAUTION
This product cannot replace
responsible adult supervision
of a child.
Important Information
B

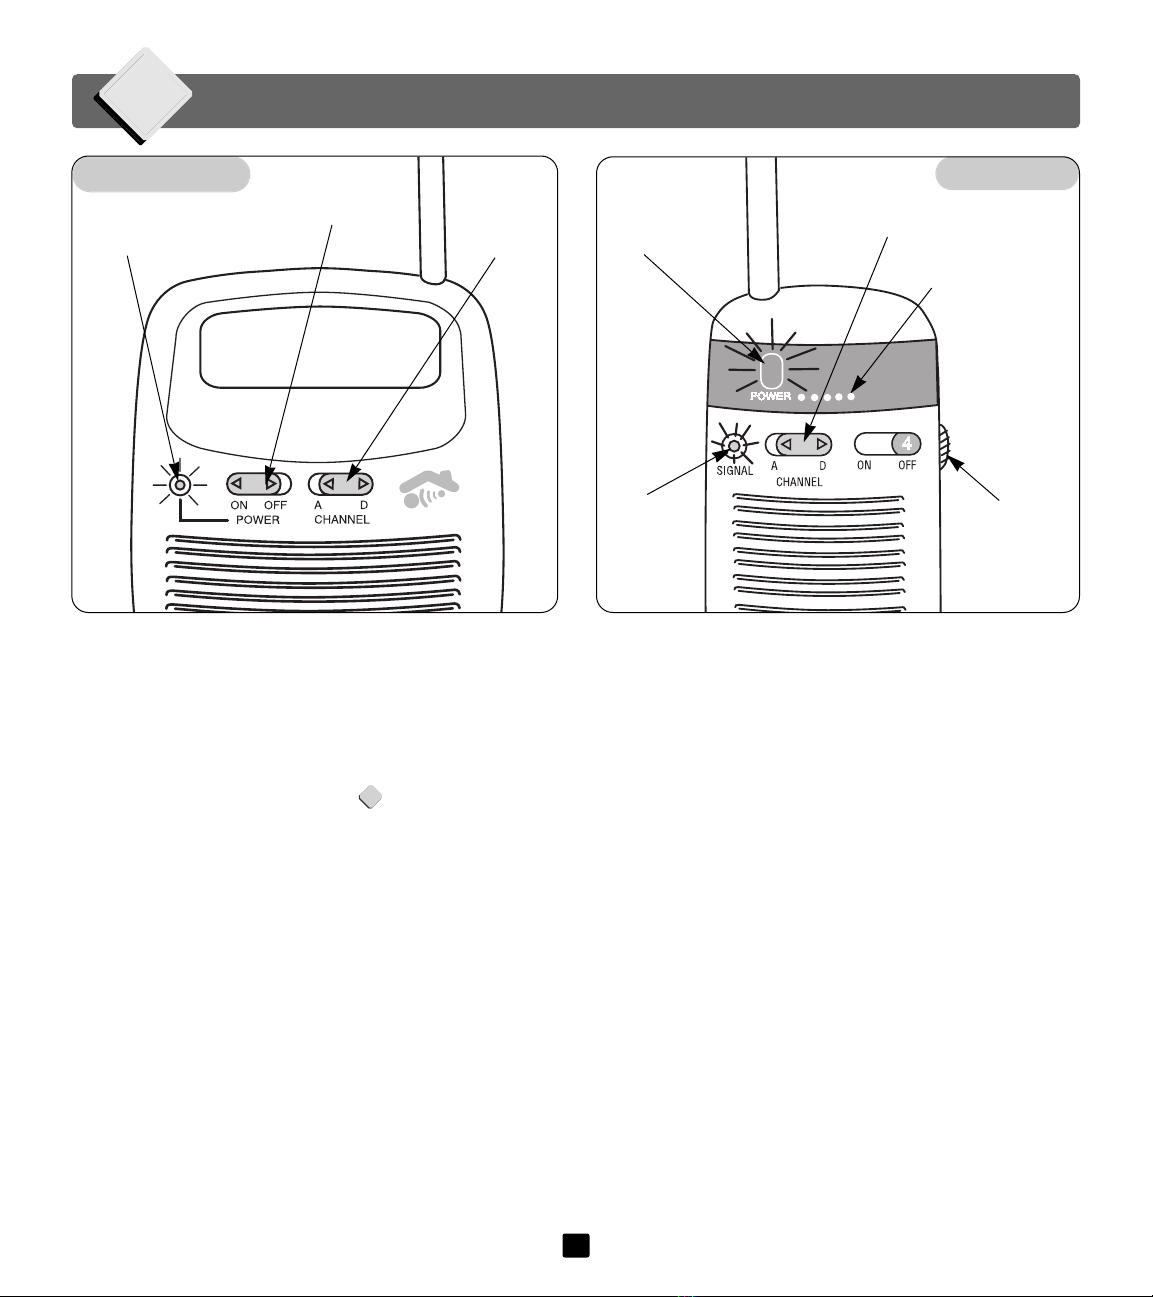
Transmitter . . . . . . . . . . . . . . .Sends (transmits) sounds to the receiver.
ON/OFF Switch . . . . . . . . . . . .Turns the transmitter power “ON” or “OFF”.
Power Indicator . . . . . . . . . . .Lights up to let you know the transmitter is “ON”.
Microphone . . . . . . . . . . . . . . .For clear audio pick-up.
2-Position Channel Switch . . . .Allows you to change channels when interference occurs.
Flexible Antenna . . . . . . . . . . .Aids in sound transmission.
AC Adaptor Socket . . . . . . . . . .For use with the provided AC adaptor.
Code Switch . . . . . . . . . . . . . .Allows you to block out other listeners to protect your privacy.
Battery Compartment Door . . .For easy access to battery compartment.
Receiver . . . . . . . . . . . . . . . . .Receives signal from the transmitter to hear sound.
Signal Indicator . . . . . . . . . . . .Lights up to let you know you’re “connected” to baby.
ON/OFF/Volume Dial . . . . . . .Turns the receiver power "ON" or "OFF". Controls the volume of sound.
Power Indicator . . . . . . . . . . . .Lights up to let you know the receiver is “ON”.
Variable Lights Display . . . . . .Shows sounds are being transmitted.
Speaker . . . . . . . . . . . . . . . . . .Allows you to hear baby’s sounds.
2-Position Channel Switch . . . .Allows you to change channels when interference occurs.
AC Adaptor Socket . . . . . . . . . .For use with the provided AC adaptor.
Code Switch . . . . . . . . . . . . . .Allows you to block out other listeners to protect your privacy.
Battery Compartment Door . . .For easy access to battery compartment.
Flexible Antenna . . . . . . . . . . .Aids in sound reception.
Belt Clip (on back) . . . . . . . . . .For added portability when moving from room to room.
AC Adaptors (2 included) . . . .Both the transmitter and receiver operate on standard household current
(120V AC outlet) with these AC adaptors.
Direct Link Privacy Monitor™Features
C
1
2
3
4
5
6
7
10
12
13 14
15
17
22
1
2
3
4
5
6
7
8
9
10
11
12
13
14
15
16
17
18
3
20
19
16
20
21
21
22
Your Fisher-Price®Direct Link Privacy MonitorTM is equipped with a custom voice scrambling system
that provides privacy protection in your home. Although no system is completely private,
your Fisher-Price®Direct Link Privacy MonitorTM has two channels and 31 different codes
to minimize the risk of unintentional eavesdropping.
9
811
19
18
The transmitter and receiver operate with either the AC adaptors included
with your Direct Link Privacy Monitor™or by battery power.
4
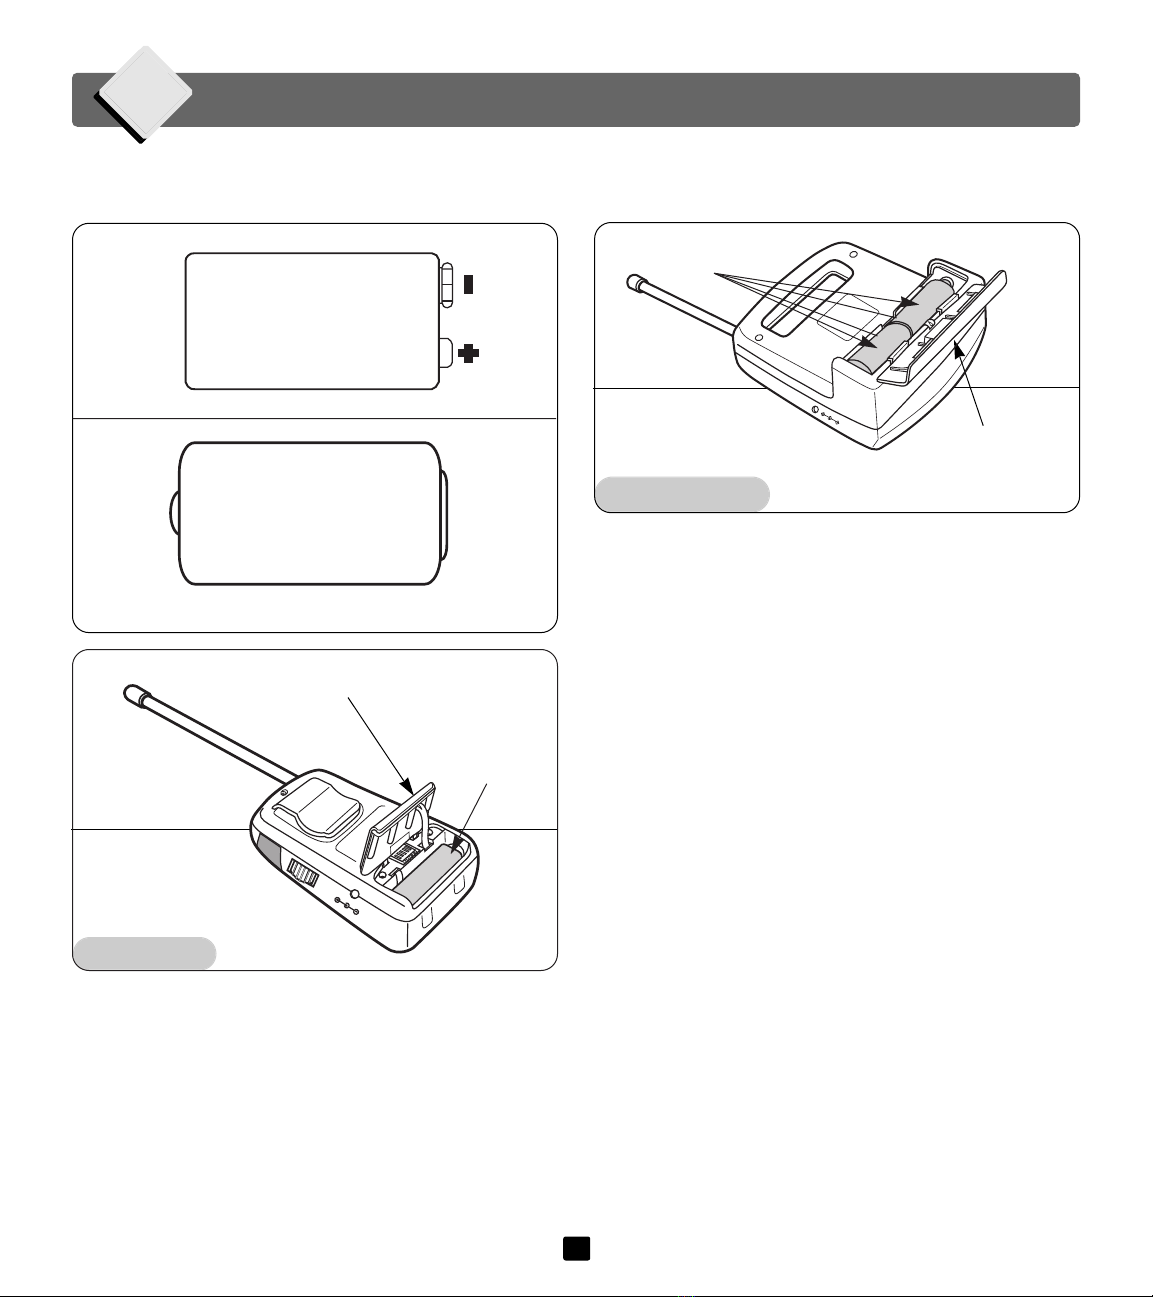
Battery Installation
D
Battery
Compartment
Door
Four Size "C"
Alkaline Batteries
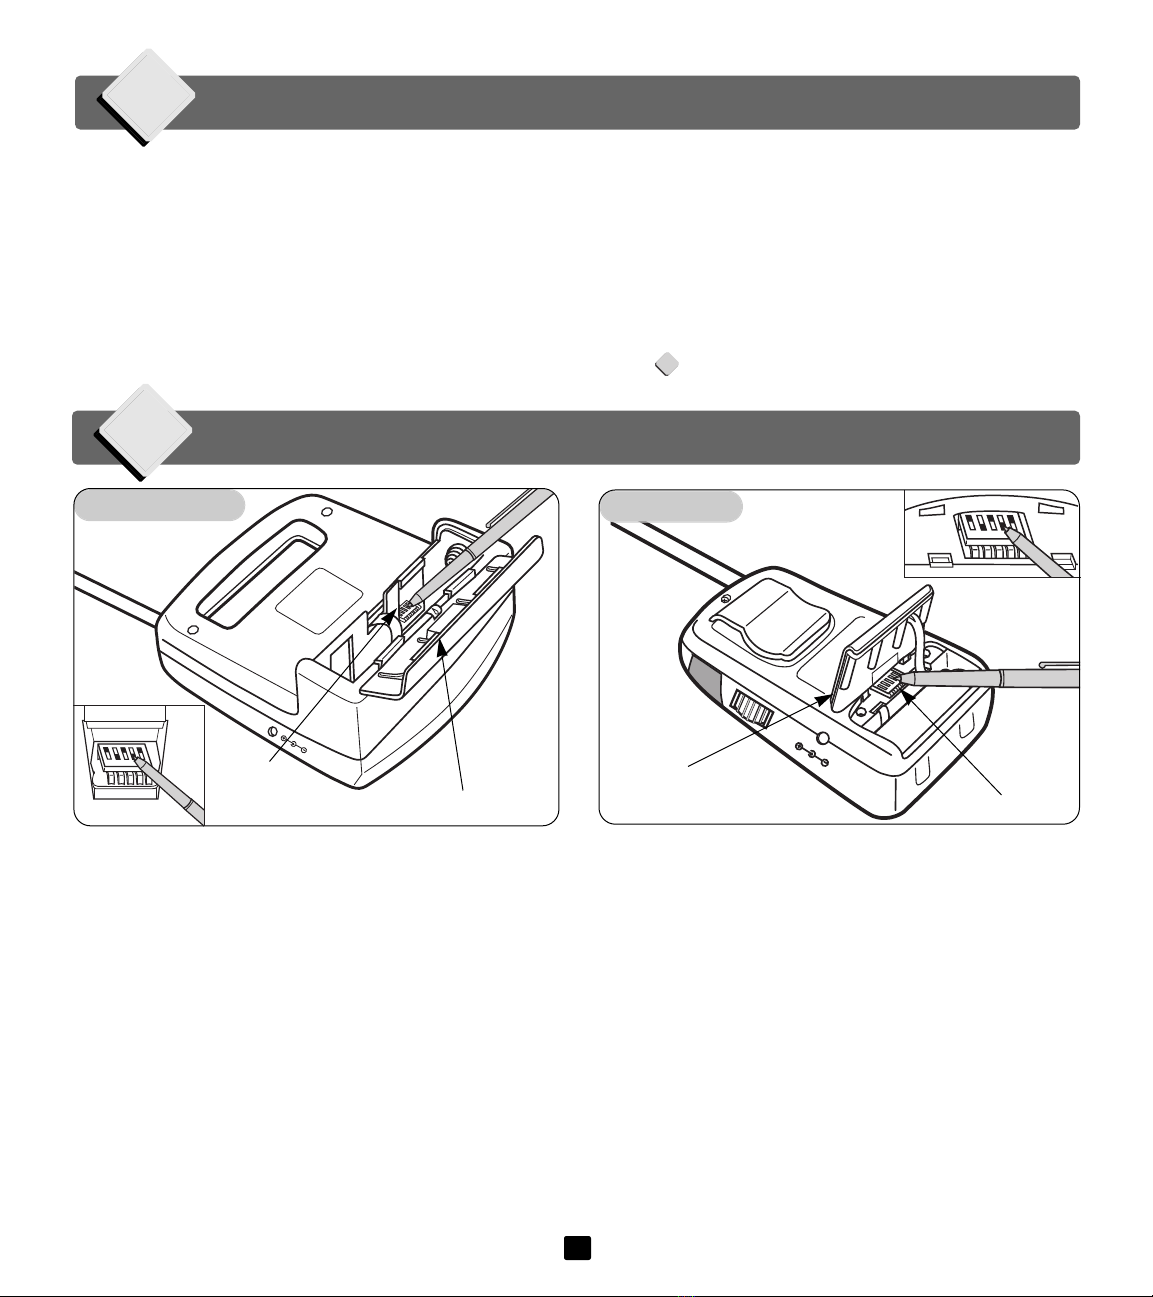
• Locate the battery compartment door on the back of
the transmitter.
• Push the battery compartment door in the direction of
the arrow to open.
• Insert four, fresh size “C” alkaline batteries as shown
inside the battery compartment.
• Close the battery compartment.
Please Note:
• Do not mix old and new batteries.
• Do not mix different types of batteries: alkaline, standard
(carbon-zinc) or rechargeable (nickel-cadmium).
• Remove batteries during long periods of non-use.
Always remove exhausted batteries from the product.
Battery leakage and corrosion can damage the product.
• Never short circuit the battery terminals.
• Non-rechargeable batteries are not to be recharged.
• Only batteries of the same or equivalent type as
recommended in the “Battery Installation” instructions
are to be used.
• If removable rechargeable batteries are used, they are
only to be charged under adult supervision.
• Rechargeable batteries are to be removed from the
product before they are charged.
• If you use a battery charger, it should be examined
regularly for damage to the cord, plug, enclosure and
other parts. Do not use a damaged battery charger until
it has been properly repaired.
+-
1.5 V x 4
“C” (LR6)
Both Shown Actual Size
Battery Compartment Door
9V Alkaline
Battery
• Locate the battery compartment door on the back of
the receiver.
• Push the battery compartment door in the direction of
the arrow to open.
• Snap the terminals of a fresh 9 volt alkaline battery into
the connectors.
• Close the battery compartment door.
9V
(6LR61)
Receiver
Transmitter
9V DC ONLY
9V DC ONLY
1
2345
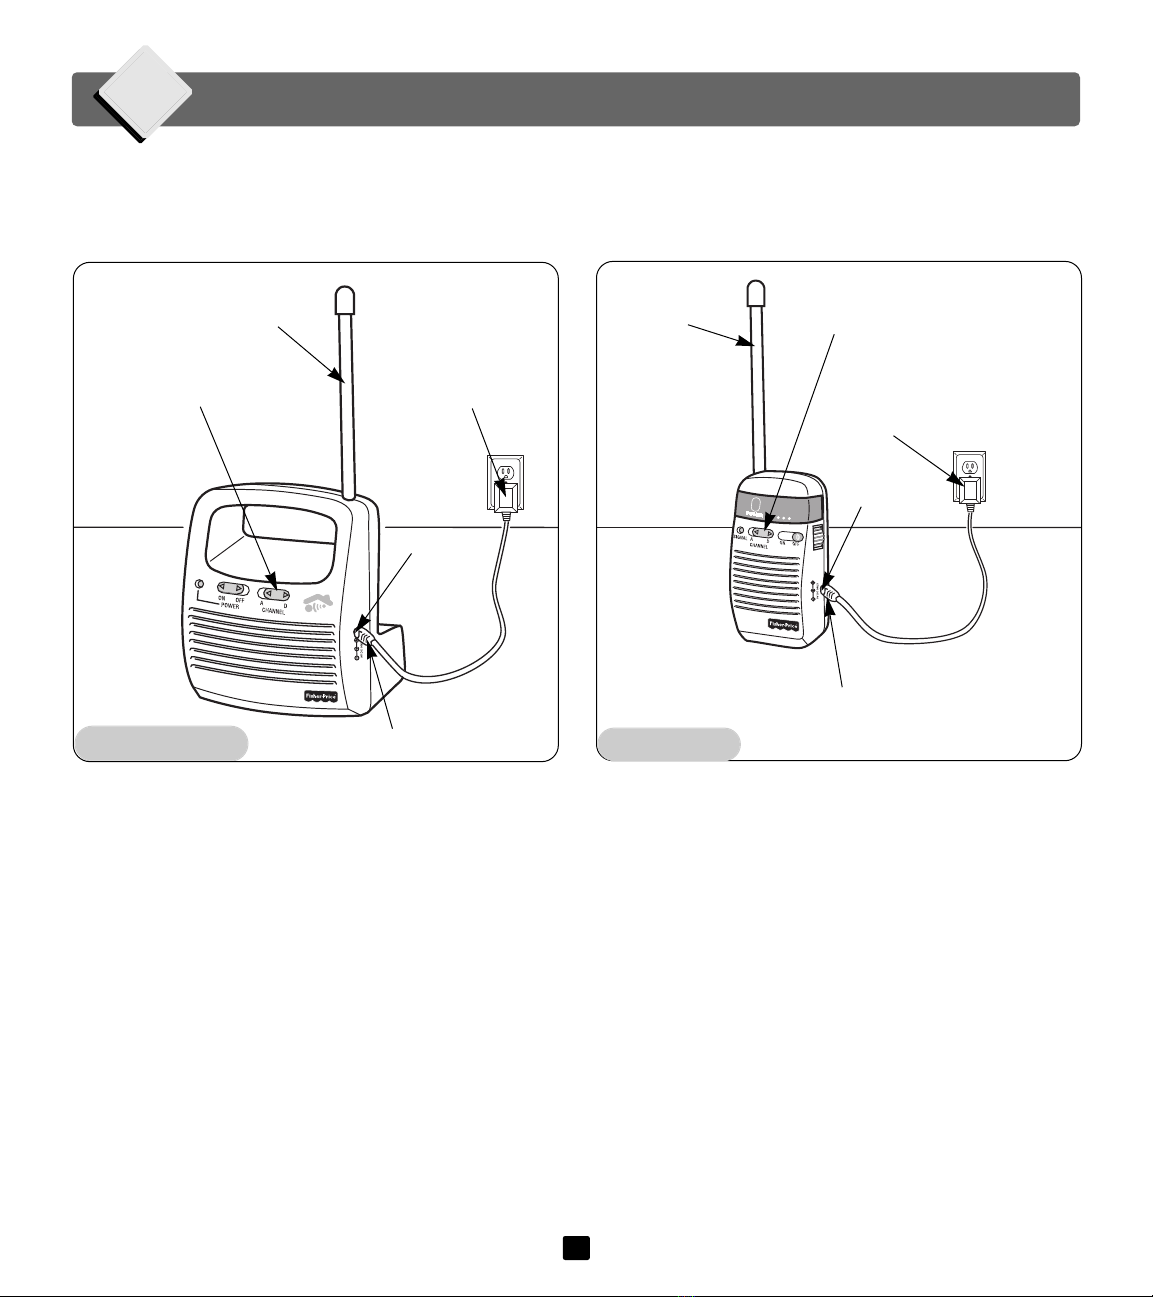
Transmitter
5
IMPORTANT! To prevent entanglement, never place the transmitter in a crib or playpen.
Place the transmitter, receiver and AC adaptor cord(s) out of baby’s reach.
Channel Switch
Antenna
AC Adaptor
• Decide whether you will use the AC adaptor or
batteries to power the transmitter/receiver. If you will
be using either unit near an outlet, we recommend
using the AC adaptor(s).
• Place the transmitter in the same room with your child.
For best sound pick-up, point the microphone directly
toward the crib or play area. Make sure the antenna
points upward for best transmission.
• For best transmission, unwrap and fully extend the
AC adaptor cord. Insert the AC adaptor jack into the
transmitter socket. Insert the plug into a standard
wall outlet.
Set-Up
E
AC Adaptor Jack
Socket
For your convenience, the channel and code switches on the transmitter and receiver
have been pre-set at Fisher-Price®.
• Place the receiver where you can hear/see it. Or, wear
the receiver using the convenient belt clip. Make sure
the antenna points upward for best reception.
• For best transmission, unwrap and fully extend the
AC adaptor cord. Insert the AC adaptor jack into the
receiver socket. Insert the plug into a standard
wall outlet.
• Check to be sure the channel switch on both the
receiver and the transmitter are on the same
channel.
Channel Switch
AC Adaptor
AC Adaptor Jack
Socket
Receiver
Antenna

Receiver Transmitter
Checking Privacy
F
• Rotate the ON/OFF/volume dial on the receiver to the
“ON” position. The power indicator will light.
• Make sure the power switch on the front of the trans-
mitter is in the “OFF” position. The power indicator
should NOT light.
• Look at the signal indicator on the receiver. It should
NOT light.
• Change the channel switch on the receiver to the
other channel.
•L
ook at the signal indicator on the receiver. It should
NOT light. If the signal indicator does NOT light on
either channel (with the transmitter power “OFF”), the
privacy feature on your Direct Link Privacy MonitorTM
is working.
Power Indicator ON/OFF Switch
Channel Switch
ON/OFF/
Volume Dial
Signal
Indicator
Power Indicator
• Re-set the channel switches on both the transmitter
and the receiver to the same channel.
IMPORTANT! If the signal indicator lights on either
channel (with the transmitter power “OFF”), you need to
reset your scrambled code. Please see Resetting Your
Scrambled Code, page 8.
I
6
Transmitter Receiver
Use
G
• Slide the ON/OFF switch on the front of the transmitter
to the “ON” position. The power indicator will light.
• Rotate the ON/OFF/Volume dial on the receiver to the
“ON” position. The power indicator will light.
• Check to be sure the signal indicator on the receiver
lights. If the signal indicator on the receiver does not
light, you need to reset your scrambled code. Please see
Resetting Your Scrambled Code, page 8.
• Adjust the volume to a comfortable level on the receiver.
I
Power Indicator
ON/OFF Switch Channel
Switch
Power
Indicator
Signal
Indicator ON/OFF/
Volume Dial
Variable Lights
Display
Channel Switch
7
• The variable lights display will light when sound is
received by the receiver.
• If all five bars in the variable lights display light and there
is a high level of static:
– The receiver power is “ON” and the transmitter power
is “OFF”. (Turn the transmitter power “ON”.)
– The receiver is out of range of the transmitter. (Move
the receiver closer to the transmitter.)
– The receiver and the transmitter are not on the same
channel. (Set the channel switches on the transmitter
and receiver to the same channel.)
– Loud sounds are transmitting.
Please Note: The variable lights display will not
light if the battery is weak, even though you may still
hear sounds. Replace the battery with a fresh 9 volt
alkaline battery, or use the AC adaptor that came with
this product.
• To further enhance the privacy of your home, be sure to
turn the transmitter and receiver “OFF” when not in use.
9V DC ONLY
1
2345
Transmitter
9V DC ONLY
1
2345
8
• Check to be sure the channel switch on both the
receiver and the transmitter are on the same channel.
• Locate the battery compartment doors on the back of
the receiver and the transmitter.
• Push the battery compartment doors in the direction of
the arrow to open them.
• If you are using battery power in either unit, remove the
batteries.
• Using a pen, push the code switches up or down to
change your scrambled code. Make sure the code
switches in the transmitter and receiver match.
Resetting Your Scrambled Code
I
Battery
Compartment
Door Code Switches
Battery Compartment Door
Code
Switches
Sound Reception
H
12345
12345
• Test the Direct Link Privacy Monitor™transmission and
reception. Have an adult speak into the transmitter in the
room you intend to use the transmitter. (If an adult is not
available, use a ticking clock or radio.) Place the receiver
in the room in which you intend to use the receiver.
Adjust the receiver location or volume dial until you hear
sounds clearly through the receiver.
• If you experience interference (buzzing, static, etc.)
while using one channel setting, switch both units to the
other channel. Selecting a channel is usually a one-time
adjustment.
• If interference occurs on both channels or if further prob-
lems develop, please refer to the Problems and Solutions
Guide beginning on page 10.
It is very important to test the sound reception of the Direct Link Privacy Monitor™before first-time use
and whenever you change the location of the transmitter.
L
Receiver
IMPORTANT NOTES!
_Do not use a pencil to move the code switches.
_Do not position all five code switches in the “OFF”
position.When the code switches in the transmitter
are all in the “OFF” position, the scrambling feature
is disabled.
• If you are using battery power in either unit, re-install
the batteries.
• Slide the ON/OFF switches on the front of the
transmitter and receiver to the “ON” position. The
power indicators will light.
• Check to be sure the signal indicator on the receiver
lights. If the signal indicator on the receiver does not
light, you have not reset the code switches correctly.
Please re-read this section carefully and reset the code
switches.

Care
J
• Keep the transmitter and receiver free from dust.
• The outer surface of the transmitter and receiver can be
cleaned with a cloth lightly dampened with a mild
cleaning solution.
• Do not immerse any part of the transmitter or receiver.
Direct Link Privacy Monitor™
Model Number: 71566
This device complies with Part 15 of the FCC Rules.
Operation is subject to the following two conditions:
(1) This device may not cause harmful interference and
(2) this device must accept any interference received,
including interference that may cause undesired
operation.
Fisher-Price, Inc.
Consumer Affairs Department
636 Girard Avenue
East Aurora, New York 14052
FCC Note
(United States only)
K
9

IMPORTANT! If you have a problem with the Direct Link Privacy Monitor™, first check the
Problems and Solutions Guide. If you still experience a problem with the Direct Link Privacy Monitor™
,
please call Fisher-Price®Consumer Affairs at 1-800-432-KIDS.
Problems and Solutions Guide
L
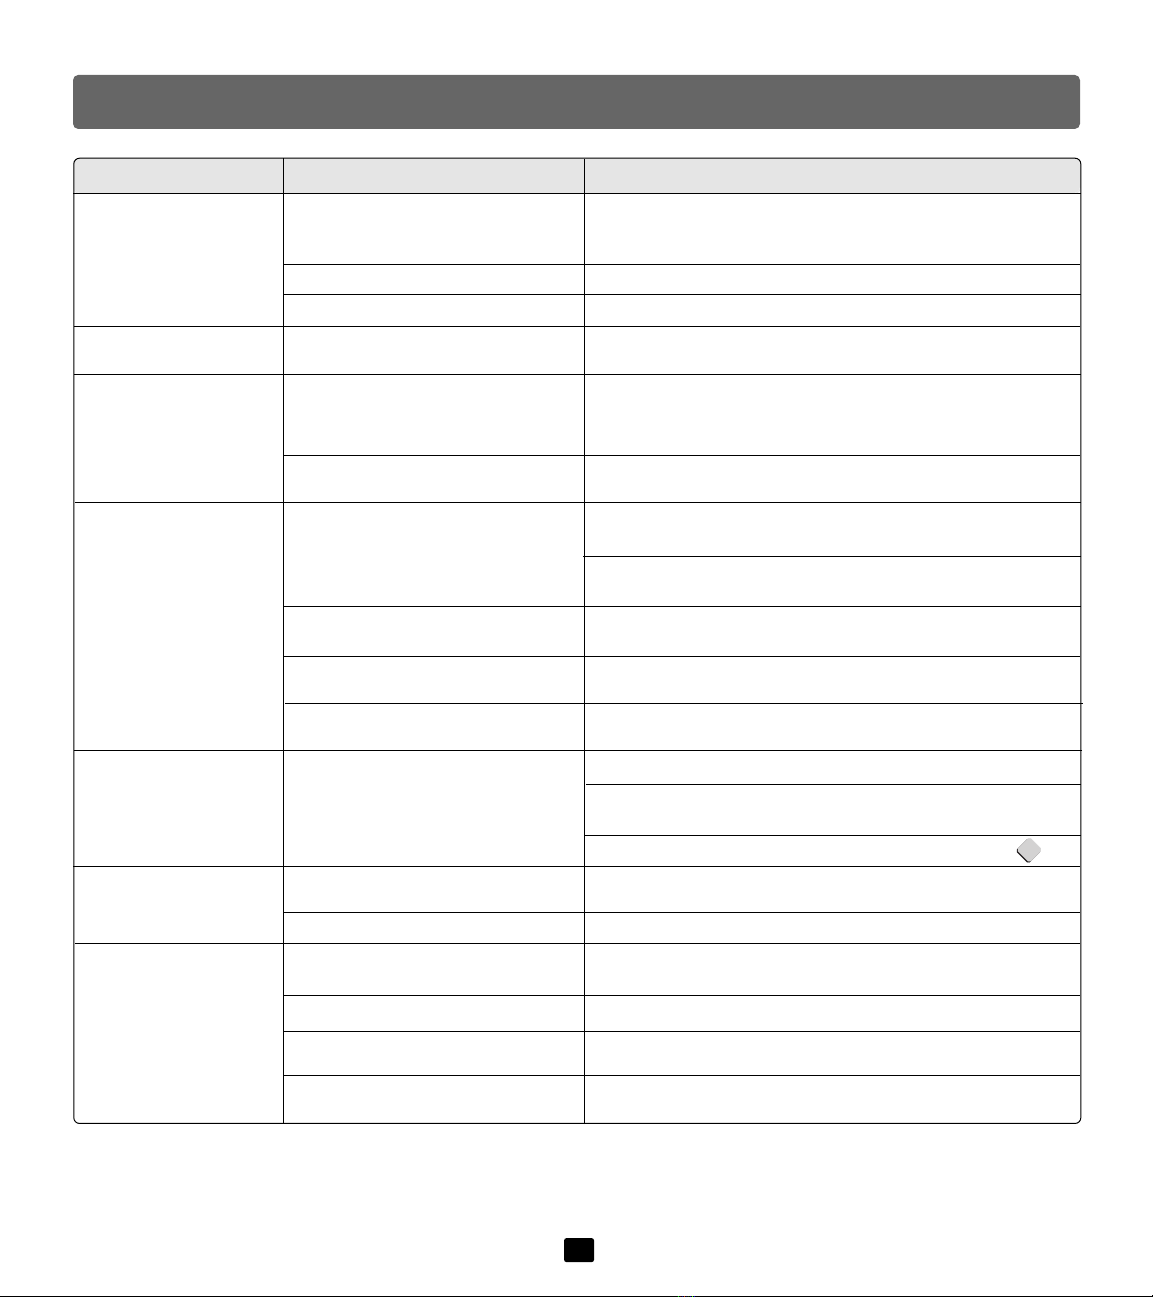
PROBLEM PROBABLE CAUSE SOLUTION
Transmitter power Transmitter not turned “ON” Turn the transmitter “ON”.
indicator does not light
Power is turned “OFF” Make sure that any light switches that control power flow to
the wall outlet are “ON”.
Make sure house fuses and circuit breakers are “ON”.
AC adaptor not properly connected Check AC adaptor jack-to-socket and plug-to-outlet connections.
AC adaptor problem Test the transmitter using the other AC adaptor included with this
product. If the transmitter works with the other AC adaptor,
contact Fisher-Price®to replace the broken AC adaptor.
Weak or dead batteries Replace the batteries in the transmitter with four fresh size “C”
alkaline batteries or use AC adaptor.
Receiver power Receiver not turned “ON” Turn the receiver “ON”.
indicator does not light
Power is turned “OFF” Make sure that any light switches that control power flow to the
wall outlet are “ON”.
Make sure house fuses and circuit breakers are “ON”.
AC adaptor not properly connected Check AC adaptor jack-to-socket and plug-to-outlet connections.
AC adaptor problem Test the transmitter using the other AC adaptor included with this
product. If the transmitter works with the other AC adaptor,
contact Fisher-Price®to replace the broken AC adaptor.
Weak or dead battery Replace the battery in the receiver with a fresh 9v alkaline
battery or use the AC adaptor.
No sound Channel switches not on same setting Set channel switch on transmitter and receiver to the same
(channel) channel.
Signal interference due to
monitors, Change the channel setting on both the transmitter and the
cordless telephones, etc. receiver.
Identify and eliminate the source of interference.
Test reception by moving the transmitter and/or receiver to
different locations throughout the house. Relocate the
transmitter and/or receiver.
Out of range or insufficient signal Test reception by moving the transmitter and/or receiver to
different locations throughout the house. Relocate the
transmitter and/or receiver.
Volume not turned up Adjust volume control on receiver.
Improper antenna position Make sure the antenna on the transmitter and receiver are
pointing upward.
Weak or dead batteries Replace the battery in the receiver with a fresh 9V alkaline
battery, and the batteries in the transmitter with four size “C”
alkaline batteries or use the AC adaptors.
AC adaptor not properly connected Check AC adaptor jack-to-socket and plug-to-outlet connections.
10
PROBLEM PROBABLE CAUSE SOLUTION
Weak reception Out of range or insufficient signal Test reception by moving the transmitter and/or receiver to
different locations throughout the house. Relocate the transmitter
and/or receiver.
AC adaptor cord(s) not fully extended Fully extend AC adaptor cord(s).
Improper antenna position Make sure antennas are pointing upward.
Receiver variable lights Weak or dead battery in receiver Replace the battery in the receiver with a fresh 9v alkaline
display does not light battery or use the AC adaptor.
Interference Signal interference due to another Change channel switch on both transmitter and receiver to the
(buzzing, static, etc.) nursery monitor or cordless other channel.
and signal indicator on telephone, etc.
receiver is “ON”
Channel switches not on same setting Set channel switch on transmitter and receiver to the
(channel) same channel.
Interference Signal interference due to other Change channel switch on both transmitter and receiver to the
(buzzing, static, etc.) nursery monitors or cordless to the other channel.
and signal indicator on telephones, etc.
receiver is “OFF” Identify and eliminate source of interference. Do not use more
than one transmitter at the same time in the same house.
Channel switches not on same setting Set channel switch on transmitter and receiver to the
(channel) same channel.
Receiver power is “ON” but Make sure the transmitter is “ON”.The power indicator should
transmitter power is “OFF” be lit.
Code switches in receiver and
Reset code switches in receiver and transmitter so that they match.
transmitter do not match
Interference Signal interference due to another Make sure transmitter power is “ON”.
(garbled voices) and Fisher-Price®Direct Link Privacy
signal indicator on Monitor™Change channel switch on both transmitter and receiver to the
receiver is “ON” other channel.
We recommend “Checking Privacy” periodically. See page 6 .
Feedback Receiver is too close to the transmitter Move receiver further away from transmitter.
(squealing or whistling)
Volume is set too high Lower volume on the receiver.
All five bars on the Receiver power is “ON” but Turn the transmitter power “ON”.
receiver variable lights transmitter power is “OFF”
display light
Out of range or insufficient signal Move the receiver closer to the transmitter.
Channel switches not on same Set channel switches on transmitter and receiver to the
setting (channel) same channel.
AC adaptor not properly connected Set AC adaptor jack-to-socket and plug-to-outlet connections.
to transmitter
11
Problems and Solutions Guide
F

One (1) Year Limited Warranty
Fisher-Price, Inc., 636 Girard Avenue, East Aurora, New York 14052 warrants to the original owner that the Direct Link
Privacy MonitorTM is free from all defects in material and workmanship when used under normal conditions for a period
of one (1) year from the date of purchase.
Should the product fail to perform properly, we will repair or replace it at our option, free of charge. Purchaser is
responsible for shipping the product to Fisher-Price Consumer Affairs at the address indicated above and for all
associated freight and insurance cost. Fisher-Price, Inc. will bear the cost of shipping the repaired or replaced product
to you.This warranty excludes any liability other than that expressly stated above including but not limited to any inci-
dental or consequential damages.This warranty is void if the owner repairs or modifies this product.
SOME STATES DO NOT ALLOW THE EXCLUSION OR LIMITATION OF INCIDENTAL OR CONSEQUENTIAL
DAMAGES, SO THE ABOVE LIMITATION OR EXCLUSION MAY NOT APPLY TO YOU.
THIS WARRANTY GIVES YOU SPECIFIC LEGAL RIGHTS, AND YOU MAY ALSO HAVE OTHER RIGHTS WHICH
MAY VARY FROM STATE TO STATE.
©1997 Fisher-Price, Inc., a subsidiary of Mattel, Inc., East Aurora, New York 14052 71566 3 71566-0920
Printed in China
12
If you have any questions about this product:
In Canada, call 1-800-567-7724, or write to: Mattel Canada Inc., 6155 Freemont Blvd., Mississauga, Ontario L5R 3W2.
In Great Britain, telephone 01734 770488.
In Australia, call the Fisher-Price Australian Consumer Advisory Service toll-free at 1-800-800-812, or write to: Fisher-Price, Mattel Pty. Limited,
461 Plummer Street, Port Melbourne,Victoria 3207.
M
Other manuals for Direct Link Privacy Monitor
1
This manual suits for next models
1
Table of contents
Other Fisher-Price Measuring Instrument manuals


