Fisher Research Laboratory 1212-X m-scope User manual
1212-X
Operating Manual
One Knob Metal Detector
FISHER RESEARCH LABORATORY

CONTENTS
About Your 1225-X ..................................................................pg. 1
Setting Up.................................................................................pg. 2
Control Functions....................................................................pg. 4
Discrimination Points ..............................................................pg. 5
Searching ................................................................................pg. 7
Pinpointing...............................................................................pg. 9
Recovery Tools .......................................................................pg. 11
Target Recovery .....................................................................pg. 11
Operating Tips.........................................................................pg. 12
False Signals ............................................................................ pg. 13
Battery Replacement.............................................................pg. 14
Maintenance ..........................................................................pg. 15
Treasure Hunters’ Code Of Ethics..........................................pg. 15
Where To Use Your Metal Detector In The U.S.....................pg. 16
Specifications .........................................................................pg. 17

ABOUT YOUR DETECTOR
Your 1212-X is more proof from Fisher Research Laboratory that
a good metal detector doesn’t have to be complicated and
expensive. No frills but a lot of performance features that really
count: automatic VLF-ground rejection, automatic tuning,
variable trash rejection, headphone jack, built-in speaker and a
deep-seeking, lightweight, 8 inch, search coil. Best of all, it does
what a metal detector is supposed to do—it ignores ground
minerals and trash as it detects valuable buried targets.
One knob operation. Just pick it up, set your trash rejection level
and start searching. No tuning, no meter, no gimmicks.
Performance. If you’ve tested other detectors in this price range,
you’re in for a pleasant surprise. In fact you may find that your
1212-Xgoes deeperand ignorestrash betterthan somedetectors
costing much more.
State of the art. Engineered by the world’s oldest and proudest
name in metal detectors. Patented, double derivative
electronics provide up to 30 hours of silent, no drift operation on
a single 9 volt transistor battery.
Read this instruction manual from cover to cover and treat
your 1212-X as you would any high quality precision instrument.
Drop us a line if you have any questions, comments, or exciting
1212-X stories. In the meantime . . .
Happy Hunting!
Fisher Research Laboratory
1

2
SETTING UP
The 1212-X comes to you just about ready to use. The only
adjustment required is the angle of the stem. Take a look at
page 3 and familiarize yourself with the parts of the 1212-X
before proceeding.
1. Unpack your new 1212-X carefully. Save the
carton and inserts—they may come in handy for
future storage or shipment.
2. Note that the search coil cable is permanently
attached to the control housing. Be careful not to
put any undue strain on it.
3. Take a look inside the locknut on the upper stem.
Note the yellow locking pad on the left-hand side
and loosen the locknut by rotating it fully
counterclockwise.
4. Slip the lower stem into the upper stem, tighten and
loosen the fit by turning the locknut.
5. Adjust the stem length (using the locknut) and the
coil angle (using the nylon wing nut) so that the
search coil rests flat on the ground about 6 inches
in front of, and slightly to the right of, your right foot
(to the left of your left foot for left handers.) Your
arm should be straight and relaxed with your grip
held loosely.
REMEMBER: THE LONGER THE SHAFT, THE MORE YOU
WILL HAVE TO BEND YOUR ELBOW AND THE
SOONER YOUR ARM WILL GET TIRED. THE 1212-X IS
BALANCED FOR COMFORTABLE SEARCHING IN A
TIGHT SEMICIRCLE AROUND THE FRONT OF THE
OPERATOR.
6. With the stem length properly adjusted, remove
the search coil from the lower stem (by removing
the Delrin bolt and wing nut). Wind the cable
loosely around the upper and lower stems and
reinstall the search coil.
CAUTION: MAKE SURE THE CABLE IS NOT PULLED
TIGHT AT THE CONTROL HOUSING AND THAT YOU
HAVE ENOUGH SLACK AT THE SEARCH COIL TO
ADJUST IT TO ANY ANGLE.

7. With the shaft length and coil angle
properly adjusted, you should be
able to move into your “search”
position (as shown in Figure 2) by
leaning forward very slightly and
raisingyour arm (stillstraight) untilthe
search coil is about 2 inches above
the ground and 12 inches in front of
your foot. The search coil should be
parallelto the groundand mayhave
tobe slightly readjusted at thispoint.
3
SETTING UP
Padded Arm
Hand
Control Housing
Battery Access Search Coil
Upper
Lock
Lower
Search Coil
Derlin Bolt,
8-inch Waterproof ESI
Figure 1. Fisher M-Scope 1212-X
Figure 2. Search Position

4
1. ON/OFF - TRASH REJECTION CONTROL: Power is
turned off at the full counter clockwise “OFF”
position. All metals are detected when turned on
to zero. Most small pieces of metal trash are
rejected at the maximum level of ten. Most ground
minerals are ignored at all settings.
2. STEREOHEADPHONEJACK:Located ontherightside
of the control panel, this jack accepts most stereo
and mono headphones with 1/4” diameter plugs.
When used, the speaker is automatically
disconnected. A headphone can be very helpful
whenhunting in noisy areas ordetecting faint signal
on small, deep targets. CAUTION: Since the 1212-X
has a fixed volume setting (loud), always use
headphones with individual volume controls
adjusted to a comfortable level. Also, If you use a
stereo headphone, make sure the stereo/mono
switch is in the “stereo” position.
CONTROL FUNCTIONS
SPEAKER
GRILL 2
1
Figure 3. Control Panel. One knob does it all!

5
DISCRIMINATION POINTS
By adjusting the TRASH REJECTION control you will be able to
reject (or “discriminate”) small pieces of metallic trash and
ground minerals while detecting valuable targets. The lowest
setting at which an object is rejected is referred to as the object’s
“discrimination point.” Discrimination points are determined by
such factors as size, shape, depth, type of metal and ground
mineralization. Note: the terms “discrimination” and “trash
rejection” are used interchangeably.
1. Scatter some sample targets such as coins, pull
tabs and small pieces of foil on the ground 1 to 2
feet apart.
2. Turn the TRASH REJECTION control to zero.
3. Hold the search coil about 2 inches above and
parallel to the ground. Move it slowly over the
samples and note the sharp loud response as you
pass over each one. Keep in mind that the 1212-X
is a motion detector and responds only when the
search coil (or the target) is moving.
4. Increase the TRASH REJECTION control to a setting
of 3 and again pass over the targets. Repeat this
process at settings 4, 5, 6 and so on to 10. You will
note that as you increase the level of trash
rejection, the 1212-X will reject some targets and
continue to respond to others. You have now
determined the discrimination points for the
rejected objects. For example, the small nail
discrimination point may be at 4 and the pull tab
discrimination at 6.
5. The 1212-X will remain silent when some objects are
rejected, however, other objects may “snap,
crackle and pop” as they are rejected. This is a
perfectly normal response indicating that the
powerful discrimination circuitry is doing its job.
6. Large pieces of trash such as beer cans or jar lids
may sound like a good target no matter what you
do. With a little practice, however, you will be able
to tell the difference between a large target and
a small coin-sized object.

6
7. Figure 4 shows some different responses you may
expect at different levels of discrimination. Note:
that as you increase the discrimination level, you
progressivelyeliminate moretargets includingsome
good ones, such as nickels and gold rings.
NOTE: The discriination levels shown are typical values only and
may vary from detector to detector.
Figure 4. Typical 1212-X audio responses over 1-inch deep targets with search coil
sweeping 2 to 3 inches above ground.
DISCRIMINATION POINTS

7
1. Decide how much trash rejection you want to use.
a. In relatively non-trashy soil you may wish to
search at zero trash rejection. In this manner, your
1212-X is at its most sensitive and will detect all
metal targets within its range. Once an object is
detected, you can increase the trash rejection
level for further identification.
b. In trashy areas, it is generally easier to search at
a higher level of trash rejection (at the pull tab
discrimination point for example). This way you
will detect mostly good targets and can lower
the rejection level for pinpointing (zero trash
rejection will produce the strongest signal over
small or deep targets).
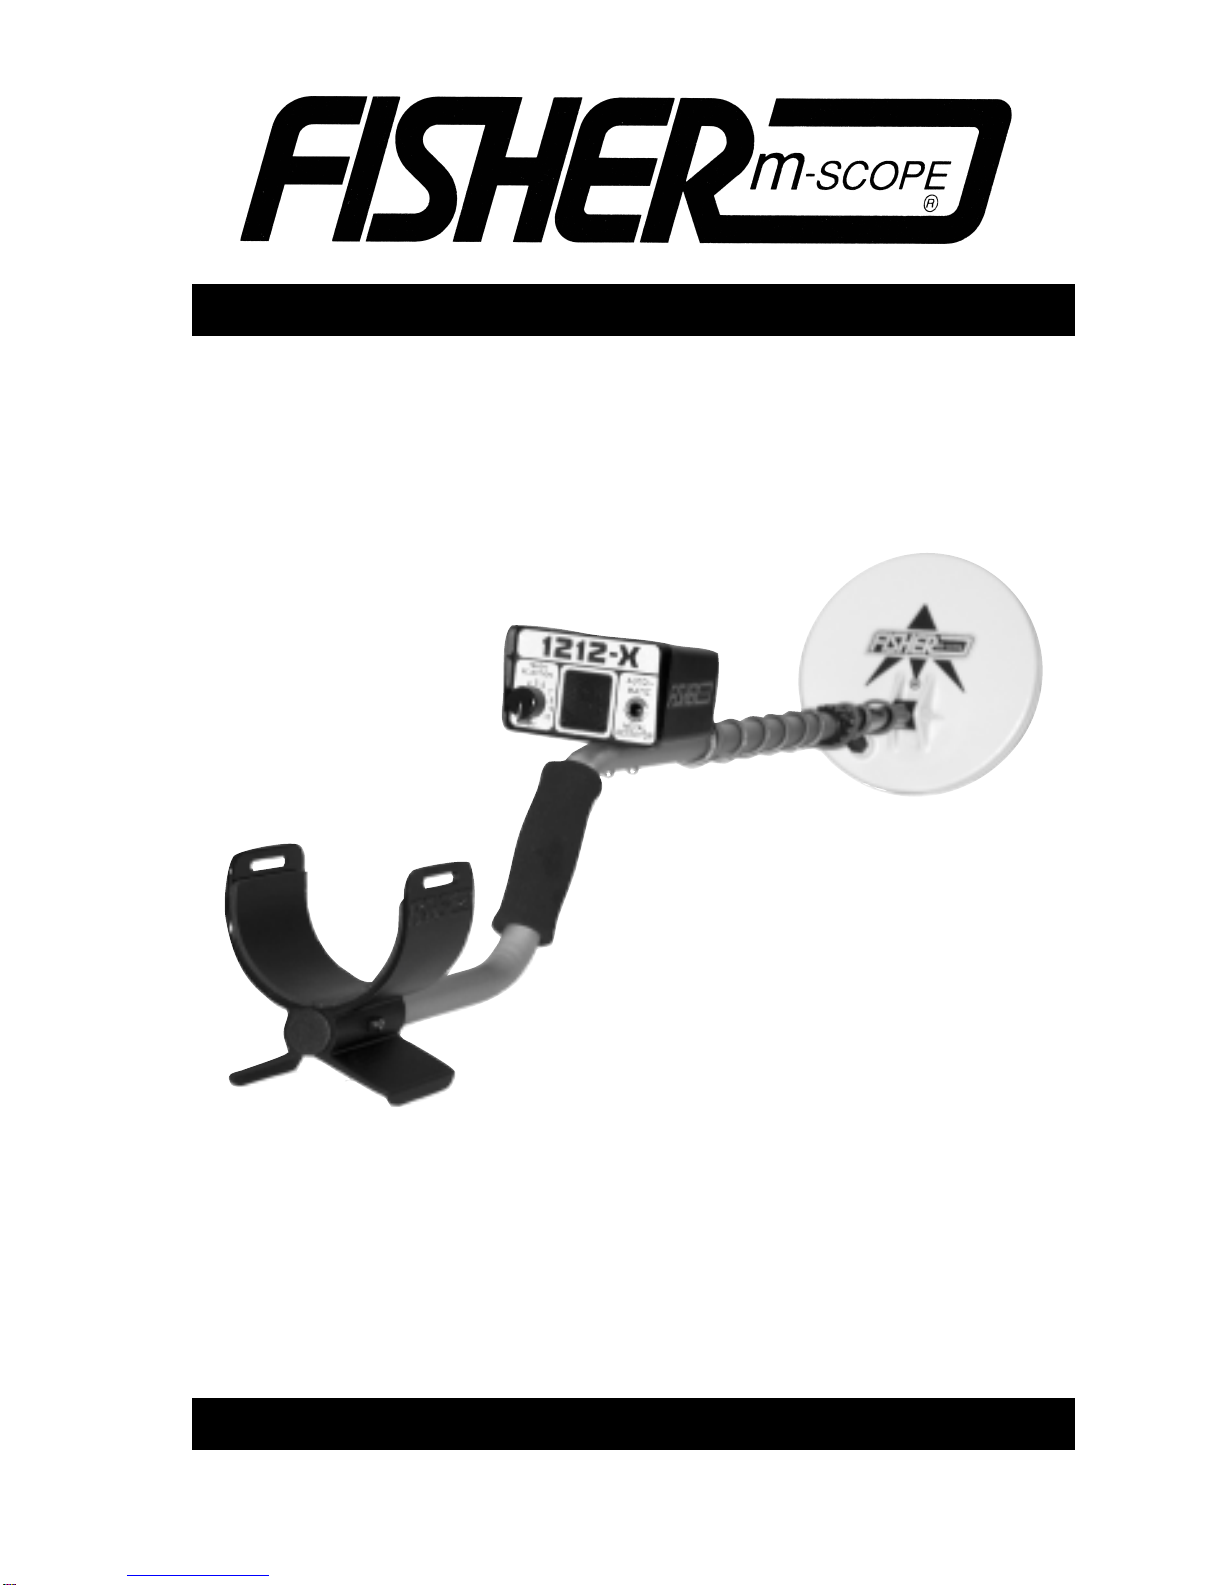
2. Search slowly and systematically, sweeping in a
tight semicircle (see illustration below).
3. Keep the coil parallel to, and as close to the ground
as practical. If you’re hunting on a lawn, you can
set the coil right on the grass and search.
4. Overlap your sweeps at least 50%.
5. Searchin a methodicalmanner. Payclose attention
to where you’re going and where you’ve been.
6. Keep the search coil moving at a comfortable rate.
SEARCHING
Figure 5. Search Pattern.
When the stem length is properly
adjusted, the 1212-X is balanced
for sweeping in a tight semi-circle.
Always overlap your sweeps at
least 50%.
8
SEARCHING
NOTE: Other motion detectors may require a fast sweep speed
for maximum sensitivity. If you try that with your 1212-X, you’ll
actually lose sensitivity.
Figure 6. Keep the search
coil parallel and close to
the ground at all times.

9
Pinpointing takes practice. The more time you spend with your
1212-X, the faster and more accurate you’ll become.
1. Once a buried target is indicated by the tell-tale
“beep” of the 1212-X, continue moving the search
coilfrom side-to-side across the target in anarrower
and narrower search pattern.
2. When you have narrowed your search pattern as
much as you can, and still hear the target, stop the
search coil.
3. Now, move the coil slowly forward and then
straight back towards you a couple of times. Stop
the coil over the area where you get the loudest
response.
4. Move the coil slowly side-to-side one more time,
zeroing in on the loudest target response.
5. Stop the coil over the area of loudest response
and rest it on the ground.
6. Your target should be below the “Hot Spot” of
the search coil which is marked by a bull’s- eye,
slightly below the center of the coil.
7. Slowly move the coil aside, keeping your eyes on
the spot where the “Hot Spot” was and quickly
mark the target location with your finger or
digging tool.
8. For very strong signals, you may improve your
pinpointing accuracy by adding one or more of
the following steps:
a. Lift the coil until the signal is just barely heard.
b. Increase the discrimination level.
c. Rest the coil on the ground and move it
back and forth very slowly.
9. For very weak signals try the following:
a. Move the coil closer to the ground.
b. Decrease the discimination level.
c. Speed up the sweep rate slightly.
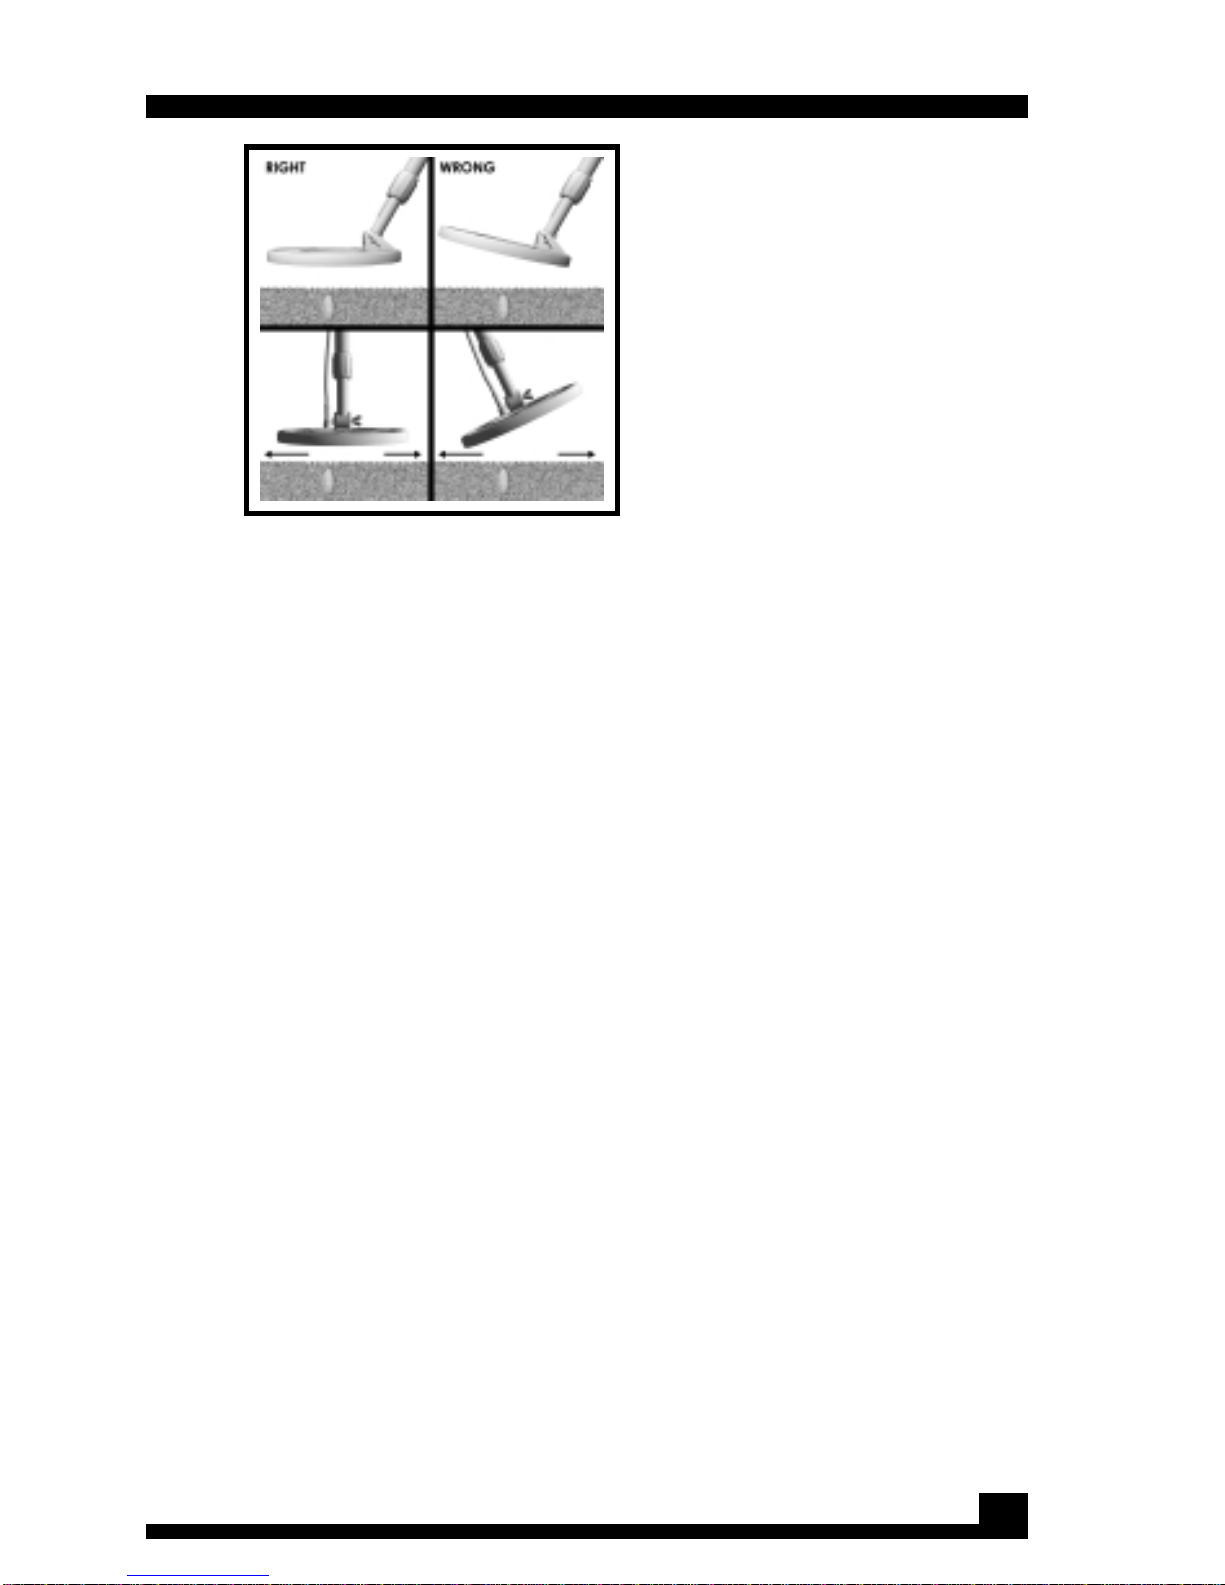
10. The diagram on the next page shows the search
coil detection pattern and how it is affected by
various sweep speeds, trash rejection and
ground mineralization levels.
PINPOINTING
10
Figure 7. Search coil detection
pattern and the effects of sweep,
speed, trash rejection and ground
mineralization.
PINPOINTING
1
2
34
1. MINIMUM DEPTH
a. Very slow or fast sweep
speed.
b. Trash rejection set at “10.”
c. Highly mineralized soil.
2. GOOD DEPTH
a. Moderate sweep speed.
b. Trash rejection set at “5.”
c. Moderately mineralized soil.
3. MAXIMUM DEPTH
a. Moderate sweep speed.
b. Trash rejection set at “0.”
4. MISSED TARGETS Many targets
well within the range of the
1212-X will not be detected
unless you overlap your
sweeps.

11
Once you have pinpointed a target, your objective is to
recover it quickly and neatly, leaving virtually no trace of your
excavation. There are almost as many ways to do this as there
are Treasure Hunters. Whatever works for you is good enough
as long as you don’t break any laws, damage vegetation, or
leave your search area looking like a World War II battlefield.
Generally speaking, beachcombers do little if any damage
to the environment while recovering targets. However, if you
plan to use your 1212-X on lawns or in parks, your target
recovery method can be very important. Two of the most
successful methods are illustrated in a separate booklet
enclosed with your 1212-X.
WHICHEVER TOOL OR METHOD YOU CHOOSE, REMEMBER
THAT RESPONSIBLE TREASURE HUNTERS TAKE PRIDE IN THEIR
ABILITY TO LEAVE SOIL AND VEGETATION INTACT AND
UNDAMAGED.
TARGET RECOVERY
RECOVERY TOOLS
1. A thin, dull probe is the preferred tool for precise
target location, such as heavy duty, blunt
screwdriver.
2. A sturdy hunting knife with a 5 inch blade will suffice
in most soils. A high quality double-edged
“survival” knife is an even better choice (and more
expensive)since itwill be almostimpossible tobend
or break.
CAUTION: Using a jackknife without a locking
blade is a good way to lose a finger!
3. A narrow garden trowel will work in loose or wet
soil.
4. Several excellent digging tools are made just for
the treasure hunter. Especially designed sand
scoops are available for beachcombing.

12
1. We’ve already said it, but it bears repeating: TAKE
YOUR TIME AND OVERLAP YOUR SWEEPS.
2. Keep your trash rejection level set low. You’ll dig
more trash, but you’ll find more good targets, too.
If you continually run at the pull tab discrimination
level, for example, you’ll find coins and silver rings
but very few gold rings.
3. Usegood headphones.You won’tmiss fainttargets,
you won’t attract unwanted attention and you
won’t bother others. Plus you’ll get longer battery
life.
4. Practice pinpointing. There’s nothing sacred about
the methods described in this manual. Many 1212-
X users have developed their own pinpointing
methods.
5. Always bury a coin when working in unfamiliar
territory and check it at different “trash rejection”
levels. There is some sensitivity loss at higher levels
of discrimination. The greater the ground
mineralization, the higher the sensitivity loss. For
example, you may be able to detect a penny 6
inches deep at zero discrimination, but no deeper
than 4 inches at the pull tab discrimination point.
Also, ground mineralization can reduce a
detector’s ability to discriminate accurately. In
highly mineralized soil, some trash targets may not
be rejected.
6. When in doubt about the possible identity of a
target, dig it up.
7. The 1212-X is an easy detector to use but if you’re
having trouble with any aspect of its operation
(pinpointing, searching false signals, etc.) go back
and reread the part of this manual relating to your
problem.
OPERATING TIPS

13
Due to the sensitivity of the 1212-X, you’re bound to get some
“false signals” once in awhile. A false signal occurs when
something that shouldn’t, sounds like a good target. The 1212-X
does a good job of rejecting junk but it can be fooled by “hot”
mineralized spots in the soil, large pieces of junk, some kinds of
bottle caps and pull tabs or trash less than 2 inches from the coil.
So what do you do about false signals? Well, 90 percent of
them will sound suspicious to you after you’ve had some
experience, and you’ll just ignore them. They may be very faint
or very abrupt with static. Often when you go back over the
same spot, a false signal will simply disappear. Other false signals
may be very loud and sharp, but most of these will also disappear
if the coil is speeded up or raised slightly. Some shallow, large or
irregular pieces of junk, however, will sound off no matter what
youdo. Youmay reduce thenumber offalse signalsby increasing
the trash rejection level. Some other sources of false signals are:
1. ELECTRICAL INTERFERENCE: Caused by radio/TV
stations, power lines, or nearby detectors
operating at the same frequency.
SOLUTION: Move further away, reduce sweep
speed.
2. HIGHLY MINERALIZED SOIL: Usually causes constant
static on good target sounds. SOLUTION: Increase
trash rejection level, raise the search coil until false
signals disappear and sweep at that height.
3. WET SAND: Same as highly mineralized soil.
4. ELONGATED FERROUS OBJECTS: If you hear two
beeps very close together and can’t find either
one, you’re probably over a nail or some other long
iron object. But a very shallow coin or a buried coin
on edge may give the same response. SOLUTION:
In all cases, the target will be between the beeps
or, if you sweep at right angles to your original
direction, you’ll receive a single beep directly over
the target (except for the very shallow coin). One
way to tell the difference between a coin and a
nail is to set your trash rejection to about 5. Most
small nails will be tuned out while most coins will
respond with a good, smooth signal.
FALSE SIGNALS

14
5. EXTREMELY TRASHY SOIL: May result in a constant
chatter or “snap, crackle and pop” with assorted,
hard to find “good signals.” SOLUTION: Increase the
trash rejection level to maximum.
6. DIGGING TOOL: Your 1212-X is sensitive enough
(depending on how big the digging tool and how
low you hold it) to sound off each time you sweep
your search coil beneath it. SOLUTION: If you’re
carrying a metal sand scoop, digging knife or
screwdriver, hold it behind your back or keep it
above your waist.
A very weak or inaudible response means that it’s time to
change the battery. A single 9 volt transistor battery is attached
to the inside of the battery panel at the rear of the control
housing.
1. Remove the battery panel by pulling the Nylatch
fasteners partially out.
2. Carefully disconnect the battery connector and
remove the battery. Note: There may be a rubber
band wrapped around the battery bracket to
keep the battery in place during shipment. This is
not required for normal use.
3. Attachthe batteryconnector to the new battery,
insert the battery into the bracket and reinstall the
battery panel on the control housing.
FALSE SIGNALS
BATTERY REPLACEMENT

15
MAINTENANCE
TREASURE HUNTERS’ CODE OF ETHICS
LETS PRESERVE OUR TREASURED SPORT!
Laws governing the use of metal detectors are becoming
more and more common. In many countries, the use of metal
detectors is illegal or severely restricted. Don’t let this happen
in your area.
ALWAYS get permission to hunt on private property.
ALWAYS leave a site cleaner than you found it. Take at least
some trash with you or, if you can, take it all.
ALWAYS fill in your holes neatly whether you’re in a city park or
remote wildernessness. Leave the land as it was before you
disturbed it.
ALWAYS obey all laws relating to Treasure Hunting.
ALWAYS return valuable property if you can locate the original
owner.
ALWAYS do whatever you can to give the hobby of Treasure
Hunting the good image it needs and deserves.
Your 1212-X doesn’t require a lot of care, but there are a few
things you should do to keep it in peak operating condition.
1. If you’re not going to be using it for awhile, take
the batteries out. Acid damage caused by a
leaking battery can be severe.
2. Avoid extreme temperatures like those inside a
closed car sit- ting in the sun. Even worse, inside
the trunk of a car.
3. If you “scrub” the search coil on the ground, you’ll
eventually wear through the bottom. Replacement
coils are expensive. Instead, invest in an
inexpensive coil cover.
4. Put a plastic bag or Fisher’s optional rain cover over
the control housing if you’re hunting in rain, fog or
dust.
5. Keep your 1212-X dry and clean. Wipe off the lower
stem before sliding it into the upper stem and keep
the slip nut free of sand and dirt.

16
Where To Use Your Metal Detector In The U.S.
National Forest and Federal Lands—Metal detecting is
allowed only by special permit acquired from the federal
government. Each area has a district office.
Corps of Engineers, Lakes, Shorelines and Lands—Permission
has been granted only on predisturbed sites, such as beaches
and attached swimming areas. New Corps lakes and lands
must be okayed by the main office of the Army Corps of
Engineers. Each area has a district office.
State Parks and Lands—Some state parks are open to metal
detecting, but some are not. Always check with the park
ranger before attempting to use your detector.
Bureau of Land Management (BLM) Lands—Some areas are
open for metal detecting, and some are not. Always check
with the district office.
City or County Park Lands—Most are open to metal detecting
unless notice is given by a sign or city ordinance. When in
doubt, always check with the City’s Parks and Recreation
Department.
Public School Grounds—Most are open to metal detecting
unless notice is given by a sign, city ordinance, law
enforcement official, or school employee. You should always
check with the school office first.
Privately Owned Lands (Private Property)—Permission required.
And it is always best to have the permission in writing.
Historically Marked Lands or Sites—Metal detecting is not
allowed. Don’t even think about it.

SPECIFICATIONS 1
Length 2.................................. Extended........................................55"
................................................. Collapsed ......................................41"
Weight 2...............................................................................2.9 Pounds
Frequency ............................. VLF Search ............. 4.2 kHz Unipolar
Audio Target Response ............................................................ 450 Hz
Operating Modes ................ SearchVLF All-Metal, Slow Motion 4
Search Coil ............................ Type ............ Concentric, Co-Planar
................................................. Diameter ..........................................8"
................................................. Shielding ......................... 100% E.S.I. 5
................................................. Interchangeable......................... Yes
................................................. Waterproof................................... Yes
................................................. Interchangeable..........................No
Built-In Speaker................................................................. Yes (2-1/4")
Stereo/ Mono Headphone Jack......................................Yes (1/4")
Batteries ..................................................................... (1) 9V Transistor
Battery Life 26........................ Carbon Zinc................... 10-15 Hours
................................................. Alkaline........................... 25-35 Hours
Notes:
1. Subject to improvement or modification without notice.
2. Approximate.
3. Pulsegate Unipolar Audio Processing. Advanced Fisher circuitry which allows silent
operation below “audio threshold tone” with no loss in sensitivity.
4. The 1212-X is a “motion” detector while in the search mode. The search coil must
be moving at least slightly to detect a target.
5. Electro-Static-Insulated to eliminate certain types of false signals.
6. Use of headphones may increase battery life up to 100%.
17

QUALITY
Fisher detectors are renowned for their quality.
Each detector is hand crafted in the USA with pride
PERFORMANCE
Treasure Hunters worldwide rely on Fisher.
Our detectors are durable, dependable, and search deeper.
REPUTATION
Fisher produced the first patented metal detector in 1931. For
over 70 years, the Fisher logo has been a mark of excellence
on the best consumer detectors in the industry.
LIFETIME WARRANTY
Fisher believes in the products we produce and backs this
belief with a lifetime warranty. Warranty may vary outside of
the United States. See your dealer for details.
EXPORT DEPARTMENT
P.O. Box 1896
New Haven, CT 06508 USA
Tel 203.288.1638 Fax 203.287.8099
email: [email protected]
FISHER RESEARCH LABORATORY
200 West Willmott Road.,
Los Banos, California 93635
Tel 209.826.3292 Fax 209.826.0416
www.fisherlab.com email:[email protected]
SERVICE
Fisher is committed to providing you, our valued customer, with
superior service. Each and every instrument is rigidly tested and
carefully inspected during assembly and before shipment.
Shouldyou have any questions or problems, contact:
Table of contents


