FitMax iPool User manual

THE IPOOL
INSTRUCTIONMANUAL
Please carefully read this instruction manual
before installing and using the iPool

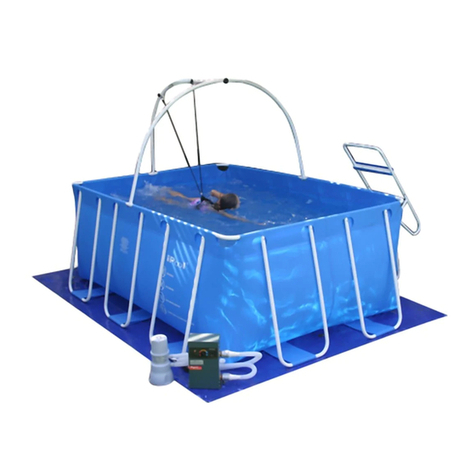
After years of development, Fitmax Inc is proud to introduce the iPool®, the latest innovation in resistance swimming.
Now available in the United States, the iPool (standing for “infinity pool”) provides a user with hours of swimming at
1/20th the price of a traditional pool. The iPool can fit into your garage, basement, backyard, or greenhouse, and the
compact, SUV-size gives you all the benefits of swimming with fewer chemicals and less space required.
The iPool is the flagship product of Fitmax, a California-based company that is committed to providing consumers
with access to quality fitness benefits typically found only in the finest fitness centers in the world.
Known as the best form of exercise to train or strengthen the cardiovascular system, swimming minimizes the stress
and impact on joints that typically lead to the most common muscular and spinal injuries. According to organizations
such as the Centers for Disease Control and Prevention, over 117 million adults suer from various chronic diseases
such as arthritis and high blood pressure. Many of these adults would benefit tremendously from the unique
exercises that swimming and water immersion provide.
Unfortunately, many people do not have access to their own pools. Traditional swimming pools can cost over
$40,000.00 to install, require large backyards, and are dicult to maintain. For parents who have children, traditional
swimming pools can be dangerous areas requiring constant supervision. Pools at health clubs are loaded with harsh
chemicals because of the volume of people that use the pool (and the bacteria that results). Similarly, community
swimming pools are crowded, are not always accessible at the times convenient to your schedule, and may be hard
to get to due to trac or distance.
Fitmax introduces the iPool as a low-cost alternative for people seeking the low-impact, high-energy exercise
that swimming provides. The iPool® costs thousands less than traditional swimming pools and propulsion system
swimming machines, but allows the user to swim without the hassle of turning around or jet-streams blowing in their
face. In fact, the iPool costs about as much as a treadmill but gives you the unique benefits of water buoyancy and
hydrostatic pressure.
More importantly, the iPool takes up a total footprint of only 8.5ft x 11.5ft x 8ft of space, less than a minivan or even
some sedans. In most places, the iPool uses about $3 of water to fill up, and can be assembled in less than an hour.
Because it is so easy to assemble and uses minimum parts, it is portable and can also be taken anywhere you wish to
exercise.
iPool® is a revolutionary new aquatic fitness system that oers unparalleled versatility and aordability within the
realm of above ground pools. For those looking for a lap pool, the iPool® has a resistance harness that allows you to
swim constantly, without ever having to change direction or turn around. For those looking to rehabilitate an injury,
our therapy pool oers fitness capabilities while being easy on your joints and muscles. For those looking for a full
body workout, our available aquatic fitness accessories can transform your iPool into a total body fitness center.
With all of these, as well as our many other options, the iPool is truly the perfect choice for anyone looking for a new
therapy, exercise, or lap pool for their home!
1
THE IPOOL INSTRUCTION MANUAL
Introduction
Please carefully read this instruction manual
before installing and using the iPool

• Read the manual first to fully understand the installation process before beginning installation.
• To avoid any scratches and damage, install the swimming pool on a level, smooth surface without
any objects in the way. It is recommended to clean the site before installation.
• After selecting site location, determine if the installation location can withstand 25 gallons of
water per square foot or about one ton of weight in order to avoid collapse.
• The installation location should be away from fire, pets with sharp claws, and sharp objects
that may cause damage to the pool.
• The installation location should be close to water, to facilitate filling up the pool.
The pool will require approximately 1,500 to 2,000 gallons of water.
• Ensure that the installation location does not cause flooding, which can result in damage or loss.
• Do not drag the swimming pool in order to avoid unexpected wear and tear.
• Before moving swimming pool to a new location, first discharge all the water to avoid lifting
up the bottom of swimming pool while full, which can cause rupturing and damage.
• To avoid bending and deformation of the steel frame, do not lean on the pipes with excessive force.
• Carefully check the swimming pool parts.
• Check the pool for damage and fracture.
• Check the water quality before filling.
• Check if the bottom of the pool is clean.
• Ensure that the ground is level and smooth.
• Do not bring into the pool sharp objects or other objects that can damage the pool.
To avoid accidents, do not shake the pool.
• To avoid drowning, do not sleep in the pool.
• When the swimming pool is not in use, please use the swimming pool cover
to prevent deterioration of water quality.
• Do not use the swimming pool alone. Swimmers should be accompanied by an adult
regardless of age or swimming skill.
• If you find a problem with the swimming pool or experience uncomfortable physical symptoms
while exercising, immediately stop using the pool.
THE IPOOL INSTRUCTION MANUAL
Installation Notes
Swimming Precautions
Please carefully read this instruction manual
before installing and using the iPool
2

What Chemicals Will I Need For The Pool?
Answer:
It is recommended that the pool pH be monitored weekly. Testing strips can be purchased online or
at your local pool supply store. Ideal water pH range is best determined by consulting your local pool
supply store because of regional dierences, but generally will fall within a pH of 7.0 to 7.6.
To maintain ideal pH balance, both a pH increaser (alkaline) and a pH reducer (acid) will need to be
purchased. These can be purchased online or from your local supply store.
A small amount of chlorine will also be needed unless a salt water system is being used. Generally
speaking, because of the small size of the pool, it will often be only a few ounces that are needed.
Both tablets and powders can work. Please refer to the recommended proportion given by the
chemical manufacturer or check with your local pool supply store.
Finally, a few drops of a pool clarifier per week is recommended. These can be purchased online or
at your local pool supply store, and will assist in keeping the pool clean by clumping smaller particles
together to be more easily caught by the filter cartridge.
How Long Should I Run The Filter Pump?
Answer:
It is recommended to run the filter pump for two to four hours in order to keep the water well-
oxygenated and prevent algae from growing in the pool. Please ensure the filter cartridge is clean
and change the filter cartridge once a month. A timer can be used in conjunction with the filter pump
to control how long it is running. It is not recommended to swim in the pool while the filter pump is
running.
For more information please visit:
http://fitmaxipool.com/frequently-asked-questions/
Our installation video can be found at:
http://fitmaxipool.com/instructions/
THE IPOOL INSTRUCTION MANUAL
Pool Maintenance
Please carefully read this instruction manual
before installing and using the iPool
3

THE IPOOL INSTRUCTION MANUAL
iPool Parts
Please carefully read this instruction manual
before installing and using the iPool
4

THE IPOOL INSTRUCTION MANUAL
iPool Parts
Please carefully read this instruction manual
before installing and using the iPool
5

THE IPOOL INSTRUCTION MANUAL
iPool Parts
Please carefully read this instruction manual
before installing and using the iPool
6

THE IPOOL INSTRUCTION MANUAL
iPool Parts
Please carefully read this instruction manual
before installing and using the iPool
7

THE IPOOL INSTRUCTION MANUAL
iPool Parts
Please carefully read this instruction manual
before installing and using the iPool
8

THE IPOOL INSTRUCTION MANUAL
Ladder Assembly
Please carefully read this instruction manual
before installing and using the iPool
9
Illustrations of iPool Ladder Assembly

THE IPOOL INSTRUCTION MANUAL
Frame Assembly
Please carefully read this instruction manual
before installing and using the iPool
10
Illustrations of iPool Frame Assembly

Note: You may refer to our installation videos for step by step instructions as well.
Step 1: Laying the bottom of swimming pool
Find an approximate 8.5ft x 11.5ft space on the ground. Remember to
give yourself enough room to walk around the perimeter comfortably.
Place and stretch out the mattress pad on the ground. For iPool heater
owners, it is recommended to get some foam or rubber padding to
place below the pool to provide insulation and prevent heat from
seeping out from bottom of the pool.
Step 2: Liner placement
Place the liner on the just-placed ground tarp and stretch out outside. Remember to fully extend the
liner sleeves to ensure you have sucient room for the leg supports.
Note: To make it easier to install, it is recommended to place the open liner under direct sunlight to
dry for about 2 hours.
THE IPOOL INSTRUCTION MANUAL
Pool Set-Up
Please carefully read this instruction manual
before installing and using the iPool
11

Step 3: Attach baskets to the inlet outlet tube
The plastic baskets which are included in the liner box should be attached to the inlet outlet ports
from inside the pool. This will help prevent anything from closing over the ports. It is recommended
to soak the baskets in warm water first for easy installation.
Step 4: Insert framework long elbow tube into the upper-
right and lower-right corners of liner
The long and short elbow tubes should be placed in the width direction of the mattress side.
Carefully place the steel pipe to avoid scratching the liner, ensuring that the ends of the framework
long elbow and short elbow tube line up.
THE IPOOL INSTRUCTION MANUAL
Pool Set-Up
Please carefully read this instruction manual
before installing and using the iPool
12

Step 5: Insert framework short elbow tube
Insert framework short elbow tube into the upper-left and lower-left corners of liner.
Step 6: Insert framework long straight tube
Insert framework long straight tube followed by two short straight tubes so that the tapered ends
line up with the elbow tubes as the picture below shows. Remember to also insert the T-shaped top
frame pieces where you want the harness frame to attach to the pool.
Your frame set up should match the picture
below:
THE IPOOL INSTRUCTION MANUAL
Pool Set-Up
Please carefully read this instruction manual
before installing and using the iPool
13

Step 7: Insert the framework long straight tube into the liner,
making sure the holes for the pipe legs will line up with the
openings in the liner
Make sure the frame is not upside down during insertion. The push pins are for holding the tubing
together during install, but the holes of the straight tubes must be facing outward towards where the
legs will insert.
Step 8: Insert the framework long elbow tube into the liner
Attach a T-shaped top frame into the long elbow tube on which end you want the harness frame to
be attached.
THE IPOOL INSTRUCTION MANUAL
Pool Set-Up
Please carefully read this instruction manual
before installing and using the iPool
14
Figure 1: Upside tubing example

Step 9: Connect the long elbow tube with the framework short
elbow tube on the width side of the pool into the liner
It is recommended to have assistance for this portion because the liner and frame pieces may be
heavy when inserting them.
Step 10: Attach the elbow tubes to the short framework
connector tube inside the liner
THE IPOOL INSTRUCTION MANUAL
Pool Set-Up
Please carefully read this instruction manual
before installing and using the iPool
15

Step 11: Attach the T-shaped top frame
Step 12: Attach the short connector tube to the long connector tube
Step 13: Insert the other short framework elbow tube into the liner
and attach it to the long connector tube.
THE IPOOL INSTRUCTION MANUAL
Pool Set-Up
Please carefully read this instruction manual
before installing and using the iPool
16

Step 14: Attach the long framework elbow tube to the short
connector tube. You may need to lift the liner and have someone
assist you to ensure that the tubing enters the liner correctly and
attaches
Step 15: Attach the grey connectors to your inlet outlet ports from
outside the pool if they are provided
THE IPOOL INSTRUCTION MANUAL
Pool Set-Up
Please carefully read this instruction manual
before installing and using the iPool
17
Completed Frame Picture

Step 16: Install the leg and connect with the harness
Connect the leg support U-shaped tube into the liner’s lower stretchable flap. Attach the legs towards the
outer end of the tube. Both tubes should be facing outwards (see figure below).
Attach the tube connections to the U-shaped tube firmly. Each of the standing legs should be assembled
in the same fashion. Attach the tube connections to the U-shaped tube firmly. Each of the standing legs
should be assembled in the same fashion.
THE IPOOL INSTRUCTION MANUAL
Pool Set-Up
Please carefully read this instruction manual
before installing and using the iPool
18

Step 16: Continued
It is recommended to have two people lift up the frame to mount onto the leg supports.
Pull the bottom section of the leg, stretching bottom flaps to maximum. If the leg supports are not able to
fully extend, you can place a brick or wooden plank underneath as a base (seen in pictures below).
THE IPOOL INSTRUCTION MANUAL
Pool Set-Up
Please carefully read this instruction manual
before installing and using the iPool
19
Other manuals for iPool
2
Table of contents
Other FitMax Swimming Pool manuals
Popular Swimming Pool manuals by other brands
azalp
azalp ubbink 350x1550 - H155 cm Note of assembly

Outside Living Industries
Outside Living Industries ubbink Ocea 470x860 - H130 cm Note of assembly
Intex
Intex 128362GN owner's manual

Piscine Solide
Piscine Solide IMPACT OCEANIA installation manual
C.P.A.
C.P.A. DIAMANTE 814 Assembly instructions
Intex
Intex Happy Crab Easy Set Pool owner's manual

