FKI ADV User manual

0
Instructions for use
Fryer ADV
Type Code ADF-21
Version 1.0 –December 2021

1
Contents
1 Introduction............................................................................................................................................... 3
General .............................................................................................................................................. 4
Appliance description................................................................................................................ 4
Manufacturer............................................................................................................................. 4
Appliance label .......................................................................................................................... 4
Technical specifications and power consumption..................................................................... 4
Modification .............................................................................................................................. 5
2 Safety......................................................................................................................................................... 6
Personal safety equipment................................................................................................................ 6
Potential hazards............................................................................................................................... 6
Safety measures, integrated.............................................................................................................. 7
Safety functions................................................................................................................................. 7
Who may use the appliance .............................................................................................................. 7
Transport/installation/fixation.......................................................................................................... 8
Transport ................................................................................................................................... 8
Installation................................................................................................................................. 9
Fixation .................................................................................................................................... 10
Operation......................................................................................................................................... 10
Cleaning/maintenance .................................................................................................................... 10
Servicing........................................................................................................................................... 10
3 Operation................................................................................................................................................. 11
Before first use ................................................................................................................................ 11
Filling with oil................................................................................................................................... 11
Quick start instructions ................................................................................................................... 11
Start-up............................................................................................................................................ 12
Programming................................................................................................................................... 13
Setting the individual programs .............................................................................................. 13
Settings that apply to all programs.......................................................................................... 15
Temperature and operating zone configuration..................................................................... 15
Setting the sound..................................................................................................................... 17
Password setting...................................................................................................................... 17
USB dongle............................................................................................................................... 18
Operation......................................................................................................................................... 18
Error codes....................................................................................................................................... 21

2
Spare parts....................................................................................................................................... 22
Spare parts list......................................................................................................................... 23
Spare parts list Automatic Raise/lowering for Fryer ADV SF................................................... 24
Spare parts list Automatic Raise/lowering for Fryer ADV DF .................................................. 25
4 Electrical diagram .................................................................................................................................... 26
5 Cleaning ................................................................................................................................................... 36
General ............................................................................................................................................ 36
Cleaning during operation............................................................................................................... 36
Daily cleaning................................................................................................................................... 36
6 Service ..................................................................................................................................................... 39
7 Disposal.................................................................................................................................................... 41
Packaging......................................................................................................................................... 41
When the appliance is no longer required...................................................................................... 41
8 EU DECLARATION OF CONFORMITY........................................................................................................ 42

3
1Introduction
Original user instructions
These instructions are FKI Fast Food Teknik's original instructions for appliance FRYER ADV.
The purpose of these instructions
These instructions are intended to ensure the correct installation, use, handling and maintenance of FRYER
ADV.
Important! Read these instructions carefully before use and keep them safe for later use.
Storage of these instructions
You must retain these instructions and make sure that they are easily accessible to users and service techni-
cians.
Understanding these instructions
It is the responsibility of the Appliance's owner to ensure that anyone who will be operating, servicing,
maintaining or repairing FRYER ADV has read these instructions and, by way of minimum, the sections that
are of relevance to the work they will perform.
Anyone who will be operating, servicing, maintaining or repairing FRYER ADV is required to look up any rel-
evant information in these instructions.

4
General
Appliance description
Fryer ADV is an easily programmable fryer that is easy to operate and maintain. Fryer ADV has deep oil
vats, so removable splash covers are not required. The powerful heating elements and electronic tempera-
ture sensor heat the frying oil very quickly. Fryer ADV is easy to clean. Fryer oil temperature is shown on a
display that can be programmed with up to six fry times. An automatic raise/lower system is an optional
upgrade.
Manufacturer
FKI Fast Food Teknik a/s
Byghøjvej 5, Verninge
DK-5690 Tommerup
www.fki.dk
Appliance label
Type code: ADF-21
Technical specifications and power consumption
1.1.4.1 Dimensions and weight
Description
Vat
Dimensions
(BxDxH)
Weight
FRYER ADV
SINGLE TABLE
16L
352x655x370
N/A
FRYER ADV
SINGLE TABLE SPL
20L
N/A
N/A
FRYER ADV
DOUBLE TABLE
2 x 16L
705x655x370
60 kg
FRYER ADV
SINGLE FLOOR
16L
352x655x880
N/A
FRYER ADV
SINGLE FLOOR SPL
20L
N/A
N/A
FRYER ADV
DOUBLE FLOOR
2 x 16L
705x655x880
99 kg

5
1.1.4.2 Power
Description
Vat
Voltage
Power
Current
Min. fuse rating
for installation
FRYER ADV
SINGLE FLOOR
16L
400V
9kW
13.0A
16A
FRYER ADV
SINGLE FLOOR
16L
3x230V
9kW
22.6A
25A
FRYER ADV
SINGLE FLOOR
16L
400V
15kW
21.6A
25A
FRYER ADV
SINGLE FLOOR
16L
3x230V
15kW
37.6A
40A
FRYER ADV
SINGLE FLOOR
16L
400V
21kW
30.3A
32A
FRYER ADV
SINGLE FLOOR SPL
20L
400V
10kW
21.6A
25A
FRYER ADV
SINGLE FLOOR SPL
20L
3x230V
10kW
37.6A
40A
FRYER ADV
SINGLE FLOOR SPL
20L
400V
14kW
30.3A
32A
FRYER ADV
DOUBLE FLOOR
2x16L
400V
2x9kW
13.0A
16A
FRYER ADV
DOUBLE FLOOR
2x16L
3x230V
2x9kW
22.6A
25A
FRYER ADV
DOUBLE FLOOR
2x16L
400V
2x15kW
21.6A
25A
FRYER ADV
DOUBLE FLOOR
2x16L
3x230V
2x15kW
37.6A
40A
FRYER ADV
DOUBLE FLOOR
2x16L
400V
2x21kW
30.3
32A
*Actual measured result can be expected to be lower.
The appliance should be connected to its own circuit.
1.1.4.3 Intended use
The fryer is intended for deep frying in oil/fat of defrosted and frozen
products that are suitable for deep frying.
The fryer must never be used for purposes other than deep frying food.
Modification
FRYER ADV must never be modified or serviced by unauthorised persons. In the event of non-compliance,
FKI Fast Food Teknik a/s waivers any and all liability.

6
2Safety
General
Read these safety instructions before using the appliance. Keep them near to the appliance for later refer-
ence. These instructions and the appliance itself are provided with important safety information that must
always be read and observed at all times. FKI Fast Food Teknik a/s disclaims any and all liability for non-
compliance with these safety instructions, for inappropriate use of the appliance or the use of incorrect set-
tings.
Fryer ADV has an electronic user interface with the option of programming with a touch-sensitive screen
and running daily programs using push buttons for tactile feedback. Precise adjustment using an electronic
controller. Also with USB port to quickly program multiple machines.
FRYER ADV is designed for continual deep frying of various food products. The appliance can also be used
for other foods that are suitable for frying. To determine optimum temperature and time, a test fry is al-
ways recommended before commencing series production. Note that the nature of the food (thickness,
temperature, surface, etc.) will affect the frying result.
When running, the appliance must be continually monitored by staff who have been trained and instructed
in how to use it.
Personal safety equipment
It is recommended that gloves and goggles are worn when working with the fryer and
when emptying the vats as the fryer has hot surfaces and hot grease can be dangerous.
Potential hazards
Surfaces on the fryer’s tabletop and vats are hot and must not be touched when switched on.
Therefore, be careful not to touch them while operating the fryer.
During operation, only the buttons and the touch screen on the front may be touched. The food for prepa-
ration should be placed in the basket when it is in the basket retainer. The basket should then be carefully
lowered into the oil.
Avoid touching the fryer’s hot surfaces.

7
Safety measures, integrated
The heating section has an integrated magnetic contact to cut power to the heating ele-
ments if the heating section is removed from the top panel. The electronic control system is
fitted with an acoustic alarm that will activate when temperatures exceeding 200°C are regis-
tered.
Safety functions
The heating section has an integrated safety thermostat that will cut power to the heating
elements if temperatures exceed 230°C. The thermostat can be reset and connected once
the temperature has fallen. To reset the thermostat, press the red button next to the heating
section. The electronic control system has a fuse to protect the control system against over-
load. The fuse is located under the front panel with the display.
We recommend that the fryer is serviced to find out why the safety thermostat was trig-
gered.
Who may use the appliance
This appliance is not intended for use by children! Neither should it be used by persons with re-
duced physical or mental capacity, or who lack appropriate experience and knowledge unless they
have been trained or instructed in the use of the appliance by someone with responsibility for
their safety.

8
Transport/installation/fixation
Transport
The fryer is delivered secured to a transport pallet and should only be transported in the same way if
moved.
When lifting the appliance into position, lift carefully from the transport pallet by lifting at the front edge of
the table top, allowing it to be carefully rolled into position.
WARNING: Do not lift the appliance at the heating sections.
Moving and setting up the appliance must be performed by two or more peo-
ple due to RISK of injury!
Wear protective gloves and safety footwear during unpacking and installation.
Cut hazard.

9
Installation
The appliance must be connected to the mains by an authorised electrician.
The fryer must always be connected to ground. Depending on variant, the fryer should be connected to ei-
ther 400V 3N~ or 230V 3~ via an approved supply isolator. Note that each heat section requires a separate
connection.
As standard, floor models are supplied with front legs and fixed wheels at the rear. Space should be left in
front of the fryer so it can be pulled away from the wall when cleaning or performing maintenance tasks.
The fryer must be connected by an authorised electrician and connected to an RCCB circuit
breaker.
See diagram for correct connection:
WARNING: This appliance must be earthed. Failure to do so may cause electric shock and serious
injury.
The appliance must be acclimatised before use. It should therefore not be started up until eight
hours have elapsed.
The power supply must be able to be disconnected, either by unplugging or by means of a freely
accessible multi-pole switch located before the power outlet in accordance with applicable elec-
tricity regulations. The appliance must be grounded in accordance with national safety standards
for electrical appliances.
Do not use extension cords or multi-socket outlets. After installation is completed there must be
no direct access to the electrical components. Never touch the appliance if you are wet or have
bare feet. Do not use this appliance if the power cord or plug is damaged, if the appliance is not
working properly, if it is damaged or if it has been dropped on the floor.
Any replacement of the power cord must be performed by an authorised technician to avoid the
risk of personal injury –RISK of electric shock. Only use oil-resistant cables!

10
Fixation
The appliance does not need to be secured. It is equipped with wheels and/or adjustable legs to
ensure stable and easy installation.
Operation
The appliance must be supervised during use and must be switched off at its main switch if left.
FRYER ADV is intended for food preparation only. Never fill the appliance with oil or fat when it is
switched on. Oil/fat can ignite if it contacts the heating elements. It can also produce intense
smoke.
Cleaning/maintenance
CLEANING AND MAINTENANCE WARNING: Check that the appliance is set to the cleaning program
before performing daily cleaning or maintenance tasks. Do not use products that contain acid as
they may damage the surface of the appliance.
Never use steam/foam cleaners due to RISK of electric shock.
Servicing
WARNING: The appliance has two supply connections, which must both be disconnected before
starting service work on the appliance.
The appliance must always be switched off and disconnected from the power source before com-
mencing repair work.
11
3Operation
Before first use
Before start-up, remove all packaging and protective plastic from the fryer and dispose of it in ac-
cordance with currently applicable regulations (see section 7.1). Carefully read section2 about
safety before connecting the fryer.
Before start-up, clean the appliance as shown in section 5.
Filling with oil
Turn the fryer off. Never fill the appliance with oil or fat when it is switched on. Oil/fat can
ignite if it contacts the heating elements. It can also produce intense smoke.
Remove the basket. Now fill the fryer with oil/fat to the correct volume. The fryer must
never be switched on unless oil has been filled at least to the minimum level indicator on the
inner side of the vat (at the rear).
Quick start instructions
Before start-up, read section 5.1 under “cleaning”.
Press the cog icon to program the fryer and adjust temperature settings. (see section 3.5 about
programming).
Press start on the display and wait 30 minutes for the fryer to heat up and become ready for use.
The appliance must not be operated unattended.
Remember to use personal safety equipment, see 2.1
12
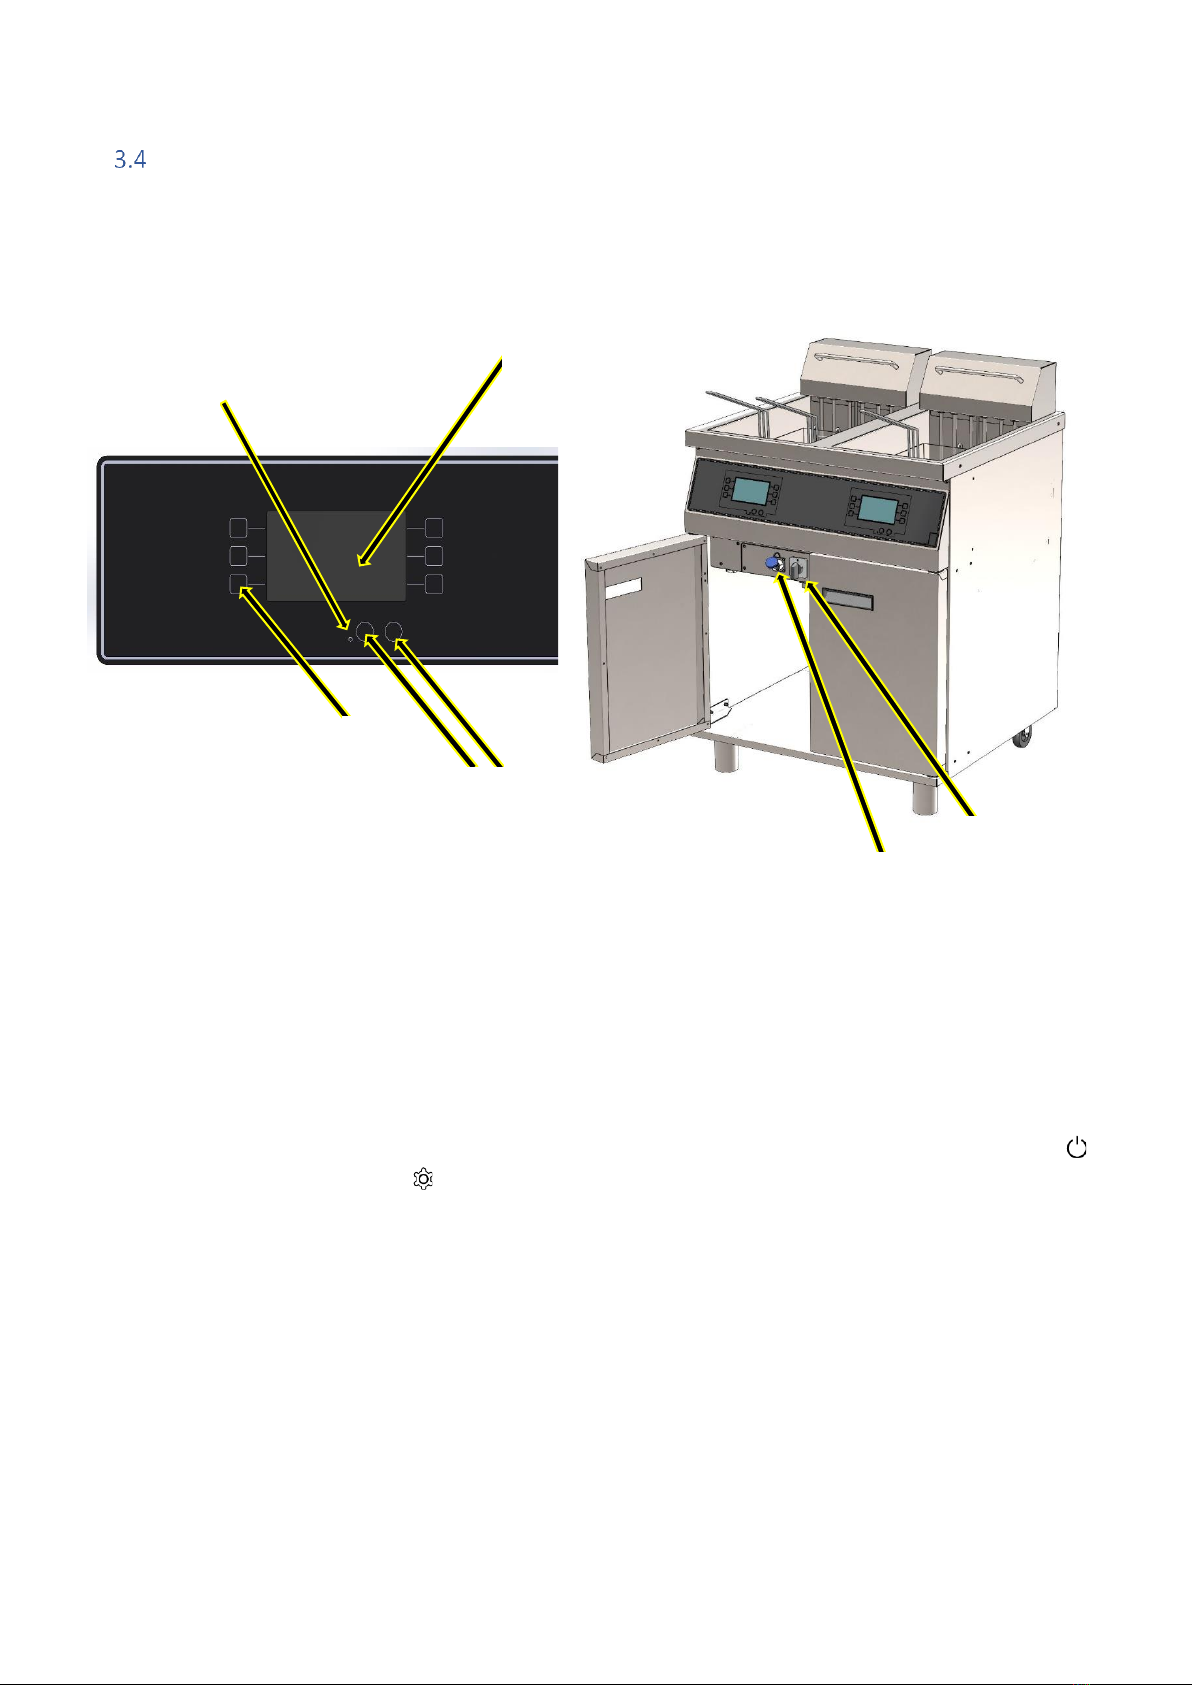
Start-up
Explanation of the FRYER ADV user interface:
No. Description
1. Light
2. Start
3. Program buttons
4. Settings
5. Screen
6. Switch
7. USB port max. 4GB
Turn the switch (6) behind the front door and the light (1) on the front of the appliance will turn on. Press
to turn on the appliance or press to configure the appliance.
FRYER ADV is supplied with the following factory settings:
Temperature: 170°C
Frying time: 2:40 minutes
Factory settings can be reloaded by creating a blank text file on a USB dongle named
"factory.txt" and load the file under USB settings.
After use, always switch the appliance off at the main switch (6).
1
2
3
4
5
7
6
13
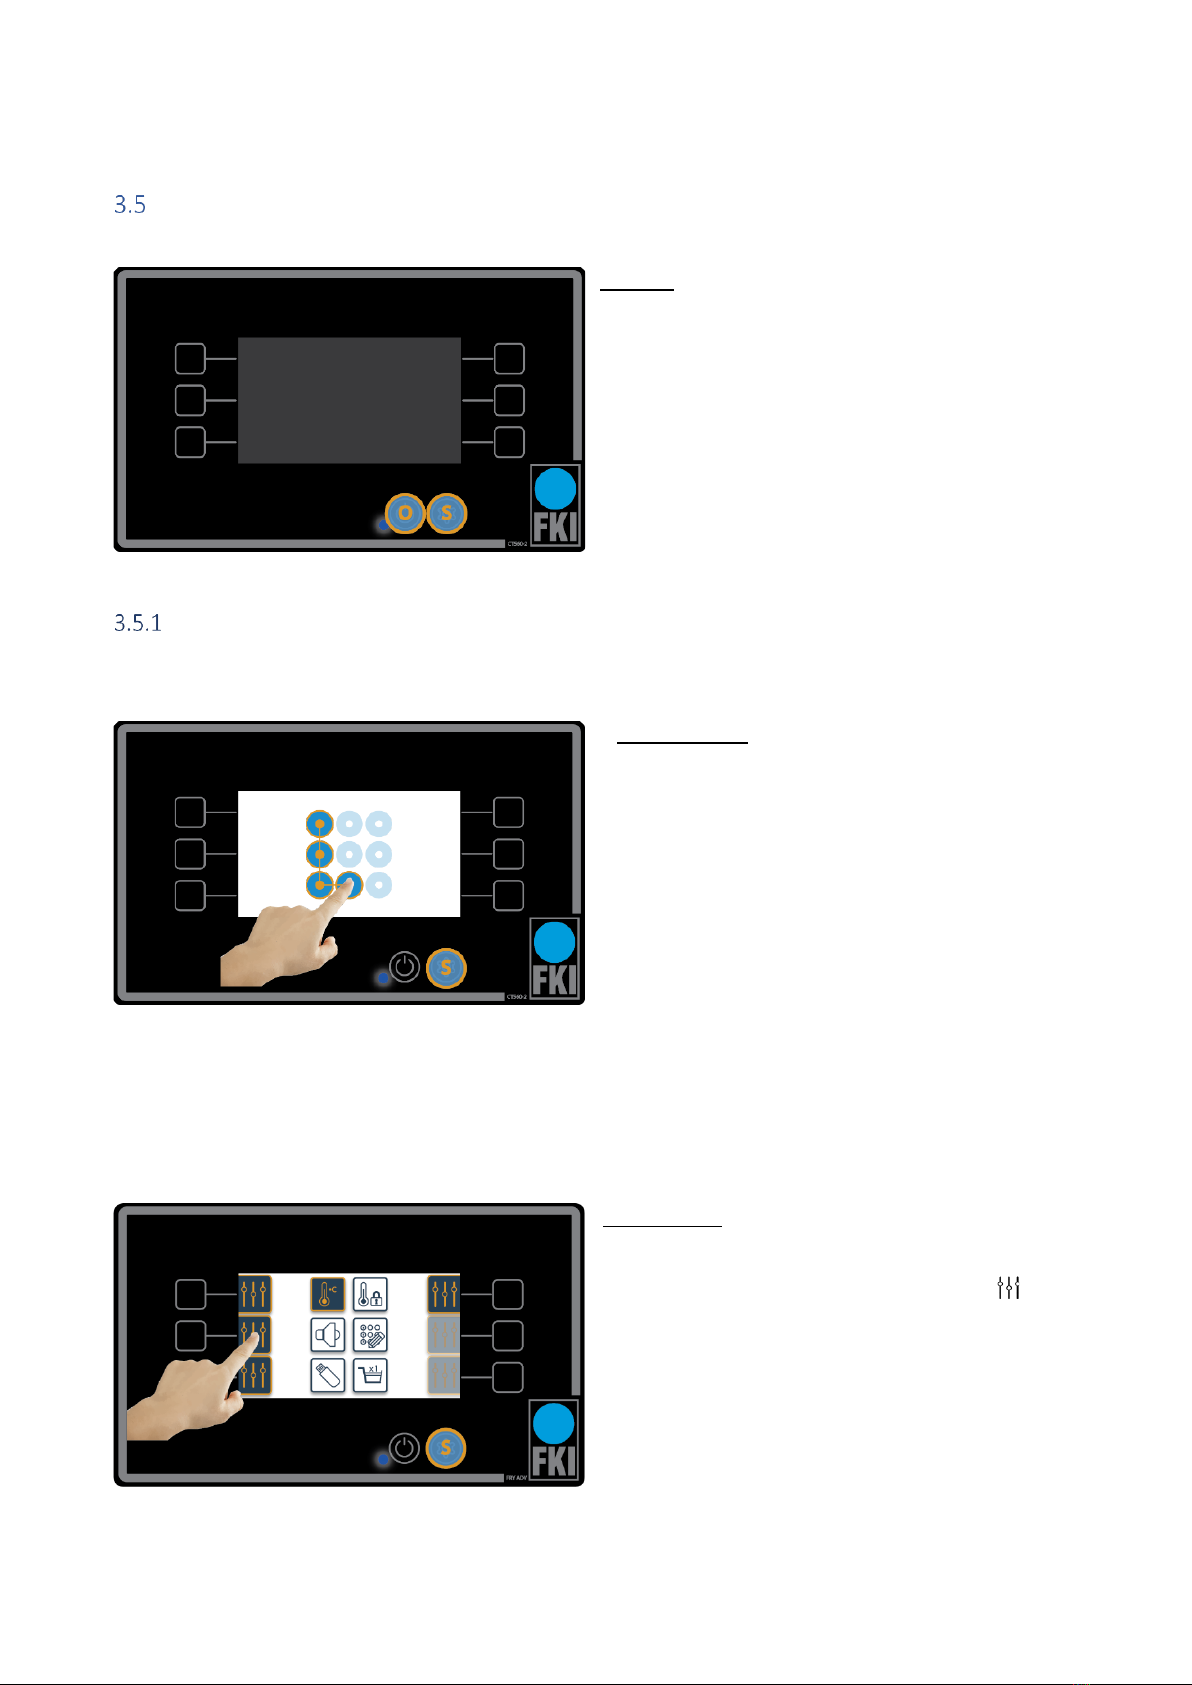
Programming
Standby
Press Oto enter daily operation, see section 3.6 (dur-
ing operation only the buttons can be used, not the
screen).
Press Sto go to settings, see section 3.5.1 (in “set-
tings” the touch screen is used instead of the but-
tons. Here only the “S” button works).
Setting the individual programs
Access control
Entering the settings menu requires entry of a de-
fault password, which is shown here on the
screen. This can be changed in “password setting”
or you can deactivate it. We recommend, how-
ever, that password is always enabled.
Forgotten passwords can be reset to the factory
setting as follows:
1. Create a blank text file on a USB dongle
named "pinreset.txt"
2. Press S to enter standby mode.
3. Insert the USB dongle into the corre-
sponding USB port.
4. Press Sto return to access control. The
password is now reset and is as shown in
the picture.
Home screen
This picture shows the home screen in the settings
menu. To set one of the six programs, press next
to the program you want to configure.

14
Program settings submenu
Program 3 is selected. It is now possible to set fry
time and program name. Pressing the light bulb icon
allows you to deactivate the program if it is not re-
quired (settings are stored even if the program is de-
activated).
When set for single basket use all six programmes are available. When set for twin basket use the right and
left side of the display are dedicated to their respective baskets, so there are only three programmes per
basket.
Time setting
Here fry time for Program 3 is selected. When you
have selected the correct time, approve it and you
will then return to the previous screen.
If a program time setting is 00:00, the timer will
function as a stopwatch and will count upwards from
zero seconds.
Edit program name
Here, the program name is selected. Enter the name
you want to use and approve.

15
Settings that apply to all programs
Explanation of symbols for this section:
Temperature
Temperature
Operating zone
Sound
Password
USB port
Switch between single
and twin basket setting
Temperature and operating zone configuration
Temperature
If you press “temperature setting” on the home
screen, this screen will appear.
Here, you have the option to set the oil temperature,
approve the set temperature, and return to the
home screen.

16
Operating zone temperature
This picture shows the screen that will appear if
you tap this icon
Here you have the option to select a temperature
range to ensure that the appliance always fries to
perfection. When temperature is outside the se-
lected range, the screen will lock until it is ready
again .
The following two pictures show what is displayed
on the screen if the appliance is too hot or not
hot enough. This option can be changed to show
a colour indication in the main menu as to
whether one or both pans are too hot or not hot
enough . This allows the user to ignore the
warning. It is also possible to completely remove
this indication .
Screen if the appliance is not hot enough.
Screen if the appliance is too hot.

17
Setting the sound
Sound
When adjusting the sound settings, it is possible to
set the volume as a percentage, and a time for how
long the notification should sound when the program
is completed.
Password setting
Password
Here, you have the option to change the password
that is required to enter the settings menu, or deacti-
vate the password completely. Deactivate the pass-
word by entering an empty password and clicking
“OK”.

18
USB dongle
USB port
The USB port allows you to upload programs or save
them externally. The icon only becomes active when a
USB dongle is inserted. The top USB port is for the left
screen and the lower one is for the right screen. The ca-
pacity of the USB dongle must not exceed 4GB.
NB! If the USB dongle contains a settings file and the
dongle is read or written, the settings will be over-
written without asking for permission.
Operation
Home screen
This is the home screen during operation.
Press 1-6 to start a program.
Press O to switch off or go into standby.
Press and hold Sfor 3 seconds to display a graph of
the temperature over the last 3.5 hours.
Program active
If program 1-6 is selected on the home screen, this
screen will appear. Here, program 2 is selected. This
displays time remaining. If you want to stop frying
before the set time has expired, press the selected
program (here, program 2) and you will return to the
home screen.

19
With twin baskets
When using twin baskets, this screen will appear if
two baskets are active at the same time.
Timer
This image shows the timer function that operates if
time is set to 00:00 in a program and is not adjusted.
This is typically used to determine the ideal frying
time for a particular food product.
Shutdown
If Ois pressed on the home screen, you will see this
screen, from where you can enter energy saving
mode for reduced power consumption, using but-
tons 3 and 5.
Programs 4 and 6 switch off the appliance when the
baskets are in raised or lowered position, respec-
tively. If no selection is made, the appliance will en-
ter standby after 15 seconds with baskets lowered.
This manual suits for next models
1
Table of contents
Other FKI Fryer manuals


