Flame-N-Go Wagon User manual

OWNER’S MANUAL
FLAME-N-GO WAGON BBQ
USE ONLY THE HOSE AND REGULATOR PROVIDED!
If a replacement is necessary, please contact either our Customer Service Department or your
local dealer.
The use of unauthorised parts can create unsafe conditions and environment.
Picture of appliance
Marketed by:
Gascraft Products
P.O. Box 33-470
Takapuna, Auckland
New Zealand
Please keep your receipt as proof of purchase

Technical Information:
APPLIANCE SUPPLIED BY: The Warehouse Ltd, Auckland, New Zealand
MODEL NO: G2082
TOTAL HEAT INPUT: 19.8 mJ / hour
GAS CATEGORY: I3B/P(30)
FUEL TYPE: LPG
GAS PRESSURE: 30mbar
INJECTOR SIZE: Main: 0.84mm
CE IDENTIFICATION CODE: 359BU1034
MIN. GAS SUPPLY PRESSURE 2.05 kPA
MAX. GAS SUPPLY PRESSURE 3.45 kPA
MAX. OVERPRESSURE 6.50 kPA
FOR USE OUTDOORS AND IN WELL VENTILATED AREAS
WARNING: ACCESSIBLE PARTS MAY BE VERY HOT. KEEP YOUNG CHILDREN AWAY
READ THE INSTRUCTION LITERATURE BEFORE USING THE APPLIANCE
Ignition: Main burner: Single shot piezo ignition unit

IMPORTANT SAFETY INFORMATION
Please read these instructions carefully before assembly and use.
zRetain these instructions for future reference.
zFor outdoor use only-do not use indoors.
zFor use with LP gas only.
zDo not use within 1m of any flammable structure or surface.
zWhen igniting barbecue,remove its lid,or open its hood before lighting.
zDo not move the barbecue while alight.
zBarbecue should never be left unattended while pre-heating,cooking,or completing post-
cooking burn off.
zOn models with roasting hoods,the hood handle can become very hot.Use of a cooking glove
is advised.
zUse caution when opening the hood,as hot gases inside are released upon opening.
zThis barbecue becomes very hot-care must be taken when children,the elderly,or animals are
present.
zAlways turn off the gas cylinder when the barbecue is not in use.
zLeak test annually,and whenever the gas cylinder is removed or replaced.
zDo not store flammable materials near this barbecue.
zDo not use aerosols near this barbecue.
zFailure to follow the manual’s instructions coule result in serious injury or damage.
zIf you have any queries regarding these instructions,contact your local dealer.
Sides and rear of appliance: 1 metre from any obstruction.
Above the appliance: NO OVERHEAD OBSTRUCTION ARE PERMITTED.
NOTE FOR CONSUMER: Retain for future Reference

2728
1
2
10
11
18
19
20 21
26
25
24
23
22
13
14
15
16
17
12
9
876
5
4
3

22
23
24
25
26
4
Screw
(M6X40)
A
B8
Screw
(M6X10)
CScrew
(M5X30) 10
D13
Screw
(M5X10)
E
Screw
(M4X10)
Clip 4
28
1
Regulator&Hose
27
NO. Description Figure Q'TY
Side Shelf,Left
1
21
1
20
1
6
1
1
Lid
1
2
11
18
17
16
15
12
10
9
8
7
6
5
4
3
2
1
Q'TY
Figure
Description
NO.
1
2
1
1
1
2
1
19
13
14
1
4
F
M5Nut 18
Wheel Axle
1
1
2
1
1
1
2
2
2
1
Trolley Wheel
Flame Tamer
Burner
Body
Warming Rack
Cooking grid
Side Shelf,Right
Knob
Control Panel
Hook
Oil Cup
Main Burner Valve
Spark Electrode
Left Leg
Assembly
Right Leg Assembly
Main Burner Ignition
Electrode
Trolley Screen
Oil Cup Hook
Gamel II
Gamel I
Lid Handle
Lid Support Axle
Transverse Leg

Part 28 Clip 2PCS
Wheel Axle 2Pcs
Front Left
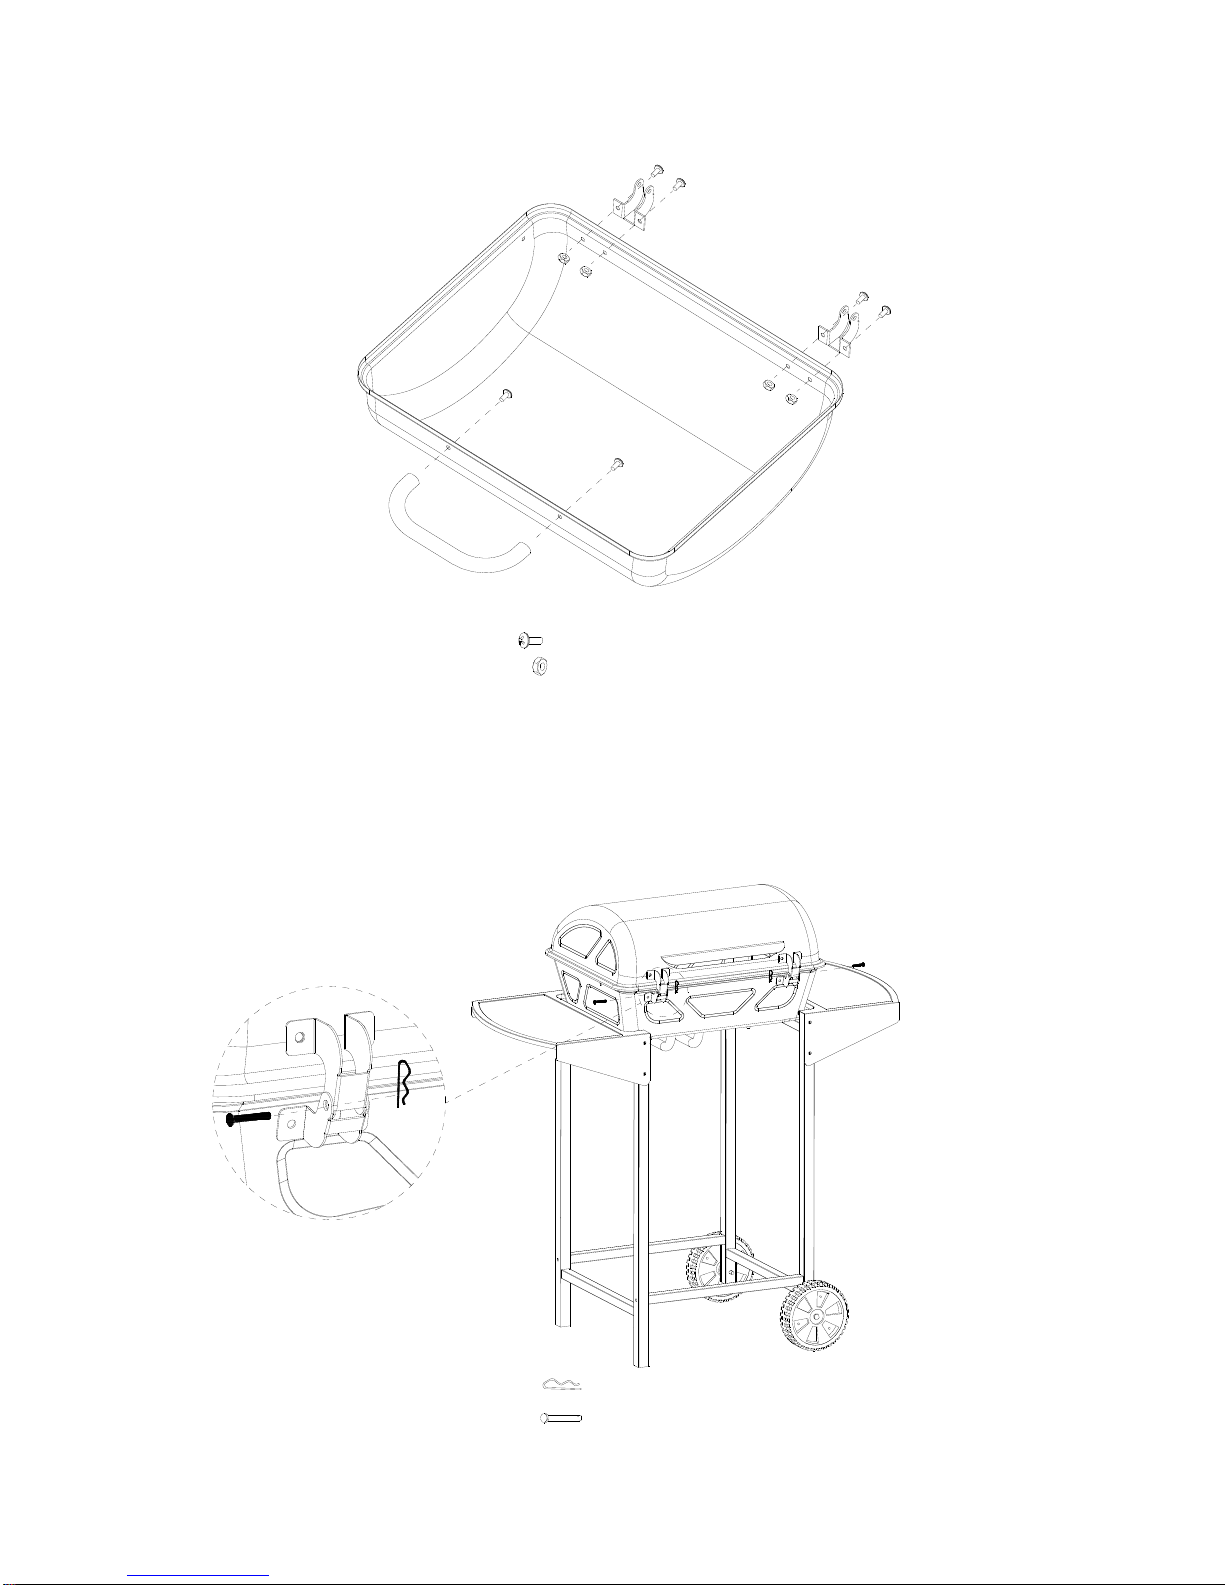
STEP 2
STEP 1
M6X40 4Pcs
A
Front Right
Back Left
Back Right
Front Left Back Left
Front Right
Back Right
A
A
A
A
Part 23

F
D
STEP 3
M4X10 4Pcs
F
DM5X10 3Pcs
F
F
STEP 4

Part 13
E
D
C
EM5Nut 8Pcs
DM5X10 4Pcs
M5X30 4Pcs
C
BM6X10 8Pcs
STEP 7
STEP 5 STEP 6
Hooks 6Pcs
B
B
B
B
D
C
EEE

EEEE
C
M5Nut 4Pcs
E
CM5X30 4Pcs
STEP 8
M5X30 2 Pcs
C
E
STEP 9
C
C
C
C
C
E
E
M5Nut 2 Pcs
D
D
D
DE
E
STEP 11
Part 9
Part 28
M5Nut 4Pcs
EM5X10 6Pcs
D
STEP 10
Lid Support Axle 2PCS
Clip 2PCS

STEP 12
STEP 13

STEP 14
After the connection is made between
hose assembly and BBQ valve, a leak
test must be performed before the BBQ
can be operated to check the
connections are gas-tight.
STEP 15

CONNECTING THE GAS CYLINDER TO THE APPLIANCE
This appliance is only suitable for use with low-pressure LPG, fitted with the appropriate low-
pressure regulator via a flexible hose. The hose should be permanently secured to the regulator
and the appliance. This barbecue is set to operate a 2.75 kPa regulator. The regulator assembly
supplied with this BBQ is of an approved type.
Regulator and Hose
These items are supplied with the barbecue, but replacements are available from your equipment
retailer or an authorised LPG gas stockist. Use only regulators and hose approved for LP Gas at
the above pressure. The life expectancy of the regulator is estimated as 10 years. It is
recommended that it the regulator is changed within 10 years of the date of manufacture.
The use of the wrong regulator or hose is unsafe; always check that you have the correct items
before operating the barbecue.
The hose used must conform to the relevant standard for the country of use. The
length of the hose must be 1.5 metres (maximum). Worn or damaged hose must be
replaced. Ensure that the hose is not obstructed, kinked, or in contact with any part
of the barbecue other than at its connection. It is recommended that the gas hose by replaced by
an authorised person every 5 years.
Storage of Appliance
Storage of an appliance indoors is only permissible if the cylinder is disconnected and removed
from the appliance. When the appliance is not to be used for a period of time it should be stored in
its original packaging and stored in a dry dust free environment.
Gas Cylinder
The gas cylinder should not be dropped or handled roughly! If the appliance is not in use, the
cylinder must be disconnected.
Cylinders must be stored outdoors in an upright position and out of the reach of children. The
cylinder must never be stored where temperatures can reach over 50°C. Do not store the cylinder
near flames, pilot lights or other sources of ignition. DO NOT SMOKE.
This barbecue is designed for use outdoors, away from any flammable materials. It
is important that there are no overhead obstructions and that there is a minimum
distance of 1 m from the side or rear of the appliance. It is important that the
ventilation openings of the appliance are not obstructed. The barbecue must be
used on a level, stable surface. The appliance should be protected from direct draughts and shall
be positioned or protected against direct penetration by any trickling water (e.g. rain).
Parts sealed by the manufacturer or his agent must not be altered by the user. No
modifications should be made to any part of this barbecue and repairs and maintenance
should only be carried out by an authorised person.
Connection to Appliance
Before connection, ensure that there is no debris caught in the head of the gas cylinder, regulator,
burner and burner ports. Spiders and insects can nest within and clog the burner/venturi tube at
the orifice. A clogged burner can lead to a fire beneath the appliance.
Clean burner holes with a heavy-duty pipe cleaner.

Fit the hose to the appliance using a spanner to tighten it onto the connection thread. If the hose is
replaced it must be secured to the appliance and regulator connections permanently. Disconnect
the regulator from the cylinder (according to the directions supplied with the regulator) when the
barbecue is not in use.
The Barbecue must be used in a well ventilated area. Do not obstruct the flow of combustion air
to the burner when the barbecue is in use. ONLY USE THIS BARBECUE OUTDOORS.
BEFORE USE CHECK FOR LEAKS
Never check for leaks with a naked flame, always use a soapy water solution
TO CHECK FOR LEAKS
Make 2-3 fluid ounces of leak detecting solution by mixing one part washing up liquid with 3 parts
water.
Ensure the control valve is “OFF”.
Connect the regulator to the cylinder and ON/OFF valve to the burner, ensure the connections are
secure then turn ON the gas.
Brush the soapy solution onto the hose and all joints. If bubbles appear you have a leak, which
must be rectified before use.
Retest after fixing the fault
Turn OFF the gas at the cylinder after testing.
If leakage is detected and cannot be rectified, consult your gas dealer.
LIGHTING YOUR BARBECUE
Lighting Instructions
1. Open the hood.
2. Turn all the control knobs clockwise to “OFF” position.
3. Connect the regulator to the gas bottle. Turn the gas supply “ON” at the cylinder. Check
with the use of soapy water for any gas leakage between the bottle and the regulator
4. Push down the left hand control knob and turn it anti-clockwise to the “Full rate” position
whilst depressing the piezo ignition button 4 or 5 times. This will light the burner. Observe if
the burner has lit. If not repeat this process.
5. If the burner has not lit after retrying wait 5 minutes and repeat step 3.
6. Adjust the heat by turning the knob to the High/Low position.
7. If the burner does not light. Light the appliance with a match using the lighting hole in the
side of the appliance. Consult your gas dealer to rectify the ignition.
8. To light the right hand burner, turn the right hand control knob to the full rate position, it will
light of the left hand burner. Always light the appliance from the left hand burner to the right
hand side.
9. To turn the barbecue ‘OFF’ turn the gas control knobs to the ‘OFF’ position and close the
cylinder valve.
Warning: If the burner fails to ignite, turn the control knob off (clockwise) and also turn the
cylinder valve off. Wait five minutes before attempting to relight with ignition sequence.
CLEANING AND CARE

CAUTION: All cleaning and maintenance should be carried out when the barbecue is cool and
with the fuel supply turned OFF at the gas cylinder.
CLEANING
“Burning off” the barbecue after every use (for approx 15 minutes) will keep excessive food residue
to a minimum.
OUTSIDE SURFACE
Use mild detergent or baking soda and hot water solution. Non-abrasive scouring powder can be
used on stubborn stains, then rinse with water.
If the inside surface of the barbecue lid has the appearance of pealing paint, baked on grease
build-up has turned to carbon and is flaking off, clean thoroughly with strong hot soapy water
solution. Rinse with water and allow to completely dry. NEVER USE OVEN CLEANER.
INTERIOR OF BARBECUE BOTTOM
Remove residue using brush, scraper and/or cleaning pad then wash with a soapy water solution.
Rinse with water and allow to dry.
WARNING:
Build up of cooking fats can creat a fire risk. Always clean your BBQ after each use.
COOKING GRID
Use a mild soapy water solution. Non-abrasive scouring power can be used on stubborn
stains then rinse with water.
CLEANING THE BURNER ASSEMBLY
Turn the gas OFF at the control knob and disconnect the cylinder.
Remove cooling grate.
Clean the burner with a soft brush or blow clean with compressed air and wipe with a cloth.
Clean any clogged ports with a pipe cleaner or stiff wire (such as an opened paper clip).
Inspect burner for any damage (cracks or holes). If damage is found, replace with a new burner.
Reinstall the burner, check to ensure that the Gas valve orifices are correctly positioned and
secured inside the burner inlet (venturi).
SERVICING
Your gas barbecue should be serviced annually by a competent registered person.
Table of contents


