FLAMECRAFT Tondo User manual


Tondo Fire Pit Manual

01
Warnings & Safety Information
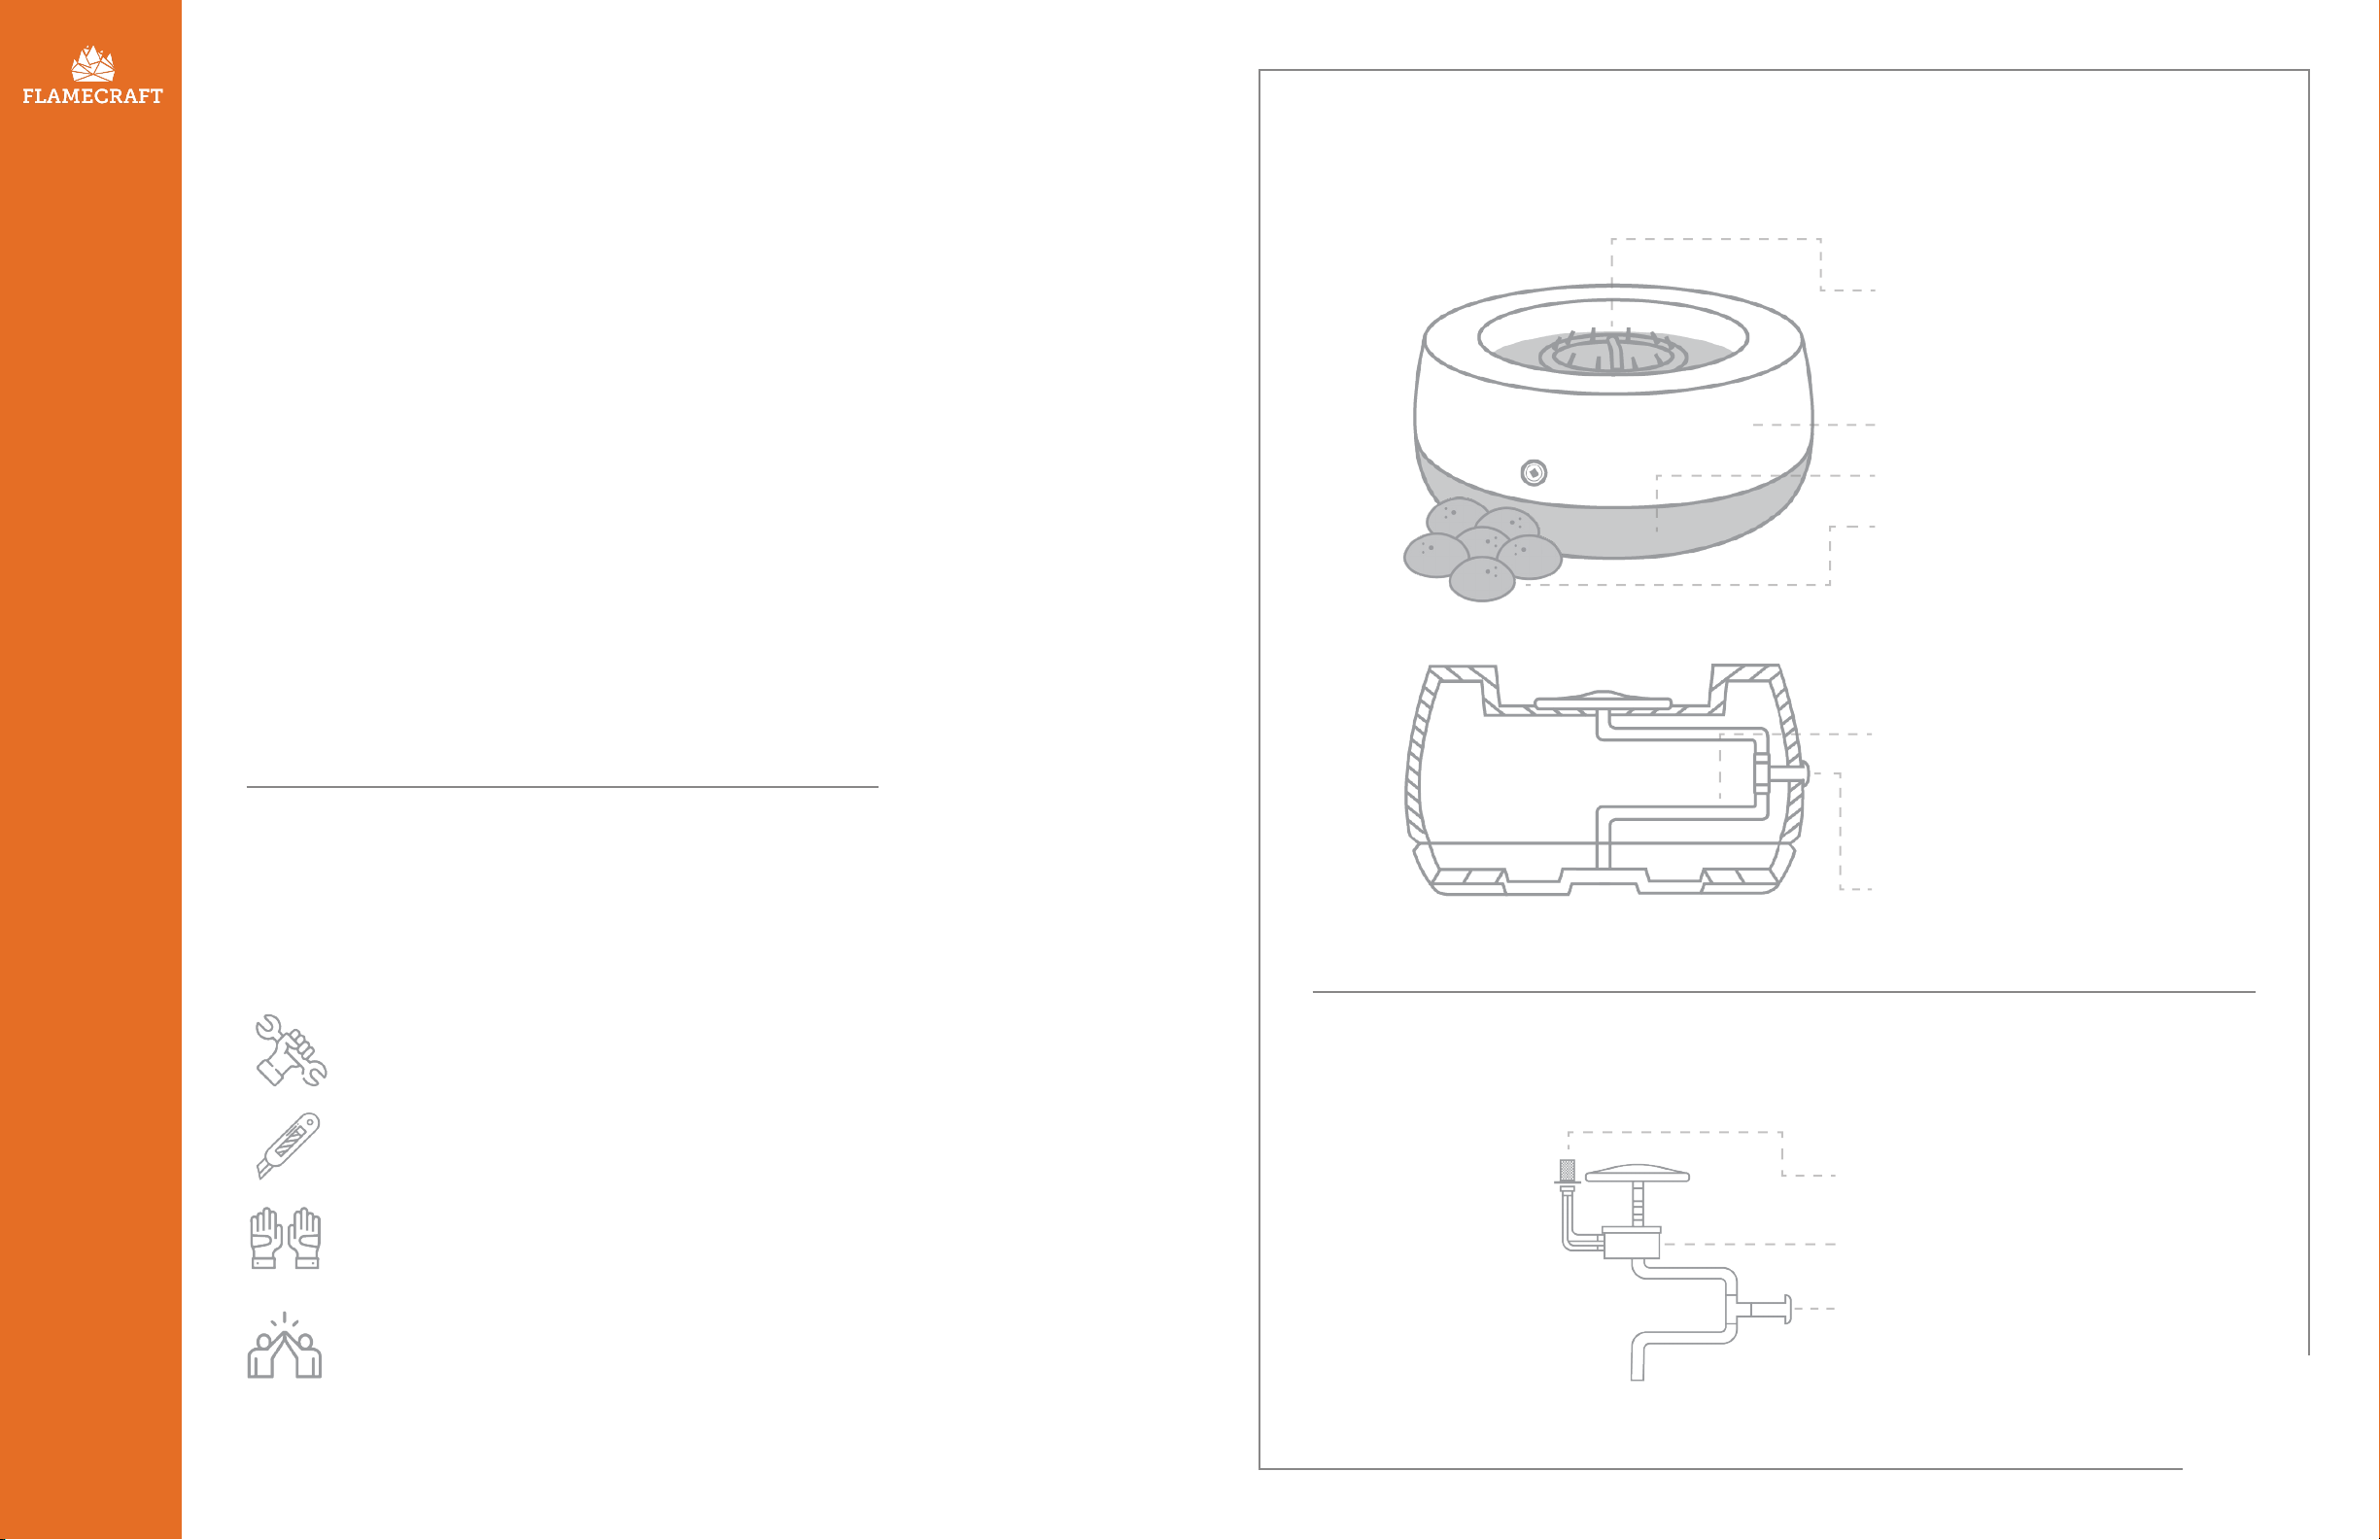
Installation
Operation / Use
WARRANTY REQUIREMENT:
Warranty is void if product is altered.
WARNING: For outdoor use only.
WARNING: This product must be installed
by a licensed gas professional that is locally
licensed by the authority having jurisdition
in gas piping. We highly recommend a
professional certied in the U.S. by the
National Fireplace Institute (NFI). The
installer must follow all instructions
carefully to ensure proper performance
and safety
WARNING: Conrm this appliance is built
for the gas-type being used – Natural Gas
or Liquid Propane. Do not use Natural Gas
congured appliances with Propane. Do
not use Propane congured appliances
with Natural Gas.
WARNING: To prevent damage or
serious injury, ensure all connections are
leak tested prior to operation and use.
WARNING: Fuel line sizing is the
responsibility of the installer and must
be able to supply the stated maximum
BTU output for the product.
WARNING: Gas Plumbing Connections:
The installer should only use joint
compound or tape that is resistant to
all gases. Apply joint compound to all
male pipe ttings only. Do not use joint
compound on ared or tapered ttings.
Be sure to tighten every joint securely.
WARNING: For systems with an extended
or detached valve box, the area in which the
valve box is installed must conform with all
installation requirements, including but not
limited to location, construction, venting and
local codes. Failure to do so may result in
personal injury, property damage, or
explosion.
WARNING: It is highly recommended that
the re pit remains covered when not in use.
WARNING: Before use, test all gas
connections for leaks. Do not use the re pit if
there is any evidence of leaking gas. If leaking
gas is suspected, turn o the main gas supply
and call a licensed gas professional.
WARNING: Do not use the re pit if the
burner or media have been submerged
under water. Immediately call a qualied
technician to inspect the re pit.
WARNING: Never use any material that
is non-porous and holds moisture, such
as gravel, pebbles, etc. This material is not
suciently porous to allow heated steam to
readily escape. When heated, any moisture
inside this material will boil and fracture
unexpectedly, which can cause personal
injury or damage.
This document contains essential information for the safe installation and
operation of this re product. Instructions are modied or updated as needed.
It is the installer’s responsibility to periodically review the current version of
instructions for applicable updates. The instructions must be strictly followed
to qualify for product warranty. Warranty will be void if not followed.
IMPORTANT
02
Maintenance
/ Service
WARNING: Solid fuels cannot be burned in
the re pit. Real wood logs, leaves, sticks, paper,
clothing, food, and plastic should be kept away
from the re pit. Do not use the re pit for
cooking. Make sure there is no vegetation or
other objects over the top or sides of the re
pit that could interfere with safe operation.
WARNING: If lava rock is wet, allow the re pit
to burn until lava rock is dry while remaining a
safe distance away (at least 20 feet from the
re pit).
WARNING: Refer to the burner manual
for gas conversion requirements. Any gas
conversion must be done by a licensed gas
professional and in strict accordance with
the burner manual.
WARNING: Refer to the burner manual
for clearances to combustibles.
WARNING: Refer to the burner manual
for yearly maintenance protocol.
WARNING: Any component removed for servicing
must be replaced prior to operating the re pit.
WARNING: Installation, service, and repair
should be done by a licensed gas professional or
NFI certied gas specialist. The re pit should be
inspected prior to use and at least annually.
WARNING: Ensure gas and power (if applicable)
are shut o and re pit is cool before servicing
WARNING: Keep any debris out of the
burner and re pit and keep air mixer clear.
WARNING: Periodical inspection by a qualied
service technician of the air-intake is required to
ensure proper performance.
WARNING: If there is any evidence of damage,
the burner must be replaced as specied by
the manufacturer.
Please carefully read and follow the
instructions in this manual to prevent
personal injury, property loss, or death.
WARNING:
This product can expose you to chemicals,
including Carbon Monoxide and Benzene,
which are known to the State of California
to cause cancer, birth defects, or repro-
ductive harm. For more information, visit
www.P65Warnings.ca.gov.
IMPORTANT
IMPORTANT
PROP 65 WARNING
Please consult with your burner manual.

Contents
Required Tools . . . . . . . . . . . . . . . . . . . . . . 3
Included With Your Fire Pit . . . . . . . . . . . . . . . . 4
Accessories . . . . . . . . . . . . . . . . . . . . . . . . 4
Unpacking . . . . . . . . . . . . . . . . . . . . . . . . 5
Base Placement . . . . . . . . . . . . . . . . . . . . . 5
Securing Top and Bottom of Fire Pit . . . . . . . . . . . 5
Ignition System Installation . . . . . . . . . . . . . . . 6
Gas Connections . . . . . . . . . . . . . . . . . . . . . 6
Fire Media Installation . . . . . . . . . . . . . . . . . . 8
Operating Instructions . . . . . . . . . . . . . . . . . . 9
Warranty Information . . . . . . . . . . . . . . . . . . 11
Routine Cleaning, Maintenance & Repair . . . . . . . . . 13
2 Open-Ended Wrenches
to secure gas connections
A Utility Knife
to remove packaging
A Buddy
to help carry the Tondo to the location
of installation and to safely secure the
top of the re pit to the bottom
Sturdy Gloves
for protection during
installation and media placement
03
Table of Contents & Parts Included
Required Tools
Before you start assembling your re pit,
make sure you have the following:
04
Included With Your Fire Pit
Included With Electronic Ignition Models Only
Burner
- Please refer to your
burner installation
manual for included parts.
Top of Fire Pit
Bottom of Fire Pit
Lava Rock
Flexible Gas Line
- 1/2-inch National Pipe
Thread Tapered (NPT)
- 12 inches in length
Key Valve
Tondo Side View (cut in half)
Pilot
Assembly
Ignition
Control Box
Key Valve With
Mounting Plate

05
Asssembly Instructions
Unpacking
• Do not discard any packaging until assembly
is complete and your re pit has been tested.
• Keep your Tondo Fire Pit installation manual
and your burner installation manual in
a safe place for future reference.
Base Placement
• Place the base in your desired nal location.
• Make sure the base is placed on a hard, at,
non-combustible surface. Avoid areas that
collect water.
Place the top half directly
over the bottom, and connect
the two notches together.
When aligned correctly, the
top (male) will interlock with
the bottom (female).
Securing the Top and
Bottom of the Fire Pit
06
Ignition System
Installation
All re pits, match-lit kits, safety
pilot, and electronic ignition systems
are designed and intended for outdoor
use only.
Match-Lit Ignition:
i. The re pit comes with a standard
match-lit ignition.
ii. Make sure there is a gas shuto
located on the exterior of your re
pit to allow for emergency shut-o
and maintenance.
Electronic Ignition:
i. Thread the pilot line, thermocouple,
and ignited lead through a hole in the
burner pan, and connect them to the
control box.
ii. Gently tug on the wires to make sure
the connection is secure, both on the
control box and the ared connection.
iii. Screw the thermocouple onto the
brass tting on the side of the control
box. Do not overtighten.
iv. Mount the pilot onto the burner pan.
v. Once all connections are secure,
preform a gas leak test before
operation.
Gas Connections
Please refer to your burner
manual before attempting to hook
up the burner or light your re pit.
Before You Begin:
• Check to make sure your gas valve is
in the OFF position before starting your
gas connections.
• Make sure the correct orices are
installed for the fuel type you are using.
Please see your burner manual for
orice sizing information.
• Use only joint compound or tape that
is resistant to all gases. Apply joint
compound to male pipe ttings only
— do not use on ared ttings.
ON OFF

Gas Connections
Continued
Propane Congurations:
i. For propane tank installations, you will
need to purchase a gas regulator hose.
ii. Connect the regulator hose to the
propane tank, then tighten by hand.
iii. Feed the hose through one of the four
holes into the bottom of the re pit,
then connect the hose to the burner.
iv. Burners do not require an air mixer
valve when connected to a propane
gas supply.
Natual Gas Congurations:
i. Hard-piped installations will require
a permanent gas line. If a gas line is
not already installed, you will need
to hire a professional to install one
and hook up your re pit.
ii. Attach the included exible gas line
from the burner to the gas valve
through one of the four holes into
the bottom of the re pit.
iii. Connect your gas supply to the shuto
valve using the included exible gas line.
iv. Use 2 open-ended wrenches to tighten
all connection points. After the
connections are nger-tight, make an
additional quarter-inch turn with your
wrenches to lock them into place.
07
Burner Plate
Burner Tube
Fuel Key Valve
Flex Lines
Fuel Source Line
08
Fire Media
Instructions
Please refer to your burner manual
for a list of approved re media.
• Wear a pair of sturdy gloves to install
your re media to avoid injuries from
shards of re glass or lava rock.
• Do not dump in re media.
Scatter all included lava rock, or
other approved re media, on top of
the at burner pan and evenly spread
it across the entire burner surface.
• For lava rock installation, apply the
media only deep enough to cover
the burner ring and pan — less than
2 inches above the re ring.
• For decorative re glass, cover the
burner with ⅛ to ¼-inch of glass.
Do not overll.
• Do not operate your re pit
without re media.
• Do not cover burner orices
with burning media.
• For electronic ignition models, do
not cover the pilot hood assembly
with re media.
• The use of concrete logs and ¾-inch
re glass is not recommended.
Proper Fire Media Installation:
Use safety gloves
when installing
re media
Leave pilot box and
burner ports uncovered

09
Operating Instructions
Before you begin operating your re pit, make sure it’s
clear of debris, the cover is removed, if applicable,
and the unit is safe to start.
Before operating your Tondo Fire Pit, ensure all gas connections
are properly tightened and thoroughly checked for leaks.
Refer to your burner manual for information on proper
leak detection and other critical information.
All re pits with electronic ignition systems must be
turned OFF via wall switch when not in operation.
IMPORTANT
IMPORTANT
IMPORTANT
IMPORTANT
10
Match-Lit Ignition
Congurations
• With the valve on the re pit in the OFF position, open the valve on your
propane tank or natural gas supply
• Double-check to make sure there are no gas leaks at the regulator or inlet
side of the valve.
i. If a leak is detected, immediately shut o the gas supply and wait
5 minutes to allow gas to dissipate. Fix any leaks before proceeding.
• Ignite a match or log lighter and hold the open ame directly over the
burner, with the gas valve and key valve still in the OFF position.
• Slowly turn your gas valve to the ON position. The gas line will ll up and
ow to the key valve.
• Slowly turn the key valve to the ON position to release gas to the burner.
• Adjust the ame to your desired height.
• To extinguish the re pit, turn your gas valve and key valve to the OFF
position.
Electronic Ignition
Congurations
• To ignite your re pit, simply turn ON the electronic device you are using
as your power supply.
• Within 10 seconds of power application, the pilot ame should be visible
(at night).
• Within 10 seconds of pilot ame ignition, the burner should ignite.

11
Warranty Information
Except as noted herein, this FlameCraft product is
warranted to the original purchaser as follows:
Details Related to the Warranty
• This FlameCraft product is warranted
to the original purchaser to be free
from defects in material and work-
manship for the periods provided
above and commences from the
date of purchase.
• The warranty on parts and in-house
labor will apply only to claims
presented to us by FlameCraft’s
original customer and is in lieu of all
other warranties expressed or implied.
• FlameCraft will, at its election,
repair or replace the product or
make appropriate adjustments where
FlameCraft’s inspection discloses any
defects occuring in normal usage
within the listed time periods.
• Concrete should be inspected prior
to installation and any defects in
material and workmanship must be
reported immediately. Changes in
appearance characteristics will
naturally occur over time much like
that of a natural stone. Eorescence
(the formation of a residue on the
surface area) is common in all
cement-bodied materials and is
natural. This is an expected and
fully harmless feature of concrete.
Concrete:
1 year (defects in material and workmanship)
Electrodes & Spark Igniters
Not Warrantied (due to lifespan)
Burner Ring & Burner Bars:
Lifetime Warranty
Stainless Steel & Aluminum Pans:
Commercial - 1 year; Residential - 3 years
Electronics, Gas Valves, & Pilot Assembly:
Commercial - 6 months; Residential - 1 year
exposure to extreme temperatures,
using improper chemicals or
compounds to clean, or other
similar incidents.
• No claims for concrete will be
accepted past the initial one-year
warranty period.
• Damage to product caused by
installation, accident, misuse,
abuse, or improper maintenance
is not covered by this warranty.
With respect to the product,
variations in color, shade, tonality,
crazing, shrink, and texture are
inherent characteristics thereof
and are not defects. Variations in
facial dimensions and thickness
will be allowed as per industry
standards.
• FlameCraft is not liable for any
direct or indirect costs associated
with the repair or replacement of
the product, including removal,
installation, or reinstallation of
the product.
To obtain service of the warranty, please contact us at
(800) 919-1904 for details on the warranty process for
your FlameCraft product.
Warranty Exclusions
• This warranty excludes claims for
incidental or consequential damage
and indirect collateral expenses arising
from product defects or warranty
recovery. Product manufactured by
FlameCraft including cLCus, UL, or
CSA Certied models, cannot be
altered or modied in any way.
• FlameCraft is not responsible for local
codes and a product that is not approved
for installation is not covered under
warranty. Please check with your local
authorities or governing agencies for
proper approvals before purchasing
and installing.
• FlameCraft is not responsible for damage
caused by overheating, modication,
abuse, improper storage, installation,
or maintenance.
• FlameCraft is not responsible for surface
level rust on stainless steel products.
• FlameCraft is not responsible for the
actions of the installer, including
negligence and any modications to
the product.
• Any labor involving installation or
maintenance with the unit is not covered.
• No warranties are made against crazing,
scratching, or wear, including improper
alteration of the surface with sealers or
grout, falling objects, abuse, misuse,
12

13
Routine Cleaning, Maintenance & Repair
Routine Cleaning
& Maintenance
i. Mild cleansers are the best way to clean your product. Generally, warm
soapy water applied with a clean sponge or microber cloth is all that is
necessary to keep your Tondo’s exterior in tip-top shape.
ii. Avoid harsh chemicals, such as lacquer-based thinners, acetone, denatured
alcohol, ammonia, or bleach, as well as abrasive cleaners and scrubbing pads.
iii. Use only pH-neutral, non-abrasive cleansers to avoid damage to the
factory-applied sealer.
iv. Make sure to clean up spills and splashes as quickly as possible and do
routine cleaning as needed. Acidic products like vinegar and lemon juice,
may stain and remain in place if not immediately removed.
v. If the concrete comes sealed by the manufacturer, we recommend any
resealing be done with the same or equivalent sealer. Please see the
manufacturer of the sealer for specic care and maintenance.
Repair
Concrete might stain or scratch over time. These imperfections do not diminish
or aect the quality of the product. However, if you believe your concrete needs
repair, please reach out to us for one of our DIY concrete repair kits, or seek the
advice of a professional stone resurfacing contractor or professional precast
company.
It’s very important to care for your Tondo Fire Pit properly,
and as directed, to ensure the natural beauty of the concrete
remains over time.
IMPORTANT
Enjoy

Table of contents
Popular Outdoor Fireplace manuals by other brands

Fiap
Fiap premiumdesign FireTower manual

Outsunny
Outsunny 842-229 Assembly instructions

Jeco
Jeco Windsor FP006 quick start guide

Spark modern fires
Spark modern fires LBS-OD 72 - NG OWNER'S OPERATION AND INSTALLATION MANUAL

Endless Summer
Endless Summer WAD15112MT manual

MODENO
MODENO Nantucket Fire Bowl OFG116LP owner's manual

Brinkmann
Brinkmann Ranch Fire Pit & Grill owner's manual

Landmann
Landmann 28240 Assembly instructions

Safavieh Furniture
Safavieh Furniture Antigua PIT1015A manual

Bioethanol Kamin Shop
Bioethanol Kamin Shop Qatar Firepit Assembly manual

Outdoor Plus
Outdoor Plus OPT-BLW60 manual

Sunjoy
Sunjoy Augusta L-FT1101PST-M Assembly instruction