manuals.online logo
Brands
  1. Home
  2. •
  3. Brands
  4. •
  5. Flavel
  6. •
  7. Dishwasher
  8. •
  9. Flavel FDW45 User manual

Flavel FDW45 User manual

Other Flavel Dishwasher manuals

Flavel DWF643W Installation instructions

Flavel

Flavel DWF643W Installation instructions

Flavel DWF 642 Installation instructions

Flavel

Flavel DWF 642 Installation instructions

Flavel FDW65 User manual

Flavel

Flavel FDW65 User manual

Flavel FDW 62 Owner's manual

Flavel

Flavel FDW 62 Owner's manual

Flavel FDW 61 User manual

Flavel

Flavel FDW 61 User manual

Flavel FDW451 User manual

Flavel

Flavel FDW451 User manual

Flavel FDW60 Installation instructions

Flavel

Flavel FDW60 Installation instructions

Flavel FDW64 Installation instructions

Flavel

Flavel FDW64 Installation instructions

Flavel FDW452 User manual

Flavel

Flavel FDW452 User manual

Flavel FDW63 Installation instructions

Flavel

Flavel FDW63 Installation instructions

Popular Dishwasher manuals by other brands

Electrolux ESI5211LOX user manual

Electrolux

Electrolux ESI5211LOX user manual

KitchenAid KUDB230B Use and care guide

KitchenAid

KitchenAid KUDB230B Use and care guide

Brandt BDJ424DB instruction manual

Brandt

Brandt BDJ424DB instruction manual

Asko DSD767UXXL.AU user manual

Asko

Asko DSD767UXXL.AU user manual

Beko DFN26210W instruction manual

Beko

Beko DFN26210W instruction manual

NEFF S153ITX00E INFORMATION FOR USE

NEFF

NEFF S153ITX00E INFORMATION FOR USE

Midea SV 4.45 wi manual

Midea

Midea SV 4.45 wi manual

LG LDF7932 Specifications

LG

LG LDF7932 Specifications

Gorenje GV63214 instruction manual

Gorenje

Gorenje GV63214 instruction manual

Hotpoint HDA1100ZWH Installation information

Hotpoint

Hotpoint HDA1100ZWH Installation information

Blomberg LDFN2240W instruction manual

Blomberg

Blomberg LDFN2240W instruction manual

AEG FFB83836PM user manual

AEG

AEG FFB83836PM user manual

Cylinda DM3220RFD user manual

Cylinda

Cylinda DM3220RFD user manual

Atag DW8214MB manual

Atag

Atag DW8214MB manual

GE GLD8000 Series owner's manual

GE

GE GLD8000 Series owner's manual

Siemens SN23HI02KE INFORMATION FOR USE

Siemens

Siemens SN23HI02KE INFORMATION FOR USE

Omega ODW717X instruction manual

Omega

Omega ODW717X instruction manual

BORETTI BVW-683 operating instructions

BORETTI

BORETTI BVW-683 operating instructions

manuals.online logo
manuals.online logoBrands
  • About & Mission
  • Contact us
  • Privacy Policy
  • Terms and Conditions

Copyright 2025 Manuals.Online. All Rights Reserved.

contents
3
Introduction
Welcome 2
Know your dishwasher / specification 4
Standards and testing information /
EC declaration of conformity 4
Warning and safety information 5
Electrical Safety 5
Childrens safety 5
General 5
ecycling 6
Energy and water saving 6
What should not be washed in your dishwasher 6
Hot Air Drying 6
Before first use 6
Hot Air Drying 6
Installation 7
Electrical requirements 7
This appliance must be earthed 7
Fitting a different plug 7
Water inlet hose connection 8
Drain hose connection 8
Installation of dishwasher 9
How to use 0
Water hardness & egeneration settings 10
Filling the (Water softener) Dishwasher salt 11
Visual indicator 11
Detergent use 11
Filling the detergent dispenser 13
inse aid 13
Filling the rinse aid dispenser 13
Loading the Dishwasher 14
2 Folding plate support rods 14
Upper basket height adjustment (Unloaded) 15
Standard loading and testing institute information 6
Operating the dishwasher 7
Unloading the Dishwasher 17
How to clean your Dishwasher 7
Filters 18
Upper spray arm 18
Lower spray arm 18
Before calling service / Trouble shooting 9
Guarantee Details 2
How to obtain service 22
4
specification
Because we continually strive to improve our
products, we may change our specifications and
designs without prior notice.
Diameter of plates for :
Upper basket : 25 cm max.
Lower basket : 31 cm max.
73/23/EC
89/336/EC
93/68/EC
IEC 436/DIN 44990
EN 50242
This appliance has been designed, constructed and
distributed in compliance with the safety requirements
of EC directives.
Load capacity : 10 place settings.
Load Capacity
Height
Width
Depth
Net weight
Supply voltage
Fuse currrent
Total power
Heater power
Pump powers
10 Place settings
820 mm
448 mm
570 mm
32 kg
220-240 V ~ 50 Hz
13 A
2200 W
1900 W
90/30 W
:
:
:
:
:
:
:
:
:
Upper basket
Dishwasher salt cap
ower basket
Cutlery basket
Detergent and Rinse
aid dispenser
Upper
spray arm
ower spray arm
Filters
Upper basket track latch
Heating element
concealed behind
the liner
Removable kick plate
Hot Air Drying
On/Off button
70°C
60°C50°C
No Heat 35°C
Programme indicator lights
2
RAPID
35°C
3
ECONOMY
50°C
NORMAL
60°C
45
INTENSIVE
70°C
1
PRE WASH
No Heat
Please clean the filters regularly.
Failure to do so will result in poor
cleaning,bad smells, and damage
to your dishwasher which is not
covered by the Guarantee. Filter
cleaning instructions are
contained in the Instruction
Booklet.
WARNING !
CANCEL
P
Programme Selection Button
Start/Pause/Cancel Button
inse aid level indicator light
Salt level indicator light
Start/Pause/Cancel indicator light
The dishwasher should only be operated on
the voltage specified. For electrical safety,
only earthed plugs and sockets should be
used. Always use the fused plug provided
with the appliance. The user is responsible
for meeting these basic safety requirements.
The life of your machine and your safety
depend on you using an electrical installation
compliant to standards.
Do not use an extension cable.
When disconnecting your machine from the
mains supply, always pull from the plug.
Never pull the cord itself.
Never allow your children to play with your
dishwasher.
Dishwasher detergents contain irritants and
abrasives. These ingredients might have
caustic effects in the eyes, mouth and throat.
They can be extremely dangerous if
swallowed. Avoid contact with skin and eyes.
Check that the detergent receptacle is empty
after completion of the wash cycle.
Keep detergents out of childrens reach and
do not put detergent in the machine until
right before you start the washing
programme.
The water in your dishwasher is not suitable
for drinking, for this reason do not allow
your children near your machine when the
front door is open.
Never allow your children to play on or sit
onto the front door when the front door is
open.
After unpacking your machine, keep the
packing material out of childrens reach.
Warning !
ong cutlery, such as ladles and long knives,
etc must be placed horizontally on top of
the full cutlery basket or on the racks to
prevent accidental injury.
The appliance is not intended for use by
young children or infirm persons without
supervision.
This dishwasher has been designed to clean
your dirty dishes at home.
Never use chemical solvents in your machine;
this may lead to explosion risk.
Never use materials other than specially
produced softening salts in the salt dispenser
of your machine.
Never use materials other than specially
produced detergents and rinse-aids in the
detergent and rinse aid dispensers of your
machine.
Please dispose of the packaging material and
old appliances carefully. Please ensure old
machines do not become a threat to child safety.
It is known that children lock themselves in
unused machines. To avoid such a problem it
is advised that you cut the mains cable off and
break the door latch so it does not lock.
The door of your machine is designed to support
the weight of a full basket when the lower
basket is pulled all the way out. Never place
any other load on the door, otherwise the
machine may tip over.
After using the dishwasher always close the
door as an open door can be a hazard.
Do not open the door whilst the appliance is
in operation.
5
Please help us to protect our environment. Packing
materials and some parts of your machine are
produced using recyclable materials. These materials
are marked up with recycling symbol and material
type information (>PE<, >PS<, >POM<, ). These
raw materials should not be mixed with daily
garbage and should be given to recycling centers.
We suggest you contact your local authority for
disposal information and facilities available.
6
After unpacking your dishwasher, check the machine
against any possible transportation damage. Never
install and use damaged machines. If your machine is
damaged contact your retailer. Always have your
machine installed by qualified electrician/plumber to
ensure correct installation.
Any repairs and maintenance work on this dishwasher
should be carried out by authorised service staff only.
epairs conducted by third persons are not only
dangerous, but also lead to the cancellation of your
warranty.
Make sure the electricity and water connections of your
dishwasher are in compliance with the instructions for
assembly as stated in the relevant part of this booklet.
Any water remaining in the dishwasher after production
should be carefully removed due to reasons of hygiene.
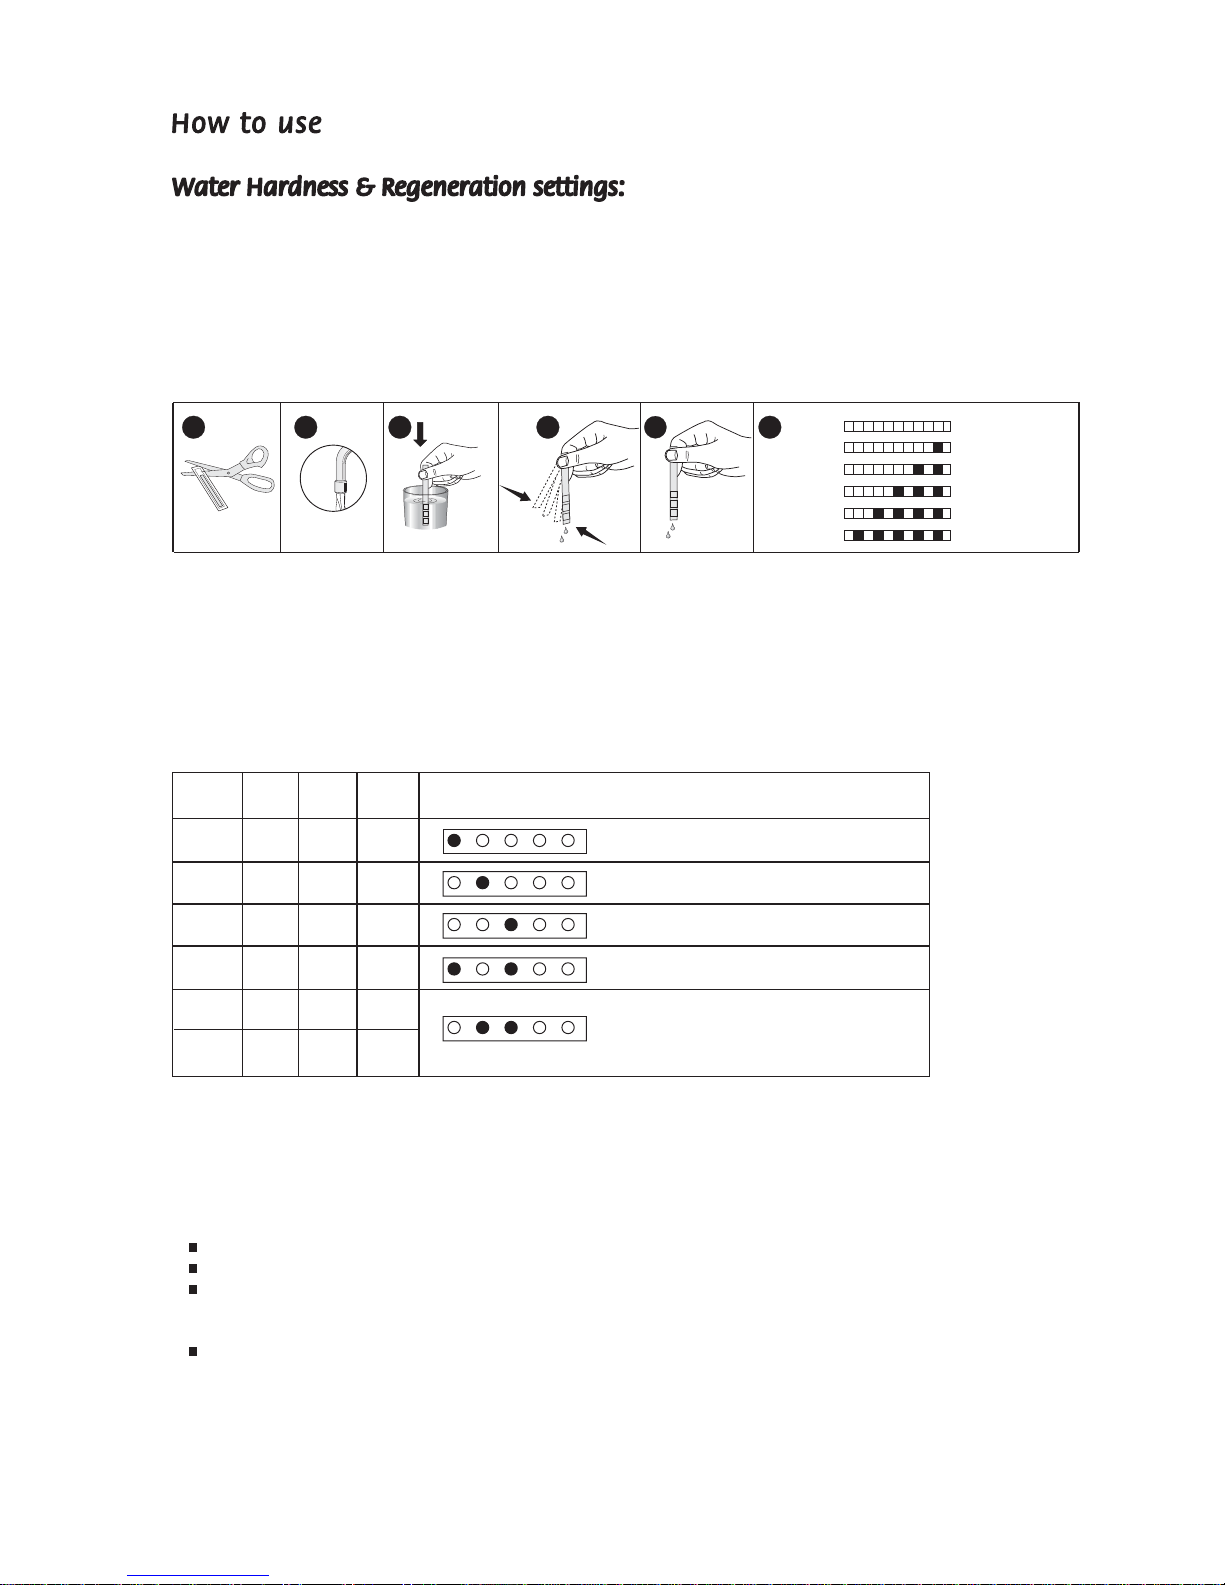
Therefore, always select a pre-wash
programme before first use
(Pre-wash or Economy programme).
Before the first wash, add 1 lt of water to the
salt container of your machine.
Hot Air Drying ensures your dishes are dried efficiently.
This product bears the selective sorting
symbol for waste electrical and electronic
equipment (WEEE).
This means that this product must be
handled pursuant to European Directive
2002/96/EC in order to be recycled or dismantled
to minimize its impact on the environment. For
further information, please contact your local or
regional authorities.
Electronic products not included in the selective
sorting process are potentially dangerous for the
environment and human health due to the presence
of hazardous substances.
Do not wash items soiled with cigarette ash, candle,
paint wax, dyes, chemicals etc. since these may
damage your machine
Do not wash forks, knives and spoons with wooden
or bone handles, items stuck together with
adhesives, plastic items not resistant to high
temperatures copper, tin items and aluminium
ware in your dishwasher.
As with hand washing, some on-glaze
decorated china, aluminum or silver have a
tendency to discolour or fade. Also, certain
types of glassware and crystals may loose their
shine and become opaque in time.
Scrape excess food from the dishes before loading
Start your dishwasher after fully loading the
machine. Do not use the pre-wash programme
unless required. Make your programme selection
as per the programme chart and quick reference
guide supplied.
A chemical reaction can occur between silver cutlery
and stainless steel cutlery. As a precaution, do not
wash together.
Iron and cast iron objects can rust and stain other
items.
Pay special attention to whether or not the item you
wash in the dishwasher is dishwasher-proof.
If in doubt, contact the manufacturer of the item.
Do not overload your dishwasher or do not load items
other than those mentioned in this manual.
7
When deciding on where to install your new
dishwasher, ensure that the position of your
dishwasher makes it easy and quick for you to
place the dishes in the dishwasher and also to
take them out and store away after the
dishwashing is completed.
Avoid placing the dishwasher where the ambient
temperature is likely to fall below. 0 degrees
C. (32° F)
When positioning your appliance, take care not
to damage your flooring, pipes wall coverings
etc. Do not move the appliance by pulling by
the door or handle
Before you insert the plug into the wall socket
make sure that the voltage and the frequency
shown in the rating label corresponds to your
electricity supply.
We recommend that this appliance be
connected to the mains supply via a suitable
switched and fused socket in a readily accessible
position.
Should the mains lead of the appliance become
damaged or need replacing at any time, it must
be replaced by a special purpose made mains
lead which can only be obtained from an
authorised service agent.
If the supply cord or the mains lead is damaged
please do not replace it by your own. The
supply cord or the mains lead must be replaced
by an authorised service agent or a similar
qualified person.
If the fitted moulded plug is not suitable for
your socket, then the plug should be cut off
and an appropriate plug fitted.
Destroy the old plug, which is cut off as a plug
with a bared cord could cause a shock hazard
if inserted into a socket elsewhere in the house.
The moulded plug on this appliance
incorporates a 13A fuse. Should the fuse need
to be replaced an ASTA approved BS1362 fuse
of the same rating must be used. Do not forget
to refit the fuse cover. In the event of losing
the fuse cover, the plug must not be used until
a replacement fuse cover has been fitted.
Colour of the replacement fuse cover must be
the same colour as that visible on the pin face
of the plug. Fuse covers are available from any
good electrical store.
As the colours of the wires in the mains lead of
this appliance may not correspond with the
coloured markings identifying the terminals on
your plug, proceed as follows:
1 Connect the green - yellow or green (earth)
wire to the terminal in the plug marked E or
with the symbol or coloured green and
yellow or green.
2 Connect the blue (neutral) wire to the terminal
in the plug marked N or coloured black.
3 Connect the brown (live) wire to the terminal
in the plug marked L or coloured red.
With the alternative plugs a 13A fuse must be
fitted either in the plug or adaptor or in the
main fuse box. If in doubt contact a qualified
electrician.
L
Brown or red
N
Blue or
black
Green and yellow
or green
Make sure your plumbing is suitable to
install your new dishwasher. If in doubt
contact a qualified plumber.
The appliance must be connected to the
water mains using the new hose set
supplied with your new dishwasher. Old
hose sets must not be re-used.
The water pressure coming from the water
mains supply must be a minimum of 0.3 and a
maximum of 10 MPa.
Fit the drainage hose of your machine
to the drainage pipe without bending.
Secure your hose firmly to the waste
pipe to avoid it coming off during the
washing process.
The waste pipe must only be connected
into the foul drains and not surface water
drainage system.
The hose should be placed between
50 cm and 110 cm from the floor level
and must not be extended otherwise the
machine may not empty the waste water.
Connect the straight end to your water
mains supply Ensure plastic filter and
black rubber seal is in place.
Please turn on the tap and check for
leakages after connecting the hose.
Please ensure the tap is turned off when
the machine is not used;
If you only have one cold water feed (For
example for your washing machine) dont
worry. a Y adaptor will provide you with
the additional cold water feed you need
for your dishwasher. Y adaptor is available
from most DIY stores.
1
8
max 110 cm
01020 30 40
50
60 70 80 90 100 110
12cm
min 4cm
max 110 cm
min 50 cm
18
21
1
An additional sheet containing assembly and
installation instructions is provided with your
appliance. Please follow the instructions and pre-
cautions contained in the mentioned sheet in
order to assemble and install your dishwasher
easily and correctly.
See the diagram on the left and also the additional
sheet. Ensure there is a clearance each side of the
machine to allow slight side ways movement for
servicing.
Position the machine next to a water tap and a
drain.
When inserting the machine, ensure that the
water inlet and drain hoses are not kinked or
squashed.
Care must be taken to ensure that the appliance
does not stand on the electrical supply cable.
Good levelling is essential for correct closure and
sealing of the door,
Make sure your dishwasher is perfectly level using
the adjustable feet.
When the appliance is correctly levelled, the door
will not catch on the inner liner on either side of
the cabinet.
If the door does not close correctly, loosen or
tighten the adjustable feet, until the machine is
perfectly level.
Ensure that door furniture is fitted properly and
check the door does not catch any other surface
to ensure door closes smoothly.
9
max 100
(+100)
(+100)
820-920
(+100)
820-920
448
min450
10
The dishwasher requires lime free water. Hard water leaves watermarks on your dishes. Your dishwasher
has a special water softening system to remove the hardness of the tap water. Setting this system
correctly will increase the washing effectiveness.
To find out the water hardness level of water in your area, contact your local Water Board or Determine
water hardness level by the help of test strip provided.
Test Strip
Let the water
flow from your
tap for 1
minute.
emove the
test strip from
its packing.
Fill a glass with
tap water and
dip the test strip
into water for 1
second.
Take the test strip
out of the water
and shake it.
Hold for
1 minute. Set the water hardness level of your dishwasher
according to the result shown by the test strip.
b
a
e
1 minute
1 second
cd f
No Lime
Very low lime content
Low lime content
Medium lime content
Lime content
High lime content
Level 1
Level 2
Level 3
Level 4
Level 5
Level 6
If you move to a different location, the level of water hardness will possibly be changed. It is essential to
reset the water hardness in order to obtain optimum washing efficiency.
If the hardness of the water you use is more than 80 dF (French Hardness) or if you are using pit water, we
recommend that you use filters and purifiers.
* If your tap water is below 9F (French hardness), you do not need to use special dishwasher salt in your machine. In this case,
salt indicator light will be on continuously.
Water Hardness Level
Le el 1
Le el 2
Le el 3
Le el 4
Le el 5
0-5
6-11
12-17
18-22
0-9
10-20
21-30
31-40
0-6
7-14
15-21
22-28
23-34 41-6029-42
Hardness
Level
Clarke
degree
s dE
German
degrees
dH
French
degrees
dF Hardness Level Displayed
*
Le el 6
35-45 61-8043-56
1st programme indicator lights
Press the programme selection button before you switch the appliance on and keep this button pressed down.
Switch the appliance on using the on/off switch. The Start/Pause/Cancel indicator light will start flashing.
Water hardness can be set to the desired level by pressing the programme selection button. The water hardness setting is
showed with different configurations of programme indicator lights. Please compare the test strip with the water hardness
level table and use the programme selection button until you reach the desired configuration.
Once you have set the hardness level press the Start/Pause/Cancel button to save the value. The Start/Pause/Cancel indicator
now lights up permanently.
! For level 5 and level 6 there is no difference between hardness level settings.
2nd programme indicator lights
3rd programme indicator lights
1st and 3rd programme indicator lights
2nd and 3rd programme indicator lights