FlexRadio Systems Maestro User manual

Page 1 © 2016 FlexRadio Systems, v1.0.0
Maestro Fixed Angle Stand Installation
Guide
February 29, 2016
The following guide will provide the necessary step-by-step procedure for installing the Maestro Fixed
Angle Stand on a Maestro Control Console for the FLEX-6000 Signature Series SDR.
Table of Contents
OBTAINING TECHNICA L SU PP OR T ............................................................................................................... 2
GETTING STARTED........................................................................................................................................... 2
Packaging and Fixed Angle Stand Contents............................................................................................ 2
Required Tools ........................................................................................................................................ 2
PREPARING FOR THE MAESTRO FIXED ANGLE STAND INSTALLATION ........................................................................ 3
PREP ARING THE WORK SUR FACE ............................................................................................................... 3
Using the Top Foam Packing Material as an Work Surface Offset ......................................................... 3
Place the Maestro on the Work Surface Offset ...................................................................................... 4
INSTALLING THE MAESTRO FIXED ANGLE STAND ASSEMBLY ................................................................................... 4
Locating the Fixed Angle Stand Mounting Screw Holes.......................................................................... 4
Orientating the Fixed Angle Stand on the Maestro ................................................................................ 5
Install Fixed Angle Stand Attachment Screws......................................................................................... 6
Tighten Attachment Screws to Secure the Angle Stand on the Maestro ................................................ 7

Page 2 © 2016 FlexRadio Systems, v1.0.0
Obtaining Technical Support
If you encounter any issues installing or operating SmartSDR for Windows with a FlexRadio Systems
Signature Series software defined radio, please use our on-line Community to find information about
SmartSDR and the FLEX-6000 radios. If you need assistance using the Community, please refer to the
community topic “How to use the FlexRadio Systems Support Community”.
If you are unable to find an existing answer to your issue on the Community, please contact FlexRadio
Systems technical support by opening a HelpDesk support ticket on-line at
https://helpdesk.flexradio.com/
For details on how to submit a HelpDesk support ticket, please refer to the following URL:
https://helpdesk.flexradio.com/hc/en-us/articles/202118688-How-to-Submit-a-Request-for-Technical-
Support.
Hours of Operation: Our Technical Support engineers are available Monday-Friday from 9:00am-5:30pm
Central Time. If you contact Support after business hours, on a holiday or weekend, we will respond to
your request for assistance during regular business hours in the order the tickets were received.
Getting Started
Packaging and Fixed Angle Stand Contents
Remove the Maestro Fixed Angle Stand contents from the packaging and verify that the following items
are included before proceeding. Refer to the image below.
One (1) 30° Fixed Angle Stand
Three (3) Attachment screws, M4 x 8mm
Required Tools
A #2 Phillips screwdriver is required (not supplied) . Note a magnetic tipped screwdriver
will facilitate the installation of the attachment screws.

Page 3 © 2016 FlexRadio Systems, v1.0.0
Preparing for the Maestro Fixed Angle Stand Installation
If the Maestro is powered on, power it off by pressing the Power Button on the top. Disconnect all cables.
Use a flat, well-lighted surface such as a table or work bench to perform the Maestro Fixed Angle Stand
installation.
You may want to use several small containers to store and organize the screws that will be used as part of
the Fixed Angle Stand installation.
Make sure to observe basic ESD control procedures to prevent static discharges that may damage
sensitive electronics components inside the Maestro, such as grounding yourself to reduce static electrical
build up.
Preparing the Work Surface
The top of the foam insert used in packing the Maestro will be used as a work surface to prevent
scratches to the front of the unit and to level the Maestro while attaching the Fixed Angle Stand.
Using the Top Foam Packing Material as an Work S urface Offset
The knobs on the front of the Maestro does not allow for the unit to lie flat on its front to facilitate easy
installation of the Fixed Angle Stand. Therefore the part of the Maestro packing material will be used as
an offset to create a flat work surface for installing the Fixed Angle Stand.
As shown in the picture below, use the top of the foam packing material and the plastic bag the Maestro
was packed in to create a convenient work surface offset. Allow the plastic bag to extend to the left to
protect the tops of the knobs. Alternately a soft cloth may be used in place of the plastic bag if desired.

Page 4 © 2016 FlexRadio Systems, v1.0.0
Place the Maestro on the Work Surface Offset
As shown in the picture below, place the Maestro touch screen display face down on the top of the foam
packing material allow the knobs to rest on the covered work surface. This will allow of the Maestro to lie
flat for the installation of the Fixed Angle Stand.
Installing the Maestro Fixed Angle Stand Assembly
Once the Maestro is properly oriented, the Fixed Angle Stand can be conveniently installed.
Locating the Fixed Angle Stand Mounting Screw Holes
Locate the three (3) M4 mounting screw holes at the bottom center of the Maestro as shown below with
the three arrows.

Page 5 © 2016 FlexRadio Systems, v1.0.0
Orientating the Fixed Angle Stand on the Maestro
Carefully orientate the Maestro Fixed Angle Stand on the back of the Maestro as shown below. The three
(3) small holes on the Fixed Angle Stand mounting plate should align with the three (3) metal insert
mounting screw holes on the back of the Maestro.

Page 6 © 2016 FlexRadio Systems, v1.0.0
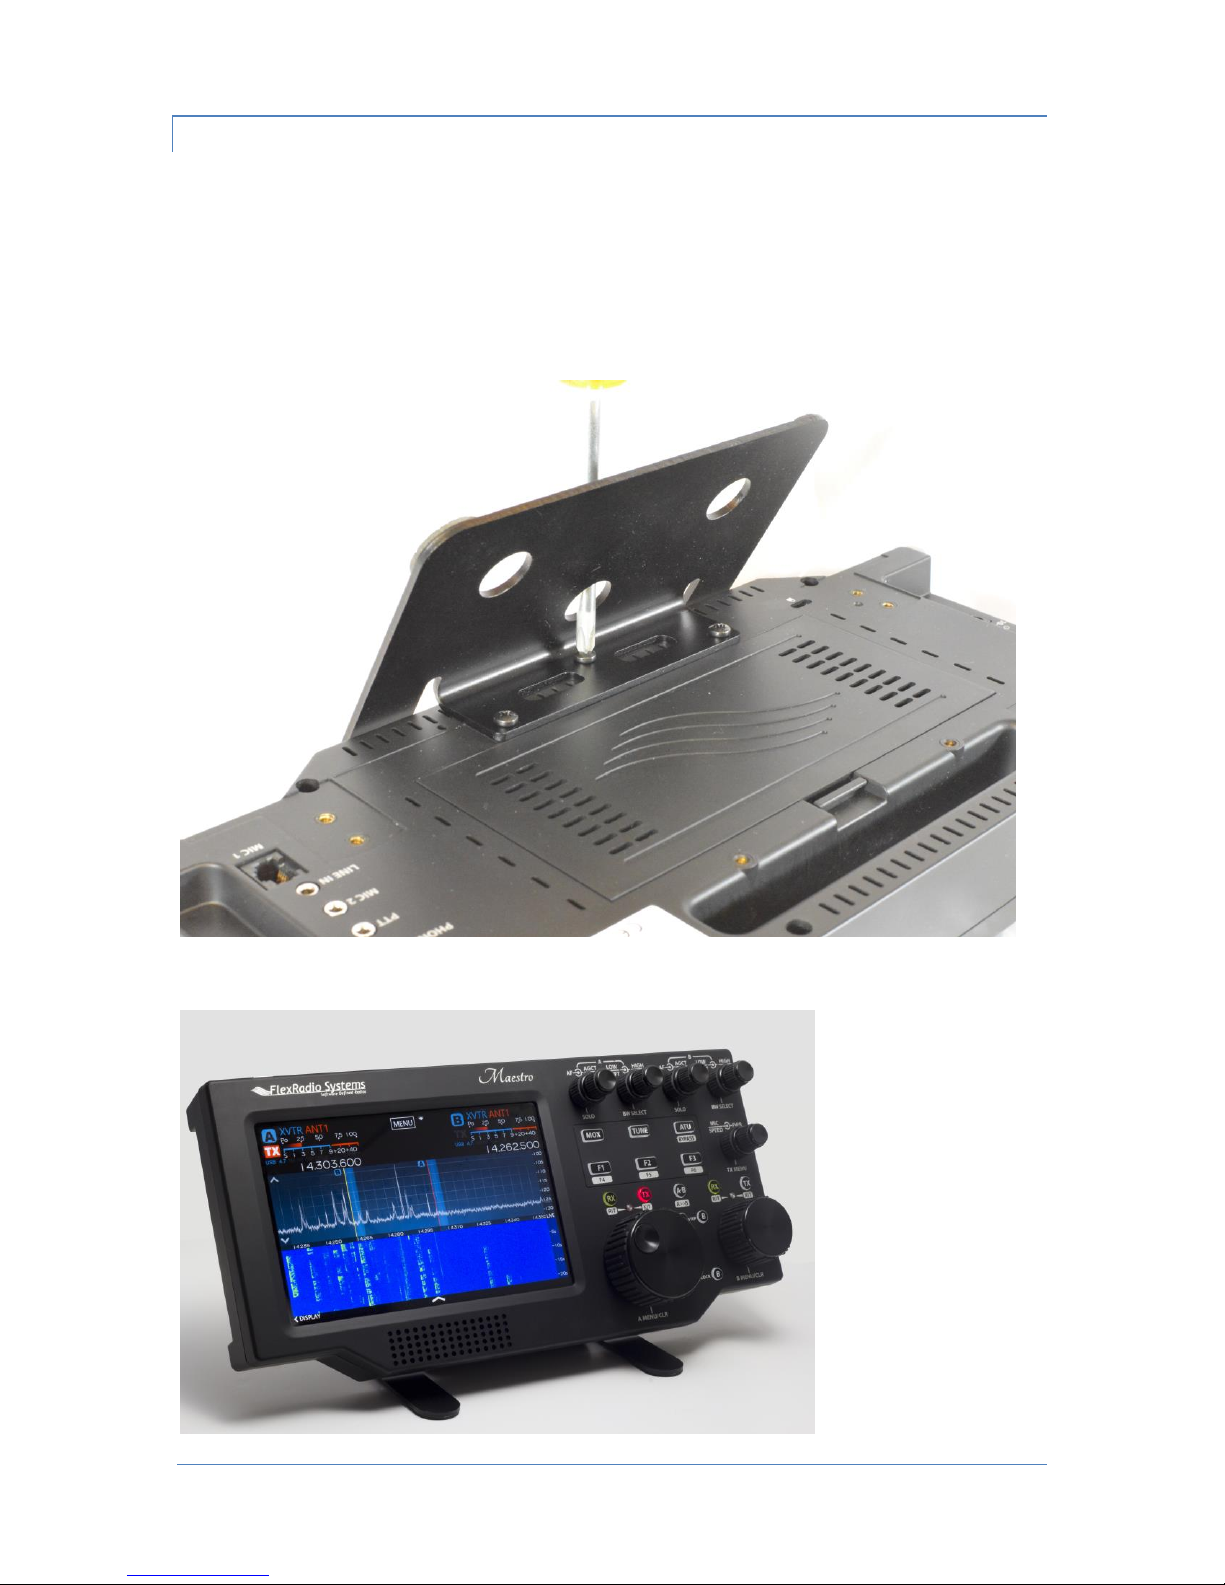
Install Fixed Angle Stand Attachment Screws
To facilitate the easy installation of the attachment screws, the three (3) large circular access holes are
provided on the bottom plate of the Fixed Angle Stand. Place the screwdriver through the access hole.
Then place a M4 attachment screw on the tip of the screwdriver and carefully thread it into the mounting
screw hole on the back of the Maestro. Refer to the image below for installing the center M4 attachment
screw.
Page 7 © 2016 FlexRadio Systems, v1.0.0
Tighten Attachment Screws to Secure the Angle Stand on the Maestro
The Fixed Angle Stand M4 attachment screws should easily screw into the mounting screw holes on the
back of the Maestro with little to no effort. If this is not the case, the screw may be cross threaded. Do
not force the M4 attachment screw into the mounting screw hole to prevent striping of the M4
attachment screw or the metal screw hole insert.
After the M4 attachment screws is completely installed, tighten it snugly, but do not over tighten it.
Repeat this procedure the remaining two (2) M4 attachment screws.
Below shows an image of the completed stand installation.
Other manuals for Maestro
1
Table of contents


