Floormaster CORDED ECO VAC F19 User manual

1
CORDED ECO VAC
Instruction Manual
Model Ref: F19
F19 01082018


1
Introduction
Thnk ou for choosing the Foormster Corded Eco Vc. A
products brought to ou b Foormster re mnufctured to
the highest stndrds of performnce nd sfet.
Before use, pese red this mnu crefu. It gives
importnt instructions bout sfet, use nd mintennce of
our vcuum.
Remove pckging mteri. You m wish to keep
the pckging for future use or storge of our vcuum.
Aterntive, dispose of ccording.
Index
Important Safety Information 02
Product Overview 04
Before First Use 05
Installation Instructions 05
Dissasembly Instructions 06
Accessory Installation 07
Emptying the Dust Tank 08
Cleaning & Maintenance 09
Troubleshooting 12
Product Specication 12
Disposal Information 13

2
IMPORTANT SAFETY INFORMATION
WARNING - To reduce the risk of fire, electric shock, or injury:
• DO NOT run the vacuum over the power cable.
• DO NOT operate the vacuum if any part of it has been
dropped or damaged.
• DO NOT disassemble or attempt to repair the
vacuum cleaner.
• DO NOT vacuum any flammable or combustible liquids or
use in areas where they may be present.
• DO NOT vacuum anything that is burning or smoking such
as cigarettes, matches or hot ashes.
• DO NOT use the vacuum without the dust tank
in place.
• DO NOT allow the vacuum to be used as a toy.
Close attention is necessary when used near children,
pets or plants.
• DO NOT unplug the vacuum by pulling on the power cord.
• DO NOT handle the vacuum with wet hands.
• DO NOT put any objects into openings.
• DO NOT use with any opening that is obstructed
or blocked.
• DO NOT use with mains extensions, external timer or
remote control systems.
• DO NOT operate the vacuum cleaner too close to heaters
or radiators.
• Keep the dust tank free of excessive dust, lint, hair and
larger debris that may reduce air flow, into and around the
dust tank.

3
• Keep hair, loose clothing, fingers and all parts of the body
away from opening and moving parts.
• Use extra care when cleaning on stairs.
• Only use the vacuum for its intended use.
• Keep the power cable away from any heated surfaces.
• Store your vacuum indoors, in a cool, dry area.
• Keep your work area well lit.
• Keep the end of the extension tube and the attachments
away from your face and body when operating.
• Use only on dry surfaces.
• Using improper voltage may result in damage to the motor
and possible injury to the user. Correct voltage is listed on
the rating label located on the base of the vacuum.
• Keep the vacuum and its power cable out of the
reach of children.
• To protect against a risk of electric shock, do not immerse
any part of the vacuum in water or other liquids.
• This vacuum is intended for household use only. Follow all
user instructions in this manual.
• Only use the manufacturer’s recommended accessories
as supplied.
• Before inserting the power cable into the wall outlet, make
sure that your hands are dry.
• Before you start vacuuming, make sure your work area is
free of sharp objects that might damage the vacuum filter.

4
1
3
4
5
6
7
2
9
8
11
12
13
PRODUCT OVERVIEW
1. Dual Speed On/O Switch
2. Power Cable
3. Dust Tank Release Button
4. Suction Nozzle Release Button
5. Dust Tank
6. Telescopic Extension Tube
7. Brush Head
8. Crevice Tool Attachment
9. Upholstery Tool Attachment
10. Accessory Adapter
11. Handle
12. Dust Tank Top
13. Dust Tank Release Clip
10
5
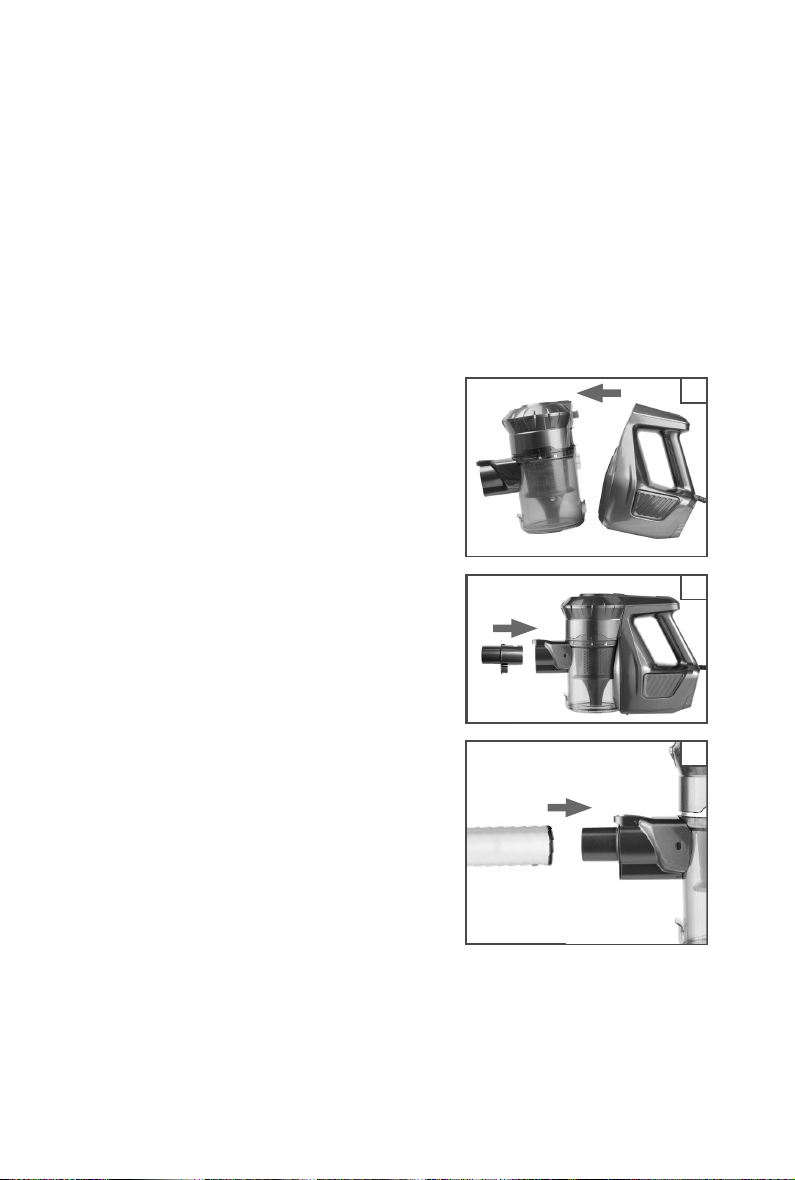
Assembly Instructions
1. Slot the handle (11) into place
on the dust tank (5) until it clicks
securely into place (Fig 1).
1
2
INSTALLATION INSTRUCTIONS
2. Connect the accessory adapter
(10) with the suction nozzle until
it clicks securely into place
(Fig 2).
3. Connect the telescopic extension
tube (6) to the end of the
accessory adapter (10) (Fig 3).
BEFORE FIRST USE
WARNING: Please keep the plug out of the socket during
assembly and disassembly.
Before using your vacuum for the rst time, wipe all parts with
a soft damp cloth.
3

6
1. Remove the brush head (7) from
the telescopic extension tube (6)
(Fig 5).
2. Remove the telescopic extension
tube (6) from the accessory
adapter (10) (Fig 6).
DISASSEMBLY INSTRUCTIONS
3. Remove the accessory adapter
(10) from the suction nozzle
by pressing the suction nozzle
release button (4) (Fig 7).
7
4. Connect the telescopic extension
tube (6) into the brush head (7)
(Fig 4). 3
4
3
5
6

7
4. Press the dust tank release
button (3) and carefully separate
the motor (12) from the handle
(11) (Fig 8).
Note: Do not attempt to separate the motor (12) from the handle
(11) without rst ensuring the motor release button is pressed (3).
1. The upholstery tool (9) can be
connected to the end of the
accessory adapter (10) directly
(Fig 9).
2. The crevice tool (8) can be
connected to the end of the
accessory adapter (10) directly
(Fig 10).
3. The upholstery tool (9) can be
connected to the end of the
telescopic extension tube (6)
directly (Fig 11).
4. The crevice tool attachment (8)
can be connected to the end of
the telescopic extension tube (6)
directly (Fig 12).
ACCESSORY INSTALLATION
8
ACCESSORY INSTALLATION
10
11
912
9

8
EMPTYING THE DUST TANK
1. Place the vacuum over your
waste bin.
2. Open the dust tank (5) by
releasing the clip (13) (Fig 13).
14
13
Dust Tank
Release
3. Gently shake the dust tank to
empty all the waste (Fig 14).
9
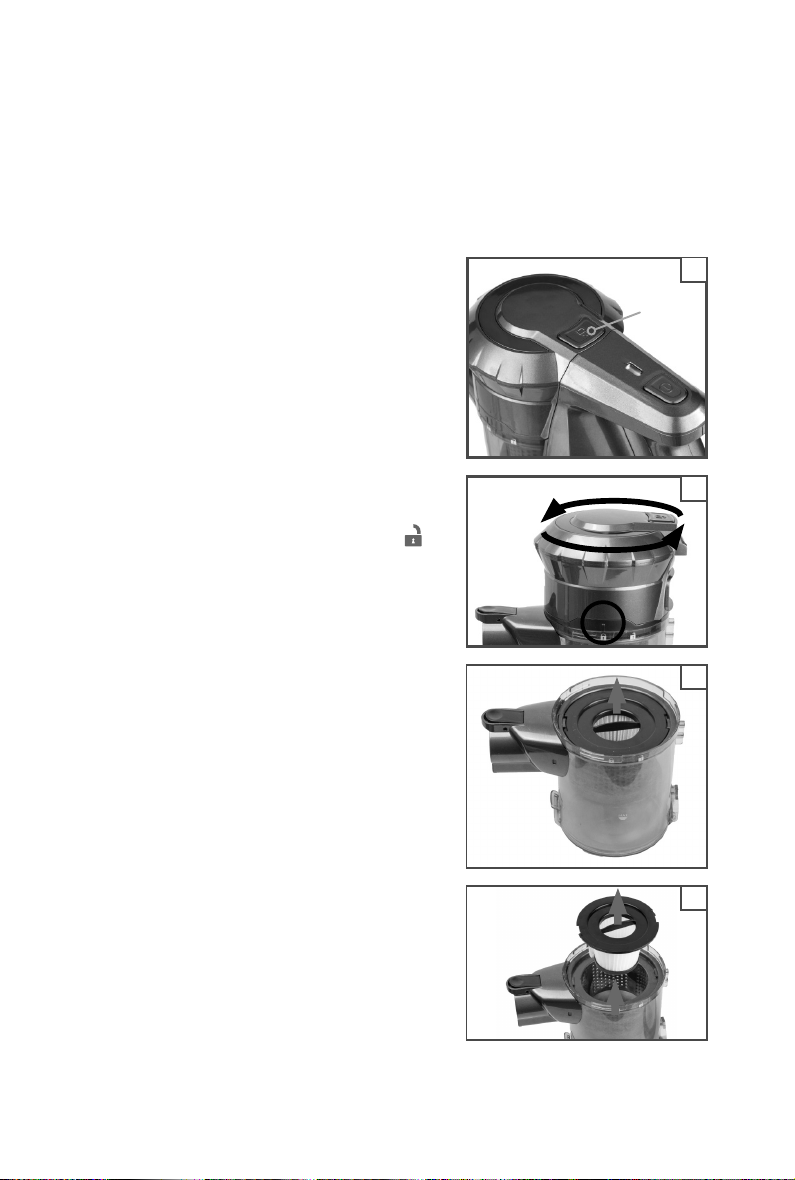
CLEANING & MAINTENANCE
Cleaning the Filters
This must be done at least once a month (for heavier vacuum
usage, clean the lter regularly).
1. Press the dust tank release
button (3) to remove the handle
(11) from the dust tank (5)
(Fig 15).
2. Rotate the top of the motor (12)
anti-clockwise until the mark on
the motor lines up with the “ ”
symbol (Fig 16).
15
3. Remove the lter case, followed
by the lter itself (Fig 17).
4. Remove the inner lter from the
lter case, by rotating
anti-clockwise (Fig 18).
16
17
18
Dust Tank
Release
Button

10
5. Wash the lter and its case and
rinse with water at least once per
month (Fig 19).
19
20
Note: When clean, leave them to dry in a warm, well
ventilated place. It is recommended to leave the lter for 24
hours to completely dry before reassembly.
6. To re-assemble the dust tank
(5) and the dust tank top (12)
together. Ensure that both parts
join together using the line and
the “ ” symbol to correctly line
up (Fig 20).

11
Clearing a Blockage
IF THE BRUSH HEAD BECOMES
BLOCKED DURING USE, THE
VACUUM WILL STOP.
1. Before checking for a blockage,
remove the brush head (7) from the
telescopic extension tube (6)
(Fig 21).
2. Carefully pull any hair or bre from
the brush head (7).
21

12
TROUBLESHOOTING
QUESTION ANSWER
The vacuum isn’t cleaning well
Empty the dust tank
Check that the dust tank is correctly tted
Check the lter is correctly tted
Clean the lter
The vacuum cleaner is cutting out or
isn’t working as intended
Check the power cable for damage
Clear debris from the motorised brush head
Unresponsive vacuum cleaner
Check the power connections
Check the wall socket
PRODUCTSPECIFICATION
MODEL: MAINS POWERED ECO VAC
Input Voltage 220~240V
Nominal Power 600W
Dust Tank Capacity 0.8L
Weight 1.8Kg
Power Cord 6M
Noise ≤ 75Db
Vacuum ≥ 15Kpa
Airow 1.05 m3/min
Motor Dual Speed

13
DISPOSAL INFORMATION
IMPORTANT INFORMATION FOR CORRECT DISPOSAL OF THE
APPLIANCE IN ACCORDANCE WITH EC DIRECTIVE 2002/96/EC
At the end of its working life, the vacuum cleaner must NOT be
disposed of as urban waste.
It must be taken to a special local authority dierentiated waste
collection centre or to a dealer providing this service.
Disposing of a household appliance separately avoids possible
negative consequences for the environment and health deriving
from inappropriate disposal and enables the constituent materials
to be recovered to obtain signicant savings in energy and
resources. As a reminder of the need to dispose of household
appliances separately, the product is marked with a crossed-out
wheeled dustbin.
For replacement lters call
0161 480 6204 or email
Info@oormaster.co.uk stating the catalogue
number

JA1731XQ
Wellington Grove, Stockport
Cheshire, SK2 6RH
Table of contents
Other Floormaster Vacuum Cleaner manuals


