FlorCraft 709-6711 User manual

8 " Laminate & Vinyl Plank Cutter
OWNER’S MANUAL
Cortador de 200 mm para pisos
laminados y tablón de vinílico
MANUAL DE OPERACIÓN
709-6711
READ AND UNDERSTAND ALL INSTRUCTIONS.
SAVE THESE INSTRUCTIONS FOR FUTURE REFERENCE.
LEA Y COMPRENDA TODAS LAS INSTRUCCIONES.
GUARDE ESTAS INSTRUCCIONES PARA USAR COMO REFERENCIA EN EL FUTURO.

2
SAFETY WARNINGS FOR LAMINATE CUTTER
WARNING
• Always wear safety glasses when operating this tool
• Keep cutting blade in the fully closed position when not in use
• Keep fingers and hands away from blade cutting area
• Periodically check that all hardware remains tight
ASSEMBLY INSTRUCTIONS FOR LAMINATE CUTTER
1. Attach the blade (A) to the cutter base (1) using the two nylon spacers (13) and double
threaded shaft (17, 18 & 19) as shown in the parts diagram.
2. To install the backstop (16), align the open slot on the backstop to the slot on the cutter
base. Secure using the two provided screws (15).
OPERATING INSTRUCTIONS
1. Place cutter on the floor making sure it is on a level surface.
2. Mark the work piece to be cut and insert it against the backstop. The “V”-Support (21)
should be used to support the laminate while cutting.
3. Always cut laminate with the finished side up. Place
the grooved or indented side of the laminate against
the backstop. (The “tongue” side should be closest to
the blade.) Begin the cut by holding the laminate firmly
with one hand and cutting into the laminate with the
blade approximately 1/2 in. You now have started your
cut. Proceed using both hands with a smooth powerful
downward motion to complete your cut.
4. Remember the cut side will always be placed along the
wall to be covered up by baseboard or finish molding.
MAINTENANCE
• Keep cutter clean and store in a dry place when not in use
• Keep edges of blade sharp by using a sharpening stone
• Periodically check all assembly to ensure that hardware remains tight
3
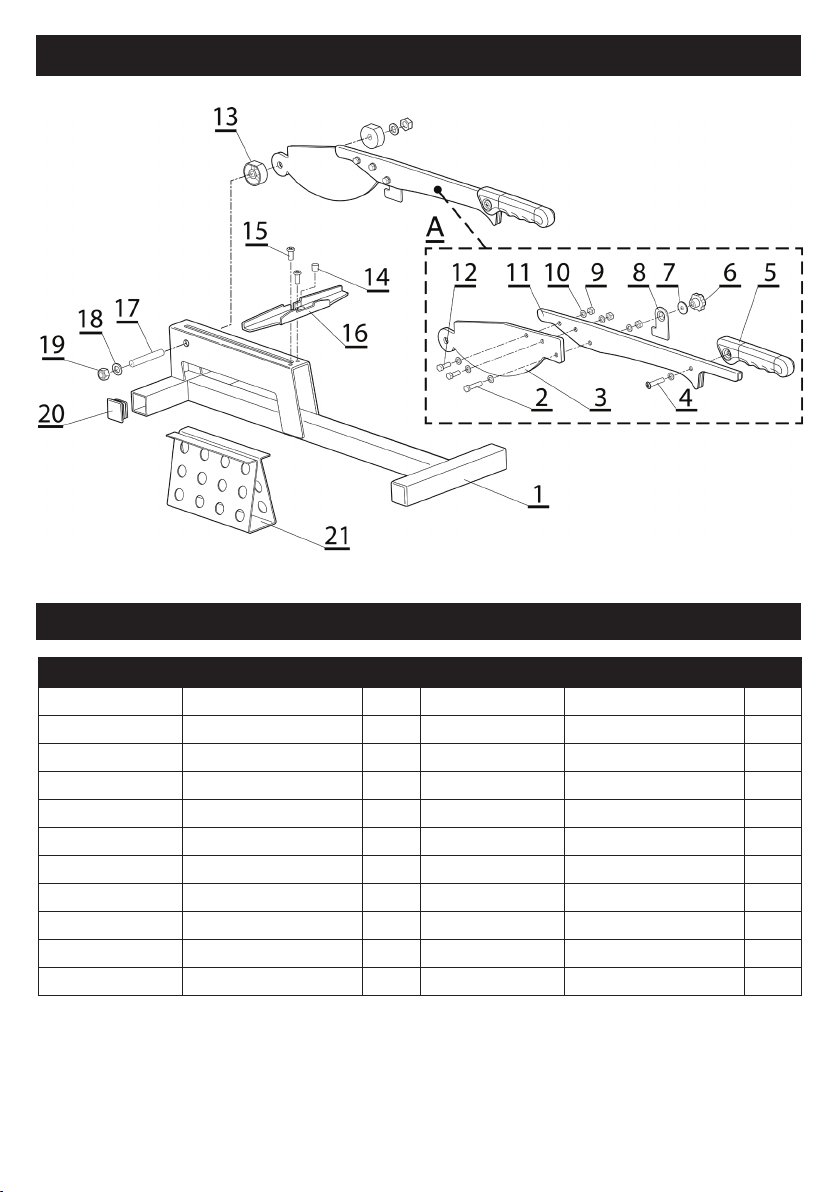
EXPLODED DIAGRAM
PARTS LIST
CUSTOMER SERVICE NUMBER: 1-866-435-8665
NO. DESCRIPTION Q T Y. NO. DESCRIPTION Q T Y.
709-6711-1 Cutter base 1 709-6711-12 Bolt 2
709-6711-2 Bolt 1 709-6711-13 Spacer 2
709-6711-3 Cutting blade 1 709-6711-14 Cushion 1
709-6711-4 Bolt 1 709-6711-15 Bolt 2
709-6711-5 Plastic Handle 1 709-6711-16 Backstop 1
709-6711-6 Knob 1 709-6711-17 Axis 1
709-6711-7 Washer 1 709-6711-18 Washer 1
709-6711-8 Hook 1 709-6711-19 Nut 1
709-6711-9 Nut 4 709-6711-20 Plastic cap 4
709-6711-10 Washer 8 709-6711-21 Support 1
709-6711-11 Steel Handle 1

4
ADVERTENCIAS DE SEGURIDAD PARA EL
CORTADOR DE PISOS LAMINADOS
ADVERTENCIA
• Siempre utilice gafas de seguridad mientras utilice esta herramienta
• Mantenga la cuchilla de corte en posición cerrada mientras no la utilice
• Mantenga los dedos y las manos lejos del área de la cuchilla de corte
• Revise periódicamente si la estructura de la herramienta continua ajustada
INSTRUCCIONES PARA HACER EL ENSAMBLAJE
DEL CORTADOR DE PISOS LAMINADOS
1. Ensamble la cuchilla de corte (A) en la base del cortador (1) utilizando los dos
espaciadores de nailon (13) y el eje con enroscado doble (17,18 y 19) tal como se
ilustran en el diagrama de las partes.
2. Para instalar la barrera (16), alinee la ranura abierta de la barrera con la ranura de la
base de la cortadora. Asegure con los dos tornillos proporcionados (15).
INSTRUCCIONES DE OPERACIÓN
1. Coloque el cortador en el piso asegurándose que está en una superficie nivelada.
2. Marque la pieza a cortar e insértela contra el retenedor trasero. El soporte en ‘’V’’ (21)
debe utilizarse para apoyar la pieza del laminado mientras
realiza el corte.
3. Siempre corte el laminado, con el acabado mirando hacia
arriba. Coloque el lado con canal o muesca del laminado
contra el retenedor trasero. (El lado con la ‘‘lengüeta’’
debe quedar más cerca a la cuchilla de corte). Comience
hacer el corte sosteniendo firmemente con una mano el
laminado y corte hacia adentro el laminado con la cuchilla
aproximadamente unos 13 mm . Usted habrá comenzado
a hacer el corte. Proceda utilizando ambas manos con
un movimiento hacia abajo con fuerza y sutilmente para
completar el corte.
4. Recuerde que el lado cortado siempre debe colocarse a lo
largo de la pared que será cubierto con zócalos o molduras para acabados.
MAINTENANCE
• Mantenga el cortador limpio y guardelo en un lugar seco mientras no lo utilice
• Mantenga los bordes de la cuchilla afilados, utilizando una piedra para afilar
• Revise periódicamente el ensamblaje para asegurar que la estructura de la herramienta
continua ajustada
5
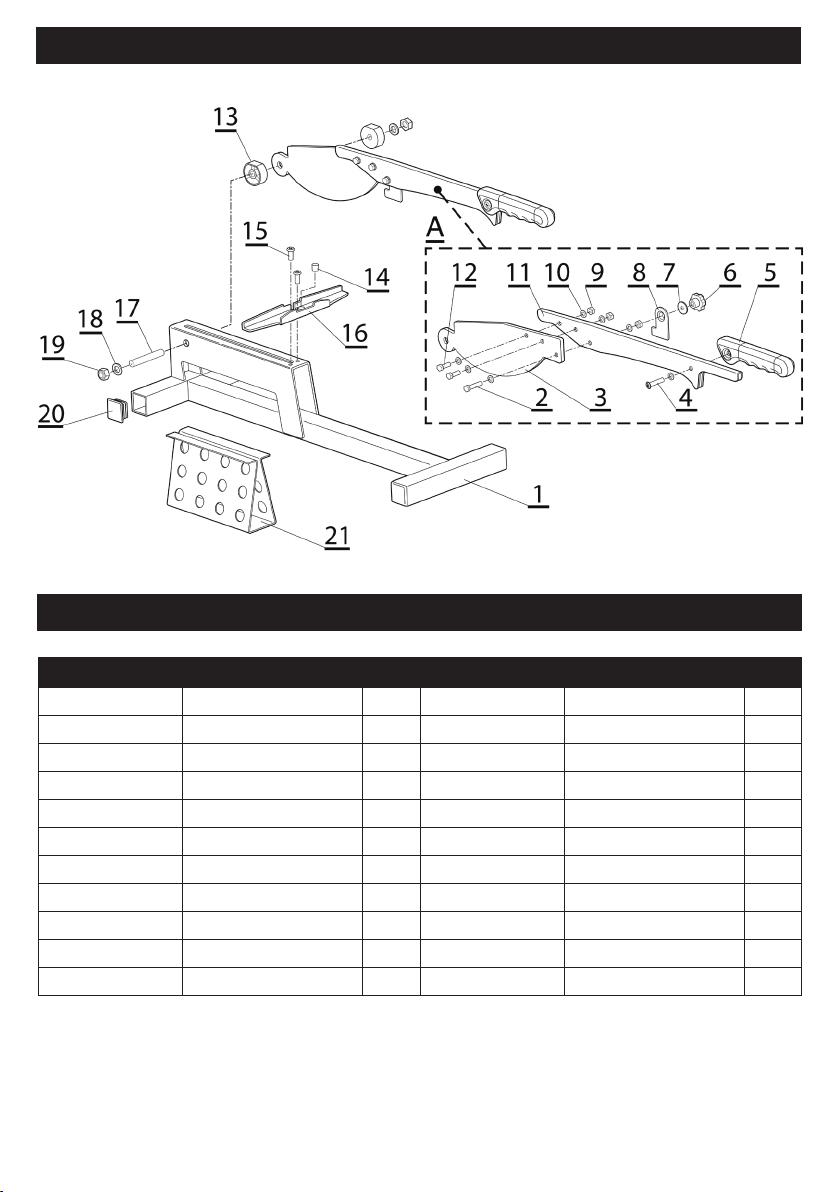
DESPIEZADO DE LAS PARTES
LISTA DE PARTES
NÚMERO DE SERVICIO AL CLIENTE: 1-866-435-8665
NO. DESCRIPCIÓN CANT. NO. DESCRIPCIÓN CANT.
709-6711-1 Base del cortador 1 709-6711-12 Tornillo 2
709-6711-2 Tornillo 1 709-6711-13 Espaciador 2
709-6711-3 Cuchilla de corte 1 709-6711-14 Amortiguador 1
709-6711-4 Tornillo 1 709-6711-15 Tornillo 2
709-6711-5 Manija plástica 1 709-6711-16 Barrera 1
709-6711-6 Perilla 1 709-6711-17 Eje 1
709-6711-7 Tornillo 1 709-6711-18 Tornillo 1
709-6711-8 Gancho 1 709-6711-19 Tuerca 1
709-6711-9 Tuerca 4 709-6711-20 Tapa de cierre 4
709-6711-10 Tornillo 8 709-6711-21 Soporte 1
709-6711-11 Manija de acero 1

6
NOTES / NOTAS

7
NOTES / NOTAS

© 2018 Distributed by Menard, Inc.
Eau Claire, WI 54703 MADE IN CHINA
Visit MENARDS.COM®
M0418-10911
Table of contents
Languages:


