Floureon 3G WIFI ROUTER/POWERBANK User manual

The factory default password WIFI connection: 12345678
Initial Account: admin Default password: admin Ports: 21
3G
WIFI
ROUTER/POWERBANK
Quick
Guide

- 2 -
3GWi-Fi is one Power bank and mobile 3G wifi router 4 in 1 machine , it is a kind of consume
r
network products. Such product enjoys many functions such as 3G router, wireless router, ADSL dial-up
networking, wireless network storage, and movable power bank so that you can enjoy wireless network a
t
any time and any place and share the wonderful contents stored in the digital devices. Such product ha
s
the following functions:
3G router: Supporting WCDMA / CDMA 2000 / TD-SCDMA system’s 3G wireless network card
dial-up and bandwidth sharing;
Wireless router: Supporting traditional cable broadband network such as ADSL dial-up, dynami
c
cable network and static cable network access;
Wireless network storage: Supporting U-disk and USB portable hard disk file reading and
sharing as well as online play;
Movable power bank: Able to charge movable digital devices such as iPhone, iPad, Android
smartphone, and panel computer.
1. Parts List
Thank you for purchasing power bank and 3GWi-Fi Mobile Power 3G Router machine. Please be
sure your package contains the following parts:
1. Mainframe
2. USB charging cable
3. Quick installation guide/warranty card
Select Network
- 3 -
2. Pane
l
l
2
2
.
.
1
1
D
D
e
e
s
s
c
c
r
ri
i
p
p
t
t
i
i
o
o
n
n
o
o
f
f
H
H
a
a
r
r
d
d
w
w
a
a
r
re
e
I
I
n
n
t
t
e
e
r
rf
f
a
a
c
c
e
e
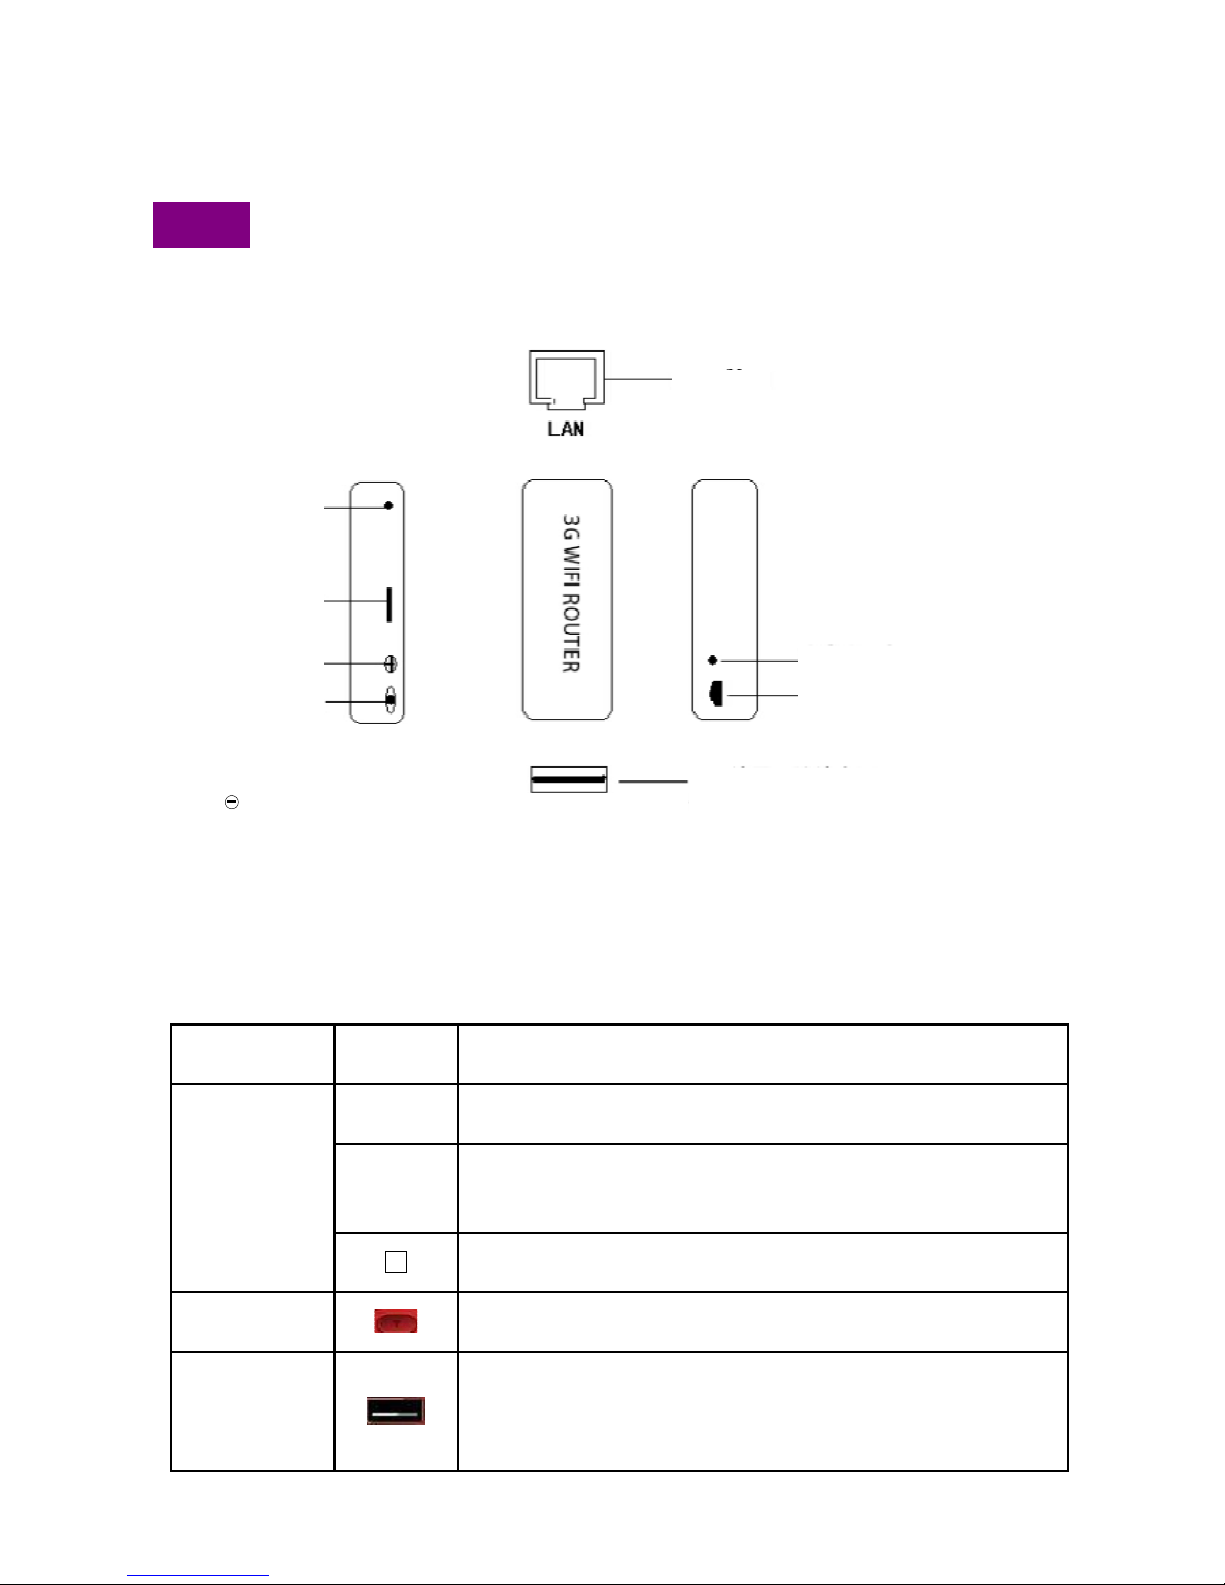
Hardware
Interface
Mark Detailed Description of Function
R
Starting up: The switch can be used to start the router in this tap
position.
C
Charging: The switch can be used to turn on the movable power
bank in this tap position and charge peripherals through USB
interface
.
Power switch
Shutdown: The switch can be used to disenable all functions of the
machine in this tap position.
Battery indicator
button
Press this button and the battery indicator will display the current
electric quantity of the battery. The electric quantity has 4 levels.
USB Port
This interface can be used to connect 3G USB network cards of
WCDMA, EVDO/CDMA2000 and TDSCDMA systems, U-disk, US
B
portable hard disk, or digital terminals such as smart phone, panel
computer and PSP for battery charging
Factory
Reset
Micro-USB
Charging
Port
Battery
Indicator
Battery
Indicator
Button
Power
Switch
USB
Port
for
connetting
3G
usb
dongle
or
supply
power
for
phone,
Pad,digital
terminal,and
etc.
Charge
Indicator
RJ45
Ethernet
Port
R: Router On
C: Charge On
O
ff
:

- 4 -
Micro-USB
Charging Port
Input of DC 5V; able to be used to charge such machine through
Micro USB charge cable.
Charge
indicato
r
This indicator is normally on when such machine is charged
.
RJ45 Etherne
t
port
port: Under dynamic IP/static IP/PPPoE mode, this port serves a
s
the WAN port and used to connect hotel’s wired network, LAN
broadband, and xDSL Modem/Cable Modem.
Restore factory
setting
s
Under the starting up condition of router, press it for 5 second
s
before releasing it. The router will be restored to factory default
settings.
2
2
.
.
2
2
D
D
e
e
s
s
c
c
r
r
i
i
p
p
t
t
i
i
o
o
n
n
o
o
f
f
S
S
t
t
a
a
t
t
u
u
s
s
I
I
n
n
d
d
i
i
c
c
a
a
t
t
o
o
r
r
L
L
a
a
m
m
p
p
Action Indicator Status Detailed Desc
ription
Staring up
The blue lamp
is
normally on.
Pull the power key to the position of “Starting up”. When
the blue lamp is normally on, it indicates that the machine
is normally started up.
The blue lamp
flashes slowly (flash
once every 1.5s)
Insert U-disk, portable hard disk, and other movable
storage device into USB interface. Normally, the blue
lamp will be seen flashing slowly after 8 to 10 seconds.
This indicates that the movable storage device downloads
normally.
Insert
ion of
movable
storage device
The blue lamp
is
normally on.
The movable storage device fails to load successfully.
The blue lamp
flashes quickly (flash
once every 0.5s)
Insert the 3G USB network card and wait for around 30
seconds. The blue lamp can be seen flashing quickly
(flash once every 0.5s).This indicates that 3G dialing state
has been entered.
The blue lamp
flashes slowly (flash
once every 1.5s)
The blue lamp flashes slowly (flash once every 1.5s). This
indicates that the router 3G dial-up is successful and the
internet can be accessed.
Insertion of 3G
network card
The blue lamp
is
normally on.
Dial-up is not successful.
The green lamp i
s
normally on.
If the green lamp is seen normally on 5s after the cable is
inserted. This indicates that the connection of the cable is
norma
l.
Insert
ion of
ADSL cable
(under PPPoE
mode)
The blue lamp
flashes slowly (flash
once every 1.5s)
If the green lamp is seen flashing slowly a while after the
green lamp is normally on, it indicates that router ADSL
dial-up is successful and the Internet can be accessed.
The green lamp i
s
normally on.
It indicates that the connection of the cable is normal.
Insert
ion of
router cable
(under dynam
ic
IP mode)
The green lamp
flashes slowly (flash
It indicates that the connection of the cable is normal and
that the router has successfully get back the assigned

- 5 -
once every 1.5s) dynamic IP address from the router at the upper level.
Insertion o
f
router cable
(under static IP
mode)
The green lamp i
s
normally on.
It indicates the connection of the cable is normal.
4. Function of movable power bank: This guide describes how to charge digital
products such as mobile phone and panel computer.
Step 1: View of battery powe
r
Before charging the digital products such as mobile phone and panel computer, please first check the
battery power of the equipment.
a) Press the power capacity indication button and the battery level indicator lights. The curren
t
battery percentage can be viewed. After 4 seconds, the indicator goes out to save power
automatically.
Step 2: Charge the digital products such as mobile phone and panel computer.
Please pull the switch to the position of “Battery Charge” (“C”). The functions of movable power ban
k
can thus be enabled. Then connect the charge cable of the digital products to the USB interface of such
machine. At this time, it will charge the mobile digital equipment such as iPad, iPhone and Android
smartphone.
(View of Battery Power)

- 6 -
Prompt: Please use the charge cable provided with the mobile phone/devices so that the best charge
effects can be achieved.
(
(C
Ch
ha
ar
rg
ge
e
o
of
f
P
Pe
er
riip
ph
he
er
ra
al
l)
)
5. Battery Char
ge
When the battery of such product is about to run out, we can charge it through the following two
method
s:
Charger by power supply: Connect one end of the Micro USB charge cable to the DC charge
coupler of this product (Micro USB interface) and the other end to the USB interface of the power
adapter.
Charge by computer’s USB port: Connect one end of the Micro USB charge cable to the DC
charge coupler of this product (Micro USB interface). Then connect the another end of the
charge cable to the USB interface of the computer to charge this machine.
Precautions for charge
:
1. Please use the power adapter of DC 5V (with the output current of between 600mA and 1000mA).
Common iPhone and iPad power adapters can also be used
.
2. Charging period: Charge for about 5 to 8 hours if 5V 1000mA charge connector is used
Charge various
peripherals throu
gh
this USB interface

- 7 -
Charge for about 11 hours if 5V 600mA charge connector is used
Charge for more than 12 hours if computer USB is used for charge directly
3. W hen such machine is being charged, do not charge other equipment with such machine in orde
r
to protect the battery and prolong the life of the battery.
6. Function and Configuration of 3GWi-Fi Wireless Route
r
3GWi-Fi router can be accessed and configured through web browser. We can log in to the router through
common IE of Microsoft, Safari of Apple Inc and built-in browser of Android operating system, to browse
the contents of movable storage device and parameters of the routers. Below is the introduction of it
s
operation. ’
6
6.
.1
1
W
Wi
ir
re
el
lees
ss
s
C
Cl
li
ieen
nt
t
D
De
ev
vi
ic
ce
e
n
neee
ed
ds
s
t
to
o
b
be
e
c
co
on
nn
ne
ec
ct
te
ed
d
t
to
o
t
th
he
e
W
Wi
ir
re
el
le
es
ss
s
R
Ro
ou
ut
te
er
r
F
Fi
ir
rs
st
t
(
(T
Ta
ak
ke
e
i
iP
Pa
ad
d
f
fo
or
r
E
E
x
x
a
a
m
m
p
p
l
l
e
e
)
)
Step 1: Open the main interface of iPad and select “Settings” and then “WLAN” to enter the Wi-Fi
settings page. Turn on the wireless switch. The iPad will then automatically scan the surrounding wireless
network. Find router of SSID named “3GWi-Fi xxxx”. Double click for connection.
Step 2: During connection, please enter the Wi-Fi password according to the back of the router shell
for connection (the password can be changed).
Upon a successful connection, a small tick “ ” will appear on the left of router’s name. At the same
time, a sign icon ” will appear on the top left corner of the screen, which indicates
successful.
connection. If prompt is given that the network can not be joined, please confirm whether
your wireless
password has been entered correctly.
Step 3: View and set network parameters. Click the “>” button on the right of connected wireless
router. Then, the parameter setting page of wireless network pops up (the router starts the DHCP serve
r
by defaults and recommends the use of DHCP).
6
6
.
.
2
2
E
E
n
n
t
t
e
e
r
r
t
t
h
h
e
e
C
C
o
o
n
n
f
f
i
i
g
g
u
u
r
r
a
a
t
t
i
i
o
o
n
n
I
I
n
n
t
t
e
e
r
r
f
f
a
a
c
c
e
e
o
o
f
f
3
3
G
G
W
W
i
i
-
-
F
Fi
i
R
R
o
o
u
u
t
t
e
e
r
r
Click the Safari browser and enter “http://192.168.169.1” in the address bar. Click the “Go” button and the
home page of router configuration can be accessed. See the figure below:
Besides, for users of ios equipment such as iPhone and iPad, there are quicker ways to enter the
router configuration page. We can enter the two characters “wd” in the address bar of the Safari browser
.
Then click “Go” and the configuration page can be entered.

- 8 -
6
6
.
.
3
3
H
H
o
o
m
m
e
e
P
P
a
a
g
g
e
e
o
o
f
f
C
C
o
o
n
n
f
f
i
i
g
g
u
u
r
r
a
a
t
t
i
i
o
o
n
n
I
I
n
n
t
t
e
e
r
r
f
f
a
a
c
c
e
e
o
o
f
f
R
R
o
o
u
u
t
t
e
e
r
r
:
:
F
F
u
u
n
n
c
c
t
t
i
i
o
o
n
n
D
D
e
e
s
s
c
c
r
r
i
i
p
p
t
t
i
i
o
o
n
n
o
o
f
f
C
C
o
o
m
m
m
m
o
o
n
n
O
Op
peerra
at
ti
inngg
I
In
nt
te
errf
fa
ac
ce
e
The first row of icons:
: When this icon is clicked, the configuration page of 3G can be entered.
: When this icon is clicked, multimedia files stored in the movable storage devices can be
browsed and played.
: When this icon is clicked, the security settings interface of wifi can be entered to finish the
change of wifi password.
: When this icon is clicked, the advanced settings interface of the router can be entered to
realize more functions settings of the router such as firmware upgrades and status view.
The second rows of icons:
: Click this icon and the setting interface of dynamic IP networking will pop up at the bottom
of
3G
DHCP(Auto confing)
Advanced Settings
MultiMedia Browse
Wifi Seeurity
Wifi Relay
- 9 -
the page. If you now get access to internet through cable (such method is often used in hotels) and the IP
address is assigned by the router at the upper level, please click “Ok” to finish the settings. Otherwise
,
click “Cancel”.
: Click this icon and the setting interface of PPPoE dial-up networking will pop up at the
bottom of the page. If you now get access to internet through cable or telephone dialing, please first ente
r
the user name and password of PPPoE dial-up. Then click “OK” to finish the settings. Otherwise, clic
k
“Cancel”.
: Click this icon and the setting interface of static IP networking will pop up at the bottom of the
page. If you now get access to internet through cable and the IP address is assigned manually, please
enter the IP address, mask code, gateway and address of DNS domain name respectively into each
column. Then click “Ok” to finish the settings. Otherwise, click “Cancel
”.
6
6
.
.
4
4
C
C
h
h
a
a
n
n
g
g
e
e
o
o
f
f
W
W
i
i
-
-F
Fi
i
P
P
a
a
s
s
s
s
w
w
o
o
r
rd
d
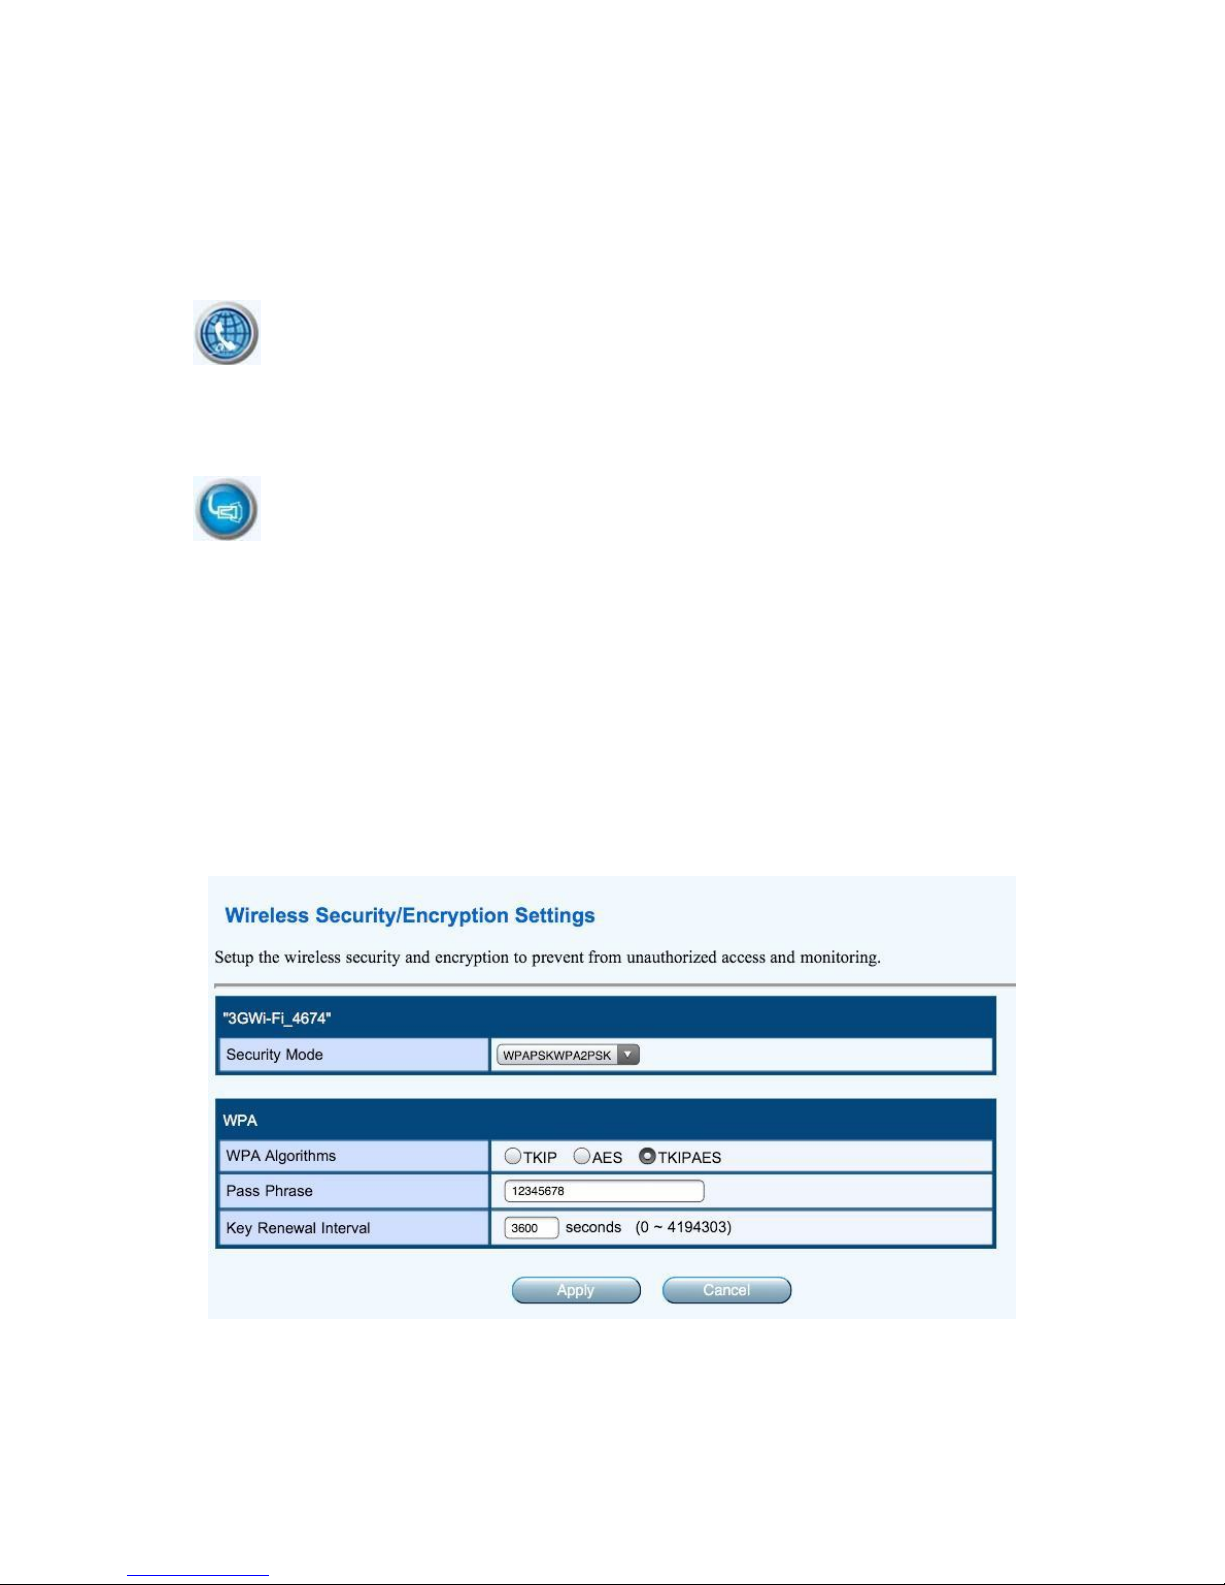
The wifi password of factory setting of router is simple. Remember to change the password of wifi
during first use of this product to ensure the security of the data,because the initial password is simple.
Method:
Click the “Wifi security” icon to enter the wifi security settings page.
Prompt
:
a) In order to ensure your wireless network will not be accessed by unauthorized person, it is suggested
that wireless encryption be set. The recommended encryption method is W PA-PSK/WPA2-PSK.
b) After wireless network SSID and encryption settings, please reconnect the router. The Wifi password

- 10 -
is the newly set one.
6
6.
.5
5
S
Se
et
tt
ti
in
ngg
o
of
f
3
3G
G
N
Ne
et
tw
w
o
or
rk
k
P
Pa
ar
ra
am
me
et
te
er
r
When the user inserts the 3G usb dongle into the USB interface of the router, the router will
automatically begin dialing up progress.
During 3G dial-up, some configuration information needs to be invoked. Please configure such
information in 3G configuration page before the 3G wireless network card is inserted.
Click “3G” icon to enter the 3G setting interface. During dial-up settings, select the dial mode. Enter
the dial parameters provided by 3G ISP and click “OK”. The default mode is automatic identification model,
i.e. plug and play and does not need to be changed
.
Normally, if SIM card in the 3G usb dongle is provided by ISP of Chinese mainland, so it is no
t
necessary to change settings in the 3G configuration page. See the figure below:
The default dial parameter of such machine only applies to the 3G operators in Chinese mainland.
For Hong Kong, Taiwan and other countries, the parameters provided by the local ISP will prevail.
Therefore, users not from Chinese mainland need to set the dial parameters on the 3G setting interface
from “default” to “user-defined”. Then they should, on the displayed setting interface, continue to fill ou
t
information such as the dial number, APN user name and password provided by the local ISP, and finally
click “Ok” to finish the settings. See the figure below:
In general, the user only needs to select “Auto Detect” as the model of USB 3G dongle on the interface
shown in the figure above, to automatically set information such as dial number, APN user name and
password. In this way, you only need to connect the 3G network card and USB interface of router to finish
3G dial-up.
Note:
- 11 -
We can not rule out the possibility that: the types of 3G usb network cards able to be supported
currently might not be able to be supported by such equipment in the future due to the manufacturers’
adjustment of the internal parameters of the products.
6
6
.
.
6
6
.
.
S
S
e
e
t
t
t
t
i
i
n
n
g
g
o
o
f
f
W
W
i
i
r
r
e
e
d
d
B
B
r
ro
o
a
a
d
d
B
B
a
a
n
n
d
d
N
N
e
e
t
t
w
w
o
o
r
r
k
k
P
P
a
a
r
r
a
a
m
m
e
e
t
t
e
e
r
r
s
s
Under the wired to W iFi mode, 3GW I-FI is equal to a wireless router and the Ethernet interface
serves as the WAN interface. All the wireless terminals can only be connected to the router through WIFI.
Click “Network Settings” and then “WAN”. Determine the networking ways according to the
broadband line at the front end. The router supports three common kinds of wired networking modes, i.e
.
static IP, dynamic IP and PPPoE.
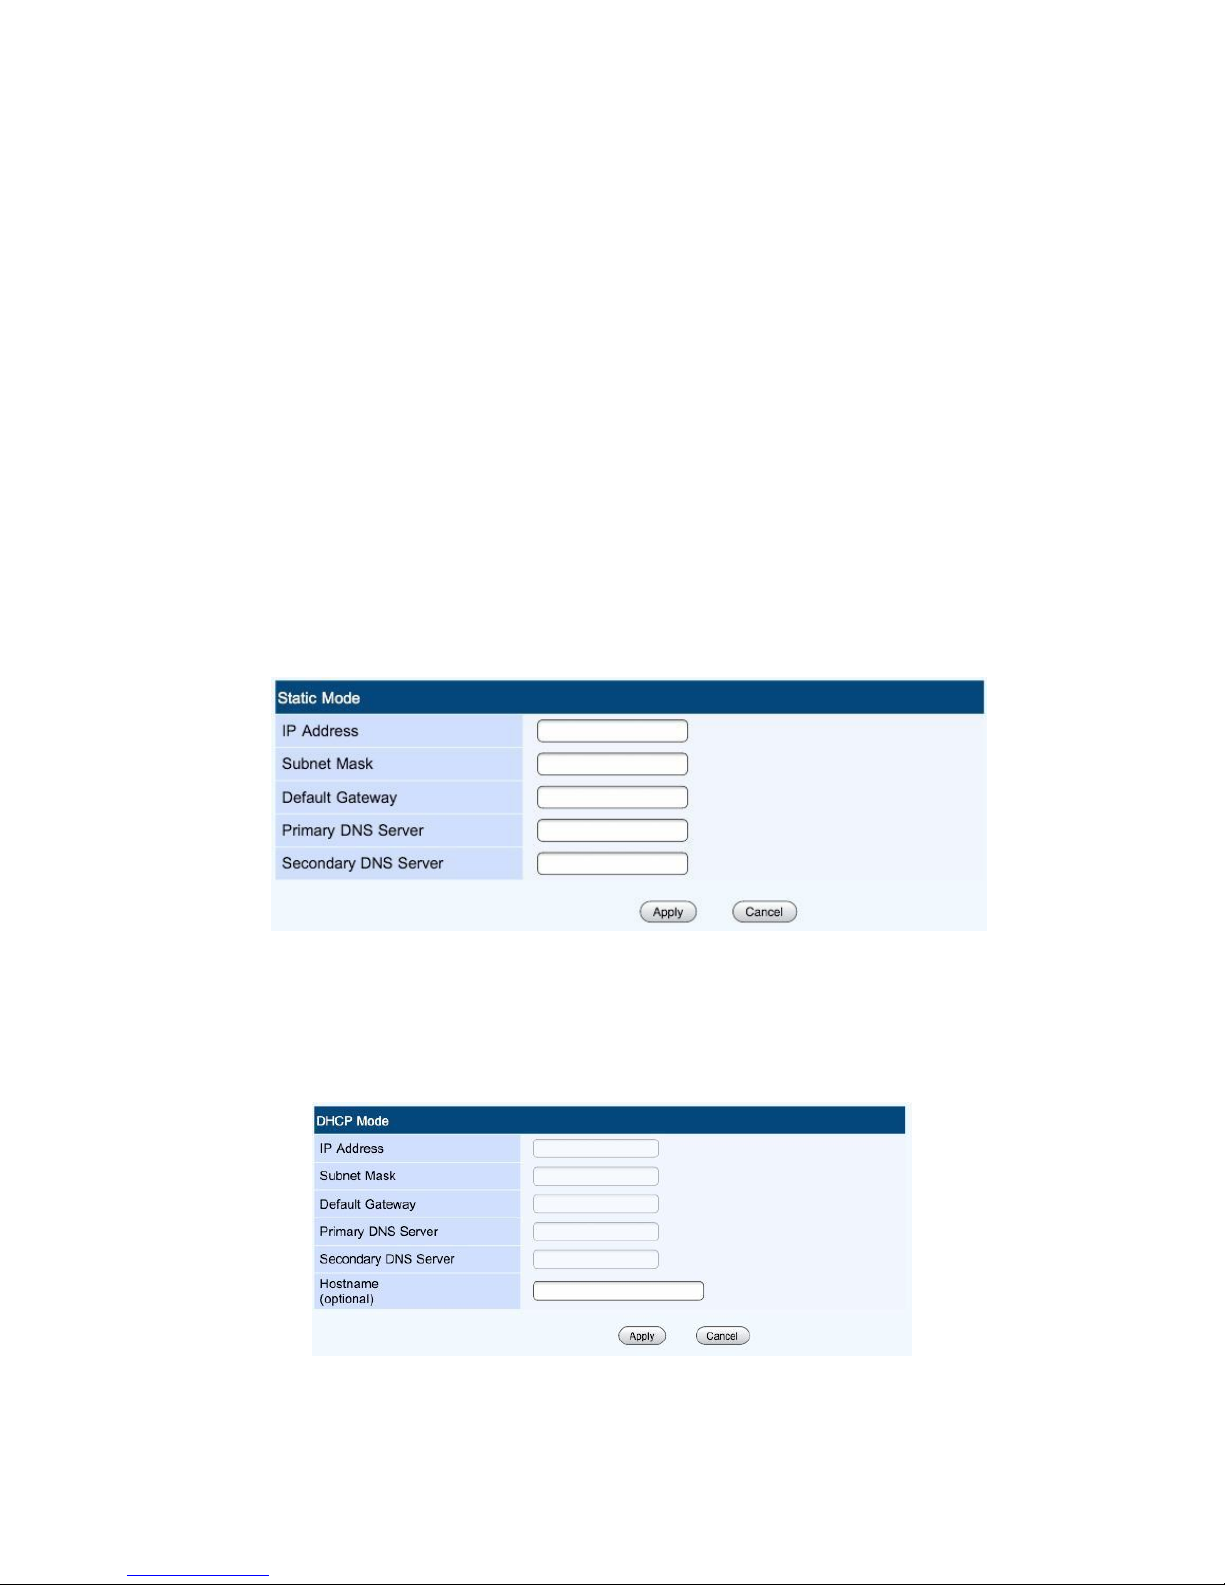
a) Static IP
If the internet accessing method offered by the network provider is static IP, you need enter the IP
address, subnet mask, gateway, as well as IP address of the primary DNS server and the IP address of
the secondary DNS server.
b) Dynamic IP
If the internet accessing method offered by the network provider is dynamic IP, you do not need
to set anything. Just click “Ok”. Dynamic IP is common networking method adopted by public places
such as guesthouses and hotels.
c) PPPoE
If you get access to internet through“ADSL dialing mode”, you only need to enter the account
information provided by the ISP for you in the input boxes of “User Name” and “Password”. After setting
s
are finished, click “
Ok”.

- 12 -
6
6.
.7
7
B
Ba
as
si
ic
c
S
Se
et
tt
ti
in
ngg
o
of
f
w
w
i
i
f
fi
i
W
Wi
ir
re
el
le
es
ss
s
N
Ne
et
tw
w
o
or
rk
k
Click the menu bar on the left, “Wireless Network Setting”, and then “Basic Setting”. You can then
perform basic wireless network setting such as network model, SSID and wireless channel.
6
6.
.8
8
F
Fi
irrm
mw
w
a
ar
re
e
U
Up
pg
grra
ad
de
es
s
o
of
f
W
Wi
ir
re
el
le
es
ss
s
R
Ro
ou
ut
te
er
r
Routers support firmware upgrades through browser. By upgrading firmware, you enable the
products to get new application functions.
The firmware can be upgraded through the following two methods:
1) Firmware upgrades through L
AN
Upgrade of firmware through this method can only be realized on Windows PC and laptop. The
operating steps are as follow
s:
Firstly, please connect your W indows PC or laptop to 3GWi-fi router via wireless interface,
Next, Click “Browse”button. Search the name of firmware to be upgraded in the popped file
selection dialog box. After it is found, click “Ok” to start the upgrade.
- 13 -
2) Firmware upgrades through USB storage device (U disk or SD card)
Log into the route through browser (the browser of PC, smartphone or panel computer can be used).
Select “System Management” and then “Firmware Upgrade” in the left menu and then insert the U disk/TF
containing the file to be upgraded into the router interface. At this time, click the button “scan” on the
operation interface, select the file to be upgraded from the drop down box, and finally click “Ok”.
Note:
In the process of upgrading, the operating lights of the router will flash fast constantly. When they are
flashing, try not to turn off the power of router until the operating lights of the router go out. When the
upgrading of router is finished, the router will be restarted. At this time, your wireless devices might need
to manually search such equipment again and try connecting again.
See the figure below for the specific process:
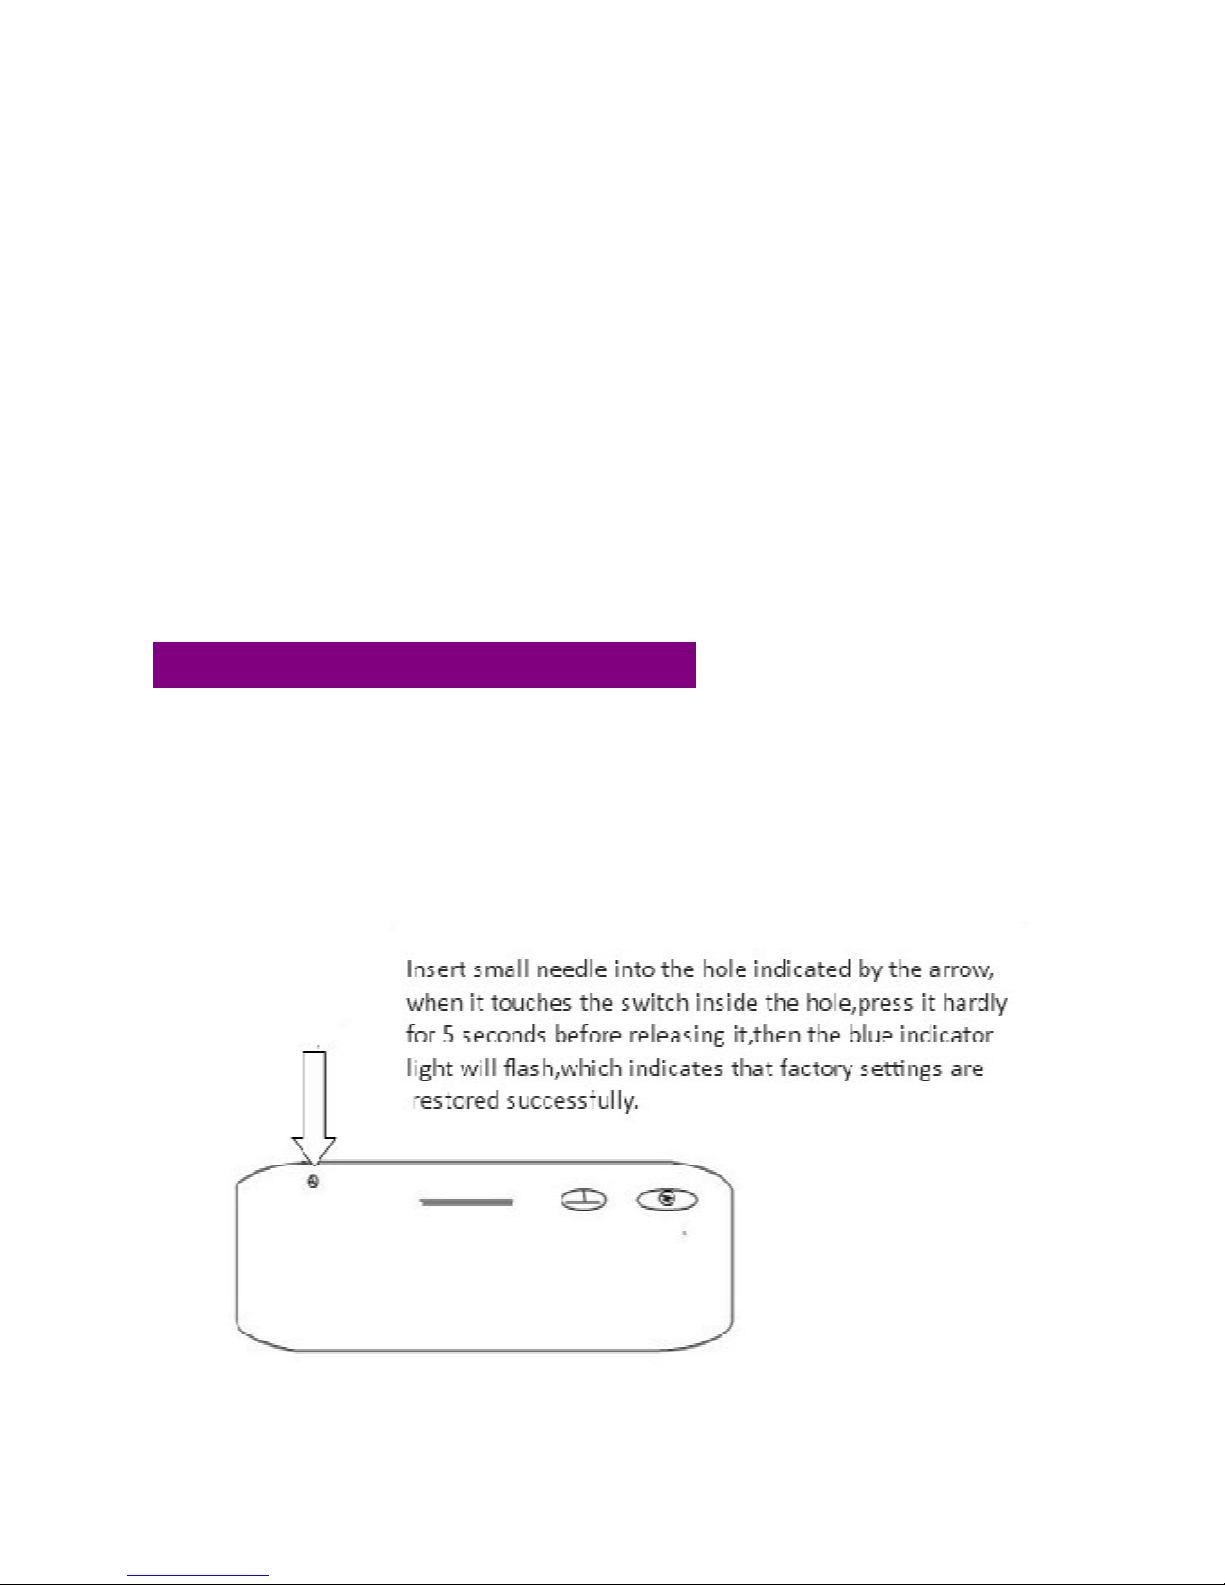
7. Restore Factory Settings of Wireless Router
After we change some parameters of the router, some usage problems might arise. For example, we
have changed the wifi password of the router. However, after a period of time, we forget the password . As
a result, we are not able to enter the password when the connection router of terminal equipment give
s
prompts. In such case, please manually restore the factory defaults of parameters of the wireless router.
The specific operating steps are as follows:

- 14 -
8. Wireless Network Storage Function: How Terminal Equipment Including iPad
Access
U Disk or Portable Hard Disk
3GWi-Fi provides a USB interface for connection with U disk or portable hard disk/card reader as wel
l
as supports the shared access to the contents of such storage devices through wireless methods. Official
and third-party streaming media software can be used to play, upgrade and download the shared files in
the USB storage device, such as WDplayer, Goodplayer, OPlayerHD, and TIOD Aceplayer.
The router provides three methods to access U disk, portable hard disk and other kinds of storage
devices. The operating steps of wireless storage access are as follows:
8
8
.
.
1
1
S
S
t
t
r
re
e
a
a
m
m
i
i
n
n
g
g
M
M
e
e
d
d
i
i
a
a
O
O
n
n
l
l
i
i
n
n
e
e
P
P
l
l
a
a
y
y
Step 1: Insert the USB storage devices such as U disk and portable hard disk into the USB interface
of the router.
Step 2: Turn on the power of the router to start the router. Observe the blue LED status indicator of
the router.
Step 3: Open the Wi-Fi setting page of ipad, select SSID of 3GWi-Fi equipment, and realize wireless
network connection (refer to the last section).
Step 4: Click the Safari browser and enter in the address bar “http://192.168.169.1” or “wd”. Click the
“Go” button. Then click the icon “Multimedia Browse” and the browse page of file in the movable storage
device of the router. Here you can get quick access to the files stored in the U disk or portable hard disk
such as pictures, videos and music.
storage 1, storage 2, etc are the names of shared folders in the U disk and portable hard disk.
8
8
.
.
2
2
i
i
o
o
s
s
c
c
l
l
i
i
e
e
n
n
t
t
A
A
p
p
p
p
l
l
i
i
c
c
a
a
t
t
i
i
o
o
n
n
The ios client application develop for 3GWi-Fi router is available on app store.
The following sections describe how to use iPad to share the files in the router FTP server.
WDPlayer is not only a local media player, but also a combination of “video player, download
- 15 -
manager and streaming media player”.As long as the shared media files are transmitted to iOS equipmen
t
through Wi-Fi, they can be played immediately.
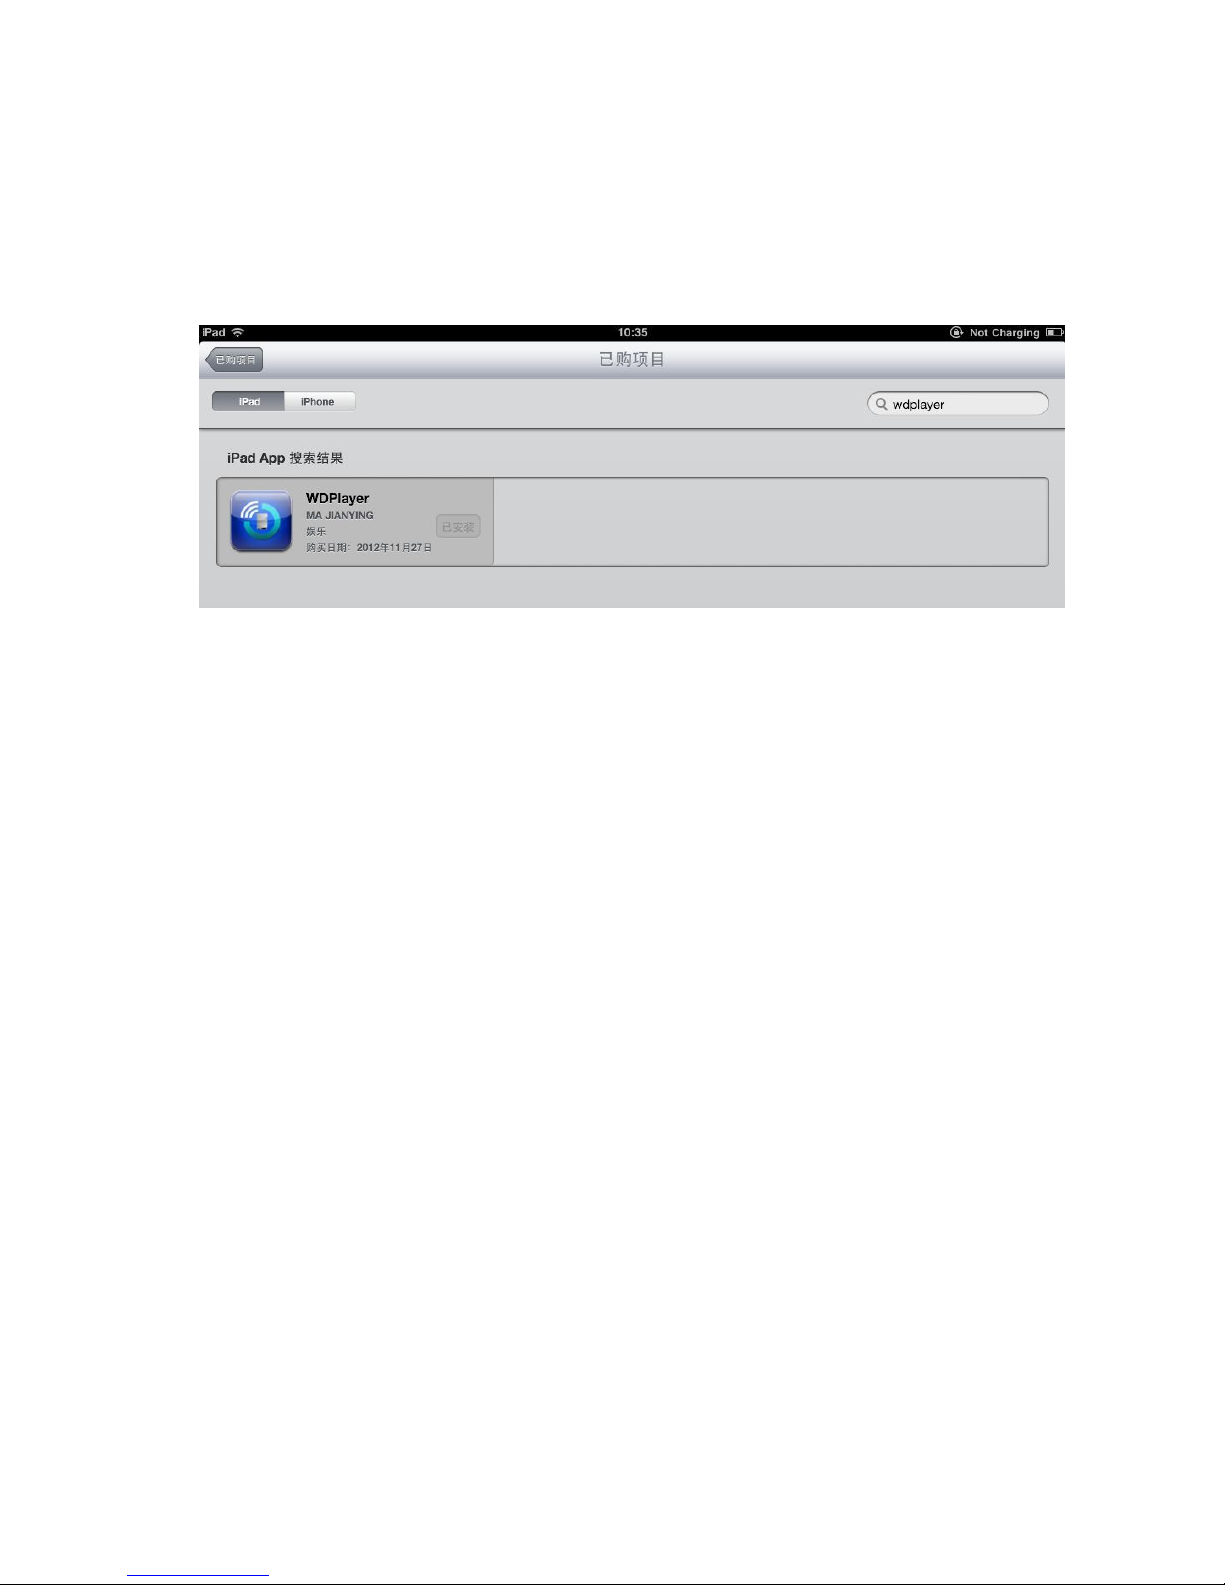
Step 1: Enter “App Store”, search “WDPlayer” program, as well as download and install it.
Step 2: Open WDPlayer, this application start to look for 3GWi-Fi device.
WDPlayer find the 3GWi-Fi device:
Step 3: Click the “Wireless Drive”blank, it will list the share content.
Prompt: If the 3GWi-Fi device enter the low battery capacity status (capacity less than 10% ), the
Application will disable wireless storage share function. See the figure below:
Pease insert the Micro-USB charge cable to this device, and charge it.
10. How Windows PC/Laptop Accesses U Disk or Portable Hard Disc via Wifi
First, please confirm that your computer has been connected to the “3GWi-fi” wireless router through
w
ireless network.
Then, double click the icon “My Computer” on the computer desktop. Enter “\\192.168.169.1” in the
address bar and press Enter key. You will see the following password hint interface.
At this time, please enter user name and password (Note: both the user name and password are
“admin” by default).
After “Ok” is pressed, the contents to be shared will appear. See the figure below.
Table of contents


