manuals.online logo
Brands
  1. Home
  2. •
  3. Brands
  4. •
  5. Fluke
  6. •
  7. IP Camera
  8. •
  9. Fluke Ti9 User manual

Fluke Ti9 User manual

QuickStart: FLUKE Ti9, Ti10, Ti25, TiRx, TiR, TiR1
© 2011 The Snell Group / 322 N. Main St. / Suite 8 / Barre, VT 05641 / 800.636.9820 / www.thesnellgroup.com
Page 1
1. MEMORY: Insert SD memory card into the slot under the rubber cover on the side of the camera.
2. POWER: The Ti25 has an internal battery, This can be charged by plugging the adapter into the camera (under
the same rubber cover). A battery life indicator is displayed in the upper left corner of the LCD screen.
3. START: Press and hold the F2 button for 1-2 seconds until you hear an audible tone signaling camera startup.
Swing the attached lens cover up and lock in the open position on the top of the camera.
The LCD display will turn on and you will see the default start up screen (as above) showing a live
infrared image.
To turn the camera off hold the F2 button until an audible tone signals it is powering down.
4. AUTO ADJUST: (Level and Span) The default start-up mode is auto adjust and “Auto” is displayed in the upper
right corner of the LCD screen.
5. FOCUS: Focus by slowly manually rotating the focusing ring on the infrared camera lens. You may need to use
auto adjust again after focusing.
F1 F2 F3
(On/Off)
Range Indicator
Level and Span
Indicator
Memory Card Slot
Power/Charge
IR Focusing Ring
Trigger
(pause image)
Visual
Camera
(Ti10, Ti25, TiR,
TiR1 only)
Speaker
Microphone
Backlight
Battery Life
Indicator Auto/Manual
Mode Indicator
Lens Cover
(Swing up and lock)
QuickStart: FLUKE Ti9, Ti10, Ti25, TiRx, TiR, TiR1
© 2011 The Snell Group / 322 N. Main St. / Suite 8 / Barre, VT 05641 / 800.636.9820 / www.thesnellgroup.com
Page 2
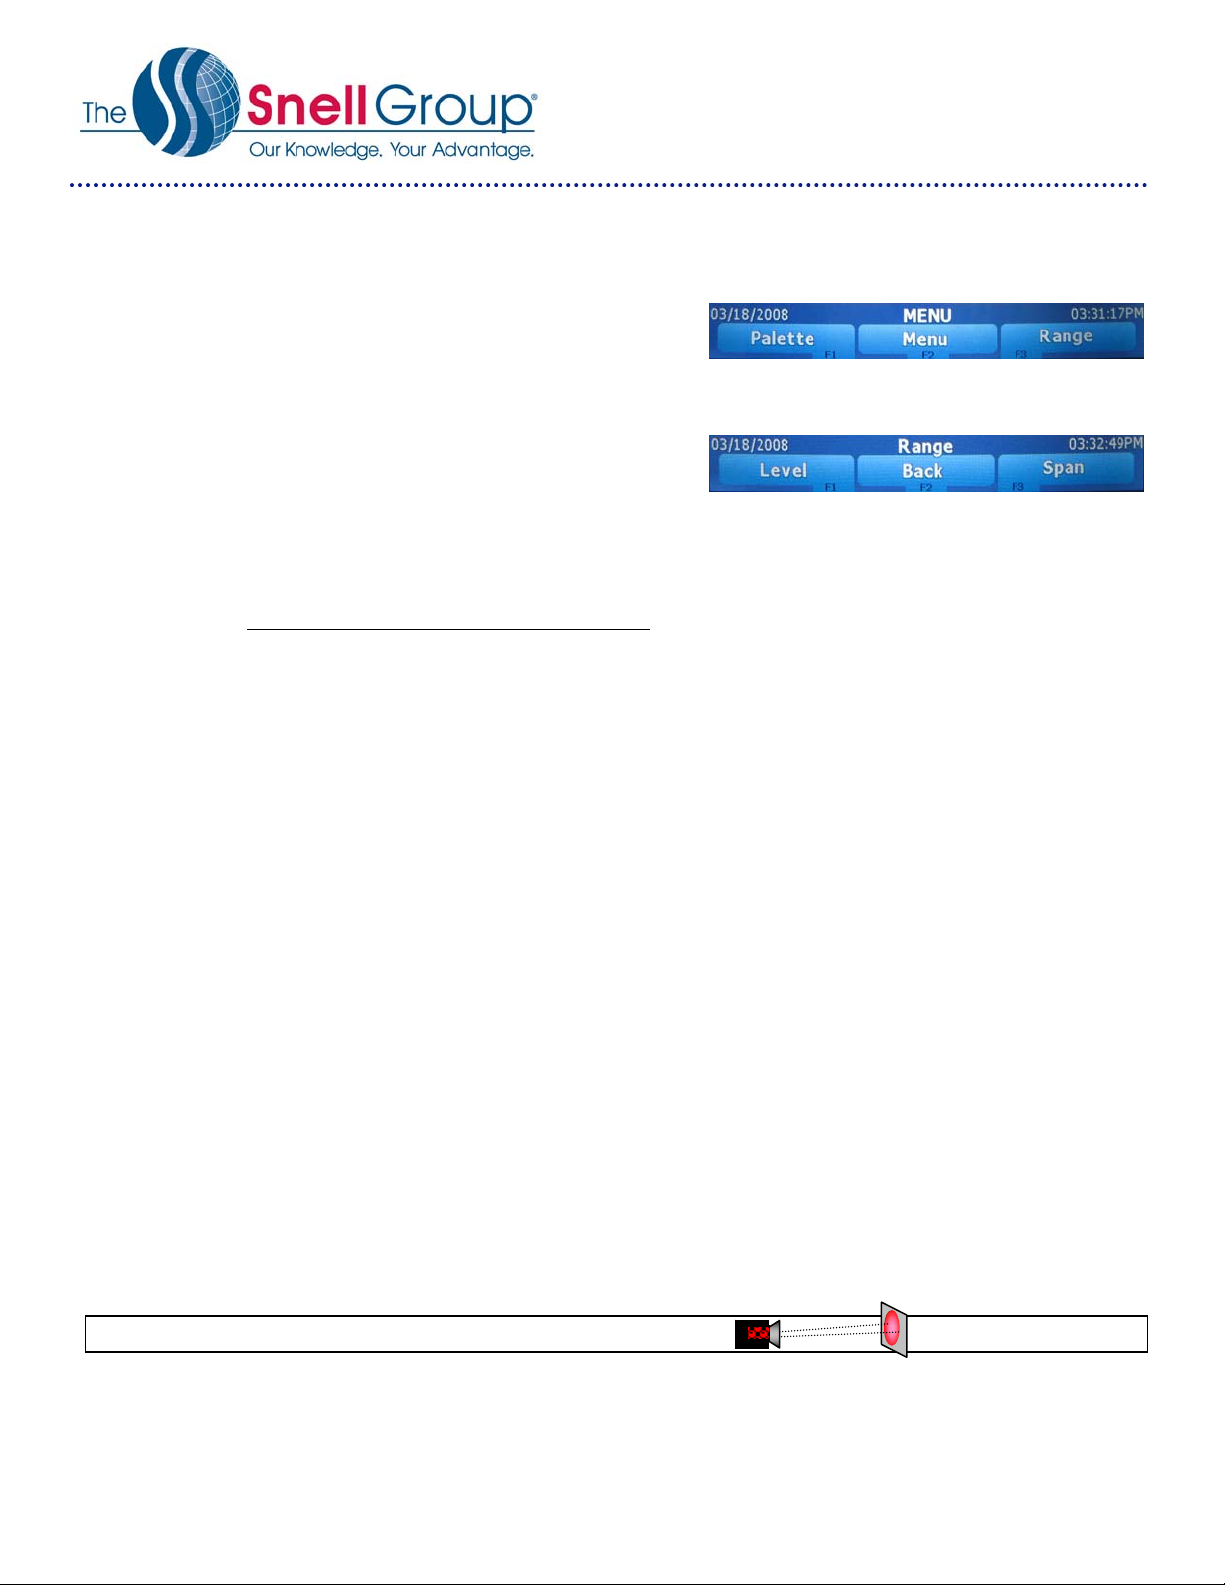
6. MANUAL ADJUST: (Level and Span) From the default
start-up screen push F2 twice until [Palette] [Menu] [Range]
appears in the lower portion of the LCD screen.
Press F3 [Range] to display [Manual] above the F1 button.
Press F1 [Manual] to display [Level] [Back] [Span].
Note: the Mode indicator now displays “Manual”
at the upper left corner of the LCD screen.
Press F1 [Level] to display the Level adjustment
screen [Up] [Back] [Down].
Press F3 [Span] to display the Span adjustment screen [Increase] [Back] [Decrease].
You can now use all menu items in Manual mode until you return to the Range menu and push the F3
[Auto] button.
NOTE: For later models of the Ti10, Ti25, TiR & TiR1
Fast Auto/Manual Toggle:When NOT in a menu mode, press the [F1] button for ½ second to toggle
between Auto and manual.
Fast Auto Rescale:While in manual mode, and NOT in a menu mode, press the [F3] for ½ second for a one
time auto rescale of level and span. The camera will power up in the same mode (auto or manual) that it was
in when powered down.
7. PAUSE IMAGE: Pause or Freeze the image by momentarily pressing the front Trigger. (If this is not an image
you desire to save, abort the saved image by pressing the trigger button again and return to a live image.)
8. SAVE IMAGE: To save an image first pause the image as above which also displays the Image Captured
menu. To save the displayed image press the F1 [Store] button.
9. CHANGE PALETTE: From the default start-up screen push F2 twice until [Palette] [Menu] [Range] appears in
the lower portion of the LCD screen.
Press F1 [Palette] then F1 [Up] or F3 [Down] to scroll through the six available palette choices.
10.EMISSIVITY:(Ti25 & TiR1 only)Press F2 twice until [Emissivity] appears in the lower portion of the LCD screen
Press the corresponding F key, now emissivity can be set directly as a value or selected from a list of
emissivity values for some common materials.
11.BACKGROUND TEMP:(Ti25 & TiR1 only)Press F2 twice until [Background] appears in the lower portion of
the LCD screen
Press the corresponding F key.
Now press F1 [Up] or F3 [Down] to raise or lower the reflective background temperature value.
Ti9, Ti10, Ti25, TiRx, TiR, TiR1
IFOV =2.5 mRad (Theoretical with 160x120 Detector and standard 23˚x17˚lens) Detect 1in. target @ 33ft.

Other manuals for Ti9

2

This manual suits for next models

5

Other Fluke IP Camera manuals

Fluke Ti400 User manual

Fluke

Fluke Ti400 User manual

Fluke Ti27 User manual

Fluke

Fluke Ti27 User manual

Fluke Ti30 User manual

Fluke

Fluke Ti30 User manual

Fluke VT02 User manual

Fluke

Fluke VT02 User manual

Popular IP Camera manuals by other brands

Abus TVAC19000A user guide

Abus

Abus TVAC19000A user guide

Prestel 4K-F4U3 user manual

Prestel

Prestel 4K-F4U3 user manual

Nexcom NCr-312-OVR user manual

Nexcom

Nexcom NCr-312-OVR user manual

JK Audio BluePack user guide

JK Audio

JK Audio BluePack user guide

FLIR FC-Series R installation manual

FLIR

FLIR FC-Series R installation manual

Carrera RC 370503025 Assembly and operating instructions

Carrera RC

Carrera RC 370503025 Assembly and operating instructions

Foscam FI8916W Quick installation guide

Foscam

Foscam FI8916W Quick installation guide

Creative VF0820 user guide

Creative

Creative VF0820 user guide

Motorola SCOUT66 user guide

Motorola

Motorola SCOUT66 user guide

BlueStork P2P Quick install guide

BlueStork

BlueStork P2P Quick install guide

NewTek NDI-PTZ1 operating instructions

NewTek

NewTek NDI-PTZ1 operating instructions

Asoni CAM748F user manual

Asoni

Asoni CAM748F user manual

Panasonic HomeHawk SHELF Information and troubleshooting guide

Panasonic

Panasonic HomeHawk SHELF Information and troubleshooting guide

Nace IP-NC328-VDZ quick start guide

Nace

Nace IP-NC328-VDZ quick start guide

ZMODO Snap PT quick start guide

ZMODO

ZMODO Snap PT quick start guide

Logipix LOBJ-05P installation guide

Logipix

Logipix LOBJ-05P installation guide

deXlan IP CAMERA 050862 user manual

deXlan

deXlan IP CAMERA 050862 user manual

Infinova V6812IR-H0 Series user manual

Infinova

Infinova V6812IR-H0 Series user manual

manuals.online logo
manuals.online logoBrands
  • About & Mission
  • Contact us
  • Privacy Policy
  • Terms and Conditions

Copyright 2025 Manuals.Online. All Rights Reserved.