Fly Kan Z-CUG01 User manual


Dual Port PCI Express Gigabit Ethernet
Adapter
English
Model No.: Z-CUG01
The Z-CUG01 PCI Express Dual Port Gigabit Network Card lets you add two gigabit Ethernet ports to
a desktop computer through a single, four-lane (x4 or higher) PCI Express slot. Each port is fully
compatible with IEEE 802.3/u/ab standards, for 10/100/1000 Mbps auto-negotiation.
This 2-port GbE network card is based on the high-performance Intel® I350 chipset, which offers
several advanced driver options including IEEE 802.3ad link aggregation / teaming support,
enabling you to add additional bandwidth to your system. Support for Jumbo Frames, full-duplex
operation and 802.1q VLAN tagging also aid in creating an efficient network configuration.
Also useful for virtualization applications or setting up a dual-homed host configuration, this
dual-port network card lets you accommodate several complex network scenarios, to meet your
business needs. For added versatility, the controller card is equipped with a standard profile
bracket and includes a low-profile / half-height bracket for installation in small form-factor
computers.
Delivery content
•1 x 2 Port Network Card
•1 x Driver CD
•1 x Instruction Manual
System Requirements
•Available PCI Express x4 or higher (x8, x16) slot
•Windows® 10 / 8 / 7
•Linux 2.4.x/ 2.6.x
Up-to-date operating instructions
Download the latest operating instructions from our website www.fly-kan.com.com or scan the
printed QR code.

Installation
Install the Intel Ethernet Adapter
WARNING! PCI Express cards, like all computer equipment, can be severely damaged by
static electricity. Be sure that you are properly grounded before opening your computer
case or touching your PCI Express card. We recommend that you wear an anti-static strap
when installing any computer component. If an anti-static strap is unavailable, discharge
yourself of any static electricity build-up by touching a large grounded metal surface (such
as the computer case) for several seconds. Also be careful to handle the card by its edges
and not the gold connectors.
Installing an Adapter
1. Turn off the computer and unplug the power cord. If performing a "hot plug" install, see your
server documentation first.
2. Remove the computer cover and the adapter slot cover from the slot that matches your adapter.
You may utilize a slot that is longer than your adapter’s connector with no harm, but do not
attempt to install in a slot that is shorter than the connector.
3. Firmly place the adapter into the slot and secure the bracket.
4. Replace the computer cover. Plug in the power cord.
Install the Drivers
Microsoft* Windows* Operating Systems
Installing drivers requires administrator rights to the operating system. See the System
Requirements page in the Adapter Guide for supported operating systems.
The card may auto-install using native drivers, however it is recommended to use the
procedure below to update to the latest version and have access to advanced features.
The adapter will be detected as new hardware when Windows starts. To install the correct driver:
1. Download the latest driver package from http://support.intel.com
Confused about what to download?
Automatically detect and update your drivers and software with the Intel® Driver & Support
Assistant.
2. If the Found New Hardware wizard starts, press the Cancel button.
3. Choose the appropriate driver for your version of windows and double-click to run the installer.

4. Choose the driver options you would like installed and follow the on-screen instructions to
complete the installation.
Verifying Installation
Windows
1. Open the Device Manager by right-clicking on Computer, and then select Manage. In the new
Computer Management window, select Device Manager from the left window panel (For Windows 8,
open the Control Panel and select Device Manager).
2. Expand the “Network Adapters” section. On a successful install, you should following devices in
the list with no exclamation points or question marks.
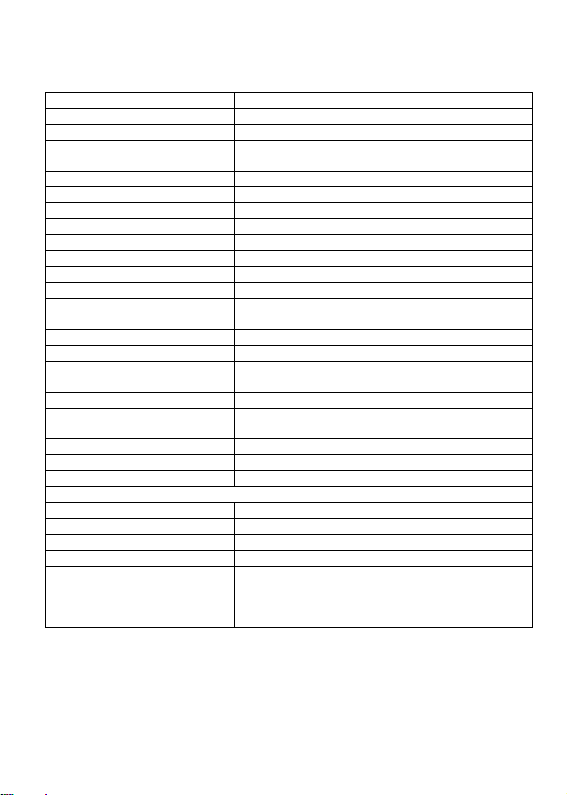
Technical Specifications
Bus Type PCI Express
Card Type Standard Profile (LP Bracket Is An Option)
Chipset ID Intel
–
i350-AM2
Industry Standards IEEE 802.3, IEEE 802.3u, IEEE 802.3ab
PCI Express Base Specification 2.1
Interface RJ45 (Gigabit Ethernet)
Port Style Integrated on Card
Ports 2
Auto MDIX Yes
Compatible Networks 10/100/1000 Mbps
Full Duplex Support Yes
Jumbo Frame Support
9K max.
Maximum Data Transfer Rate 2000 Mbps (full-duplex), 1000 Mbps (hal
f
-duplex)
Supported Protocols IEEE 802.3ad (link aggregation), IEEE 1588 (time sync) /
802.1AS, IEEE 802.1q (VLAN tagging)
Connector Type(s) 1 -
PCI Express x4 Male
External Ports 2 -
RJ-45 Female
OS Compatibility Windows® 7, 8, 10
Linux 2.4.x to 4.11.x LTS versions only
System and Cable Requirements Available PCI Express x4 or higher (x8, x16) slot
LED Indicators 2 -
10/100/1000 Mbps Indicator
2 - Link / Activity
Humidity 5~85% RH
Operating Temperature
0°C to 50°C (32°F to 122°F)
Storage Temperature -20°C to 60°C (-4°F to 140°F)
PHYSICAL CHARACTERISTICS
Product Dimension 11 X 7cm (Bracket Length not included)
Weight of Product 75g
Package Dimension TBA
Shipping (Package) Weight TBA
WHAT'S IN THE BOX
1 -
2 Port Network Card
1 - Low Profile Bracket (* Optional)
1 - Driver CD
1 - Instruction Manual
FCC Statement
This equipment has been tested and found to comply with the limits for a Class B digital device,
pursuant to part 15 of the FCC Rules. These limits are designed to provide reasonable protection
against harmful interference in a residential installation. This equipment generates, uses and can
radiate radio frequency energy and, if not installed and used in accordance with the instructions,
may cause harmful interference to radio communications. However, there is no guarantee that
interference will not occur in a particular installation. If this equipment does cause harmful
interference to radio or television reception, which can be determined by turning the equipment
off and on, the user is encouraged to try to correct the interference by one or more of the following
measures:
(1) Reorient or relocate the receiving antenna. (2) Increase the separation between
the equipment and receiver. (3) Connect the equipment into an outlet on a circuit
different from that to which the receiver is connected. (4) Consult the dealer or an
experienced radio/ TV technician for help.
This device complies with part 15 of the FCC Rules. Operation is subject to the following two
conditions: (1) This device may not cause harmful interference. 2) This device must accept any
interference received, including interference that may cause undesired operation.
Any changes or modifications not Expressly approved by the party responsible for compliance could
void the user’s authority to operate the equipment.
Disposal of Old Electrical & Electronic Equipment (Applicable in the European Union and other
European countries with separate collection systems).
This symbol on the product or on its packaging indicates that this product shall not be
treated as household waste. Instead it shall be handed over to the applicable collection
point for the recycling of electrical and electronic equipment. By ensuring this product
is disposed of correctly, you will help prevent potential negative consequences for the
environment and human health, which could otherwise be caused by inappropriate waste handling
of this product. The recycling of materials will help to conserve natural resources. For more
detailed information about recycling of this product, please contact your local Civic Office, your
household waste disposal service or the shop where you purchased the product.
The product carries the CE Mark
This is a class B product. In a domestic environment, this product may cause radio
interference, in which case the user may be required to take adequate measures.

JOIN FLY KAN
AS DISTRIBUTOR
AS RESELLER
Please feel free write to your Distributor / Reseller Willing to
Support / Unterstützung / Soporte / Supporto /サポート
EN: For warranty information, go to:
DE: Garantieinformationen finden Sie unter:
ES: Si desea obtener información sobre la garantía, visite:
FR: Pour consulter les informations sur la garantie, visitez:
IT: Per informazioni sulla garanzia, accedere a:
JP: 保証情報については、次のEmail にメールをお書きください。
Manufacturer / Hersteller/ Fabricante
Fabricant / 製造者
Fly Kan Tech Co., Ltd (HK)
W: www.fly-kan.com

Table of contents
Other Fly Kan Adapter manuals


