flying eagle Fys-13 User manual
1
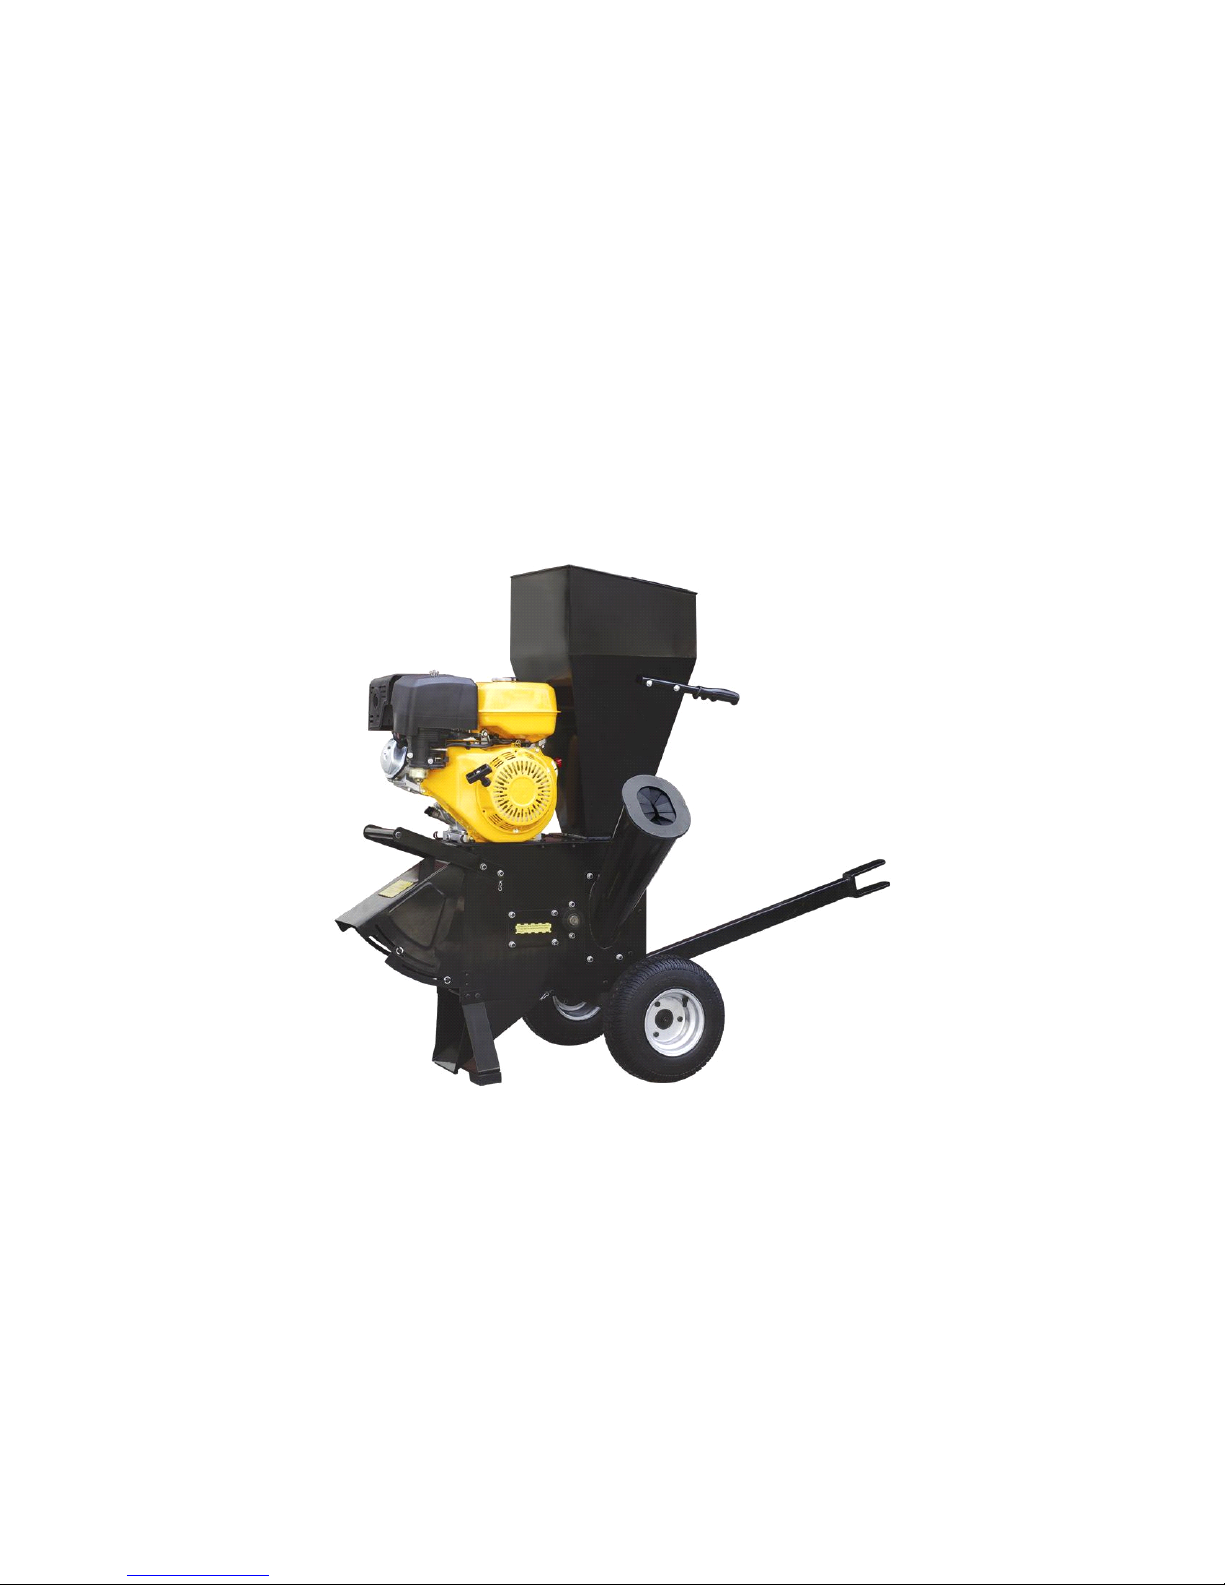
FYS-13 FYS-13L
POWERFUL SHREDDER
OWNER ’ S MANUAL

2
To
operator:
Thank you for buying Shredder Fys-13 and Fys-13 L.
This owner
’
s manual is considered a part of shredder and should be always with
the shredder. Please make sure to read and follow all instructions in this manual
before attempting to operate this machine.
WARNING
This symbol points out important safety instructions, which if not followed, may
result in personal injury. When you see the symbol, please read the instructions
carefully.
1. Understand and follow the instructions on the machine and in the manual before
attempting to assembl
e
or operate the machine. K eep this manual in a safe place for
future and regular reference and for ordering replacement parts.
2. Never allow children under 16 years old to operate this machine. Never allow
adults to operate this machine without proper instruction.
3. Keep bystanders, helpers, pets, and children at least 10m from the machine while
it is operation. Stop the machine if someone enters.
4. Be familiar with all the controls and their proper operation.
5. Never run an engine indoors or in a poorly ventilated area. Engine exhaust
contains carbon monoxide, an odorless and deadly gas.
6. Do not put hands and feet near rotating parts or in the feeding chambers and
discharge opening.
7. Do not put metal or stone into the machine.
8. Never wear loose clothes or long jewelry and keep your long hair under
protective headgear when operating machine.
9. Never use the machine on a slope or hard smooth floor.
II. Assemble Instructions
3
Unpack and check contents.
Remove all the items from the box. If any part are missing, contact your place of
purchase at once.
Assembly should be done on a clean, level surface with a helper.
1.
Take
out the body from the box and place it on a wood shelf.
figure 1
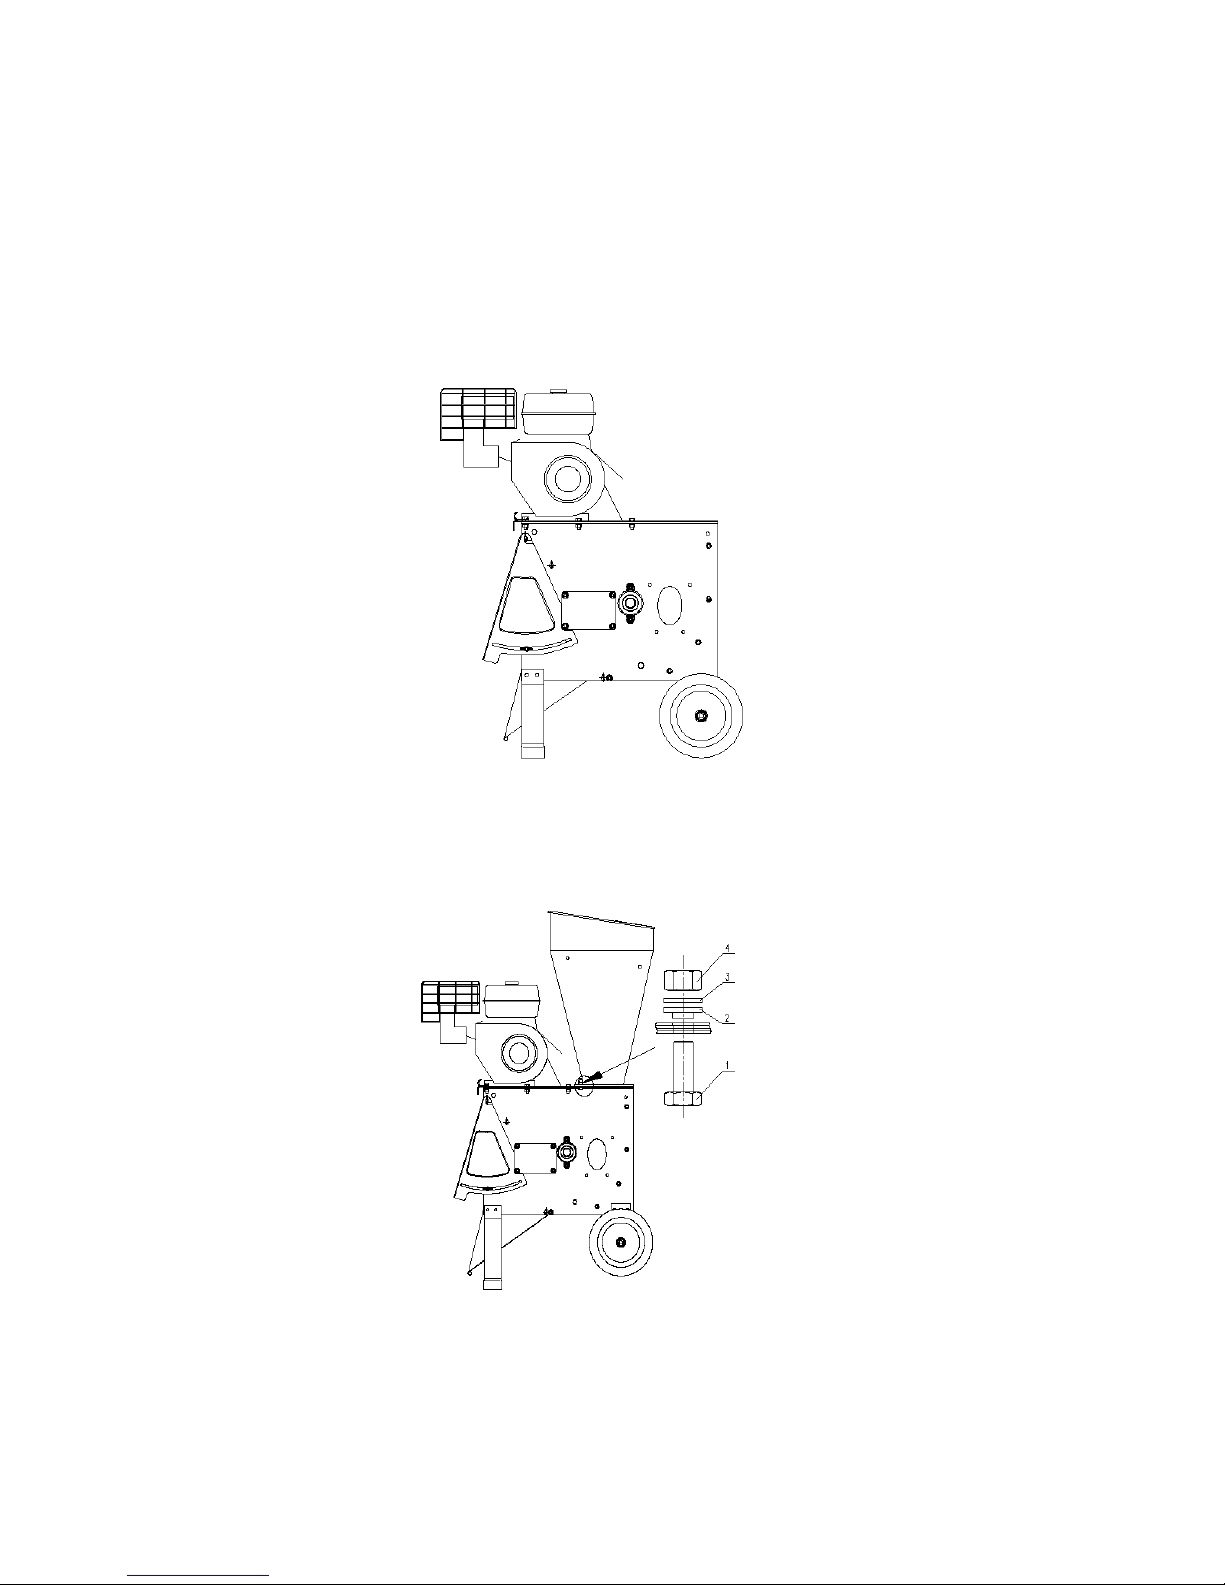
2. Attaching the funnel to the basic machine, see figure 2
figure 2
2.1. Place the big funnel on the main body.
4
2.2. Fasten the bolt 1 with washer 2,gasket 3 and nut 4.See figure 2.
2.3. Pull the discharge hopper out of the parts box and align the holes 1,2.
2.4. Attach front foot 5 , to the sideboard of the parts box and align the mounting
holes with holes 1,2.
2.5. Put the pipe spacer that was removed in step1 back in place. Insert the bolts and
secure them tightly with gasket s and nuts.
3. Attach axle brackets, axle and tires. See picture 3.
figure 3
3.1
Remove the wood shelf.
3.2 Disassemble the bolt 7 and pipe spacer.
3.3
Put the rear axle brackets in place and align the mounting hole with holes 6.7.
3.4
Insert M8*20 bolt in hole 6 from outside to inside and secure it slightly with
gasket and nut.
3.5
Reassemble the pipe spacer and the long bolt 7and secure it tightly with gasket

5
and nut. Then screw the nut tight in 6 place.
4. Attaching the chipper tube to the basic machine.
Note: The short chipping chute refers to Fys-13 and the long chipping chute refers
to Fys-13L.
figure 4
4.1. Put the chipper tube 2 in place on the side of the basic machine. Align the three
mounting holes in the flange with three holes around place 1.
4.2. Secure the flange with gaskets and nuts M8. Make sure the chipper tube has no
deflection before tighten the nuts.
5 . Mounting the discharge grid.
5.1 . Remove the thumbscrew s on both sides of the movable door and lift the door
on the highest position. Hook the grid on the axis of the door and clamp the grid
with the spring to prevent the grid falling off.

6
5.2 . Put lower part of the grid outside of lower axis in the discharge opening.
Tighten the screws M5*15 on the left and right side of discharge opening to fix the
grid.
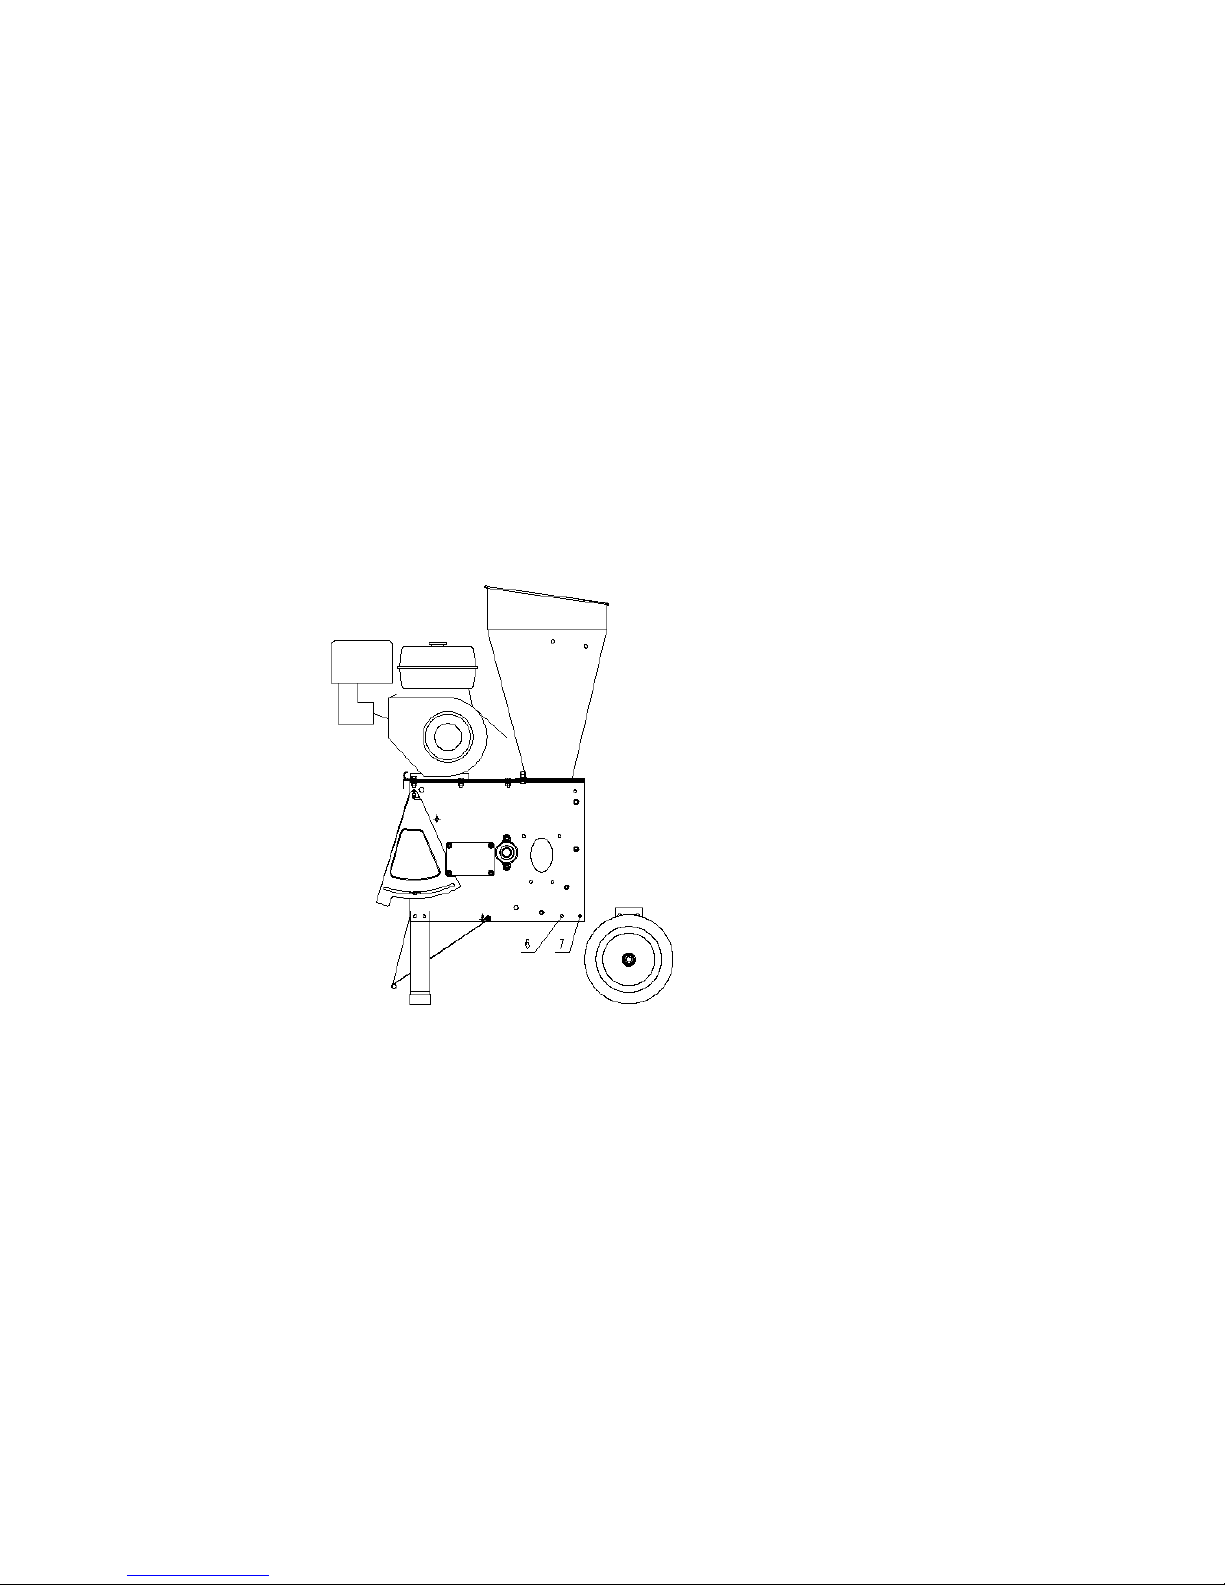
6. Mounting the two handles
7. Safety instructions for machine with bagging attachments. Cover the discharge
opening with the nylon bag and tighten the tie. When the machine is working, the
chips are collected in the bag.
8. Check all the screw, bolts, nuts and tighten them if they get loose.
9. Add fuel to engine.
9 .1. There is no fuel and oil in the new engine.
9 .2. Open the cover of fuel tank and add pure gasoline. See picture 5.Do not fill
closer than 10mm to 15mm from the top of the fuel tank.
figure 5
9 .3. Open the cover and pull the di p stick out. See picture 6. Gasoline 10W-30 and
5W-30 are available . Do not fill closer than 10mm to 15mm from the top of the
fuel tank.

7
figure 6
9. 4 . Refer to “ starting the engine ” for the instruction of adding fuel.
III.
III.
III.
III. Safety
Safety
Safety
Safety Instruction
Instruction
Instruction
Instruction s
s
s
s
i. Training
Make sure you fully understand the owner
’
s manual before attempting to operate
the machine.
ii. Preparation
1. P ut the machine securely on a level surface .
2. Keep the operator area clear of other objects.
3. Wear ear protection, safety goggles and gloves while operating the machine.
4. Examine the machine ensure its in good condition, check all the screws, nuts
and other fasteners are properly secured and the screen is in place. Replace
unreadable labels.
5. Attaching the chip collection bag. See page 10.
6. Pay more attention while handling fuels. They are flammable and the vapors are
explosive. The points below should be followed.
---Never remove the fuel cap or add fuel with a power source running . Stop
engine, allow engine and exhaust components to cool before refueling.

8
---Never add fuel to the machine indoors.
---Do not smoke while adding fuel.
---Never refuel or store the machine in a place where there is open flame, spark
or other ignition object.
---Do not attempt to start the power source if fuel is spilled . W ipe away the
spillage and put it far away from the area before starting the machine.
---Always make sure the fuel cap is securely tightened and replace before starting .
---If the fuel tank needs to be drained, it should be done outdoors.
7. The starter handle is located on the engine. Pull the starter handle to start the
engine. Check the machine is in proper working condition after starting engine.
8. Chipper chute — allow twigs and small branches up to 4 ” in diameter to be fed
into the impeller for chipping.
9. Chip p ing funnel — allow leaves and small branches up to 1/4 ” diameter to be
fed into the funnel for chipping and shredding.
10. Lawn tractor or
ATV
trailer hitch — to be used for towing
by
lawn tractors or
ATVs
at speeds below 20kmh.
iii. Operation
1. Make sure the plastic cover on upper hopper is closed when your shredder is
running. Flying chips are very hazardous.
2 . Use a rough wooden stick to push the material in to the feed hopper. Do not
use your hands or metal tools.
3. Keep your face and body away from the feed intake opening.

9
4. Do not allow hands or any other parts of the body or clothing inside the feed
hopper, discharge chute, or other rotating parts.
5. Be aware of the hot muffler, when the machine is in operation touching the
muffler will cause burns.
6. Keep proper balance and footing at all times. Do not overreach. Never stand at
a higher level than the base of the machine when feeding material into it.
7. The operator should be extremely careful that pieces of metal, stone, glass or
other foreign objects are not put into the intake opening together .
8. Please check if there is an abnormal noise or shaking of the machine. If so,
please turn off engine immediately and solve the problem. Please inspect for
damage; check for and tighten any loose part; have damaged parts replaced or
repaired with parts having equivalent specifications.
9. Big branches are fed comparatively slowly and branches larger than the yellow
ring on hopper can
’
t
be put into the machine.
10. Do not allow processed material to build up in the discharge zone; this may
prevent proper discharge and can result in kickback of material through the
feed intake opening.
11. If the machine becomes clogged, shut-off the power source before clearing
the debris. Keep the power source clear of debris and other accumulations to
prevent damage to power source or possible fire.
12. Never put something on the cover of hopper in case it may fall into the
machine.

10
1 3 . Make sure the opening of the chipping tube is always covered while not at
work in case children place their hands into the tube.
14 .
To
move the machine, firmly hold the handle with both hands, step on the
shaft on the rear wheel with one foot, lift the front of machine, pay attention to
center of gravity of machine, walk slowly forward, backward or turn around.
15. Before operating the machine, please check the direction of the wind to avoid
working downwind of exhaust .
16. Keep all guards and deflectors in place and in good working condition.
17. Muffler and engine become hot and can cause a burn. Do not touch.
18. Turn off machine before transport the machine.
19. Do not tilt the machine while the engine is running .
IV.
IV.
IV.
IV.
Maintenance
Maintenance
Maintenance
Maintenance and
and
and
and storage
storage
storage
storage
1. When the machine needs servicing, inspection, or storage, or to replace a part ,
turn off the engine, make sure all the moving parts are completely stop ped and
allow the machine to cool before making any inspections, adjustment etc.
2. Store the machine where fuel vapors will not reach an open flame or spark. If
the machine is stored for a long time, drain the fuel out of the machine. Make
sure the machine is cool before storing.
3. When the cutting blades need servicing, remove them manually when the
machine is stopped .
V.
V.
V.
V.
Additional
Additional
Additional
Additional safety
safety
safety
safety instructions
instructions
instructions
instructions for
for
for
for machine
machine
machine
machine with
with
with
with bagging
bagging
bagging
bagging attachment
attachment
attachment
attachment
Before attaching or removing the bag, the engine should be shut off. Cover the

11
discharge opening with a fabric bag and tighten the cord in the mouth of the bag .
When the machine is working, all the chips are collected in the bag.
Y
ou may
take another way to deal with the chips.
VI.
VI.
VI.
VI. Wood
Wood
Wood
Wood Shredder
Shredder
Shredder
Shredder operation
operation
operation
operation
Branch chipping
1. Long branches like sunflower stems, corn stems and tree branches etc are fed
into the side chipping tube for chipping by the rotating blade.
2. Some side shoots and branches may have to be trimmed from the main stalk
before chipping.
3. Shorts stubs of branches may be pushed through the chipper section with the
next branch, never use your hand.
4. The l ast branch is pushed inside the tube by a tool like a wood en stick. Never
use your hand.
5. Never push the small branches by hand, use a wood stick instead.
6. When feeding branches, be certain that thicker branches are pushed slow er than
thin ones.
A
technique and understanding will be acquired to successful
ly
shred
very soon.
7. Do not allow an
y
accumulation of processed material to build up under
discharge of the shredder-chipper as this can result in clogging. Use wood tools
to clear the build up.
8. Do not put your face close to the feed hopper . This may result in injury.
9. Do not stand in front of discharge opening and never attempt to open the outlet

12
of discharge while machine is on operation.
10. Set back the cover to the side tube once finishing chipping.
VII.
VII.
VII.
VII. Leaves
Leaves
Leaves
Leaves and
and
and
and Grass
Grass
Grass
Grass Shredding
Shredding
Shredding
Shredding
1. Leaves and short stalk (bean plants), cobs, sod and similar material should be
fed into the hopper and chipped in 16 interlaced chipping lots.
2. Do not open the plastic cover when adding more material.
3. If t he leaves and similar material proves difficult to enter the hopper, use a
wooden stick to push them in , instead of by hand , or other metal bars.
4. Keep your face and body away from the feed hopper to avoid being struck by
any material that may bounce back.
5. The discharge area is easily clogged if the material is moist. Always stop the
engine before clearing build-up with wood tools. Never use your hand or foot.
6. Never attempt to clear an accumulation of processed material when engine is
still on operating .
7. For the processing of organic garden mulch complete the following:
Put the discharge towards a wall, large board or other obstruction. Open the
discharge door and remove the screen to allow the processed material pile up.
With a garden spade feed this material into the shredder until it reaches the
consistency you want.
Keep pet s and bystander s away from the discharge area while the machine is in
operation. Set the screen back to the place and close the discharge door when
shredding is finished.

13
VIII.
VIII.
VIII.
VIII. Sharpen
Sharpen
Sharpen
Sharpen the
the
the
the blade
blade
blade
blade
The c utting blade is made of special material and the blade is very sharp after heat
treatment. It may be dull after being used for some time.
Judgment for dull blade: when the chipping sound become s very ponderous and the
belt always skids while it is not loose, or feeding speed gets slow, please remove the
blade and check if it is dull.
1. Turn off the engine before remove the blade.
●Remove the board covering the blade.
●Open the small outlet of the discharge.
●Remove the discharge screen.
2. Wearing safety gloves, turn the blade tray to a proper position.
3. Remove the location screw on the two piece s of blade.
4. Sharpen the blade.
●If the blade is damaged by metal or stone or other hard objects please
sharpen the damaged area.
●Avoid changing the blade color and anneal when sharpening the blade.
●It may result in a breach on the edge if you overexert .
●Knifepoint angle should be kept in 45-40 degree.
●The two blades should retain the same weight. Vibration will occur if they

14
differ.
5. Position the blade in its location and tighten the nuts.
6. Replace the board covering the blade.
7. Replace the discharge screen.
8. Close the outlet of the discharge.
IX.
IX.
IX.
IX. Adjusting
Adjusting
Adjusting
Adjusting the
the
the
the belt.
belt.
belt.
belt.
There is a “ V ” belt under the belt guard transmitting energy from the engine to the
blade tray. The belt will be getting loose and skid after use for some time. So tension
adjustment is required.
1. Turn off the engine and remove the belt cover.
2. Loose n the four location nuts on the engine.
3. Move engine forward un til the “ V ” belt is tight.
4. Put the main pulley and affiliated pulley in the same plane. (A ruler can be used
to measure if lack of experience ). Tighten the four location holes on the engine.
5. Set the belt cover back to its place.
X.
X.
X.
X. Replace
Replace
Replace
Replace the
the
the
the belt
belt
belt
belt
The “ V ” belt need s to be replaced if it is too long or damaged.
1. Turn off the engine and remove the belt cover.
2. Remove the old belt. Pull the belt outside
by
tools and turn the pulley gradually to
remove the pulley.
Note: please mind your finger.
3. Place the new belt in the main pulley first ( “ V ” belt on engine) and then to the

15
affiliated pulley beside the blade tray.
4. The new belt is tighter than the old.
To
assemble the new one is not as easily as to
remove the old. When you hold the belt into the slot, do not put your finger
between the pulley and belt, which may result in injury.
5. Replace the belt cover.
XI.
XI.
XI.
XI. Adjusting
Adjusting
Adjusting
Adjusting the
the
the
the hammer
hammer
hammer
hammer
There are 16 hammers in the machine box, when the blades are running fast, these
hammers will forceful hit the raw material constantly until crush them into small
pieces. As the machine working for a long time, the cutting edge of the hammer will
become blunt. Then, the oper ator needs to reinstall the hammers after overturning
them 18 0 ° , let the blunt edge backward and the sharp edge forward.
When both sharp edges of one end of the hammer become blunt we can also replace
this end with the other end which is with sharp edges.
1. Turn off the engine before adjusting the hammer.
2. Open the side door of the outlet of discharge, remove the discharge screen.
3. Remove the board covering the blade.
4. Remove the upper hopper.
5. Wearing safety gloves ; turn the hammer to the upper position of one axle.
6. Turn the axle of the hammer; remove the roll pin which is at the end of the axle.
There are four roll pins and make sure take all the roll pins out of the machine.
7. Place the axle of the hammer in the middle of the board covering the blade, then
pull out the axle.
8. Place the blunt edge of the hammer to the reverse and install them to the axle.
9. When adjust the hammer well, replace the roll pins.
10. Replace the upper hopper .
11. Replace the discharge screen .

16
12. Replace the board covering the blade.
13. Close the outlet of the discharge.
S pecification of shredder chipper

17
ITEM:
Shredder chipper
FYS-13, FYS-13L
ENGINE:
T
ype of engine:
DJ390D5
Carburetor type :
S ingle cylinder,4 stroke
D isplacement:
389cc
Max. engine speed:
3600r/min
R ated input power:
7.7kw/3600r/min
Max. engine power:
8.5kw/3600r/min
S tarting mode:
R ecoil starter
F uel tank capacity:
2 .6 L
L ubricating oil tank
capacity:
1.4L
RATE:
1.74:1
Belt:
V-belt B 1092
Knife:
1 piece
C hipping capacity:
Diameter: 4 inches
M ax chipping speed:
26m
3
/h
N.W:
105kg
Carton:
860*735*1310(mm)

18
No.
Description
Qty
No.
Description
Qty
1
rubber foot
2
32
spacer(right)
1
2
leg
1
33
impeller
1
3
flat washer
many
34
key
1
4
hex nut
many
35
rear board
1
5
lock washer
many
36
engine seat
1
6
hex bolt
1
37
tool box
1
7
discharge chute
1
38
rubber gasket
1
8
movable door
1
39
hopper
1
9
tube
3
40
handles
1
10
screen
1
41
hook
2
11
side door plate
2
42
hex bolt
many
12
hitch pin
2
43
burn-proof net
1
13
door axle
2
44
clutch
1
14
spacer I
4
45
V-belt
1
15
spacer II
8
46
pulley cover
1
16
spacer III
4
47
Belt cover bracket
1
17
hammer
16
48
spacer
1
18
spacer VI
4
49
pulley
1
19
roll pin
4
50
special washer(left)
1
20
hammer axle
4
51
washer (right)
1
21
blade
2
52
box frame side
1
22
flat HD SCR
6
53
wheel tube
2
23
box frame side left
1
54
wheel axel
1
24
wheel
2
55
front handle
2
25
wheel support
1
56
handle part
2
26
blade cover plate
1
57
box holder
2
27
wire circlip 1
1
58
adjusting block
2
28
Washer (right)
1
59
hitch trailer
1
29
chipping chute
1
60
hitch pin
2
30
bearing seat
2
61
adjusting bolt
2
31
ball bearing
2
62

19
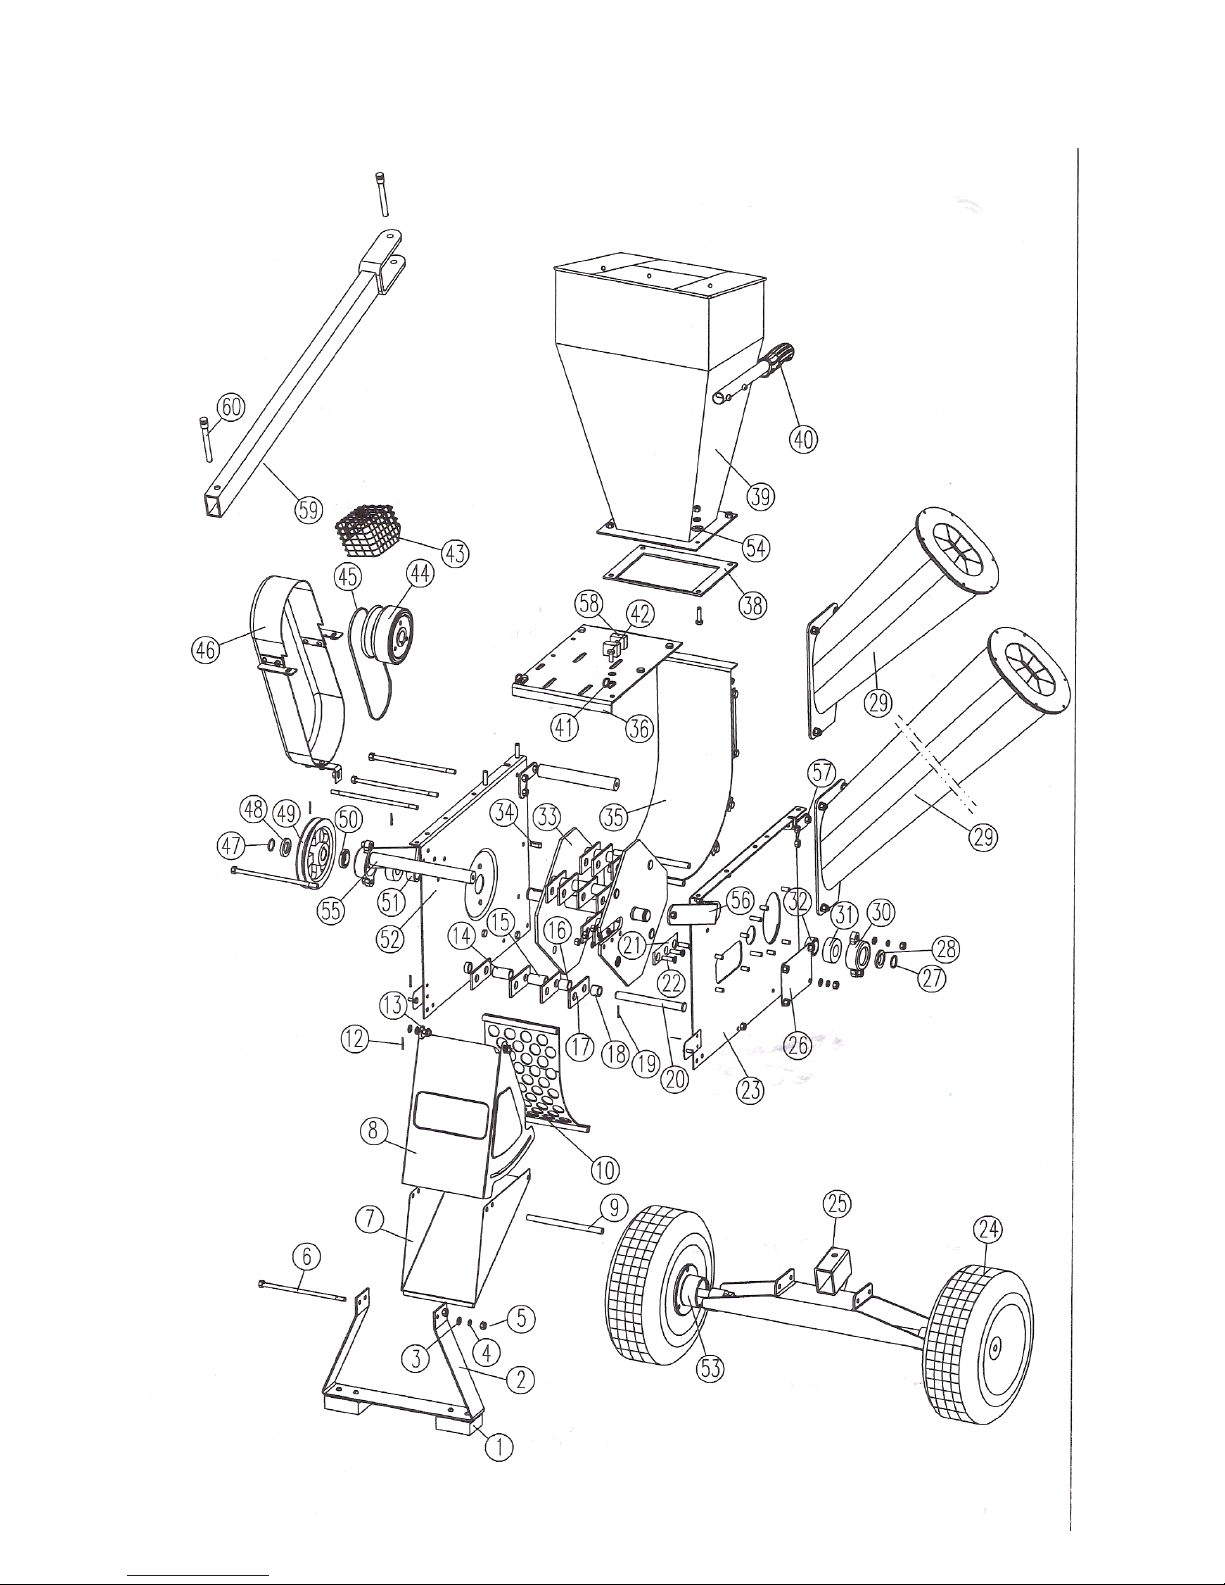
20


