FlyingDutchmanPlans Goose V2 User manual
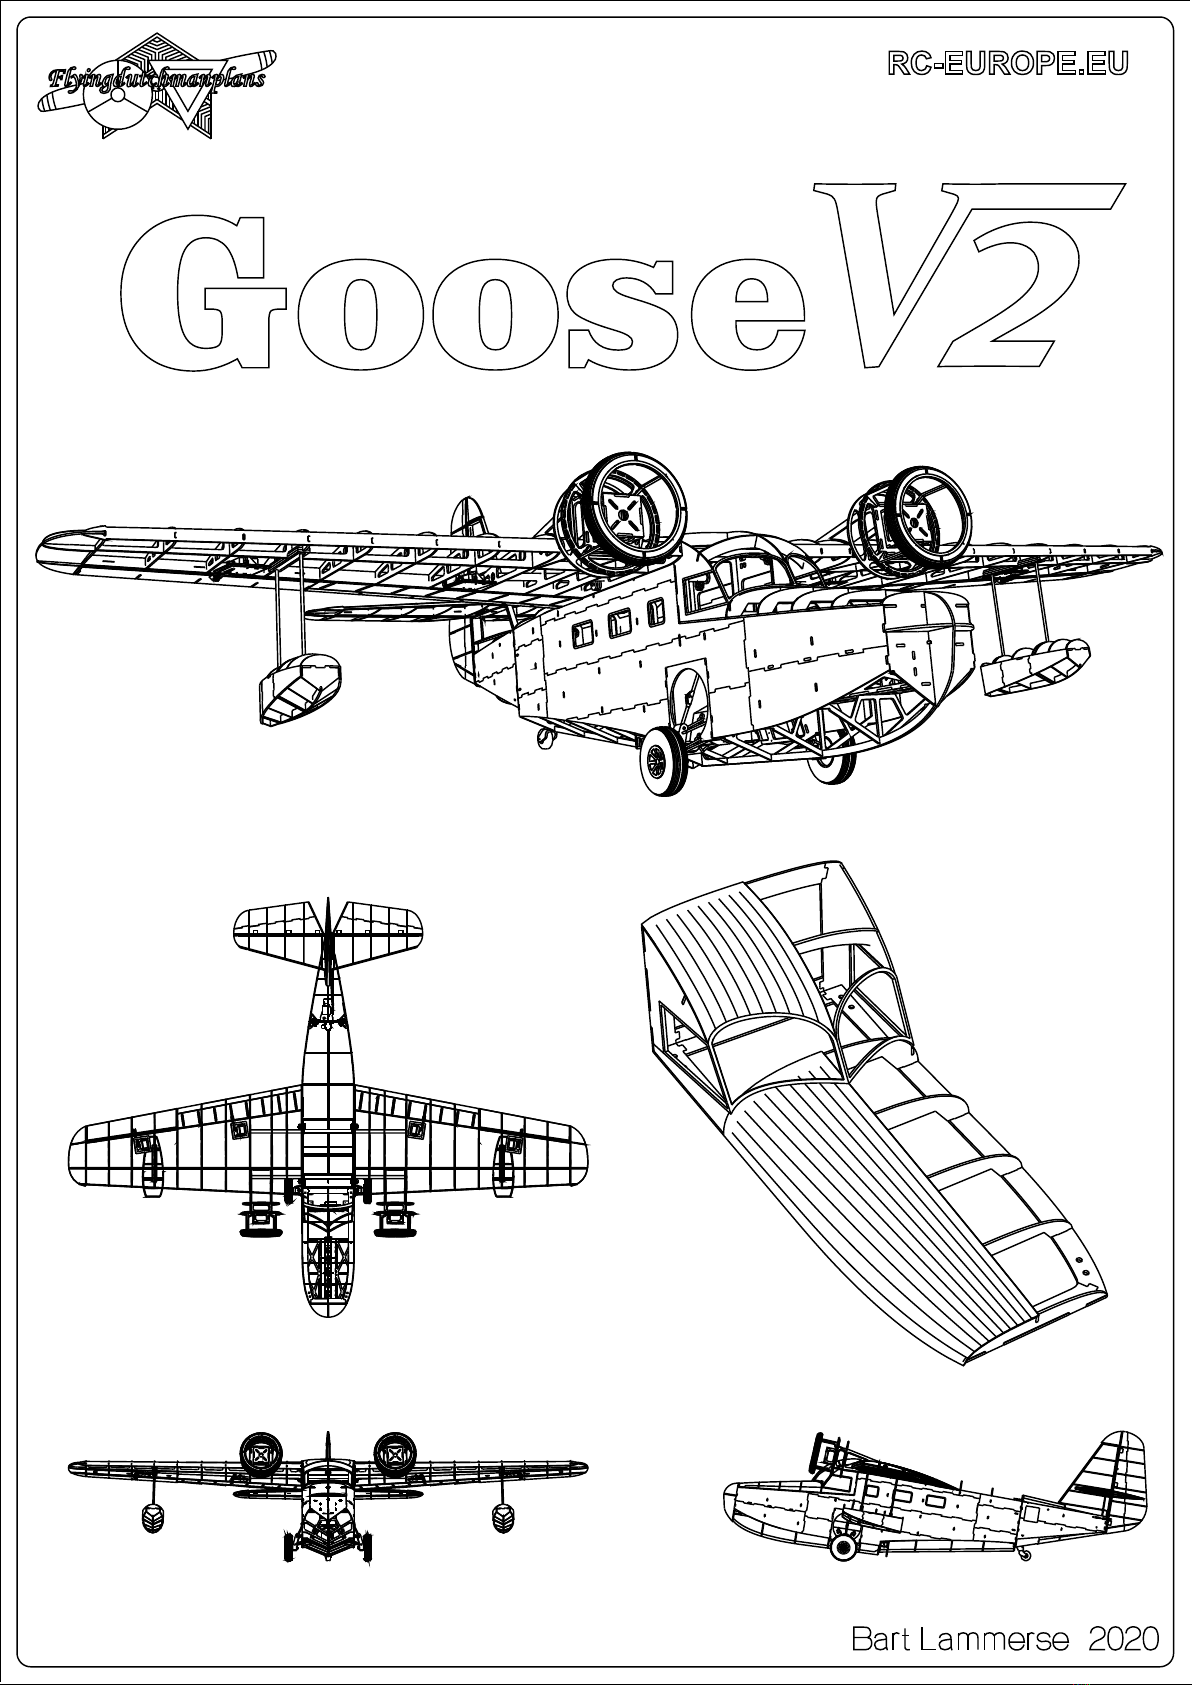

Introduction
Thank you for choosing the GooseV2 as your project, I hope you have much fun building and flying this model.
Before you start with the build I recommend to read through this manual and watch all the GooseV2 build videos on
my YouTube channel. Also, the build thread on RcGroups contains many pictures from the prototype build and is a
useful course of information. This book covers the build step by step but I did not make instructions for scale details
etcetera, these will have to be scratch build to your own desire. Also, obvious things such as trimming sheeting and
sanding ribs and former edges to follow the model’s curvature are not mentioned as I assume you will understand
that needs to be done.
The build is divided in several chapters, each begins with a hardware list for that build stage. Some parts will have to
be cut to size from a supplied length of material, the wing tubes and pushrods for example. The exact dimensions
can be found in the hardware list. Also, which type of glue needs to be used is not mentioned. I recommend medium
CA for balsa to balsa, waterproof wood glue for ply to balsa and ply to ply joints. Use epoxy or CA with filling powder
on high stress joints.
Waterproof wood glue is also used for balsa to balsa large area joints such as gluing the wing spars. The CF and brass
tubes can be glued in place using medium CA, I found that this works very well. Thin CA is used for hardening the
wood surrounding a screw hole, the servo cover screw holes for example.
To build the Goose a 100% flat building board 120x60cm fits the job, use waxed paper to cover it and preventing you
from gluing the model to the building board.
If you take a close look at a laser cut part you will see that the cutline is not 90 degrees. The cut is wider where it
enters the wood. Use this to your benefit when deciding in which direction to orient the parts.
The book has instructions for flaps, however if the model is built light, they are not necessary. If you choose to use a
glass cloth finish instead of covering film and the AUW is around 6kg it is recommended to equip the Goose with
flaps.
Make sure you completely understand each build stage before gluing any parts together.
When the build is ready finish the model with covering film and for the area below the waterline use glass cloth and
resin. Then setup the radio system and your ready to go. It is probably best to do some sea trials before attempting
maiden flight. I found that is a good way to get used to a flying boat before actually flying it. This helps you relax for
the maiden itself. When flying off water you will experience that the goose gets on step very easy. Landing without
bounce is bit trickier, a very slow rate of decent is demanded for a nice landing. Try to have the center of the step hit
the water first with a high angle of attack and some power on. It takes practice to get it right.
After each season the landing gear need maintenance. The brass tubes all need to be cleaned and lubricated. Also
give all the metal parts a coat of CorrosionX every now and then to prevent them from rusting.
But all this is many building hours away so let’s get started . . . . .
On YouTube look for GooseV2 and you’ll find the video series on my channel (Bart83)
Link to GooseV2 playlist:
https://www.youtube.com/playlist?list=PLkpKj72K3uYmgntGXOHDq5Y_r17no_eFl
Link to prototype build thread :
https://www.rcgroups.com/forums/showthread.php?3515473-GooseV2-new-lasercut-kit
If you have any question about the GooseV2 feel free to email me at [email protected]
For questions about the kit contact Sebastiaan (owner RC-Europe.eu) at [email protected]
Enjoy the build,
Bart Lammerse Bart83 ( RcGroups user name)
2

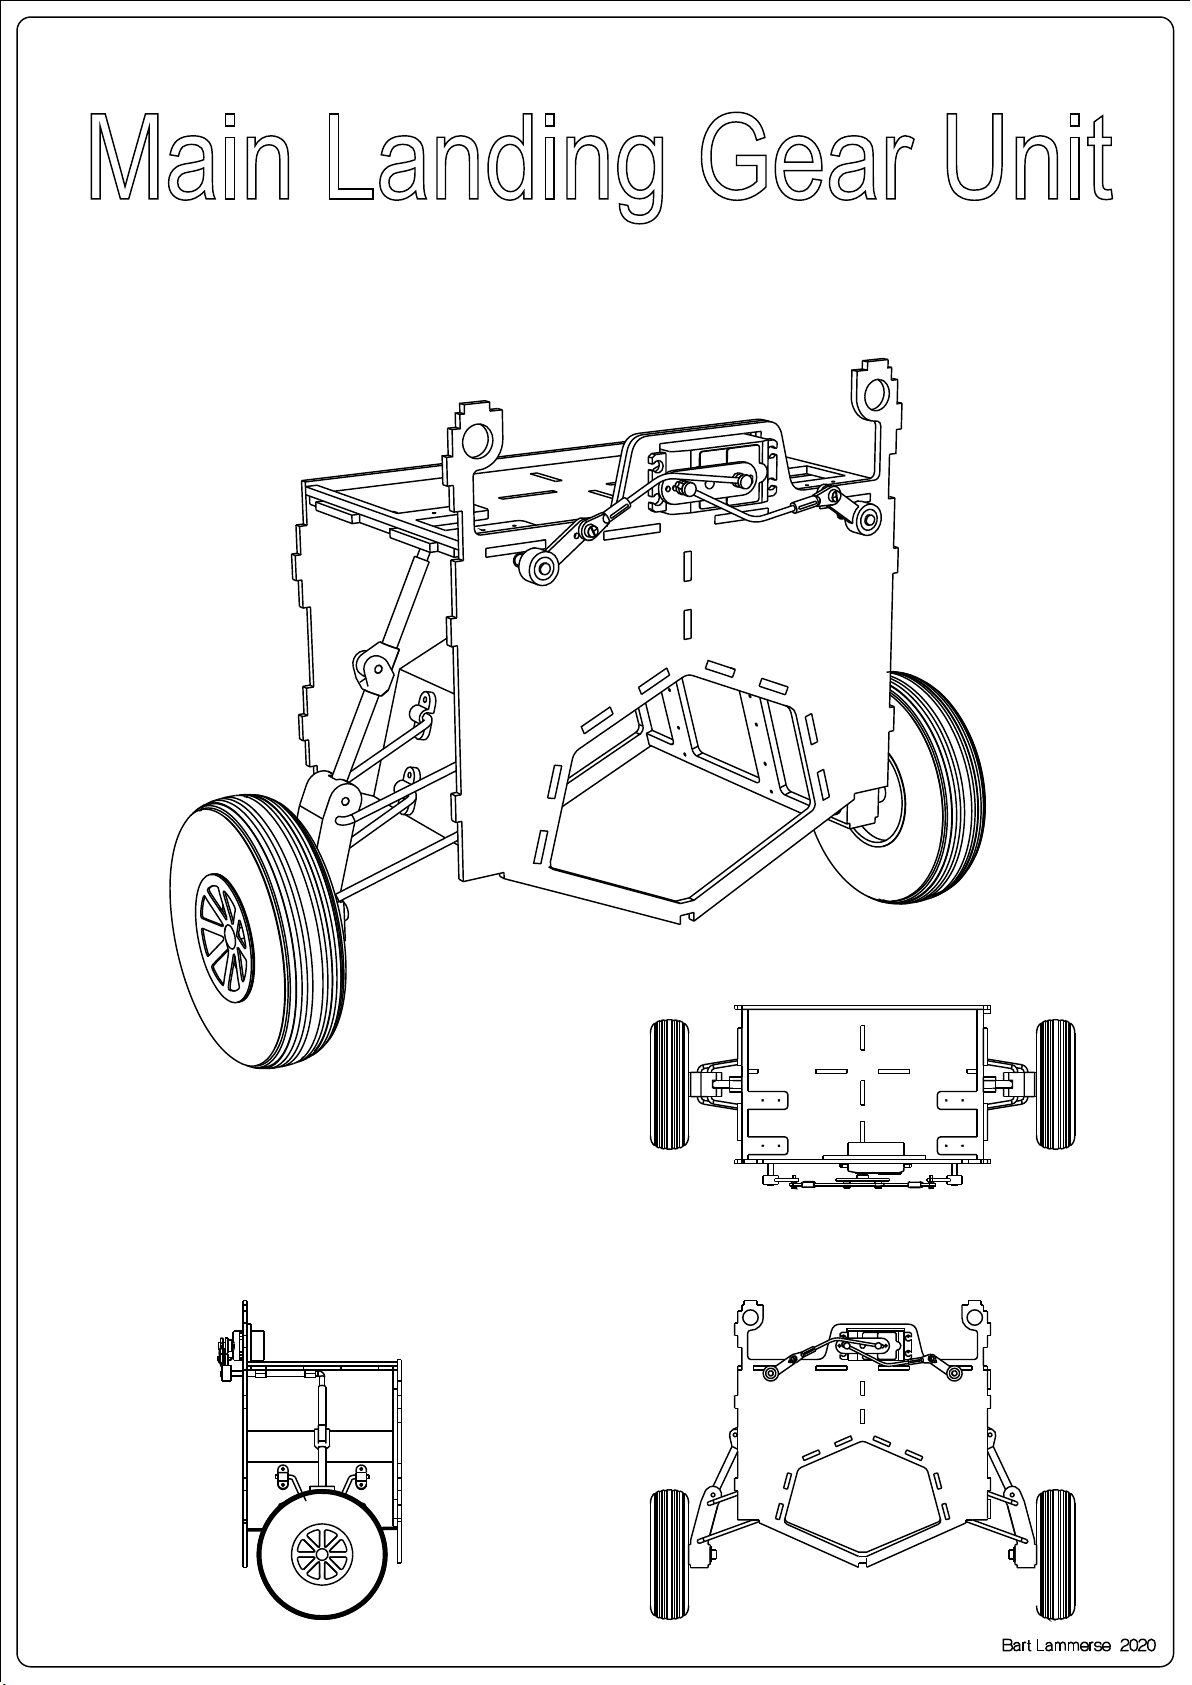
Build the model stand from parts on sheet 23
3

4mm
M4x55mm
Pre-bend upper folding arm
2x
steel wire
Lower folding arm
Pre-bend suspension arm 3mm steel wire
3x12mm
Upper folding arm 3d printed part
2x
4x
3d printed part
2x Lower T-Bone 3x20mm cut to from supplied steel wire
2x Folding hinge pin
5x4.1x65mm
cut to from supplied steel wire
2x Lower folding arm inner 3x41mm cut to from supplied steel wire
2x Inner axle
2x
Stainless steel allen bolt
2x Outer axle 5x4.1x22mm Cut from supplied brass tube
2x Wheel locking nut M4 Stainless steel
10x Washer large OD M4 Stainless steel
2x Folding arm sleeve
Hardware for this build stage
Cut from supplied brass tube
8x Suspension arm tube 4x3.1mm Cut from supplied brass tube
4x Du-Bro gear strap 3/16 + screws
8x Du-Bro gear strap 5/32 + screws
2x Nylon steering arm 4mm hole
2x Threaded pushrod M2 Cut to correct size
2x Ball-link M2
2x Machine screw M2x12mm Stainless steel
2x Nut M2 Stainless steel
2x Washer M2 Stainless steel
2x Dubro EZ connector .22’’ Heavy Duty
1x Hitec HS-75BB Retract servo + mounting hardware
2x Du-Bro Lightweight wheel 4’’
5
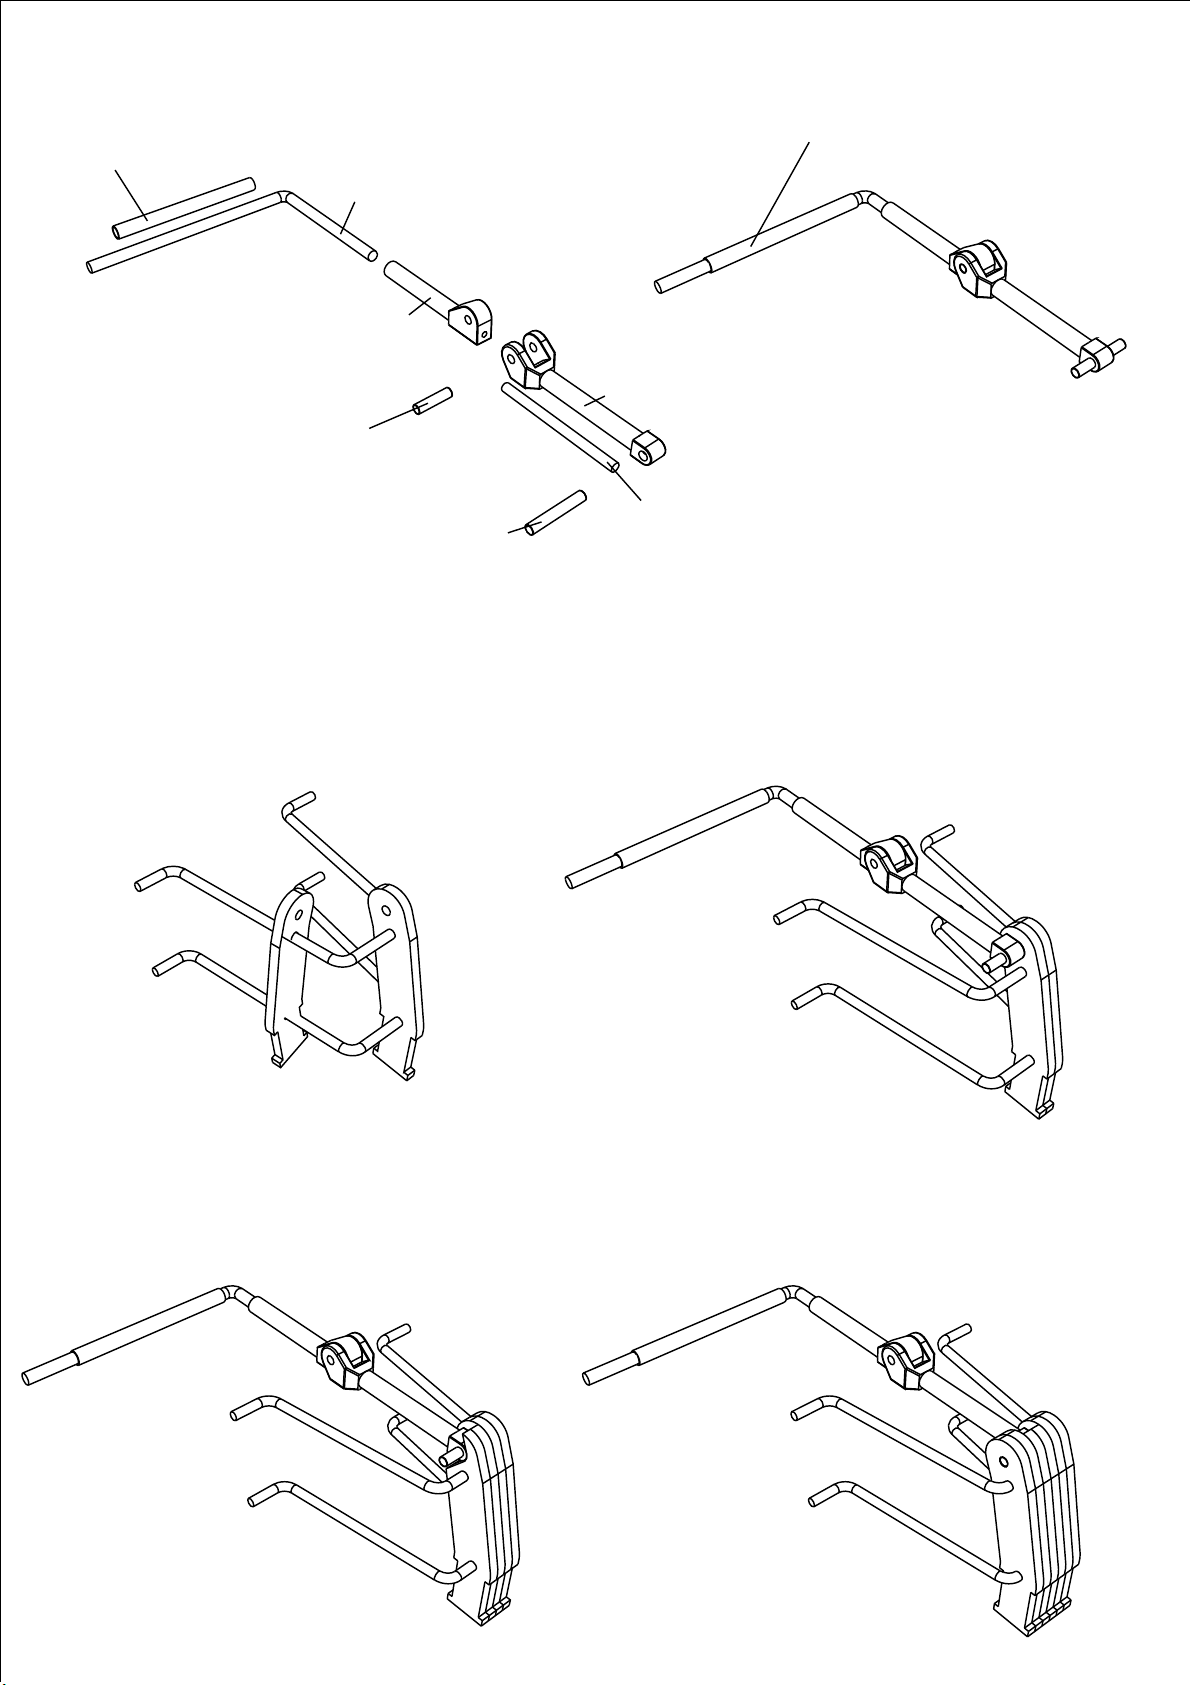
Steel wire T-bone 3x20mm
Steel wire hinge pin 3x12mm
Lubricate the tube with grease
Brass tube 5x4.1x65mm
Slide the remaining axle member parts in place and glue assembly,
make sure to have the parts aligned correctly!
Steel wire lower folding arm reinforcement 3x41mm.
Slide the first two axle member
parts on the suspension arms
Pre bend 4mm landing gear part
3d printed lower part
Position the previously build folding arm
3d printed upper part
6

Allen bolt M4x55mm
Washer M4 large OD
Locknut M4
Brass tube 5x4.1x22mm
(lenght may be different when not using Du-Bro wheels)
Use more washers if wheel does not clear axle member
Du-Bro 5/32'' gear straps
Du-Bro 3/16'' gear straps Brass tube 4x3.1mm
Glue the two plywood plates to the axle member and drill 4mm hole
7

FF-G2
FF-G1D
FF-G1
FF-F6
8
Arrow on part points to nose

FF-F4
FF-G4
Sand beveled edge
9
Washer M4
Nylon steering arm with 4mm hole
Install previously build retracts
FF-G4D
FF-F4D
10

Hitec HS-75BB Retract servo
Nut M2
Washer M2
Du-Bro EZ connector Heavy Duty .22''
Machine screw M2x12mm
Ball link M2
Setup linkage, mount wheels and test the retract system
Threaded pushrod M2
Du-Bro Lightweight wheel 4''
11

1x
M2
Balloon
4x
1.5’’Du-Bro tailwheel1x
2mmSelf tapping screw
1x
Mighty micro servo + mounting hardwareHitec HS-85BB1x
To make the watertight cuff
Metal clewis1x
Pushrod connector1x
Cut to sizeM2Pushrod
Hardware for this build stage
3mm steel wire3x25mmAxle1x
Cut from leftover m2 pushrod2x7mmHinge pin1x
Cut from leftover m2 pushrod2x12mmHinge pin1x
Steel wire3x33mmHinge pin2x
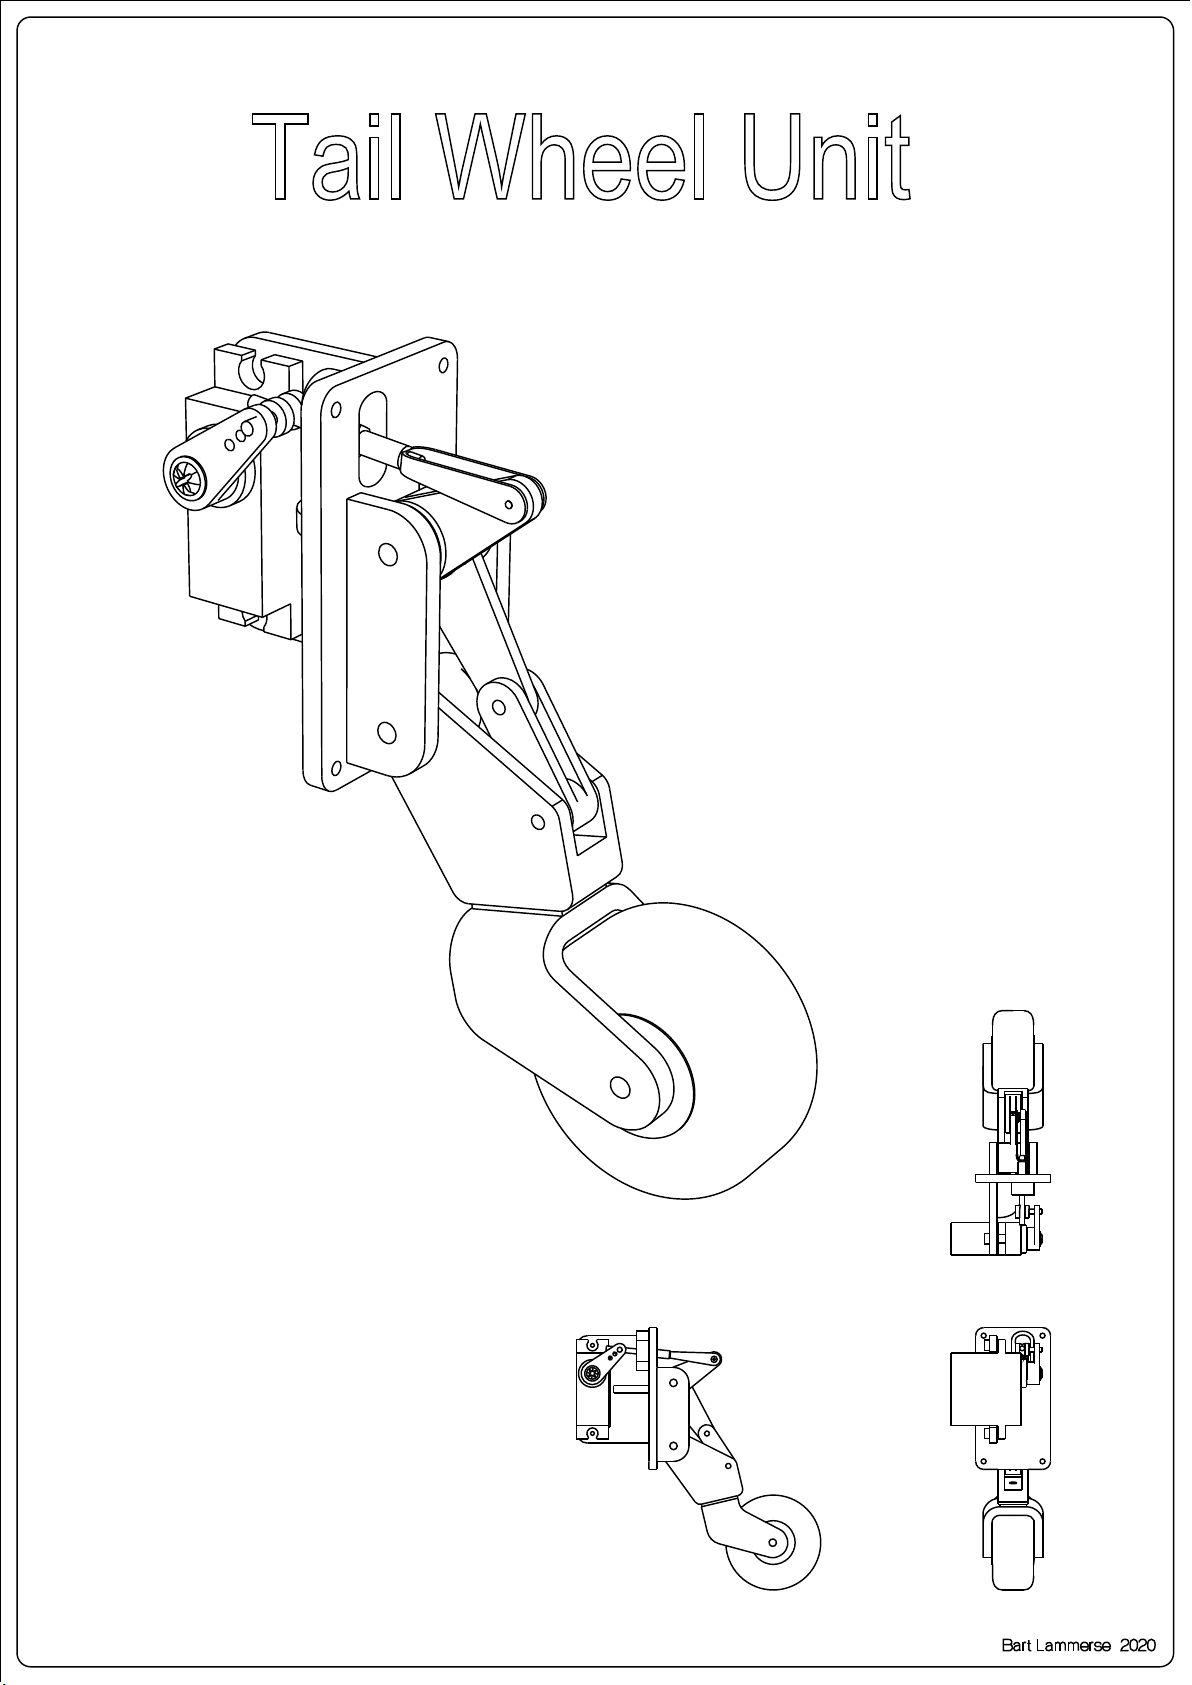
3d printed partsTailwheel unit1x
13

3d printed parts
3d printed parts
Steel wire 3x25mm
Du-Bro tailwheel 1.5''
Steel wire 2x12mm
Steel wire 3x33mm
Steel wire 3x33mm
Steel wire 2x7mm
14

Threaded pushrod M2 & metal clewis
Setup linkage and test operation.
Pushod may need to be bend to prevent binding to the 3d printed part
Flange to attach watertight cuff
Hitec HS-85BB Servo
Pushrod connector
15


Round magnet
MPX Connector female
2x Wing joiner tube 13x12.1mm
Machine screw
4x Nylon screw M6
8x Nylon nut M6
6x
Cut to from supplied brass tube
M2
2x Spring or rubber band For closing gear door
2x Gear door hinge Make from leftover pushrod & tube
2x Spring attachment Make from pushrod inner wire
1x Canopy lock
2x MPX Connector male
1x
5x3mm
2x EC3 Connector male
1x Lipo connector
1x Battery wire 12 AWG
1x Battery wire 14 AWG
-- Servo wiring See YouTube channel for reference
1x Receiver Min. 5 channel
1x Ubec Min. 6A
1x Flight battery
6x
Hardware for this build stage
17
3s5500 to 4s6500 mAh Lipo

IH
G
F
E
D
C
BA
Use the window frames and
parts labeled 'press' on sheet 23
to form the windows.
FF-W2
FF-W1
J
Window frames need to be flush with the outside of the fuselage.
Make sure to build one left and one right side!
Assemble fuselage sides
See video on YouTube for tips and tricks
18

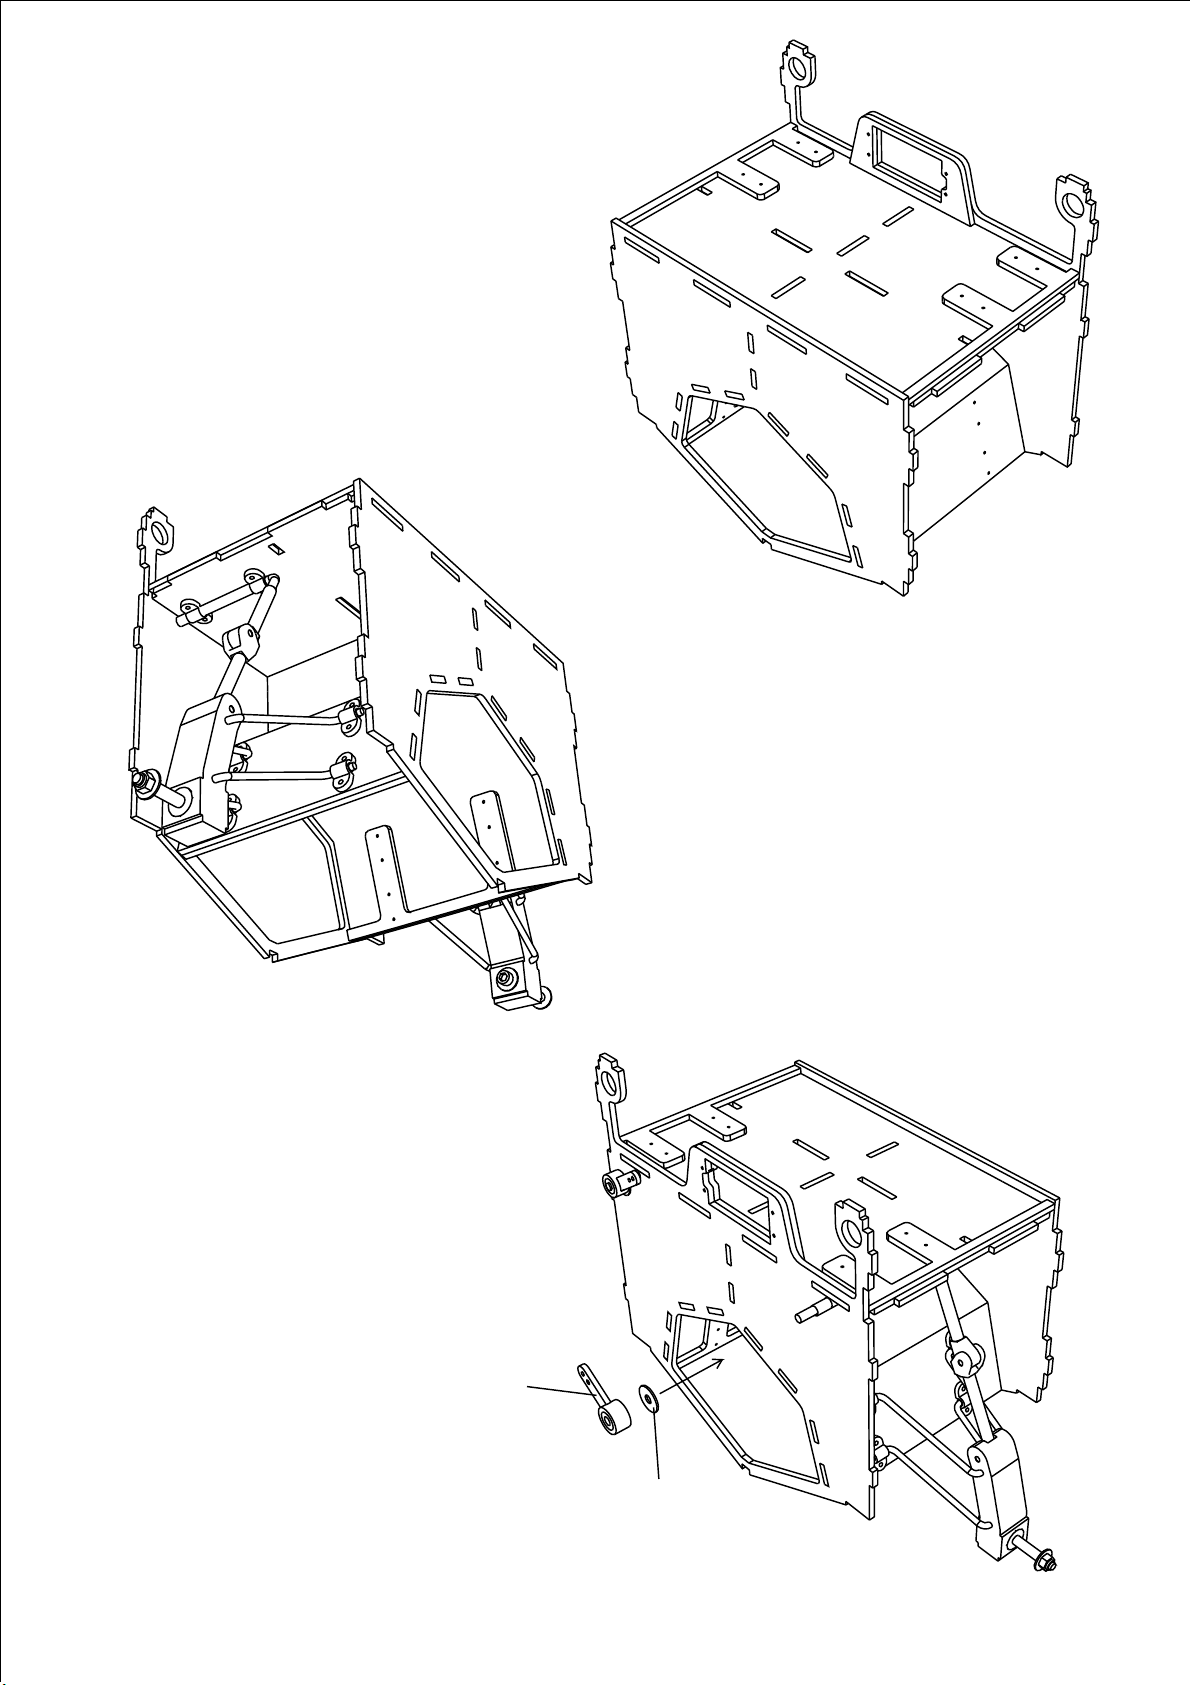
Previously build landing gear box
FF-F7
FF-F8
FF-BX1
Assemble FF-BX1
Fuselage boxframe sub assembly
FF-BX1
FF-F5
19

FF-L4
FF-L3
FF-L2
FF-L1
Round magnet 5x3mm FF-L2 Round magnet 5x3mm
FF-F12D
Use tailwheel unit to position FF-F12D
6M
Canopylock determines position of support frame
Glue canopy lock in place
Nylon nuts M6
FF-LC2
FF-LC1
Split fuse former sub assembly
FF-F12
FF-TR
Locktab should move without friction
HEX
Battery lock sub assembly
20
Keep the locktab free of glue!
Popular Toy manuals by other brands


Bengtson Company
Bengtson Company Albatros DVa 54" instructions

Dancing Wings Hobby
Dancing Wings Hobby S21 Fieseler Fi 156 Storch V2.0 instruction manual

DERBEE
DERBEE ASW28 manual

BNF
BNF Blade 300 X instruction manual

KIDdesigns
KIDdesigns SPIDEY INTERACTIVE ADVENTURES quick start guide

Trix
Trix 22243 manual

Mega Bloks
Mega Bloks Collector Series instructions

Eduard
Eduard S-100 Schnellboot Flak 38 quick start guide

Eduard
Eduard F-15E Strike Eagle seat manual

GRAUPNER
GRAUPNER MAXIE SPORT 490 Building instructions

POLA G
POLA G Madulain Station quick start guide

SNAP CIRCUITS
SNAP CIRCUITS SCP-14 quick start guide