FMA Direct Skysprite User manual
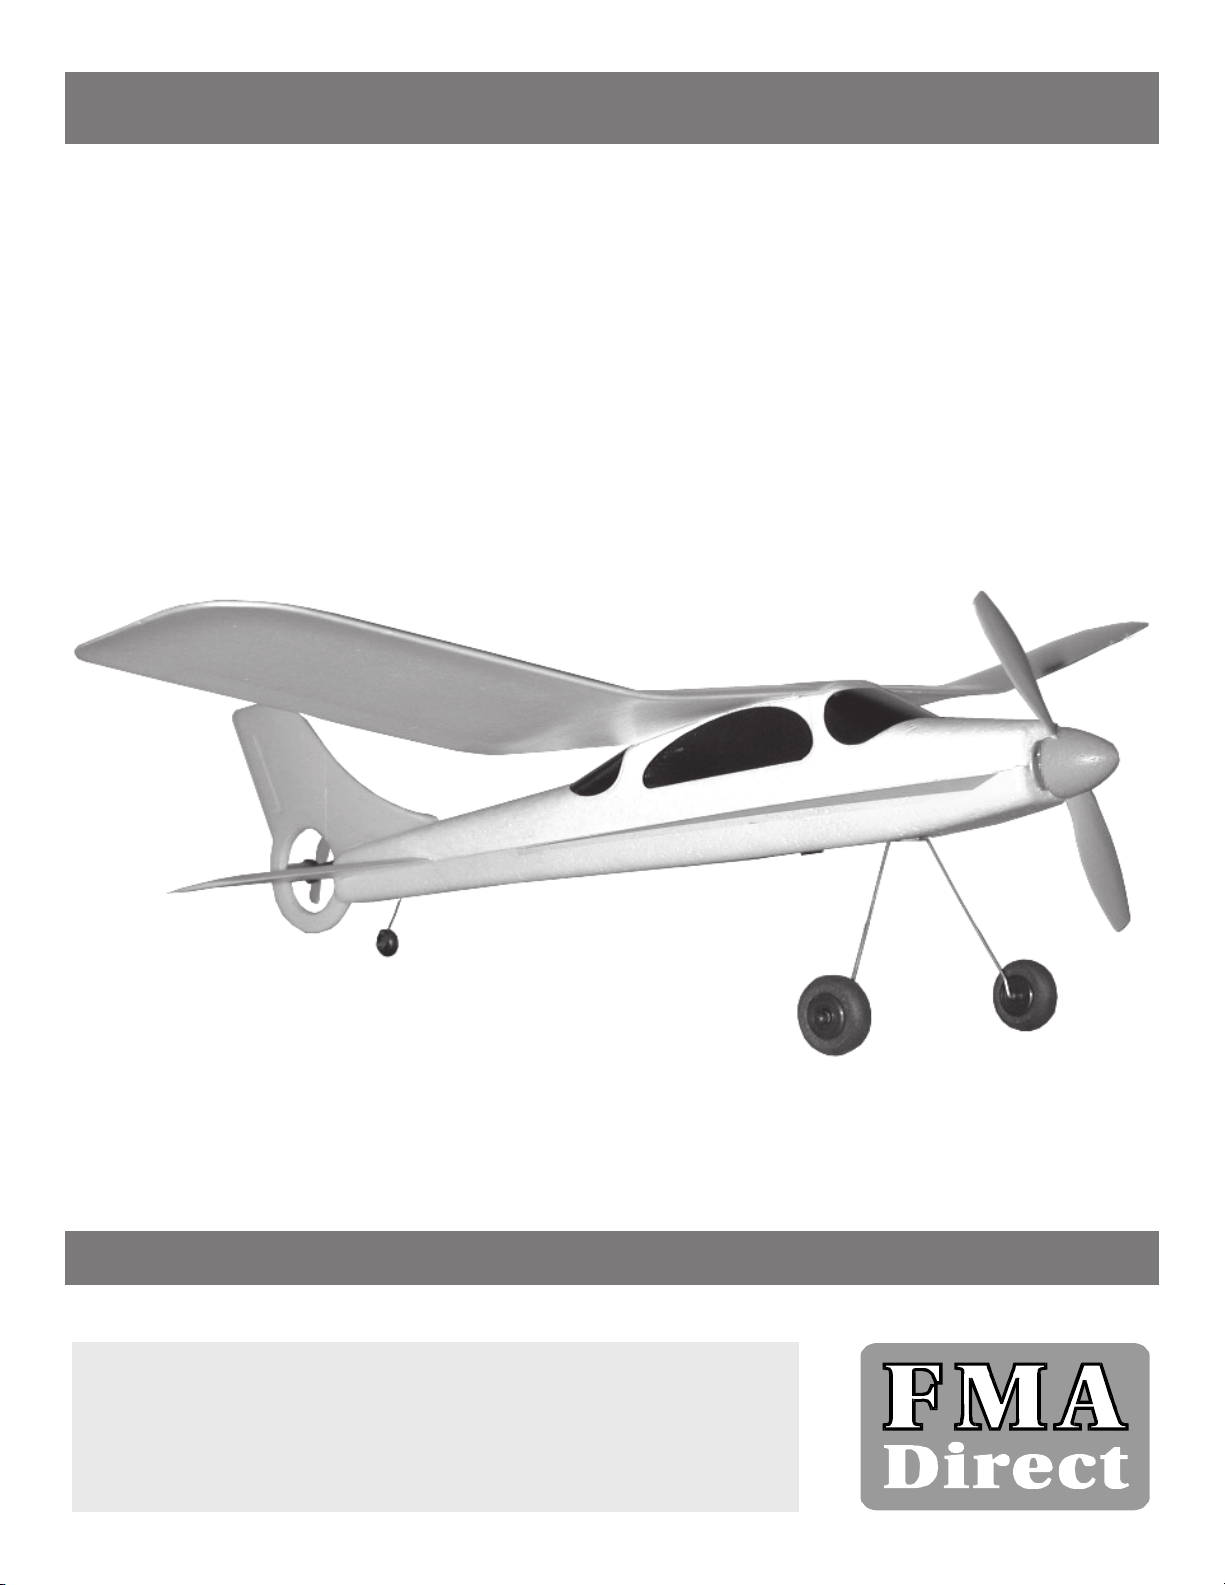
Skysprite
Ready-To-Fly Radio Controlled Electric Airplane
Instruction Manual
FMA, Inc.
5716A Industry Lane
Frederick, MD 21704
Sales: (800) 343-2934 zTechnical: (301) 668-4280
www.fmadirect.com
Instructions for setting up and flying Skysprite
Skysprite instruction manual 2 FMA Direct
Check the contents of the package to make certain you have all
the parts:
Airplane
Transmitter
Landing Gear
Tail Wheel
Airplane Battery
Tool
Spare Propeller
Spare Spinner
You need to supply:
6 AAalkaline cells (You can also use rechargeable NiCD or
NiMH AA cells. You will need to provide a charger for these
cells.)
Hobby knife
Pliers
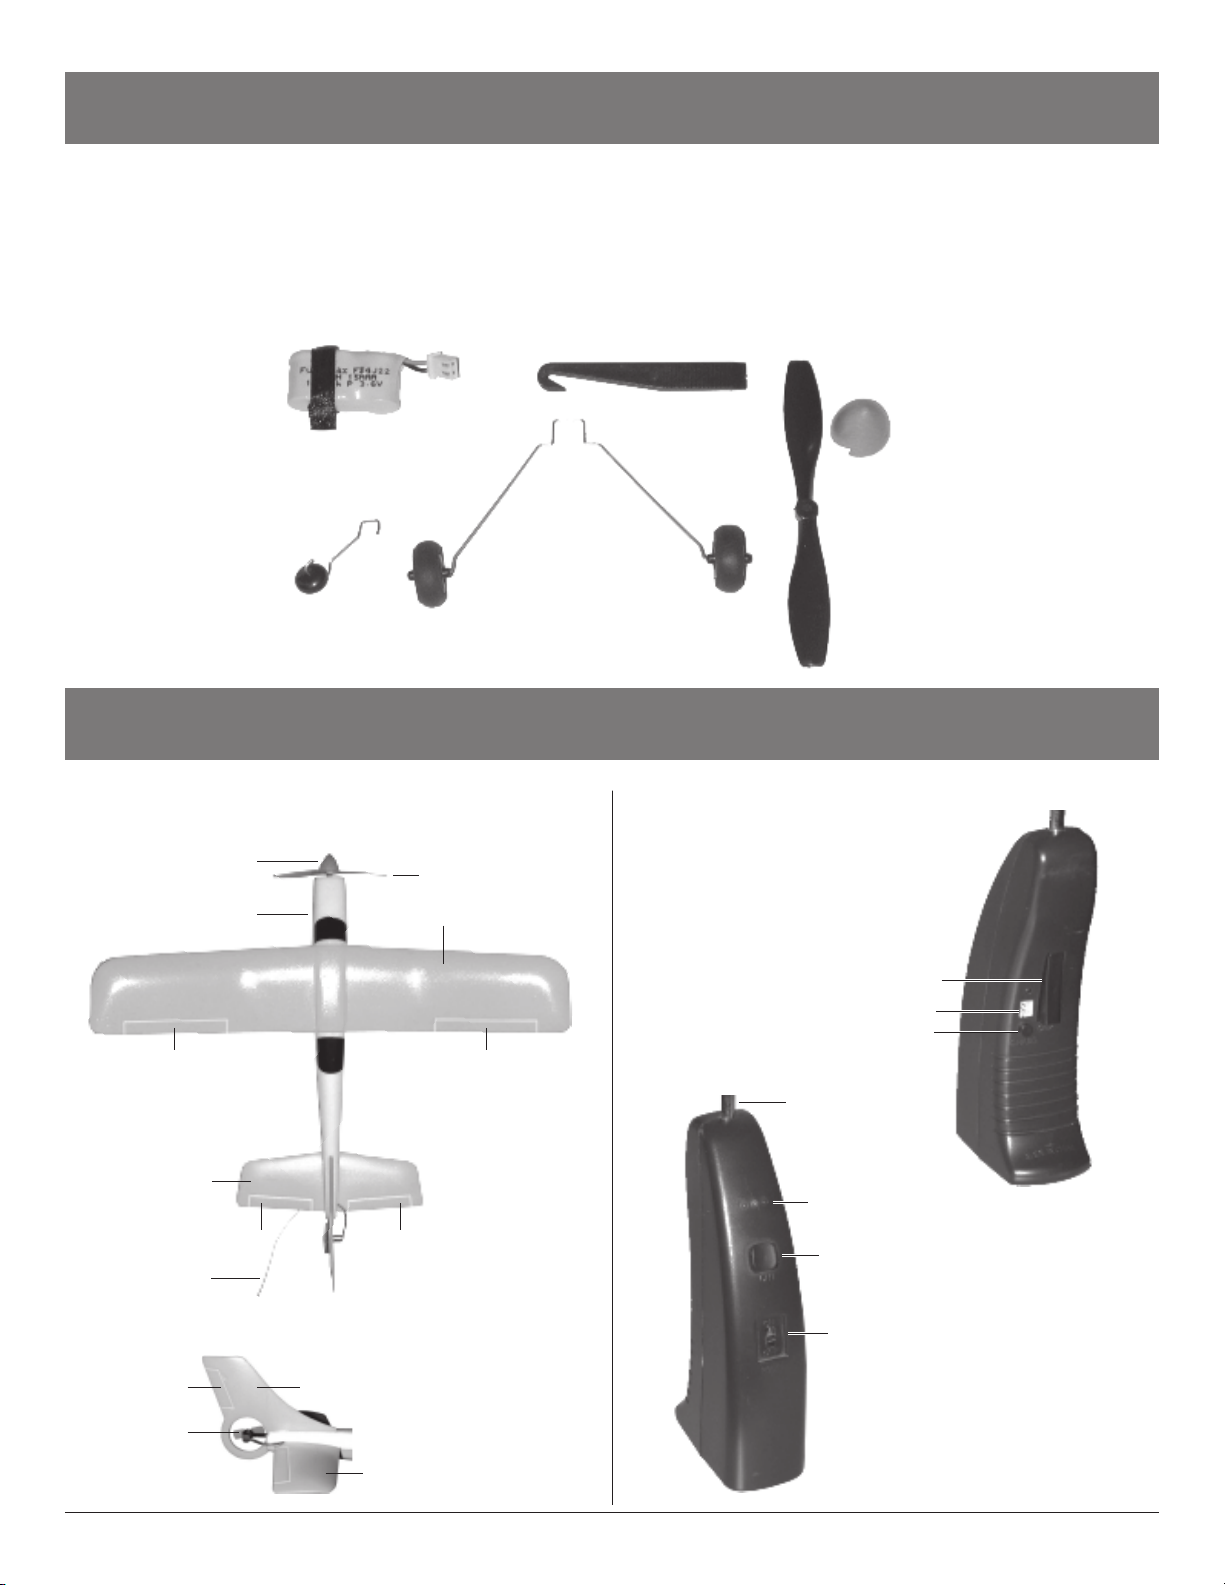
Check the parts
Identify key features
Airplane Transmitter
Spinner Propeller
Right Aileron Trim TabLeft Aileron Trim Tab
Antenna
Elevator Trim TabElevator Trim Tab
Fuselage Wing
Horizontal
stabilizer
Horizontal Stabilizer
Vertical Stabilizer
Rudder
Trim Tab
Tail Fan
Status Lights
Direction Switch
On/Off Switch
Antenna
Motor Trigger
Charge Socket
Charge Button
Tool
Spare Spinner
Spare Propeller
Landing Gear
Airplane Battery
Tail Wheel
FMA Direct 3 Skysprite instruction manual
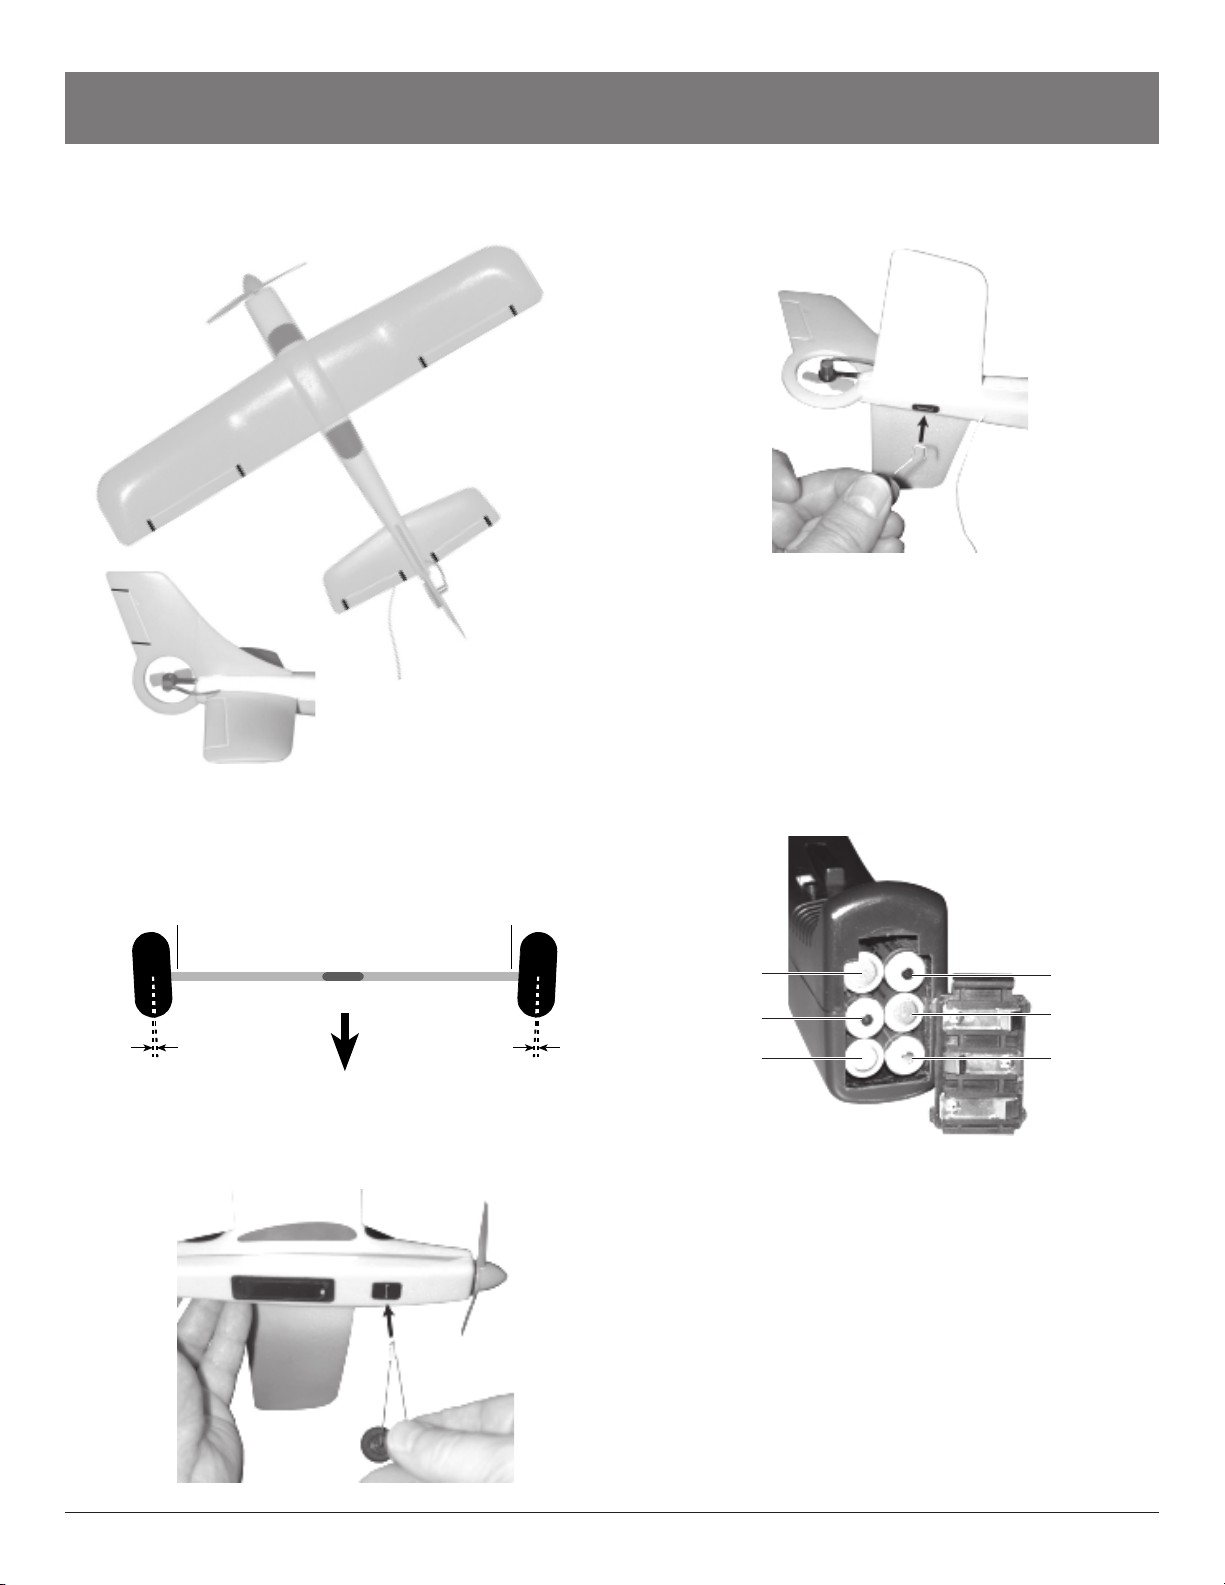
Assemble the airplane
1. Using a sharp hobby knife, make 10 cuts along the short in-
dentations in the elevator, wing and vertical fin as shown by
the black lines below.
4. Slide the Tail Wheel into the slot in the bottom rear of the fu-
selage until it is all the way in.
5. Gently straighten the antenna wire that exits the fuselage un-
der the tail. Don’t pull on the wire.
6. Install 6AA alkaline cells in the Transmitter:
a. Turn the Transmitter On/Off switch to Off.
b. Remove the Battery Cover from the bottom of the Trans-
mitter.
c. Install the cells as shown here:
d.
Replace the Battery Cover on the bottom of the Transmitter.
2. Using pliers, bend the Landing Gear as shown below. This
toe-in helps Skysprite roll straight as it takes off from a
smooth surface.
About 2-3°About 2-3°
Front of Skysprite
Grip here with pliers
to bend this side
Grip here with pliers
to bend this side
3. With the toe-in toward the front of the airplane, slide the
Landing Gear into the slot on the bottom of the fuselage until
it is all the way in.
–
+
+
+
–
–

Skysprite instruction manual 4 FMA Direct
Charge and install the Airplane Battery
1. Turn on the Transmitter and check the three Status Lights
above the On/Off Switch.
Red Green Red Voltage Status
ON ON ON 9.0 Ready
ON ON off 7.5 Ready
ON dim off 6.5 Marginal (Airplane Battery
takes longer to charge)
ON off off 5.5 Don’t charge or fly
If the Transmitter status is “Ready,” turn the Transmitter
off, then go to step 2.
If the Transmitter status is “Marginal,” the transmitter bat-
teries may be able to charge theAirplane Battery, but
charging will take longer. After charging, check the Status
Lights again. If the status is still “Marginal,” you may be
able to make one more flight before you change the trans-
mitter batteries. Otherwise...
If the Transmitter status is “Don’t fly,” turn the Transmitter
off. Remove and discard the transmitter batteries. Install
freshAAalkaline cells, then check the Status Lights again.
2. Plug the Airplane Battery into the Charge Socket next to the
Motor Trigger on the Transmitter. The plug is keyed and will
only go into the socket one way.
3. Press and hold the Charge button. Watch the blue Charge In-
dicator on the end of the Airplane Battery. Release the
Charge button when the Charge Indicator becomes pale blue
or white.
Blue: not charged White: fully charged
CAUTION: The Airplane Battery is now HOT!
4. Disconnect theAirplane Battery from the Transmitter.
5. Remove the Battery Cover from the bottom of the airplane.
6. Gently pull the Battery Connector a short distance out of the
Battery Compartment. If necessary, use the supplied Tool to
hook the wire so you can grasp it.
7. Plug the Airplane Battery into the Battery Connector. The
plug is keyed and will only go into the Battery Connector one
way.
CAUTION: The airplane is now on, and the Propeller
can turn.
8. Push the connectors into the Compartment, then push the Bat-
tery into the Compartment with the cloth tab up.
9. Fold the cloth tab flat against the Battery. Replace the Battery
Cover and snap it into place.
Cloth tab
Charge Button
Charge Socket
FMA Direct 5 Skysprite instruction manual
Test operation Trim Skysprite
You must trim Skysprite before you attempt powered flights.
Trimming is the process of adjusting Skysprite’s trim tabs for
stable flight. During trimming, theAirplane Battery must be in-
stalled (it’s weight affects Skysprite’s balance), but it will not be
used to power the airplane (this initial trimming involves gliding
Skysprite). With the Transmitter off...
1. Gently toss Skysprite into the wind, with the wings level, aim-
ing for a point about 15 to 20 feet in front of you. Watch how
it glides.
Good: straight glide
Bad: stall
Bad: dive
2. Trim Skysprite according to how it glides:
If Skysprite dives into the ground, gently bend the elevator
trim tabs up about 1/32" (about the thickness of a credit
card).
If Skysprite swoops up and stalls, gently bend the elevator
trim tabs down about 1/32" (about the thickness of a credit
card).
If Skysprite turns to the left, gently bend the rudder trim tab
to the right about 1/32" (about the thickness of a credit
card).
If Skysprite turns to the right, gently bend the rudder trim
tab to the left about 1/32" (about the thickness of a credit
card).
3. Repeat steps 1 and 2 (bending the trim tabs a little farther) un-
til Skysprite glides in a straight line without diving into the
ground or swooping into a stall.
Skysprite is now ready to fly!
Note: If you will not be flying the airplane in the next few
minutes, remove and disconnect the Airplane Battery. If
you leave the Airplane Battery connected, it will eventu-
ally discharge.
1. Hold Skysprite firmly in one hand and the Transmitter in the
other hand.
2. Turn on the Transmitter and extend the antenna.
3. Squeeze the Motor Trigger with your index finger.
Skysprite’s propeller should turn at high speed. Release the
Motor Trigger.
4. Move the Direction Switch in both directions. Skysprite’s
Tail Fan (at the rear of the fuselage) should turn at high speed.
5. Turn off the Transmitter and collapse the antenna.
On/Off Switch
Direction Switch
Motor Trigger
Skysprite instruction manual 6 FMA Direct
Things you should know before you fly Skysprite
Where to fly. You’ll need an open area about the size of a
baseball field, football field or soccer field. A large, empty
parking lot is also good. Avoid areas with trees, power lines,
houses, buildings, cars and people. If the area is paved or
hard dirt, Skysprite can take off from the surface. Otherwise,
you’ll need to launch it by hand.
Wind speed. Don’t fly if the wind is moving tree branches or
blowing dust and dirt. Astrong wind could blow Skysprite
away. A gentle, steady breeze that you can barely feel is good
for flying.
Wind direction. Always take off or hand launch Skysprite
into the wind (the wind will be in your face). Always land
Skysprite into the wind. Why? Flying into the wind provides
more lift when Skysprite is moving slowly over the ground. A
length of ribbon or sewing thread tied to the top of the Trans-
mitter antenna will tell you which way the wind is blowing.
Always keep Skysprite upwind from you: if you are facing
into the wind, and Skysprite is in front of you, it is upwind
from you. Why? If the Airplane Battery runs down, the wind
will help Skysprite glide back toward you, instead of away
from you.
Light wind
You
Best flying area
Frequencies. Skysprite is available on two frequencies:
27MHz and 49MHz. You and someone else can fly
Skysprites on different frequencies at the same time. You can-
not fly two Skysprites on the same frequency at the same time.
RECOMMENDED: trim for a circle. Until you learn how
to control Skysprite in the air, you should set it up to fly in a
circle. This will keep it nearby so you can see how it reacts
when you use the Transmitter controls. To trim for a left turn,
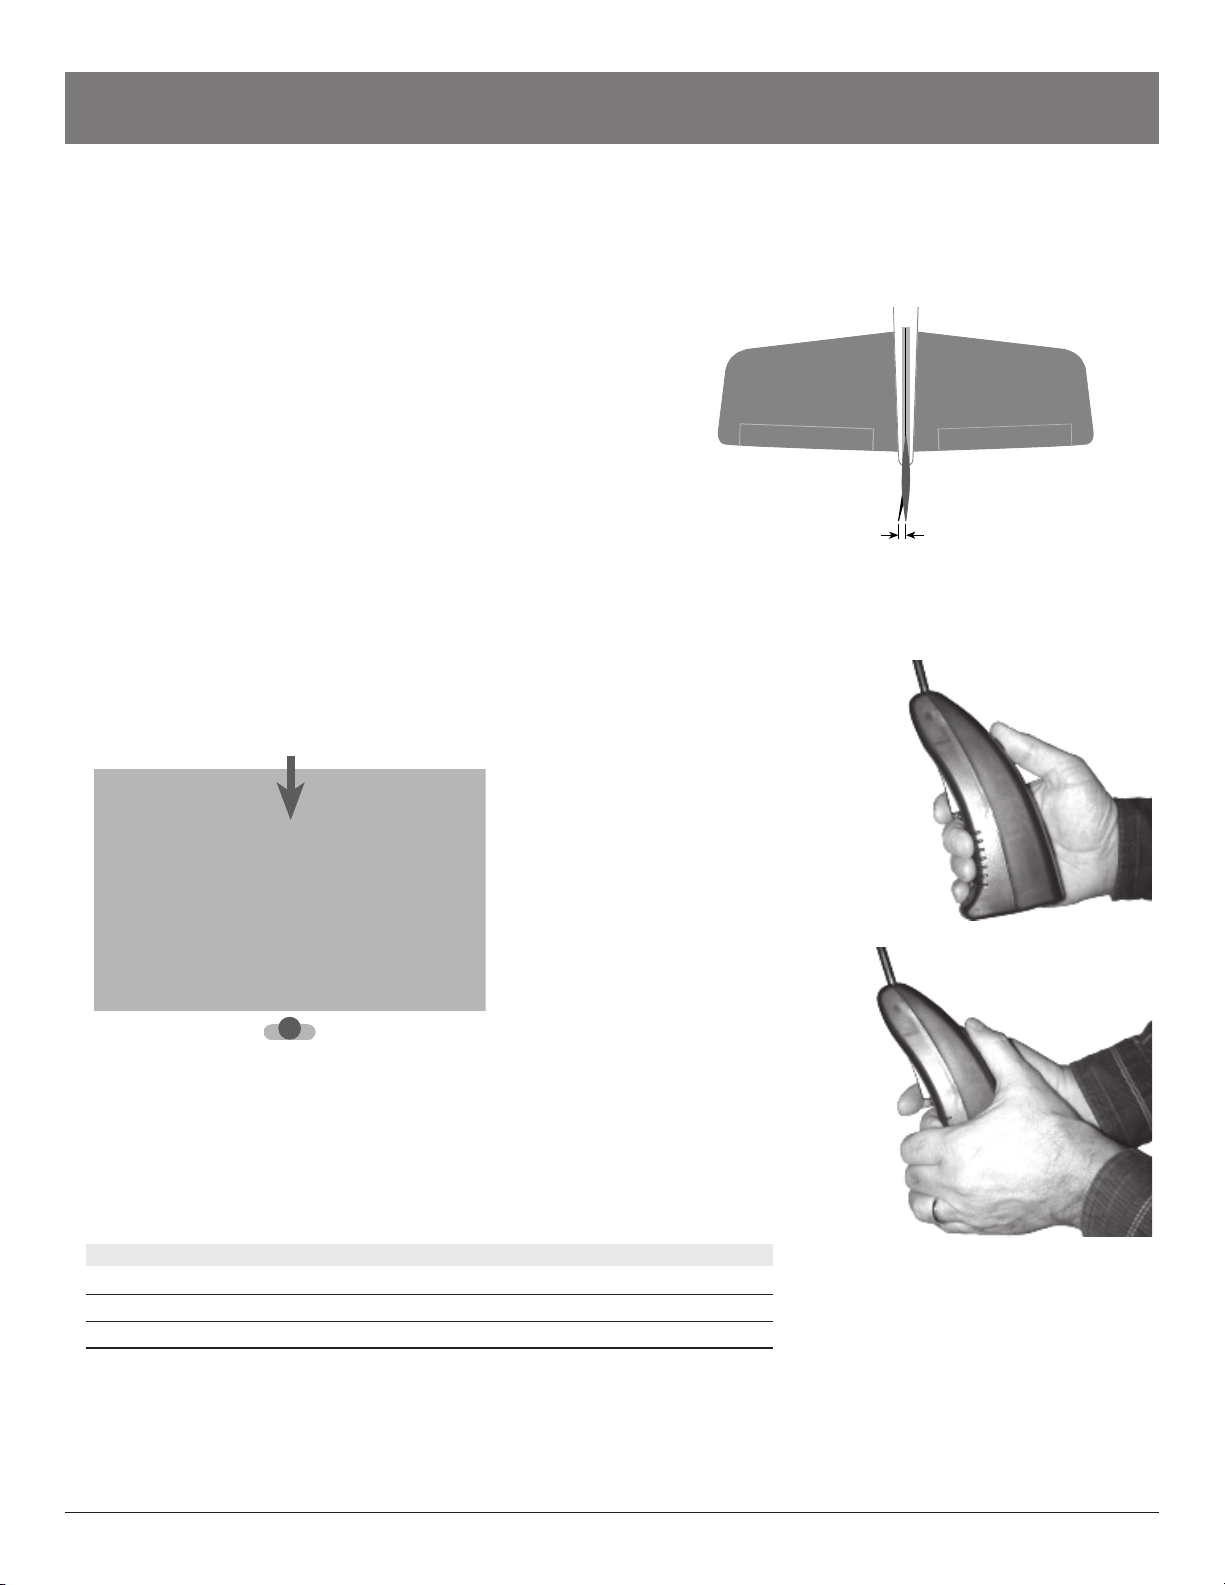
gently bend the rudder trim tab to the left about 1/32".
Bend rudder trim tab
1/32" to left
Holding the Transmitter. Before you fly the airplane for the
first time, figure out how you will hold the Transmitter and
press its buttons. There are two possibilities:
zOne-handed method:
Squeeze the Motor Trigger
with your index finger and
press the Direction Switch
with the thumb on the same
hand.
zTwo-handed method:
Squeeze the Motor
Trigger with the index
finger on the hand
holding the Transmit-
ter. Press the Direction
Switch with the thumb
on the other hand.
Flight behavior. Here is how Skysprite responds to the Transmitter controls:
If the Motor is... and the Direction Switch is... then Skysprite will...
On centered fly straight ahead and up
On left (or right) fly left (or right) and down
Off centered fly straight ahead and down

FMA Direct 7 Skysprite instruction manual
Flying Skysprite the first time
Preflight check. It’s a good idea to perform a preflight check
before each flight to make certain everything is working:
a. Turn on the Transmitter and extend the antenna.
b. Check the Status Lights to make sure it’s okay to fly.
c. Hold Skysprite firmly in one hand. Squeeze the Motor
Trigger to make sure the propeller turns very fast.
d. Press the Direction Switch to make sure the Tail Fan turns
fast.
If everything checks out, you are ready to fly.
Taking off from the ground. If your flying area has a
smooth, flat surface, it’s easiest to take off from the ground.
a. Place Skysprite on the ground or pavement, with its nose
pointed into the wind.
b. Squeeze and hold the Motor Trigger.
c. After rolling about 20 feet, Skysprite should lift off and be-
gin to climb.
Launching by hand. If your flying area is grass or has a
rough surface, you must hand-launch Skysprite.
a. Hold Skysprite from below the fuselage, just behind the
wing. Hold the Transmitter in the other hand.
b. Point Skysprite into the wind.
c. Squeeze and hold the Motor Trigger.
d. Gently toss Skysprite straight out with the wings level.
You don’t need to throw Skysprite hard—it should just fly
out of your hand from a gentle toss. Also, you don’t need
to throw Skysprite up—if theAirplane Battery is fully
charged, Skysprite will maintain altitude and slowly climb.
Controlling Skysprite in the air.
zKeep squeezing the Motor Trigger. If you trimmed the rud-
der as recommended, Skysprite should fly gradually up and
to the left. Fly Skysprite until it is at least 50 feet above the
ground before you try turning it yourself.
zRelease the Motor Trigger. Notice that Skysprite begins to
glide downward.
Important point: Squeeze the Motor Trigger to make
Skysprite go up. Release the Motor Trigger to let
Skysprite come down.
zSqueeze the Motor Trigger, then press the Direction Switch
to one side for a short time (just a few seconds, at most).
Skysprite should make a gentle turn in that direction. If
you hold the Direction Switch too long, Skysprite will be-
gin to descend, even if you are still squeezing the Motor
Trigger.
zUsing the Direction Switch, practice making gentle turns to
the right and left.
Important point: When Skysprite is flying toward you,
the Direction Switch will seem reversed—you want
Skysprite to turn to your left, but it turns the other way.
This is one of the challenges of flying radio-controlled air-
craft. We recommend lots of practice until you can make
Skysprite turn the direction you want, whether it’s flying
away from you or toward you.
zTry making Skysprite fly straight without rising by alternat-
ing short left and right bursts with the Direction Switch.
Important point: When properly trimmed, Skysprite
goes up when it is flying straight ahead, and it goes down
when it is turning. By turning a little left, a little right, a
little left, a little right, and so forth, you can keep
Skysprite from rising while it moves straight ahead.
How long can you fly? If the Airplane Battery starts with a
full charge, you can fly for about 5 minutes. As theAirplane
Battery starts to run down, Skysprite will not climb when you
squeeze the Motor Trigger. When you notice this, you should
land the airplane.
Tip: To fly longer, use the optional Lithium Polymer Air-
plane Battery. This battery is described later in the
manual.
Landing.
a. Turn Skysprite so it is flying into the wind.
b. Release the Motor Trigger to let Skysprite glide down. If
Skysprite is coming down too fast, squeeze the Motor Trig-
ger in short bursts to maintain a gentle glide path.
After the flight.
CAUTION: The Airplane Battery becomes very hot dur-
ing a flight. Let it cool down for about 30 minutes before
you remove it from the airplane.
a. Turn off the Transmitter and collapse the antenna.
b. After the Airplane Battery cools down, remove it from the
airplane.

Skysprite instruction manual 8 FMA Direct
More information
Don’t leave Skysprite in hot sunlight. Skysprite won’t warp
on its own, but it can be permanently bent if left in a hot area
with its surfaces against something. If that happens, Skysprite
may not fly as expected.
Motor downthrust. Notice that the Motor Shaft is angled
slightly downward. This is called downthrust, and it helps
Skysprite fly level. If you handle Skysprite roughly, or fly it
into a tree or building, the downthrust angle may change. If
downthrust is incorrect, Skysprite may ascend too rapidly
when launched, then stall (the wing stops lifting the airplane)
and fall to the ground.
Check the downthrust angle periodically. If the angle has
changed, use a scrap of matchbook or folded paper to wedge
the Motor back into position.
Slight downthrust
Replacing the Spinner and Propeller. If the Propeller is
damaged, you should replace it with the Spare Propeller. Pull
the original Spinner and Propeller off of the Motor shaft.
Press the Spare Propeller onto the Motor Shaft. Glue the
Spinner onto the Propeller with a small amount of white glue
(for example, Elmer’s brand).
Trimming. Here are some common flight problems, and how
to solve them:
zIf Skysprite rises too fast after launch, then stalls and falls
to the ground:
Make sure the Motor has the correct downthrust (it may
have too little). If it doesn’t, shim the Motor into place.
Fly Skysprite. If that doesn’t solve the problem, then...
Add a little down elevator trim. Gently bend both eleva-
tor trim tabs down about 1/32" (about the thickness of a
credit card). Fly Skysprite. If that doesn’t solve the
problem, then...
Add a little left rudder trim. Gently bend the rudder trim
tab toward the left side of Skysprite. Turning helps keep
Skysprite from rising.
zIf Skysprite dives into the ground after launch:
Recharge theAirplane Battery (see "Charge and install
theAirplane Battery," earlier in this manual). Fly
Skysprite. If that doesn’t solve the problem, then...
Make sure the Motor has correct downthrust (it may
have too much). If it doesn’t, shim the Motor into place.
Fly Skysprite. If that doesn’t solve the problem, then...
Add a little up elevator trim. Gently bend both elevator
trim tabs up about 1/32".
zIf Skysprite rolls to the left or right during launch (instead
of climbing with the wings level):
There may be too much rudder trim. Reduce rudder
trim. Fly Skysprite. If that doesn’t solve the problem,
then...
Correct the roll using the aileron trim tabs. If Skysprite
rolls to the left, gently bend the left aileron trim tab
down and the right trim tab up about 1/32". If Skysprite
rolls to the right, gently bend the right aileron trim tab
down and the left trim tab up.
zIf Skysprite dives (instead of slowly descending) when you
release the Motor Trigger:
Add a little up elevator trim. Gently bend both elevator
trim tabs up about 1/32".
After you master basic flying skills, you are ready for some new
challenges:
Loop. Fly Skysprite to an altitude of about 150 feet. Hold a
left turn until Skysprite is diving and building up speed.
Switch to a right turn and hold that until Skysprite starts up
into the loop. As Skysprite comes out of the loop, hold a left
turn to keep it from going back up again.
Advanced techniques
Barrel roll. Start out like a loop (see above). As Skysprite
reaches vertical (about 1/4 of the way into the loop), give it a
right turn.
Spot landing. Mark a spot on your flying field, and see how
close you can land Skysprite to it.
FMA Direct 9 Skysprite instruction manual
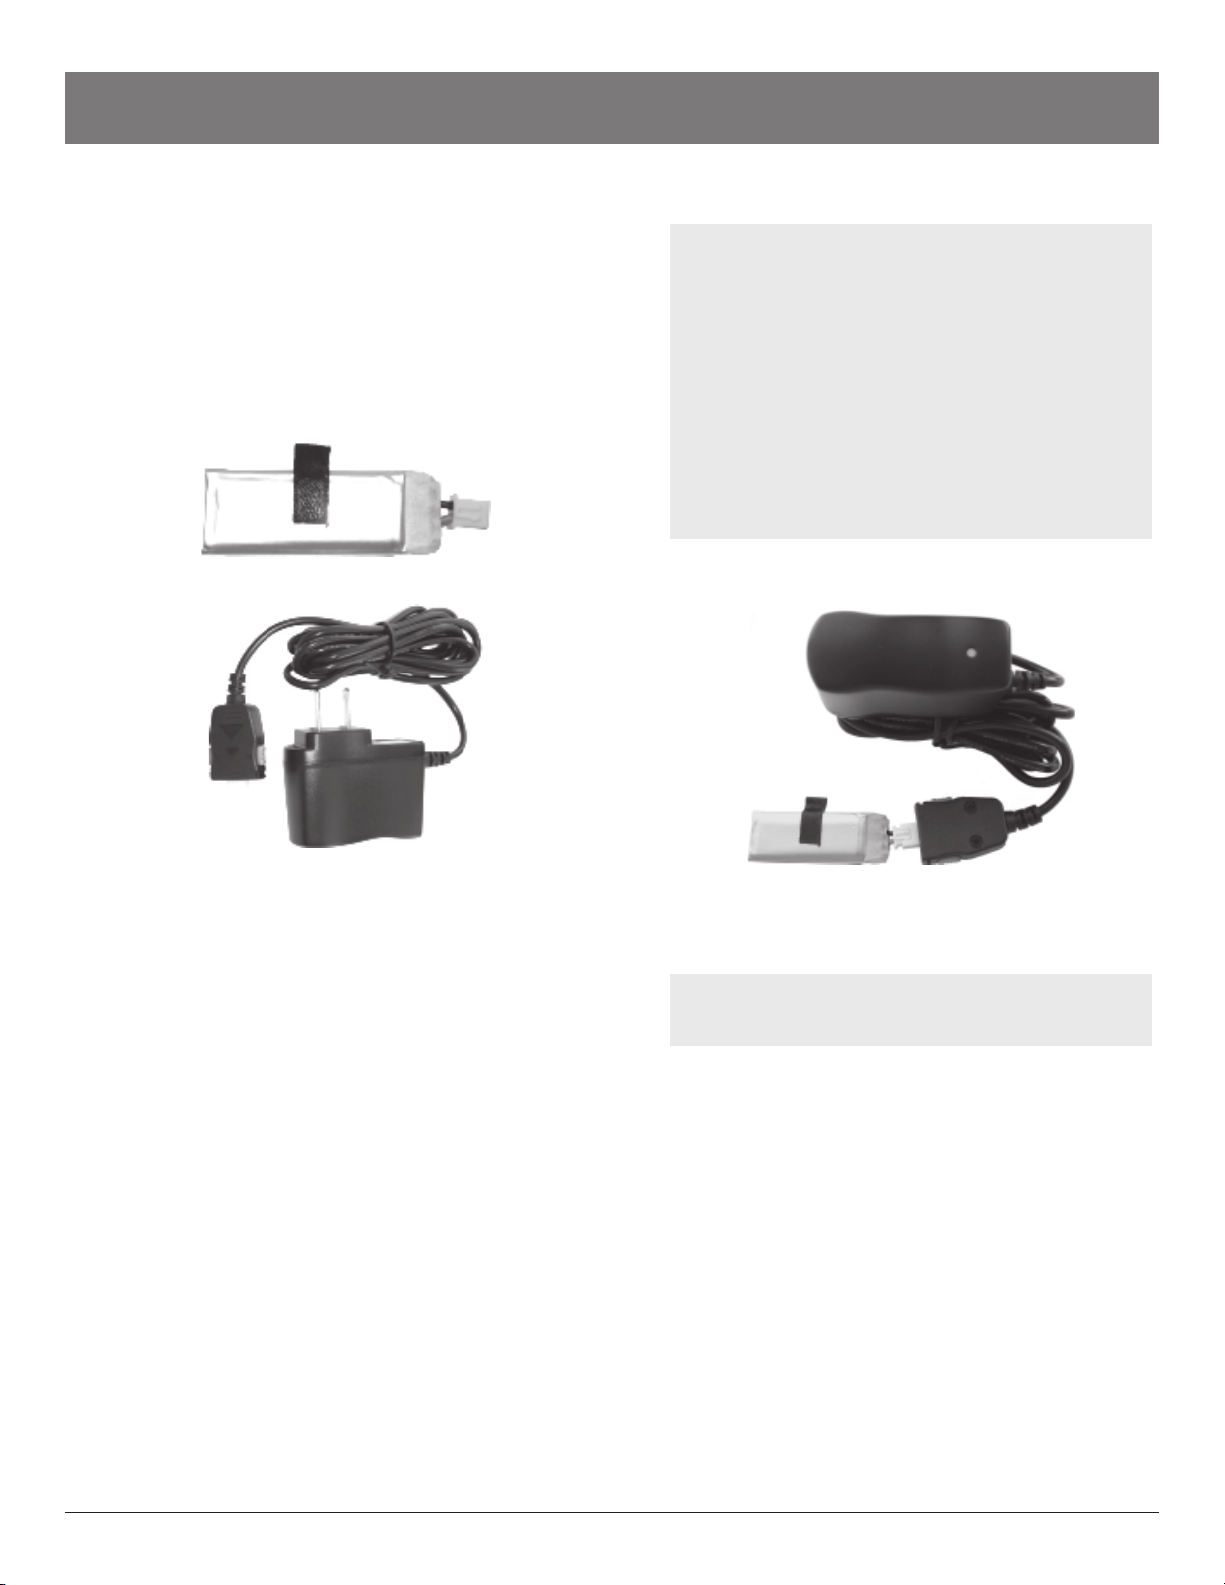
An optional Lithium Polymer (LiPo)Airplane Battery is avail-
able from your dealer. This battery is lighter and more powerful
than the standardAirplane Battery. When powered by the LiPo
Airplane Battery, Skysprite will fly faster and glide farther.
Skysprite will also fly longer—up to 10 minutes on a charge.
Parts
Lithium PolymerAirplane Battery (3.7 volts, 350 milliamp-
hour capacity)
Lithium Polymer Charger
Lithium Polymer Airplane Battery
Lithium Polymer Charger
Charging the LiPo Airplane Battery
Important
Adult supervision is required to charge and use the
LiPo Airplane Battery and Charger.
Charge the LiPo Airplane Battery ONLY with the sup-
plied LiPo Charger.
DO NOT charge the LiPo Airplane Battery with the
Transmitter.
DO NOT charge the standard NiMH Airplane Battery
with the LiPo Charger.
ALWAYS remove and disconnect the LiPo Airplane
Battery after flying.
a. Plug the LiPo Airplane Battery into the LiPo Charger.
b. Plug the LiPo Charger into a 110VAC power outlet.
c. Charge the LiPoAirplane Battery for 2 hours.
Note: Charging longer than 2 hours will not harm the
Battery. The Charger has a built-in protection device that
prevents overcharging.
d. When charging is complete, unplug the Charger from the
power outlet, then unplug the LiPoAirplane Battery from
the Charger.
Using the LiPo Airplane Battery
a. Install the LiPo Airplane Battery in Skysprite (see steps 5
through 9 in “Charge and install theAirplane Battery,” ear-
lier in this manual).
b. Because the LiPoAirplane Battery is lighter, Skysprite may
climb too fast. Bend the elevator trim tabs down about
1/32" (about the thickness of a credit card). If Skysprite
still climbs too quickly, bend the tabs down a little more.
c. As with the standardAirplane Battery, you must disconnect
and remove the LiPo Airplane Battery after flying. If you
forget and leave it plugged in for a long time, the battery
may not recharge.
Optional Lithium Polymer Battery and Charger

Skysprite instruction manual 10 FMA Direct
FMA limited warranty for Skysprite
FMA, Inc. warrants this product to be free of manufacturing
defects. Should any defects covered by this warranty occur,
the product shall be repaired or replaced with a unit of equal
performance by FMA or an authorized FMA service station.
Call (301) 668-4280 for more information about service and
warranty repairs.
Where to find more information about
radio controlled airplanes...
Academy of Model Aeronautics (AMA)
www.modelaircraft.org
AMAis the official national organization for model aviation
in the United States. Membership is open to anyone inter-
ested in flying model airplanes.
Your local model airplane club
www.modelaircraft.org/clubsearch.aspx
Local clubs chartered by theAMA can help beginners with
airplane selection, construction and flying instruction.
Your local hobby shop
www.modelaircraft.org/HobbyShopSearch.aspx
The Internet
Many resources for beginners are available on the Web.
Books and magazines
And when you need batteries, receivers, servos and other com-
ponents, always check here first...
FMA Direct
www.fmadirect.com

FMA Direct 11 Skysprite instruction manual

Skysprite instruction manual 12 FMA Direct
041212
Table of contents
Other FMA Direct Motorized Toy Car manuals


