Fmart YZ-X1 User manual

INSTRUCTION MANUAL
SUJKR ?@>

1 Important Safety Instructions.......................................................................1
2 Product Components...................................................................................2
2.1 The main machine and accessories.................................................................2
2.2 The main machine......................................................................................3
2.3 Charging station.........................................................................................3
2.4 Dustbin....................................................................................................4
2.5 Water tank...............................................................................................4
2.6 Side brush...............................................................................................4
2.7 Remote control..........................................................................................4
3 Product Operations......................................................................................6
3.1 Quick start guide........................................................................................6
3.2 Start/Pause/Standby mode...........................................................................7
3.3 Plan mode...............................................................................................7
3.4 Cleaning mode..........................................................................................8
3.5 Water tank and mop operation.......................................................................9
4 Product Maintenances................................................................................11
4.1 Cleaning of side brush...............................................................................11
........................................................................11
4.3 Cleaning of sensors and charging poles.........................................................12
4.4 Cleaning of main brush..............................................................................12
4.5 Water tank maintenance.............................................................................13
4.6 Battery replacement..................................................................................13
5 Resume to default setting...........................................................................14
6 Troubles Shooting.......................................................................................15
7 Product Parameters....................................................................................16
Table of Contents

狣
1 Important Safety Instructions
Warning! Violation of safety instructions may cause
severe personal casualty and property loss.
Do not attempt to disassemble or
revise the main machine, otherwise
personal injury.
Do not touch the power cord with wet
hand, otherwise may cause electric
shock.
Do not touch wheels and brushes when
the product is working and keep your
clothes and hair away from the product
when it is working.
Always use the original charger with
this product, otherwise may cause
Do not put weight on the power cord or
bend the power cord, otherwise may
Keep the product away from heat or
Attention! Violation of safety instructions may
cause personal injury and product damage.
Please switch the product off when you
will not use it for a long time.
Please take careful of children when
use the product to avoid scaring or
injury.
Do not use the product to vacuum
water or other liquids, otherwise may
cause product damage.
This product is intended to be an
indoor appliance. Never use it outdoor.
Make sure the charger plugged in the
socket tightly, otherwise may cause
electric shock, short-circuit, smoke or
Clear up all fragile, braided fabrics,
glasses or bottles before use it,
otherwise may cause damage.
Do not stand or sit on the product,
otherwise may cause product damage
or personal injury.
Do not use the product on an easy
falling place such as table or chair to
avoid product damage.
Do not use it in public commercial
places.
When people with disabilities (body perception and thinking ability defects) and children
using, need to be operated under the guardian to accompany with product use and get
the related instructions.
Please read the following safety instructions before using this product to
avoid damage.
Do not use the product to vacuum
stone, big waste paper, burning
cigarette ends or metals.

2 Product Components
2.1 The main machine and accessories
No. Name Quantity
1Main machine 1pc
2Charging station 1pc
3Remote control 1pc
4Adapter 1pc
5Cleaning brush 1pc
6Insturction manual 1pc
7Side brush 2pcs
8Water tank 1pc
Attention:
Please take actual product shall prevail on the basis of not less than the above accessories.
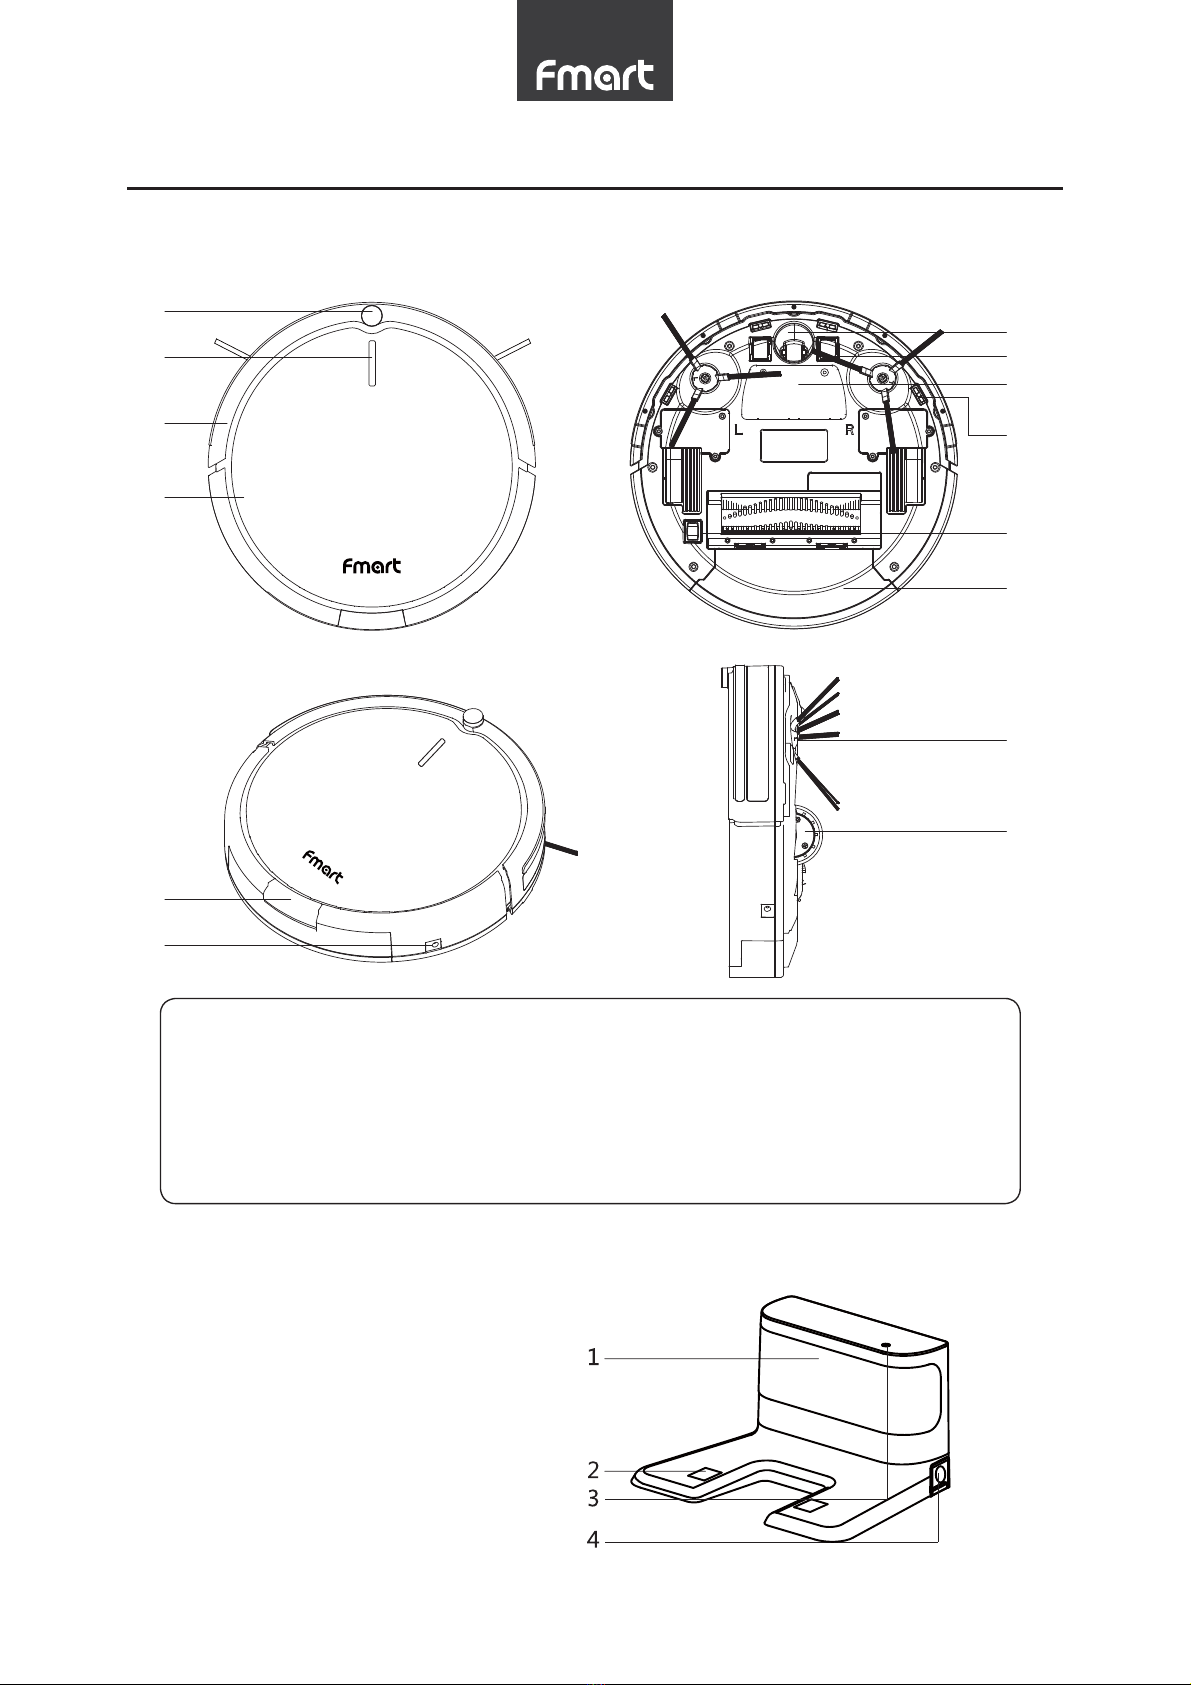
2 Product Components
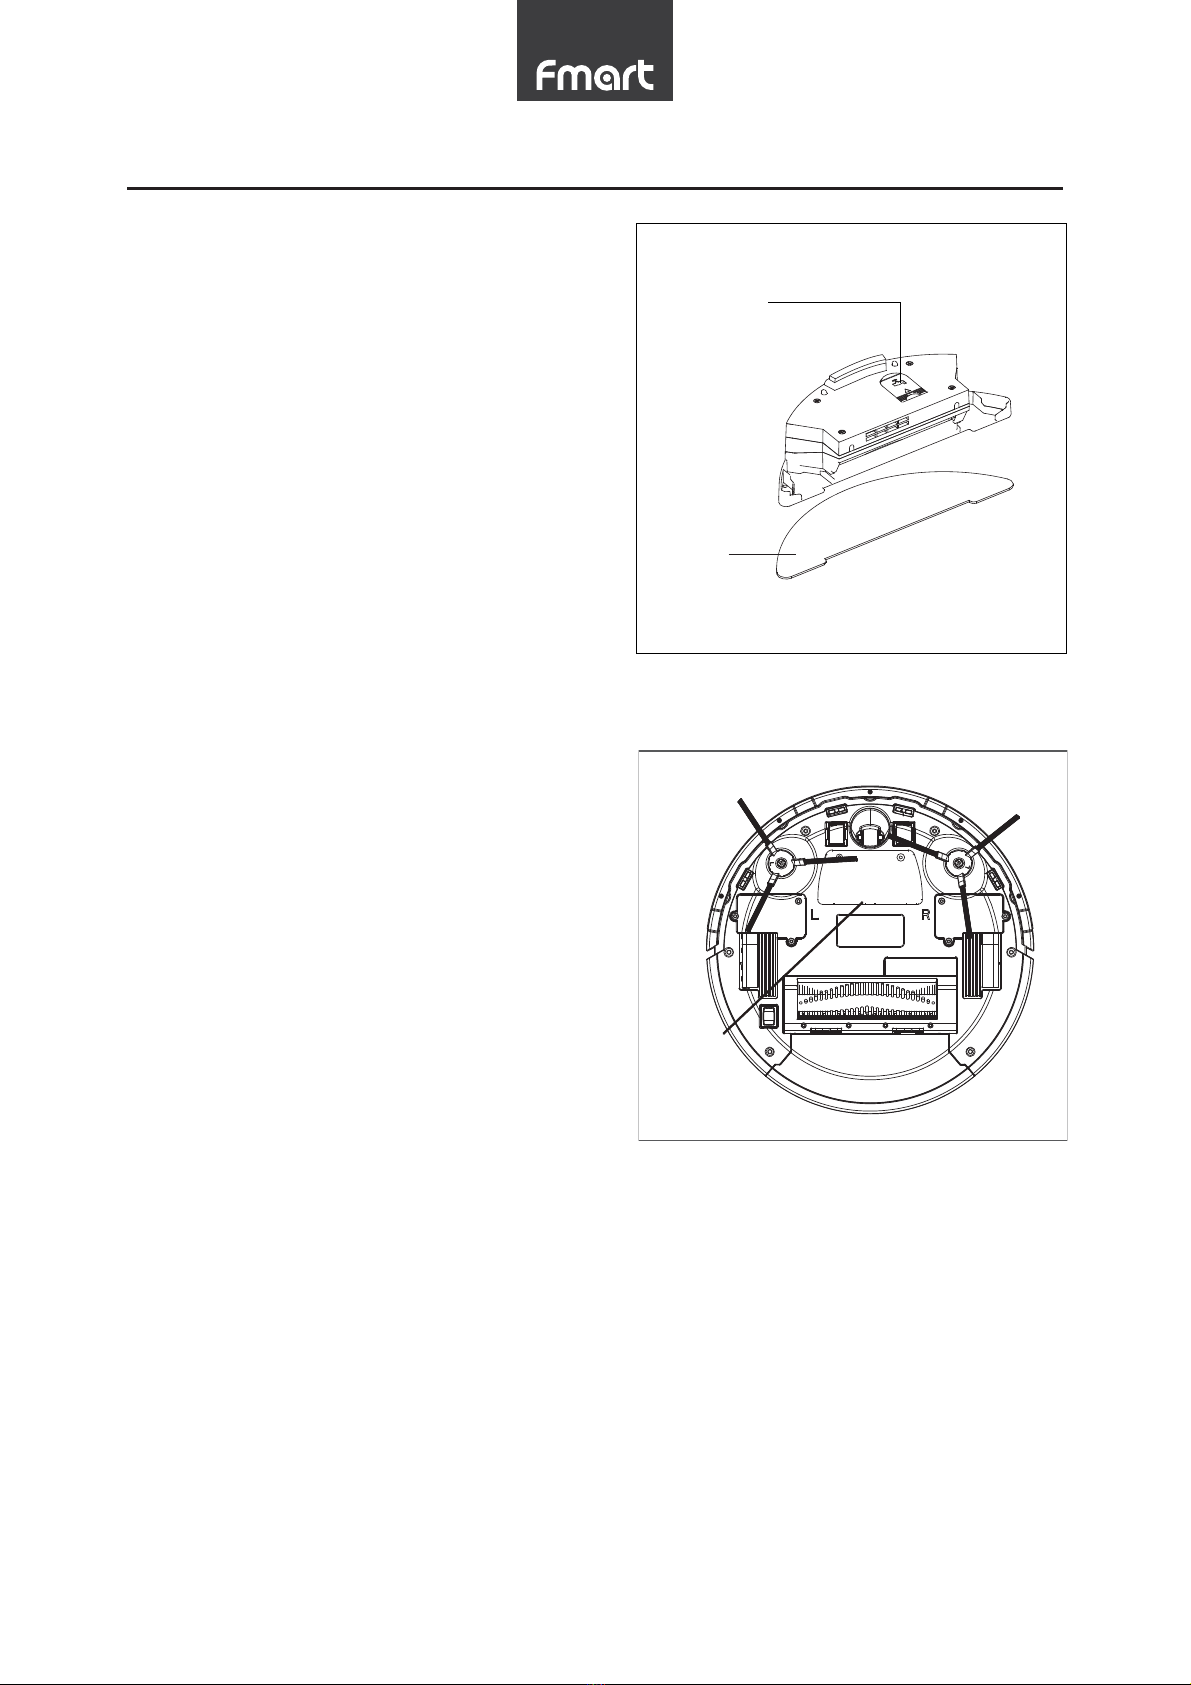
2.2 Main machine
2.3 Charging station
1.Signal projector
2.Charging poles
3.Indication light
4. Adapter socket
1. Signal receiving
sensor
2. Clean button
3. Bumper
4. Panel
5. Universal wheel
6. Charging poles
7. Battery cover
8. Stair detection
sensor
9. Main brush
10. Dustbin
11.Dustbin cover button
12.Charging socket
13. Side brush
14. Drving wheel
2 Product Components
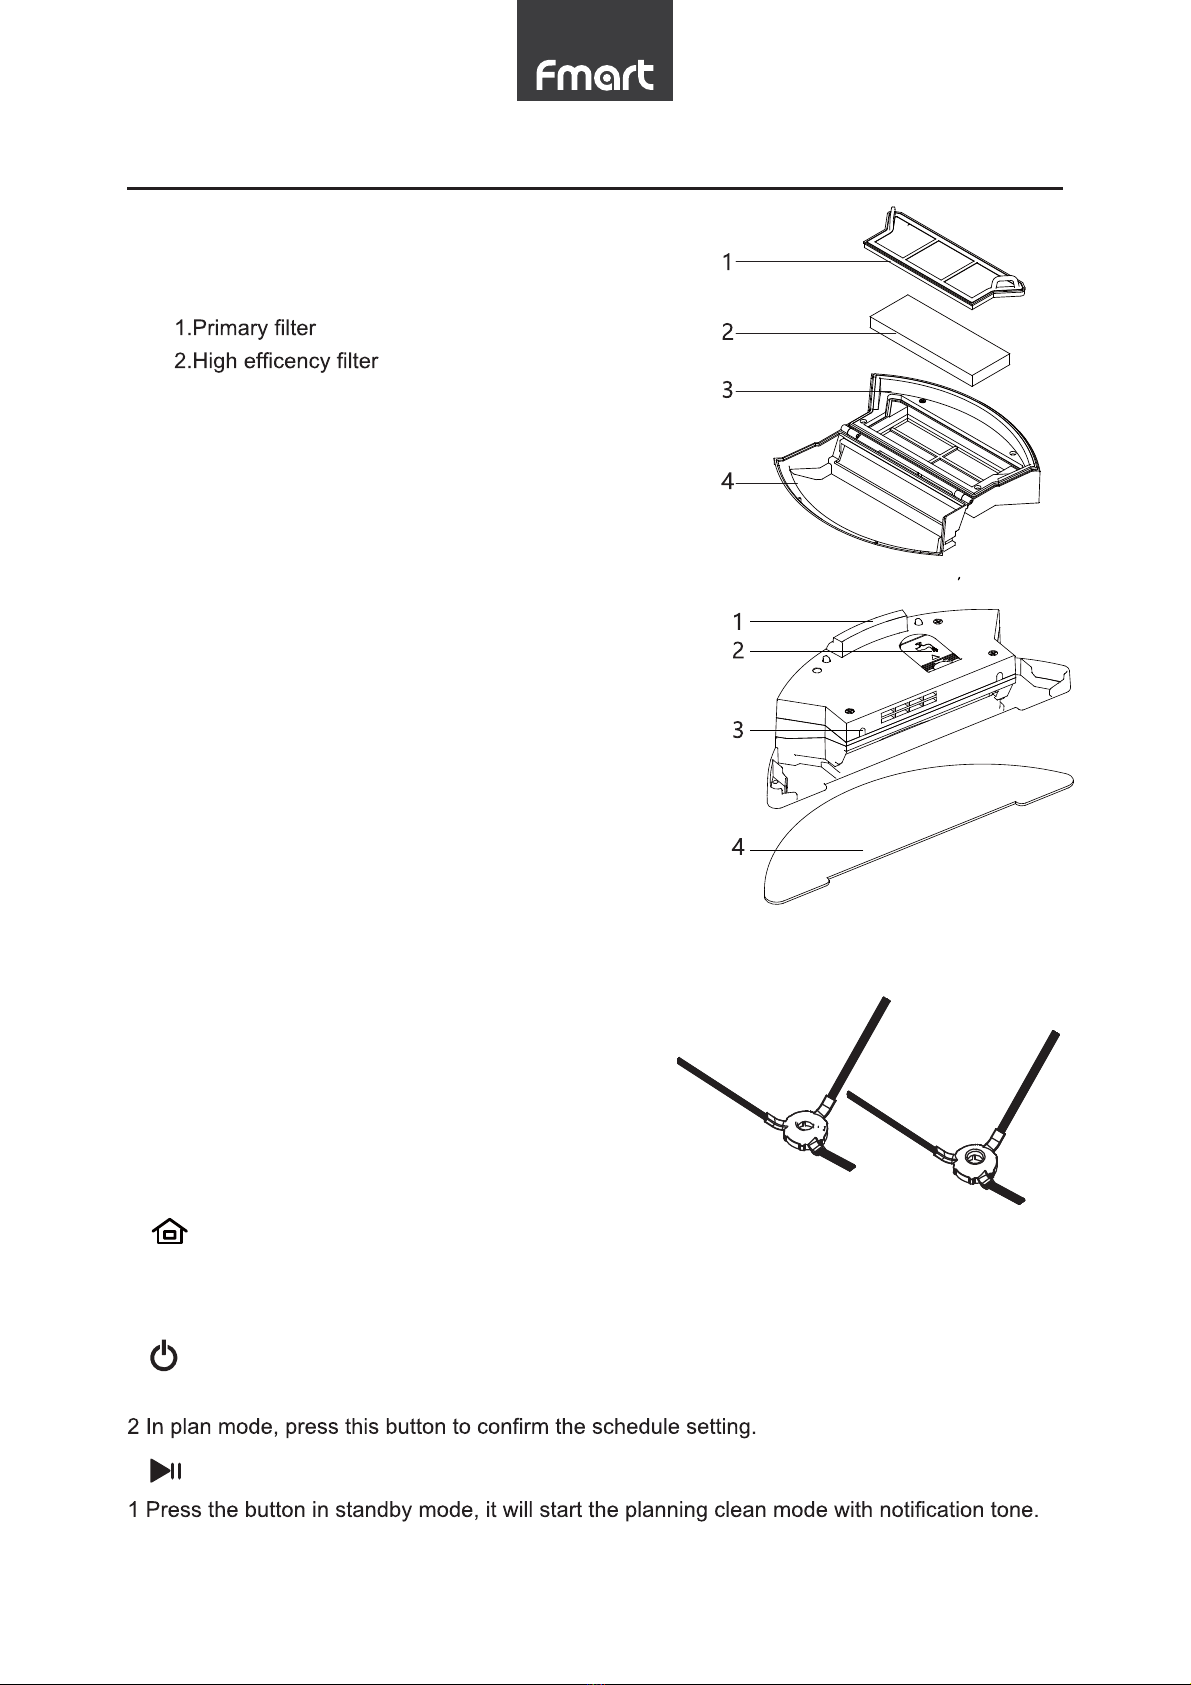
2.4 Dustbin
3.Dusbin upper cover
4. Dusbin botton cover
2.5 Water tank
1. Water tank button
2. Water inlet cap
3. Air valves
4. Mop
2.6 Side brush
Please install the side brush according to the color
of the socket of the side brush. Left brush is green
color, and right brush is red color.
2.7 Remote control
1
The robot is in standby or cleaning mode, press this button to start auto recharging. Voice
prompt “DING”
2
1 Press this button to change standby mode from sleep mode (power switch is on).
3
2 Press the button in other woking mode, it will stop working and continue work in the pre-
timeout mode after you press the button again.
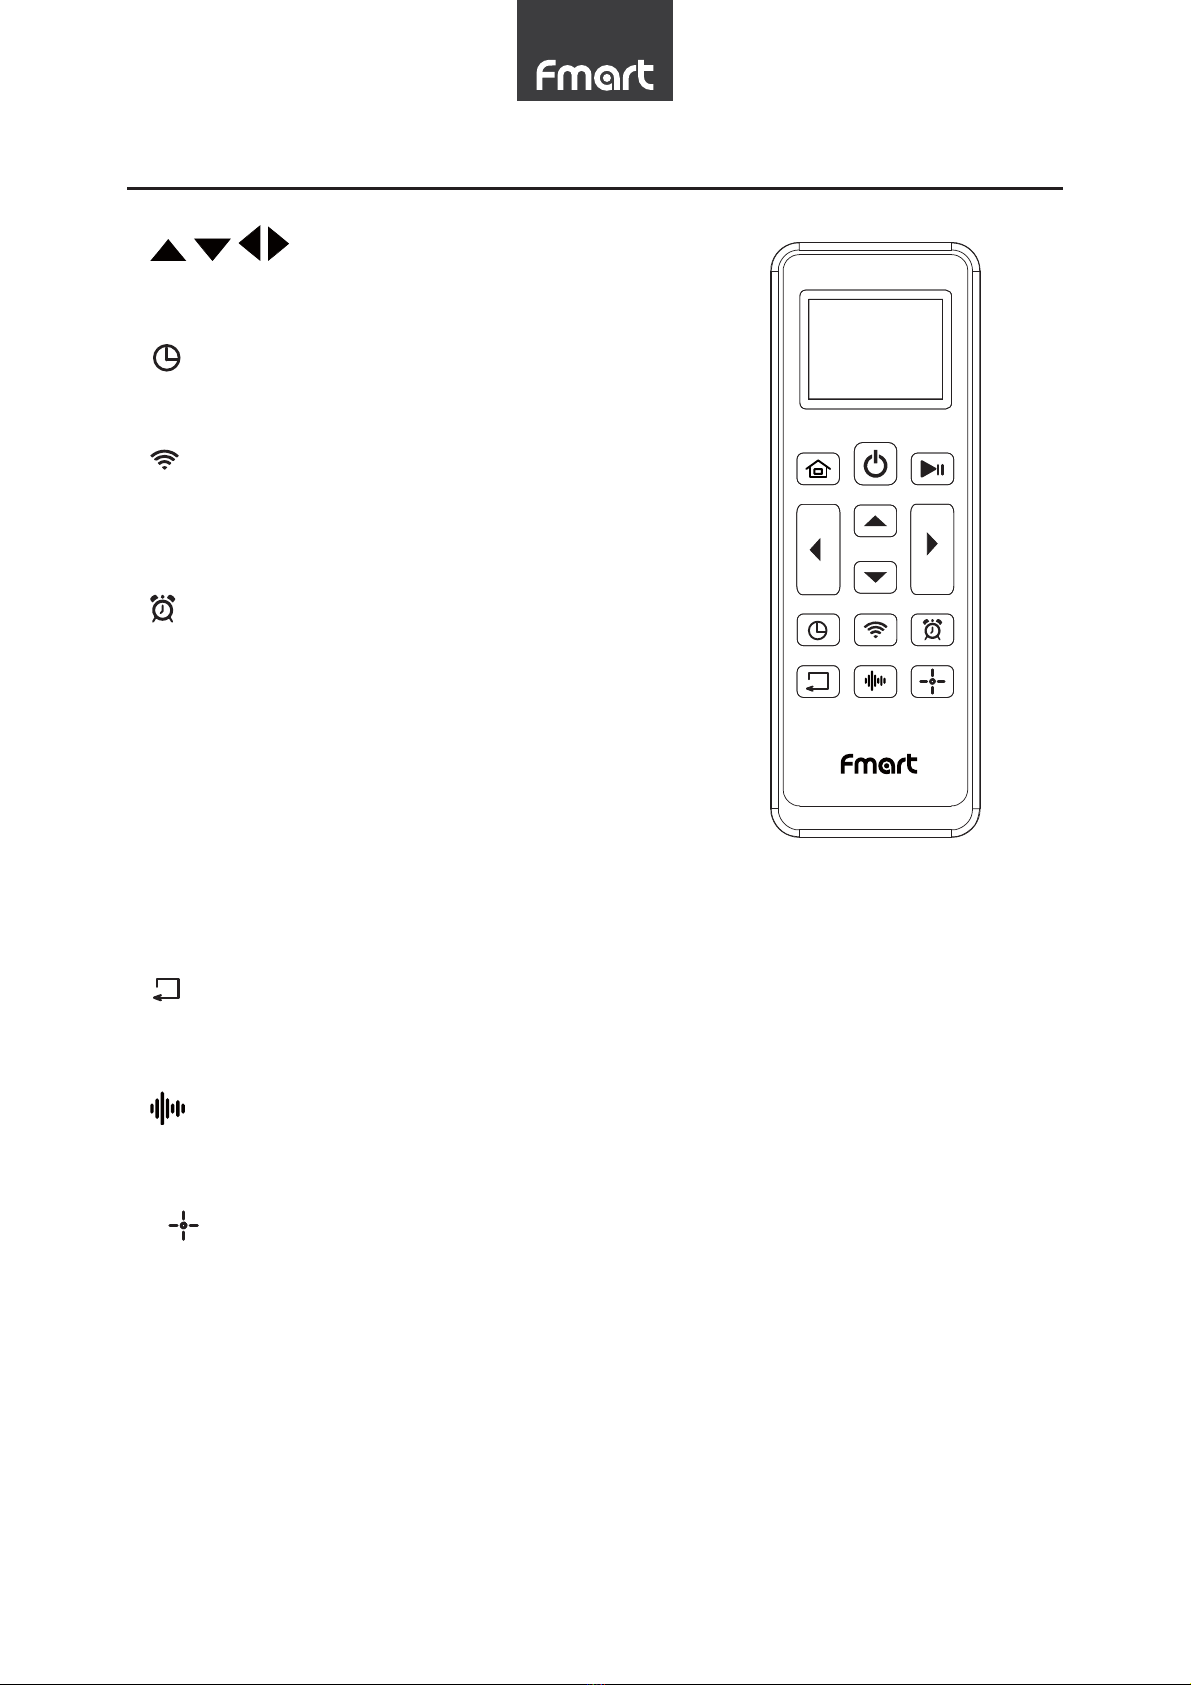
狧
2 Product Components
4
Press direction button to adjust the robot
moving direction.
5
Press this button for 3 seconds to start time
6
The main machine will start the distribution net
work if press the button for a long time which
above 3 seconds.
7
Press the botton for 3 seconds for the
appointment cleaning, press the On/Off button
remind you successful appointment with “Ding”.
Please set the time to 00:00, meanwhile,
the appointment function. The machine will
8
9
Press the button for one time in standby mode or working mode, the machine will trun “On/Off”
10
Press the button in standby mode or working mode, it will start the spot cleaning mode with
Attention:
1 Please install 2 AAA/R03(No.7) battery.
2 Please take out battery when you do not use for a long time.
3 Remote control will be in standby mode in a few seconds after use, please press any key to
wake up it.

3 Product operations
3.1 Quick start guide
1.Place charge
Place charger, connect the adapter and
power, and the power light on the charger
will stay lit. Position the charger against
the wall, and remove all obstacles about 1
or 2 meters ahead of the charger.
2. Power Switch
Turn on the power switch of the product, and press directly the sweep button on the panel, voice
prompts:enter cleaning mode, the product is start to clean.
this time the product will into the state of APP connecting network, after successful connection,
voice prompts,successful network connection. Then the users can remotely control the main
engine.
3. Main machine sweep button
Turn on the power switch of the product, and
press directly the sweep button on the panel, it
will begin with a zigzag path cleaning.
4.Product charging
There are two methods of charging.
1 Plug the power adapter directly to the
machine and the other end is plugged in
the power.
2 When the charge is lower than 20%, the
machine will automatically start looking for
recharge stand, or press the recharge
button on the remote control to return
the automatic charger. Automatic
recharge-sensing distance as in the
charging a RADIUS 4m, please ensure
that the charger is powered and obstacle
.
8UHUZ
'JGVZKX
6U]KX
PP
P

狩
3 Product operations
Attention:
1 When charging, make sure the power switch is on.
2 using the charger stand will interrupt the charging and start the cleaning, so please do not
make this operation when using thedirect charge.
4 When charging, the cleaning button blinks, and when fully charged, the cleaning button stops
blinking, and lit permanently.
5 Please switch the main machine off when long time no use.
3.2 Pause/Standby mode
1. This model operation process: sleep mode>Standby mode>Cleaning
mode
1 Sleep mode: power switch is on, CLEAN button light is off, the robot does not work.
2 Standby mode: power switch is on, CLEAN button light is on, the robot does not work.
3 Cleaning mode: the robot is cleaning, CLEAN button light is off.
2.Start
1 Please turn on the switch at the bottom of the
machine.
2 Press sweep button on the machine or on
the remote control to automatically start the
machine to work.
Attention:
When the robot is in sleep mode, press CLEAN
button on the main machine to wake it up, press
again to start cleaning.
3.Standby mode
Standby mode refers to the machine switching from working status to static status. Press the
sweep button on the machine or switch button on the remote control to operate.
4.Sleep mode
In standby mode without any operation the machine will enter into standby mode after 2
minutes, or press the On/Off Button on the remote control and the machine is in static status
and the button indicator light is off.
3.3 Plan mode
Under the plan mode, the machine can work at a preset time.
1.Set the remote controller clock time

狪
3 Product operations
according to “up, down, left and right” direction button.
2 Press the clock button once again to save the setting.
2.Set the pre-scheduled cleaning time
1 Point the remote controller at the machine (the machine is in standby status).
2 Long press the “plan” button in the remote controller for 3 seconds into the plan mode, and set
3 Press the on/off button to save the settings.
4 Please set the time to 00:00 if you want to cancel the appointment function. Press the On/Off
Attention:
1 Set clock for your remote control before cleaning, the time settings are using real time.
2 Replace the remote control batteries, reset the appointment.
3 This machine uses real time for an appointment. If power is off, you will need to make an
appointment.
4 Make an appointment for each half hour, clock settings are in minutes.
5 It just can be set once if you make appointment by the remote control, please set by APP if
you want to make several appointments.
3.4 Clean mode
1.Automatic clean
Press the plan cleaning key on host or the
key on remote then product into the bow-
shaped path planning mode of cleaning, will
after cleaning
Attention:
Machine in any cleaning mode, press the
remote control "on/off" button or sweep button
on the machine to stop working.

狫
3 Product operations
2.Spot cleaning
Place machine in clean area, press the remote
button on the machine to start with the
placement point spiral sweep.
3.Edge cleaning
Press button on remote control
to start edge cleaning mode, the robot will start
edge cleaning.
Note:
1 The current job will be suspended if you press
the auto button, whatever in any cleaning mode.
Press the auto button again the machine will
continue work in the pre-timeout mode.
2 Please keep the machine in the Pause Mode
mode to the auto mode, then press the auto
button again, it will switch to auto mode.
3.5 Water tank and mop operation
1.Filling water into water tank
1 Open water inlet cap.
2 Fill in water and cover the cap. Water tank capacity is 260ml(appr.).
3 Check whether the tank bottom outlet wool column drops (not drops is normal).
facing the ground.

3 Product operations
5 Put the tank into the machine, start the machine, and water enters into the mop through wool
column, water stopped dripping out of the tank when the machine stops. Pour water out if the
machine stops working for a long time.
2 Installation of water tank
jacks.
Attention
1 Please remove the water tank when injecting
water, and do not inject with complete machine.
2 Please remove water drops when installation
of water tank.
3 Mop shall not be too wet, and wring to prevent
tire slippage.
Mop
4 Product Maintenances
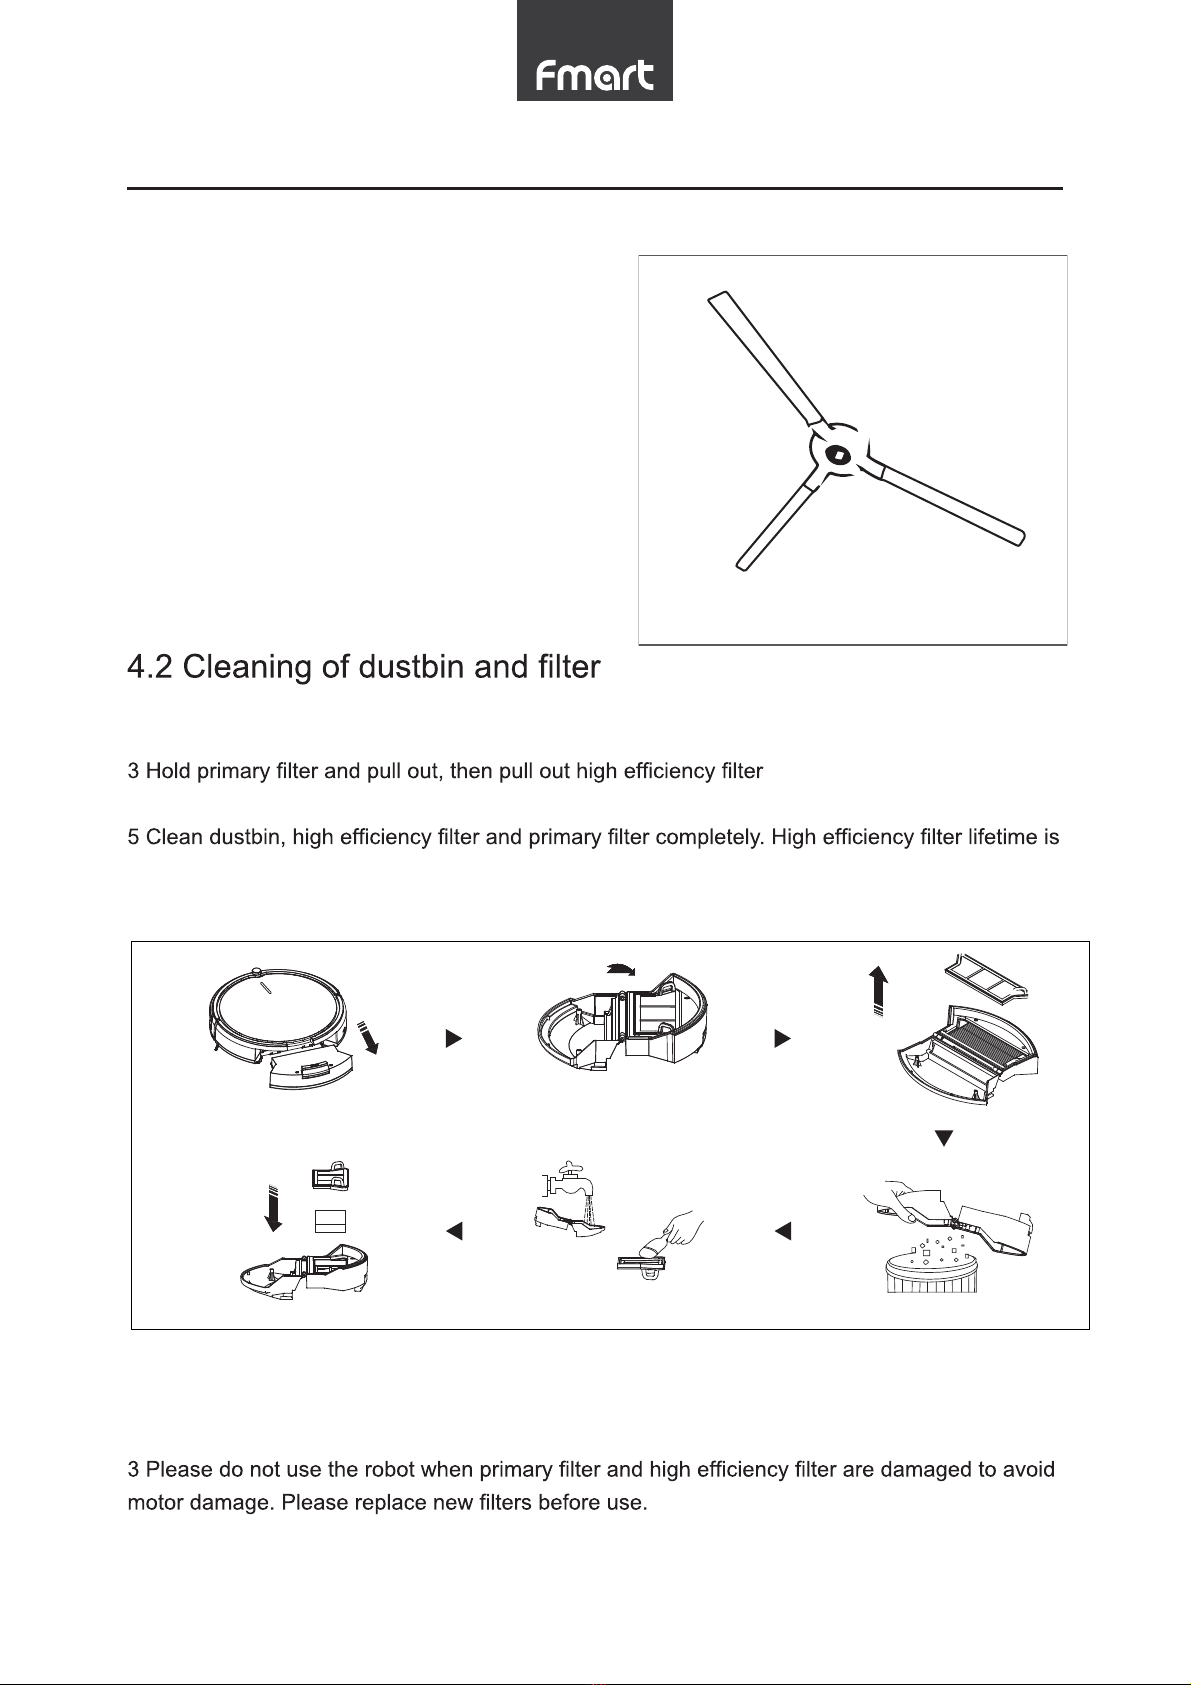
4.1 Cleaning of side brush
Side brush can be removed and clean by water.
Please dry them completely before second use.
If side brushes damaged, please replace them.
Attention:
When replace side brush, please pay attention
to the L and R position and color.
1 Press PUSH button on dustbin, remove the dustbin.
2 Open dustbin bottom cover.
.
4 Pour out trash into trash bin.
6 months.
6 Please install them correctly before second use.
Attention
1 Please clean the dustbin after each use.
2 Parts washed by water, do not expose to sun. Please install them after drying completely.

4 Product Maintenances
4.3 Cleaning of sensors and charging poles
1 Clean sensors and charging poles on robot bottom by using soft cloth.
2 Clean charging poles on charging station by using soft cloth.
4.4 Cleaning of main brush
1 Press the locker, open main brush cover.
after cleaning.
3 Clean the hair and dirt by using a cleaning brush. Please make sure that do not lose the
rubber.
4 Install the main brush and cover after cleaning.
Attention
All maintenance must be done after dustbin removed.
)NGXMOTMIUTZGIZUX
)NGXMOTMIUTZGIZUX
9KTYUX 9KTYUX
4 Product Maintenances
4.5 Water tank maintenance
4.6 Battery replacement
1 Open the battery cover by using a screw driver.
2 Hold the insulation cloth and pull out the battery.
3 Detach the battery from the main machine.
4 Install new battery. Make sure the side with
words up.
5 Connect the battery with main machine.
6 Lock the battery cover.
7 Turn on the robot to check.
Attention:
1 Do not use unapproved battery to avoid damage.
2 Please charge for 6 hour after new battery
changed.
3 Keep the old battery for recycling.
(GZZKX_
=GZKXOTRKZ
3UV
The mop needs to be cleaned on time,
the mop is removed from the water
tank and cleaned.
Note: If the water tank is not used for a
long time, please pour out the water.
5 Resume to Default Setting
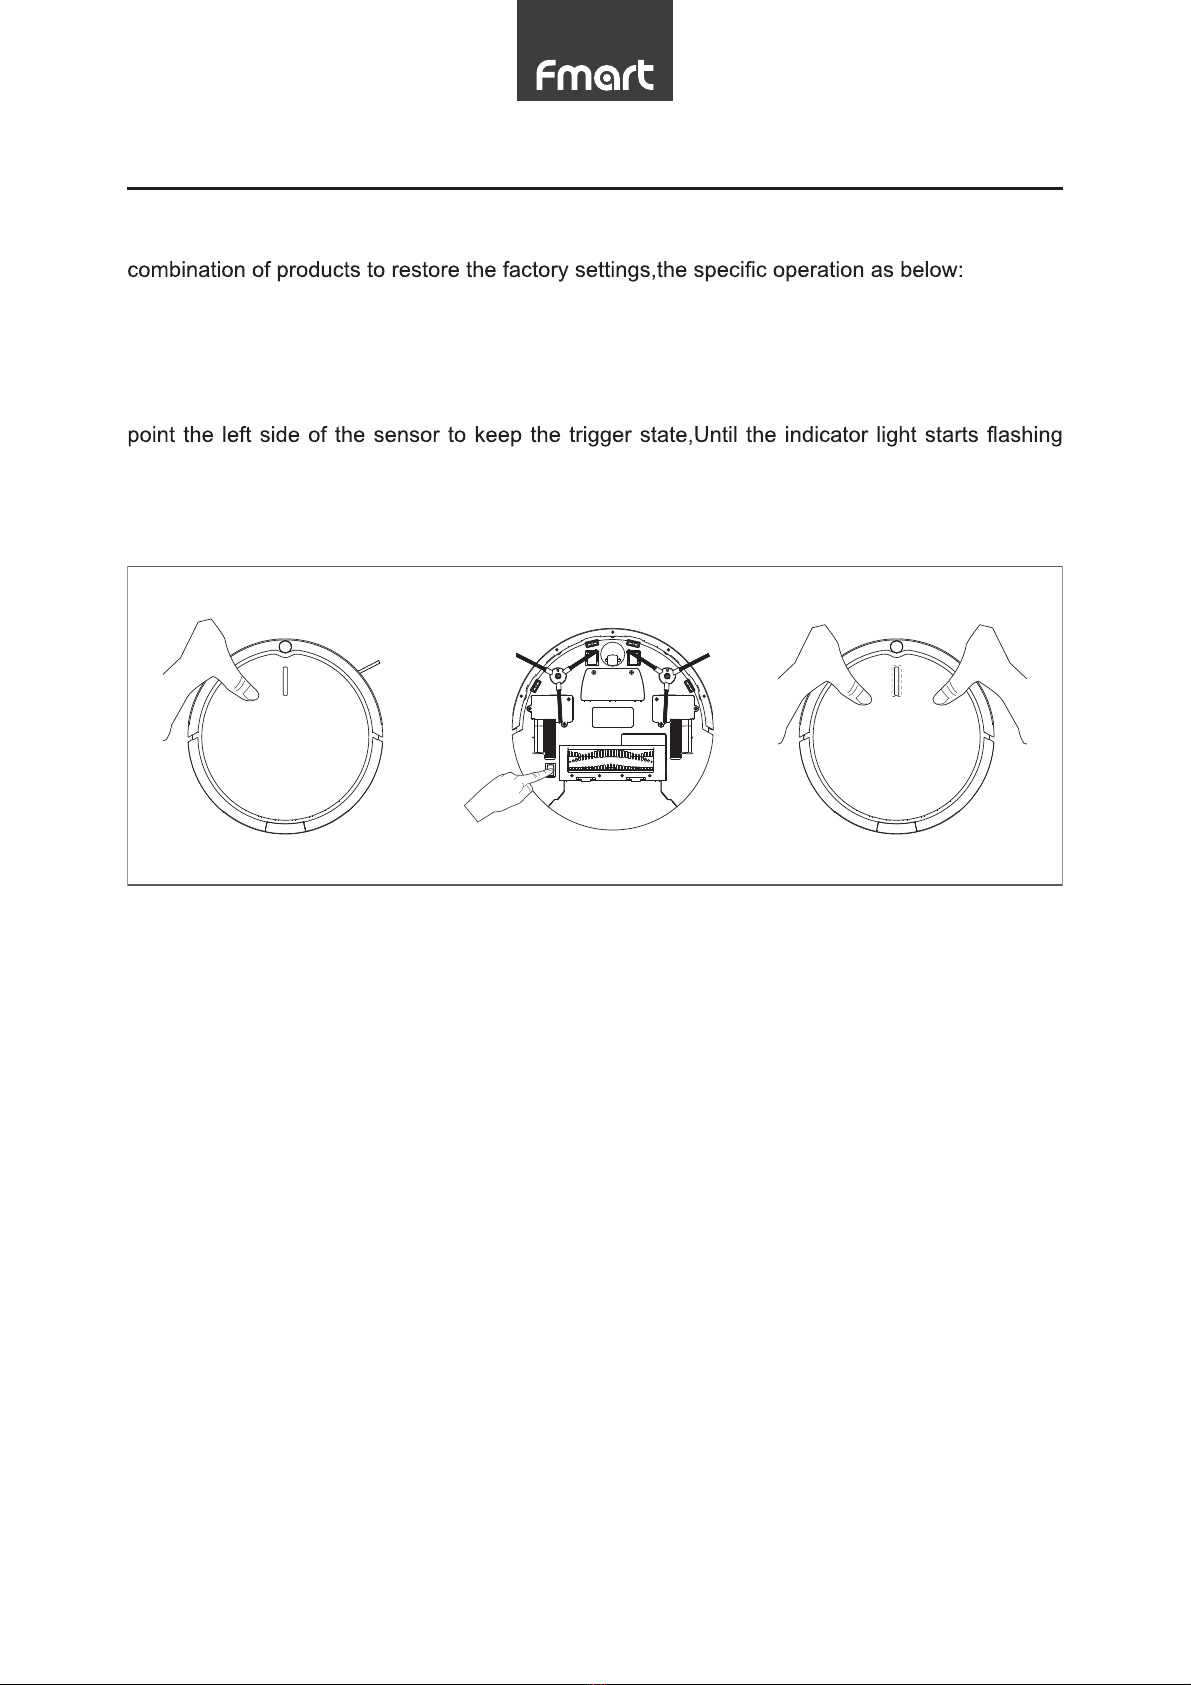
If the machine has some software system problems during the using ,it can be triggered by the
1 Hold down the host front collision left sensor when the produce is in shutdown state.
2 While hold down the host front collision left sensor ,open the power switch on the bottom ,the
host machine lights starts blinking.
3 Until the indicator lights became light on,hold down the host front collision right sensor,at this
again and release the left and right sensors.
4 The product will restart,at this point the restore the factory settings was completed.

6 Trouble shooting
No. Problems Solution
1
The robot keeps
moving backwards
1 Avoid working in high light intensity environments.
2 Avoid working on deep dark carpets.
3 Clean the stair detection sensors by using a soft
cloth.
4 Check the bumper and clean.
2The robot do not work 1 Turn on the power switch button.
2 Check the battery capacity, and charge the robot.
Check again after full charging.
3
The robot do not
recharge automatically
1 Make sure the indication light on charging station is
on.
2 Check if there are obstacles between robot and
charging station.
3 When low battery, please charge the robot by using
adapter.
4
The robot cannot be
recharged
1 Please use approved adapter and make sure
adapter plugged.
2 When the robot is damaged, please do not use.
Contact after sales.
5Remote control do not
work
1 Check the remote control battery; Check the signal
sensor on the robot clean it.
7 Product Parameters
Size 320*320*85mm
Net Weight 2.6kg
Working voltage 14.8V
Input voltage 19V
Input current 1.0A
Dustbin capacity 400mL
One time charging time 4-6h
One time cleaning time 90-120min

8 F CC Statement
This device complies with Part 15 of the FCC rules. Operation is subject to the
following two conditions: 1) this device may not cause harmful interference, and 2)
this device must accept any interference received, including interference that may
cause undesired operation.
Note: This equipment has been tested and found to comply with the limits for a Class
B digital device, pursuant to part 15 of the FCC Rules. These limits are designed to
provide reasonable protection against harmful interference in a residential installation.
This equipment generates uses and can radiate radio frequency energy and, if not
installed and used in accordance with the instructions, may cause harmful
interference to radio communications. However, there is no guarantee that
interference will not occur in particular installation. If this equipment does cause
harmful interference to radio or television reception, which can be determined by
turning the equipment off and on, the user is encouraged to try to correct the
interference by one or more of the following measures:
--Reorient or relocate the receiving antenna.
--Increase the separation between the equipment and receiver.
--Connect the equipment into an outlet on a circuit different from that to which the
receiver is connected.
--Consult the dealer or an experienced radio/TV technician for help.
Changes or modifications not expressly approved by the party responsible for
compliance could void the user’s authority to operate the equipment.
FCC Radiation Exposure Statement
This device complies with FCC RF radiation exposure limits set forth for an
uncontrolled environment. This transmitter must not be co-located or operating in
conjunction with any other antenna or transmitter.
This device must operate with a minimum distance of 20 cm between the radiator
and user body.
Table of contents


