Fogazzo 755 Service manual
Model 755
Wood Fired Oven Kit
INSTALLATION INSTRUCTIONS
&
OWNER’S MANUAL
®
Manufacturing, import, export, and distribution of wood fired ovens, barbecues, fireplaces and, related accessories.
USA Headquarters
114 East Saint Joseph Street
Arcadia CA 91006
Toll Free 1- 66-FOGAZZO (364-2996) Website: www.fogazzo.com Email: [email protected]m
Model 755Wood Fired Oven Kit
Conception and industrial design: Sergio de Paula
United States Patent # USD642 55
Model 755 Installation Instructions and Owner’s Manual
Editor: Sergio de Paula
Illustrations: SDP&A and Sergio de Paula
Photography: Renata Mancini and Sergio de Paula
Recipes from: Mancini Family and De Paula Family
ote:
All information contained herein, is based on information which was available at the time of publication. Fogazzo reserves the
right to make changes as deemed necessary at any time and, without notice.
Important:
heck with the local building authority and or the fire department having jurisdiction over your project, for all construction and
permit requirements, and or use approvals, prior to the start of your installation.
Warranty:
A copy of the Fogazzo Five-Year Limited Warranty for the Model 655, is found on the last page of this manual, and is also
posted on the world wide web at: http://www.fogazzo.com/warranty.html.
EPA, UL, FPA, and SF Certification
The product listed in this installation manual, when installed in accordance to the instructions contained herein, has been fully
tested and certified to meet the
UL737 and the UL2162 standards. Additionally, it has been verified to conform to the
NSF/ANSI-4 and ANSI-Z83.11a standards
, and the NFPA lassification of a “Prefabricated Fire hamber Assembly”.
EPA certification has been applied for and granted, a copy of which will be available at the www.epa.gov website by mid 2013.
Venting:
The oven listed in this installation manual, is recommended by Fogazzo to be vented though a 5” or 6” internal diameter,
UL103HT standard listed, double wall chimney pipe system, to a minimal total length of 36 inches of pipe, and be terminated,
with a chimney cap containing a UL approved spark arrestor screen. Please check local codes, applicable to the specifics of
your particular installation.
Clearances:
The oven shall be installed to a minimum clearance of 6” (six inches) to combustible materials.
Declaration of Conformity
Fogazzo hereby declares that these products are in conformity with the following standards and directives of the EEC
Model 755
89/106 EEC
Construction Products Directive
93/68/EEC
EC Marking Directive
The construction files for this product are held by Fogazzo
(the manufacturer) and would be available for inspection
by a national authority, upon request.
Signed by 21, October, 2013
For Fogazzo Wood Fired Ovens and Barbecues, LLC
®

Thank you for choosing a Fogazzo Wood Fired Oven Kit.
The “Treasure Chest” series of wood fired ovens, is the result of ore than three decades of
work and study in the field of wood fired oven design, construction, and use. I used this acquired
knowledge to design a series of wood fired oven kits, that could be built quickly, at a low cost, and
with little or no chance for istakes or delays. If the directions are followed, the design is truly
foolproof and it resolves any of the flaws which I believe plague any existing oven designs.
This book contains valuable infor ation on how to properly install, operate, and aintain
your new oven. Please read all instructions carefully, and plan your installation well ahead of
ti e, to ensure the ti ely co pletion of your project. The installation is designed for professionals
with full knowledge of construction practices or, for well infor ed DIYers. If you are unsure of
any aspect of this installation, please consult Fogazzo toll free at 1-866-FOGAZZO or a qualified
local contractor.
Every oven installation is unique because generally, the architectural ele ents of the ho e, is
what dictates the style and types of finishes the are used. The ai of this book at a ini u is to
show proper installation of the actual kit, and where needed, to convey known practices that are
considered essential for a good installation overall.
A well-insulated oven will perfor ore efficiently and therefore better. The concrete shelf is
designed to support the oven and to aid in heat retention. Mini al cracking inside any wood fired
oven is expected and, is a characteristic of any cast refractory product. All the supplied insulation
aterials are the ini u s to aintain efficiency, any additional insulation should be ade fro
safe, non-fla able, readily available aterials. Please follow the precautions listed for each
product.
Following the guidelines contained herein, will ini ize proble s or delays and, will ensure
that your Fogazzo Treasure Chest Wood Fired Oven Kit, will last a lifeti e. Upon co pletion of
the oven kit installation, it is also critical to carefully follow all the initial firing guidelines, which
will aid in the proper curing of your new oven.
Please follow the directions carefully and be patient, your patience will surely be rewarded.
Cheers,
Sergio de Paula
President
®

Model 755 Installation Instructions and Owner’s Manual © 2013 Fogazzo Wood Fired Ovens and Barbecues, LLC All Rights Reserved

TABLE OF CONTENTS
· Precautions 1
· Kit Contents 2
· Materials List 2
· Exploded view 3
· Oven Kit Dimensions 4-5
· Before you begin / Schedule summary / Plan View 6
· Foundation & Floor Slab 7
· Masonry Construction 7
· Concrete Shelf 7
· Oven Pre-assembly/Final Assembly 8-9
· Oven Enclosure 11
· Chimney & Insulation 11
· Roofing and Exterior Finishes 11
· Curing & Initial Firing 12
· Resources 12
· Oven Basics 13
· Starting Your Oven 14
· Firewood 15
· Dough Recipes 16-17
· Pizza Making Basics 18
· Pizza Making Step By Step 19-21
· Grilling-Roasting-Baking 22
· Fogazzo Limited Warranty 23
Model 755 Installation Instructions and Owner’s Manual © 2013 Fogazzo Wood Fired Ovens and Barbecues, LLC All Rights Reserved
DO NOT THROW THIS MANUAL AWAY
PLEASE RETAIN THIS MANUAL FOR FUTURE REFERENCE!
IF YOUR OVEN IS NOT PROPERLY INSTALLED A FIRE MAY RESULT TO REDUCE
THE RISK OF FIRE, FOLLOW THESE INSTALLATION INSTRUCTIONS AND ALL
LOCAL BUILDING AND FIRE CODE REQUIREMENTS CAREFULLY
FOR YOUR SAFETY
Wood fired ovens must be vented using Class A chimney systems, installed in accordance
with all relevant Local and National Codes The installation and use of these class A chimney
components must be also be in accordance with the manufacturers installation instructions
THE USE OF WOOD FIRED OVENS, GENERATES CREOSOTE AND OTHER SUBSTANCES THAT
WILL ACCUMULATE IN IT’S CHIMNEY SYSTEM OVER TIME THE RATE OF ACCUMULATION
DEPENDS ON FACTORS SUCH AS: FREQUENCY OF USE, FIRE TEMPERATURE, THE WOOD TYPE
AND, ITS MOISTURE CONTENT THOROUGH FLUE AND CHIMNEY INSPECTION AND
CLEANING IS THE BEST WAY TO MINIMIZE THE RISK OF CHIMNEY FIRES
Chimney System Maintenance and Creosote Problems
When organic materials such as wood is burned in an oven, volatile gases and vapors are
produced These gases and vapors are carried up the chimney and, some may condense on
its surface, forming creosote Chimney creosote is combustible and, if not removed from the
inside of the chimney, may cause chimney fires Chimney fires are very hazardous because of
their high temperatures which can cause structural damage to the chimney and can ignite
nearby combustible materials
Creosote is produced when any type of wood is burned Because of their higher extractive
content, certain species have more potential than others for producing creosote, but the
amount of creosote depends more on the type of fire and the temperature of the chimney
surface A smoldering, low temperature fire will produce more creosote than a roaring, high
temperature fire, because the hotter fire burns more of the condensable gases More creo-
sote will condense on a cool chimney surface than on a warm surface More creosote is also
produced when wet wood is burned because of the lower temperature of the fire and a less
complete combustion
Creosote problems can be minimized by:
(1) Burning only well seasoned, thoroughly air-dried wood
(2) Making small hot fires instead of large smoldering fires and, keeping the oven door open
(3) Inspecting and cleaning the chimney as needed frequently
Please refer to the chimney manufacturer’s instructions for cleaning and maintenance
FOGAZZO RECOMMENDS THAT YOU SUBMIT YOUR CHIMNEY PLANS TO THE AUTHORITY HAVING
JURISDICTION BEFORE PROCEEDING WITH INSTALLATION OF ANY WOOD BURNING APPLIANCE
Information on installation and or maintenance is available from
Fogazzo, toll free at 1-866-364-2996 It is recommended that this
oven be installed, and maintained by qualified professionals
Model 755 Installation Instructions and Owner’s Manual © 2013 Fogazzo Wood Fired Ovens & BBQs, LLC All Rights Reserved 1

Model 755
Wood Fired Oven Kit
Installation Instructions
®
2
Kit Contents
24 ea Refractory floor bricks
1 ea Front wall precast
1 ea Apron precast
1 ea Hood/flue precast
2 ea Side walls, precast
1 ea Rear wall precast
3 ea Domes precast
1 ea Steel oven door
1 ea Bucket refractory mortar
Insulation Materials
24 sq ft 2” Insulation blanket
12 sq ft Rigid insulation board
Printed Materials
1 ea Installation Instructions
1 ea Warranty
Installation Instructions Toll Free Help 1-866-FOGAZZO
Order Model 755
accessories at
WWW FOGAZZO COM
Materials List
Your oven kit does not include anything not listed in the kit contents above The following materials
list is provided for your convenience only Your materials list will vary based on your particular needs
Foundation and slab
Stakes and forms
1500 psi or higher strength concrete mix
#3 or #4 steel rebar
Walls and support shelf
Forms
6x8x16” masonry blocks (CMU)
Masonry mortar (Type S)
1500 psi or higher strength concrete mix
Roof
Non-flammable roofing material
Chimney (not included in the oven Kit)
1 each Duratech® #9341
Anchor plate for 5” pipe
1 each Duratech® double wall chimney
Pipe (exact length will depend
on individual installation needs)
1 each Duratech® #9384 chimney cap
with spark arrestor
1 each Tube high temperature calking
Order your Duratech® components by calling toll free
1-(866) FOGAZZO or online at www fogazzo com
Duratech
®
#9341
Anchor plate for 5” pipe
Model 755 Installation Instructions and Owner’s Manual © 2013 Fogazzo Wood Fired Ovens & BBQs, LLC All Rights Reserved

Exploded View
3
Flue Hood
Apron
Side Wall
Front Wall
Dome Front Dome Rear
Back Wall
Side Wall
Floor Bricks
Under Oven Insulation
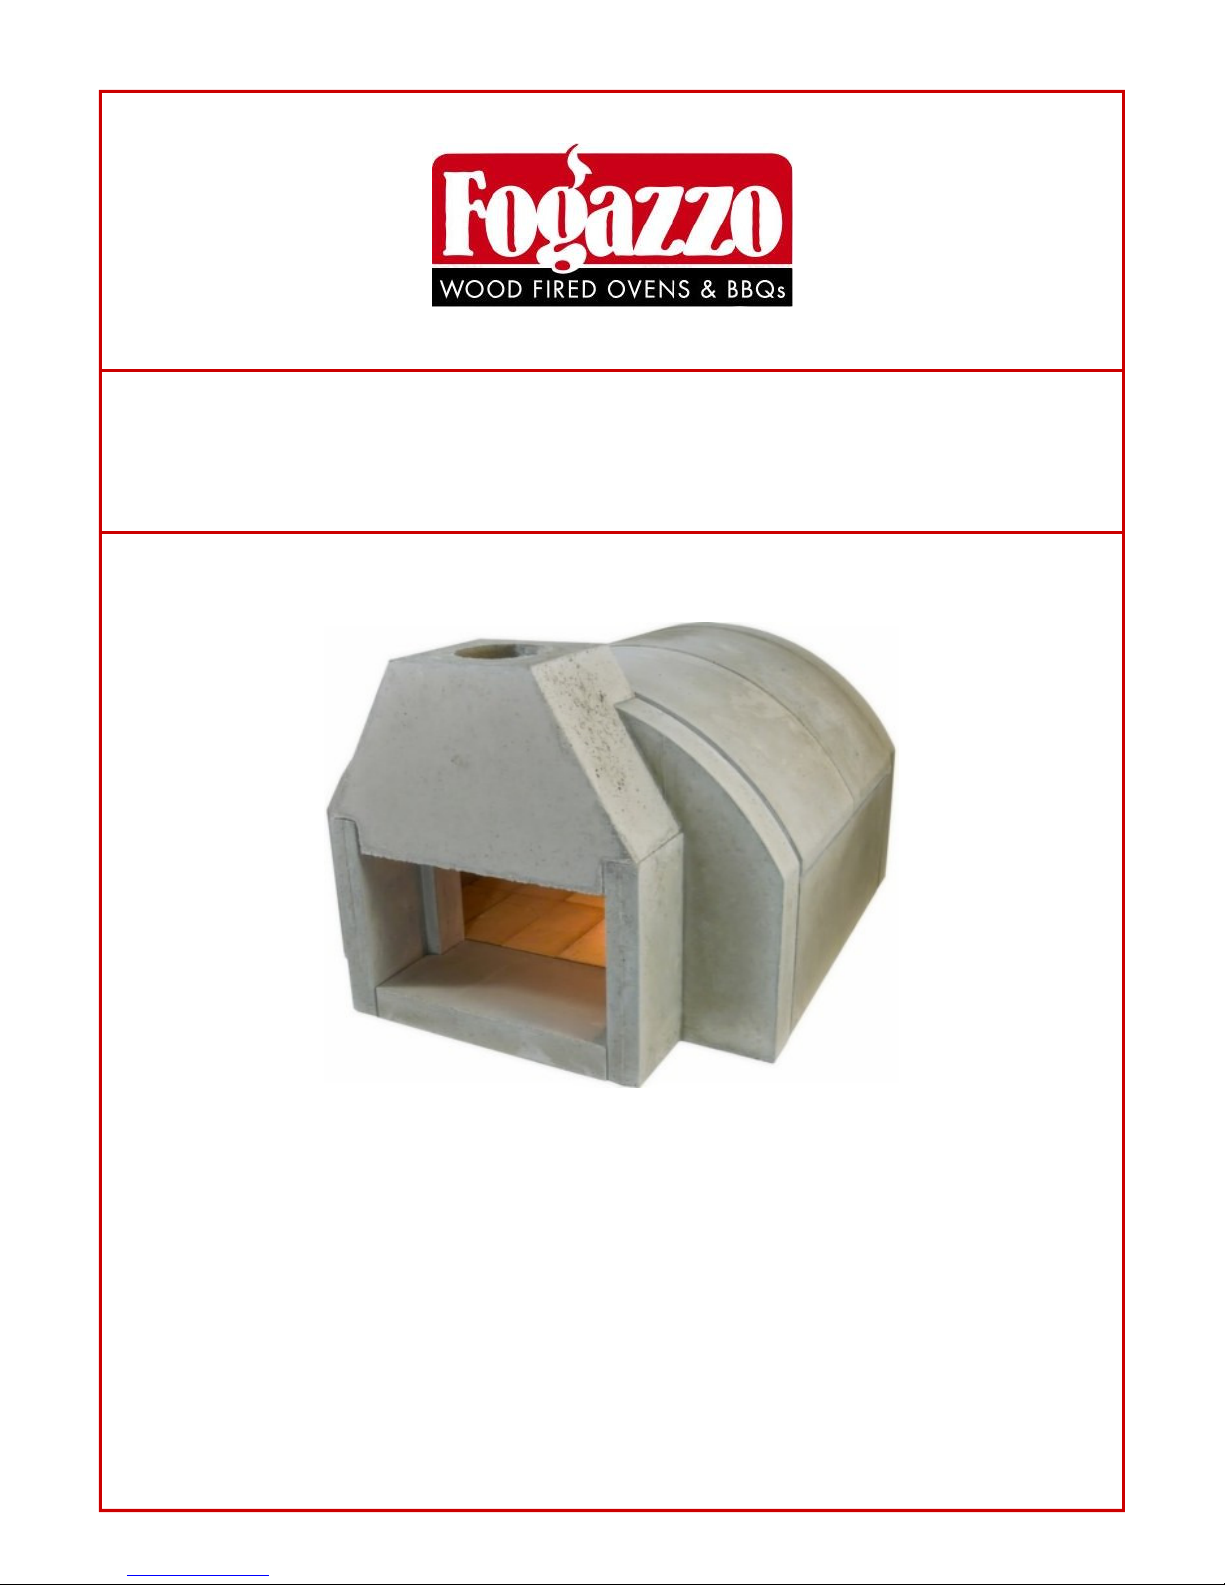
The Fogazzo Model 755 wood fired oven kit is made up of 24 refractory bricks for the oven floor,
a front wall, an apron, two side walls, a rear wall, three hood pieces and a smoke chimney
hood All of the precast parts are made using a proprietary mix of heavy duty, made in USA
refractory materials, with a high content of alumina Our mix is designed to withstand a working
temperature of 2300 degrees Fahrenheit which is much higher than temperatures the oven will
ever encounter, of around 1000 degrees Fahrenheit
Installation Instructions Toll Free Help 1-866-FOGAZZO
Model 755 Installation Instructions and Owner’s Manual © 2013 Fogazzo Wood Fired Ovens & BBQs, LLC All Rights Reserved
Dome Front

42” Model 755
Kit Dimensions
11 5”
10”
9” 9”
23 5”
12”
17”
9”
21”
6”
6”
11 5”
10”
9”
23 5”
17”
9”
21 5”
33”
4 Model 755 Installation Instructions and Owner’s Manual © 2013 Fogazzo Wood Fired Ovens & BBQs, LLC All Rights Reserved
Before you begin
Schedule summary
Plan View
Before you begin
Review your plans carefully Be sure to order
any items which may hold up your schedule
well ahead of the start of construction Allow
for sufficient time for each concrete pour to
cure
Schedule summary:
Pre-construction:
Order oven kit
Order chimney system
Order construction materials
Order finish materials
Construction
Build foundation and base
Form and pour shelf
Assemble and grout oven
Install ceramic fiber blanket
Build surround
Fill oven cavity with vermiculite
Roof enclosure
Install finish on walls
Install finish around door
Post-Construction
Allow 72 hours after installation for curing
Initial firing of oven Follow the initial firing and
curing instructions
5
Installation Instructions Toll Free Help 1-866-FOGAZZO
Model 755 Installation Instructions and Owner’s Manual © 2013 Fogazzo Wood Fired Ovens & BBQs, LLC All Rights Reserved

Foundation and floor slab
Masonry Construction
Concrete Shelf
Foundation and floor slab
(Please follow local code if different)
Dig a 48” wide by 62” front to back, to a depth
of 12 inches Set forms around the perimeter
using 2x4 or 2x6 material held in place by
stakes Place a rebar grid using #4 rebar at 12”
on center in both directions Place rebar dow-
els for masonry at 12 to 16” on center to a
height of 24 to 36”
Pour foundation and floor slab (minimal 4
inches) as a monolith, using 1500lbs psi or
higher concrete mix with 3/8” or greater rock
Concrete can be transit mix and pumped from
truck or mixed on site Varieties of pre-mixed
concrete are readily available at local home
centers with cured strength ratings as high as
55 lbs psi Follow mixing instructions and pre-
cautions on bag
Walls (first lift)
Erect three walls (two sides and back) using
CMU (concrete blocks), these are available in
most home centers or construction yards Build
to a height of 40” to 42” above finished floor
Allow sufficient time to dry and grout when fea-
sible Place dowels into grout to re-enforce the
concrete shelf as shown on Fig 2
Concrete shelf
Form for concrete shelf using 2x4 material and
plywood The bottom of the shelf should be at
38” up from the finished floor Install #4 rebar
grid 12” on center in both directions and dow-
els for oven enclosure (as needed) shown on
Fig 2 Pour shelf (3 5 to 6”) using 1500 lbs psi or
higher concrete mix with 3/8” to 3/4” aggre-
gate Allow this to dry at least 24 hours Do not
remove the forms for 3 to 14 days as they
should not otherwise impede progress of the
job
Fig 2
First
lift
#4 Rebar dowels
Slab on grade 4” min.
#4 rebar
Footing 12x12” min.
Fig 1
Fig 2
Concrete Shelf
#4 rebar
re-enforcing tying
walls to and shelf
to enclos re
6
Installation Instructions Toll Free Help 1-866-FOGAZZO
Model 755 Installation Instructions and Owner’s Manual © 2013 Fogazzo Wood Fired Ovens & BBQs, LLC All Rights Reserved
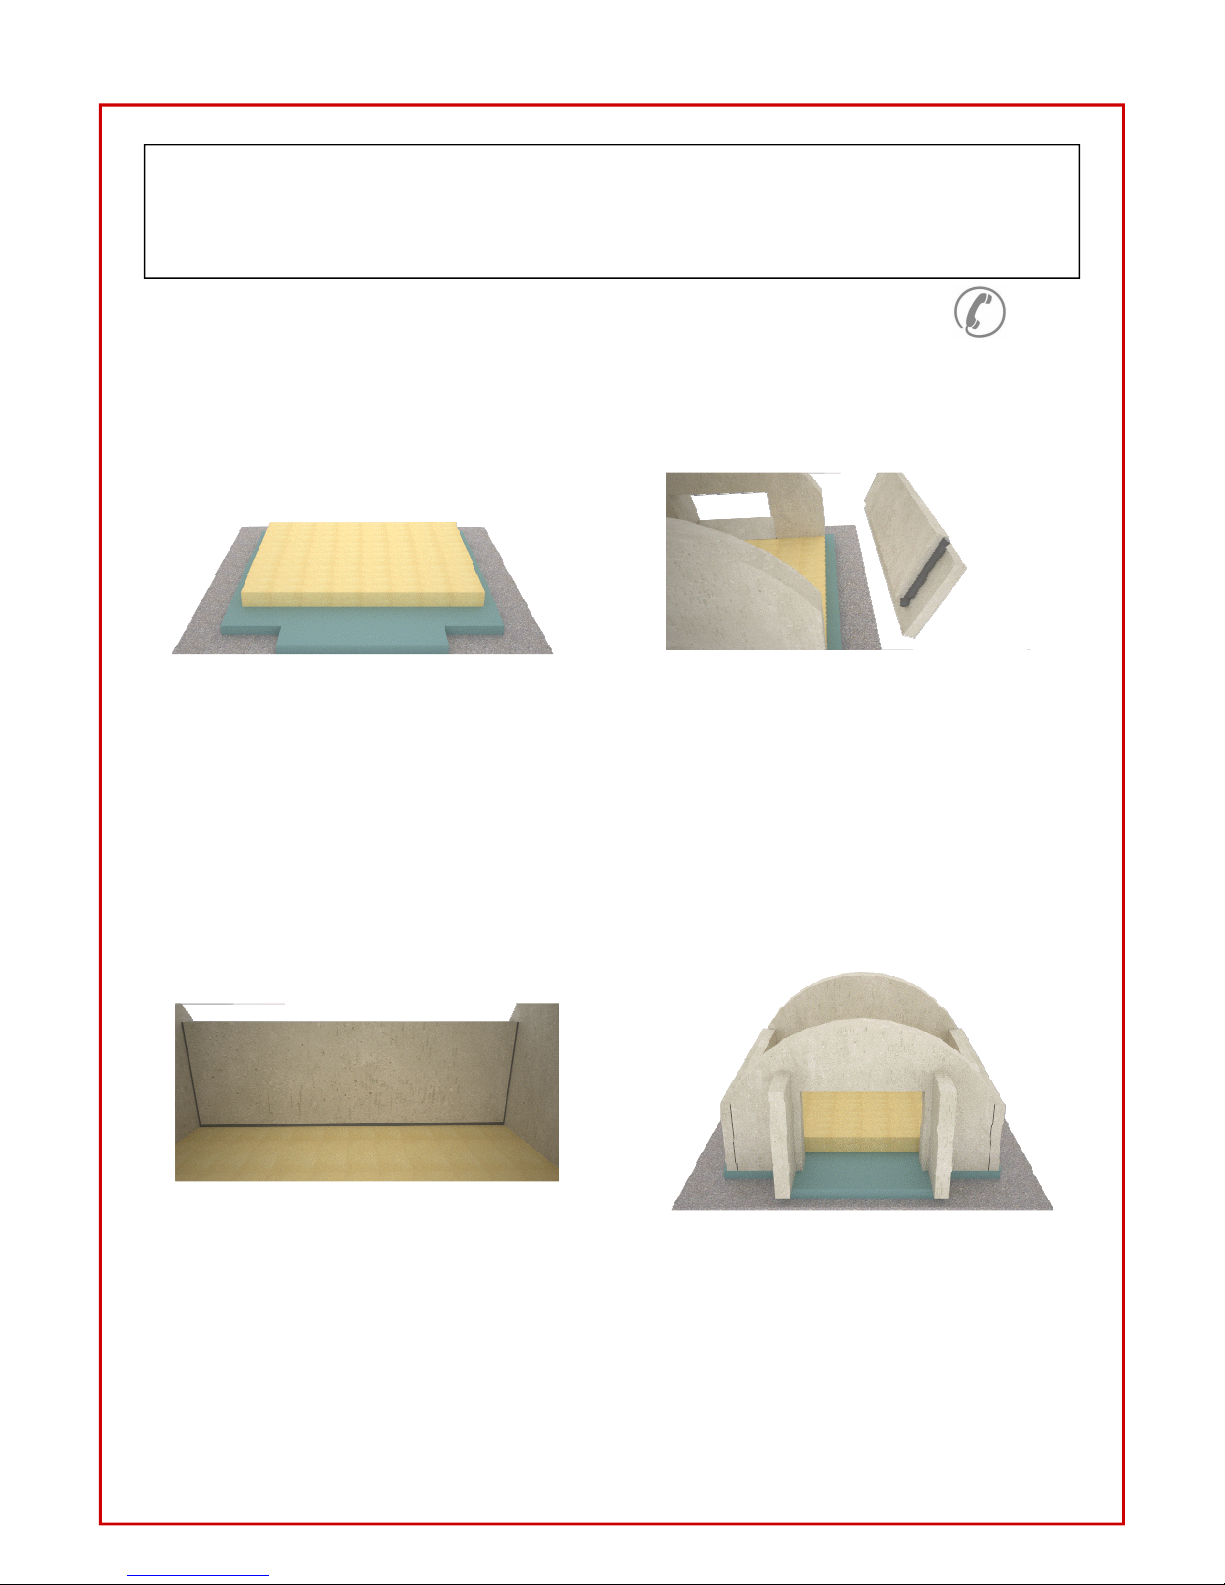
Oven Pre-assembly
Oven Final Assembly
Notes
Oven Pre-assembly
All our products are hand-made, as such, small
imperfections are a known characteristic In order to
achieve the best overall fit, care must be taken in
the assembly of the kit
Always check the fit during oven assembly!
Choose the best side of each floor bricks based
on it’s location in the oven Chipped sides, corners,
edges, etc, should always go where the blemish will
not be seen Chips on the oven floor can be placed
face down or where the side wall will cover it
Check the fit for each piece, to ensure the best fit
for each part Make any necessary adjustments to
the pieces to provide the best fit
Note: Small differences on the exterior of the oven,
can be made up with the finish materials
Oven Final Assembly
The mortar for setting the oven parts is in the small
white bucket
Mix mortar using clean water to the consistency of
peanut butter Do not use any add-mixes Mix only
what can be used in 15 minutes at a time
Notes:
- Front of oven should be 2 inches back from the
front edge of the support shelf
- Ensure the best fit on walls and dome, so that little
or no mortar shows through the oven interior
- DO NOT RETEMPER THE MORTAR, AFTER 15 MINUTES
DISCARD ANY UNSUSED MORTAR AND MIX A NEW
BATCH AS NEEDED
Fig 3
7
Installation Instructions Toll Free Help 1-866-FOGAZZO
Model 755 Installation Instructions and Owner’s Manual © 2013 Fogazzo Wood Fired Ovens & BBQs, LLC All Rights Reserved
1 Place the short side of your insulation boards to
the front, centered on the support shelf You may
trim the board as shown above at the beginning or
later Measure 11” back from the front edge and
draw a line Install your floor bricks starting at this line
Be sure to look for the best side of the brick to be
facing up and put any chipped edges facing down
or along the left or right edges where the walls will
cover them All floor bricks are laid dry, without the
need to use mortar, at all
2 Next set your back wall, side walls and front wall
using mortar to set the pieces Do not mortar under
the front or back walls, only where the side walls sit
over the bricks for the oven floor and, on the joints
between the pieces, i e side walls to front and back
walls, etc The front apron will need tall globs of mor-
tar in order to level it to the height of the oven floor
3 Clean the mortar from all the inside joints of the
oven using a sponge
4 Clean the mortar from all the outside joints of the
oven using a sponge
Oven Final Assembly
8
Installation Instructions Toll Free Help 1-866-FOGAZZO
Model 755 Installation Instructions and Owner’s Manual © 2013 Fogazzo Wood Fired Ovens & BBQs, LLC All Rights Reserved
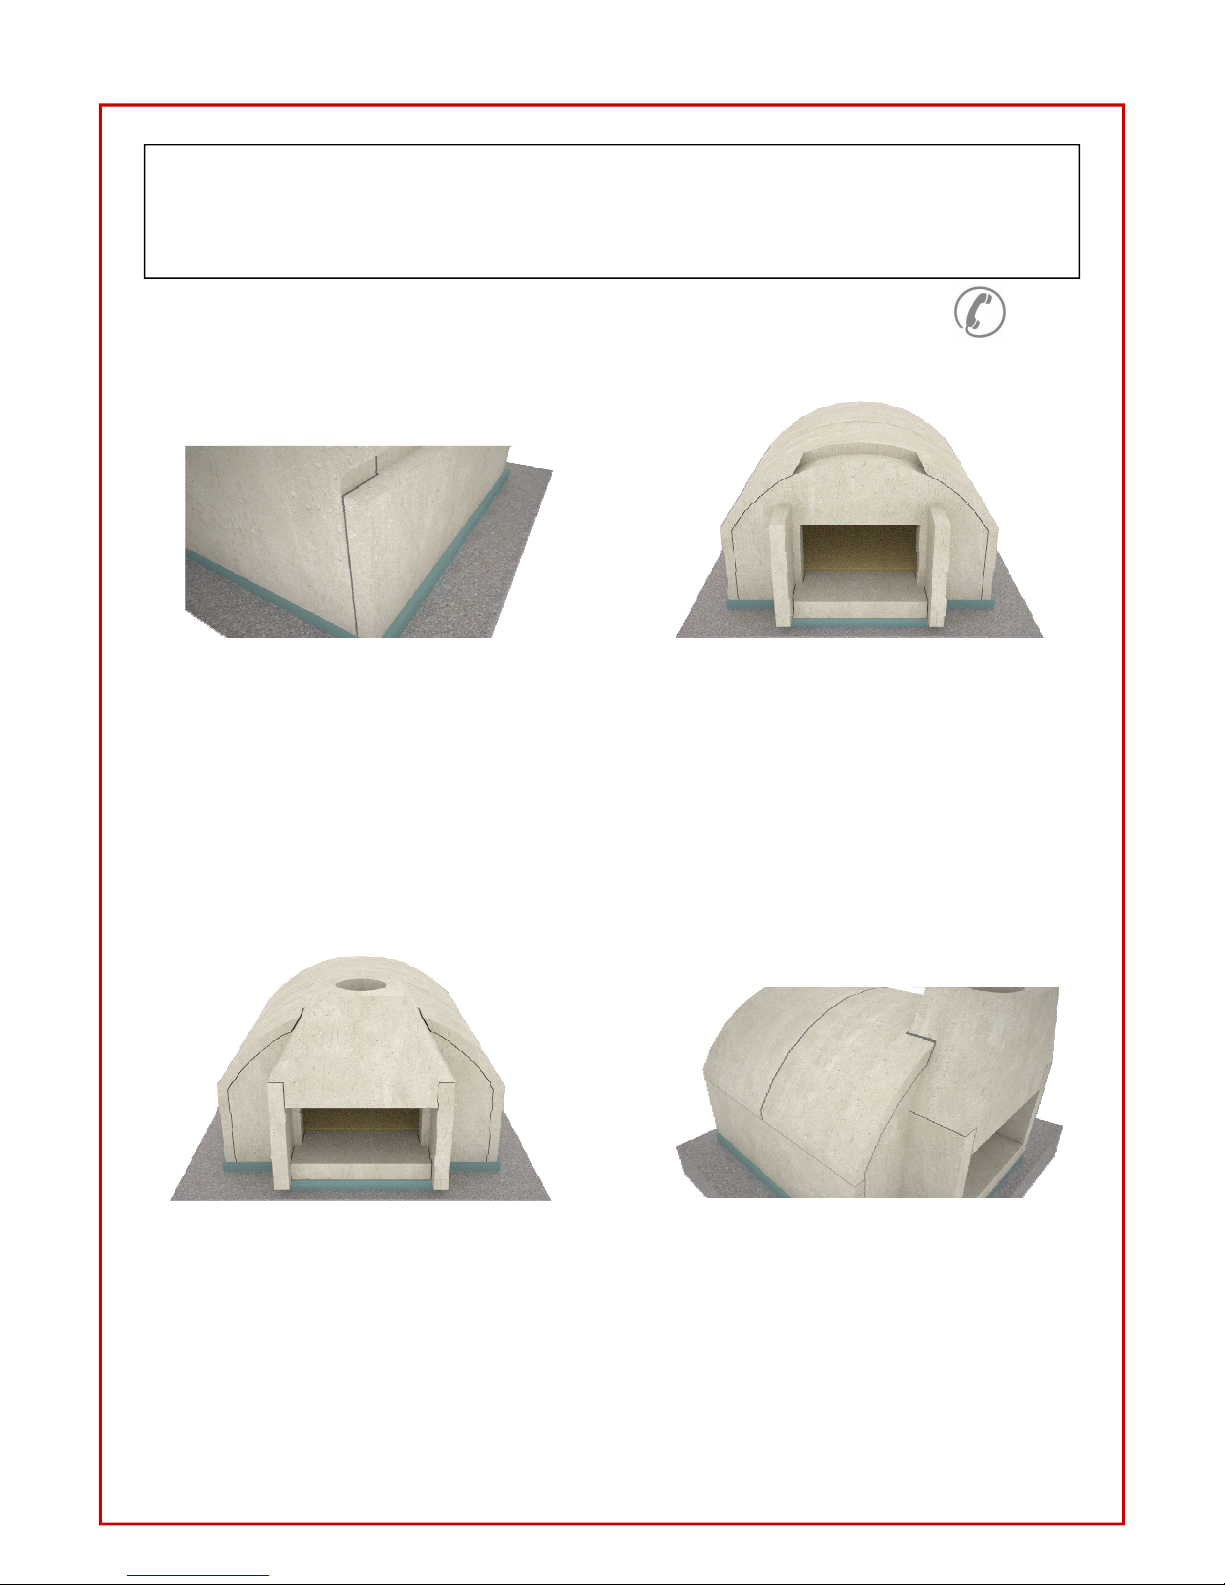
Oven Final Assembly
5 Clean the mortar from all the outside joints of the
oven using a sponge
6 Next place your rear and front dome pieces
Place mortar over the rear wall, set rear dome piece,
clean mortar from the inside at the top of the rear
wall joint, and any mortar that falls on the floor Next
place mortar over the front wall and set the dome
front, again cleaning the joint and oven floor as
needed Last, fill the gap between rear and front
domes from the outside of the oven only This joint is
meant to be filled after the dome pieces are in
place and from the outside only
7 Lastly, set your flue/hood by placing a bead of
mortar at either side of the door and over the front
wall Level the flue/hood and clean any of the excess
mortar as needed for a clean joint Fill around where
the flue/hood meets the dome as needed for a solid
finish
8 Clean the mortar from all the outside joints of the
oven using a sponge
9
Installation Instructions Toll Free Help 1-866-FOGAZZO
Model 755 Installation Instructions and Owner’s Manual © 2013 Fogazzo Wood Fired Ovens & BBQs, LLC All Rights Reserved

Oven Enclosure
Chimney & Insulation
Oven Enclosure
Enclose oven using CMU block masonry or light
gauge metal studs and track with cement
backer board
Chimney
Set your chimney anchor plate, Duratech
#9441 using high temperature caulking You
can also use concrete screws Drill for fasteners
following the manufacturers directions You
must be very careful not to damage the flue
You must use high temperature (550˚F) caulk or
other suitable sealer between anchor plate
and flue to seal it tight against air leaks Next
set a section of Duratech pipe The chimney
length dictates airflow in the oven We recom-
mend a minimal of 36” of pipe to ensure proper
air flow Set your cap with spark arrestor Du-
ratech # 9484 to complete the chimney
Insulation
After oven has dried a minimal of 48 hours,
cover it with the 2” ceramic blanket You can
use wire or metal lath to hold it in place After
exterior walls are built, place vermiculite gran-
ules 6” above the dome of the oven or to
within 3 inches of the top of the enclosure
Additional Mass
The Model 755 is a well balanced oven that
was designed for everyday use, and it should
satisfy the needs of 90+% of our customers For
those who are heavy bread bakers, and we
mean baking a lot of bread, they may want to
consider adding additional mass Although this
may give them additional cooking time, they
will take longer to heat up, (3 hours or 4 hours
or more)
Note: Any additional mass is only necessary if
you intend to use your oven primarily for bread
baking You can bake bread in the Model 855
ovens with the same results, you will just have
less total time for baking, since it is a lighter
oven, balanced for everyday use, including
baking bread
Roofing and Exterior Finishes
Roof using non-flammable roofing materials
that conform to local building codes
10
Installation Instructions Toll Free Help 1-866-FOGAZZO
Model 755 Installation Instructions and Owner’s Manual © 2013 Fogazzo Wood Fired Ovens & BBQs, LLC All Rights Reserved

Oven Finishes
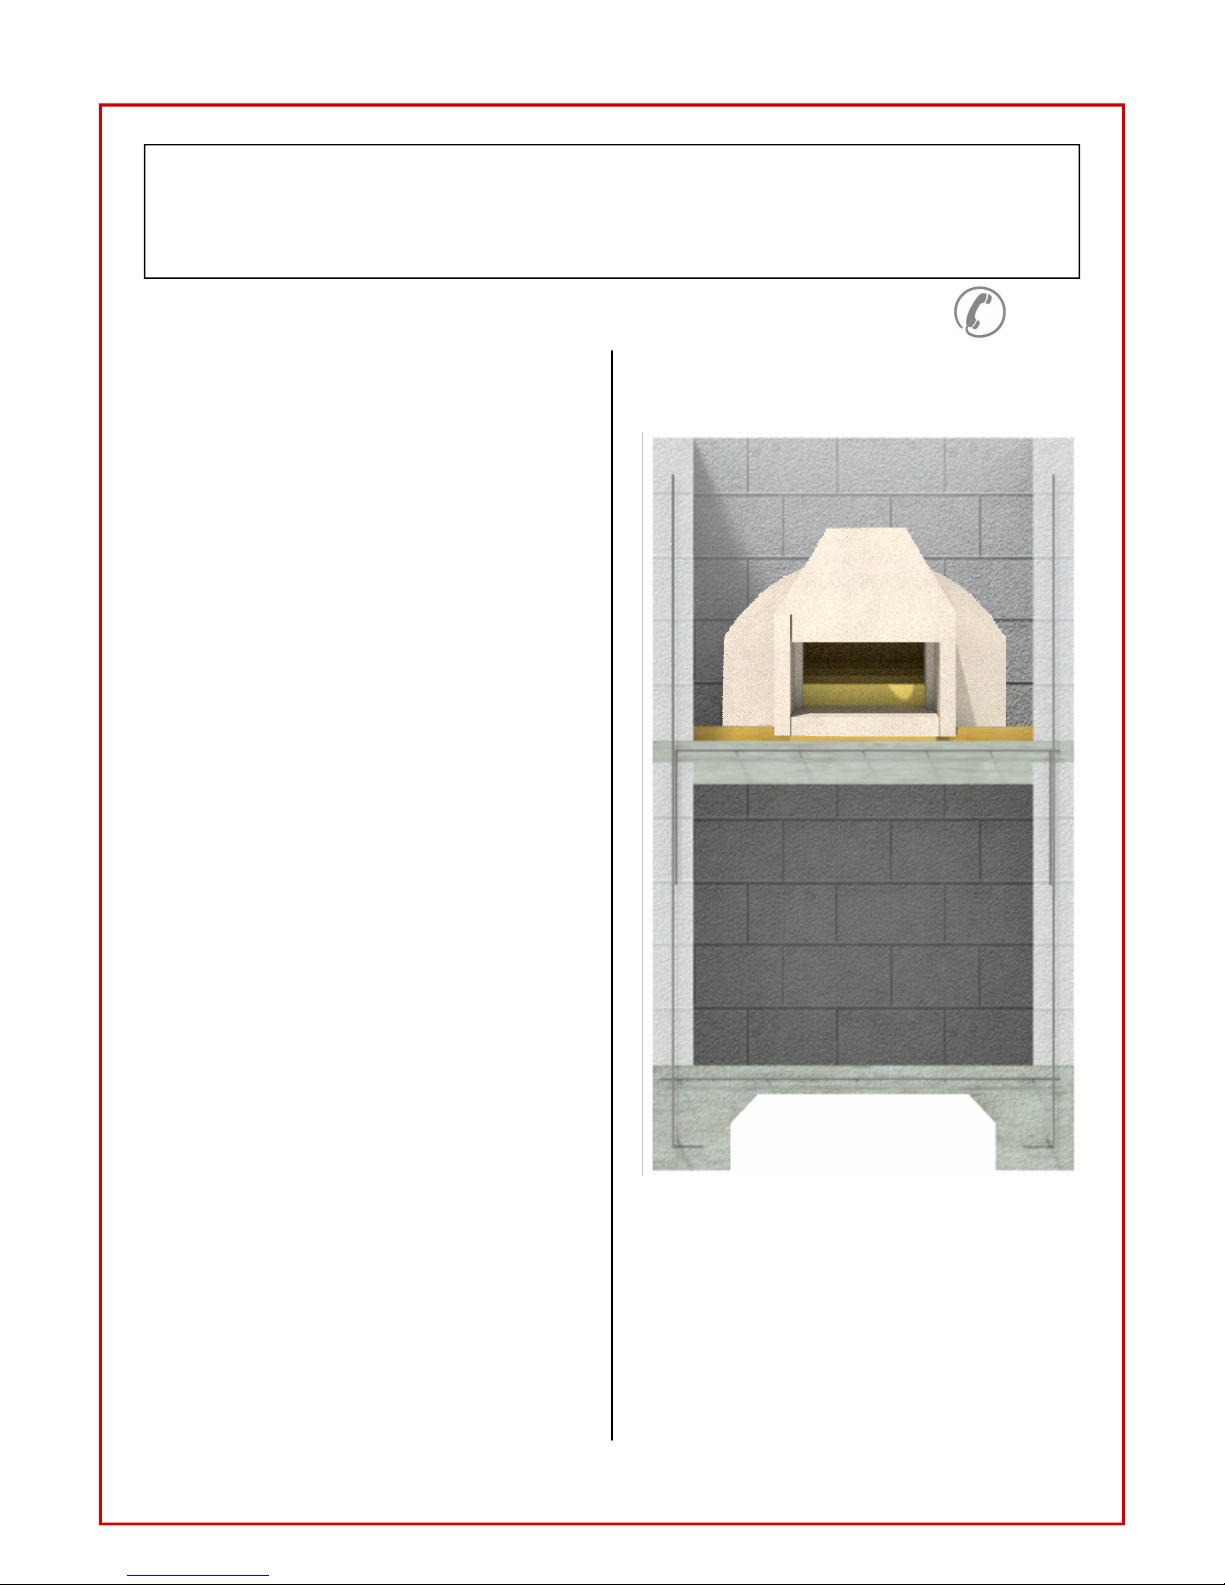
Cut-Away View
*Typical cut away view of oven installation using masonry construction
11
Installation Instructions Toll Free Help 1-866-FOGAZZO
Model 755 Installation Instructions and Owner’s Manual © 2013 Fogazzo Wood Fired Ovens & BBQs, LLC All Rights Reserved

Curing & Initial Firing
Oven Resources
Installation Instructions Toll Free Help Line 1-866-FOGAZZO
Curing
Allow the oven to cure a minimum of 3 days prior to
the initial firing (72 hours), so sufficient moisture can
evaporate from mortar etc
Initial Firing Procedures
Initial firing is the single most critical component in
completing a good installation Please follow these
instructions carefully to ensure proper operation of
your oven for many years to come
First firing - 4 to 9 hours
NOT TO EXCEED 225˚ FARENGHEIT
Use three 16oz cans of alcohol gel fuel (aka chaffing
dish fuel) Placed at the center of the oven, and
light them Keep oven door partially off The first cans
will burn for 4 to 4 5 hours Once first cans are empty,
light three more cans like the first These cans will
burn for 4 to 4 5 hours When these cans run out of
fuel, close the oven door and allow the oven to cool
down overnight
Caution: THE OVEN MAY STILL BE HOT!
You may now start to cook in your oven!
Please keep in mind that the oven is still tempering
Over the next few firings the performance charac-
teristics of your oven will improve gradually During
this break in period, caution should be taken to
gradually increase the heat with each fire for the first
5 to 6 times the oven is used After these first few fir-
ings your oven will become fully ready for normal
use!
Under normal operating conditions, small cracks will
develop due to the heating and cooling process
These small cracks are normal and will not effect the
performance or durability of your oven
Resources
Chimney / Venting products:
Fogazzo Toll free at 1-866-FOGAZZO or online at:
www fogazzo com
Gel Fuel, to start the oven the first time only!
Gel fuel is available at most sporting goods or res-
taurant supplies stores You can use any of the differ-
ent styles available What’s important is the amount
of time that they burn and, the temperature they
heat the oven up to The goal is to reach and main-
tain 200 degrees Fahrenheit in 4 hours
Non-toxic fire starters:
Fatwood
Available at most home centers or from Fogazzo
Weber Fire Starters
Available nationally at most home centers
Cans of chaffing
dish fuel in an oven,
during initial firing
procedure.
Second Firing - 5 hours
NOT TO EXCEED 500˚ FARENGHEIT
Use a non-toxic fire starter to light a small pile of fire-
wood, placed in the center of the oven Each piece
should be up to 8 inches long and 1 inch thick
Flames must not be allowed to reach the dome of
the oven Continue to maintain temperature by
adding 1 or 2 pieces of the same size of firewood
every 15 to 20 minutes for a total of 5 hours At the
end of the second firing, close the oven door, and
allow the oven to cool down overnight
Caution: THE OVEN MAY STILL BE HOT!
During the second
firing, small pieces of
firewood are used, to
take the oven to
higher temperatures
than in the first firing
The small fire is kept
at the center of the
oven floor, and the
flames should not
reach the top of the
dome’s interior
12 Model 755 Installation Instructions and Owner’s Manual © 2013 Fogazzo Wood Fired Ovens & BBQs, LLC All Rights Reserved
Oven Basics
“Even if you own the worlds greatest coffee maker, it cannot guarantee
that you will get the best cup of coffee in the world, on your first try”.
Cooking with real fire takes some getting used to, but don’t be afraid to experiment
Many recipes need adjustments, but will work well As a general rule, anything that a
conventional oven can do, a wood fired oven will do better
Most splattering from baking or roasting will burn off To avoid excessive splattering use
cookware that is suitable for the food you are cooking Wood fired ovens are very
low-maintenance If you spill something on the floor of the oven, just wait for it to burn
off If you want to expedite this process, move some coals over the spill Wait for it to
burn off and sweep with an oven safe brush
When you are through cooking Close oven door to help extinguish any coals that are
still burning Allow oven to cool down slowly or overnight Remove ashes using an ash
vacuum or oven safe brush
Always
• Allow 2 hours or more to bring your oven to temperature slowly
• Add wood in 15 to 30 minute intervals
• Add wood of similar size
• Keep oven closed when not in use
• Use safety gear to avoid injuries or burns
Never
• Leave a burning fire unattended
• Allow cold water to hit a hot oven
• Use tools that can chip or scrape your oven walls or floor
• Drag heavy cookware on the oven floor
• Add too much wood at once
• Throw wood against walls or floor
• Build a large fire inside your oven
• Dispose of hot coals in the trash
• Use liquid fuels such as gasoline to start an oven
13 Model 755 Installation Instructions and Owner’s Manual © 2013 Fogazzo Wood Fired Ovens & BBQs, LLC All Rights Reserved
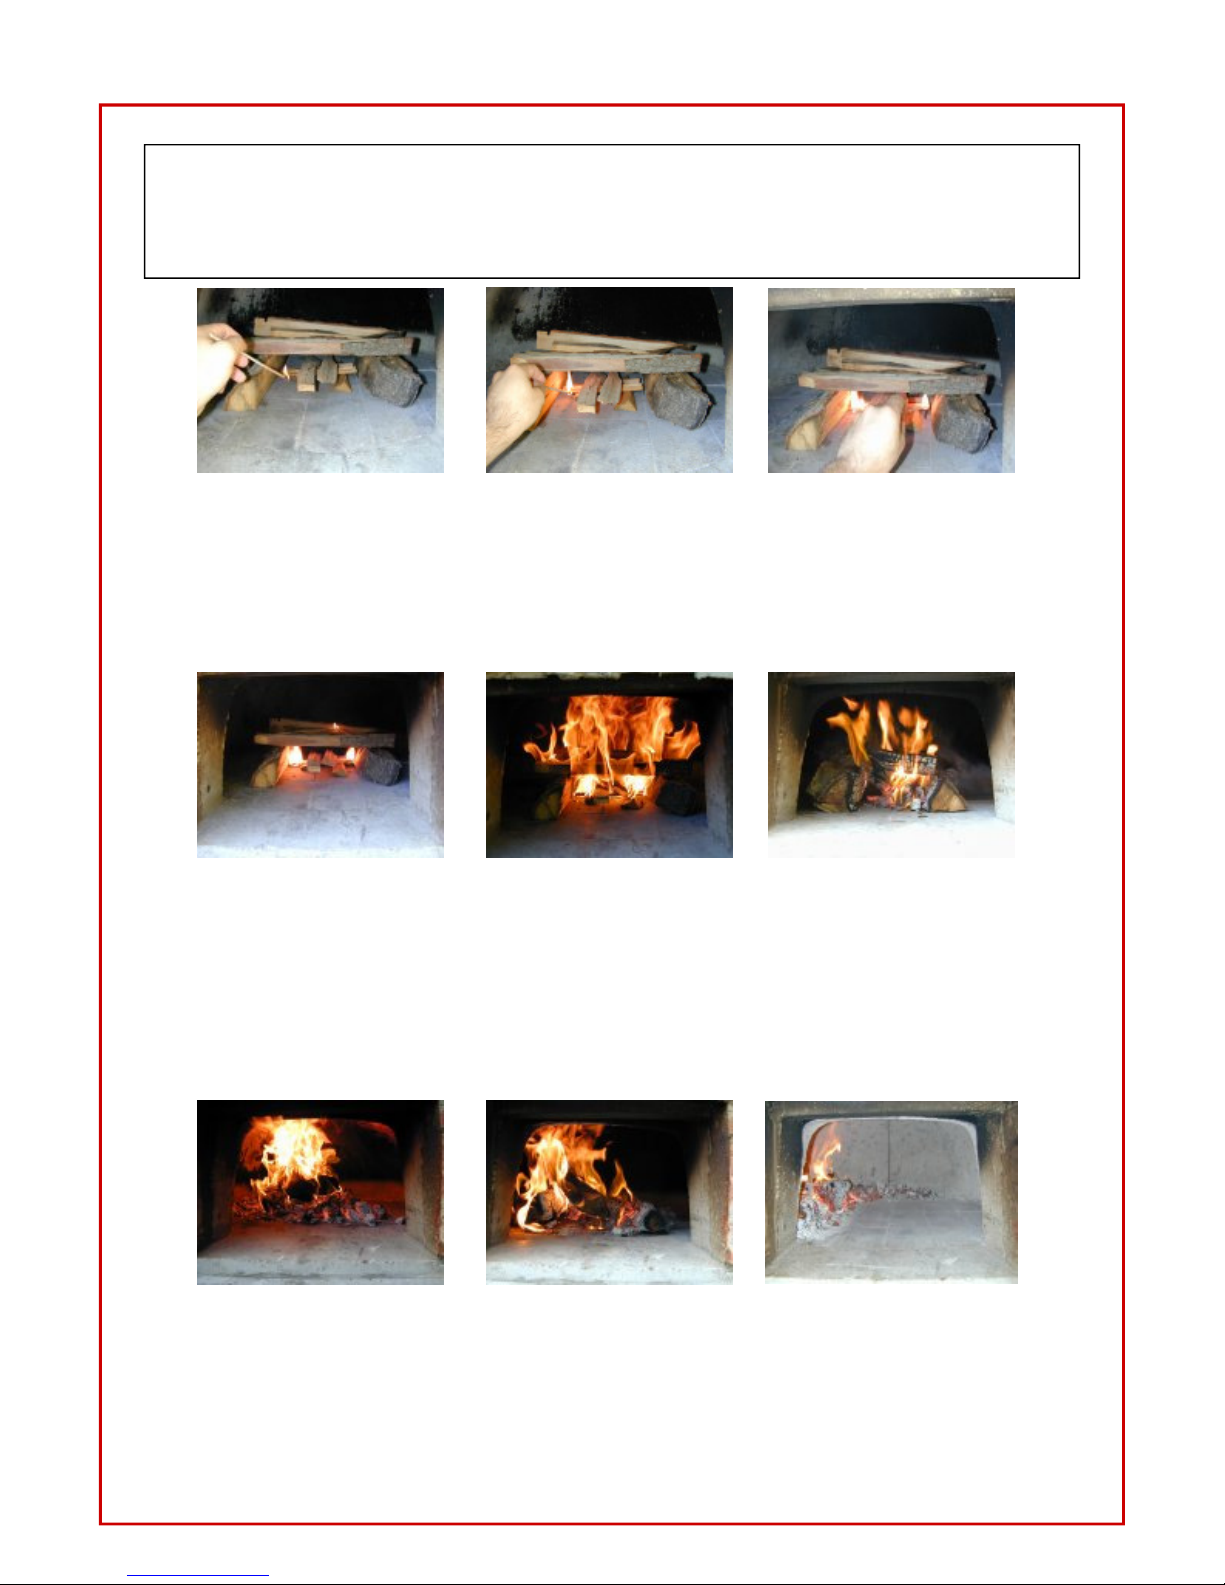
Use two medium size logs, one on the left and one on the right as props to hold up
smaller pieces of kindling across them Place a few pieces of kindling below per-
pendicular to the pieces above Add one or two pieces of “Fatwood” or other
nontoxic fire starter to this kindling Using fireplace matches or a fireplace lighter,
light the two pieces of “Fatwood”
After these pieces burn for about fifteen minutes, add a piece 3 to 4 inches thick
and 12 to 16 inches long over the top of the kindling parallel to the larger pieces
Add a similar size piece every 15 to 20 minutes for the next 90 to 120 minutes
After 90 to 120 minutes, the oven will have a nice size pile of coals right in the mid-
dle Move them to either the left or the right, sweep the smaller pieces straight
back and add a medium size piece of wood over the coals You are now ready to
cook Always keep a small piece of wood burning to provide a source of light in-
side the oven
Lighting your oven
14 Model 755 Installation Instructions and Owner’s Manual © 2013 Fogazzo Wood Fired Ovens & BBQs, LLC All Rights Reserved
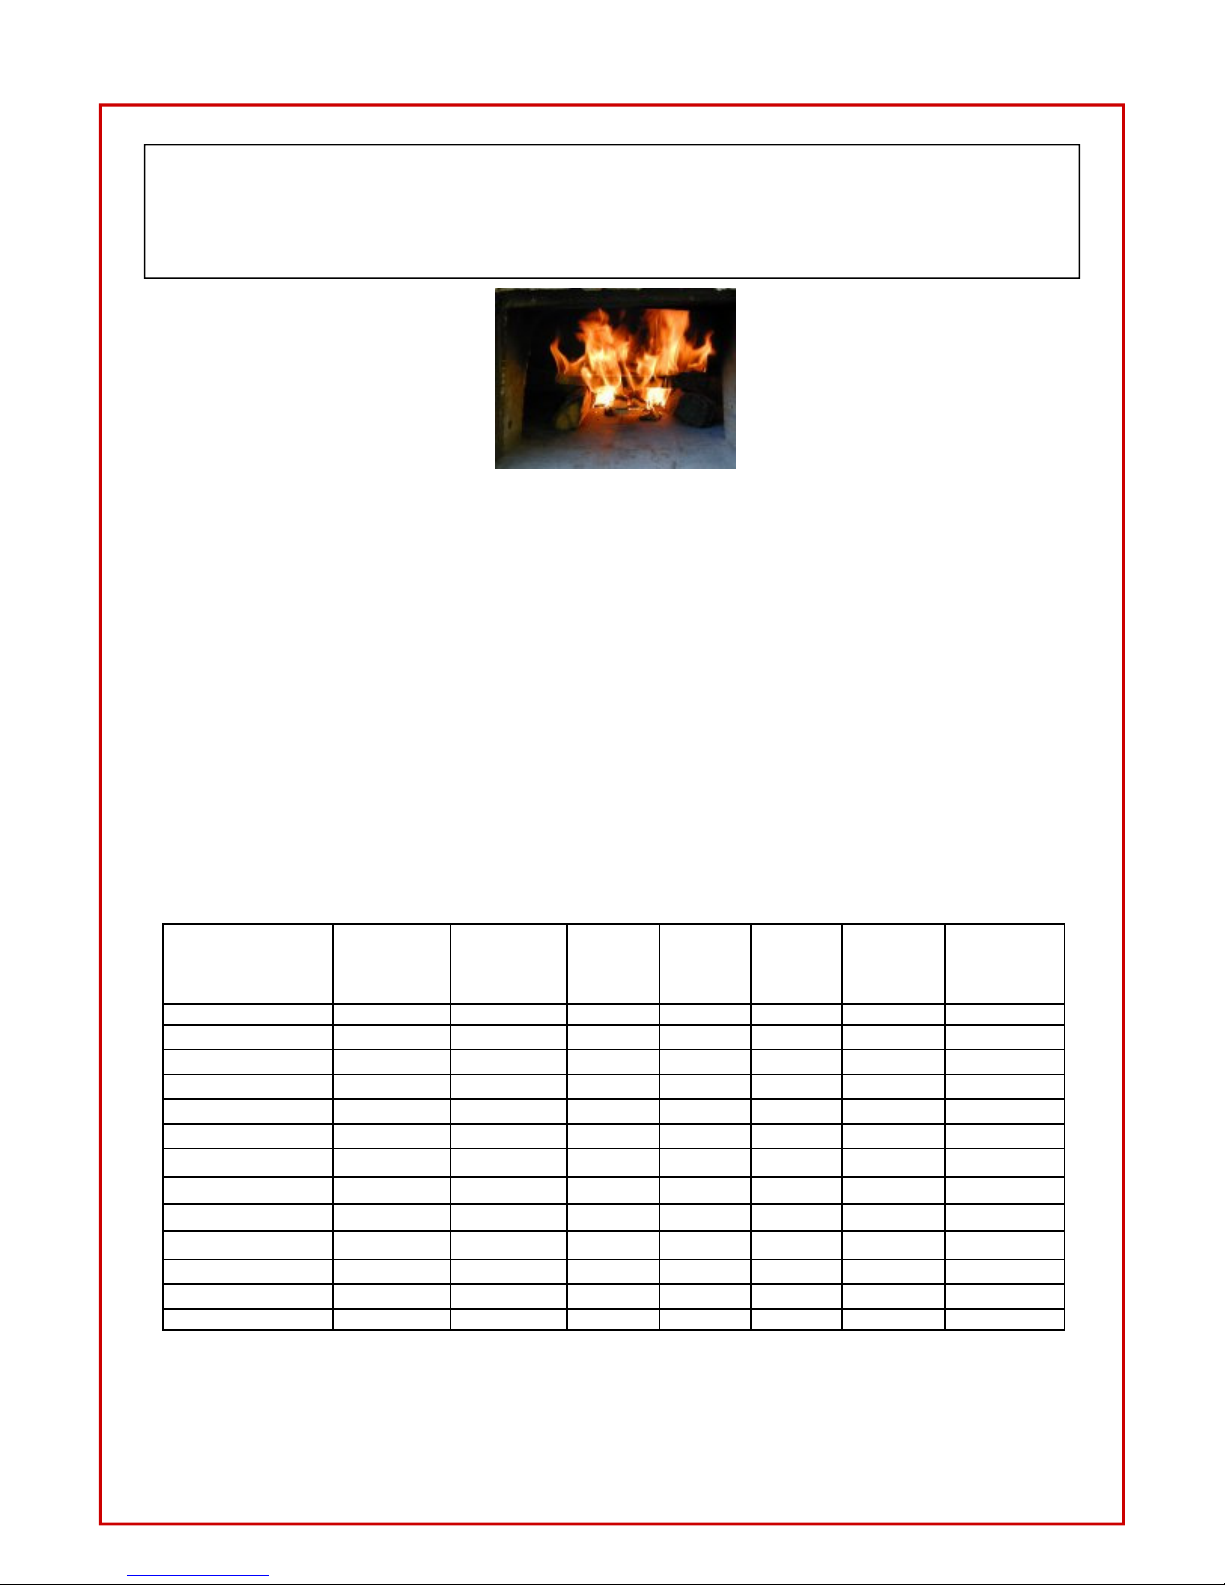
Firewood
Quality firewood is essential for the operation of your wood fired oven When buying fire-
wood it is important to get your money’s worth Cord sizes are regulated and so firewood
quantities must comply with industry standards The best way to be sure you are getting
what you are paying for is to measure your delivered firewood, which should be neatly
stacked
Quantities are as follows:
Full cord = 4’ x 4’ x 8’ = 128 cu ft
½ cord = 4’ x 4’ x 4’ =64 cu ft
¼ cord = 4’ x 4’ x 2’ =32 cu ft
Firewood should be split, seasoned, and ready to burn, cut to approximately 12 to 16 inches
in length and 2 to 4 inches in diameter The following table contains a list of firewood rec-
ommended for use in wood fired ovens and the qualities associated with each species The
Firewood BTU (British Thermal Units) is the amount of heat energy produced by different
types of wood when burned
Species Heat/ Cord
(1,000,000
BTU'S)
Ease of
Splitting
Smoke Sparks Coals Fragrance Overall
Quality
Almond 23 5 Medium Low Few Good Good Good
Apple 27 Medium Low Few Good Excellent Excellent
Ash, Green 20 Easy Low Few Good Slight Excellent
Ash, White 24 2 Medium Low Few Good Slight Excellent
Avocado 17 5 Medium Low Few Good Slight Good
Birch, Paper 20 8 Medium Medium Few Good Slight Fair
Cherry, Black 20 4 Easy Low Few Excellent Excellent Good
Hickory, Shagbark 27 5 Difficult Low Few Excellent Excellent Excellent
Maple, Other 25 5 Easy Low Few Excellent Good Excellent
Maple, Silver 19 Medium Low Few Excellent Good Fair
Oak, Bur 26 2 Easy Low Few Excellent Good Excellent
Oak, Red 24 6 Medium Low Few Excellent Good Excellent
Oak, White 29 1 Medium Low Few Excellent Good Excellent
15 Model 755 Installation Instructions and Owner’s Manual © 2013 Fogazzo Wood Fired Ovens & BBQs, LLC All Rights Reserved
Table of contents
Other Fogazzo Oven manuals


Popular Oven manuals by other brands


Zanussi
Zanussi ZBM973 Instruction booklet

GE
GE JT1000DFBB Dimensions and installation information

Fisher & Paykel
Fisher & Paykel Aerotech OB30SD installation instructions

Klugmann
Klugmann KO608TCP instruction manual

Frigidaire
Frigidaire FEB27S6F Factory parts catalog

Bosch
Bosch 8 Series installation instructions