GE JTP10GP User manual

BuiltElectric Oven
Contents
AluminumFoti 4,14 ThermostatAdjustment
ApplianceRegistration 2VentDuct 5;;
CareandCleaning 16-20 PowerOutage? 7
ClocWTimer 7ProblemSolver 21
ConsumerServices 23 SafetyInstructions 2-4
Energy-SavingTips 4warranty BackCover
Features 5,6
ModelandSerialNumbers 2
Oven 8
Baking/BaldngGuide 9-11
Broiling/BroilingGuide 14,15
ControlPanel 6
ControlSettings 6-15
DoorRemoval 16
LighCBtib Replacement 16
Preheating 4,11
Roasting/RoastingGuide 12,13
Self-CleaningInstructions 17-19
SettheClock 7GEAnswerCenteP
SettheTimer 7800.626.2000
Models JTP1OGP
JTP1lWP
GEAppliances

Helpushelpyou... IMPORTANT
SAFETY
INSTRUCTIONS
Beforeusingyouroven,
readthisbook carefully.
Itis intendedtohelpyou
operateandmaintainyournew
ovenproperly.
Keepithandyforanswersto
yourquestions.
If youdon’tunderstandsomething
or needmorehelp,write(include
yourphonenumber):
ConsumerAffairs
GEAppliances
AppliancePark
Louisville.KY40225
Writedownthe model
andserialnumbers.
You’llfindthemon alabelon
thefrontof theovenbehindthe
ovendoor.
Thesenumbersarealsoonthe
ConsumerProductOwnership
RegistrationCardthatcamewith
youroven.Beforesendingin
thiscard,pleasewritethese
numbershere:
Model Number
Serial Number
Usethesenumbersin any
correspondenceor servicecalls
concerningyouroven.
Savetimeandmoney.
Beforeyourequest
service...
ChecktheProblemSolverinthe
backof thisbook.It listscausesof
minoroperatingproblemsthatyou
cancorrectyourself.
If youneedservice...
Toobtainservice,seethe
ConsumerServicespagein
thebackofthisbook.
We’reproudof ourserviceand
wantyouto bepleased.If for some
reasonyouarenothappywiththe
serviceyoureceive,herearethree
stepsto followforfurtherhelp.
FIRST,contactthepeoplewho
servicedyourappliance.Explain
whyyouarenotpleased.In most
cases,thiswillsolvetheproblem.
NEXT,if youare stillnotpleased,
writeallthedetails—including
yourphonenumber—to:
Manager,ConsumerRelations
GEAppliances
AppliancePark
Louisville,KY40225
FINALLY,if yourproblemis still
notresolved,write:
MajorApplianceConsumer
ActionPanel
20NorthWackerDrive
Chicago,IL 60606
Readdl instructions
beforeusingthis
appliance.
l~ORTANT
SAFETYNOTICE
TheCaliforniaSafeDrinking
WaterandToxicEnforcement
ActrequirestheGovernorof
Californiatopublishalistof
substancesknowntothe state
to causebirthdefectsor other
reproductiveharm,andrequires
businessesto warncustomers
ofpotentialexposureto
suchsubstances.
Thefiberglassinsulationin
self-cleaningovensgivesoffa
verysmallamountof carbon
monoxideduringthecleaning
cycle.Exposurecanbe
minimizedbyventingwith
anopenwindoworusinga
ventilationfanorbond.
WhenYouGetYourOven
●Havetheinstallershowyou
thelocationofthecircuit
breakerorfuse.Markitfor
easyreference.
●Besumyourapplianceis
pro~erlyinstalledand
groundedbyaqualified
techniciminaccordancewiththe
providedInstallationInstructions.

●Don’tattempttorepairor
replaceanypartofyouroven
unlessitisspecifically
recommendedinthisbook.All
other servicingshouldbereferred
toaqualifiedtechnician.
●Beforeperformingany
service,DISCONNECTTHE
OVENPOWERSUPPLYAT
THEHOUSEHOLD
DISTRIBUTIONPANELBY
REMOVINGTHEFUSEOR
SWITCHINGOFFTHE
CIRCUITBREAKER.
●Donotleavechildrenalone-
Childrenshouldnotbeleftalone
orunattendedinanareawhere
applianceisinuse.Theyshould
neverbeallowedtositorstand
onanypartoftheappliance.
●Don’tallowanyonetoclimb,
standorhangonthedoor.
Theycoulddamagetheoven.
●CAUTION:ITEMSOF
INTERESTTOCHILDREN
SHOULDNOTBESTORED
INCABINETSABOVEAN
OVEN.CHILDREN
CLIMBINGONTHEOVEN
TOREACHITEMSCOULD
BESERIOUSLY
INJURED.
●Neverwearloose-fittingor
hanginggarmentswhileusing
theappliance.Becarefulwhen
reachingforitemsstoredin
cabinetsovertheoven.
Flammablematerialcouldbe
ignitedifbroughtincontactwith
hotheatingelementsandmay
causesevereburns.
●DONOTSTOREORUSE
COMBUSTIBLE
MATERIALS,GASOLINEOR
OTHERFLAMMABLE
VAPORSANDLIQUIDSIN
THEVICINITYOFTHISOR
ANYOTHERAPPLIANCE.
●Useonlydrypotholders—
Moistordamppotholderson
hotsurfacesmayresultinburns
fromsteam.Donotletpot
holderstouchhotheating
elements.Donotuseatowelor
otherbulkycloth.
●Foryoursafety,neveruse
yourapplianceforwarmingor
heatingtheroom.
●Storageinoronappliance—
Donotstoreflammablematerials
intheoven.
●Keephoodandgreasefilters
cleantomaintaingoodventing
andtoavoidgreasefires.
●Donotletcookinggreaseor
otherflammablematerials
accumulateinorneartheoven.
●Donotusewaterongrease
fires.Flamesinovencanbe
smotheredbycompletely
closingdoorandpressing
ovenCLEAWOFFpad,oruse
adrychemicalorfoam
typeextinguisher.
●Donottouchheatingelements
orinteriorsurfaceofoven.
Thesesurfacesmaybehot
enoughtoburneventhoughthey
aredarkincolor.Duringand
afteruse,donottouch,orlet
clothingorotherflammable
materialscontactanyinterior
areaoftheoven;allowsufficient
timeforcooling,first.
Potentiallyhotsurfacesinclude
theovenventopenings,surfaces
neartheopenings,crevices
aroundtheovendoor,theedges
ofthedoorwindowandmetal
trimpartsabovethedoor.
Remember:Theinsidesurface
oftheovenmaybehotwhenthe
doorisopened.
*Whencookingpork?follow
thedirectionsexactlyandalways
cookthemeattoaninternal
temperatureofatleast170°F.
Thisassuresthat,intheremote
possibilitythattrichinamaybe
presentinthemeat,itwillbe
killedandthemeatwillbesafe
toeat.
Oven
Q
Standawayfromovenwhen
openingovendoor.Thehotair
orsteamwhichescapescan
burnhands,faceand/oreyes.
●Don’theatunopenedfood
containersintheoven.Pressure
couldbuildupandthe
containercouldburst,causing
aninjury.
●Keepovenventduct
unobstructed.
●Keepovenfreefromgrease
buildup.
●Placeovenshelfindesired
positionwhileoveniscool.If
shelvesmustbehandledwhen
hot,donotletpotholdercontact
heatingunitsintheoven.
●Pullingoutshelftoshelfstop
isaconvenienceinliftinghea~
foods.Itisalsoaprecaution
againstburnsfromtouching
hotsurfacesofdooror
ovenwalis.
●Whenusingcookingor
roastingbagsinoven,follow
themanufacturer’sdirections.
●Donotuseyouroventodry
newspapers.Ifoverheated,they
cancatchfire.
(continued next page

IMPORT~T
SAFETY
INSTRUCTIONS
*Beforeself-cleanbgtheoven7
remove
brotierpanand
othercookware.
●L&tenforfan—afannoise
should&heardduringthe
cleani~gcycle.Ifnot,cdlfor
servicebeforeself-cleaning
again.
Energy-Saving
Tips
●Preheatovenonlywhen
necessary.Mostfoodswillcook
satisfactorilywithoutpreheating.
If youfindpreheatingisnecessw,
listenforthebeep,andputfoodin
ovenpromptlyaftertheoven
ispreheated.
●Alwaysturnovenoffbefore
removingfood.
●Duringbaking,avoidfrequent
dooropenings.Keepdooropenas
shortatimeaspossibleif it is
opened.
●Cookcompleteovenmeals
insteadofjust onefooditem.
Potatoes,othervegetables,and
somedessertswillcooktogether
withamain-dishcasserole,meat
loaf,chickenorroast.Choose
foodsthatcookatthesame
temperatureandin approximately
thesametime.
●Useresidualheatin theoven
wheneverpossibleto finish
cookingcasseroles,ovenmeals,
etc.Also,addrollsorprecooked
dessertsto warmoven,using
residualheatto warmthem.

FeaturesofYourOven
??
JTP1OGP
JTP1lWP
I@
Explained
FeatureIndex onpage
1OvenDoorGasket I19,20
2ModelandSerialNumbers I2
3OvenBroilUnit I14,15
4OvenDoorLatch j17-19
5OvenControl,ClockandTimer I6,7
6OvenLightSwitch 8
(Letsyouturninterioroven
lightson andoff.)
7OvenVent I3,8
8OvenInteriorLight I8,17
II
I
Feature Index
9OvenShelfSupports
(Forroasting,bakingandbroiling
positionsof shelves,see
suggestionsin cookingguides.)
10 OvenShelves
11 BakeUnit
12 RemovableOvenDoor
withWindow
13 BroilerPan andRack
(Donotcleanin self-cleanoven.)
ExDlained
-z
on page
8
8, 11,14, 15
3,20
16.20
14, 15
—

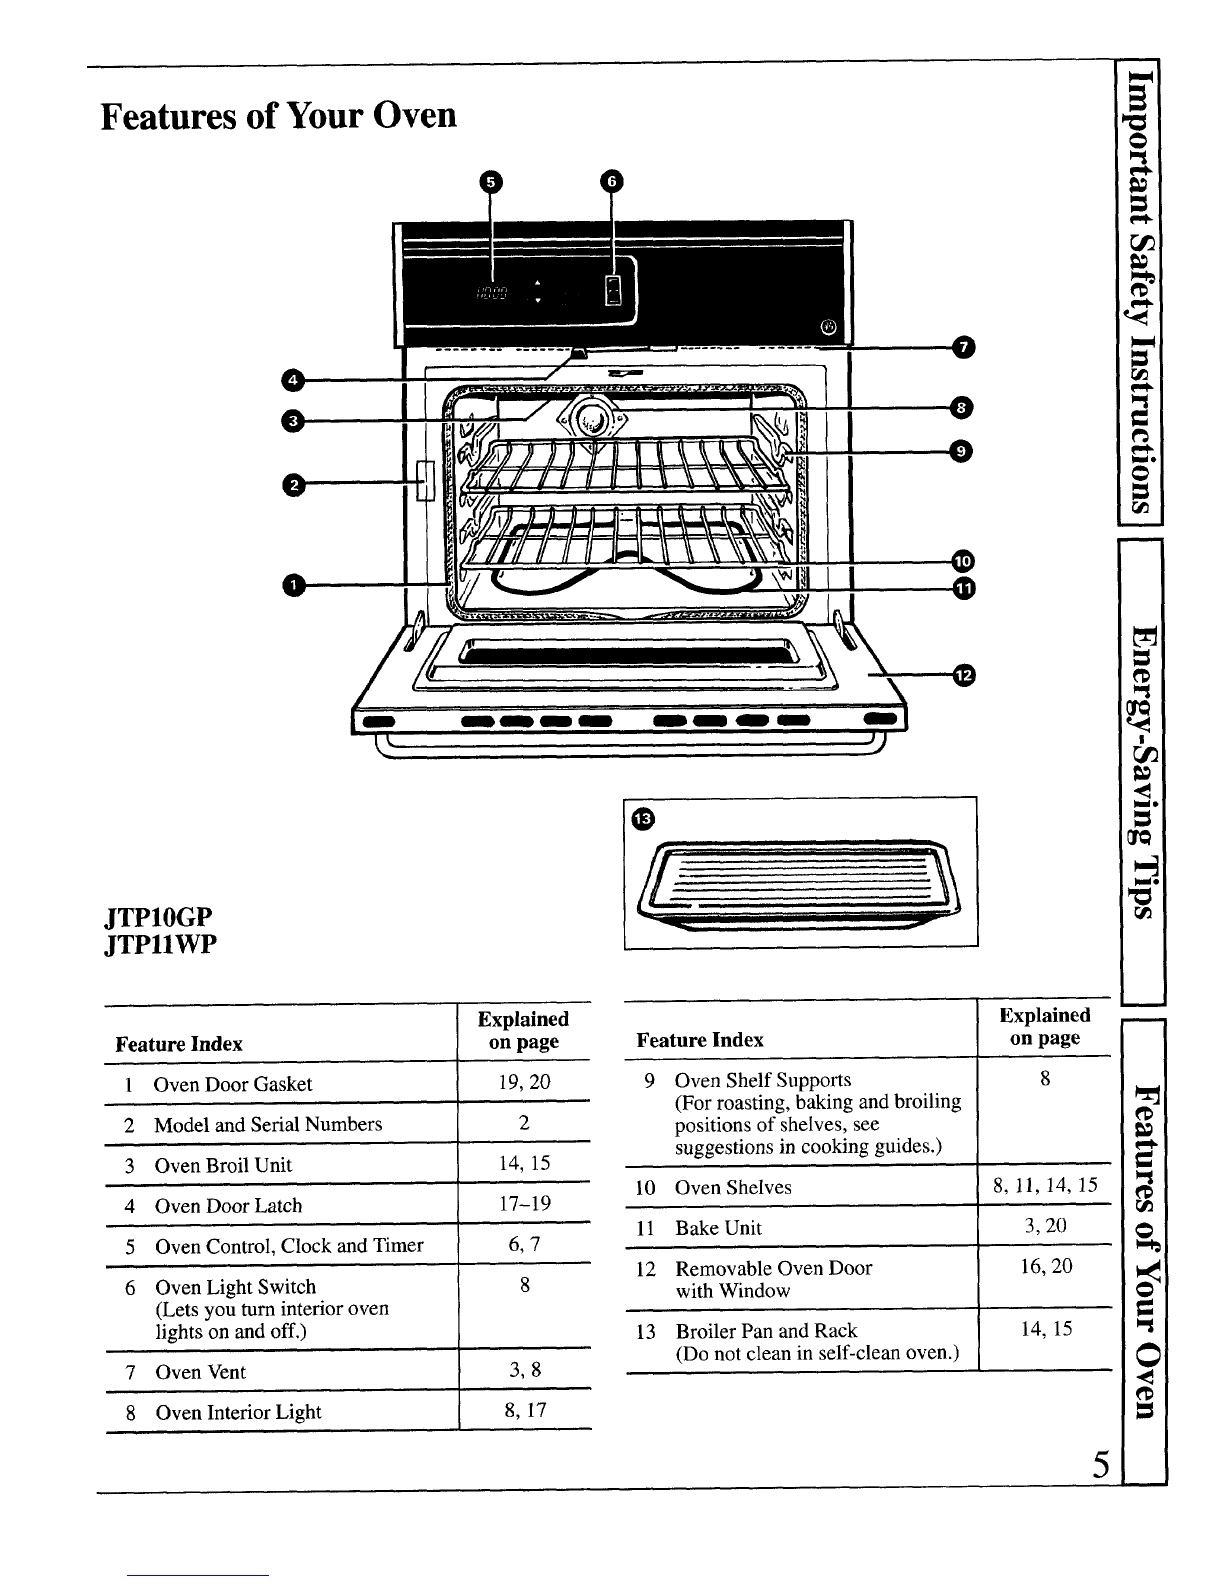
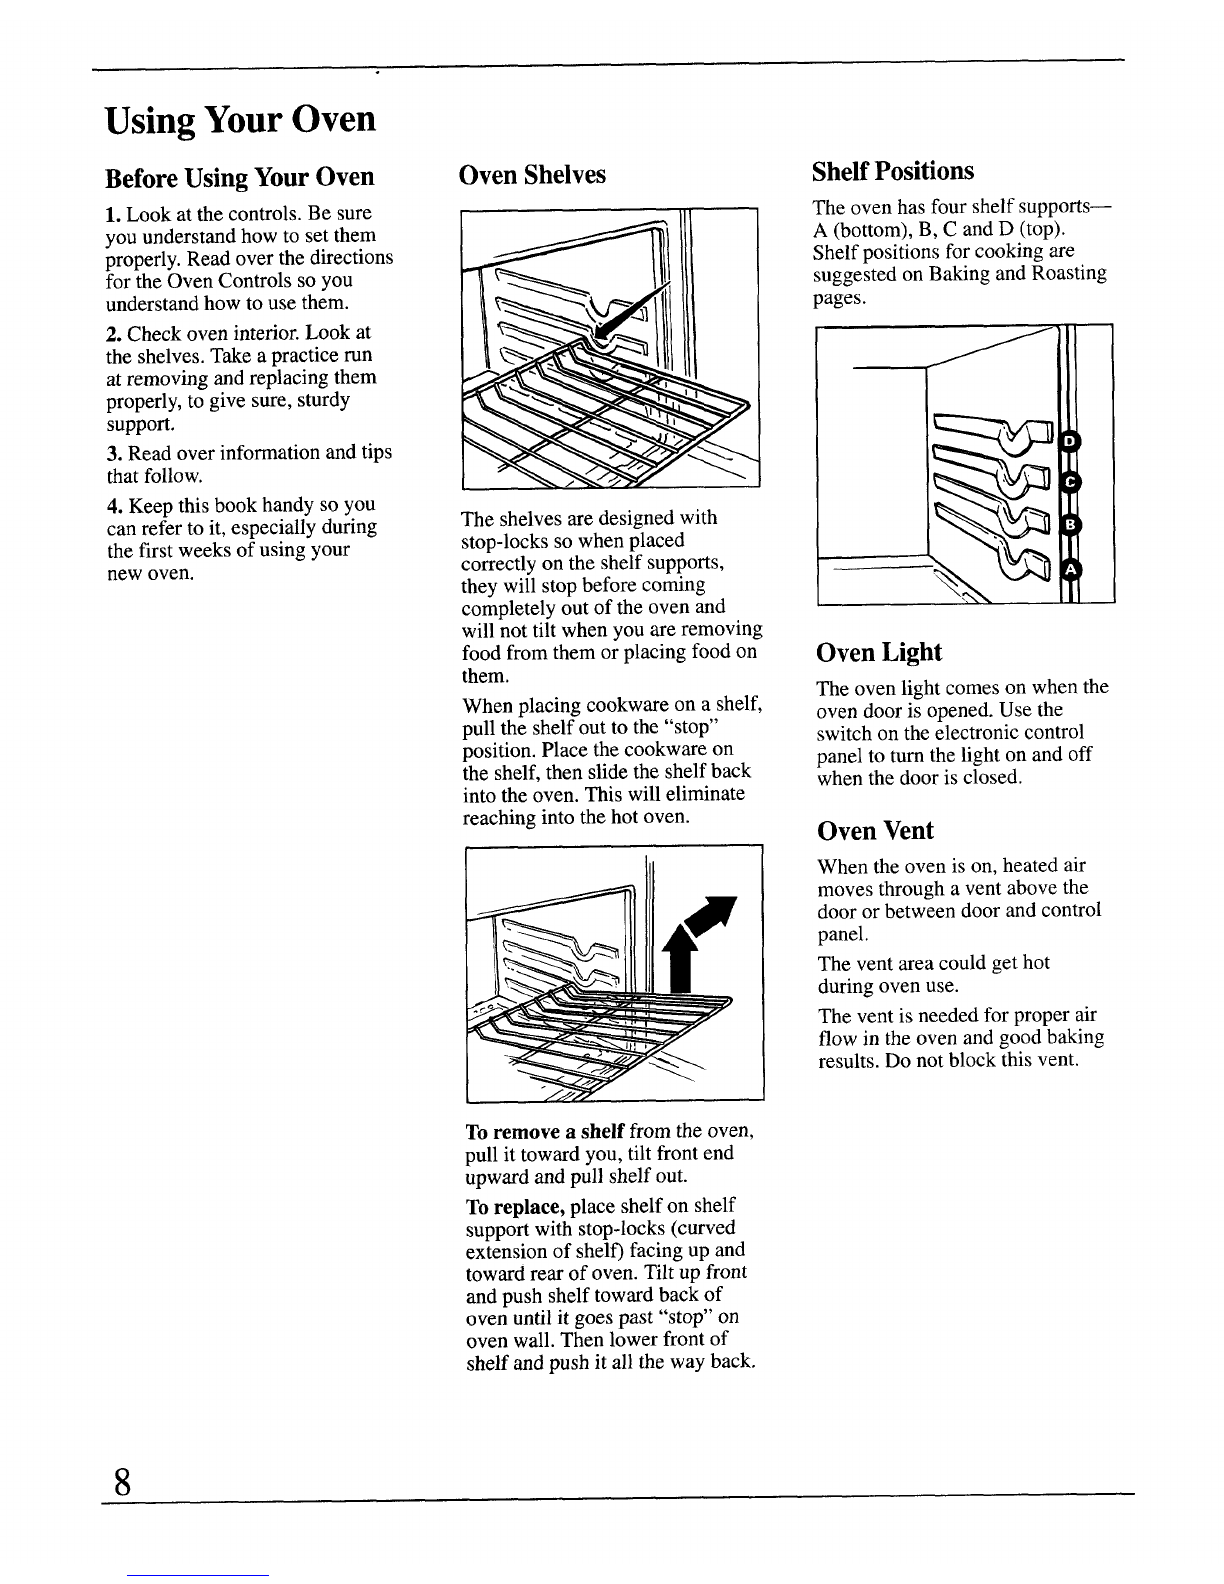
FeaturesofYourOvenControl
@Q@ QQ~ 9~~
1. TIMER ON/OFF. Pressthis
padto selecttimerfunction.The
timerdoesnotcontroloven
operations.Thetimercantimeup
to9hoursand55minutes.
Tosettimer,firstpressTIMER
ON/OFFpad.“TIMER’willflash
inthedisplay.TapINCREASEor
DECREASEpadto changethe
timeby smallamounts.Pressand
holdINCREASEorDECREASE
padto changethetimeby
largeramounts.
Hoursandminuteswillbe
displayedif thetimesetonthe
timerismorethan 1hour.Minutes
andsecondswillbedisplayedif
thetimesetonthetimeris less
than 1hour.Pressandhold
TIMERON/OFFpadto clear
timer.
2. CLEAWOFF. Pressthispadto
cancelallovenoperationsexcept
clockandtimer.
3.PROGRAM STATUS. Words
lightup in thedisplayto indicate
whatisintimedisplay.Programmed
informationcanbedisplayedat
anytimebypressingthepadof the
operationyouwantto see.
Forexample,youcandisplaythe
currenttimeofdaywhilethetimer
is countingdownbypressing
theCLOCKpad.
4. TIME DISPLAY. Showsthe
timeof day,thetimessetforthe
timeror automaticovenoperation.
5. OVEN TEMPERATURE
AND BROIL DISPLAY. Shows
theoventemperatureorthebroil
settingselected.
6.FUNCTION INDICATORS.
Lightsup to showwhetherovenis
inbake,broilor self-cleanmode.
7.INCREASE. Shorttapsto this
padincreasetimeortemperamre
by smallamounts.Pressandhold
padto increasetimeortemperate
bylargeramounts.
8.BAKE. Pressthispadto select
bakefunction.Thentaporpress
INCREASEor DECREASEpadto
setdesiredtemperature.
9. COOK TIME. Pressthispad
andthenpresstheINCREASE
orDECREASEpadto setthe
amountoftimeyouwantyour
foodto cook.PressBAKEand
theINCREASEor DECREASE
padto settheoventemperature.
Theovenwillshutoffafterthe
selectedCookTimehasrunout.
10. STOP TIME. Usethispad
alongwithCOOKTIMEand
INCREASEorDECREASEpadto
settie ovento startautomatically,
cookfor aspecifiedtimeandstop
automaticallyatatimeyouselect.
11.BROIL. Pressthispadto
selectbroilfunction.Thentap
INCREASEpadonceto broilat
LO (450”F.)or twiceto broilatHI
(550”F.).TapDECREASEpadto
changebackto LObroil.
b&&
@
12. DECREASE. Shorttapsto
thispaddecreasetimeor
temperatureby smallamounts.
Pressandholdpadto decrease
timeor temperatureby larger
amounts.
13.CLEAN. Pressthispadto
selectself-cleaningfunction.See
Self-CleaningInstructions.
14.CLOCK. Pressthispadto set
theclock.
Tosetclock,firstpressCLOCK
pad.“TIME” willflashinthe
display.TapINCREASEor
DECREASEpadto changethe
timeofdayby smallamounts.
PressandholdINCREASEor
DECREASEpadto changethe
timeof dayby largeramounts.
IIf “F-” andanumberflash
onthedisplay,thisindicatesa
functionerrorcode.Pressthe
CLEAR/OFFpad.Allow
ovento coolfor onehour.Put
ovenbackintooperation.If
functionerrorrepeats,
disconnectpowerto the
range.Callfor service.
6

OvenControl,ClockandTimer
Clock
Theclockmustbe setforthe
automaticoventimingfunctions
to workproperly.Thetimeof day
cannotbechangedduringaTIME
BAKEor CLEANcycle.
ToSetthe Clock
Step 1. PresstheCLOCKpad.
Step2.PressINCREASEor
DECREASEpadtosetthetimeof
day.
PowerOutage?
Afterapoweroutage,when
powerisrestoredthedisplaywill
flashandtimeshownwillno
longerbecorrect-for example,
aftera5-minutepowerinterruption
theclockwillbe5minutesslow.
Thedisplayflashesuntiltheclock
isreset.Allotherfunctionsthat
werein operationwhenthepower
wentoutwillhaveto be
programmedagain.
Timer
Thetimerdoesnotcontroloven
operations.Themaximumsettingon
thetimeris9hoursand55minutes.
ToSetThe Timer
Step 1. PresstheTIMERON/OFF
pad.
Step 2.PressINCREASEor
DECREASEpadto settheamount
oftimeontimer.
Thetimerwillstartautomatically
withinafewsecondsofreleasing
thepad.
Thetimer,asyouaresettingit,
willdisplaysecondsuntil60
secondsisreached.Thenit will
displayminutesandsecondsuntil
60minutesisreached.
After60minutes,it willdisplay
hours(“HR”nowappearsin
display)andminutesuntilthe
maximumtimeof9hoursand
55minutesisreached.
ToResetTimer
PressTIMERpadandthenpress
INCREASEorDECREASEpad
untilthetimeyouwantshowson
thedisplay.
ToCancelTimer
PressandholdTIMERON/OFF
paduntiltheword“TIMER”quits
flashingonthedisplay(about4
seconds).
TimerTones
Thetimertonebeepsthreetimes
andthenisasteadysignalthat
repeatsevery6secondsuntilyou
pressanyoperation.If youwould
liketo changethetoneto asetof3
shortbeeps,pressandhold
CLEAR/OFFfor 10seconds.
Toreturnto onebeepevery6
seconds,pressandhold
CLEAWOFFfor 10seconds.
DisplayMessages
If “door” appears on the display,
theovendoorisin thelocked
position.BAKE, BROIL and
COOK TIME cannotbe setif
thedooris in thelockedposition.

UsingYourOven
BeforeUsingYourOven
1. Lookatthecontrols.Besure
youunderstandhowto setthem
properly.Readoverthedirections
fortheOvenControlssoyou
understandhowto usethem.
2. Checkoveninterior.Lookat
theshelves.Takeapracticerun
atremovingandreplacingthem
properly,to givesure,sturdy
support.
3. Readoverinformationandtips
thatfollow.
4. Keepthisbookhandysoyou
canreferto it,especiallyduring
thefirstweeksofusingyour
newoven.
OvenShelves
Theshelvesaredesignedwith
stop-lockssowhenplaced
correctlyontheshelfsuppofls,
theywillstopbeforecoming
completelyoutof theovenand
willnottiltwhenyouareremoving
foodfromthemorplacingfoodon
them.
Whenplacingcookwareon ashelf,
pulltheshelfoutto the“stop”
position.Placethecookwareon
theshelf,thenslidetheshelfback
intotheoven.Thiswilleliminate
reachingintothehotoven.
Toremove ashelf fromtheoven,
pullit towardyou,tiltfrontend
upwardandpullshelfout.
Toreplace, placeshelfon shelf
supportwithstop-locks(curved
extensionof shelf)facingup and
towardrearofoven.Tiltup front
andpushshelftowardbackof
ovenuntilit goespast “stop”on
ovenwall.Thenlowerfrontof
shelfandpushit allthewayback.
ShelfPositions
Theovenhasfourshelfsupports—
A(bottom),B,CandD(top).
Shelfpositionsforcookingare
suggestedonBakingandRoasting
pages.
OvenLight
Theovenlightcomesonwhenthe
ovendooris opened.Usethe
switchon theelectroniccontrol
panelto turnthelightonandoff
whenthedoorisclosed.
OvenVent
Whentheovenis on,heatedair
movesthroughaventabovethe
doororbetweendoorandcontrol
panel.
Theventareacouldgethot
duringovenuse.
Theventisneededforproperair
flowin theovenandgoodbaking
results.Do notblockthisvent.

Baking
See Baking Guide.
Youroventemperatureis
controlledveryaccuratelyusing
anelectroniccontrolsystem.It is
recommendedthatyouoperatethe
ovenfor anumberofweeksusing
thetimegivenonrecipesas a
guideto becomefamiliarwith
yournewoven’sperformance.
If youthinkanadjustmentis
necessary,seeAdjustingOven
Temperaturesection.
Howto SetYourRange
for Baking
Step 1: Positiontheshelfor
shelvesin theoven.If cookingon
twoshelvesatthesametime,place
shelvesonalternateshelfsupports
andstaggerfoodonthem.
Step 2: Closetheovendoor.
Step 3: PressBAKEpad.
Step 4: PressINCREASEor
DECREASEpad.
Step 5: PressINCREASEor
DECREASEpaduntildesired
temperatureisdisplayed.
Theword“ON’ andthechanging
temperaturewillbe displayedas
theovenheatsup.Whentheoven
reachesthe settemperatureatone
willsound.
Tochangeoventemperatureduring
BAKEcycle,pressBAKEpadand
thenINCREASEorDECREASE
padto getnewtemperature.
Howto TimeBake
Theelectronicovencontrolallows
youto turntheovenon oroff
automaticallyat specifictimesthat
youset.
NOTE: Before beginning make
sure the oven clock shows the
correct time of day.
Tosettheclock,firstpressthe
CLOCKpad. “TIME” willflash
in thedisplay.PressINCREASEor
DECREASEpaduntilcorrecttime
ofdayisdisplayed.
Howto SetImmediate
StartandAutomaticStop
Theoventurnsonrightaway,
cooksfor presetlengthoftime,
andturnsoffautomaticallyatthe
presetStopTime.
Step 1: Positiontheshelfor
shelvesin theoven.If cookingon
two shelvesatthe sametime,place
shelveson alternateshelfsupports
andstaggerfoodon them.
Step 2: Closetheovendoor.
Step 3: PressCOOKTIMEpad.
Ii :A
Step 5: PressBAKEpad
Step 6: PressINCREASEor
DECREASEpaduntildesired
temperatureis displayed.
Theword “ON” andtherising
oventemperaturewillbe displayed
astheovenheatsup.Whenthe
ovenreachesthesettemperaturea
tonewillsound.Theove”nwill
continueto cookforthe
programmedamountoftime,
thenshutoffautomatically.
Step 7: Removefoodfromthe
oven.Remember,eventhough
ovenshutsoffautomatically,
foodscontinuecookingafter
controlsareoff.
9

Baking(continued)
Howto SetDelayStart
andStop
Quick Reminder:
1. PressCOOKTIMEpad.
2. PressINCREASE/
DECREASEpadto setcooking
time.
3.PressSTOPTIMEpad.
4. PressINCREASE/
DECREASEpaduntildesired
StopTimeappearsindisplay.
5.PressBAKEpad.
6. PressINCREASE/
DECREASEpadto selectoven
temperature.
DelayStartandStopis settingthe
oven-timerto turntheovenon and
offautomaticallyat alatertime
thanthepresenttimeof day.
Forexample:Let’ssayit’s2:00
anddinnertimeis shortlyafter
7:00.Therecipesuggests3hours
bakingtimeat 325”F.Here’show:
Step 1:Positiontheshelforshelves
intheoven.If cookingontwo
shelvesatthesametime,staggerthe
pansforbestheatcirculation.
Step 2: Closetheovendoor.
Step 3: PressCOOKTIMEpad.
Step 4: For3hoursofcooking
time,pressINCREASEor
DECREASEpaduntil“3:00”
appearsin thedisplay.
~!i
D’
Step 5: PressSTOPTIMEpad
5:00appearsonthedisplayand
“STOPTIME”flashes.Thecontrol
automaticallysetsStopTimeby
addingtheCookTimetothetime
ofday.Inthisexample,thetimeof
dayis2:00andtheCookTimeis3
hours.Adding3hourstothetime
ofdayequals5:00.
Step 6: ChangeStopTimefrom
5:00to7:00bypressingINCREASE
paduntil“7:00”appearsin the
display.
~mlll
:A
Step 7: PressBAKEpad.
Step 8: PressINCREASEor
DECREASEpad.
PressINCREASEorDECREASE
paduntil“325°”is displayed.
At 4:00,theovenwillturnon
automatically.Theword“ON’ and
thechangingoventemperaturewill
bedisplayedastheovenheatsup.
Theovenwillcontinueto cookfor
theprogrammed3hoursandshut
offautomaticallyat7:00.
Step 9: Removefoodfromthe
oven.Remember,eventhough
ovenshutsoffautomatically,foods
continuecookingaftercontrols
areoff.
NOTE: Thelowtemperaturezone
of thisrange(between150”F.and
200”F.)is availabletokeephot
cookedfoodswarm.Foodkeptin
theovenlongerthantwo hoursat
theselowtemperaturesmayspoil.
Whensettingyourovenforadelay
start,neverletfoodssuchasdairy
products,fish,meat,poultry,etc.
standformorethan1hourbefore
actualcookingbegins.Room
temperaturepromotesthegrowthof
harmfulbacteria.Besuretheoven
lightisoffbecauseheatfromthe
bulbwillspeedbacteriagrowth.
10

BakingGuide
1.Aluminumpms conductheat 2.Darkornon-shinyfinishesand 3. Preheatingtheovenisnot
quickly.Formostconventional glasscookwaregenerallyabsorb alwaysnecessary,especiallyfor
baking,light,shinyfinishesgive heat,whichmayresultin dry, foodswhichcooklongerthan30to
bestresultsbecausetheyhelp crispcrusts.Reduceovenheat 40 minutes.Forfoodswithshort
preventoverbrowning.Forbest 25°F.iflightercrustsaredesired. cookingtimes,preheatinggives
bestappearanceandcrispness.
4. Opentheovendoorto check
foodaslittleaspossibleto prevent
unevenheatingandto saveenergy.
;esults,werecommenddull Rapidbrowningof somefoods
bottomsurfacesforcakepans canbe achievedbypreheating
cast-ironcookware.
andpieplates.
Shelf
Position Time,
Minutes
Oven
Temperature
400°-4750
350°-4000
400°-450”
350°
400°-4250
375°
350°-3750
375°-4250
375°-4250
350°-3750
325”-375°
375°-400”
325°-3500
325°-3500
350°-3750
275°-3000
350°-3750
350°-3750
350°
325°-3500
350°-4000
400°-4250
375°-4000
350°-4000
300°-3500
325°
400°-4250
325°-3500
400°-4250
400°-4250
450°
325°-4000
325”-375°
300°-3500
Comments
Canned,refrigeratedbiscuitstake2to
4minuteslesstime.
Container
ShinyCookieSheet
ShinyMetalPanwith
satin-finishbottom
Castfronor GlassPan
ShinyMetalPanwith
satin-finishbottom
ShinyMetalMuffinPans
Food
Bread
Biscuits(l/2-in.thick) B,C
A,B
B
B
A,B
B
A;B
A,B
A,B
A
B
A
A,B
A:B
B
B
B
B,C
B,C
B,C
B,C
15-20
20-30
20-40
45-55
20-30
45-60
45-60
45-60
10-25
20-30
Coffeecake
Preheatcast-ironpanforcrispcrust.
Corobreadormtrfflns
Gingerbread
Decreaseabout5minutesformuffin
mix,orbakeat 450”F.for25minutes,
thenat 350”F.for 10to 15minutes.
Muffins
DeepGlassorCast-IronCups
MetalorGlassLoafPans
Popovers
Quickloafbread
Yeastbread(2loaves) Darkmetalorglassgivedeepest
browning.
Forthinrolls,ShelfBmaybe used.
Plainroils
Sweetrolls ShinyOblongorMuffinPans
ShinyOblongorMuffinPans
‘Ches
(withoutshortening)
Angelfood
Jellyroll
Sponge
Cakes
Bundtcakes
Cupcakes
Fruitcakes
Two-piecepanisconvenient.
Linepanwithwaxpaper.
AluminumTubePan
MetalJellyRollPan
MetalorCeramicPan
30-55
10-15
45-60
45-65
20-25
2-4hrs.
20-35
25-30
40-60
MetalorCeramicPan
ShinyMetalMuffinPans
MetalorGlassbaf orTubePa
ShinyMetalPanwith
satin-finishbottom
ShinyMetalPanwith
satin-finishbottom
MetalorGlassLoafPans
Paperlinersproducemoistercrusts.
Use300”F.andShelfBforsmallor
individualcakes.
Ifbakingfourlayers,useshelves
BandD.
Layer
Layer,chocolate
Loaf
Cookies
Brownies
Drop 25-35
10-20
6-12
7-12
Barcookiesfrommixusesametime.
UseShelfCandincreasetemp.25”F.
to50”F.formorebrowning.
MetalorGlassPans
CookieSheet
CookieSheet
CookieSheet
GlassorMetalPans
GlassCustardCupsorCassero
(setinpanofhotwater)
GlassCustardCupsorCassero
Refrigerator
Rolledorsliced
Fruits, Other Desserts
Bakedapples
Custard A,B, C
B
B
30-60
30-60
50-90
45-70
15-25
40-60
40-60
12-15
60-90
30-60
30-75
Reducetemp.to300”F.forlarge
custard.
Cookbreadorricepuddingwith
custardbase80to 90minutes.
Paddings,rice
andcustard
Pies Largepiesuse400°F.andmoretime.
Toquicklybrownmeringue,use400°F
for8to 10minutes.
Custardfillingsrequirelower
temperature,longertime.
FoilPanonCookieSheet
Spreadtocrustedges
GlassorSatin-finishMetalPan
Glassor Satin-finishMetalPan
A:B
A,B
B
B
Frozen
Meringue
Onecrust
Twocrust
Pastryshell
Miscellaneous
Bakedpotatoes
Scallopeddishes
Souffles
Increasetimeforlargeramountor
size.
SetonOvenShelf
GlassorMetalPan
Glass
A,B, C
A,B,C
B
11

Roasting
Roastingis cookingby dryheat.
Tendermeator poultrycanbe
roasteduncoveredin youroven.
Roastingtemperatures,whichshould
belowandsteady,keepspattering
to aminimum.Whenroasting,it is
notnecess~ to sear,baste,cover
or addwaterto yourmeat.
Roastingis reallyabaking
procedureusedformeats.
Therefore,ovencontrolsaresetfor
BAKE.(Youmayhearaslight
clickingsound,indicatingtheoven
isworkingproperly.)Roastingis
easy;just followthesesteps:
Step 1: Checkweightof meat,and
place,fat sideup,onroastingrack
in ashallowpan.(Broilerpanwith
rackis agoodpanforthis.)Line
broilerpanwithaluminumfoil
whenusingpanformarinating,
cookingwithfruits,cookingheavily
curedmeatsorbastingfoodduring
cooking.Avoidspillingthese
materialsonovenlineror door.
Step 2: Placein ovenon shelfin
AorBposition.Nopreheating
is necessary.
Step 3: PressBAKEpad.
12
Step 4: PressINCREASEor
DECREASEpad.
Step 5: PressINCREASEor
DECREASEpaduntildesired
temperatureis displayed.
Theword“ON”andthechanging
oventemperaturewillbe displayed
astheovenheatsup.Whenthe
ovenreachesthesettemperaturea
tonewillsound.
Tochangeoventemperatureduring
BAKEcycle,pressBAKEpadand
thenINCREASEorDECREASE
padtogetnewtemperature.
~iii
A*
o
Step 6: PresstheCLEAR/OFFpad
whenroastingis finishedandthen
removefoodfromoven.
Step 7: Mostmeatscontinueto
cookslightlywhilestanding,after
beingremovedfromtheoven.
Standingtimerecommendedfor
roastsis 10to 20minutes.This
allowsroaststo firmup andmakes
themeasierto carve.Internal
temperaturewillriseabout5°to
10”F.;to compensatefor
temperatureincrease,if desired,
removetheroastfromovensooner
(at5°to 10”F.lessthantemperature
in theRoastingGuide).
NOTE: YoumaywishtoTIME
BAKE,asdescribedintheBaking
section,to turnovenonand
offautomatically.
Rememberthatfoodwillcontinue
to cookin thehotovenand
thereforeshouldberemovedwhen
thedesiredinternaltemperature
hasbeenreached.
ForFrozenRoasts
●Frozenroastsofbeef,pork,lamb,
etc.,canbe startedwithout
thawing,butallow10to 25
minutesperpoundadditionaltime
(10minutesperpoundforroasts
under5pounds,moretimefor
largerroasts).
●Thawmostfrozenpoultrybefore
roastingtoensureevendoneness.
Somecommercialfrozenpoultry
canbe cookedsuccessfullywithout
thawing.Followdirectionsgiven
onpackagelabel.
QuestionsandAnswers
Q. Is it necessary to check for
doneness with ameat
thermometer?
A. Checkingthefinishedinternal
temperatureatthecompletionof
cookingtimeisrecommended.
TemperaturesareshowninRoasting
Guideonoppositepage.Forroasts
over8lbs.,cookedat300”F.with
reducedtime,checkwith
thermometerathalf-hourintervals
afterhalfthecookingtimehas
passed.
Q. Why is my roast crumbling
when Itry to carve it?
A. Roastsareeasierto sliceif
allowedto cool10to 20minutes
afterremovingfromoven.Be sure
to cutacrossthegrainofthemeat.
Q. Do Ineed to preheat my
oven each time Icook aroast
or poultry?
A. It israrelynecessaryto preheat
youroven.Preheatonlyforvery
smallroasts,whichcookashort
lengthof time.
Q. When buying aroast, are
there any specialtips that would
help me cookit more evenly?
A. Yes.Buyaroastasevenin
thicknessaspossible,orbuy
rolledroasts.
Q. Can Iseal the sides of my foil
‘tent’’when roasting aturkey?
A. Sealingthefoilwillsteamthe
meat.Lea~ingit unsealedallowsthe
airto circulateandbrownthemeat.

RoastingGuide
1. PositionovenshelfatBfor
small-sizeroasts(3 to7lbs.)and
atAfor largerroasts.
2.Placemeatfat-side-up,or
poultrybreast-side-up,onbroiler
panorothershallowpanwith
trivet.Donotcover.Donotstuff
poultryuntiljust beforeroasting.
Usemeatthermometerformore
accuratedoneness.(Donotplace
thermometerin stuffing.)
TvDe
Meat
Tendercutsofbeefirib,highquality
sirlointip,rumportopround*
Lamblegorbone-inshoulder*
Vealshoulder,legorloin*
Porkloin,ribor shoulder*
Ham,precooked
Ham,raw
*Forbonelessrolledroastsover6
inchesthick,add5to 10minutesper
poundtotimesgivenabove.
Poultry
ChickenorDuck
Chickenpieces
Turkey
3. Removefatanddrippingsas 5.Frozenroastscanbe
necess~. Basteasdesired. conventionallyroastedby adding
4. Standingtimerecommendedfor 10to 25 minutesperpoundmore
roastsis 10to 20minutes.This timethangivenin guidefor
allowsroaststo firmup andmakes refrigeratedroasts.(10minutesper
themeasiertocarve.Internal poundforroastsunder5pounds.)
temperaturewillriseabout5° to Defrostpoultrybeforeroasting.
10°F.;to compensatefor
temperaturerise,if desired,
removetheroastfromovenwhen
itsinternaltemperatureis 5°to
10”F.lessthantemperatureshown
in theRoastingGuidebelow.
Oven
l’emperature
325°
325°
325°
325°
325°
325°
325”
350°
325°
Donenms
Rare:
Medium:
WellDone:
Rare:
Medium:
WellDone:
WellDone:
WellDone:
ToWarm:
WellDone:
WellDone:
WellDone:
WellDone:
Approximate Roasting Time Internal
in Minutes per Pound Temperature ‘F.
3to 5Ibs. 6to 8lbs.
24-30 18-22 130°-1400
30-35 22-25 150°-160°
35-45 28-33 170°-1850
21-25 20-23 130°-1400
25-30 24-28 150°-1600
30-35 28-33 170°-1850
35-45 30-40 170°-1800
35-45 30-40 170°-1800
10minutesperpound(anyweight) 125°-1300
Under 10Ibs. 10to 15Ibs.
20-30 17-20 170°

Broiling
Broilingis cookingfoodby intense
radiantheatfromtheupperunitin
theoven.Mostfishandtendercuts
ofmeatcanbebroiled.Follow
thesestepsto keepspatteringand
smokingto aminimum.
Step 1: If meathasfatorgristle
nearedge,cutverticalslashes
throughbothabout2“apart.If
desired,fatmaybe trimmed,
leavinglayerabout1/8”thick.
Step 2: Placemeatonbroilerrack
inbroilerpanwhichcomeswith
range.Alwaysuseracksofat
dripsintobroilerpan;otherwise
juicesmaybecomehotenoughto
catchfire.
Step 3: Positionshelfon
recommendedshelfpositionas
suggestedin theBroilingGuide.
If yourrangeis connectedto 208
volts,youmaywishto useahigher
shelfposition,preheatthebroiler,
orbroilalittlelonger.
Step 4: Leavedoorajarafew
inches(exceptwhenbroiling
chicken).Thedoorstaysopenby
itself,yetpropertemperatureis
maintainedin theoven.
~!il
.8
●m
Step 5: PressBROILpad.
Step 6: SelectLOBroil(450”F.)
bytappingINCREASEpadonce.
SelectHIBroil(550”F.)bytapping
INCREASEpadtwice.
TochangefromHI Broilto LO
Broil,presstheBROILpadthen
tapDECREASEpadonce.
Step 7: Turnfoodonlyonce
duringcooking.Timefoodsfor
firstsideperBroilingGuide.
Turnfood,thenusetimesgivenfor
secondsideasaguideto preferred
doneness.(Wheretwothicknesses
andtimesaregiventogether,use
firsttimesgivenforthinnestfood.)
Step 8: WhenBroilingis
completedpresstheCLEAR/OFF
pad.Servefoodimmediately,and
leavepanoutsideovento cool
duringmealfor easiestcleaning.
UseofAluminumFoil
Youcanusealuminumfoilto line
yourbroilerpanandbroilerrack.
However,youmustmoldthefoil
tightlyto therackandcutslitsin
itjust liketherack.
Withouttheslits,thefoilwill
preventfatandmeatjuicesfrom
drainingto thebroilerpan.The
juicescouldbecomehotenoughto
catchon fire.If youdo notcutthe
slits,youarefrying,notbroiling.
Questions&Answers
Q. Why should Ileave the door
closed when broiling chicken?
A. Chickenis theonlyfood
recommendedforclosed-door
broiling.Thisis becausechicken
isrelativelythickerthanother
foodsyoubroil.Closingthedoor
holdsmoreheatintheoven
whichallowschickento cook
evenlythroughout.
Q. When broiling, is it necessary
to always use arack in the pan?
A. Yes.Usingtherack suspends
themeatoverthepan.Asthemeat
cooks,thejuicesfallintothepan,
thuskeepingmeatdrier.Juicesare
protectedbytherackandstay
cooler,thuspreventingexcessive
spatterandsmoking.
Q. Should Isalt the meat before
broiling?
A. No. Saltdrawsoutthejuices
andallowsthemto evaporate.
Alwayssaltaftercooking.Turn
meatwithtongs;piercingmeat
withaforkalsoallowsjuicesto
escape.Whenbroilingpoultry
or fish,brusheachsideoften
withbutter.
Q. Why are my meats not turning
out as brown as they should?
A. In someareas,thepower
(voltage)totherangemaybe low.
In thesecases,preheatthebroil
unitfor 10minutesbeforeplacing
broilerpanwithfoodin oven.
Checkto seeif youareusingthe
recommendedshelfposition.Broil
forlongestperiodoftimeindicated
intheBroilingGuide.Turnfood
onlyonceduringbroiling.
Q. Do Ineed to grease my
broiler rack to prevent meat
from sticking?
A. No. Thebroilerrack isdesigned
toreflectbroilerheat,thuskeeping
thesurfacecoolenoughto prevent
meatfromstickingto thesurface.
However,sprayingthebroilerrack
lightlywithavegetablecooking
spraybeforecookingwillmake
cleanupeasier.
14

BroilingGuide
1. Alwaysusebroilerpanandrack
thatcomeswithyouroven.It is
designedto minimizesmokingand
spatteringby trappingjuicesin the
shieldedlowerpartofthepan.
2.Ovendoorshouldbeajarforall
foodsexceptchicken;thereis a
specialpositionon doorwhich
holdsdooropencorrectly.
3. Forsteaksandchous.slashfat
throughouterfat surfacejust to the
edgeofthemeat.Usetongsto turn
meatovertopreventpiercingmeat
andlosingjuices.
4. If desired,marinatemeatsor
chickenbeforebroiling,orbrush
withbarbecuesaucelast5to 10
minutesonly.
5. Whenarrangingfoodonpan,do
notlet fattyedgeshangoversides,
evenlyaroundoutsid~edgesof whichcoulds~iloven-with
meat.Toslash,cutcrosswise fatdripping.
Food
Bacon
Ground Beef
WellDone
Beef Steaks
Rare
Medium
WellDone
Rare
Medium
WellDone
Chicken
Bakerv Products
Bread(Toast)or
ToasterPastries
EnglishMuffrrrs
Lobster Tails
Fish
Ham Slices
(precooked)
Pork Chops
WellDone
Lamb Chops
Medium
WellDone
Medium
WellDone
Wienersandsimilar
precookedsausages,
bratwurst
1/2to 3)4in.thick IDIHI I8-9
I
1inchthick DHI 9
(i to lfi lbs.) D12-13
D13
1Xin.thick !Dl I10
(2to2Xlbs.) D15
D25
1whole BLO 28-30
(2to 2XIbs.),
splitlengthwise
2to4slices IDIHII 2-3
1-lb.fillets1/4to DHI 5
1/2in.thick
1in.thick lc]L018
2(1 inch) DHI 8
about10to 12oz. D10
2(1Xinch) D10
about1Ib. c17
l-lb. pkg.(10) DHI 6
6. Broilerdoesnotneedto be
preheated.However,for verythin
foods,or to increasebrowning,
preheatif desired.
7.Frozensteakscanbe
conventionallybroiledby
positioningtheovenshelfatnext
lowestshelfpositionand
increasingcookingtimegivenin
thisguide1Xtimesper side.
Second Side
rime, Minutes Commen@
2fi IArrangeinsinglelayer.
Spaceevenly.
6-7 Upto8pattiestakeaboutsametime.
7
6-7
8-9
6-7
9-12
16-18
Steakslessthan1inchthickcook
throughbeforebrowning.Panfrying
isrecommended.
S1ashfat.
18-20 Reducetimeabout5to 10minutes~r
sideforcut-upchicken.Brusheach
sidewithmeltedbutter.Broilskin-side-
downfirstandbroilwithdoorclosed.
1/2-1 Spaceevenly.PlaceEnglishmuffins
cut-side-upandbrushwithbutter,if
desired.
Donot Cutthroughbackofshell.Spreadopen.
turnover. Brushwithmeltedbutterbeforeand
afterhalfofbroilingtime.
5Handleandturnverycarefully.Brush
withlemonbutterbeforeandduring
cookingifdesired.Preheatbroilerto
Iincreas~browning.
8Increasetime5to 10minutesuerside
for 1Minchthickorhomecur~d.
4-5 Slashfat.
8-9
4-7
10
4-6
Slashfat.
12-14
1-2 Ifdesired,splitsausagesin half
lengthwise;cutinto5-to 6-inchpieces.
15

andCleaning
(See CleaningGuide)
Proper care and cleaning are
important so your oven will give
you efficient and satisfactory
service. Follow these directions
carefully in caring for your oven
to assure safe and proper
maintenance.
OvenShelves
Oven shelves may be cleaned with
amild abrasive cleanser following
manufacturer’s directions. After
cleaning, rinse the shelves with
clean water and dry with aclean
cloth.
To remove heavy,burned-on soil,
soapy metal pads may be used
following manufacturer’s
directions. After scrubbing, wash
with soapy water, rinse and dry,
Oven shelves may be cleaned in
self-cleaning oven. However, they
will darken, lose their luster and
become hard to slide. Wipe the
shelf SJpportswith cooking oil
after self-cleaning to make shelves
slide more easily.
BroilerPan &Rack
After broiling, remove the broiler
pan and rack from the oven.
Remove the rack from the pan.
Carefully pour out the grease in the
pan into aproper container.Wash
and rinse the pan and rack in hot,
soapy water.
If food has burned on, sprinklethe
rack, while hot, with detergent and
cover with wet paper towels or a
dish cloth. That way, burned-on
foods will soak loose while the
meal is being served.
Do not store asoiled broiler pan
and rack in the oven.
OvenLightBulb
The light bulb is located on the
back wall of the oven. Before
replacing the bulb, disconnect
electric power to the oven at the
main fuse or circuit breaker panel
or unplug the oven from the
electrical outlet. Let the bulb cool
completely before removing it, Do
not touch ahot bulb with adamp
cloth.If you do, the bulb will break.
Toremove:
●Remove the 4screws in the lamp
cover.
●Detach lamp cover and remove
bulb.
To replace:
●Putin anew 40-watt appliance
bulb.
NOTE: A40-watt appliance bulb
is smaller than astandard 40-watt
household bulb. We recommend
you use an appliance bulb that is
no longer than 3%inches.
●Install lamp cover. Replace
screws and tighten, making sure
cover fits flush with oven wall.
●Reconnect electrical power to
the range.
Ltit-OffOvenDoor
The oven door is removable to
make the interior more accessible.
To remove the door,open it afew
inches to the special stop position
that will hold the door open. Grasp
firmly on each side and lift the
door straight up and off the hinges.
Do not use the door handle to lift
tie door.
NOTE: Be careful not to place
hands between the spring hinge
and the oven door frame as the
hinge could snap back and pinch
fingers.
Toreplace the door, make sure
the hinges are in the special stop
position. Position the slots in the
bottom of the door squarely over
the hinges. Then lower the door
slowly and evenly over both
hinges at the same time. If hinges
snap back against the oven frame,
pull them back out.
16

OperatingtheSelf-CleaningOven
Nofial CleaningTime:3hours
QuickReminder—
ToSetSelf-Clean:
1.Prepareovenforcleaning.
2,Slidethelatchhandleto the
rightasfarasitwillgo.
3.PressCLEANpad.
4.PressINCREASEor
DECREASEpad.
5.PressINCREASEor
DECREASEpadto setclean
time.
Beforea CleanCycle
Step 1: Removethebroilerpan,
broilerrack,allcookwareandany
aluminumfoilfromtheoven—
theycannotwithstandthehigh
cleaningtemperatures.(Oven
shelvesmaybeleftin oven.)
NOTE: Shelveswilldiscolorafter
theself-cleancycle.
Step 2: Wipeup heavysoilonthe
ovenbottom.
7—
A. OvenFrontFrame
B.OvenDoorLatch
C. OvenDoorGasket
D. OvenLight
Step3: Cleanspattersor spillson
ovenfrontframe(A)andovendoor
outsidegasket(C)withadampened
cloth.Polishwithadrycloth.Do
notcleangasket(C).Neverusea
commercialovencleanerinor
aroundself-cleaningoven.
Step 4: Closethe doorandmake
suretheovenlight(D)is off.
Ovenshelvesmaybe cleanedin
theself-cleaningoven.However,
theywilldarken,losetheirluster
andbecomehardto slide.Wipethe
shelfsupportswithcookingoil
afterself-cleaningto makeshelves
slidemoreeasily.
Donotusecommercialoven
cleanersorovenprotectorsinor
neartheself-cleaningoven.A
combinationof anyof these
productsplusthehighclean-cycle
temperaturesmaydamagethe
porcelainfinishoftheoven.
Important
Theovendoormustbe closedand
allcontrolsmustbe setcorrectly
forthecleancycletoworkproperly.
Aftera CleanCycle
Afteracleancycle,youmay
noticesomewhiteashin theoven.
Justwipeitup withadampcloth.
If whitespotsremain,remove
themwithasoap-filledsteelwool
pad.Be sureto rinsethoroughly
withavinegarandwatermixture.
Thesedepositsareusuallyasalt
residuethatcannotberemovedby
thecleancycle.
If theovenis notcleanafterone
cleancycle,thecyclemaybe
repeated.
Howto Set Oven
for Cleaning
Step 1: Followstepsatleftto
preparetheovenforcleaning.
Step 2: Closetheovendoorand
makesuretheovenlightis off.
Slidethelatchhandletotheright
asfar asit willgo.
Step 3: PressCLEANpad.
Step 4: PressINCREASEor
DECREASEpad.
Step 5: Tochangecleantimepress
INCREASEor DECREASEpad
untildesiredCleanTimeis
displayed.
CleanTimeisnormally3hours.
YoucanchangetheCleanTimeto
anywherebetween2and4hours,
dependingonhowdirtytheovenis.
Theself-cleancyclewill
automaticallybeginwithinafew
secondsandtheword“ON”will
appearon thedisplay.Whenthe
ovenlockstheword“LOCK’will
bedisplayedand,ashorttimelater,
thedoorlatchhandlewillbe
lockedin position.It willnotbe
possibleto opentheovendoor
untiltemperaturedropsbelowthe
locktemperature.
Whenthecleancycleis finished,
theword“CLEAN’willgo outin
thedisplayandtheovenwillbegin
to cool.Whentheoven
temperaturehasfallenbelowthe
lockingtemperature(about20-30
minutesaftertheword“CLEAN”
goesoutat theendoftheclean
cycle),theword“LOCK”goesout
andthedoorcanbeopened.
Step 6: WhentheLOCKlightis
off,slidelatchhandleto theleftas
far as it willgo andopenthedoor.
Never force the handle. Wait
until the word “LOCK” goes out
in the display. Forcing the latch
handlemay damagethe doorlock.
If “F-” andanumberflash
onthedisplay,thisindicatesa
functionerrorcode.Pressthe
CLEAR/OFFpad.Allow
ovento coolforonehour.Put
ovenbackintooperation.If
functionerrorrepeats,
disconnectpowerto the
range.Callfor service.
17

Howto DelayStart
of Cleaning
DelayStartis settingtheoven
timerto startthecleancycle
automaticallyat alatertimethan
thepresenttimeofday.NOTE:
Beforebeginning,makesurethe
ovenclockshowsthecorrecttime
ofday.
Quick Reminder—Delay
Start for Self-Clean:
1. Prepareovenforcleaning.
2. Slidethelatchhandleto the
rightasfarasit willgo.
3. PressCLEANpad.
4.PressINCREASEpad.
5.PressSTOPTIMEpad.
Timethatappearsis 3hours
laterthanthetimeofday.Press
INCREASEpaduntiltheStop
Timeyoudesireappearsin the
display.Theself-cleancycle
willautomaticallybegin3hours
beforethestoptimeyouselect.
Forexample:Let’ssayit’s7:00
andyouwanttheoventobegin
self-cleaningat 9:00afteryou’re
finishedin thekitchen.Theoven
isjust soiledanorrnd amountso
thenormalCleanTimeof 3hours
ispreferred.
Step1:Preparetheovenforcleaning.
Step 2: Closetheovendoorand
makesuretheovenlightis off.
Slidelatchhandleto therightas
far asit willgo.
~mii
A
Step 3: PressCLEANpad.
Step 4: PressINCREASEpad.
Step 5: Cleantimeforheavysoil
canbe setfor4hours.If alonger
or shorterCleanTimeis desired,
pressINCREASEorDECREASE
paduntildesiredcleantimeis
displayed.
~mii
t“
Step 6: PressSTOPTIMEpad.The
earliestpossiblestoptimeappears
ondisplayand“STOPTIME’
flashes.Thecontrolautomatically
setsStopTimebyaddingtheClean
Timetothetimeofday.Inthis
example,thetimeofdayis7:00and
theCleanTimeis3hours.Adding3
hourstothetimeofdayequals
10:00.
Step7:ChangeStopTimefrom
10:00to 12:00bypressing
INCREASEpaduntil“12:00”
appearsinthedisplay.
Thewords“DELAYCLEAN”
willalso appearin thedisplay.
Theself-cleancyclewill
automaticallybeginat9:00and
finishat 12:00.Theword“ON’
willappearon thedisplayat 9:00.
Whentheovenlocks,theword
“LOCK’willbedisplayedand,a
shorttimelater,thedoorlatch
handlewillbelockedinposition.
It willnotbepossibleto openthe
ovendooruntilthetemperature
dropsbelowthelocktemperature.
Whenthecleancycleis finished,
theword“CLEAN”willgoout
in thedisplayandtheovenwill
beginto cool.Whentheoven
temperaturehasfallenbelowthe
lockingtemperature(about20-30
minutesaftertheword“CLEAN’
goesoutattheendoftheclean
cycle),theword“LOCK”goesout
andthedoorcanbe opened.
Step 8: WhentheLOCKlightis
off,slidelatchhandleto theleftas
far asit willgo andopenthedoor.
Never force the latch handle.
Wait until the word “LOCK”
goes out in the display. Forcing
the latch handle may damage the
door lock.

OperatingtheSelf-CleaningOven(continued)
QuestionsandAnswers
Q. If my oven clock is not
working, can Istill self-clean
my oven?
A. If theclockis notworkingthen
theentirecontrolis notworking.If
theclockis notsetto thecorrect
timeof dayyouwillnotbe ableto
setadelaycleanto endat a
specifictime.
Q. Can Iusecommercial
ovencleaners on any part
ofmy self-cleaning oven?
A. Nocleanersorcoatingsshould
beusedaroundanypart of this
oven.If you do use themand
donotwipetheovenabsolutely
clean,theresiduecanscarthe
ovensurfaceand damagemetal
parts the next time the oven is
automaticallycleaned.
Q. Can Iclean the Woven
Gasket around the oven door?
A. No, thisgasketis essentialfora
goodovenseal,andcaremustbe
takennottorub,damageormove
thegasket.
Q. What should Ido if excessive
smokingoccurs during cleaning?
A. Thisis causedby excessivesoil.
PresstheCLEAR/OFFpad.Open
windowsto ridroomof smoke.
Waituntilthe ovenhascooled
(about20-30minutes)andthe
wordLOCKis offin thedisplay.
Wipeup theexcesssoilandreset
thecleancycle.
Q. Is the “crackling” sound I
hear during cleaning normal?
A. Yes. Thisis thesoundof the
metalheatingandcoolingduring
boththecookingandcleaning
functions.
Q. Shouldthere be any odor
during the cleaning?
A. Yes,theremaybe aslightodor
duringthefirstfewcleanings.
Failureto wipeoutexcessivesoil
mightalsocauseastrongodor
whencleaning.
Q. What causesthe hair-like
lines on the enameled surface
of my oven?
A. Thisis anormalcondition,
resultingfromheatingandcooling
duringcleaning.Theselinesdonot
affecthowyourovenperforms.
Q. Why do Ihave ash left in my
ovenafter cleaning?
A. Sometypesof soilwillleave
adepositwhichis ash.It canbe
removedwithadampsponge
orcloth.
Q. Myovenshelves do not slide
easily.What is the matter?
A. Aftermanycleanings,oven
shelvesmaybecomesocleanthey
donotslideeasily.If youwish
shelvesto slidemoreeasily,
dampenfingerswithasmall
amountof cookingoilandrub
lightlyoversidesof shelfwhere
theycontactshelfsupports.
Q. My ovenshelveshave become
gray after the self-clean cycle.
Is this normal?
A. Yes.Aftertheself-cleancycle,
theshelvesmaylosesomeluster
anddiscolorto adeepgraycolor.
AdjustingOvenThermostat
Whencookingafoodforthefirst
timeinyouroven,usetimegiven
onrecipesasaguide.Oven
thermostats,overaperiodofyears,
may“drift”fromthefactorysetting
anddifferencesin timingbetween
anoldandanewovenof5to 10
minutesarenotunusualandyou
maybeinclinedto thinkthatthe
newovenisnotperforming
correctly.However,yournewoven
hasbeensetcorrectlyatthefactory
andis moreapttobe accuratethan
theovenitreplaced.
If youthinktheovenshouldbe
hotteror cooler,youcan adjustit
yourself.Todecidehowmuchto
changethetemperature,setthe
oventemperature25”F.higheror
lowerthanthetemperatureinyour
recipe,thenbake.Theresultsof
this“test”shouldgiveyouanidea
ofhowmuchthetemperature
shouldbechanged.
Toadjusttemperature:
1. PressBAKEpad.
2. Selectanoventemperature
between500”F.and550°F.
3. Immediately,beforeONis
displayed,pressandholdthe
BAKEpadfor about4seconds.
Thered displaywillchangeto the
ovenadjustmentdisplay.
4.Theoventemperaturecanbe
adjustedup to (+)35”F.hotter
or (–)35”F.cooler.Usethe
INCREASEor DECREASEpads
to selectthedesiredchangein the
red display.
5.Whenyouhavemadethe
adjustment,presstheCLEAR/OFF
padto gobackto thetimeof day
display.Useyourovenasyou
wouldnormally.
NOTE:Thisadjustmentwillnot
affectBroilor Cleantemperatures.
It willberememberedwhenpower
isremoved.
19

CleaningGuide
NOTE: Let oven pa~ cool before touching or handling.
PART
Bake Unit and
Broil Unit
Broiler Pan and Rack
Control Panel
Metal Parts
Outside Glass Finish
Oven Door*
Oven Gasket
Oven Liner
Porcelain Enamel
and Painted Surfaces*
Shelves
(See SeIf-Cleaning
OvenDirections)
MATERIALS TO USE
●SoapandWater
●SoapFilledScouringPad
●PlmticScouringPad
●Dishwasher-Safe
●DampCloth
●PaperTowel
●SoapandWater
●SoapandWater
●SoapandWater
●SoapandWater
●SoapandWater
●PaperTowel
●DryCloth
●SoapandWater
●SoapandWater
●Dishwasher-Safe
GENERAL DIRECTIONS
Donotcleanthebakeunitorbroilunit.Anysoilwillbumoffwhentheunitis heated.
NOTE:Thebakeunitcanbeliftedgentlytocleantheovenfloor.Ifspillover,residue,
orashaccumulatesaroundthebakeunit,gentlywipearoundtheunitwithwarmwater.
Drainfatandcoolpanandrackslightly.(Donotlet soiledpanandrackstandin ovento
cool.)Sprinkleondetergent.Fillthepanwithwarmwaterandspreadadampclothor
papertowelovertherack.Letpanandrackstandforafewminutes.Wash;scourif
necessary.Rinseanddry.OPTION:Thebroilerpanandrackmayalsobecleanedin
adishwasher.
DO NOTUSEabrasives, Washcontrolpanelwithsoapandwater,usingasoft
cleaningpowders,steel wool cloth.Rinseanddrywithasoftcloth.
or plastic scouring pads.
They will mar the surface.
DO NOTUSEsteel wool, Tosafelycleansurfaces:wash,rinse,andthendry
abrasives, ammonia, acids withasoftcloth.Donotallowwatertorundown
orcommercialovencleaners. insidethesurfaceoftheglasswhilecleaning.
Cleanoutsideofcooledglassdoorwithaglasscleanerthatdoesnotcontainammonia.
Donotallowwaterto rundowninsideopeningsintheglasswhilecleaning.
DO NOTUSEoven INSIDEOFDOOR:CleanONLYthedoorlineroutside
cleaners, cleansing powders thegasket.Thedooris automaticallycleanediftheoven
or harsh abrasives. isintheself-cleaningcycle.DONOTrubordamagethe
gasket.Avoidgettingsoapandwateronthegasketorin
anyopeningsonthedoor.Rinsewell.NOTE: Soapleft
onlinercausesadditionalstainswhenovenisreheated.
OUTSIDEOFDOOR:Usesoapandwatertothoroughly
cleanthetop,sidesandfrontoftheovendoor.
AvoidgettingANYcleaningmaterialsonthegasket.
Allowtocoolbeforecleaning.Frequentwipingwithmildsoapandwaterwillprolong
thetimebetweenself-cleaningcycles.Besure to rinse thoroughly to avoid
additional stins.
DONOUSE steel WOO1, Ifacidsshouldspillontheovenwhileit is hot,useadry
abrasives, ammonia, acids papertowelorclothto wipethemuprightaway.When
orcommercialovencleaners. the surface hascooled,washandrinse.Forotherspills,
suchasfat smatterings,etc.,washwithsoapandwater
whencooledandthenrinse.Polishwithdrycloth.
1
Shelvescanbecleanedwiththeself-cleaningfunctionintheoven.However,theywill
darken,losetheirlusterandbecomehardto slide.Wipetheshelfsupportswithcooking
oilafterself-cIeaningtomakeshelvesslidemoreeasily.Forheavysoil,cleanbyhand
andrinsethoroughly.
*spillageofmarinades,fruitjuices,tomatosaucesandbastingmaterialscontactingacidsmaycausediscolorationandshouldbewipedUPimmediately.
T&ec-menottotouchhotportionofoven.Whensurfaceiscool,cleanandrinse.
20
This manual suits for next models
1
Table of contents
Other GE Oven manuals
Popular Oven manuals by other brands

Frigidaire
Frigidaire FEB27T5ASA Control guide

Electrolux
Electrolux EZB53400AX user manual

THERMODYNE
THERMODYNE 200NDNL Installation & operation manual

Whirlpool
Whirlpool GY398LXPB00 parts list

Krups
Krups FBB2 user manual

Middleby Marshall
Middleby Marshall RED LOBSTER PS200-R68 Series OPERATING AND INSTALLATION Manual

Hotpoint Ariston
Hotpoint Ariston OK 89 EN DC.20 /HA operating instructions

Veloci
Veloci High Speed Commercial Combination Oven owner's manual

AEG
AEG Competence 5051 B operating instructions

Monogram
Monogram Monogram ZET1038PFSS owner's manual

Smeg
Smeg Oven user manual

Amana
Amana Gas Freestanding BIG OVEN Service manual