Foma D902iS User manual
Manual for Data Communication
Data communication .......................................................................................... 1
Flow of setup for data communication ............................................................2
Connecting PC to FOMA terminal .....................................................................3
Installation of the communication configuration file (driver) ........................4
Communicating using the FOMA PC configuration software ........................5
Communicating without using the FOMA PC configuration software ........15
AT command .....................................................................................................25
■About Manual for Data Communication
In this manual, the important items, which are needed for data communication by
FOMA D902iS and the method of installing “communication configuration file (driver)
for D902iS” and “FOMA PC configuration software” are explained.
■Operations for Windows
In this manual, the contents correspond to Windows XP Service Pack 2.
A part of the operations or screens may differ, depending on the environment.

1
Data communication
The data communication modes available from
FOMA terminal and hints on use are explained.
・FOMA terminal does not support the Remote
Wakeup.
・FOMA terminal does not support fax communication.
・When connecting FOMA terminal to DoCoMo’s
PDA “sigmarion Ⅱ” or “musea” for data
communication, make sure to update “sigmarion
Ⅱ” or “musea”. For details on update, visit the
DoCoMo website.
Supported communication modes
FOMA terminal supports 3 communication modes:
packet communication, 64K data communication and
data transfer.
These communications become available by
installing the related software onto a PC from the
attached CD-ROM, connecting FOMA terminal to the
PC and making required settings.
■Packet communication
Packet communication charges are based on the
amount of data sent and received, which make it
suitable for high-speed exchange of relatively
small amounts of data such as sending and
receiving mail. No communication charges are
required when no data are exchanged even if you
are connected to the network. Therefore, sending/
receiving data as needed while remaining
connected to the network is possible.
High-speed packet communication provides a
maximum reception speed of 384 kbps and a
maximum transmissionspeed of64 kbps by using
access points that support packet communication
on FOMA, such as Docomo’s “mopera U/mopera”
Internet connection service. These are offered by
Best-effort connection which allows transmission
speed to vary with the environment and the rate of
congestion.
Note that communications of large-size data such
as for viewing and downloading websites
containing images will require high charges.
■64K data communication
The 64K data communications allow data transfer/
reception at stabled communication rate of 64
kbps. Communication charges are based on the
duration of the connection to the network
regardless of the volume of data, which make it
suitable for sending and receiving relatively large
amounts of data as in downloading multi-media
contents. You need to use access points that
support FOMA 64K data communication such as
Docomo’s “mopera U/mopera” Internet connection
service or ISDN synchronized 64 kbps access
points.
Note that communicating for long time will require
high charges.
■Data transfer
It is the mode of non-charged communication in
which data are transferred/exchanged via FOMA
USB cable (optional). Various data including the
phonebook, incoming/outgoing mail and
bookmarks are sent/received.
Usage precautions
When using the Internet from PC, usage charge to
your Internet service provider (hereinafter called
provider) is generally required. This charge is paid
directly to the provider, and is separate from the
FOMA service charge. For more information on
usage charges, contact your provider.
・DoCoMo provides 2 Internet connection services:
mopera U and mopera.
The mopera U service requires subscription and
a monthly fee. It allows you to use broadband
Internet connection and international roaming
services. There is also a plan that requires a
monthly fee only when you use the service.
The mopera service, allows you to access the
Internet without subscription and monthly fee.
You can make a connection with Internet
immediately.
For details such as on charges, visit the DoCoMo
website.
Different dialup connections are required for packet
communication and 64K data communication. When
performing packet communication, use the dialup
connection for FOMA packet communication. When
performing 64K data communication, use the dialup
connection for FOMA 64 kbps data communication or
ISDN synchronized 64 kbps data communication.
・You cannot connect to access points of PHS 64K/
32K data communication such as PIAFS or DoPa.
Some dialup connections require user authentication
(ID and password) before a connection can be
established. If user authentication is required, you
must use your communication software or dialup
network to enter your ID and password before
connection. Your ID and password will be assigned
by the provider or network administrator such as in-
house LAN, etc. For more information, contact your
provider or network administrator.
Internet service provider usage charge
Setting the dialup connection (provider, etc.)
User authentication during network access
Next
2
To authenticate FirstPass (user certificate), you must
install FirstPass PC software from the attached CD-
ROM and configure it. For details, see
“FirstPassManual” in the CD-ROM.
To view “FirstPassManual” (PDF format), Adobe
Reader (version 6.0 or later recommended) is
required. If Adobe Reader is not installed in your PC,
you need to download the latest version from the
Adobe Systems Incorporated website (Communication
fee is separately required for downloading). For
details, see the Adobe Systems Incorporated website.
■Operating environment for the FirstPass PC
software
*1 May vary with the PC system configurations.
To perform data communication from FOMA terminal,
the following conditions must be satisfied.
・The PCs which may use a FOMA USB cable
(optional).
・You must be within the FOMA service area.
・Packet communication requires an access point
that supports FOMA packet communications.
・64K data communication requires an access point
that supports FOMA 64 kbps or ISDN synchronized
64 kbps data communication.
However, even when the above requirements are
satisfied, you may not be able to perform data
communication if base station traffic is heavy, or the
signal quality is poor.
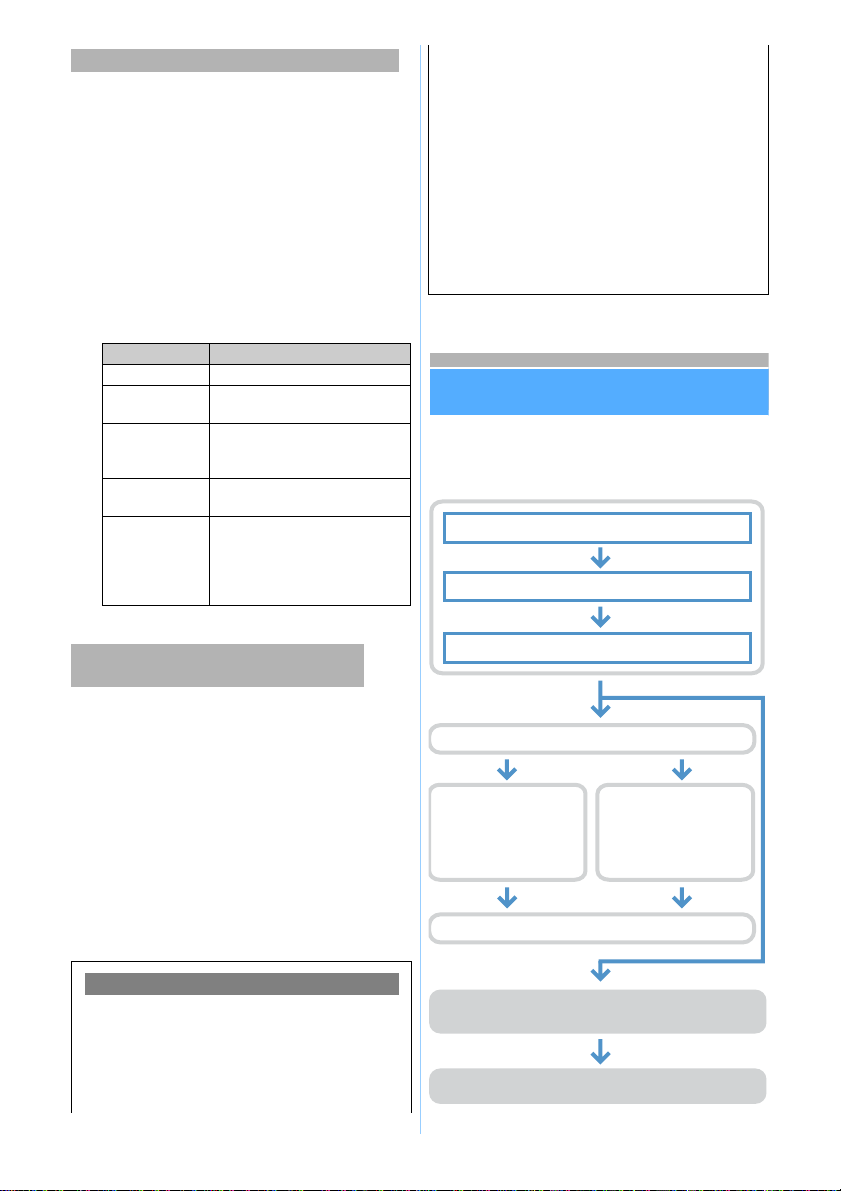
Flow of setup for data communication
The setup work needed to connect FOMA
terminal to a PC to perform packet or 64K data
communication is as follows:
Access authentication when using PC browser
Item Requirements
PC PC/AT compatible computer
OS The Japanese version of
Windows 98SE, Me, 2000 or XP
Memory
requirements*1Windows 98SE, Me, 2000: 32MB
or more
Windows XP: 128MB or more
Hard disk
capacity*110 MB or more free disk space
Browser Microsoft®Internet Explorer 5.5
and later version
For Windows XP,
Microsoft®Internet Explorer 6.0
and later version
Conditions of packet communication and
64K data communication
Glossary of Data communication
●Administrator privilege
A user level that provides complete access to all OS
functions in Windows XP and 2000. There must be
at least one user that has administrator privileges for
each PC. A user that has no administrator privileges
is not normally allowed to install/uninstall drivers and
software.
●APN (Access Point Name)
String to identify a provider, etc. to connect by
packet communication. The APN for moperaUis
“mopera.net” and mopera is “mopera.ne.jp”.
●cid (Context Identifier)
The registration number when writing packet
communication dialup connection (APN) information
to FOMA terminal. 10 numbers from 1 to 10 are
available for FOMA terminal.
By default, “mopera.ne.jp” is registered in cid1, and
“mopera.net” in cid3.
●W-TCP
A TCP parameter designed to fully utilize TCP/IP
transmission capacityduring packet communications in
a FOMA network. This communication setting is
essential to enable full use of FOMA terminal capability.
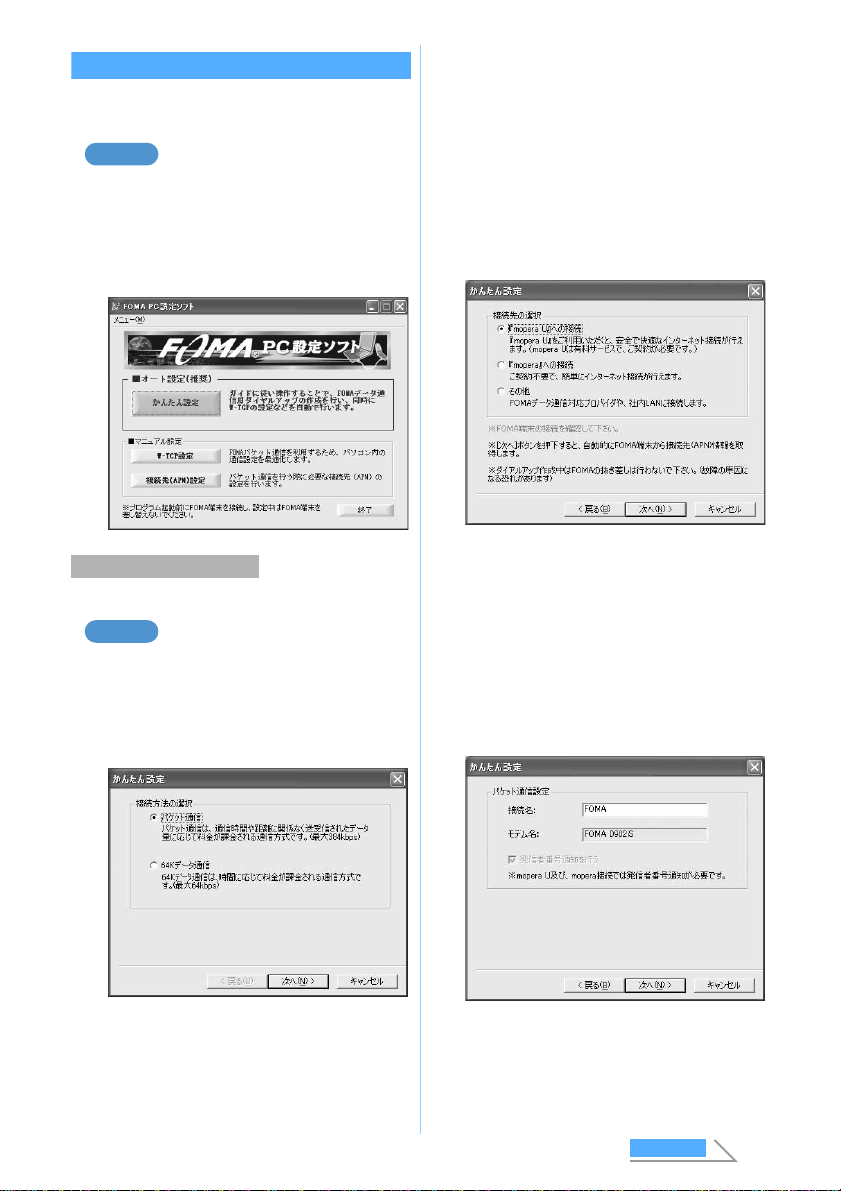
Install the FOMA PC configuration software ☛P6
(Easy Setup)
Packet communication
setup
●mopera U / mopera
☛P7
●Other providers ☛P8
(Easy Setup)
64K data communication
setup
●mopera U / mopera
☛P10
●Other providers ☛P11
Execute communication ☛P11 (Disconnect ☛P12)
Set up communications without using the FOMA PC
configuration software ☛P15
Connect ☛P23 (Disconnect ☛P24)
Install the communication configuration file
☛
P4
Connect a PC to FOMA terminal ☛P3
Check the communication configuration file
☛
P4
3
Communication configuration file (driver)
Install the communication configuration file on a PC
from the attached CD-ROM, before connecting
FOMA terminal to a PC to perform packet
communication or 64K data communication.
FOMA PC configuration software
When the FOMA PC configuration software (found on
the CD-ROM) is installed on a PC, a number of
settings required for data communication via
connection between FOMA terminal and PC can be
made from the PC by simple operation.
Checking operating environment
Use the communication configuration file and the
FOMA PC configuration software in the following
operating environments:
*1 USB port (conform to USB specification 1.1/2.0) is
required.
INFORMATION
●Note that utilization may not be possible in certain
operating environments. Furthermore, operation will
not be guaranteed in an environmentother than that
described above or by upgrading. And DoCoMo
assumes no responsibility for operation under such
conditions.
●In this manual, Windows 98 and Windows 98SE are
collectively shown as Windows 98.
Before installation/uninstallation
・Installing and uninstalling the communication
configuration file or the FOMA PC configuration
software under Windows XP or 2000 can only be
performed by a user with administrator privileges.
Attempts made by other users will result in errors.
For details on PC administrator privileges, refer to
the instruction manual of the PC or contact your PC
manufacturer or Microsoft Corporation.
・Before starting operation, make sure that no other
program is running. If there is any active program,
save and exit the program before operation.
Connecting PC to FOMA terminal
The connection should be made with the PC and
FOMA terminal both switched on.
・Be sure to install the communication configuration
file (driver) before connecting with a PC in
communication mode. ☛P4
Connecting a PC
Connect by using the FOMA USB cable (optional).
aOpen the cap on the FOMA terminal’s
external connection terminal
bInsert one end of the FOMA USB cable into
the FOMA terminal’s external connection
terminal until it clicks
cInsert the other end of the FOMA USB cable into
the PC USB connector
・When a PC and FOMA terminal are connected in
communication mode, appears on the
display of FOMA terminal.
・If you connect FOMA terminal to a PC in
communication mode before installing the
communication configuration file, Windows may
automatically detect that a FOMA USB cable has
been inserted, request to install a driver, and the
wizard screen will be displayed. In that case,
remove FOMA terminal and click
キャンセル
(Cancel) to exit the wizard.
■Removing FOMA USB cable
Press release buttons on both sides of the
connector for FOMA terminal and pull it out. Pull
the connector for PC out from the side of PC.
Item Requirements
PC*1PC/AT compatible computer
OS The Japanese version of
Windows 98, Me, 2000 or XP
Memory
requirements Windows 98, Me: 32MB or more
Windows 2000: 64MB or more
Windows XP: 128MB or more
Hard disk capacity 5 MB or more free disk space
Connector
(label facing up)
Release
button
USB connector
Next
4
・Be sure to press release buttons on both sides
of the connector when pulling it out for FOMA
terminal. Forcing to pull it out may cause a
malfunction.
FOMA terminal can be connected using a desktop
holder (optional) during the charging. However,
charging time becomes longer.
aConnect the desktop holder to the AC
adapter
・Plug the AC adapter into the wall outlet
bConnect FOMA terminal and FOMA USB
cable
cAlong with the desktop holder, insert FOMA
terminal at an angle as shown in the figure
・Pull out the FOMA USB cable in front of the
desktop holder, when inserting FOMA terminal.
・Check that the Enter key lights in red.
INFORMATION
●FOMA terminal can be connected in communication
mode by using a data communication adapter
D01(optional), while charging. However, charging
time becomes longer.
●Do not remove the FOMA USB cable during data
communication, or give shock to FOMA terminal and
desktop holder. It may cause the interruption of
charging or data communication, malfunction or
failure of PC or FOMA terminal, or loss of data.
●Starting to charge during data communication may
not complete charging. To complete charging, it is
recommended that you end the data communication
first, and then start charging.
Installation of the communication
configuration file (driver)
Install the communication configuration file onto a
PC before connecting FOMA terminal to the PC
to perform communication.
Installing the communication configuration file
Before operation, read “Before installation/
uninstallation” ☛P3
・Perform Steps 1 to 3 first, and then connect
FOMA terminal to a PC.
1Insert the attached CD-ROM into a PC
The
ソフトウェアのセットアップ
(Software
setup) screen appears.
2Click
通信設定ファイル
(Communication
configuration file)
3Click
インストール開始
(Start installation)
A screen requesting to connect FOMA D902iS to
the PC appears.
4Connect FOMA terminal to the PC
A progress screen for installation appears and
automatically completed.
・Connect FOMA terminal while the power is on.
・Go to “Checking the communication
configuration file”, and check the type and
name of the device installed.
INFORMATION
●Installation may take a few minutes.
●When Windows rebooting is prompted on the screen,
follow the instruction and reboot.
●If a PC and FOMA terminal are connected before
the communication configuration file is installed,
another driver may be automatically installed. When
this happens, performing the operation in Step 2
displays a message saying that the installed driver
must be uninstalled. In this case, uninstall the driver
following instruction shown on the display and install
the communication configuration file.
Checking the communication configuration file
When the PC does not detect FOMA terminal
correctly, settings and communication cannot be
performed.
Connecting while charging
Desktop holder
Enter key
FOMA USB cable connector
for FOMA terminal
(label facing up)
AC adapter connector
( facing up)
Next

5
For Windows XP
1Click
スタート
(Start),
コントロールパネ
ル
(Control Panel), the
パフォーマンスと
メンテナンス
(Performance and
maintenance) icon and the
システム
(System) icon
The
システムのプロパティ
(System properties)
screen appears.
■For Windows 2000, Me, 98:
aClick
スタート
,
設定
(Setting) and
コント
ロールパネル
bDouble-click the
システム
icon
2Click the
ハードウェア
(Hardware) tab z
デバイスマネージャ
(Device manager)
The
デバイスマネージャ
screen appears.
■For Windows Me, 98: Click the
デバイスマ
ネージャ
tab
3Double-click a type of each device z
Check the name of the installed device
Check that all the names of installed devices are
shown.
*1 Displayed only under Windows Me and 98.
*2 “x” of COMx varies by PC to be used.
Uninstalling the communication configuration file
Before operation, read “Before installation/
uninstallation” ☛P3
Before uninstalling, make sure that FOMA terminal is
removed from the PC.
For Windows XP
1Click
スタート
,
コントロールパネル
and the
プログラムの追加と削除
(Add/
delete Programs) icon
The
プログラムの追加と削除
screen appears.
■For Windows 2000, Me, 98:
aClick
スタート
,
設定
and
コントロールパ
ネル
bDouble-click the
アプリケーションの追加
と削除
(Add/delete applications) icon
2Select FOMA D902iS USB zClick
変更
と削除
(Update/delete)
・For Windows Me or 98, click
追加と削除
(Add/
delete).
3Check the name of program and click
はい
(Yes)
The uninstall process of the configuration
software starts.
4Click OK
INFORMATION
●When the installation fails or FOMA D902iS USB is
not displayed on the screen of Step 1, insert the
attached CD-ROM into the PC, click
通信設定ファイ
ル
on the
ソフトウェアのセットアップ
screen and
uninstall the communication configuration file.
●When the communication configuration file is
uninstalled and immediately reinstalled under
Windows Me or 98, data communication may not be
successful depending on the PC environment. In
this case, the FOMA USB cable (optional) should be
removed and reinserted before re-attempting data
communication.
Communicating using the FOMA PC
configuration software
A number of settings are required when FOMA
terminal is connected to a PC to perform packet
communication or 64K data communication. The
FOMA PC configuration software allows you to
easily perform the following settings:
■Easy setup
Creating a dialup connection for FOMA data
communication and W-TCP setup can be
performed automatically by following the
instructions in the guide.
■W-TCP setup
This function optimizes the settings in the PC
required for FOMA packet communication.
Optimization of the communication settings using
W-TCP setup is required to enable
communication capability to maximum extent.
Device type Device name
USB (Universal Serial
Bus) Controller ・FOMA D902iS
・FOMA D902iS Command*1
・FOMA D902iS Modem*1
・FOMA D902iS OBEX*1
Port (COM and LPT)
or (COM/LPT) ・FOMA D902iS
Command Port (COMx)*2
・FOMA D902iS OBEX Port
(COMx)*2
Modem FOMA D902iS
Example
Example
Next

6
■Dialup connection (APN) setup
This function performs the dialup connection
(APN) setup required for packet communication.
Unlike 64K data communication, phone numbers
cannot be used as a dialup connection for FOMA
packet communication. Set a dialup connection name
called APN in FOMA terminal for each dialup
connection in advance, and enter the registration
number (cid) in the phone number field of dialup
connection. By default, “mopera.ne.jp” (APN) is
registered in cid 1 to connect to mopera, and
“mopera.net” (APN) for cid 3 to connect to mopera U,
but the APN for connections to other providers and in-
house LAN must be set.
Installing the FOMA PC configuration software
・Uninstall an old version of the FOMA PC
configuration software (version 1.00 or 2.00), if
already installed, before installing the FOMA PC
configuration software (version 2.0.1) from the
attached CD-ROM. You can display the version
from
メニュー
(Menu)
→
バージョン情報
(Version
information) of the FOMA PC configuration
software.
・If the following software (provided with the FOMA
model released before this time’s) are installed,
uninstall them in advance:
・W-TCP environment configuration software
(hereinafter called “old W-TCP configuration
software”)
・FOMA data communication configuration
software (hereinafter called “old FOMA data
communication configuration software”)
・Before operation, read “Before installation/
uninstallation” ☛P3
For Windows XP
1Insert the attached CD-ROM into the PC
The
ソフトウェアのセットアップ
(Software setup)
screen appears.
2Click PC
設定ソフト
(PC configuration
software)
3Click
次へ
(Next)
The FOMA PC configuration software license
agreement appears.
4Read the content of the screen and click
はい
if you agree to the agreement
5Check that
タスクトレイに常駐する
(Reside in task tray) is selected and click
次へ
W-TCP
設定
(W-TCP setup) resides in the task tray
after the setup.
・This is recommended for setting and
cancellation of W-TCP communication. (☛P13)
・You can change the setting of resident
software after the installation.
6Check the installation path and click
次へ
7Check the name of the program folder and
click
次へ
8Click
完了
(Done)
FOMA PC
設定ソフト
(FOMA PC configuration
software) is started up.
・Settings can be started from this screen.
INFORMATION
●If the FOMA PC configuration software, old W-TCP
configuration software, or old FOMA data
communication configuration software is already
installed, the screen to cancel the installation
appears. Click OK to uninstall this software and then
install the FOMA PC configuration software.
●When
キャンセル
or
いいえ
(No) is clicked during
installation, the confirmation screen to cancel the
installation appears. To continue the installation,
click
いいえ
. To cancel, click
はい
and
完了
.
Example
7
Setting packet communication by easy setup
Before setup, make sure that FOMA terminal and
the PC are properly connected. ☛P3
For Windows XP
1Click
スタート
,
すべてのプログラム
(All
programs) (
プログラム
(Programs) for
other than Windows XP), FOMA PC
設定ソ
フト
and FOMA PC
設定ソフト
The FOMA PC configuration software is started up.
・Using other providers ☛P8
For Windows XP
1Start the FOMA PC configuration software z
Click
かんたん設定
(Easy setup)
2Select
パケット通信
(Packet
communication) zClick
次へ
3Select
『
mopera U
』
への接続
(mopera U
connection) or
『
mopera
』
への接続
(mopera connection) zClick
次へ
・DoCoMo provides 2 Internet connection
services: mopera U and mopera. The mopera
U service requires subscription and a monthly
fee. The mopera service requires no
subscription and a monthly fee.
・When mopera U is selected, a confirmation
message to agreement appears. If the
subscription is completed, click
はい
.
4Click OK on the FOMA
端末設定取得
(Get
FOMA terminal settings) screen
接続先
(APN)
情報
(Dialup connection (APN)
information) is obtained from FOMA terminal.
Please wait.
5
Enter any connection name
z
Click
次へ
・The following characters (one-byte) cannot be
entered:
¥/ : *? ! <> |
Using mopera U / mopera
Example
Example
Next
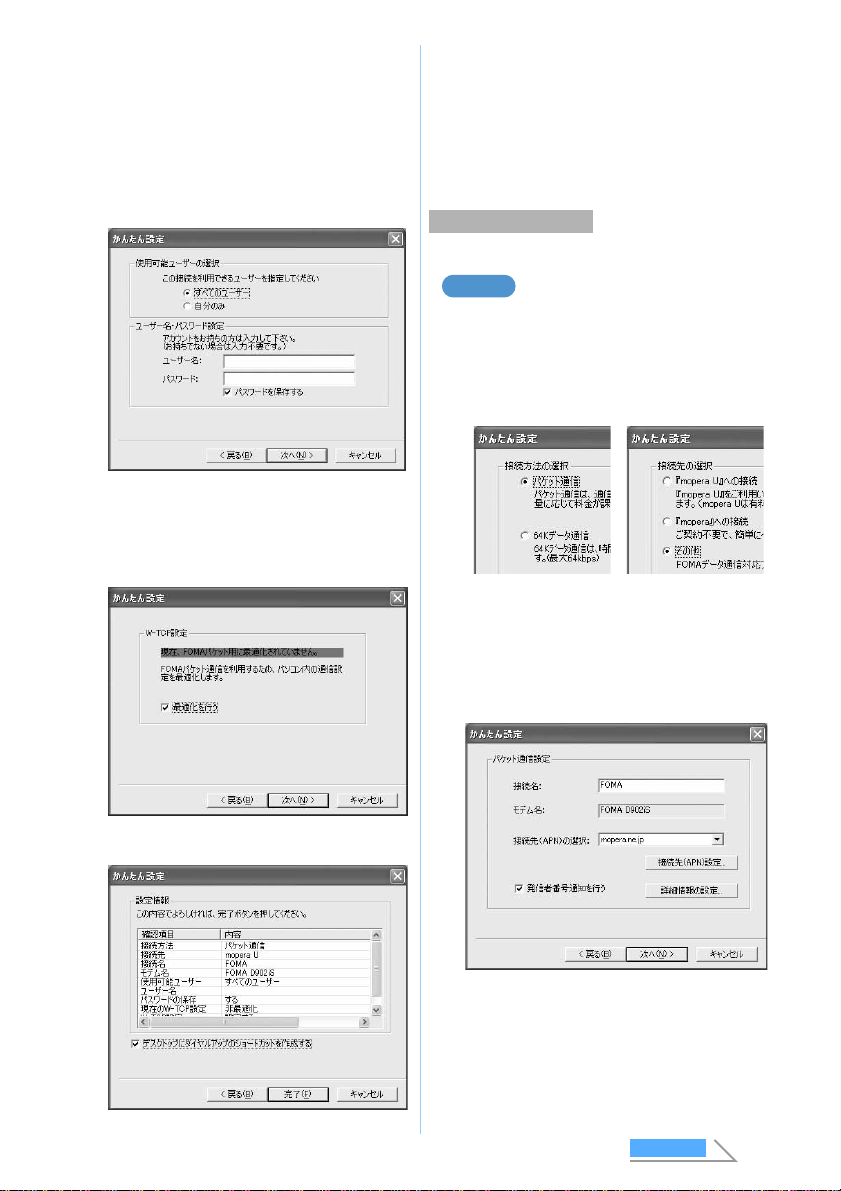
8
6Click
次へ
・The entry for
ユーザー名
(User name) or
パスワード
(Password) is not required.
・For Windows XP or 2000, select the allowable
user. If you select
すべてのユーザー
(All
users), all users that are allowed to logon to
Windows can access the connection. For
Windows Me or 98,
使用可能ユーザーの選択
(Select allowable user) is not displayed.
7Check that
最適化を行う
(Optimize) is
selected and click
次へ
・This screen is not displayed if optimization has
already been performed.
8Check the settings and click
完了
9Click OK
The PC must be rebooted for the changes to take
effect. Click
はい
when a window prompts you to
reboot the PC.
・If optimization of W-TCP setting has already
been performed, rebooting is not required.
・Performing communication ☛P11
・Using mopera U / mopera ☛P7
For Windows XP
1Perform Steps 1 to 4 of “Using mopera U /
mopera” of “Setting packet
communication by easy setup” ☛P7
・Select
その他
(Others) in Step 3 for the dialup
connection.
2Enter any connection name zClick
接続
先
(APN)
設定
(Set dialup connection
(APN))
・The following characters (one-byte) cannot be
entered:
¥/ : *? ! <> |
■Advanced setting (TCP/IP setting):
Click
詳細情報の設定
(Set detail info) to
display the IP
アドレス
(IP address) and
ネー
ムサーバー
(Name server) setting screens.
When dialup information is required, register
such as addresses, based on the information
assigned by the provider,etc.
Using other providers
Example
Next
9
3Set the dialup connection (APN)
By default, “mopera.ne.jp” is registered in cid1,
and “mopera.net” in cid3. Register a dialup
connection (APN) for cid 2 or 4 to 10.
aClick
追加
(Add)
The
接続先
(APN)
の追加
(Add dialup
connection (APN)) screen appears.
bIn
接続先
(APN), correctly enter a dialup
connection name (APN) of your provider, etc.,
which supports the FOMA packet
communication zClick OK
The display returns to the
接続先
(APN)
設定
screen.
・Only one-byte alphanumeric characters,
hyphens ( - ) and periods ( . ) can be entered
for
接続先
(APN).
4Click OK
The display returns to the screen in Step 2.
接続先
(APN) set in Step 3 appears in
接続先
(APN)
の選択
(Select dialup connection (APN)).
5Check the dialup connection name (APN) of
接続先
(APN)
の選択
and click
次へ
6Enter the user name in
ユーザー名
and the
password in
パスワード
zClick
次へ
・Enter the user name and password assigned
by the provider, etc. correctly. Be careful about
the upper/lower case of each character.
・For Windows XP or 2000, select the allowable
user. If you select
すべてのユーザー
, all users
that are allowed to logon to Windows can
access the connection. For Windows Me or 98,
使用可能ユーザーの選択
is not displayed.
7Check that
最適化を行う
is selected and
click
次へ
・This screen does not appear if optimization has
already been performed.
8Check the settings and click
完了
9Click OK
The PC must be rebooted for the changes to take
effect. Click
はい
when a window prompts you to
reboot the PC.
・If optimization of W-TCP setting has already
been performed, rebooting is not required.
・Performing communication ☛P11
▼
10
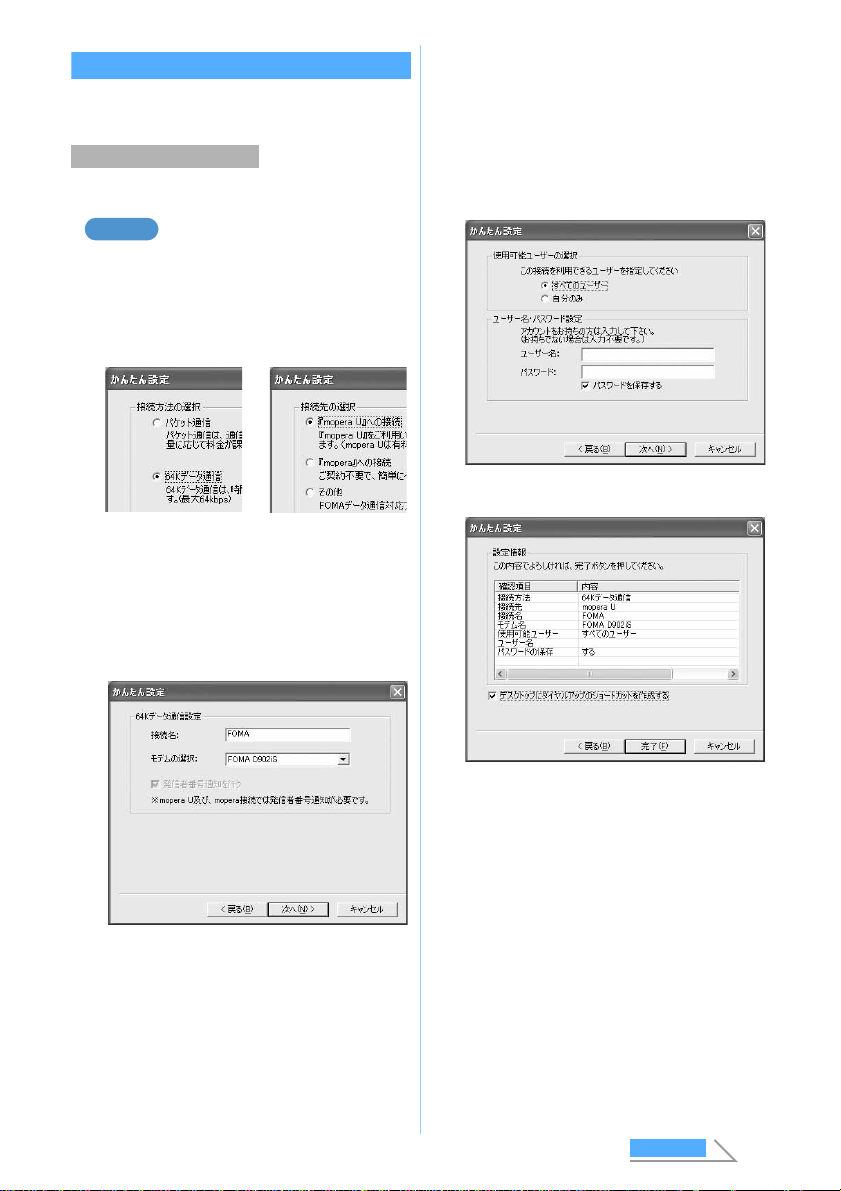
Setting 64K data communication by easy setup
Before setup, make sure that FOMA terminal and
the PC are properly connected. ☛P3
・Using other providers ☛P11
For Windows XP
1Perform Steps 1 to 3 of “Using mopera U /
mopera” of “Setting packet
communication by easy setup” ☛P7
・Select 64K
データ通信
(64K data communication)
in Step 2 for the communication procedure.
2Enter any connection name and select the
modem zClick
次へ
・The following characters (one-byte) cannot be
entered:
¥/ : *? ! <> |
・Check that FOMA D902iS is set for
モデムの選
択
(Modem selection).
3Click
次へ
・The entry for
ユーザー名
or
パスワード
is not
required.
・When the OS is Windows XP or 2000, select
the allowable user. If you select
すべてのユー
ザー
, all users that are allowed to logon to
Windows can access the connection. For
Windows Me or 98,
使用可能ユーザーの選択
is not displayed.
4Check the settings and click
完了
5Click OK
・Performing communication ☛P11
Using mopera U / mopera
Example
Next

11
・Using mopera U / mopera ☛P10
For Windows XP
1Perform Steps 1 to 3 of “Using mopera U /
mopera” of “Setting packet
communication by easy setup” ☛P7
・Select 64K
データ通信
in Step 2 for the
communication procedure, and
その他
in Step
3 for the dialup connection.
2Set each item zClick
次へ
・Register the following items:
・
接続名
: Optional
・
モデムの選択
: FOMA D902iS
・
電話番号
(Phone number) :
Enter based on information
given by provider, etc.
■Advanced setting (TCP/IP setting):
Click
詳細情報の設定
to display the IP
アドレ
ス
and
ネームサーバー
setting screens. When
dialup information is required, register such
as addresses based on the information
assigned by the provider, etc.
3Enter the user name in
ユーザー名
and the
password in
パスワード
zClick
次へ
・Enter the user name or password assigned by
the provider, etc. correctly. Be careful about the
upper/lower case of each character.
・For Windows XP or 2000, select the allowable
user. If you select
すべてのユーザー
, all users
that are allowed to logon to Windows can
access the connection. For Windows Me or 98,
使用可能ユーザーの選択
is not displayed.
4Check the settings and click
完了
5Click OK
・Performing communication ☛P11
Performing communication
Starting communication set with the FOMA PC
configuration software and disconnection are
explained here.
1Connect FOMA terminal to a PC ☛P3
2Double-click the connection icon on the
desktop
Using other providers
Example
・The icon varies depending on the OS.
Next
12
・When there is no connection icon made on
desktop, start from the
スタート
menu.
■Starting from the
スタート
menu of
Windows XP:
aClick
スタート
,
すべてのプログラム,アク
セサリ
(Accessories),
通信
(Communication), and
ネットワーク接続
(Network connection)
bDouble-click the connection icon
■Starting from the
スタート
menu of
Windows 2000, Me or 98:
aClick
スタート
,
プログラム
,
アクセサリ
,
通
信
and
ネットワークとダイヤルアップ接続
(Network and dialup connections)
(
ダイヤルアップネットワーク
(Dialup
network) for Windows Me/98)
bDouble-click the connection icon
3Check each item and click
ダイヤル
(Dial)
・When mopera U / mopera is selected, the entry
for
ユーザー名
or
パスワード
is not required.
・If required by the instructions of a subscribed
provider, enter the user name and the
password, and then click
ダイヤル
(
接続
(Connect) for Windows Me/98) according to the
input instruction information.
・The connection established screen may be
displayed depending on the OS. Click OK.
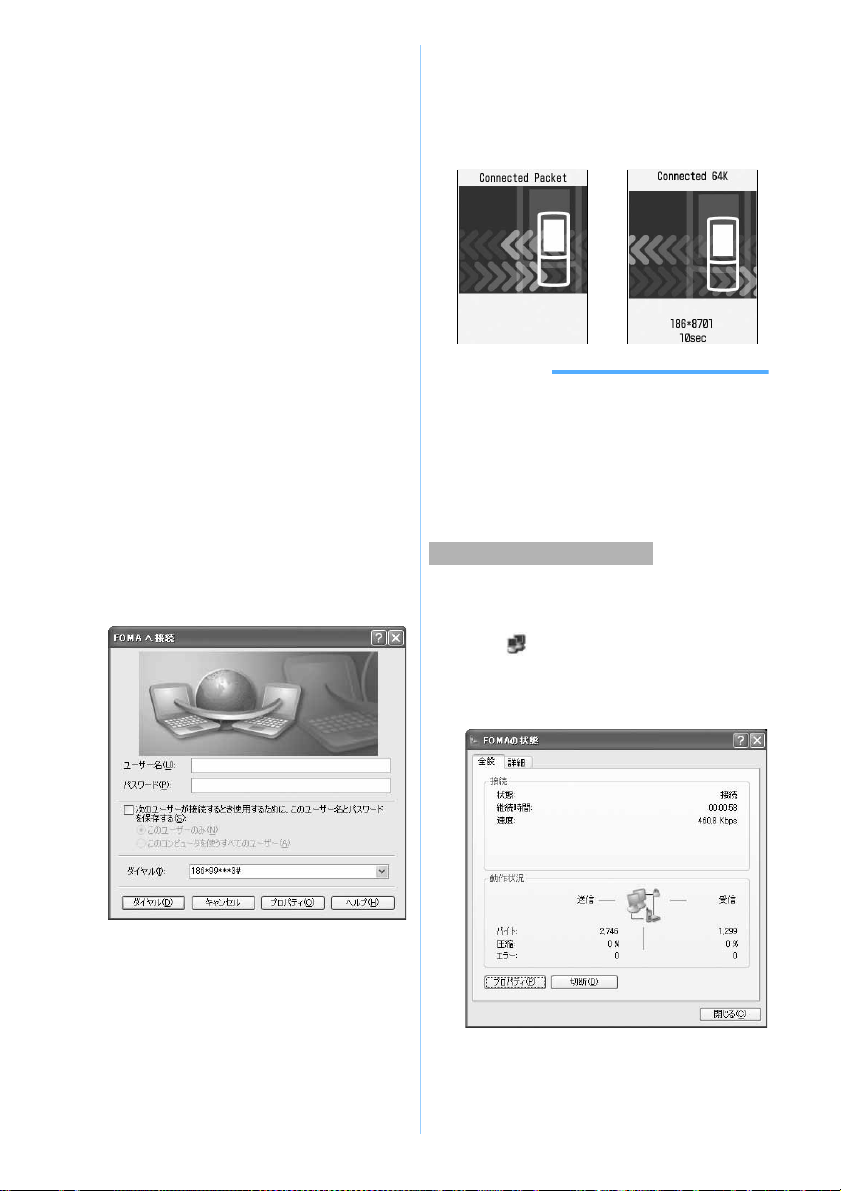
■FOMA terminal screen while communicating
FOMA terminal displays a connecting screen
when you execute packet or 64K data
communication. The following screens are
displayed when a connection has been
established:
INFORMATION
●The transmission speed displayed on your PC may
differ from actual speed.
●Data transmission is available only with FOMA terminal
that was connected when the icon was created.
●When connecting FOMA terminal other than D902iS,
installation of the communication configuration file for
your FOMA terminal is needed.
Just exiting the browser may not disconnect the
connection. To ensure disconnection, perform the
following operation:
1Click in the task tray
・Double-click for Windows Me and 98.
2Click
切断
(Disconnect)
Disconnecting communication

13
Optimizing packet communication setup
The method of optimizing the PC packet
communication setup for FOMA network by means of
W-TCP setup and canceling optimization is explained
here.
The W-TCP setup is a TCP parameter tuning tool for
optimizing TCP/IP transmission capacity during packet
communication in the FOMA network. To enable
communication capability of FOMA terminal to
maximum extent, this communication setup is
required.
System optimization can be performed for each
dialup connection.
1Start FOMA PC
設定ソフト
(☛P7) z
Click W-TCP
設定
■Starting from the task tray: Click
2Perform the following:
■When the system has not been optimized:
aClick
最適化を行う
on the W-TCP setting
screen
bSelect the dialup connection to be
optimized zClick
実行
(Execute)
Optimization of the system settings and
dialup settings are performed respectively.
■When the system has been optimized:
The following screen appears. Make the
required settings if changes are to be made.
■Deactivating optimization:
aClick
システム設定
(System setting) in
the W-TCP
設定
(
ダイヤルアップ
)(Set
W-TCP (dialup)) screen
The W-TCP setting screen appears.
bClick
最適化を解除する
(Deactivate
optimization)
3Reboot the PC, following the instruction
shown on the screen
・The settings take effect after rebooting the PC.
1Start FOMA PC
設定ソフト
(☛P7) z
Click W-TCP
設定
■Starting from the task tray: Click
2Perform the following:
■When the system setting has not been
optimized: Click
最適化を行う
■When canceling optimization of the
system setting: Click
最適化を解除する
3Reboot the PC, following the instruction
shown on the screen
・The settings take effect after rebooting the PC.
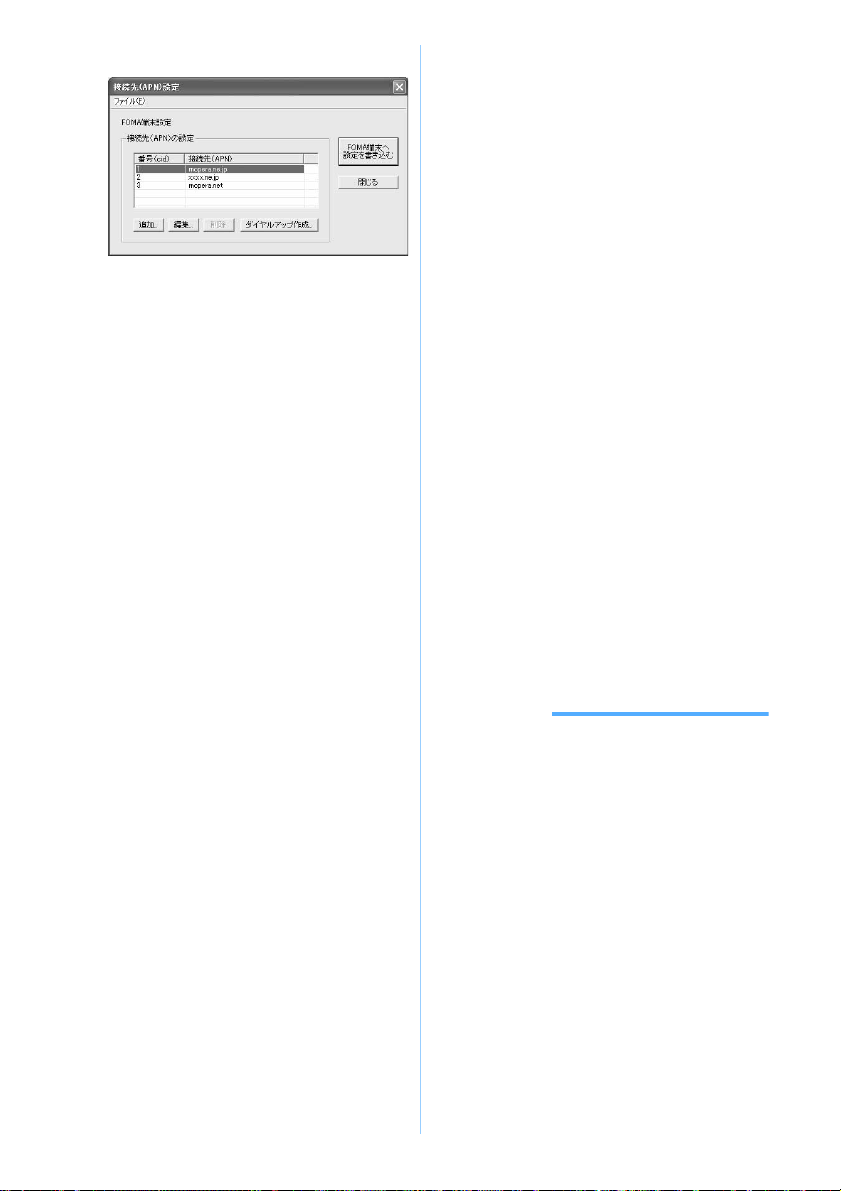
Setting dialup connections (APNs)
Set the dialup connection (APN) for packet
communication.
Up to 10 dialup connections (APNs) can be set, which
are to be registered under registration numbers (cid) 1 to
10 for management.
By default, “mopera.ne.jp” is set for cid1 and
“mopera.net” for cid3.
・Before setup, make sure that FOMA terminal and
the PC are properly connected. ☛P3
・For dialup connections (APNs) other than mopera
U / mopera, inquire your provider or network
administrator.
1Start FOMA PC
設定ソフト
(☛P7) z
Click
接続先
(APN)
設定
The FOMA
端末設定取得
screen appears.
2Click OK
FOMA terminal is accessed for reading the
registered dialup connection (APN) information.
For Windows XP
Under Windows 2000, Me or 98
Next
14
3Make the dialup connection (APN) settings
■Adding dialup connections (APNs): Click
追加
■Editing or correcting registered dialup
connections (APNs): Select the dialup
connection (APN) from the list zClick
編
集
(Edit)
■Deleting the registered dialup connection
(APN): Select the dialup connection (APN)
from the list zClick
削除
(Delete)
・The dialup connection registered in cid1 and
cid3 cannot be deleted. (Selecting cid3 and
clicking
削除
do not actually delete, but
return to “mopera.net”.)
■Saving settings as file: Click
ファイル
(File) and
名前を付けて保存
(Save as...) or
上書き保存
(Overwrite)
・Save the settings as a file to back up the
dialup connection (APN) settings registered
in FOMA terminal or save the dialup
connection (APN) settings during editing.
■Importing settings from file: Click
ファイル
and
開く
(Open)
・Import settings from a file to edit dialup
connections (APNs) saved on the PC or
write to FOMA terminal.
■Importing the dialup connection (APN)
information from FOMA terminal: Click
ファ
イル
and FOMA
端末から設定を取得
(Import
settings from FOMA terminal)
Access manually to FOMA terminal to import
the registered dialup connection (APN) settings.
■Writing the dialup connection (APN)
information to FOMA terminal: Click FOMA
端末へ設定を書き込む
(Write settings to
FOMA terminal)
The displayed dialup connection (APN)
settings are written to FOMA terminal.
■Creating dialup connections:
aSelect an added or edited dialup
connection (APN) zClick
ダイヤルアッ
プ作成
(Create dialup connection)
The FOMA
端末設定書き込み
(Write setting
to FOMA terminal) screen appears.
bClick
はい
zClick OK
When the dialup connection (APN)
information have been written to FOMA
terminal,the
パケット通信用ダイヤルアッ
プの作成
(Create dialup connection for
packet communication) screen appears.
cEnter any connection name zClick
ア
カウント・パスワードの設定
(Set
account and password)
dEnter the user name in
ユーザー名
and
the password in
パスワード
zClick OK
・Not required for mopera U / mopera.
・For Windows XP or 2000, select the
allowable user. If you select
すべての
ユーザー
, all users that are allowed to
logon to Windows can access the
connection.
・Some providers, etc. may request you to
enter IP and DNS information settings.
Should this be the case, click
詳細情報の
設定
in the
パケット通信用ダイヤルアッ
プの作成
screen, register the required
information and click OK.
eClick OK zClick OK
fClick FOMA
端末へ設定を書き込む
A confirmation screen appears asking
whether to overwrite.
gClick
はい
zClick OK
INFORMATION
●Since the dialup connection (APN) setting is
information saved in FOMA terminal, re-register the
APN when connecting another FOMA terminal
(terminal replaced by repair, etc.).
●To continue to use the dialup connection (APN)
saved in the PC, save the registration number (cid)
of the same APN to FOMA terminal.
●When FOMA terminal is detected as number other
than COM1 to 9 by checking the communication
configuration file, APN information may not be
obtained or written during an APN setting. In that case,
set the information using “HyperTerminal” that comes
with Windows. ☛P15

15
Uninstalling the FOMA PC configuration software
Before operation, read “Before installation/
uninstallation” ☛P3
Right-click in the task tray, and click
常駐させない
(Do not reside) to cancel the resident of W-TCP setup.
For Windows XP
1Click
スタート
,
コントロールパネル
and
the
プログラムの追加と削除
icon
■For Windows 2000, Me, 98:
aClick
スタート
,
設定
and
コントロールパ
ネル
bDouble-click the
アプリケーションの追加
と削除
icon
2Select NTT DoCoMo FOMA PC
設定ソフ
ト
(NTT DoCoMo FOMA PC configuration
software) zClick
変更と削除
・For Windows Me or 98, click
追加と削除
.
3Check that you have selected the correct
program to delete and click
はい
The uninstallation of the FOMA PC configuration
software starts.
■Canceling W-TCP optimization:
A confirmation screen appears when W-TCP
has been optimized.
・Usually, click
はい
and deactivate the
optimization.
・Select whether to reboot immediately and
click
完了
when Windows prompts you to
reboot the PC.
・Canceling of W-TCP optimization is
performed after the PC is rebooted.
4Click OK
Communication
Communicating without using the FOMA PC
configuration software
The method of dialup network setup for packet
communication/64K data communication without
using the FOMA PC configuration software is
explained.
Setting operation procedures
Setting the dialup connection (APN) for packet
communication
Communication software to input AT commands is
required for making settings. The method of setting
using “HyperTerminal” that comes with Windows is
explained here.
For Windows XP
1Connect FOMA terminal to a PC ☛P3
2Click
スタート
,
すべてのプログラム
,
ア
クセサリ
and
通信
zClick
ハイパーター
ミナル
(HyperTerminal). (And double-click
the Hypertrm icon under Windows 98.)
・For other than Windows XP,
プログラム
is
displayed for
すべてのプログラム
.
Uninstall preparations
Uninstalling
Example
Default cid1:mopera.ne.jp
cid3:mopera.net
cid2, 4 to 10:not recorded
Install the communication configuration file ☛P4
Connect a PC to FOMA terminal ☛P3
Set the dialup connection (APN)
(This setting is not required for 64K data
communication, and for packet communication via
mopera U / mopera.)
Set to show/hide caller ID ☛P17 (Set as required.)
Other settings (AT commands) ☛P25
(Set as required.)
Dialup network setup
OS
Windows XP
Windows 2000
Windows Me
Windows 98
Dialup connection TCP/IP
P17
P19
P23
P22
P18
P21
P22
P23
• For details on settings, inquire your provider or
network administrator.
Connect ☛P23 (Disconnect ☛P24)
Settings
Example
Next
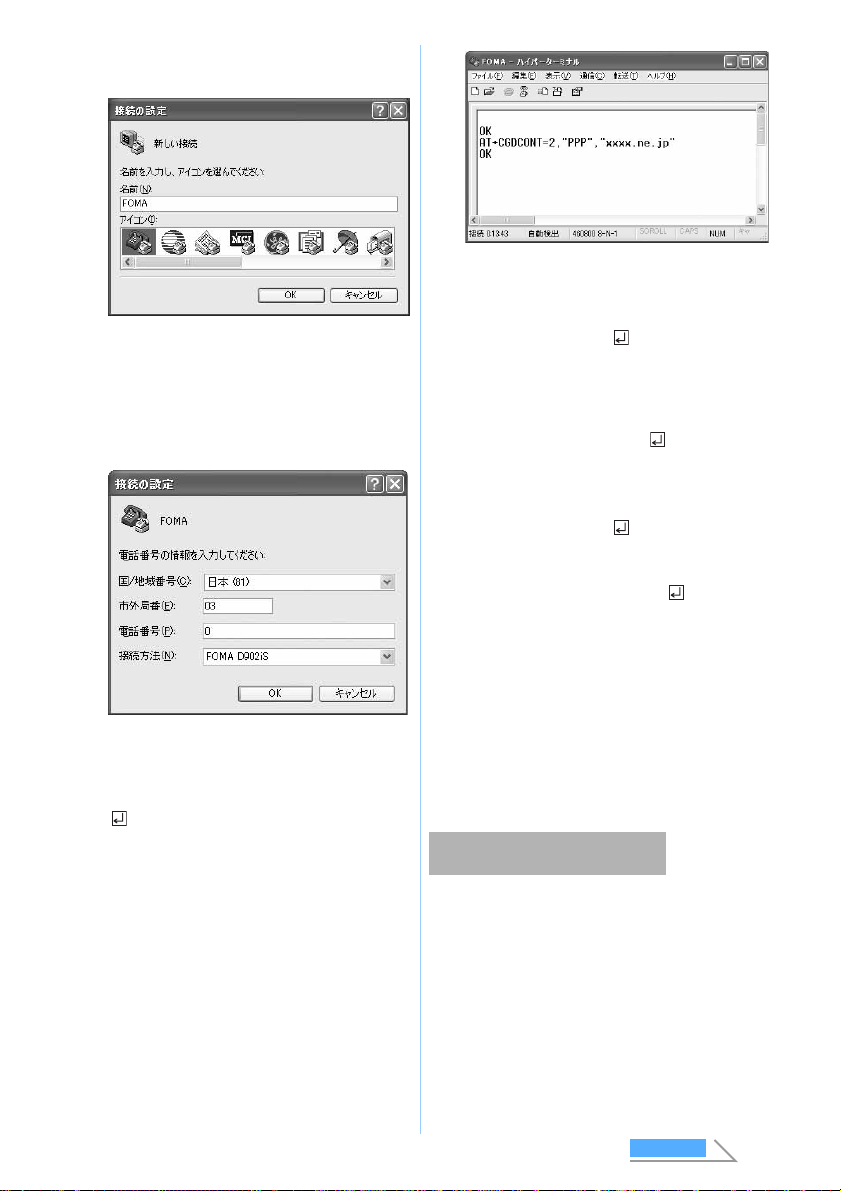
16
3Enter any connection name in
名前
z
Click OK
4Enter a fictional phone number (such as 0) for
電話番号
, select FOMA D902iS from
接続
方法
(Connection procedure) zClick OK
・Since
市外局番
(Area code) does not effect the
dialup connection (APN) setting, it is not
necessary to change.
5Click
キャンセル
when the connection
screen appears
6Enter the dialup connection (APN) zPress
・Enter in the format “AT+CGDCONT =<cid>,
“PPP”, “APN””.
If OK appears, the dialup connection (APN) has
now been set.
■Resetting the dialup connection (APN)
settings:
・The settings are restored to the default
settings for <cid> =1 and 3, and the
settings for <cid> =2, 4 to 10 are
cleared.
■Checking the dialup connection (APN)
settings:
■When nothing is displayed even if AT
command is entered: ATE1
・For details ☛P28
7Check that OK is displayed and click
ファイル
and
ハイパーターミナルの終
了
(End HyperTerminal)
・After
現在、接続されています。切断してもよ
ろしいですか?
(Connecting now. Disconnect?)
appears, click
はい
・“XXX”
と名前付けされた接続を保存しますか
?
(Save the connection named “XXX”?) appears.
Click
いいえ
.
The dialup connection (APN) for packet
communication can be set for registration numbers
between cid1 to 10 in FOMA terminal. By default,
“mopera.ne.jp” is set for cid1 and “mopera.net” for
cid3. For connecting to other providers or corporate
LANs, register the dialup connection (APN) for cid2, 4
to 10.
<cid> : Enter any number between 2, 4 to 10.
“PPP” : Enter “PPP”.
“APN”: Enter the dialup connection (APN) in
quotation marks.
AT +CGDCONT=
Reset all cids.
AT +CGDCONT=<cid>
Reset the specified cid
AT + CGDCONT?
・For details ☛P30
Dialup connection (APN) and
registration number (cid)
Next
17
・For the dialup connection (APN), inquire your
provider or network administrator.
・The dialup connection settings can be considered
as phonebook registration for packet
communication. The comparison between dialup
connection settings and the FOMA terminal
phonebook entries is as follows:
・The registered cid become the connection
numbers of dialup connection setting.
Setting to show/hide caller ID
Take care when disclosing your caller ID since it is
important information.
・Settings must be “show” for using mopera U /
mopera.
For Windows XP
1Perform Steps 1 to 5 of “Setting the dialup
connection (APN) for packet
communication” ☛P15
2Set to show (186)/hide (184) caller ID
during packet communication
Enter in the format “AT *DGPIR=<n>”.
■When nothing is displayed even if AT
command is entered: ATE1
・For details ☛P28
3Check that OK is displayed and click
ファ
イル
and
ハイパーターミナルの終了
・After
現在、接続されています。切断してもよ
ろしいですか?
appears, click
はい
・“XXX”
と名前付けされた接続を保存しますか
?
appears. Click
いいえ
.
■Setting to show/hide caller ID by dialup
network settings
The dialup network settings can also be used to
append “186 (show)” or “184 (hide)” to the dialup
connection number.
If “186” (show) or “184” (hide) is set by both the
AT *DGPIR command and dialup network
settings, the show/hide caller ID setting is as
follows:
・To reset the show/hide setting made by the AT *
DGPIR command to the default (not set), enter “AT
*DGPIR=0”.
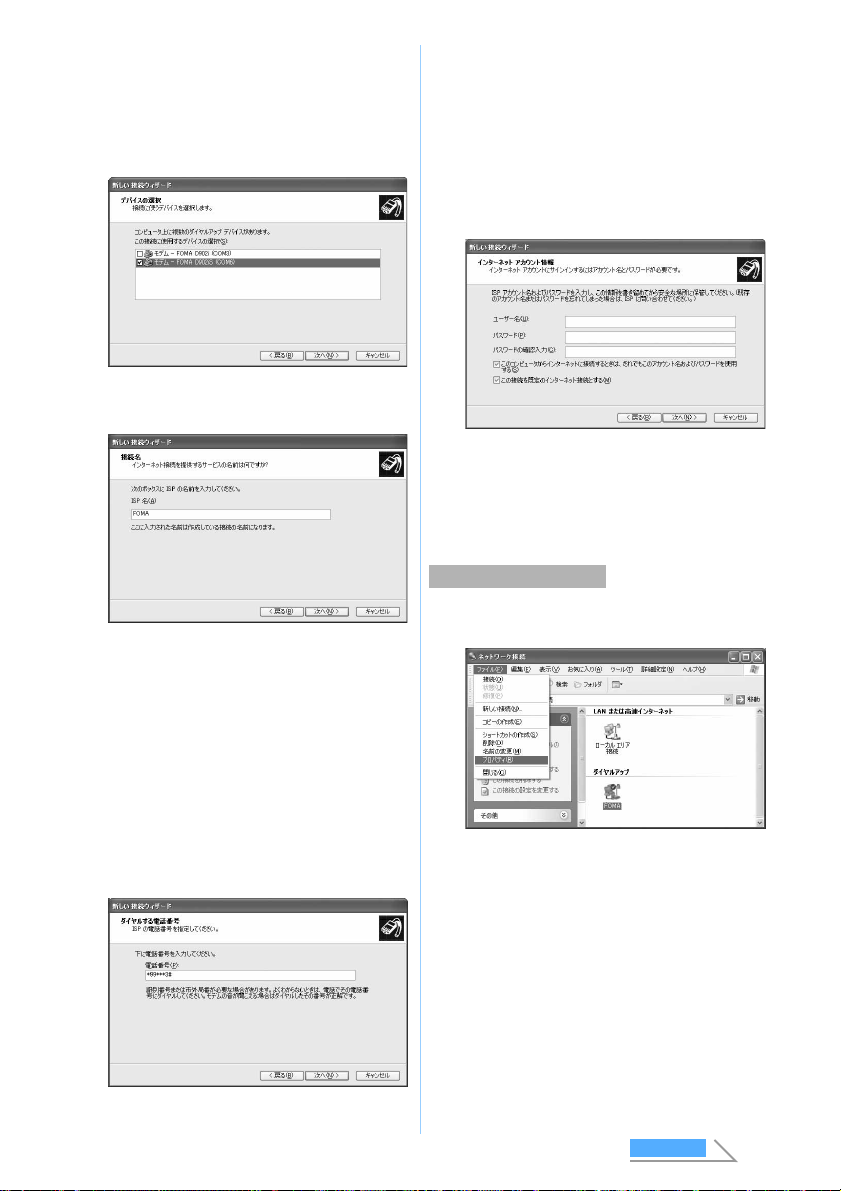
Setting for Windows XP
1Click
スタート
,
すべてのプログラム
,
ア
クセサリ
,
通信
and
ネットワーク接続
The
ネットワーク接続
screen appears.
2Click
新しい接続を作成する
(Create new
connection) in
ネットワークタスク
(Network task)
The
新しい接続ウィザード
(New connection
wizard) screen appears.
3Click
次へ
A screen for selecting the type of network
connection appears.
4Select
インターネットに接続する
(Connect to Internet) zClick
次へ
The setup screen appears.
5Select
接続を手動でセットアップする
(Set up connection manually) zClick
次へ
The Internet connection screen appears.
6Select
ダイヤルアップモデムを使用して
接続する
(Use dialup modem to connect)
zClick
次へ
The device selection screen appears.
・If there is only one modem installed, the device
selection screen is not displayed. Go to Step 8.
Dialup connection
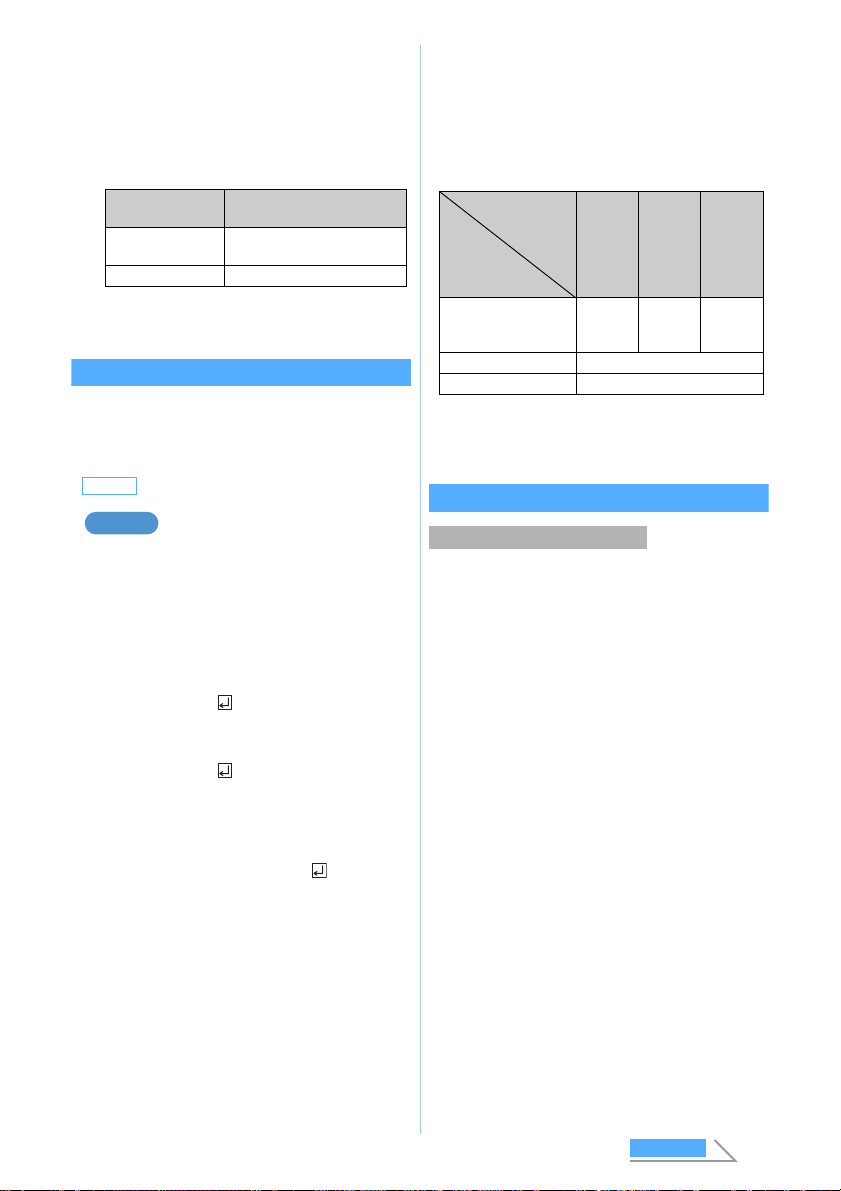
settings FOMA terminal phonebook
entries
Registration
number (cid) Registration number
(Phonebook No.)
APN Party’s phone number
Default not set
AT *DGPIR=1
When packet communication connection is
being established, “184” is added to connect
to the dialup connection (APN).
AT *DGPIR=2
When packet communication connection is
being established, “186” is added to connect
to the dialup connection (APN).
Example Setting the dialup connection
Setting made by
AT
*
DGPIR
command
Dialup network
setting (<cid>=3)
Not set Hide Show
*99 *** 3# Caller ID
is sent. Caller ID
is not
sent.
Caller ID
is sent.
184 *99 *** 3# Caller ID is not sent.
186 *99 *** 3# Caller ID is sent.
Next
18
7Select
モデムー
FOMA D902iS (COMx)*1
(Modem: FOMA D902iS (COMx)) zClick
次
へ
・Check that only
モデム−
FOMA D902iS
(COMx)*1is selected.
*1 “x” of COMx varies by PC to be used.
8Enter any connection name in ISP
名
(ISP
name) zClick
次へ
9Enter the number of the dialup connection
(one-byte) in
電話番号
zClick
次へ
■For packet communication:
Enter “ *99 *** <cid>#”.
・For <cid>, enter the cid number registered
in “Setting the dialup connection (APN) for
packet communication” ☛P15. “*99***
3#” for mopera U and “*99***1#” for
mopera.
■For 64K data communication:
Enter the dialup connection phone number.
・“*8701” for mopera U and “ *9601” for
mopera.
10
Enter the user name in
ユーザー名
, the
password in
パスワード
and
パスワード
の確認入力
(Check and enter password)
zSet each items as shown below zClick
次へ
・When the access point is mopera U / mopera,
the entry for
ユーザー名
,
パスワード
and
パス
ワードの確認入力
is not required. Set each
items as shown and click
次へ
.
11
Click
完了
12
Check the settings and click
キャンセル
・Check the settings without connecting to the
Internet immediately.
1Select the created dialup connection icon z
Click
ファイル
and
プロパティ
(Properties)
Setting TCP/IP protocol
Next
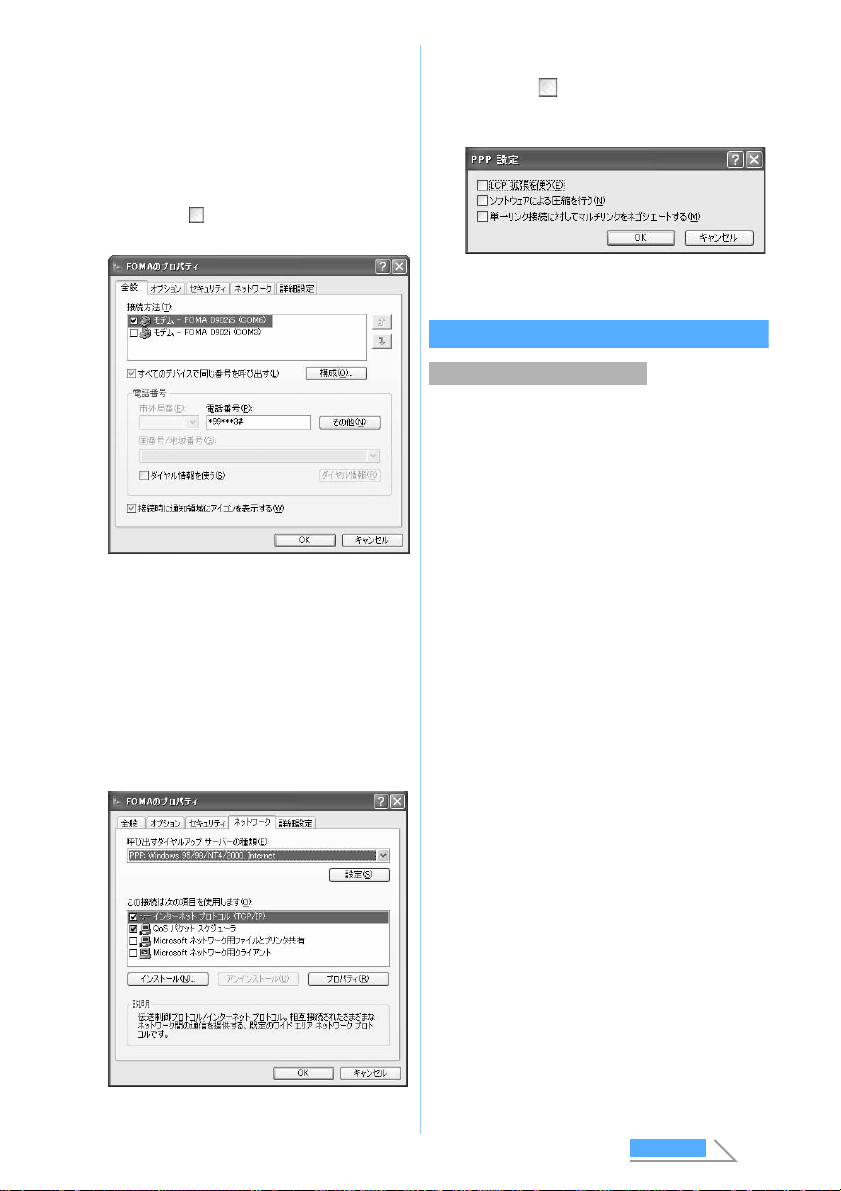
19
2Check the setting of each item in the
全般
(General) tab
・When multiple modems are installed to the PC,
select
モデム
ー
FOMA D902iS (COMx)*1 in
接続
方法
.
・Check that only
モデム−
FOMA D902iS
(COMx)*1is selected.
*1 “x” of COMx varies by PC to be used.
・Uncheck ( )
ダイヤル情報を使う
(Use dial
information).
3Click the
ネットワーク
(Network) tab z
Check the setting of each item
・Set PPP: Windows 95/98/NT4/2000, Internet as
呼び出すダイヤルアップサーバーの種類
(Type
of dialup server to call).
・Select only
インターネットプロトコル
(TCP/
IP) (Internet protocol (TCP/IP)) in
この接続は次
の項目を使用します
(Use these items for this
connection). Since QoS
パケットスケジューラ
(QoS packet scheduler) settings can not be
changed, leave it as it is.
4Click
設定
5Uncheck ( ) all items and click OK
The dialup connection properties screen
reappears.
6Click OK
Setting for Windows 2000
1Click
スタート
,
プログラム
,
アクセサリ
,
通信
and
ネットワークとダイヤルアッ
プ接続
The
ネットワークとダイヤルアップ接続
screen
appears.
2Double-click the
新しい接続の作成
(Create
new connection)
icon
The
所在地情報
(Location information) screen
appears.
・This screen appears for the first time you
double-click the
新しい接続の作成
icon. From
the second time, go to Step 5.
3Enter the number in
市外局番
(Area code)
zClick OK
The
電話とモデムのオプション
(Phone and
modem options) screen appears.
4Click OK
The
ネットワークの接続ウィザード
(Network
connection wizard) screen appears.
5Click
次へ
A screen for selecting the type of network
connection appears.
6Select
インターネットにダイヤルアップ
接続する
(Use dialup connection to
Internet) zClick
次へ
The start screen of
インターネット接続ウィザー
ド
(Internet connection wizard) appears.
Setting the dialup connection
Next
Other manuals for D902iS
1
Table of contents
Other Foma Telephone manuals


