FONDI G312 User manual
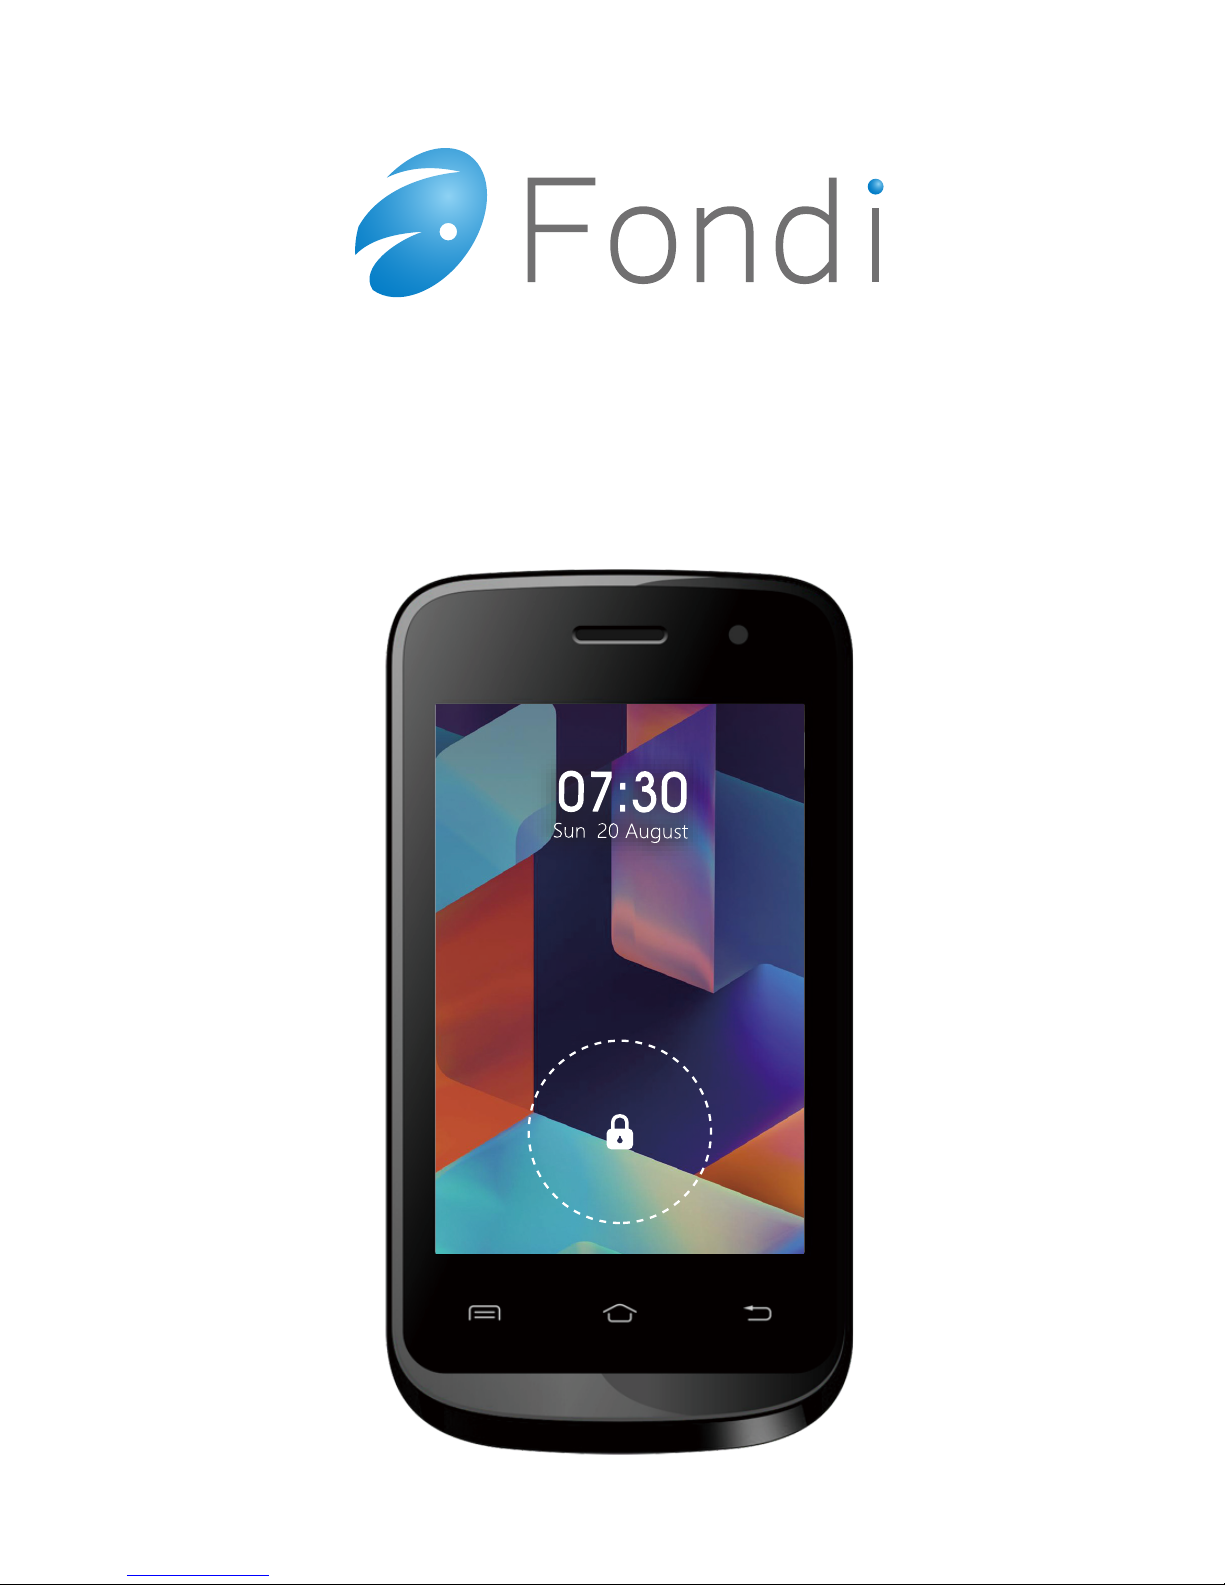
G312 User Manual
ideas forever

-1-
Content
1Introduction to Smartphone...................................3
1.1 Overall Machine Diagram of Smartphone........ 3
1.2 Safety warning and Attentions..........................4
2Your phone.............................................................. 7
2.1 Phone overview................................................7
2.2 Functions of Keys.............................................7
2.3 Functions of icons............................................ 8
3Getting started........................................................ 8
3.1 Installing the SIM Card and the Battery........... 8
3.2 Charging the Battery........................................ 9
3.3 Linking to the Networks and devices..............11
3.4 Using the touch screen....................................13
3.5 Using the onscreen keypad............................. 14
3.6 Dialing Calls.................................................. 15
4Using the Menus....................................................16
4.1 Browser..........................................................16
4.2 Calculator.......................................................18
4.3 Calendar......................................................... 18
4.4 Camera........................................................... 20

-2-
4.5 Clock..............................................................20
4.6 Downloads..................................................... 21
4.7 Email..............................................................21
4.8 Facebook........................................................ 22
4.9 File Manager.................................................. 22
4.10 FM Radio..................................................... 22
4.11 Gallery..........................................................22
4.12 Gmail........................................................... 22
4.13 Google setting.............................................. 22
4.14 Messaging.................................................... 23
4.15 Music........................................................... 23
4.16 People.......................................................... 25
4.17 Phone........................................................... 26
4.18 Play store..................................................... 26
4.19 Search.......................................................... 26
4.20 Settings........................................................ 26
4.21 SIM Toolkit..................................................29
4.22 Sound Recorder............................................29
4.23 Video player................................................. 29
5Appendix............................................................... 30
-3-
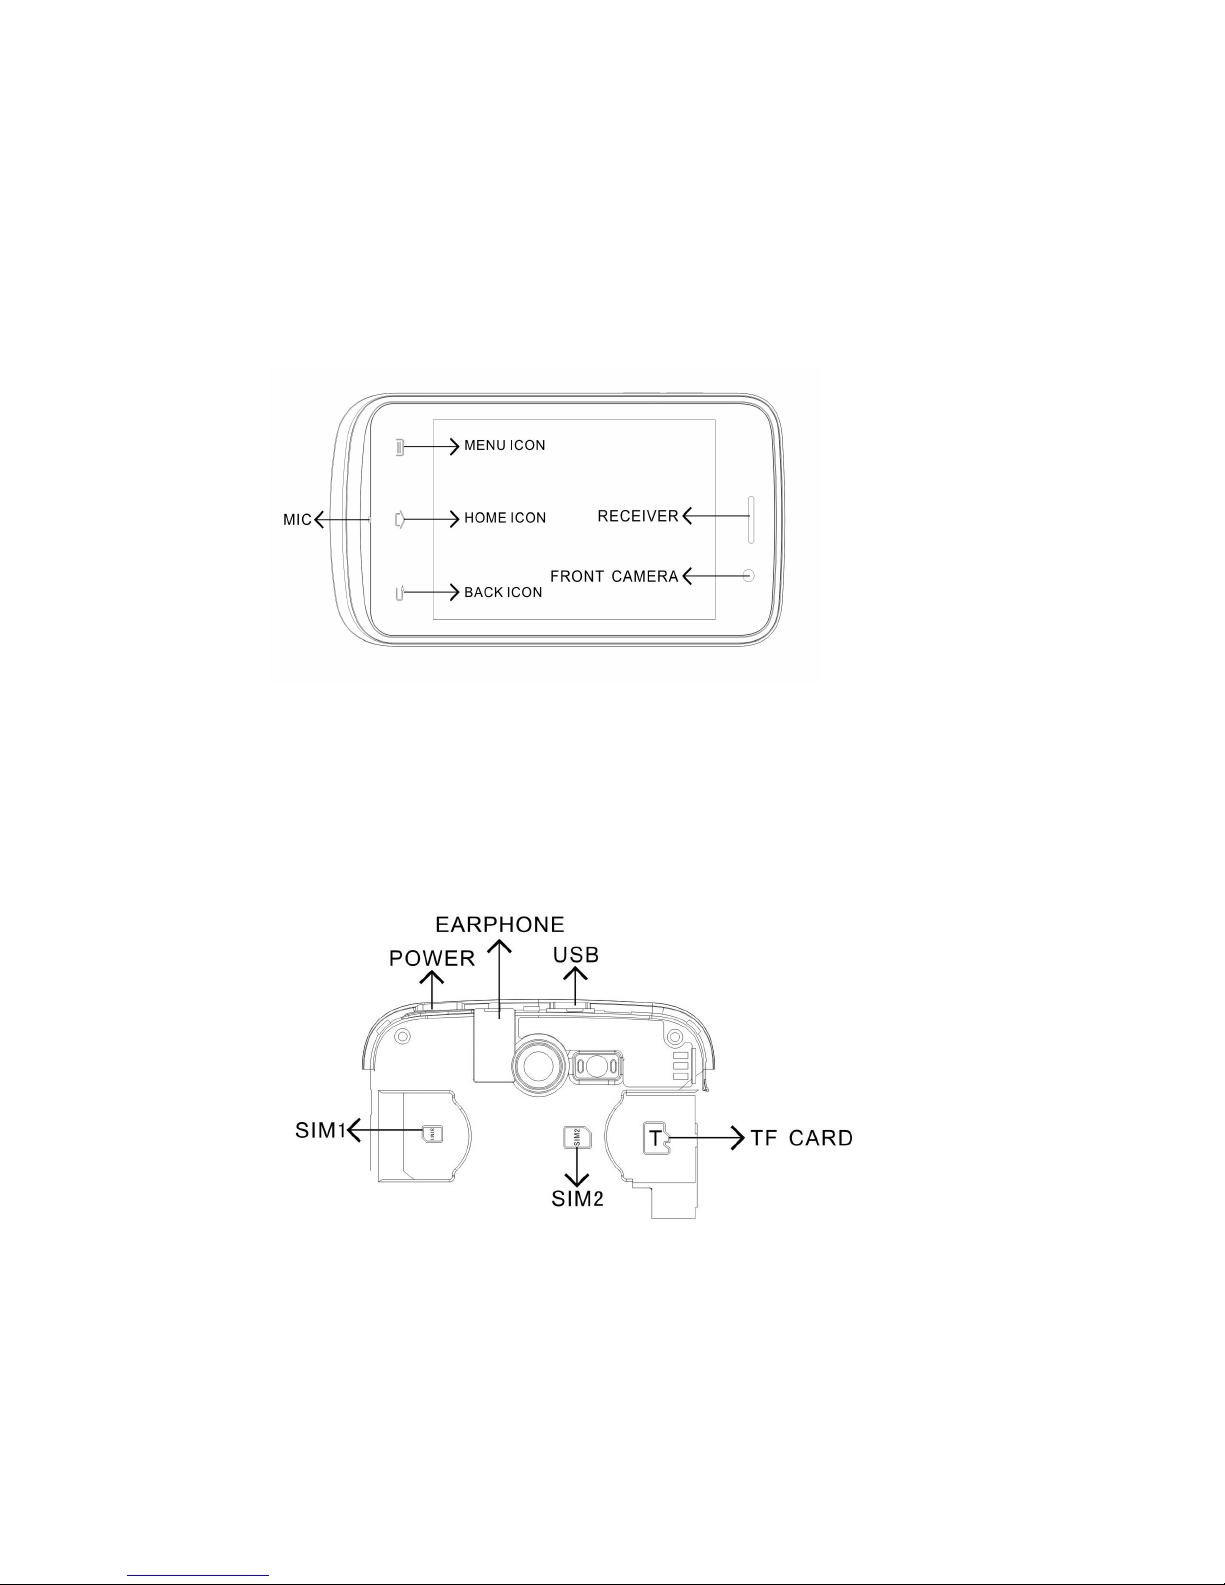
1.Introduction to Smartphone
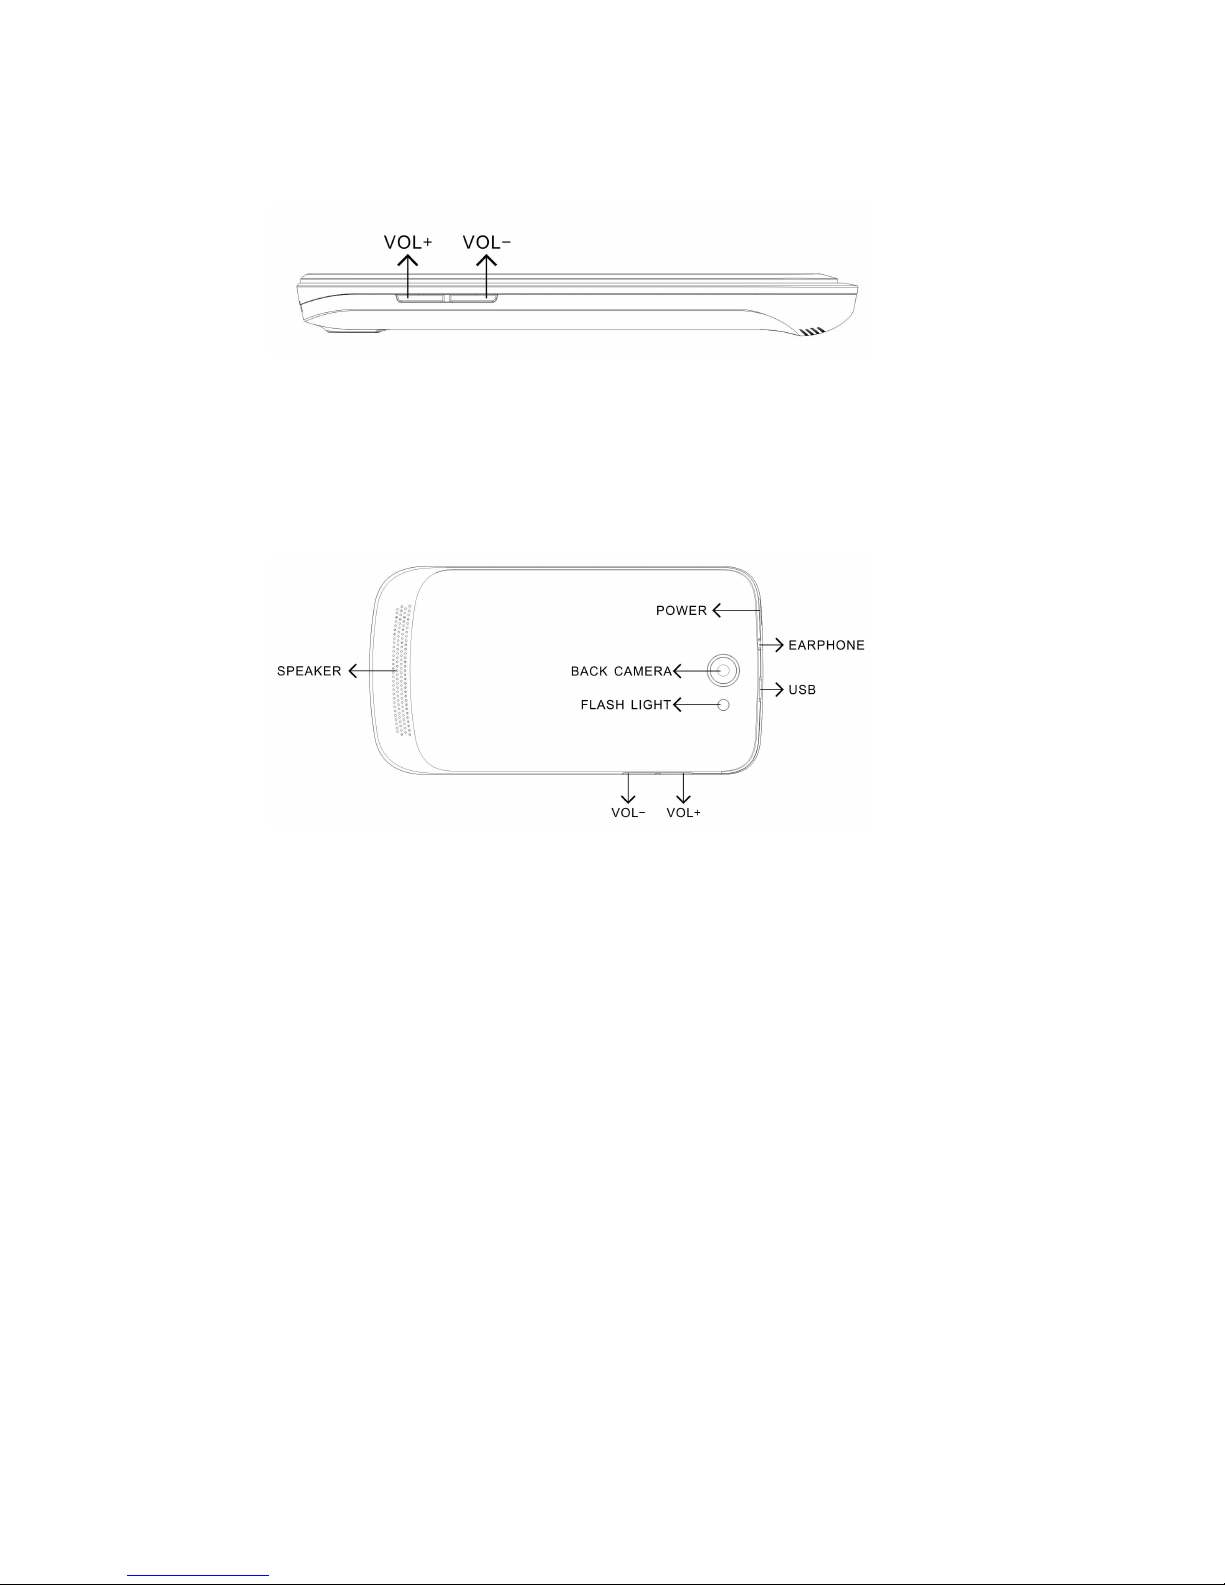
1.1 Overall Machine Diagram of Smartphone
Frone Diagram:
Figure 1-1
Side Diagram:
Figure 1-2
-4-
Side Diagram:
Figure 1-3
Bottom Diagram:
Figure 1-4
1.1. Safety warning and Attentions
Safety warning
ROAD SAFETY COMES FIRST
Do not use a hand-held phone while driving. Use
hands-free fittings when calls are unavoidable while
driving. In some countries, dialing or receiving calls while
driving is illegal!
SWITCH OFF IN AIRCRAFT

-5-
Wireless devices can cause interference in aircraft.
Using a mobile phone in flight is illegal and risky.
Please make sure that your mobile phone is powered off in
flight.
SWITCH OFF BEFORE ENTERING RISKY
AREAS
Strictly observe the relevant laws, codes, and
regulations on the use of mobile phones in risky areas.
Turn off your mobile phone before entering a place
susceptible to explosion, such as an oil station, oil tank,
chemical plant or a place where a blasting process is under
way.
OBSERVE ALL SPECIAL REGULATIONS
Follow any special regulations in force in any area
such as hospitals and always switch off your phone
whenever it is forbidden to use it or, when it may cause
interference or danger. Properly use your mobile phone
near medical apparatuses, such as pacemakers, hearing
aids and some other electronic medical devices, as it may
cause interference to such apparatuses.
INTERFERENCE
The conversation quality of any mobile phone may be
affected by radio interference. An antenna is built inside
the mobile phone and located below the microphone. Do
not touch the antenna area during a conversation, lest that
the conversation quality deteriorate.
QUALIFIED SERVICE

-6-
Only qualified personnel may install or repair phone
equipment. Installing or repairing the mobile phone on
your own may bring great danger and violates the
warranty rules.
ACCESSORIES AND BATTERIES
Use only approved accessories and batteries.
USE SENSIBLY
Use only in a normal and proper manner.
EMERGENCY CALLS
Ensure the phone is switched on and in service, enter
the emergency number, e.g. 112, then press the Dial key.
Give your location and state your situation briefly. Do not
end the call until told to do so.
Note: Just like all other mobile phones, this mobile phone
does not necessarily support all the features described in
this manual due to network or radio transmission
problems. Some networks even do not support the
emergency call service. Therefore, do not rely solely on
the mobile phone for critical communications such as first
aid. Please consult the local network operator.
Precautions
This mobile phone is well designed with fine art.
Please exercise special care when using it. The following
suggestions will help your mobile phone survive the
warranty period and extend its service life:
Keep the mobile phone and all its fittings beyond
children's reach.

-7-
Keep the mobile phone dry. Keep away from rain,
moisture, liquid or other substances that may corrode
electronic circuits.
Do not use or store the mobile phone in dusty place,
lest that active parts of the mobile phone be damaged.
Do not store the mobile phone in a high-temperature
place. High temperature will shorten the life of
electronic circuits and damage the battery and some
plastic parts.
Do not store the mobile phone in a chilly place.
Otherwise, moistures will be formed inside the mobile
phone to damage electronic circuits when the mobile
phone is moved to a constant temperature place.
Do not throw, knock or shock the mobile phone, as that
will destroy the internal circuits and high-precision
components of the mobile phone.
2. Your phone
2.1. Phone overview
This is a smart phone, it has the beautiful appearance
and powerful function.
2.2. Functions of Keys
The mobile phone provides the following keys:
Power key
Power key situates at the top of the phone. While
using the phone, you can press this key to lock screen; if

-8-
you press and hold this key, a phone-options dialog would
pop out. Here, you can select to adjust the profile mode,
power off, reboot or turn on/off airplane mode.
Volume key
Volume key situates at the left side of the phone. You
can press it to adjust or reduce ringer volume.
2.3. Functions of icons
Menu icon
Touch this icon to access options of a selected
function;
Home icon
Touch it to open home screen. If you’re viewing
the left or right extended Home screen, touch it
can enter the home screen.
Back icon
Touch this icon to return to the previous screen;
3. Getting started
3.1. Installing the SIM Card and the Battery
A SIM card carries useful information, including your
mobile phone number, PIN (Personal Identification
Number), PIN2, PUK (PIN Unlocking Key), PUK2 (PIN2
Unlocking Key), IMSI (International Mobile Subscriber
Identity), network information, contacts data, and short

-9-
messages data.
Note:
After powering off your mobile phone, wait for a few
seconds before removing or inserting a SIM card.
Exercise caution when operating a SIM card, as
friction or bending will damage the SIM card.
Properly keep the mobile phone and its fittings such as
the SIM cards beyond children's reach.
Installation
Hold the power key for a while and select power off to
power off the mobile phone
Take the back cover away.
Insert the SD Card into the SD Card slot lightly, till the
SD Card cannot be further pushed in
Insert the SIM Card into the SIM Card slot lightly with
the corner cutting of the card aligning to the notch of
the slot and the gold plate of the card facing download,
till the SIM Card cannot be further pushed in.
Note: There are two SIM Card slots, user must insert the
SIM Card to apply for the slot by the different direction.
With the metallic contacts of the battery facing the
metallic contacts in the battery slot, install the battery.
Note:
The SD card is a miniature object. Keep it out of the
reach of children for fear that children swallow it!
3.2. Charging the Battery
Your mobile phone can monitor and display the battery

-10-
state.
Normally the remaining energy of the battery is
indicated by the battery level icon at the upper right
corner of the display screen.
When the battery energy is insufficient, the mobile
phone prompts "Battery low".
Using a travel adapter:
Install the battery into the mobile phone before
charging the battery.
Connect the adapter of the travel charger with the
charging slot in the mobile phone. Ensure that the
adapter is fully inserted.
Insert the plug of the travel charger to an appropriate
power outlet.
During the charging, the battery level grids in the
battery icon keep flickering till the battery is fully
charged.
The battery icon does no longer flicker when the
charging process ends.
Note:
Ensure that the plug of the charger, the plug of the
earphone, and the plug of the USB cable are inserted in
the right direction. Inserting them in a wrong direction
may cause charging failure or other problems.
Before the charging, ensure that the standard voltage and
frequency of the local mains supply match the rated
voltage and power of the travel charger.

-11-
Optimizing battery life
You can extend your battery’s life between charges
by turning off features that you don’t need. You can also
monitor how applications and system resources consume
battery power.
To guarantee the optimal performance of your battery,
please stick to the following rules:
Turn off radios that you aren’t using. If you aren’t
using Wi-Fi, Bluetooth, or GPRS, use the Setting
application to turn them off.
Turn down screen brightness and set a shorter screen
timeout.
If you don’t need them, turn off automatic syncing for
Gmail, Calendar, Contacts, and other applications.
Note: On the Home screen, press Menu icon and
touch Settings > About phone > Battery use. The Battery
Use screen lists the applications that have been using the
battery, from greatest to least battery use. The top of the
screen displays the time since you were last connected to a
charger or, if you’re currently connected to one, how long
you were running on battery power before you connected
to a charger. Then each application or service that used
battery power during that time is displayed, in order of the
amount of power they used. Touch an application in the
Battery Use screen to learn details about its power
consumption. Different applications offer different kinds
of information.

-12-
3.3. Linking to the Networks and devices
Your phone can connect to a variety of networks and
devices, including mobile networks for voice and data
transmission, Wi-Fi data networks, and Bluetooth devices,
such as headsets. You can also connect your phone to a
computer, to transfer files from your phone’s SD card and
share your phone’s mobile data connection via USB.
Connecting to mobile networks
When you assemble your phone with a SIM card,
your phone is configured to use your provider’s mobile
networks for voice calls and for transmitting data.
Connecting to Wi-Fi networks
Wi-Fi is a wireless networking technology that can
provide Internet access at distances of up to 100 meters,
depending on the Wi-Fi router and your surroundings.
Touch Settings>Wireless & networks > Wi-Fi. Check
Wi-Fi to turn it on. The phone scans for available Wi-Fi
networks and displays the names of those it finds. Secured
networks are indicated with a Lock icon.
Note: If the phone finds a network that you connected
to previously, it connects to it.
Touch a network to connect to it. If the network is
open, you are prompted to confirm that you want to
connect to that network by touching Connect. If the
network is secured, you’re prompted to enter a password
or other credentials.
Connecting to Bluetooth devices

-13-
Bluetooth is a short-range wireless communications
technology that devices can use to exchange information
over a distance of about 8 meters. The most common
Bluetooth devices are headphones for making calls or
listening to music, hands-free kits for cars, and other
portable devices, including laptops and cell phones.
Touch Settings>Wireless & networks > Bluetooth.
Check Bluetooth to turn it on.
You must pair your phone with a device before you
can connect to it. Once you pair your phone with a device,
they stay paired unless you unpair them.
Your phone scans for and displays the IDs of all
available Bluetooth devices in range. If the device you
want to pair with isn’t in the list, make it discoverable.
Connecting to a computer via USB
You can connect your phone to a computer with a
USB cable, to transfer music, pictures, and other files
between your phone’s SD card and the computer.
3.4. Using the touch screen
Touch-screen tips
Touch
To act on items on the screen, such as application and
settings icons, to type letters and symbols using the
onscreen keyboard, or to press onscreen buttons, you
simply touch them with your finger.
Touch & hold
Touch & hold an item on the screen by touching it and

-14-
not lifting your finger until an action occurs. For example,
to open a menu for customizing the Home screen, you
touch an empty area on the Home screen until the menu
opens.
Drag
Touch & hold an item for a moment and then,
without lifting your finger, move your finger on the screen
until you reach the target position.
Swipe or slide
To swipe or slide, you quickly move your finger
across the surface of the screen, without pausing when
you first touch it (so you don’t drag an item instead). For
example, you slide the screen up or down to scroll a list.
Lock screen
When Screen lock in Security setting is enabled, press
Power key to lock the handset. This helps to prevent
accidental touching of keys and as well as power saving.
When Sleep function in Display setting is enabled, after
the handset device has been idle for preset period, the
screen will be locked automatically to save power.
Unlock screen
Press Power key to switch on the handset device. The
lock screen appears. Touch and slide right to unlock
screen, and the screen being locked last time will show.
3.5. Using the onscreen keypad
You enter text using the onscreen keyboard. Some
applications open the keyboard automatically. In others,

-15-
you touch a text field where you want to enter text to open
the keyboard. You can also enter text by speaking instead
of by typing.
To enter text
Touch a text field, and the onscreen keyboard opens.
Some applications open the keyboard automatically. In
others, you touch a text field where you want to enter text
to open the keyboard.
Touch the keys on the keyboard to type.
The characters you’ve entered appear in the text field,
with suggestions for the word you are typing below.
Use the Delete icon to erase characters to the left of
the cursor.After finishing typing, touch Back icon
to close the keyboard.
3.6. Dialing Calls
Dialing a call to a number in the contacts
Touch the Phone icon or the phone application icon on
the Home screen, then select the Contacts tab. Swipe or
slide upward/downward to pick out the target contact.
Then you can touch the dial icon to originate a call.
Dialing a call to a number in call log
Touch the Phone icon or the phone application icon on
the Home screen, then select the call log tab. Swipe or
slide upward/downward to pick out and touch the target
contact. Then you can originate a call.
Answering incoming calls
Drag the Answer icon towards right to answer an

-16-
incoming call.
Touch the End icon to end the current conversation.
To reject an incoming call, drag the End icon towards
left.
Managing multiple calls
If you accept a new call when you’re already on a call,
you can drag the Answer icon towards right to answer the
current calls.
4. Using the Menus
4.1. Browser
You can use Browser to view web pages and search
for information on the web after connecting to the
Network.
When you open Browser, site navigation opens. The
web address (URL) of the current page is displayed at the
top of the window.
To go to a webpage or search the web
Touch the URL box at the top of the Browser screen.
Enter the address (URL) of a webpage. Or enter terms you
want to search for. As you enter text, your web search
engine makes suggestions of web pages and queries.
To refresh the current page
Touch Menu icon and an option interface appears,
then you can touch Refresh to update the current web
page.

-17-
To zoom in or out on a webpage
Slide your finger slightly on the screen to reveal the
Zoom control. Touch the plus or minus side of the Zoom
control to zoom in or out.
To share page
you can share the page which you are viewing to
Bluetooth, E-mail, Messaging, Twitter, Whatsapp and so
on.
To find text on a webpage
Touch Menu icon and touch Find on page. Enter the
text you’re looking for. As you type, the first word with
matching characters is highlighted on the screen, and
subsequent matches are boxed. Touch the left or right
arrow to scroll to and highlight the previous or next
matching word.
Copy text from webpage
Use your finger to long press the text you want to
copy. It will pop up some options, select the Select text
option to select the text you want, and then touch the icon
at the right top corner of the screen to copy or share the
text.
Navigate among webpage
You can open links on a webpage, navigate back and
forward, and review your browsing history, just as in any
web browser.
To open a link: Touch a link to open it. Links that
you touch are highlighted in orange until the webpage

-18-
they refer to opens in the window.
To go back and forward among the pages you’ve
opened: Press back key or touch forward.
Working with bookmarks
Open a web page to bookmark, touch menu icon>
Bookmarks/History, here, you can view bookmarks
displayed in thumbnail style.
Touch & hold a bookmark, an option box will pop out.
There, you can perform the following operations on
bookmarks: Open, open in new window, Edit bookmark,
Add shortcut to Home, Share link, copy link URL, Delete
bookmark and set the current bookmark as homepage.
4.2. Calculator
You can use this Calculator to solve simple arithmetic
problems or use its advanced operators to solve more
complex equations.
Enter numbers and arithmetic operators on the basic
screen; Drag the basic screen to the left to open the
advanced screen; Touch back space to delete the last
number or operator you entered. Touch & hold back space
to delete everything in the display.
In the calculator screen, you can touch menu icon to
clear history or access advanced panel.
4.3. Calendar
You can open Calendar to view events you’ve created.
Touch the Calendar icon in the main menu interface.
Events from each account you’ve added to your phone

-19-
and configured to synchronize calendars are displayed in
Calendar.
Creating an event
You can use Calendar on your phone to create events.
In any calendar view, touch menu icon > new event to
open an event details screen for a new event.
Enter a name, time, location and optional additional
details about the event. You can touch plus icon to add
more reminders. In the Guests field, you can enter the
email addresses of everyone you want to invite to the
event. Separate multiple addresses with commas ( , ). If
the people to whom you send invitations use Google
Calendar, they’ll receive an invitation in Calendar and by
email. You can touch menu icon and touch Show extra
options to add details about the event. Touch the Done
icon. The event is added to your calendar.
Displaying calendars
When you add a Google Account or Microsoft
Exchange ActiveSync account to your phone that includes
a calendar service, and you configure that account to
synchronize calendar events to the phone, the events from
that calendar are added and kept up to date in Calendar on
the phone.
In calendar screen, touch menu icon and touch
Calendars to display > Calendars, here, you can set
whether calendars are stored on the phone or visible. The
Calendars screen displays all the calendars you’ve added
Table of contents


