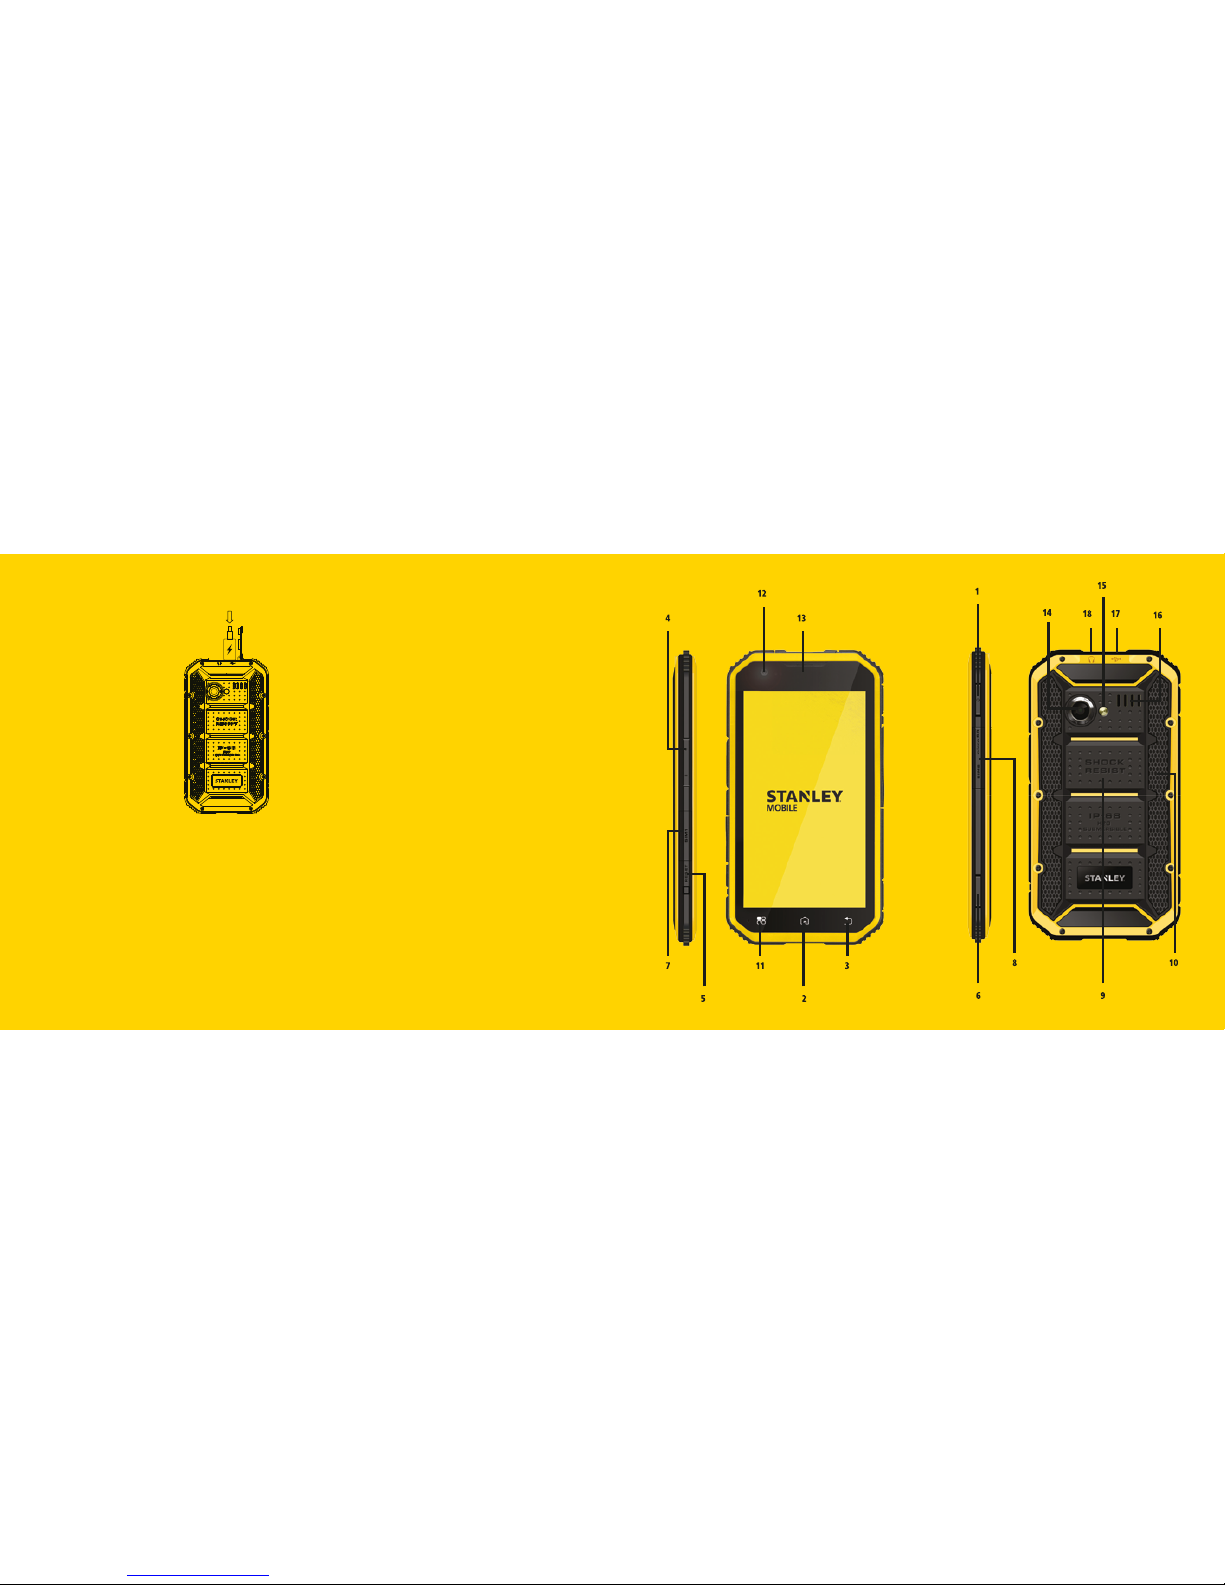
Stanley S241 User manual

QUICK POWER ON
MISE SOUS TENSION
INBETRIEBNAHME
SNEL INSCHAKELEN
ENCENDER EL TELEFONO
ARRANQUE RÁPIDO
ﻊﯾرﺳﻟا لﯾﻐﺷﺗﻟا
1Installing SIM 1 and/or SIM 2 card:
Open the cover of SIM1/ SIM2, and insert a standard
SIM card into the slot SIM 1 and a micro SIM for SIM 2.
Secure the SIM 1/ SIM 2 cover as shown in the diagram.
Installer la carte SIM 1 et/ou SIM 2 :
Soulevez le cache rabattable de l'emplacement de la
carte SIM1/ SIM2, et insérez une carte SIM Standard
pour l'emplacement SIM 1 et une carte micro SIM
pour l'emplacement SIM 2 prévu à cet effet et rabattez
le cache comme indiqué sur l’Image.
Einsetzen von SIM-Karte 1 und/oder
SIM-Karte 2:
Öffnen Sie die Abdeckung für SIM-Karte 1/2 und
setzen Sie eine herkömmliche SIM-Karte in Steckplatz
1 sowie ggf. eine Mikro-SIM-Karte in Steckplatz 2 ein.
Schließen Sie die SIM-Abdeckung anschließend wie in
der Abbildung dargestellt.
Installeer de SIM 1- en/of SIM 2-kaart:
Open het klepje van SIM1/SIM2 en plaats een
standaardsimkaart in de gleuf SIM1 en een
micro-simkaart voor SIM2. Sluit het klepje van
SIM1/SIM2 weer af zoals wordt getoond in het schema.
Instalar la tarjeta SIM 1 y/o SIM 2:
Levante la tapa lateral del compartimento de la tarjeta
SIM1/ SIM2, Introduzca la tarjeta une SIM estándar
para el compartimento SIM1 y/o una micro SIM para
el compartimiento SIM2. Después vuelva a colocar la
tapa como se indica en la imagen.
Instalar cartão SIM 1 e/ou SIM 2:
Abra a tampa do SIM1/ SIM2 e insira um cartão SIM
padrão na ranhura do SIM 1 e um micro SIM para o
SIM 2. Fixe a tampa do SIM 1/SIM 2 conforme ilustrado
no diagrama.
:SIM 2 وأ/و SIM 1 ﺔﻗﺎطﺑ بﻛر
و SIM 1 ﺔﺣﺗﻓ ﻲﻓ ﺔﯾﺳﺎﯾﻗ SIM ﺔﻗﺎطﺑ لﺧداو ،SIM1 / SIM2 ءﺎطﻏ عزﻧا
ﺢﺿوﻣ وھ ﺎﻣﻛ SIM 1/SIM 2 ءﺎطﻏ طﺑرا .SIM 2 ﺔﻗﺎطﺑﻟ micro SIM
.ﻲﻧﺎﯾﺑﻟا مﺳرﻟا ﻲﻓ
2Install the micro SD card:
Open the cover of micro SD card,and Insert the micro
SIM card into the slot and then plug the micro SD card
cover as shown in the diagram.
Installer la carte micro SD card :
Soulevez le cache rabattable de l'emplacement de la
carte micro SD card, et insérez la carte micro SD card
à l'emplacement prévu à cet effet et rabattez le cache
comme indiqué sur l'image.
Einlegen der Mikro-SD-Karte:
Öffnen Sie die Abdeckung des Steckplatzes für die
Mikro-SD-Karte und setzen Sie die Mikro-SD-Karte in
den Steckplatz ein. Schließen Sie die Abdeckung dann
wie in der Abbildung dargestellt.
Plaats de Micro-SD-kaart:
Open het klepje van de Micro-SD-kaart en plaats die in
de gleuf. Sluit het klepje van de Micro-SD-kaart weer
af zoals getoond in het schema.
Instalar la tarjeta micro SD card:
Levante la tapa lateral del compartimento de la tarjeta
micro SD card , Introduzca la tarjeta micro SD card en
su compartimento y vuelva a colocar la tapa como se
indica en la imagen.
Instale o cartão micro SD:
Abra a tampa do cartão micro SD e insira o cartão SIM
micro na ranhura e, em seguida, coloque a tampa do
cartão micro SD conforme ilustrado no diagrama.
:micro SD ﺔﻗﺎطﺑ بﯾﻛرﺗﺑ مﻗ
مﻗ مﺛ ﺔﺣﺗﻔﻟا ﻲﻓ micro SIM ﺔﻗﺎطﺑ لﺧداو ،micro SD ﺔﻗﺎطﺑ ءﺎطﻏ ﺢﺗﻓا
.ﻲﻧﺎﯾﺑﻟا مﺳرﻟا ﻲﻓ نﯾﺑﻣ وھ ﺎﻣﻛ micro SD ﺔﻗﺎطﺑ ءﺎطﻏ لﯾﺻوﺗﺑ
ﺔﻣﻼﻋ STANLEYو،(ﺎﺳﻧرﻓ) زوﻟوﺗ ﻲﻓ لﺟﺳﻣ رﻘﻣﺑ ADAR Générale Télécom Services ﺔﻛرﺷ - ﻊﯾﻧﺻﺗﻟا ﺔﮭﺟ نﻠﻌﺗ
ﺔﻣﻼﻌﻟا تﺣﺗ عﺎﺑﺗ ﻲﺗﻟا ﺔﯾﺣوﻠﻟا ةزﮭﺟﻷاو ﺔﻟوﻣﺣﻣﻟا فﺗاوﮭﻟا ﻊﯾﻣﺟ نأ ﮫﺑﺟوﻣﺑ - صﯾﺧرﺗ بﺟوﻣﺑ مدﺧﺗﺳُﺗو ﺎﮭﻟ ﺔﻠﺟﺳﻣ ﺔﯾرﺎﺟﺗ
وھو ،1999 سرﺎﻣ 9 ﻲﻓ سﻠﺟﻣﻟاو ﻲﺑوروﻷا نﺎﻣﻟرﺑﻟا نﻋ ردﺎﺻﻟا EC/1999/5 ﮫﯾﺟوﺗﻟا ﻊﻣ ﺎًﻣﺎﻣﺗ لﺛﺗﻣﺗ STANLEY ﺔﯾرﺎﺟﺗﻟا
.ﮫﺗﺎﻘﺣﻠﻣو S241 جذوﻣﻧﻟا ﻰﻠﻋ يرﺳﯾ
Bay Area Compliance 1313 ﮫﺑ رﺎطﺧﻹا مﺗ يذﻟا لﻛﯾﮭﻟا مﻗر) لﺎﺛﺗﻣﻻا نﻋ ءﺎﺻﻘﺗﺳﻼﻟ ﺔﯾﻟﺎﺗﻟا رﯾﯾﺎﻌﻣﻟا ﻖﺑطﻧﺗ
:(Laboratories Corp
EN 60950-1: 2006 + A11: 2009 + A1: 2010 + A12: 2011 + A 2:2013 ﺔﻣﻼﺳﻟاو ﺔﺣﺻﻟا
EN50360: 2001 +A1: 2012; EN 50566: 2013
ETSI EN 301 489-1 V1.9.2 (2011-09);ETSI EN 301 489-3 V1.6.1 (2013-08)EMC
ETSI EN 301 489-7 V1.3.1 (2005-11); ETSI EN 301 489-17 V2.2.1 (2012-09)
ETSI EN 301 489-24 V1.5.1 (2010-10)
EETSI EN 300 328 V1.8.1 (2012-06); ETSI EN 301 908-1 V6.2.1 (2013-04) وﯾدارﻟا
ETSI EN 301 908-2 V6.2.1 (2013-10; ETSI EN 301 908-13 V6.2.1 (2013-10)
ETSI EN 300 440-2 V1.4.1 (2010-08); ETSI EN 300 330-2 V1.6.1 (2015-03)
ETSI EN 301 511 V9.0.2 (2003-03)
لﺑﻗ نﻣ عوﻧ يأ نﻣ ﺔﻟءﺎﺳﻣ وأ نﺎﻣﺿ وأ لﯾﺛﻣﺗ وأ ﺔﻟﺎﻔﻛ وأ دﺎﻣﺗﻋا وأ طرﺷ نودﺑو "ﻲھ ﺎﻣﻛ" ﻖﺋﺎﺛوﻟا هذھ مدﻘُﺗ
.ﺎﮭﻟ ﺔﻌﺑﺎﺗﻟا تﺎﻛرﺷﻟاو STANLEYBLACK&DECKER
.stanleymobile.com ةرﺎﯾز ﻰﺟرﯾ ﺔﻠﻣﺎﻛﻟا ﻖﺋﺎﺛوﻟا نﻣ ﺎھرﯾﻏو ﺔﻘﺑﺎطﻣﻟا نﻼﻋإ ضارﻌﺗﺳﻻ
ﺔﻘﺑﺎطﻣﻟا نﻼﻋإ
Fabricado sob licença pela ADAR Générale Télécom Services com sede social em Toulouse
(FRANÇA) e STANLEY uma marca comercial registada e é utilizada sob licença e declara pelo
presente que todos os telemóveis e Tablets vendidos sob a marca STANLEY estão
completamente em conformidade com a Diretiva 1999/5/EC o Parlamento Europeu e com
o Conselho de 9 de Março de 1999, que é aplicável para o modelo S241 e aos seus acessórios.
As normas que se seguem foram aplicadas para a investigação de conformidade (Número de
notificação do produto 1313 Bay Area Compliance Laboratories Corp):
Segurança e Saúde EN 60950-1: 2006 + A11: 2009 + A1: 2010 + A12: 2011 + A 2:2013
EN50360: 2001 +A1: 2012; EN 50566: 2013
EMC ETSI EN 301 489-1 V1.9.2 (2011-09);ETSI EN 301 489-3 V1.6.1 (2013-08)
ETSI EN 301 489-7 V1.3.1 (2005-11); ETSI EN 301 489-17 V2.2.1 (2012-09)
ETSI EN 301 489-24 V1.5.1 (2010-10)
Rádio EETSI EN 300 328 V1.8.1 (2012-06); ETSI EN 301 908-1 V6.2.1 (2013-04)
ETSI EN 301 908-2 V6.2.1 (2013-10; ETSI EN 301 908-13 V6.2.1 (2013-10)
ETSI EN 300 440-2 V1.4.1 (2010-08); ETSI EN 300 330-2 V1.6.1 (2015-03)
ETSI EN 301 511 V9.0.2 (2003-03)
Esta documentação é fornecida “como tal” e sem condição, endosso, garantia, representação
ou responsabilidade de qualquer tipo pela STANLEY BLACK&DECKER e as suas empresas
afiliadas.
Para ver a declaração de conformidade e outra documentação integral, visite stanleymobile.com.
DECLARAÇÃO DE CONFORMIDADE

3Charge 12 hours
Charge the battery for 12h before using for the first
time. *Please completely discharge and charge that
battery when using your phone for the first 3 times
Charge
Il est recommandé de charger la batterie pendant
12 heures avant la toute première utilisation de
l’appareil. *Veullez à respecter le cycle de charge:
déchargez et chargez entièrement la batterie lors des
3 premières utilisations.
Aufladen des Akkus
Es wird empfohlen, vor der Verwendung des Geräts
den Akku 12 Stunden zu laden. Achten Sie bei den
ersten drei Ladezyklen darauf, dass der Akku vor
jedem Wiederaufladen vollständig entladen ist.
Laad 12 uur op
Laad de batterij voor het eerste gebruik 12 uur op.
* Laat de batterij de eerste 3 keer dat u uw telefoon
gebruikt, altijd volledig ontladen en laad ze dan
vervolgens volledig op.
Carga
Se recomienda cargar la batería durante unas
12 horas antes de utilizar el móvil por primera vez
*Se recomienda respectar los ciclos de carga :
descargue y cargue labatería completamente
durante los tres primeros usos del móvil.
Carregue durante 12 horas
Carregue a bateria durante 12 horas antes de a utilizar
pela primeira vez. *Descarregue e carregue
completamente a bateria ao utilizar o telefone nas
primeiras 3 vezes.
ﺔﻋﺎﺳ 12 ةدﻣﻟ نﺣﺷﻟا
ﻎﯾرﻔﺗ ﻰﺟرﯾ * .ةرﻣ لوﻷ مادﺧﺗﺳﻻا لﺑﻗ ﺔﻋﺎﺳ 12 ةدﻣﻟ ﺔﯾرﺎطﺑﻟا نﺣﺷا
تارﻣﻟا ﻲﻓ فﺗﺎﮭﻟا مادﺧﺗﺳا دﻧﻋ ﺔﯾرﺎطﺑﻟا نﺣﺷو ﺎًﻣﺎﻣﺗ نﺣﺷﻟا نﻣ ﺔﯾرﺎطﺑﻟا
.ﻰﻟوﻷا ثﻼﺛﻟا
Note:
Ensure thast the phone is switched off before plugging in
or pulling out the SIM card and micro SD card. And make
sure the SIM card covers is secured tightly.
Remarque:
Veuillez mettre le téléphone hors tension avant d'installer
ou
de retirer la carte SIM et/ou la carte micro SD.
Assurez-vous également d’avoir bien refermé le
compartiment de la carte SIM.
Hinweis:
Bitte schalten Sie erst das Telefon aus, bevor Sie die SIM-
oder Mikro-SD-Karte einlegen oder herausholen. Stellen
Sie sicher, dass die Abdeckung des SIM-Kartenfachs sicher
verschlossen ist.
Opgelet:
Schakel de telefoon uit alvorens u er de simkaart en
Micro-SD-kaart insteekt of uithaalt. En zorg er altijd voor
dat de klepjes van de simkaart stevig weer afgesloten zijn.
Nota:
Apague el teléfono antes de Introducir o de retirar la
tarjeta SIM y/o la tarjeta micro SD. Asegúrese también de
haber cerrado correctamente el compartimento de la
tarjeta SIM.
Nota:
Certifique-se de que desliga o telefone antes de inserir ou
retirar o cartão SIM ou micro SD. E certifique-se de que
a tampa do cartão SIM está fixamente presa.
:ﺔظوﺣﻠﻣ
.micro SD ﺔﻗﺎطﺑو SIM ﺔﻗﺎطﺑ جارﺧإ وأ لﺎﺧدإ لﺑﻗ فﺗﺎﮭﻟا قﻼﻏإ نﻣ دﻛﺄﺗ
.مﺎﻛﺣﺈﺑ ﻖﻠﻐﻣ SIM ﺔﻗﺎطﺑ ءﺎطﻏ نأ نﻣ دﻛﺄﺗو
QUICK POWER ON
MISE SOUS TENSION
INBETRIEBNAHME
SNEL INSCHAKELEN
ENCENDER EL TELEFONO
ARRANQUE RÁPIDO
ﻊﯾرﺳﻟا لﯾﻐﺷﺗﻟا

KEYPAD DESCRIPTION
1. Power Key ON/OFF : Press and hold the button for 3 seconds.
2. Home Key: Return to home screen. To view recent application,
press and hold the home key.
3. Back Key: Return to previous screen.
4. Volume Key: Adjust the volume of the ring tone.*
5. Reset Key: Press and hold the Reset key and Power key at the
same time for 10 seconds to shut down the phone to reset.
6. Camera Button: Press and hold to start camera application.
7. SIM1: Slot for a standard SIM card.
8. SIM2 & micro SD: Slots for a Micro SIM card and a micro SD
card.
9. Qi wireless charging contact.
10. NFC.
11. App-Switch Key.
12. Front Camera.
13. Receiver.
14. Rear Camera.
15. Flash.
16. Speaker.
17. Micro USB port.
18. Headphone port/ jack 3.5.*
*Prolonged use of the music player at full volume may damage the
users hearing
APERÇU DU TÉLÉPHONE
1 Buton « ON/OFF » Mise sous tension / Mise hors tension:
Maintenez le bouton d'alimentation enfoncé pendant 3
secondes.
2. Accueil: Revenez à l'écran d'accueil. Maintenez la touche
Accueil enfoncée pour voir les applications utilisées
récemment.
3. Touche Retour: Pour revenir à l'écran précédent.
4. Volume: Pour régler le volume de la sonnerie.*
5. Touche de réinitialisation: En cas d'anomalie sur le téléphone,
maintenez en même temps la touche enfoncée et touche mise
sous tension pendant 10 secondes pour le mettre hors tension.
6. Touche appareil photo: Maintenez la touche enfoncée pour
lancer l'application Appareil photo.
7. SIM1: Introduisez une carte SIM standard.
8. SIM2 & Micro SD: Introduisez une carte micro SIM et une carte
micro SD.
9. Qi, Point de contact chargement sans fil.
10. NFC.
11. App menu.
12. Appareil photo frontal.
13. Combiné.
14. Appareil photo arrière.
15. Flash.
16. Haut-parleur.
17. Port Micro USB.
18. Branchement / Port Jack pour écouteurs.*
*A pleine puissance, l'écoute prolongée du balladeur peut
endommager l'oreille de l'utilisateur.
TASTENBESCHREIBUNG
1. Ein/Aus-Taste: Halten Sie die Ein/Aus-Taste 3 Sekunden lang
gedrückt, um das Gerät ein- oder auszuschalten.
2. Home-Taste: Zurück zum Startbildschirm. Halten Sie die
Home-Taste gedrückt, um zur vorherigen Anwendung
zurückzukehren.
3. Zurück-Taste: Zurück zum vorherigen Bildschirm.
4. Lautstärke-Taste: Einstellung der Lautstärke des Klingeltons.*
5. Reset-Taste: Halten Sie Reset-Taste und Ein/Aus-Taste zehn
Sekunden lang gedrückt, um das Telefon auszuschalten und
zurückzusetzen.
6. Kamera-Taste: Halten Sie die Taste gedrückt, um die Kamera
zu starten.
7. SIM 1: Steckplatz für herkömmliche SIM-Karten.
8. SIM 2 & Mikro SD: Steckplätze für eine Mikro-SIM-Karte und
eine Mikro-SD-Karte.
9. Qi, Kontakt zum drahtlosen Laden.
10. NFC.
11. App-Schalttaste.
12. Frontkamera.
13. Hörer.
14. Kamera an der Rückseite.
15. Blitz.
16. Lautsprecher.
17. Mikro-USB-Anschluss.
18. Kopfhörer-Anschluss (Klinke, 3,5 mm).*
*Die dauerhafte Nutzung des Musikplayers bei voller Lautstärke kann
das Gehör des Nutzers schädigen.
BESCHRIJVING TOETSENPANEEL
1. ON/OFF-toets (in- en uitschakelen): Hou de toets 3 seconden
ingedrukt.
2. Home-toets (beginscherm): Keer terug naar het beginscherm.
Hou de 'home'-toets ingedrukt om de recente applicatie te
bekijken.
3. Back-toets (terugkeren). Keer terug naar het vorige scherm.
4. Volumetoets: pas het volume van de beltoon aan.*
5. Reset-toets: Houd de reset-toets samen met de ON/OFF-toets
10 seconden ingedrukt om de telefoon uit te schakelen om hem
te resetten.
6. Cameraknop: Hou ingedrukt om de camera-applicatie op te
starten.
7. SIM1: gleuf voor standaardsimkaart.
8. SIM2 & Micro-SD: gleuven voor micro-simkaart en
Micro-SD-kaart.
9. Qi draadloos laadcontact.
10. NFC.
11. App Switch-toets (wisselen tussen apps).
12. Camera vooraan.
13. Ontvanger.
14. Camera achteraan.
15. Flits.
16. Luidspreker.
17. Micro-USB-poort.
18. Poort/aansluiting hoofdtelefoon 3.5.*
*Langdurig gebruik van de muziekspeler bij het hoogste volume kan
tot gehoorschade leiden
PRESENTACIÓN DEL TELÉFONO
1 Tecla "ON/OFF" para Encender / apagar el teléfono: Mantenga
la tecla de apagado/encendldo presionada durante 3 segundos.
2. Pantalla principal: Vuelva a la pantalla principal. Mantenga esta
tecla presionada para mostrar las aplicaciones utilizadas
recientemente.
3. Tecla Atrás: Para volver a la pantalla anterior.
4. Volumen: Para ajustar el volumen del tono.*
5. Tecla reinicializar: En caso de anomalía del teléfono, mantenga
la tecla relnldallzar presionada
y la tecla de encendido presionada simultáneamente durante 10
segundos para apagarlo.
6. Tecla Cámara: Mantenga la tecla presionada para iniciar la
aplicación Cámara.
7. SIM1: Introduzca una tarjeta SIM estándar.
8. SIM2 & Micro SD: Introduzca una tarjeta micro SIM y una tarjeta
micro SD.
9. Qi punto de carga inalámbrica.
10. NFC.
11. App menu.
12. Cámara frontal.
13. Receptor.
14. Cámara trasera.
15. Flash.
16. Altavoz.
17. Puerto Micro USB.
18. Puerto Jack/ Conector para auriculares.*
*A plena potencia, la escucha prolongada del walkman puede dañar
el oído del usario.
DESCRIÇÃO DO TECLADO
1. Tecla LIGAR/DESLIGAR: Pressione e mantenha o botão durante
3 segundos.
2. Tecla de início: Volta para o ecrã de início. Para ver as
aplicações recentes, pressionar e manter
a tecla de início pressionado.
3. Tecla de retrocesso: Regressar ao ecrã anterior.
4. Tecla de volume: Ajusta o volume do som de toque.*
5. Tecla de reinício: Prima e mantenha a tecla de reinício e de
alimentação ao mesmo tempo durante 10 segundos para
desligar o telefone para reinício.
6. Botão de câmara: Prima e mantenha para iniciar a aplicação da
câmara.
7. SIM1: Ranhura para um cartão SIM padrão.
8. SIM2 e micro SD: Ranhuras para um cartão Micro SIM e para
um cartão micro SD.
9. Contacto de carregamento Qi wireless.
10. NFC.
11. Tecla Alternar aplicações.
12. Câmara frontal.
13. Recetor.
14. Câmara traseira.
15. Flash.
16. Altifalante.
17. Porta micro USB.
18. Porta dos auscultadores/auricular 3.5*
*A utilização prolongada do leitor de música com o volume máximo
pode danificar a audição dos utilizadores
ﺢﯾﺗﺎﻔﻣﻟا ﺔﺣوﻟ فﺻو
.ٍناوﺛ 3 ةدﻣﻟ رارﻣﺗﺳﺎﺑ لﯾﻐﺷﺗﻟا حﺎﺗﻔﻣ رز ﻰﻠﻋ طﻐﺿا :فﺎﻘﯾﻹا/لﯾﻐﺷﺗﻟا حﺎﺗﻔﻣ .1
حﺎﺗﻔﻣ ﻰﻠﻋ طﻐﺿﻟاو ،ثﯾدﺣﻟا ﻖﯾﺑطﺗﻟا ضرﻋ .ﺔﯾﺳﯾﺋرﻟا ﺔﺷﺎﺷﻟا ﻰﻟإ ةدوﻌﻟا :ﺔﯾﺳﯾﺋرﻟا حﺎﺗﻔﻣ .2
.رارﻣﺗﺳﺎﺑ ﺔﯾﺳﯾﺋرﻟا
ﺔﻘﺑﺎﺳﻟا ﺔﺷﺎﺷﻠﻟ عوﺟرﻟا :عوﺟرﻟا حﺎﺗﻔﻣ .3
*.نﯾﻧرﻟا ﺔﻣﻐﻧ توﺻ ىوﺗﺳﻣ لﯾدﻌﺗ :توﺻﻟا حﺎﺗﻔﻣ .4
سﻔﻧ ﻲﻓ لﯾﻐﺷﺗﻟا حﺎﺗﻔﻣو طﺑﺿﻟا ةدﺎﻋإ حﺎﺗﻔﻣ ﻰﻠﻋ رارﻣﺗﺳﺎﺑ طﻐﺿا :طﺑﺿﻟا ةدﺎﻋإ حﺎﺗﻔﻣ .5
.طﺑﺿﻟا ةدﺎﻋﻹ فﺗﺎﮭﻟا قﻼﻏﻹ ٍناوﺛ 10 ةدﻣﻟ تﻗوﻟا
.ارﯾﻣﺎﻛﻟا ﻖﯾﺑطﺗ لﯾﻐﺷﺗﻟ ﻰﻠﻋ رارﻣﺗﺳﻻا ﻊﻣ طﻐﺿا :ارﯾﻣﺎﻛﻟا رز .6
.ﺔﯾﺳﺎﯾﻘﻟا SIM ﺔﻗﺎطﺑﻟ ﺔﺣﺗﻓ :SIM1 . 7
.micro SD ﺔﻗﺎطﺑو Micro SIM ﺔﻗﺎطﺑﻟ نﺎﺗﺣﺗﻓ :micro SDو SIM2 . 8
.Qi ﻲﻛﻠﺳﻼﻟا نﺣﺷﻟا لﺎﺻﺗا .9
.(NFC) ىدﻣﻟا بﯾرﻗ لﺻاوﺗﻟا .10
.ﻖﯾﺑطﺗﻟا لﯾدﺑﺗﻟا حﺎﺗﻔﻣ .11
.ﺔﯾﻣﺎﻣﻷا ارﯾﻣﺎﻛﻟا .12
.ﻲﻘﻠﺗﻣﻟا .13
.ﺔﯾﻔﻠﺧﻟا ارﯾﻣﺎﻛﻟا .14
.شﻼﻔﻟا .15
.ﺔﻋﺎﻣﺳﻟا .16
.Micro USB ذﻔﻧﻣ .17
* .3.5 سﺑﻘﻣ/سأرﻟا تﺎﻋﺎﻣﺳ ذﻔﻧﻣ .18
نﯾﻣدﺧﺗﺳﻣﻟا ﻊﻣﺳﺑ رﺿﯾ دﻗ لﻣﺎﻛ توﺻ ىوﺗﺳﻣﺑ ﻰﻘﯾﺳوﻣﻟا لﻐﺷﻣﻟ لوطﻣﻟا مادﺧﺗﺳﻻا *

KEYPAD DESCRIPTION
1. Power Key ON/OFF : Press and hold the button for 3 seconds.
2. Home Key: Return to home screen. To view recent application,
press and hold the home key.
3. Back Key: Return to previous screen.
4. Volume Key: Adjust the volume of the ring tone.*
5. Reset Key: Press and hold the Reset key and Power key at the
same time for 10 seconds to shut down the phone to reset.
6. Camera Button: Press and hold to start camera application.
7. SIM1: Slot for a standard SIM card.
8. SIM2 & micro SD: Slots for a Micro SIM card and a micro SD
card.
9. Qi wireless charging contact.
10. NFC.
11. App-Switch Key.
12. Front Camera.
13. Receiver.
14. Rear Camera.
15. Flash.
16. Speaker.
17. Micro USB port.
18. Headphone port/ jack 3.5.*
*Prolonged use of the music player at full volume may damage the
users hearing
APERÇU DU TÉLÉPHONE
1 Buton « ON/OFF » Mise sous tension / Mise hors tension:
Maintenez le bouton d'alimentation enfoncé pendant 3
secondes.
2. Accueil: Revenez à l'écran d'accueil. Maintenez la touche
Accueil enfoncée pour voir les applications utilisées
récemment.
3. Touche Retour: Pour revenir à l'écran précédent.
4. Volume: Pour régler le volume de la sonnerie.*
Manufactured under license by ADAR Générale Télécom Services with registered office in
Toulouse (FRANCE), and STANLEY is a registered trademark and is used under license , we
hereby declares that all mobile phones & Tablets sold under the STANLEY brand fully comply
with the Directive 1999/5/EC of the European Parliament and of the Council of 9th March 1999,
which is applicable for the model S241 and its accessories.
The following standards have been applied for the investigation of compliance (Notified Body
number 1313 Bay Area Compliance Laboratories Corp):
Safety&Health EN 60950-1: 2006 + A11: 2009 + A1: 2010 + A12: 2011 + A 2:2013
EN50360: 2001 +A1: 2012; EN 50566: 2013
EMC ETSI EN 301 489-1 V1.9.2 (2011-09);ETSI EN 301 489-3 V1.6.1 (2013-08)
ETSI EN 301 489-7 V1.3.1 (2005-11); ETSI EN 301 489-17 V2.2.1 (2012-09)
ETSI EN 301 489-24 V1.5.1 (2010-10)
Radio EETSI EN 300 328 V1.8.1 (2012-06); ETSI EN 301 908-1 V6.2.1 (2013-04)
ETSI EN 301 908-2 V6.2.1 (2013-10; ETSI EN 301 908-13 V6.2.1 (2013-10)
ETSI EN 300 440-2 V1.4.1 (2010-08); ETSI EN 300 330-2 V1.6.1 (2015-03)
ETSI EN 301 511 V9.0.2 (2003-03)
This documentation is provided “as is” and without condition, endorsement, guarantee,
representation or warranty or liability of any kind by STANLEYBLACK&DECKER and its
affiliated companies.
To view the declaration of conformity and other complete documentation please visit
stanleymobile.com.
DECLARATION OF CONFORMITY
Par la présente, fabriqué sous licence par société ADAR Générale Télécom Services située à
Toulouse (France), et STANLEY est une marque déposée et est utilisée sous licence, déclare
que tous les mobiles & Tablettes Stanley sont conformes aux exigences essentielles de la
directive 1999/5/EC du Parlement Européen et du Conseil du 09/Mars/1999, applicable pour le
modèle S241 et ses accessoires. Le produit est conforme aux normes suivantes et/ou aux
autres références réglementaires: (Organisme(s) Notifié(s) consultéis) Numéro 1313 Bay Area
Compliance Laboratories Corp)
Sécurité et Santé EN 60950-1: 2006 + Al 1:2009 + A1 :2010 + A12:2011 + A 2:2013
EN50360:2001 + A1:2012; EN 50566:2013
CEM ETSI EN 301 489-1 VI.9.2 (2011-09); ETSI EN 301 489-3 V1.6.1 (2013-08)
ETSI EN 301 489-7 VI.3.1 (2005-11); ETSI EN 301 489-17V2.2.1 (2012-09)
ETSI EN 301 489-24 VI.5.1 (2010-10)
Radio EETSI EN 300 328 V1.8.1 (2012-06); ETSI EN 301 908-1 V6.2.1 (2013-04)
ETSI EN 301 908-2 V6.2.1 (2013-10); ETSI EN 301 908-13 V6.2.1 (2013-10)
ETSI EN 300 440-2 VI.4.1 (2010-08); ETSI EN 300 330-2 V1.6.1 (2015-03)
ETSI EN 301 511 V9.0.2 (2003-03)
Pour visualiser la déclaration de conformité et tout autre documentation complète rendez vous
sur stanleymobile.com.
DÉCLARATION OF CONFORMITÉ
Hiermit erklärt ADAR Générale Télécom Services mit eingetragenem Sitz in Toulouse
(FRANKREICH), dass sämtliche in Lizenz unter der Marke STANLEY®vertriebenen
Mobiltelefone und Tablets den wesentlichen Anforderungen der Richtlinie 1999/5/EG des
Europäischen Parlaments und des Rates vom 9. März 1999 entsprechen, die für das Modell
S241 und dessen Zubehör Anwendung findet.
Das Produkt entspricht den folgenden Normen bzw. Rechtsvorschriften (Benannte Stelle
Nummer 1313 Bay Area Compliance Laboratories Corp):
Gesundheit & Sicherheit EN 60950-1: 2006 + A11: 2009 + A1: 2010 + A12: 2011 + A 2:2013
EN50360: 2001 + A1: 2012; EN 50566: 2013
EMV ETSI EN 301 489-1 V1.9.2 (2011-09);ETSI EN 301 489-3 V1.6.1 (2013-08)
ETSI EN 301 489-7 V1.3.1 (2005-11); ETSI EN 301 489-17 V2.2.1 (2012-09)
ETSI EN 301 489-24 V1.5.1 (2010-10)
Radio EETSI EN 300 328 V1.8.1 (2012-06); ETSI EN 301 908-1 V6.2.1 (2013-04)
ETSI EN 301 908-2 V6.2.1 (2013-10; ETSI EN 301 908-13 V6.2.1 (2013-10)
ETSI EN 300 440-2 V1.4.1 (2010-08); ETSI EN 300 330-2 V1.6.1 (2015-03)
ETSI EN 301 511 V9.0.2 (2003-03)
Die vorliegende Dokumentation wird ohne jede Mängelgewähr („as is“) sowie ohne jedwede
Bedingung, Billigung, Garantie, Zusicherung oder Gewähr von STANLEYBLACK&DECKER und
dessen angeschlossenen Unternehmen zur Verfügung gestellt.
Die Konformitätserklärung sowie weitere umfassende Dokumentationen sind unter stanleymo-
bile.com einsehbar.
KONFORMITÄTSERKLÄRUNG
Gezien de productie onder licentie door ADAR Générale Télécom Services met maatschappeli-
jke zetel in Toulouse (FRANKRIJK) en gezien STANLEY een gedeponeerd handelsmerk is dat
onder licentie wordt gebruikt, verklaren we hierbij dat alle mobiele telefoons & tablets
verkocht onder de STANLEY-merknaam conform de Richtlijn 1999/5/EG van het Europese
Parlement en de Raad van 9 maart 1999 zijn, van toepassing op het model S241 en het
toebehoren ervan.
De volgende normen werden toegepast om de conformiteit na te gaan (aangemelde instantie
nummer 1313 Bay Area Compliance Laboratories Corp):
Veiligheid & gezondheid EN 60950-1: 2006 + A11: 2009 + A1: 2010 + A12: 2011 + A 2:2013
EN50360: 2001 +A1: 2012; EN 50566: 2013
EMC ETSI EN 301 489-1 V1.9.2 (2011-09); ETSI EN 301 489-3 V1.6.1 (2013-08)
ETSI EN 301 489-7 V1.3.1 (2005-11); ETSI EN 301 489-17 V2.2.1 (2012-09)
ETSI EN 301 489-24 V1.5.1 (2010-10)
Radio EETSI EN 300 328 V1.8.1 (2012-06); ETSI EN 301 908-1 V6.2.1 (2013-04)
ETSI EN 301 908-2 V6.2.1 (2013-10; ETSI EN 301 908-13 V6.2.1 (2013-10)
ETSI EN 300 440-2 V1.4.1 (2010-08); ETSI EN 300 330-2 V1.6.1 (2015-03)
ETSI EN 301 511 V9.0.2 (2003-03)
Deze documentatie wordt als dusdanig ter beschikking gesteld en houdt geen enkele
voorwaarde, goedkeuring, garantie, vertegenwoordiging of waarborg of aansprakelijkheid van
de kant van STANLEY BLACK & DECKER en zijn filialen in.
Ga naar stanleymobile.com om de conformiteitsverklaring en de andere volledige
documentatie in te kijken.
CONFORMITEITSVERKLARING
Por la presente, Fabricado bajo licencia por la sociedad ADAR Générale Télécom Services con
sede en Tolosa (Francia), y STANLEY es una marca registrada y se utiliza bajo licencia, declara
que todos los teléfonos STANLEY cumplen con los requisitos esenciales de la directiva
1999/5/EC del Parlamento Europeo y del Consejo del 09/Marzo/1999, aplicable por el modelo
S241 y sus accesorios. El producto cumple con los siguientes estándares y / o otras referencias
normativas (organización (s) Notificado (s) consulta (s) número 1313 Bay Area Compliance
Laboratories Corp.):
SeguridaSt Salud EN 60950-1: 2006 + Al 1:2009+A1 :2010 + A12:2011 + A 2:2013
EN50360:2001 +A1:2012; EN 50566:2013
EMC ETSI EN 301 489-1 V1.9.2(2011-09);ETSI EN 301 489-3V1.6.1 (2013-08)
ETSI EN 301 489-7 V1.3.1 (2005-11); ETSI EN 301 489-17 V2.2.1 (2012-09)
ETSI EN 301 489-24 VI.5.1 (2010-10)
Radio EETSI EN 300 328V1.8.1 (2012-06); ETSI EN 301 908-1 V6.2.1 (2013-04)
ETSI EN 301 908-2 V6.2.1 (2013-10); ETSI EN 301 908-13 V6.2.1 (2013-10)
ETSI EN 300 440-2 VI,4.1 (2010-08); ETSI EN 300 330-2 V1.6.1 (2015-03)
ETSI EN 301 511 V9.0.2 (2003-03)
Para consultar la declaración de conformidad y/o otra documentación suplementario, visite
stanleymobile.com.
DECLARACIÓN DE CONFORMIDAD
5. Touche de réinitialisation: En cas d'anomalie sur le téléphone,
maintenez en même temps la touche enfoncée et touche mise
sous tension pendant 10 secondes pour le mettre hors tension.
6. Touche appareil photo: Maintenez la touche enfoncée pour
lancer l'application Appareil photo.
7. SIM1: Introduisez une carte SIM standard.
8. SIM2 & Micro SD: Introduisez une carte micro SIM et une carte
micro SD.
9. Qi, Point de contact chargement sans fil.
10. NFC.
11. App menu.
12. Appareil photo frontal.
13. Combiné.
14. Appareil photo arrière.
15. Flash.
16. Haut-parleur.
17. Port Micro USB.
18. Branchement / Port Jack pour écouteurs.*
*A pleine puissance, l'écoute prolongée du balladeur peut
endommager l'oreille de l'utilisateur.
TASTENBESCHREIBUNG
1. Ein/Aus-Taste: Halten Sie die Ein/Aus-Taste 3 Sekunden lang
gedrückt, um das Gerät ein- oder auszuschalten.
2. Home-Taste: Zurück zum Startbildschirm. Halten Sie die
Home-Taste gedrückt, um zur vorherigen Anwendung
zurückzukehren.
3. Zurück-Taste: Zurück zum vorherigen Bildschirm.
4. Lautstärke-Taste: Einstellung der Lautstärke des Klingeltons.*
5. Reset-Taste: Halten Sie Reset-Taste und Ein/Aus-Taste zehn
Sekunden lang gedrückt, um das Telefon auszuschalten und
zurückzusetzen.
6. Kamera-Taste: Halten Sie die Taste gedrückt, um die Kamera
zu starten.
7. SIM 1: Steckplatz für herkömmliche SIM-Karten.
8. SIM 2 & Mikro SD: Steckplätze für eine Mikro-SIM-Karte und
eine Mikro-SD-Karte.
9. Qi, Kontakt zum drahtlosen Laden.
10. NFC.
11. App-Schalttaste.
12. Frontkamera.
13. Hörer.
14. Kamera an der Rückseite.
15. Blitz.
16. Lautsprecher.
17. Mikro-USB-Anschluss.
18. Kopfhörer-Anschluss (Klinke, 3,5 mm).*
*Die dauerhafte Nutzung des Musikplayers bei voller Lautstärke kann
das Gehör des Nutzers schädigen.
BESCHRIJVING TOETSENPANEEL
1. ON/OFF-toets (in- en uitschakelen): Hou de toets 3 seconden
ingedrukt.
2. Home-toets (beginscherm): Keer terug naar het beginscherm.
Hou de 'home'-toets ingedrukt om de recente applicatie te
bekijken.
3. Back-toets (terugkeren). Keer terug naar het vorige scherm.
4. Volumetoets: pas het volume van de beltoon aan.*
5. Reset-toets: Houd de reset-toets samen met de ON/OFF-toets
10 seconden ingedrukt om de telefoon uit te schakelen om hem
te resetten.
6. Cameraknop: Hou ingedrukt om de camera-applicatie op te
starten.
7. SIM1: gleuf voor standaardsimkaart.
8. SIM2 & Micro-SD: gleuven voor micro-simkaart en
Micro-SD-kaart.
9. Qi draadloos laadcontact.
10. NFC.
11. App Switch-toets (wisselen tussen apps).
12. Camera vooraan.
13. Ontvanger.
14. Camera achteraan.
15. Flits.
16. Luidspreker.
17. Micro-USB-poort.
18. Poort/aansluiting hoofdtelefoon 3.5.*
*Langdurig gebruik van de muziekspeler bij het hoogste volume kan
tot gehoorschade leiden
PRESENTACIÓN DEL TELÉFONO
1 Tecla "ON/OFF" para Encender / apagar el teléfono: Mantenga
la tecla de apagado/encendldo presionada durante 3 segundos.
2. Pantalla principal: Vuelva a la pantalla principal. Mantenga esta
tecla presionada para mostrar las aplicaciones utilizadas
recientemente.
3. Tecla Atrás: Para volver a la pantalla anterior.
4. Volumen: Para ajustar el volumen del tono.*
5. Tecla reinicializar: En caso de anomalía del teléfono, mantenga
la tecla relnldallzar presionada
y la tecla de encendido presionada simultáneamente durante 10
segundos para apagarlo.
6. Tecla Cámara: Mantenga la tecla presionada para iniciar la
aplicación Cámara.
7. SIM1: Introduzca una tarjeta SIM estándar.
8. SIM2 & Micro SD: Introduzca una tarjeta micro SIM y una tarjeta
micro SD.
9. Qi punto de carga inalámbrica.
10. NFC.
11. App menu.
12. Cámara frontal.
13. Receptor.
14. Cámara trasera.
15. Flash.
16. Altavoz.
17. Puerto Micro USB.
18. Puerto Jack/ Conector para auriculares.*
*A plena potencia, la escucha prolongada del walkman puede dañar
el oído del usario.
DESCRIÇÃO DO TECLADO
1. Tecla LIGAR/DESLIGAR: Pressione e mantenha o botão durante
3 segundos.
2. Tecla de início: Volta para o ecrã de início. Para ver as
aplicações recentes, pressionar e manter
a tecla de início pressionado.
3. Tecla de retrocesso: Regressar ao ecrã anterior.
4. Tecla de volume: Ajusta o volume do som de toque.*
5. Tecla de reinício: Prima e mantenha a tecla de reinício e de
alimentação ao mesmo tempo durante 10 segundos para
desligar o telefone para reinício.
6. Botão de câmara: Prima e mantenha para iniciar a aplicação da
câmara.
7. SIM1: Ranhura para um cartão SIM padrão.
8. SIM2 e micro SD: Ranhuras para um cartão Micro SIM e para
um cartão micro SD.
9. Contacto de carregamento Qi wireless.
10. NFC.
11. Tecla Alternar aplicações.
12. Câmara frontal.
13. Recetor.
14. Câmara traseira.
15. Flash.
16. Altifalante.
17. Porta micro USB.
18. Porta dos auscultadores/auricular 3.5*
*A utilização prolongada do leitor de música com o volume máximo
pode danificar a audição dos utilizadores
ﺢﯾﺗﺎﻔﻣﻟا ﺔﺣوﻟ فﺻو
.ٍناوﺛ 3 ةدﻣﻟ رارﻣﺗﺳﺎﺑ لﯾﻐﺷﺗﻟا حﺎﺗﻔﻣ رز ﻰﻠﻋ طﻐﺿا :فﺎﻘﯾﻹا/لﯾﻐﺷﺗﻟا حﺎﺗﻔﻣ .1
حﺎﺗﻔﻣ ﻰﻠﻋ طﻐﺿﻟاو ،ثﯾدﺣﻟا ﻖﯾﺑطﺗﻟا ضرﻋ .ﺔﯾﺳﯾﺋرﻟا ﺔﺷﺎﺷﻟا ﻰﻟإ ةدوﻌﻟا :ﺔﯾﺳﯾﺋرﻟا حﺎﺗﻔﻣ .2
.رارﻣﺗﺳﺎﺑ ﺔﯾﺳﯾﺋرﻟا
ﺔﻘﺑﺎﺳﻟا ﺔﺷﺎﺷﻠﻟ عوﺟرﻟا :عوﺟرﻟا حﺎﺗﻔﻣ .3
*.نﯾﻧرﻟا ﺔﻣﻐﻧ توﺻ ىوﺗﺳﻣ لﯾدﻌﺗ :توﺻﻟا حﺎﺗﻔﻣ .4
سﻔﻧ ﻲﻓ لﯾﻐﺷﺗﻟا حﺎﺗﻔﻣو طﺑﺿﻟا ةدﺎﻋإ حﺎﺗﻔﻣ ﻰﻠﻋ رارﻣﺗﺳﺎﺑ طﻐﺿا :طﺑﺿﻟا ةدﺎﻋإ حﺎﺗﻔﻣ .5
.طﺑﺿﻟا ةدﺎﻋﻹ فﺗﺎﮭﻟا قﻼﻏﻹ ٍناوﺛ 10 ةدﻣﻟ تﻗوﻟا
.ارﯾﻣﺎﻛﻟا ﻖﯾﺑطﺗ لﯾﻐﺷﺗﻟ ﻰﻠﻋ رارﻣﺗﺳﻻا ﻊﻣ طﻐﺿا :ارﯾﻣﺎﻛﻟا رز .6
.ﺔﯾﺳﺎﯾﻘﻟا SIM ﺔﻗﺎطﺑﻟ ﺔﺣﺗﻓ :SIM1 . 7
.micro SD ﺔﻗﺎطﺑو Micro SIM ﺔﻗﺎطﺑﻟ نﺎﺗﺣﺗﻓ :micro SDو SIM2 . 8
.Qi ﻲﻛﻠﺳﻼﻟا نﺣﺷﻟا لﺎﺻﺗا .9
.(NFC) ىدﻣﻟا بﯾرﻗ لﺻاوﺗﻟا .10
.ﻖﯾﺑطﺗﻟا لﯾدﺑﺗﻟا حﺎﺗﻔﻣ .11
.ﺔﯾﻣﺎﻣﻷا ارﯾﻣﺎﻛﻟا .12
.ﻲﻘﻠﺗﻣﻟا .13
.ﺔﯾﻔﻠﺧﻟا ارﯾﻣﺎﻛﻟا .14
.شﻼﻔﻟا .15
.ﺔﻋﺎﻣﺳﻟا .16
.Micro USB ذﻔﻧﻣ .17
* .3.5 سﺑﻘﻣ/سأرﻟا تﺎﻋﺎﻣﺳ ذﻔﻧﻣ .18
نﯾﻣدﺧﺗﺳﻣﻟا ﻊﻣﺳﺑ رﺿﯾ دﻗ لﻣﺎﻛ توﺻ ىوﺗﺳﻣﺑ ﻰﻘﯾﺳوﻣﻟا لﻐﺷﻣﻟ لوطﻣﻟا مادﺧﺗﺳﻻا *
Other Stanley Cell Phone manuals