Fondis WINEMASTER C50S User manual

________________________________________________________________________________________________
WINEMASTER C50S(SR)
RÉF. 40294.3
05/2003
FMode d'emploi
GB Instructions for use
DGebrauchsanweisung

1. La conservation du vin ................................................................. Page 3
2. Principe de climatisation de cave ........................................................ Page 3
3. Caractéristiques ...................................................................... Page 4
3.1. Capacité .................................................................... Page 4
3.2 Régulation de température .................................................... Page 5
3.3. Régulation de l'hygrométrie ................................................... Page 5
3.4. Dégivrage .................................................................. Page 5
3.5. Vibrations ................................................................... Page 5
3.6. Sécurité .................................................................... Page 5
4. Tableau de contrôle du climatiseur ...................................................... Page 6
5. Emplacement du climatiseur ............................................................ Page 6
6. Création d'une cave ................................................................... Page 7
6.1. Le local ..................................................................... Page 7
6.2. L'isolation ................................................................... Page 7
6.3. Caractéristiques des isolants .................................................. Page 8
6.4. Isolation des murs et du plafond ............................................... Page 8
6.5. Isolation du plancher ......................................................... Page 9
6.6. La porte .................................................................... Page 9
7. Montage du groupe ................................................................... Page 10
8. Mise en service ....................................................................... Page 11
9. Entretien ............................................................................. Page 11
10. Garantie ............................................................................ Page 11
1. Wine Care ........................................................................... Page 13
2. Principles of cellar air-conditioning ...................................................... Page 13
3. Characteristics ........................................................................ Page 14
3.1 Capacity ..................................................................... Page 14
3.2 Temperature regulation ........................................................ Page 14
3.3 Humidity regulation ........................................................... Page 15
3.4 Defrosting ................................................................... Page 15
3.5 Vibration elimination .......................................................... Page 15
3.6 Security ..................................................................... Page 15
4. Electronic control panel ................................................................ Page 15
5. Positioning the WINEMASTER ......................................................... Page 16
6. Creating a new cellar .................................................................. Page 16
6.1 Location ..................................................................... Page 16
6.2 Insulation .................................................................... Page 16
6.3 Characteristics of insulation .................................................... Page 17
6.4 Insulation of the wall and the ceiling ............................................. Page 17
6.5 Insulation of the floor .......................................................... Page 18
6.6 The door ..................................................................... Page 18
7. Wall installation ....................................................................... Page 19
8. Connection ........................................................................... Page 19
9. Care in use ........................................................................... Page 19
10. Warranty ............................................................................ Page 20
1. Grundsätzliches zum einkellern von Weinen .............................................. Page 21
2. Klimatisierung des Weinkellers ......................................................... Page 21
3. Technische Werte ..................................................................... Page 22
3.1. Leistungsfähigkeit und Kellergröße ............................................ Page 22
3.2 Regulierung der Temperatur ..................................................Page 22
3.3. Regulierung der Luftfeuchtigkeit ............................................... Page 23
3.4. Abtauen .................................................................... Page 23
3.5. Anti-Vibrationssystem ........................................................ Page 23
3.6. Sicherheit ................................................................... Page 23
4. Bedienfeld der Weinklimaanlage ........................................................ Page 24
5. Richtige Plazierung der Weinklimaanlage ................................................ Page 24
6. Bau des Weinkellers ................................................................... Page 25
6.1. Lagerraum .................................................................. Page 25
6.2. Dämmung .................................................................. Page 25
6.3. Eigenschaften der Dämmstoffe ................................................ Page 26
6.4. Dämmung der Wände und der Decke .......................................... Page 26
6.5. Dämmung des Fußbodens .................................................... Page 27
6.6. Kellertür .................................................................... Page 27
7. Einbau des Geräts .................................................................... Page 28
8. Inbetriebnahme ....................................................................... Page 29
9. Wartung des Geräts ................................................................... Page 29
10. Garantie ............................................................................ Page 30
GUIDE D'UTILISATION WINEMASTER C50S (SR) MAI 2003
Page 2
FTable des matières
GB Contents
DInhaltsverzeichnis
1. LA CONSERVATION DU VIN
Le vin doit avoir une place bien à lui.
Sa conservation et son vieillissement nécessitent un environnement répondant à certaines conditions.
Plus que la température elle-même, c'est la stabilité de la température de la cave qui est importante pour une
bonne conservation du vin.
La température idéale de la cave est de 12 degrés environ. Au-dessus de vingt-cinq degrés, les vins blancs jeunes
risquent une fermentation secondaire. Au contraire, pour certains vins rouges, leur vieillissement se trouvera accéléré.
Les tuyaux de chauffage central et la proximité d'une chaudière sont les grands ennemis du vin.
Une bonne cave ne doit être ni trop sèche, ni trop humide.
L'action d'un air sec est insidieuse : elle dessèche les bouchons et provoque une importante évaporation du vin à
travers les bouchons et rend la bouteille "couleuse".
Un excès d'humidité favorisera le développement de moisissures sur les fûts et les bouchons.
L'hygrométrie idéale est d'environ 70 %, elle peut s'élever sans dommage pour le vin jusqu'à 90 %.
La cave doit être close, sans vibration. Les étagères ou les rayonnages sont isolés de toute source de vibration, ils
reposent sur le sol plutôt que fixés à une paroi, plus sensible aux vibrations.
Le vieillissement du vin se fait à l'abri de la lumière. La cave doit donc être sombre et la durée d'éclairage limitée
au strict nécessaire.
Ces conditions étant requises, le vin se gardera longtemps. La cave lui apportera une bonne maturation et un
vieillissement optimal.
Le vin n'est pas aussi fragile qu'on le croit souvent, il doit essentiellement être protégé de ses principaux
ennemis: les écarts brusques de température, la lumière, ... et ceux qui en abusent!
2. PRINCIPE DE CLIMATISATION DE CAVE
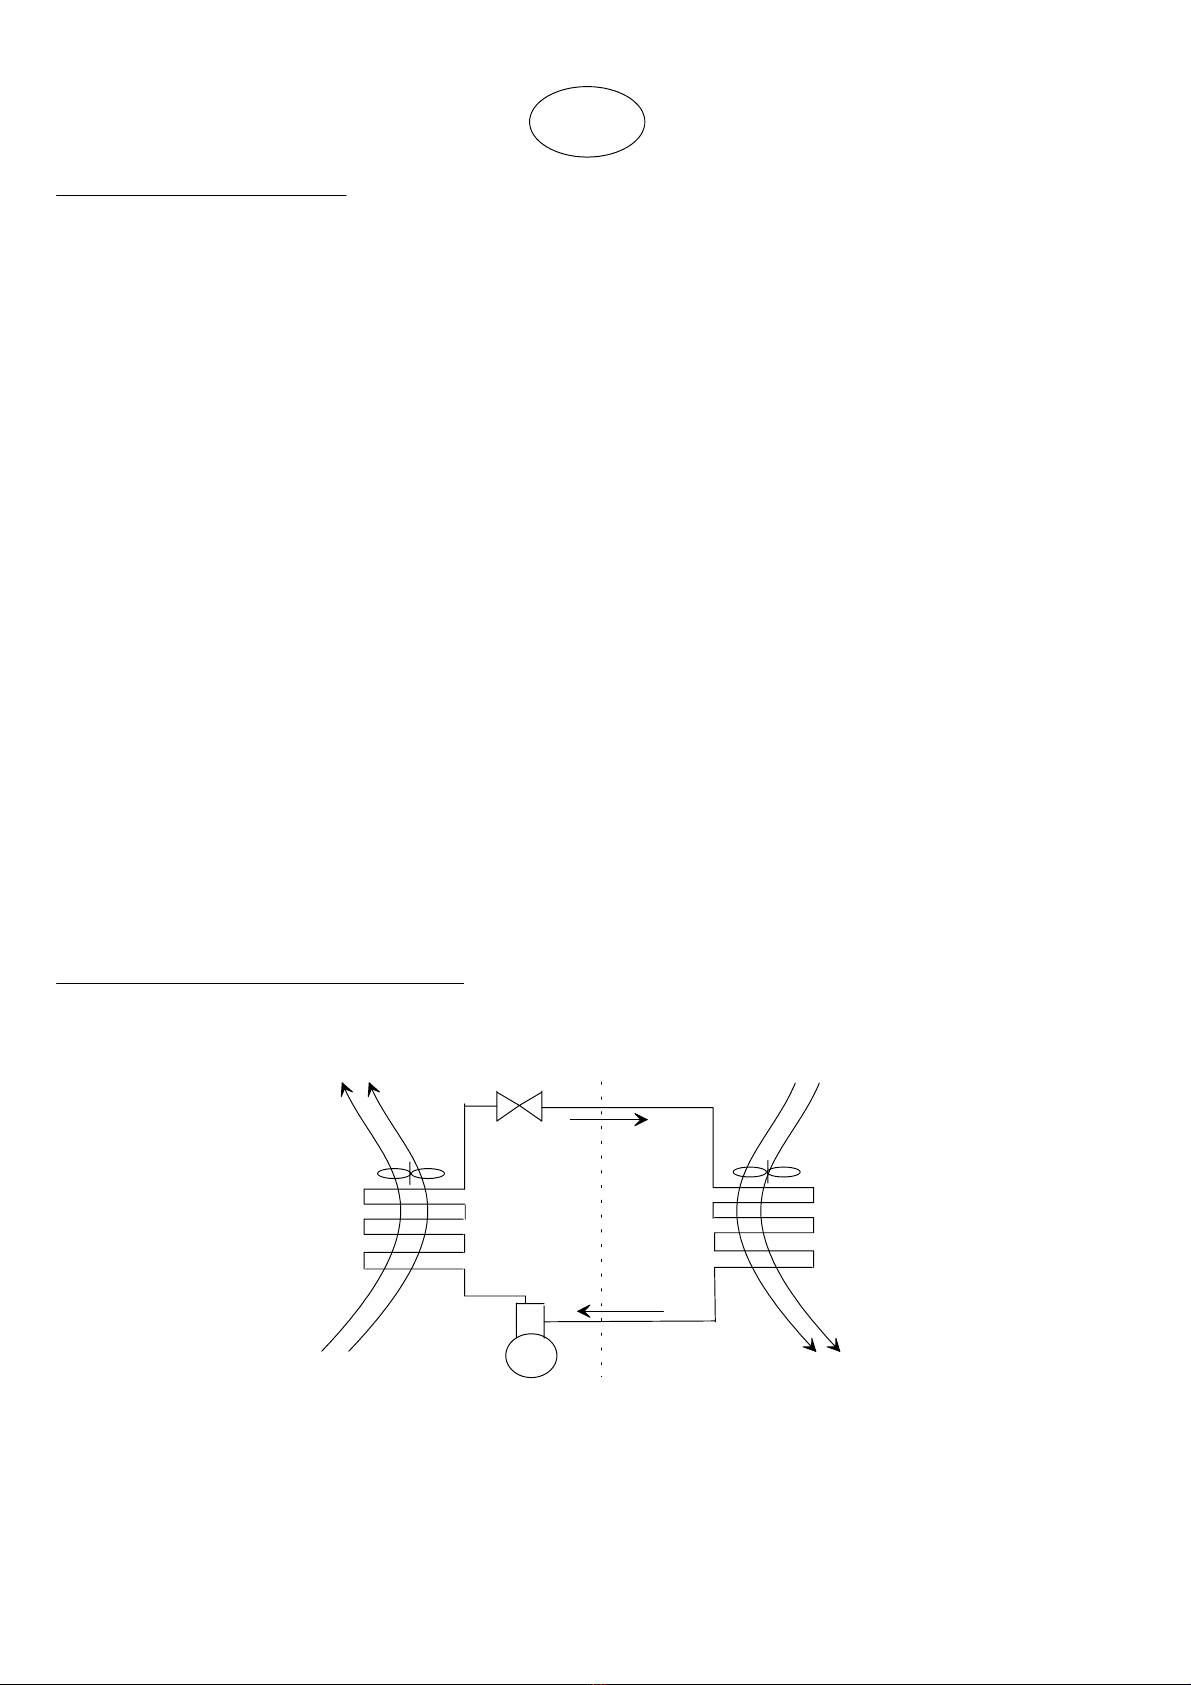
Le WINEMASTER est un groupe frigorifique de type "NO FROST" ou "FROID VENTILÉ".
GUIDE D'UTILISATION WINEMASTER C50S (SR) MAI 2003
Page 3
EXTERIEUR INTERIEUR de la cave
détendeur
Ventilateur
Ventilateur
EVAPORATEUR
CONDENSEUR
COMPRESSEUR
air chaud
air frais
F
LE FROID VENTILÉ OU "NO FROST"
Il consiste à faire circuler l'air
L'air est ensuite aspiré vers l'évaporateur sur lequel il se refroidit à nouveau et dépose une
partie de l'humidité qu'il contient avant de recommencer son cycle.
Les avantages du froid ventilé :
-pas de formation de givre ailleurs que sur l'évaporateur.
-dégivrage automatique, d'où un rendement frigorifique maximal.
- répartition du froid améliorée par le mouvement d'air continu, pas de stratification de l'air.
- la circulation de l'air permet un retour rapide à la température présélectionnée.
Le groupe WINEMASTER refroidit l'air à l'intérieur de la Cave.
Il est également équipé d'un réchauffeur
Un thermostat électronique commande le fonctionnement du groupe et maintient les liquides à la température choisie.
Le tableau de contrôle, très complet, visualise en permanence le fonctionnement de l'appareil.
3. CARACTÉRISTIQUES
3.1. CAPACITÉ
Le groupe WINEMASTER permet de maintenir la température idéale à la conservation du vin, dans les
volumes différents selon la qualité d'isolation de la cave (maximum 50 m3pour le WINE C50S).
Le tableau choix de l'isolation vous permet de choisir l'isolation qui fera du local choisi une cave idéale.
Un fonctionnement correct du WINEMASTER implique le respect de ces volumes (voir § 6.2).
GUIDE D'UTILISATION WINEMASTER C50S (SR) MAI 2003
Page 4
Tube fluorescent et interrupteur intégré à l’appareil.
Eclairage
900 W
Puissance électrique
230-240 V - 50 Hz - Avec prise de terre (livré avec câble de 1 m)
Alimentation électrique
1200 W à 15°C
Puissance frigorifique
35°C
Température extérieure maxi.
préréglé à 12°C ajustable entre 2 et 20°C
Réglage de la température
WINE C50 S (SR)

Comment le WINEMASTER satisfait-il aux exigences de la conservation du vin ?
3.2. LA RÉGULATION DE LA TEMPÉRATURE
Le thermostat est réglable entre 2 et 20°C pour le WINE C50. Il est fortement déconseillé de modifier
fréquemment le réglage de la température.
Le thermostat maintient la température de l'air intérieur à la cave, dans une fourchette de 2°C.
Cette variation de la température de l'air entraîne une variation de celle du vin de 0,2 à 0,3°C.
Cette stabilité est due à l'inertie thermique du vin et des bouteilles.
Il faut donc différencier la température de l'air de la cave et celle des produits conservés. Le WINEMASTER
apporte à ceux-ci une parfaite stabilité thermique.
3.3. LA RÉGULATION DE L'HYGROMÉTRIE
La conception du groupe frigorifique provoque en permanence un cycle de condensation-évaporation à
l'intérieur de la cave.
L'humidité qui se condense sur l'évaporateur du groupe est recueillie dans un bac pour être évacuée à l’extérieur
de l’appareil.
Le taux d'hygrométrie de la cave est alors maintenu entre 65 et 80 % d'humidité relative. L'excès coule vers
un trop plein qu'il convient soit de plonger dans un bac rempli de gravillons dans la cave soit de raccorder à
l'extérieur vers un conduit d'évacuation.
L'hygrométrie ne peut pas être totalement stabilisée à une valeur choisie, car elle dépend de l'hygrométrie
extérieure qui varie fortement selon les régions, les saisons, le temps.
IMPORTANT : la régulation d'hygrométrie et le bon fonctionnement par le WINEMASTER nécessitent :
- l'isolation intégrale de la cave (murs, sol, plafond, porte) avec un isolant étanche.
- la continuité parfaite de l'isolation (pas d'interstices, ni de ponts thermiques).
3.4. LE DÉGIVRAGE
Il se produit automatiquement par arrêt de compresseur 7 minutes par heure.
3.5. L'ÉLIMINATION DES VIBRATIONS
Les vibrations du compresseur sont absorbées à plusieurs niveaux :
- le compresseur repose sur des blocs souples en caoutchouc (Silentblocs),
- les éléments supportant les moteurs et les tubulures sont montés sur des silentblocs
- le WINEMASTER repose sur son cadre par l'intermédiaire de 2 silentblocs.
- la fixation du climatiseur au cadre bois se fait au travers de silentblocs
Si la cave est constituée d'une ossature en bois, il est préférable de stocker les bouteilles de vin sur des étagères
reposant sur le sol de l'ESPACE CAVE.
3.6. LA SÉCURITÉ
Le compresseur est équipé d'un thermostat de sécurité qui détecte les élévations anormales de température du
compresseur. En cas de mauvaise ventilation de l’espace où le climatiseur évacue l’air chaud, l’appareil
enclenche automatiquement sa vitesse maximale. Il en est de même lorsque le climatiseur est fortement sollicité
et en cas de forte chaleur.
En phase «réchauffage», en hiver par exemple, un thermostat de sécurité coupe le chauffage en cas de
surchauffe.
GUIDE D'UTILISATION WINEMASTER C50S (SR) MAI 2003
Page 5

4. TABLEAU DE CONTROLE
Le climatiseur est équipé d’un thermostat électronique placé en façade de l'appareil et permettant à tout moment de
connaître l'état de fonctionnement du WINEMASTER depuis l'intérieur de la cave.
3
2
1
5
4
II
I
I
0
12
O
5
Le bouton IOII marche-arrêt (repère 2) permet de mettre en route le climatiseur et de sélectionner la vitesse de
ventilation dans la cave.
Le bouton IO (repère 3) lumineux vert signale la mise sous tension de l’appareil et permet d’allumer l’éclairage
intégré.
Le thermostat intégré indique en permanence la température de la cave, et les fonctions en cours. Les diodes placées
sur la gauche (repère 4) du thermostat indiquent si le climatiseur est en dégivrage , en mode chauffage ou en
production de froid .
Le thermostat est équipé d’un «joystick» sur la droite (repère 1) qui permet de changer la consigne ou d’effectuer un
dégivrage manuel par arrêt du compresseur pendant 7 minutes. Pour changer la consigne il suffit d’appuyer sur le
symbole5pendant 5 secondes. L’afficheur (repère 5) affiche alors SET. Appuyer une nouvelle fois brièvement sur le
symbole5. La température de consigne s’affiche. Pour l’augmenter, appuyer sur la flèche du haut. Pour diminuer la
consigne afficher sur la flèche du bas.
Après un changement de consigne, en raison d’un dispositif empêchant les démarrages trop fréquents, le
compresseur ne démarrera qu’après quelques minutes.
5. EMPLACEMENT DU WINEMASTER
Le WINEMASTER s'intègre à travers l'une des parois de la cave.
Il produit de l'air frais à l'intérieur de la cave et rejette de l'air chaud à l'extérieur.
10 cm minimum
WINEMASTER
plafond SCHEMA DE PRINCIPE
CAVE
LEBON FONCTIONNEMENT DU WINEMASTER IMPLIQUE LE RESPECT DES CONDITIONS SUIVANTES :
- La face "chaude" du WINEMASTER doit en principe se trouver à l'intérieur d'un local. En cas d’installation
extérieure, il doit être à l’abri, protégé des intempéries (Rayonnements directs du soleil, pluie, neige ...)
- Attention, un démarrage du compresseur à une température négative entraîne sa destruction
GUIDE D'UTILISATION WINEMASTER C50S (SR) MAI 2003
Page 6

- Le local dans lequel le WINEMASTER rejette l'air chaud doit être bien ventilé de façon que sa température ne
dépasse pas 35°C.
- Un espace d'au moins 10 cm doit subsister entre le haut du WINEMASTER et le plafond de la cave afin de
permettre le démontage du capot
- La paroi dans laquelle s'intègre l'appareil ne doit pas dépasser 30 cm d'épaisseur. Dans le cas contraire, la
paroi doit être taillée en biseau.
6. CRÉER SA CAVE
Vous avez déjà une cave, mais ses variations de température sont trop importantes.
Vous disposez d'une pièce ou d'une partie d'un local et souhaitez en faire une véritable CAVE.
La solution : Construire et isoler votre cave.
6.1. LE LOCAL
‰
Existant
Vous disposez d'une cave existante ou d'une autre pièce disponible qui n'a pas les caractéristiques d'une
véritable cave.
Il suffit alors d'en isoler les parois et d'intégrer le WINEMASTER à travers l'une d’elles.
Attention
‰
A transformer
Vous transformez une partie d'un local en cave.
Une ou plusieurs parois sont alors à construire, afin de délimiter l'espace consacré à la cave.
Plusieurs techniques sont possibles :
- Maçonnerie : Monter un mur en briques, béton cellulaire, plaques de plâtre, ou tout autre matériau
approprié, puis l'isoler de la même façon que les autres murs.
-Bois : Adosser des panneaux d'aggloméré de bois à une ossature en bois. L'isolant sera ensuite fixé à ces
panneaux.
-Panneaux sandwich isolants : Il existe des panneaux composés d'une âme isolante recouverte sur chaque
face d'un panneau de bois. Ce sont des éléments auto-porteurs qui
réalisent à la fois la paroi et l'isolation.
6.2. L'ISOLATION
Elle est déterminante pour un bon fonctionnement du WINEMASTER.
Une isolation adéquate garantit la stabilité de la température et de l'hygrométrie produites par le
WINEMASTER.
Le tableau de la page ci-après (choix du WINEMASTER et de l'isolation) permet de déterminer le type et
l'épaisseur d'isolant nécessaires, en fonction du volume extérieur de la cave et du modèle de WINEMASTER.
Continuité de l'isolation :
L'assemblage des éléments d'isolants doit être réalisé, de préférence par emboîtement des feuillures des
panneaux ou par collage des panneaux entre eux, de façon à assurer une parfaite continuité de l'isolation.
Celle-ci est très importante : elle évite les entrées parasites de chaleur et d'humidité qui nuiraient à leur
régulation.
GUIDE D'UTILISATION WINEMASTER C50S (SR) MAI 2003
Page 7

IMPORTANT
La validité de la garantie du WINEMASTER est liée au strict respect des valeurs du tableau de "Choix du
WINEMASTER et de l'isolation" pour toutes les parois de la cave y compris sol et plafond + porte ainsi qu'à
la parfaite continuité de l'isolation.
CHOIX DU WINEMASTER ET DE L'ISOLATION
30
30
40
40
40
50
50
50
60
60
60
70
70
70
80
80
80
30
40
40
40
50
50
60
60
60
70
70
80
80
90
90
90
100
50
50
60
60
70
80
80
90
90
100
110
110
120
120
130
130
150
0,94
1,08
1,21
1,35
1,48
1,62
1,75
1,88
2,02
2,15
2,29
2,42
2,56
2,69
2,82
2,96
3,23
14
16
18
20
22
24
26
28
30
32
34
36
38
40
42
46
50
WINEC50 (SR)
MOUSSE DE
POLYURÉTHANE
λ= 0.025W/m°C
POLYSTYRÈNE
EXTRUDÉ
λ= 0.030W/m°C
POLYSTYRÈNE
EXPANSÉ
λ= 0.044W/m°C
RÉSISTANCE
THERMIQUE
MINIMALE
R : m² . °C/W
VOLUME DE
LA CAVE
(m3)
EPAISSEUR MINIMALE D'ISOLANT (mm)
6.3. CARACTÉRISTIQUES DES ISOLANTS
- Conductivité thermique λ: unité W/m.°C
ƒC'est une caractéristique du matériau isolant lui-même. Elle qualifie l'aptitude du matériau à conduire la
- Résistance thermique R : unité m².C/W
ƒC'est la caractéristique du panneau isolant. Elle dépend du coefficient et de l'épaisseur d'isolant.
R= épaisseur en mètres
λ
Elle qualifie l'aptitude d'une épaisseur d'isolant à freiner la transmission de chaleur.
Plus le coefficient R est grand, meilleure est l'isolation.
6.4. ISOLATION DES MURS ET DU PLAFOND
Choix des panneaux isolants Les fabricants proposent leurs panneaux isolants sous plusieurs formes :
- les isolants seuls
- les "complexes" : l'isolant est revêtu d'un parement (plâtre, minéral...),
- les sandwiches :
Le revêtement des panneaux est important : il protège l'isolant des chocs et garantit donc sa tenue dans
le temps.
Ne pas utiliser d'isolants en fibres minérales.
Protection contre les rongeurs Certains matériaux isolants sont détériorés par les rongeurs (souris, rats,
...). Il est donc nécessaire de vérifier que les parois de la cave ne présentent
pas d'orifices permettant aux rongeurs d'atteindre l'isolant.
Ces isolants seront revêtus, sur la face interne à la cave, d'un parement de protection.
Le polyuréthane est un isolant qui, du fait de sa composition chimique, n'est pas attaqué par les rongeurs.
GUIDE D'UTILISATION WINEMASTER C50S (SR) MAI 2003
Page 8

6.5. ISOLATION DU PLANCHER
Le sol de la cave doit pouvoir supporter les étagères et le vin entreposé.
Il est donc nécessaire, pour cette partie, de choisir un isolant présentant une résistance à la compression
suffisante.
Les fabricants indiquent dans leurs documentations les isolants aptes, ou destinés spécifiquement, à l'isolation
des sols.
La résistance à la perforation (pieds d'étagères en particulier) est obtenue :
- en utilisant des panneaux isolants "complexes" revêtus, sur leur face supérieure, d'un panneau
suffisamment résistant.
- en doublant l'isolant d'un panneau d'aggloméré de bois (épaisseur 15 mm environ), ou de tout autre
revêtement adapté (chape et dalle par exemple).
6.6. LA PORTE (OPTION)
Elle participe à la continuité de l'isolation.
Deux solutions sont possibles :
-Isoler la porte existante avec un isolant du même type que pour les parois de la cave.
Intercaler un joint d'étanchéité (en mousse par exemple) entre le battant et le dormant de la porte, sur toute sa
périphérie.
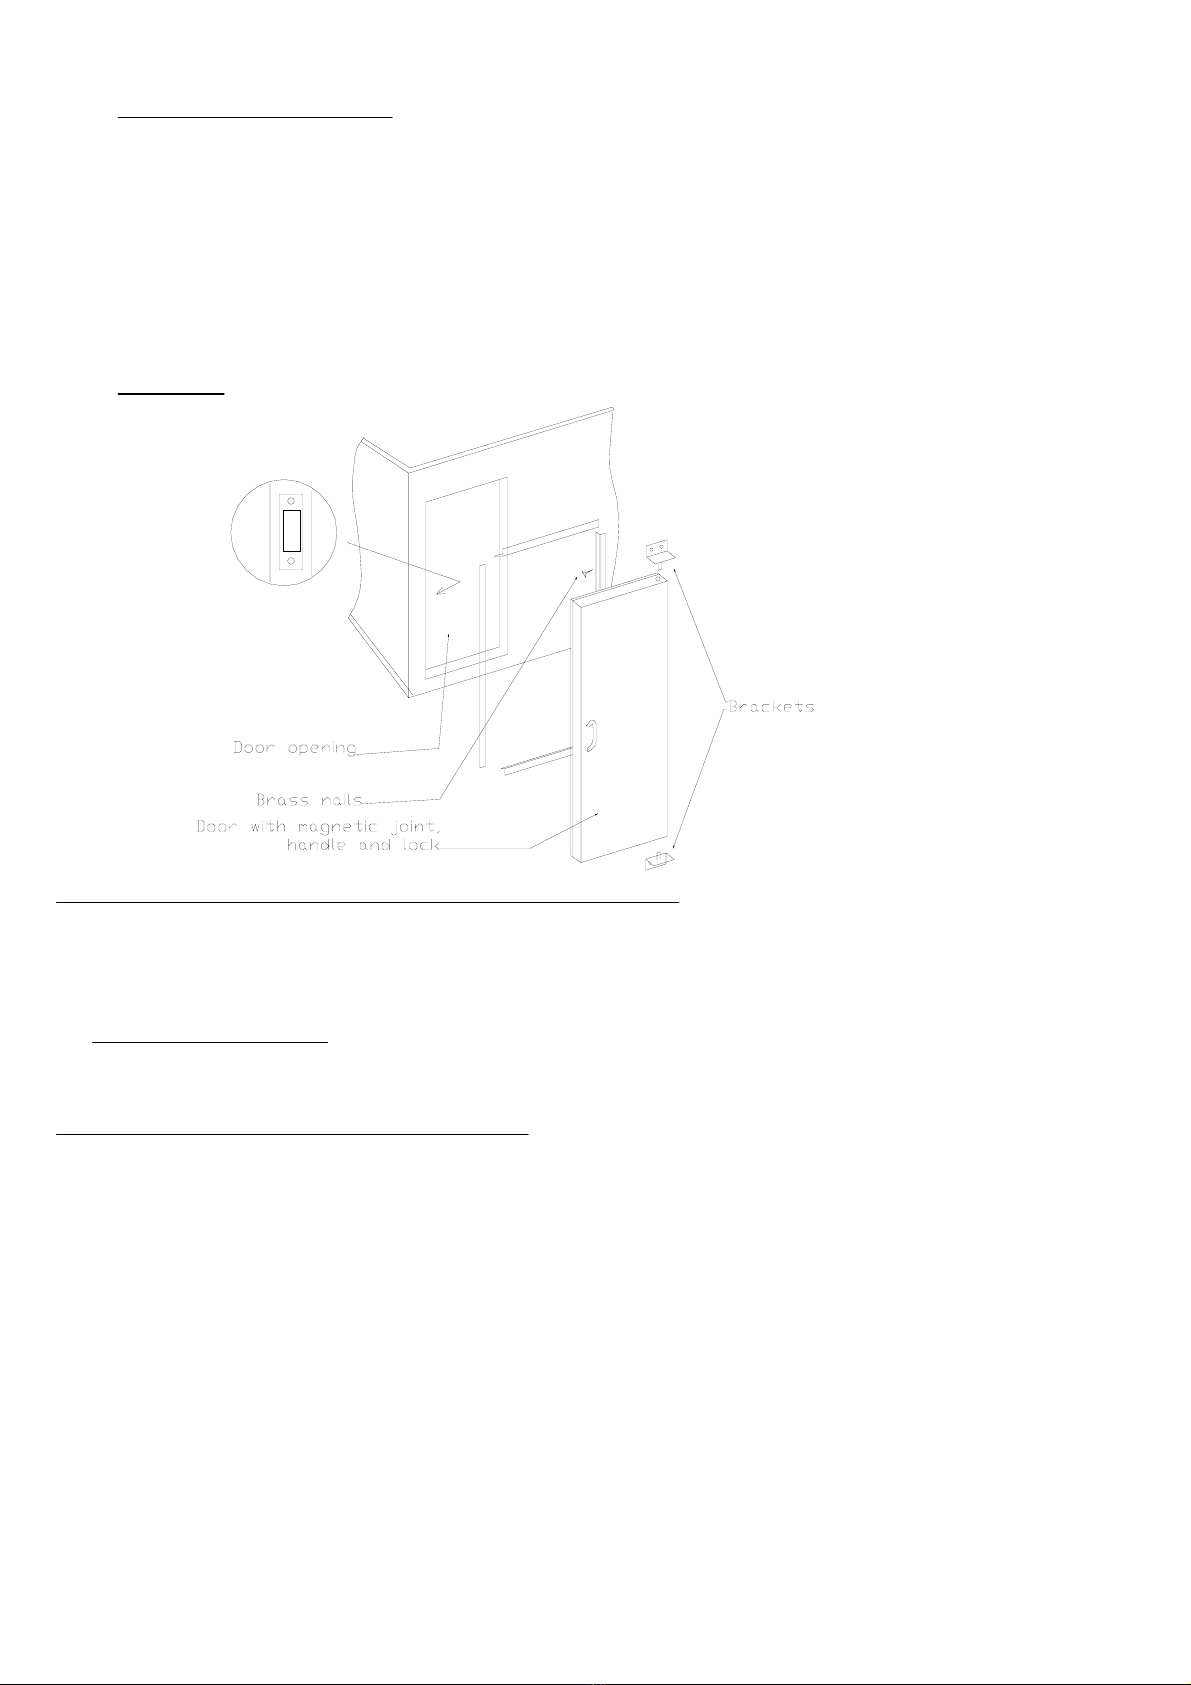
- Utiliser une PORTE ISOTHERME FONDIS, garnie de mousse polyuréthane. Elle comporte, sur toute sa
Dimensions extérieures 1 900 mm x 630 mm
Baie 1 860 mm x 590 mm
Les accessoires suivants sont livrés avec la porte :
- 4 cornières en acier à fixer au chambranle par des clous en cuivre,
- 2 équerres avec gonds fixées par des vis à bois,
-1 gâche.
GUIDE D'UTILISATION WINEMASTER C50S (SR) MAI 2003
Page 9

7. LE MONTAGE DU WINEMASTER
Pour monter le climatiseur, il est indispensable de démonter le grand capot. Oter les 3 vis du dessus et les 2 vis du
dessous.
PROCÉDURE DE MONTAGE :
- fixer le cadre en bois dans la paroi.
Le joint entre le cadre en bois et l'isolant doit être comblé (par de la mousse polyuréthane, par exemple), de façon à
assurer la continuité de l'isolation. ATTENTION, NE PAS METTRE DE MOUSSE DE POLYURETHANE ENTRE
L’APPAREIL ET LE CADRE BOIS, L’APPAREIL DEVANT RESTER DEMONTABLE.
Important le cadre bois doit être à fleur du mur coté chaud ou dépasser pour que le climatiseur ne vienne pas en
contact avec la paroi:
COTE FROID
COTE CHAUD
COTE FROID
COTE CHAUD
COTE CHAUD
COTE FROID
MAUVAISBONBON
CADRE BOIS
CADRE BOIS
CADRE BOIS
Veillez à centrer correctement le climatiseur dans le cadre bois. Un contact entre le tôle et l’encadrement provoquerait
des vibrations qui pourraient se répercuter dans l’habitation.
- fixer le WINEMASTER avec les 3 vis à bois et les rondelles.
-Sortir du climatiseur par le trou rond à gauche du compresseur, la prise de courant et le tuyau d’écoulement d’eau.
- Remonter le capot en ABS.
GUIDE D'UTILISATION WINEMASTER C50S (SR) MAI 2003
Page 10
2 vis de fixation capot
3 Vis de fixation capot
3 vis à bois et 3 rondelles
ISOLANT
CADRE BOIS
(Dimensions intérieures: L500 x H330 mm)
(Dimensions extérieures: L544 x H 374 mm)
8. MISE EN SERVICE
- Raccorder la fiche
- Sortir le tuyau d’écoulement. Celui-ci doit être droit et son extrémité ne doit pas plonger dans l’eau
- Commuter le bouton IOII (2) sur la vitesse désirée
- Le thermostat indique alors la température de la cave. Pour la modifier, se reporter au point 4 du tableau de contrôle
- Attendre quelques minutes jusqu’à ce que le compresseur démarre.
Lors de la mise en service ou après tout arrêt, le compresseur ne démarre que après quelques minutes. Lors de la
première mise en service, et pour des volumes de cave important, il est conseillé d’utiliser la position «booster» de la
ventilation intérieure de la cave. Après quelques heures, vous pourrez repasser en vitesse de ventilation normale en
plaçant le bouton repère 2 sur la position I.
9. ENTRETIEN
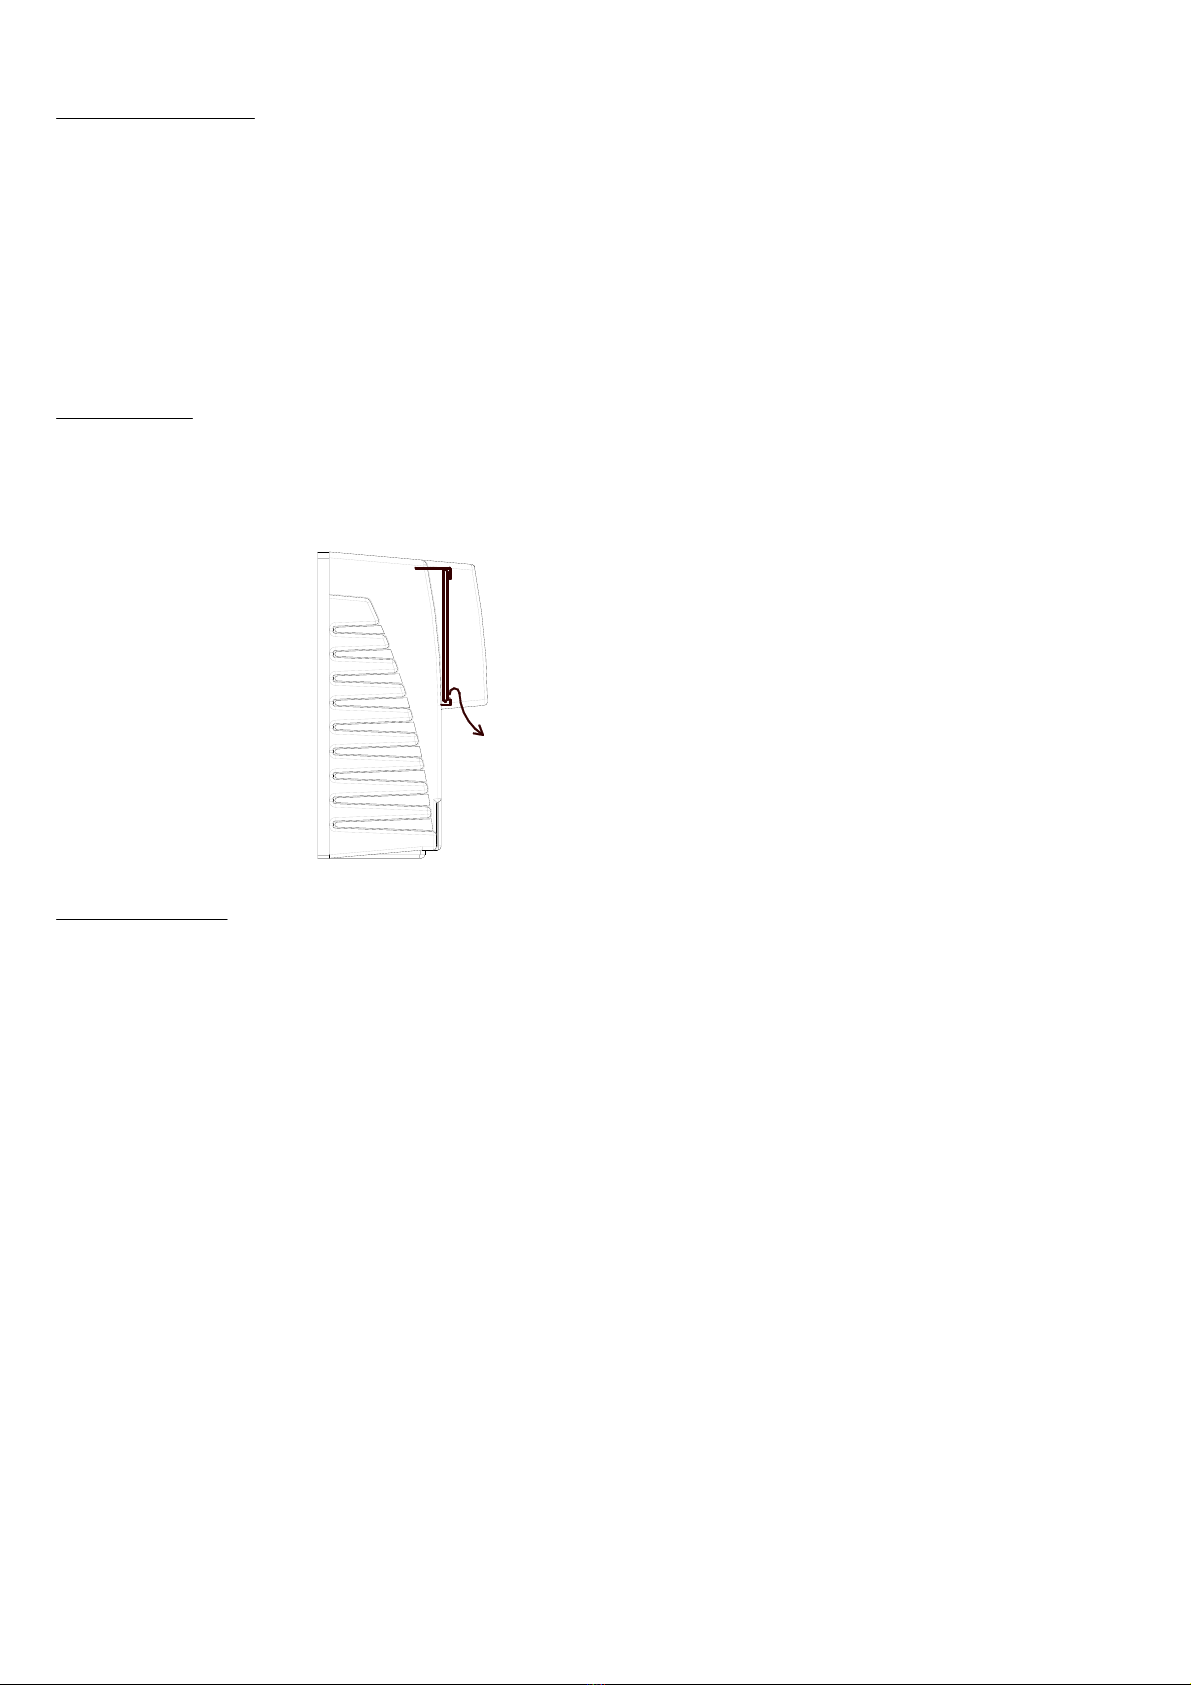
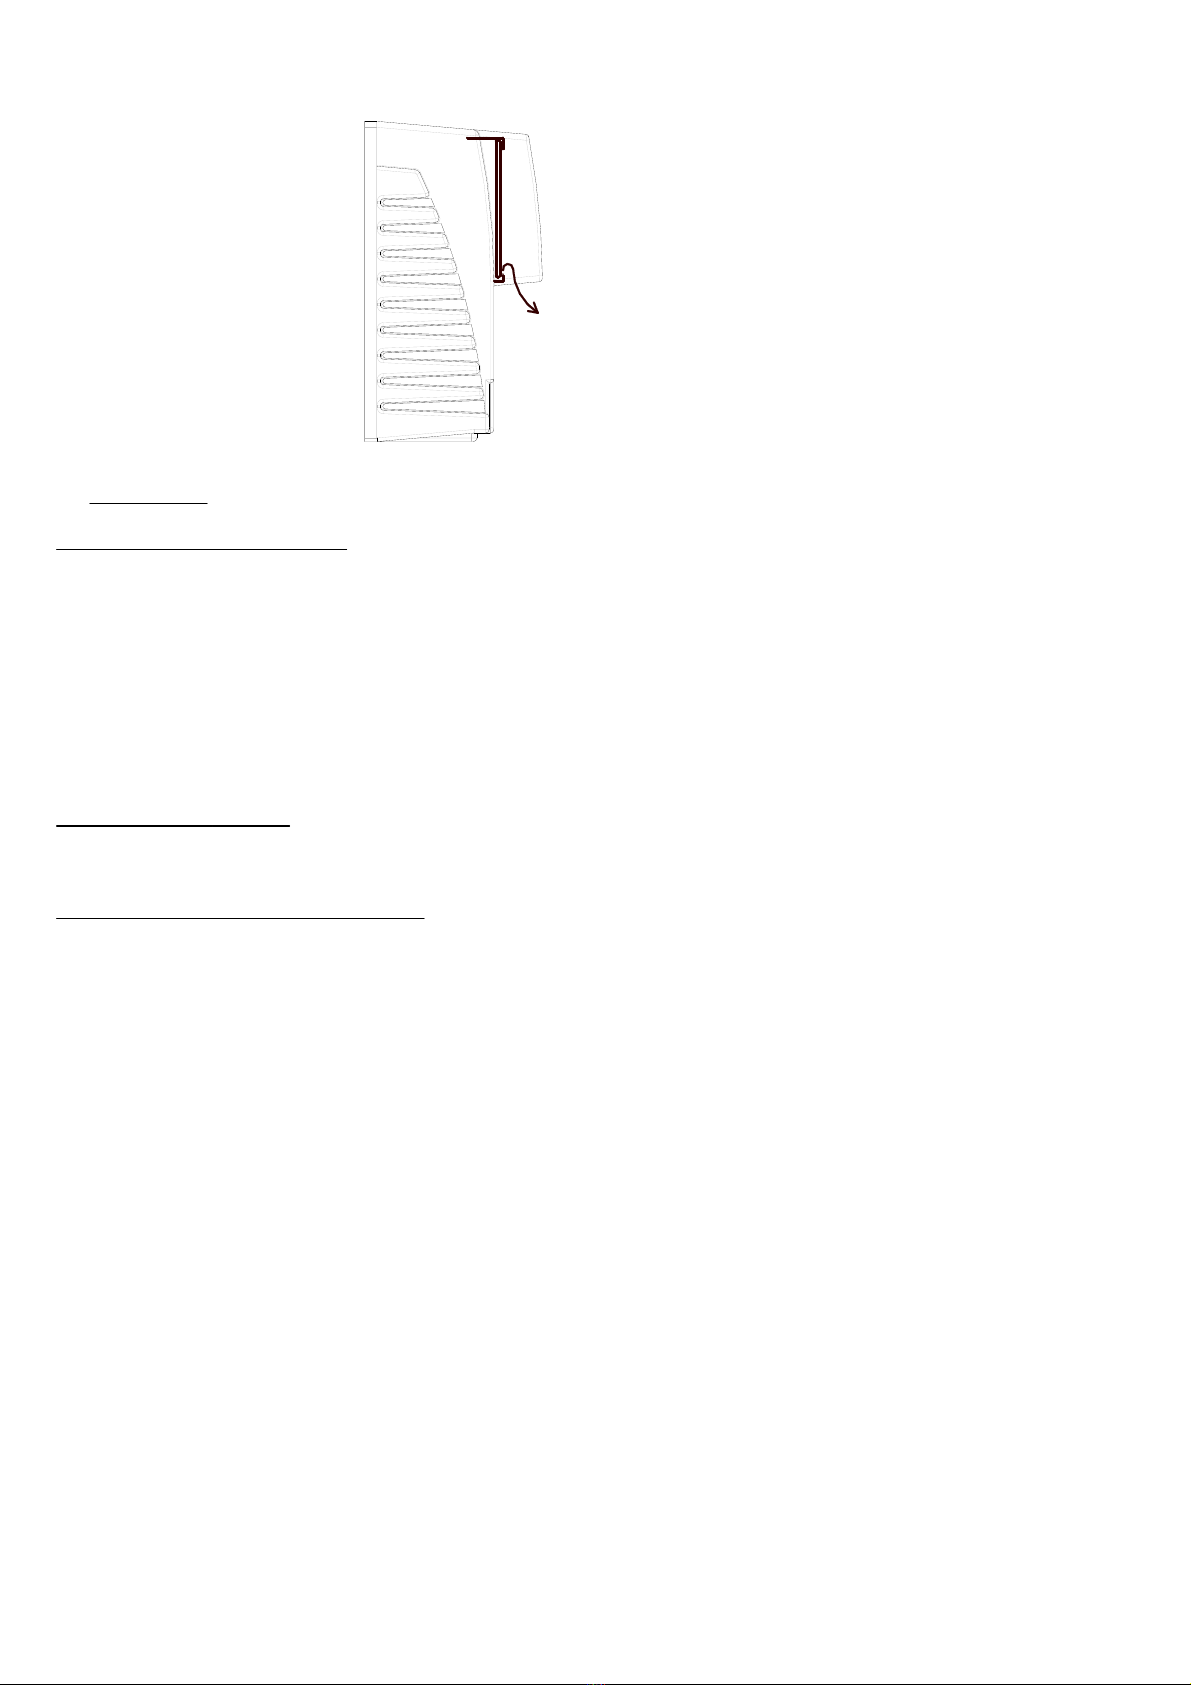
Il est indispensable de remplacer le filtre à poussière dès que nécessaire et au moins une fois par an. Si ce dernier
est encrassé, le climatiseur fonctionnera exclusivement en vitesse de ventilation maximale. Pour remplacer le filtre,
utiliser un tournevis plat pour le sortir de son logement (clips). Pour insérer le nouveau filtre, il suffit de le glisser dans
la rainure supérieure et de le coincer dans le clips du bas.
10. LA GARANTIE
GARANTIE LÉGALE
La garantie contractuelle n'est pas exclusive, du bénéfice au profit de l'acheteur, de la garantie légale pour défauts et
vices cachés qui s'applique dans les conditions des articles 1641 et suivants du code civil.
GARANTIE CONTRACTUELLE DE 2 ANS
Le climatiseur est garanti 2 ans contre tout défaut de fabrication.
Durant la période de garantie contractuelle, FONDIS remplacera toute pièce reconnue défectueuse.
En cas de panne électrique, FONDIS remplacera toute pièce reconnue défectueuse suite à l’intervention du
revendeur qualifié ou de son intervenant.
En cas de panne frigorifique, FONDIS pourra demander le retour en atelier pour réparation. Le matériel sera tenu
emballé à disposition du transporteur de FONDIS pour enlèvement.
Les interventions devront être réalisées après accords écrit du service après-vente FONDIS.
CONDITIONS D'APPLICATION DE LA GARANTIE
La garantie contractuelle s'applique à tous les appareils installés et utilisés conformément au "Guide d'installation et
d'utilisation". L'application de la garantie contractuelle est conditionnée par le retour du bon de garantie situé à la fin
du livret dans les 15 jours suivant la date d'achat.
GUIDE D'UTILISATION WINEMASTER C50S (SR) MAI 2003
Page 11

EXCLUSIONS ET LIMITES DE GARANTIE
La garantie est refusée dans les cas suivants :
- L'isolation de la cave et l’installation n'ont pas été effectuées conformément au présent guide.
- Les avaries sont dues à une négligence, un mauvais entretien, une utilisation défectueuse ou mal adaptée du
WINEMASTER.
- Les échanges de pièces ou leur remise en état au titre de la garantie ne peuvent avoir pour effet de prolonger
celle-ci.
FONDIS SA ne pourrait être en aucun cas tenu pour responsable des conséquences directes ou indirectes liées au
non fonctionnement du climatiseur. La garantie se limite au seul produit fourni par FONDIS S.A.
GUIDE D'UTILISATION WINEMASTER C50S (SR) MAI 2003
Page 12

1. WINE CARE
Ideally, wine should be stored in an environment that is able to provide certain basic conditions: a constant ideal
temperature and humidity level, minimal light, and no vibration. Within certain limits, the stability of the temperature in
the cellar is even more important for good wine preservation than the actual temperature itself. Many factors govern
the conditions in a cellar. Depending the season, the temperature may vary between 11 and 18 °C. At temperatures
above 25 °C, the young white wines may have a secondary fermentation while some red wines may have their ageing
accelerated.
Central heating pipes or boilers nearby can be damaging to wine conservation. An ideal cellar must neither be too dry
nor too wet for the following reasons: Dry air can be insidious; it dries the corks and can cause a significant
evaporation of the wine. Furthermore, a humidity level that is too high will promote the growth of mildew on the labels
and corks. Ideal humidity is approximately 70% but it can safely rise to 90% without damaging the wine.
The cellar should be completely sheltered from vibration. This includes all shelving units. Shelves should be
free-standing on the floor rather than attached to a wall, since the walls are more sensitive to vibration.
Wine ages rapidly when exposed to light. It is for this reason that the cellar should remain dark with only limited and
very dim lighting periods.
Wine is not as fragile as we often believe it to be, but it is essential that it is sheltered from its principal enemies:
sudden temperature or humidity changes, vibration, and light. With the proper conditions, you will be able to conserve
your fine wines for a long time while allowing for proper maturation and optimal ageing.
2. PRINCIPLES OF CELLAR AIR-CONDITIONING
The WINEMASTER C50 (SR) is designed upon a relatively new basic refrigeration concept known as “No Frost” or
“Ventilated Cold”. WINEMASTER, a product created in France, uses the latest most innovative technologies to
provide a product which is reliable, practical, and easy to use.
EXTERIOR INTERIOR
pressure reducer
Ventilator
Ventilator
EVAPORATOR
CONDENSOR
COMPRESSOR
hot air
cold air
“Ventilated Cold” or “No Frost"
Air circulates around the wine before passing through the evaporator, where it cools again and loses its moisture
thereby providing humidity before starting the cycle again.
The advantages of “ventilated cold”
•No frost other than on the evaporator
•Automatic defrosting and maximized refrigeration efficiency
•Cold distribution improved by a permanent air circulation (without air stratification)
Winemaster C50S(SR) USER MANUAL May 2003
Page 13
GB

•The circulation of air allows you to maintain the pre-selected temperature throughout the cellar
WINEMASTER units primarily cool the air inside the cellar but they are also equipped with a heater which maintains
an ideal temperature within the cellar even in the winter months.
An integrated electronic thermostat pilots the functioning of the unit and maintains the specific temperature selected
while the electronic control panel displays the current mode of operation.
3. WINE C50-S / (SR) CHARACTERISTICS
Flourescent lamp with on/off switch on the unitLighting
900 WElectric power
230 -240 V - 50 Hz with ground wire connection
(1
meter
of
cable)
Power Supply
1200 W at 15 °CRefrigeration Power
35 °CMaximum exterior temperature
Preset at 12 °C with possibility of adjusting the temperature
between
2 and 20
°
C
Temperature Regulation
Cellars of volumes up to 50 m³Capacity
3.1. CAPACITY
Subject to adequate insulation, the WINEMASTER will maintain an ideal temperature in cellars of up to a
maximum volume of 50 m³.
The chart on page 5 shows which types of insulation will provide the level of insulation necessary for your cellar.
In order for the WINEMASTER to function efficiently, the cellar must be thoroughly insulated and the cellar
volume must not be exceeded.
3.2 TEMPERATURE REGULATION
The thermostat is preset at 12 °C and is adjustable between 2 and 20 °C, but it is strongly advised that the
temperature is not adjusted frequently.
The thermostat will maintain the temperature inside cellar within ±2 °C accuracy. The thermal inertia of the wine
and the glass is such that within this temperature range the temperature of the wine will only fluctuate between
0.2° and 0.3° C.
It is important to appreciate that there is a difference between the air temperature inside the cellar and the actual
temperature of the wine. The WINEMASTER creates perfect thermal stability.
3.3 HUMIDITY REGULATION
The refrigeration unit creates a constant cycle of condensation-evaporation within the cellar.
The humidity condensing on the evaporator is collected by the WINEMASTER. Then, some of this water is
evaporated, thus stabilising the cellar humidity between 65% and 80%. The excess water is then routed into a
drainage pipe which must be set into a container inside or outside of the cellar.
It is important to understand that the humidity cannot be completely stabilized, because it depends on exterior
conditions that vary widely according to the region, the season, and the weather. In particular cases of extremely
dry air, it may not be possible to sufficiently humidify the air.
IMPORTANT: In order for accurate humidity regulation and efficient functioning of the WINEMASTER unit, you
will need:
Complete insulation of the cellar (walls, floor, ceiling, door) with an airtight seal.
Perfect continuity of the insulation (no gaps).
Winemaster C50S(SR) USER MANUAL May 2003
Page 14

3.4. DEFROSTING The WINEMASTER C50-S/(SR) defrosts automatically by shutting down the compressor for 7
minutes each hour.
3.5. VIBRATION ELIMINATION
The vibration of the compressor is controlled in two ways:
The compressor sits on flexible rubber blocks (silent blocks).
The Winemaster is surrounded in its frame by these silent blocks.
Please note: In wooden frame cellars it is very important to store the wine bottles on shelves standing on the
floor of the cellar, NOT on shelves fixed to the walls.
3.6. SECURITY
The compressor is equipped with a safety thermostat which detects any irregular increases in the compressor
temperature. In the case of a dangerous temperature, the compressor automatically shuts down. In the event of
poor ventilation where the air inside the cellar becomes too warm, the C50-S automatically speeds up the
ventilation and heat exchange system to obtain the desired temperature and air circulation.
4. ELECTRONIC CONTROL PANEL
The WINEMASTER is equipped with an electronic thermostat placed on the front of the unit which permits you to view
the mode of operation inside the cellar at any time from the exterior of the cellar. In addition, the thermostat continues
to display the precise temperature inside of the cellar.
3
2
1
5
4
II
I
I
0
12
O
5
The on/off button IOII (reference 2 in diagram) allows you to start the air conditioner and select the level of
ventilation within the cellar.
The button IO (reference 3) when lit up in green indicates the electricity connection of the unit and allows you to
illuminate the integrated flourescent lamp.
The electronic thermostat precisely displays the temperature as well as the current mode of operation within the
cellar. The symbols on the upper left corner of the control panel (reference 4) indicate the WINEMASTER's
current mode of operation: defrost , heating , or cooling .
The thermostat is equipped with a keypad on upper the right side (reference 1) which allows you to change the
temperature setting or manully activate the defrost mode. In order to modify the temperature setting, press the left
arrow button 5for 5 seconds. The screen (reference 5) should then display the word SET. Again, press briefly on
the arrow button 5. The temperature is then displayed. To increase the temperature setting, press the upward
arrow button . To decrease the temperature setting, press the downward arrow button .
After the modification of the temperature settings, there is an automatic delay before the compressor restarts
itself. This is an integrated trouble shooting system which prevents frequent stopping and starting to prolong the
life of the compressor.
Winemaster C50S(SR) USER MANUAL May 2003
Page 15

5. POSITIONING OF THE WINEMASTER
The WINEMASTER should be installed into a wall with one side of the unit facing the interior of the cellar and the
other side facing the exterior of the cellar on the other side of the wall. This means that the exterior side of the unit
must be accessible from outside of the cellar - see item 6 "WINEMASTER Wall Installation." This allows for the
production of cool air within the cellar by keeping all warm components on the exterior side of the wall.
10 cm minimum
WINEMASTER
ceiling
CELLAR
The conditions for efficient functioning of the WINEMASTER:
The "warm" side of the WINEMASTER should theoretically face the interior of another room inside a home. In
particular cases where the "warm" side of the unit is on the exterior of a home, it must be sheltered from direct
rays of the sun, rain, snow, etc.
Please note: turning on the compressor in temperatures of below 0 °C can cause permanent damage.
The room, into which the WINEMASTER transfers warm air, must be well ventilated so that its temperature
does not exceed 30 °C.
There must be a space of at least 10 cm (4 in) between the top of the WINEMASTER and the ceiling of the
cellar to facilitate the removal of the cover if needed..
The wall, into which the WineMaster is installed, should not exceed a thickness of 30 cm. Otherwise, the wall
must be bevel-edged (see diagram in item 7 "Installation")
6. CREATING A CELLAR
6.1. THE LOCATION
For an Existing Cellar
If you have an existing cellar or another available room that does not have the characteristics of a real cellar, you
must well insulate the room before installing the WINEMASTER into one of the walls.
Note: Do not use fibreglass or rock wool insulation.
To Create a New Cellar
In order to transform an unused space into a genuine wine cellar it is necessary to measure the area, mark the
places where you will need to build walls and then implement one of the following building techniques:
Masonry: build a wall of brick, cement blocks, plaster casts, or other appropriate materials. Then completely
insulate it in the same manner as any other wall and seal all cracks.
Wood: build a wooden frame and then attach wooden panels to create walls. Then attach insulation materials
to the wooden panels and seal all cracks.
"Sandwich" panels: purchase pre-insulated double-layer panels which come equipped with an internal layer
of insulation. In this case you can accomplish the creation of the walls and the insulation in one step.
6.2. INSULATION
Insulation is essential for efficient functioning of the WINEMASTER. A good insulation permits the
WINEMASTER to maintain a stable temperature and humidity level.
The chart on the next page will allow you to determine the type and the thickness of insulation needed in relation
to the exterior volume of the cellar.
Winemaster C50S(SR) USER MANUAL May 2003
Page 16

Complete Insulation
The insulating elements should preferably be “tongue and groove” type panels or panels fused together to ensure
perfect continuity of the insulation. This is necessary to avoid the intrusion of heat and humidity which can alter
the functioning of the WINEMASTER.
IMPORTANT: The warranty is only valid if the insulation is in compliance with the "Minimum Thickness
Requirements" for all walls, doors, floors, and ceilings with perfect continuity of insulation.
INSULATION - MINIMUM THICKNESS REQUIREMENTS (mm)
Minimum Thickness Requirements
30
30
40
40
40
50
50
50
60
60
60
70
70
70
80
80
80
30
40
40
40
50
50
60
60
60
70
70
80
80
90
90
90
100
50
50
60
60
70
80
80
90
90
100
110
110
120
120
130
130
150
0.94
1.08
1.21
1.35
1.48
1.62
1.75
1.88
2.02
2.15
2.29
2.42
2.56
2.69
2.82
2.96
3.23
14
16
18
20
22
24
26
28
30
32
34
36
38
40
42
46
50
Polyurethane
λ= 0.025W/m°C
Polystyrene extruded
λ= 0.030W/m°C
Polystyrene
expanded
λ= 0.044W/m°C
Minimum thermal
strength R = m².
°C/W
Volume of the Cellar
(m3)
6.3. CHARACTERISTICS OF THE INSULATORS
•Thermal conductivity: λUnit: W/m.°C
- This is a characteristic of the insulating material itself. It qualifies the capacity of a material to
conduct heat. The smaller the coefficient, the better the insulator.
•Thermal strength: R Unit:m². C/W
- This is a characteristic of the insulated panel. It depends on the thickness coefficient of the insulator.
R= thickness in meters
λ
The R value qualifies the ability of a material's thickness to stop the transmission of heat. The greater the
coefficient, the better the insulator.
6.4. INSULATION OF THE WALLS AND THE CEILING
When deciding on which type of insulation to use, there are three possibilities:
Traditional insulation
“Complex”insulation: insulation is covered with a facing (plaster, ore…etc.)
"Sandwich" panels: insulation is covered on each side with a wooden panel or plasterboard.
The covering of the panels is important; it protects the insulation against damage and guarantees its longevity.
Please note: Do not use insulators composed of mineral fibres.
Protection from rodents:
Check whether the cellar shows the presence of mice or rats. Some insulating materials are damaged by
rodents. If necessary, cover the insulation with a protective lining on the interior of the cellar. Polyurethane is an
insulator that, due to its chemical composition, is not attacked by the rodents.
Winemaster C50S(SR) USER MANUAL May 2003
Page 17
6.5. INSULATION OF THE FLOOR
The floor of the cellar must be able to support the shelves and the stored wine Thus it is necessary to choose an
insulation with an adequate compression strength. The load capacity of each insulating material should be noted
on the manufacturer's label. Another possibility is to cover the insulation with an insulating material designed
specifically for floors such as quality chipboard.
Improve the load capacity of the insulation (particularly under the shelf legs) by:
Using “complex” insulating panels covered by panels of higher load capacity.
Covering the floor insulator with quality chipboard (with a thickness of 15 mm) or with an other
appropriate material.
6.6. THE DOOR (Optional)
An adequately insulated door can be obtained in one of two ways:
Insulate an existing door with the same insulating materials used for the walls of the cellar. Provide a tight seal
between the door frame and all sides of the door with a strip of foam rubber, for example.
Use a specially designed FONDIS Isothermic door containing polyurethane. In this case you are assured to have
a tight seal on all sides of the door which is equipped with a magnetic joint.
FONDIS Isothermic Door
Exterior dimensions: 1900 mm x 630 mm
Door opening: 1860 mm x 590 mm
The following accessories are delivered with the door:
- 4 steel edges to be fixed to the frame by the brass nails
- 2 hinged brackets to be fixed by the wood screws
- 1 latch plate
Winemaster C50S(SR) USER MANUAL May 2003
Page 18

7. WINEMASTER WALL INSTALLATION
2 screws
3 screws
3 wood screws with 3 washers
INSULATION
WOODEN FRAME
(Interior dimensions : L500 x H330 mm)
(Exterior dimensions: L544 x H 374 mm)
- Install the wooden frame into the wall.
The space between the wood frame and the insulation must be filled and sealed (with polyurethane for example), in
order to ensure a complete insulation.
Please note: exterior of the wooden frame must be even with the warm side of the wall or slightly past the wall so that
the WINEMASTER does not come in contact with the wall see diagram below:
Center the WINEMASTER correctly in its frame. Contact between the sheet metal and the wood frame could cause
vibrations which could spread throughout the cellar.
- Secure the WINEMASTER with the 3 wood screws and washers.
8. CONNECTION
-Insert the plug into the socket
-Set the drainage pipe into a container . The pipe has to be straight and its end must not dip into the water
-Set the on/off button IOII (reference 2 in the diagram) onto the desired level of ventilation within the cellar.
-The electronic thermostat now shows the current temperature witin the cellar. In order to change the temperature
setting refer to pint 4 “Electronic Control Panel” of this guide
-Be patient for some minutes until the compressor starts working. It only starts if temerature of the cellar requires it.
After electricity connection or after having completely stopped the compressor, it will not start again until after a few
minutes. During the first connection, and for larger cellar volumes, it is recommended that you use the booster position
I to well ventilate the interior of the cellar. After a few hours, you can return the ventilation to the normal level by
moving the switch marked IOII into the lower position marked I .
9. CARE IN USE
It is essential that the dust filter is replaced
at least one time per year to ensure optimum
performance. If the filter is full of dust,
the WINEMASTER will automatically function
at the highest ventilation speed.
Winemaster C50S(SR) USER MANUAL May 2003
Page 19
WOODEN
FRAME
GOOD GOOD BAD
COLD SIDE
HOT SIDE
COLD SIDE
WOODEN
FRAME
HOT SIDE
COLD SIDE
WOODEN
FRAME
HOT SIDE
.
10. WARRANTY
Legal and contractual warranties
As a supplement to the legal warranty provided under the laws of the purchaser's country, FONDIS offers an additional 2
year contractual warranty with each WINEMASTER product.
During the two year period of the contractual warranty, FONDIS will replace any parts that have a manufacturer's
defect.
In case of electric failure, FONDIS reserves the right to send an expert technician to inspect the appliance before
replacing any defective parts.
In case of refrigeration faliure, FONDIS may require that the appliance be returned to the factory for repair.
Any interventions will take place according to the guidelines set in the "Service After Sale" document.
Conditions of the warranty
The contractual warranty applies to all appliances installed and used in conformity with this “User Manual.” The warranty
is only valid if the warranty certificate is returned within 15 days after the date of purchase.
Exclusions and limitations of the warranty
The warranty can be refused in the following cases:
- Insulation of the cellar or Installation of the appliance not in compliance with the instructions of this guide.
- Damage due to negligence, lack of maintenance, or incorrect use of the WINEMASTER .
The exchange or repairing of parts under warranty will not extend the 2 year warranty period.
FONDIS S.A. cannot, in any case, be held liable for any direct or indirect damages resulting from the failure of the
WINEMASTER unit. This warranty is exclusively limited to the product itself.
Wine Master products are manufactured by:
FONDIS S.A.
Z. I. de Vieux Thann
18 rue Guy de Place - B.P. 9
68801 THANN Cédex
France
Winemaster C50S(SR) USER MANUAL May 2003
Page 20
This manual suits for next models
1
Table of contents
Languages:
Other Fondis Wine Cooler manuals


