FONESTAR ZSM-1050 User manual

ZSM-1050
MESSAGE PROGRAMMER, EVENTS AND
BACKGROUND MUSIC PLAYER
WITH 4 OUTPUT ZONES
INSTRUCTION MANUAL
ZSM-1050_MANUAL_(EN)_20190425.qxp_Maquetación 1 25/4/19 9:33 Página 1

TABLA DE CONTENIDO
- Security and Environment..........................................................................................................
- Significance of the symbols on the machine.............................................................................
1. Description.................................................................................................................................
2. Basic steps recommended for installation/configuration of ZSM devices................................
3. New connections.......................................................................................................................
Access data ...............................................................................................................................
Options ......................................................................................................................................
Groups.......................................................................................................................................
Select device in LAN..................................................................................................................
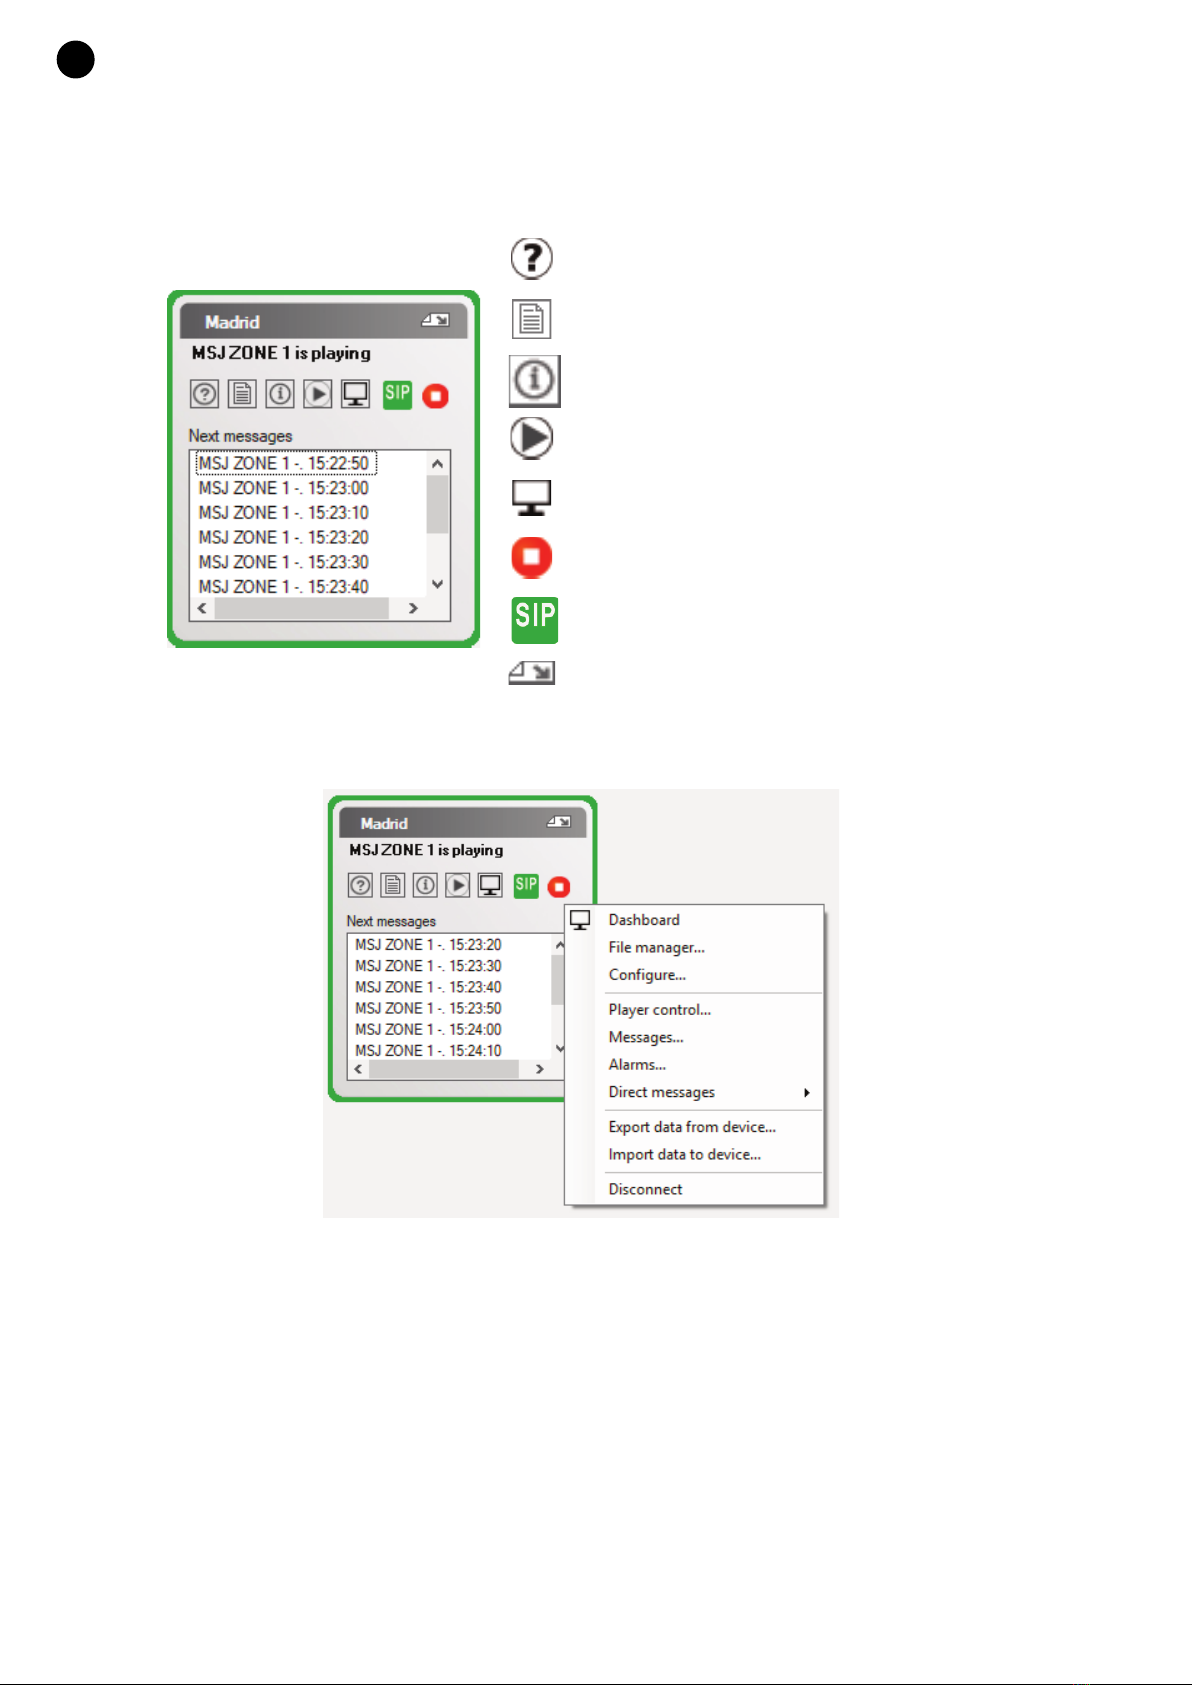
4. Basic controls............................................................................................................................
Icon buttons...............................................................................................................................
Right click on the device ...........................................................................................................
5. Configuration .............................................................................................................................
General ......................................................................................................................................
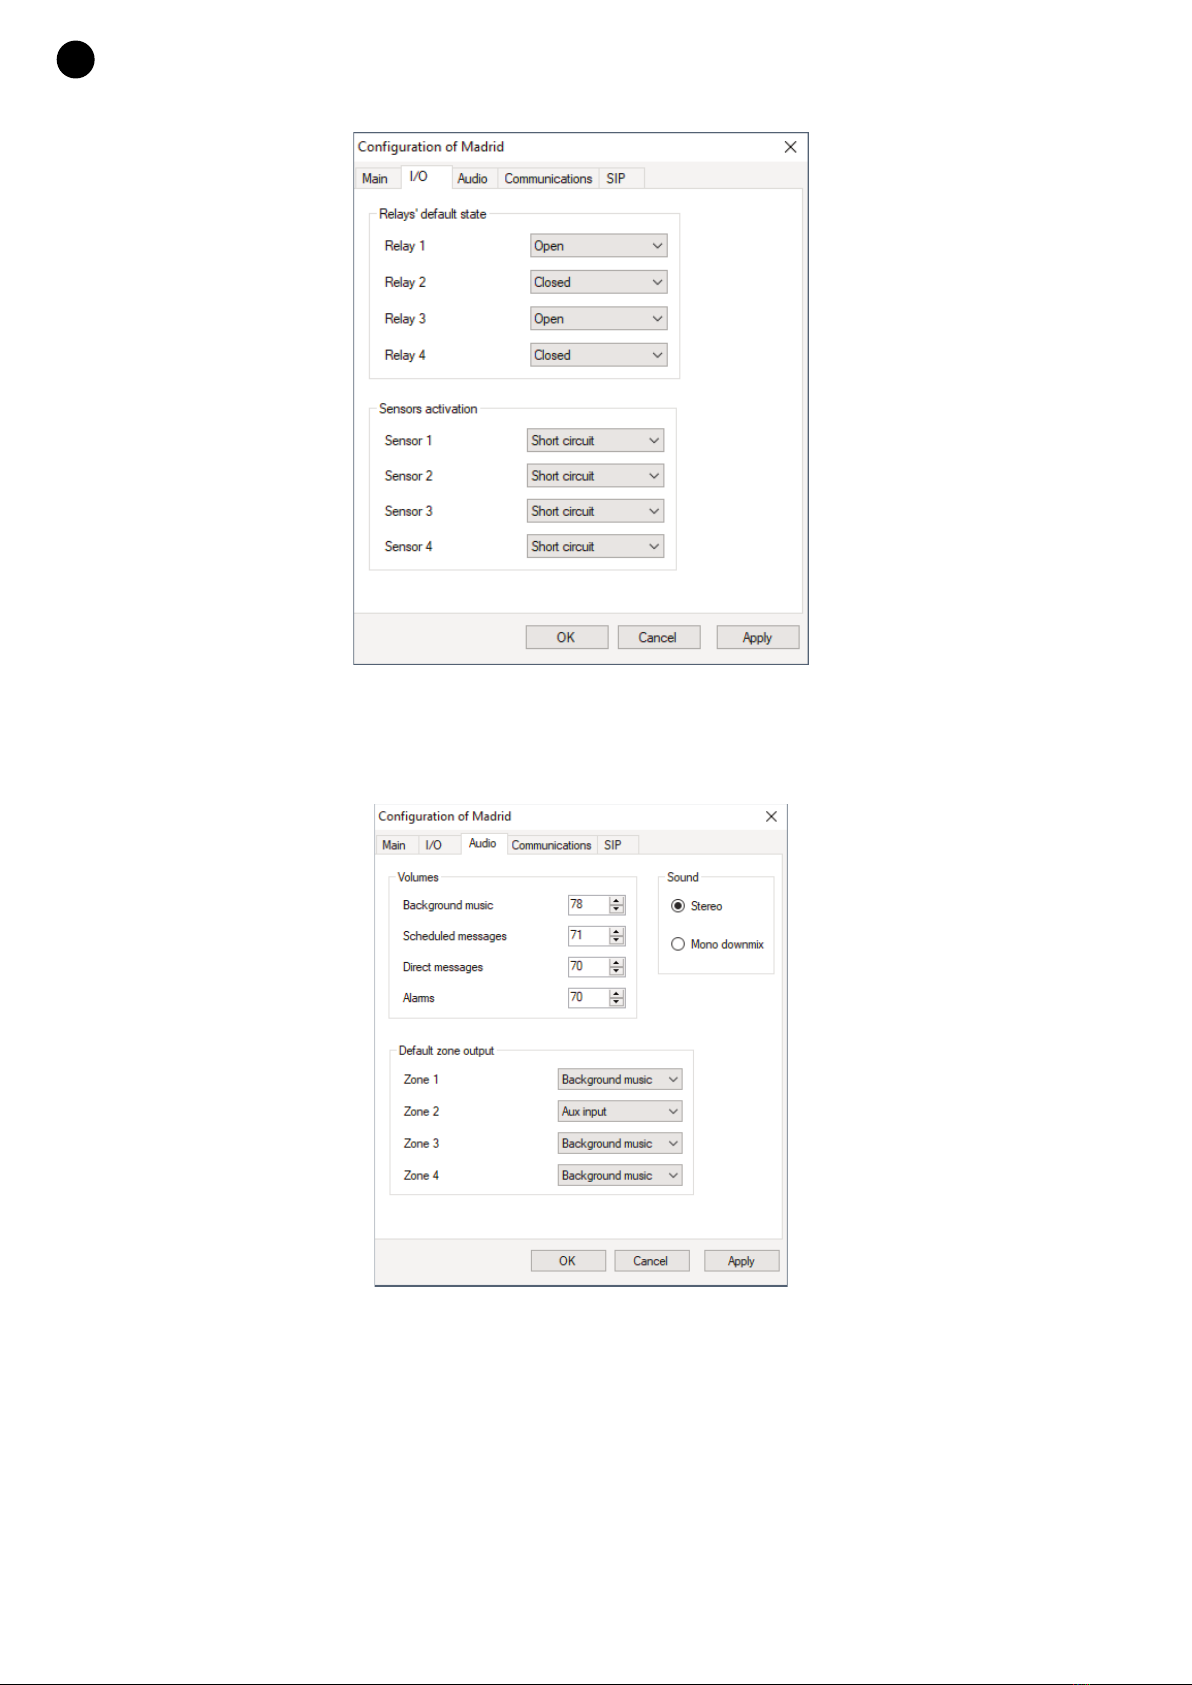
Inputs/Outputs...........................................................................................................................
Audio..........................................................................................................................................
Comunications...........................................................................................................................
SIP .............................................................................................................................................
6. File manager ..............................................................................................................................
Background music.....................................................................................................................
Messages ..................................................................................................................................
Alarms........................................................................................................................................
7. Background music.....................................................................................................................
8. Scheduled messages ...............................................................................................................
New message ...........................................................................................................................
9. Alarms........................................................................................................................................
Alarm configuration ...................................................................................................................
10. Direct messages ........................................................................................................................
New direct message..................................................................................................................
11. Dashboard window ...................................................................................................................
12. Exporting and importing ............................................................................................................
Export ........................................................................................................................................
Import ........................................................................................................................................
13. Updating ...................................................................................................................................
Remote method (Internet or LAN)..............................................................................................
14. Local control of ZSM-1050 device ............................................................................................
15. Controls and functions ..............................................................................................................
16 Technical specifications ............................................................................................................
Warranty ....................................................................................................................................
- 2 -
EN
3
4
5
5
6
6
7
7
7
8
8
8
9
9
10
10
11
12
12
13
14
14
15
16
16
17
18
19
19
20
21
21
24
28
28
30
38
39
40
ZSM-1050_MANUAL_(EN)_20190425.qxp_Maquetación 1 25/4/19 9:33 Página 2

We take this opportunity to thank you for buying this product.
We recommend you read the instruction manual before switching on the machine and follow the instructions
that are given. Keep the manual for future reference.
SECURITY AND THE ENVIRONMENT
ELECTRICAL SECURITY
Check that the current in the mains connection where the machine is to be installed corresponds to the
power supply of the machine.
To avoid damaging the equipment, electrical shocks, fire or physical injury when you connect or disconnect
the equipment from the power supply, pull the plug firmly out of the mains socket holding the plug, never the
cable.
Always do this with dry hands.
Keep the power supply cable far from sources of heat. Do not put heavy objects on top of it or change it.
Clean dust and dirt off the power supply cable regularly.
Do not open the machine; you could get an electric shock.
CAUTION
While installing the machine, make sure it is switched off and unplugged.
Do not open the machine. Touching the internal parts is dangerous and you could receive an electric shock.
The machine must not be splashed or dripped on. Never place recipients with liquid inside on the machine.
Do not place anything inside the machine.
LOCATION
Place the equipment on a horizontal surface with enough space around it to allow ventilation.
Avoid direct sunlight, heat sources and excessive dust.
Do not place the machine near magnetic fields or static electricity.
Do not use surfaces which vibrate or receive impact.
Do not pile machines on top of one another.
VENTILATION
Never block or cover the ventilation slits on the machine.
Do not expose it to direct sunlight or place it near sources of heat.
PERIODS OF INACTIVITY
When the machine is not going to be used for a long period of time, disconnect it from the mains.
If you are using an adapter, take into account that it will continue using electricity even if the machine is
switched off. If it is not going to be used for a long period of time, disconnect it from the mains.
THE ENVIRONMENT
To save energy, switch the machine off when you are not going to use it for a long time. The machine could
contain substances that are harmful to the environment or human health. To minimize the effect of these
substances the machine must be correctly managed and recycled when you decide to dispose of it.
When you dispose of it remember: it cannot be thrown into a conventional rubbish bin.
If it contains or uses batteries, these must be disposed of separately.
The machine (without batteries) must be disposed of correctly. Put it in a container specially intended for the
collection of electronic and electrical appliances, at the dump or hand it over to the dealer when you purchase
similar equipment, so that the dealer can dispose of it correctly (at no added cost).
- 3 -
EN
ZSM-1050_MANUAL_(EN)_20190425.qxp_Maquetación 1 25/4/19 9:33 Página 3

SIGNIFICANCE OF THE SYMBOLS ON THE MACHINE*
The symbol formed by the expression “Class 1 laser product” written in a rectangle
indicates that visible or invisible laser radiation could be produced. Avoid direct expose to
the laser.
The symbol formed by a ray of lightening inside a triangle shows that the machine has
connection terminals or a circuit with areas with a current which could cause an electric
shock, even in normal working conditions.
The symbol formed by an exclamation mark in a triangle shows that the instruction manual
must be referred to for information on how the machine works and its use.
The symbol formed by one square inside another square shows that the machine has
double electrical insulation.
The European Community symbol shows that the machine complies with the current
European Union legislation, as well as its transposition to local legislation.
The symbol of a rubbish bin crossed out and over a horizontal line shows that when the
product is disposed of it must be done properly, placing it in a special selective electronic
and electrical equipment container or through a dealer when purchasing a similar product,
at no additional cost. It also shows that the machine was put on the market after 13th
August 2005 (European Community Directive 2002/96/CE of Electrical and Electronic
recycling, and its Spanish equivalent R.D.208/2005).
In accordance with what is set out in the aforementioned decree, FONESTAR is registered
in the RAEE (Registro de Aparatos Eléctricos y Electrónicos) in a special section REI
(Registro de establecimientos Industriales), with the entry number 001851.
*It is possible that some of these symbols do not appear on the machine.
EXEMPTION OF LIABILITY
The characteristics of the equipment and the content of the manual can change without forewarning.
FONESTAR, S.A. does not assume responsibilities regarding the inappropriate use of the equipment or the
information supplied in this instruction manual, and specifically disclaims any implied liability for marketability
or fitness for any other use.
All rights reserved by FONESTAR, S.A.
- 4 -
EN
ZSM-1050_MANUAL_(EN)_20190425.qxp_Maquetación 1 25/4/19 9:33 Página 4

1. DESCRIPTION
- Message programmer, alarms, background music player and SIP client with 4 output zones.
-4 independently configurable zones (aux input, background music, scheduled messages, instant
messages, alarms and SIP call).
- 16 GB internal memory for audio files. Compatible formats: MP3, WMA, WAY and OGG.
- USB storage device and SD memory card for updating the device and audio file storage.
- Remote control using ZSM-GO: status control, scheduling and audio file transfer.
- Autonomous operating without the need to be connected to the ZSM-GO program.
2. BASIC STEPS RECOMMENDED FOR INSTALLATION/CONFIGURATION OF
ZSM DEVICES
1.- Make sure the device is connected to the local network.
In the ZSM-1050 device itself, enter the Configuration menu -> Network -> Status.
If it appears as “disconnected”, check the configuration of your network, the connection of the device,
the Ethernet cable, etc. If necessary, set up a fixed IP address in the Set up menu -> Network -> Edit.
To connect to a ZSM device via internet, the TCP communications port and the UDP transfer port must
be redirected.
The easiest way to accomplish this is by assigning a fixed IP address to the device and then, redirecting
the two ports in the router to this fixed IP address.
2.- Use the ZSM-GO program to create a new connection and so be able to connect with the device (see
New Connections section).
3.- Use the ZSM-GO program to configure the device (see Configuration section). The following parameters
can be configured: General, Inputs/Outputs (I/O), Audio and Communications.
4.- Transfer the audio files from the ZSM-GO program to the device.
5.- Using the ZSM-GO program set up background music, scheduled messages, direct messages and
alarms (see corresponding sections).
- 5 -
EN
ZSM-1050_MANUAL_(EN)_20190425.qxp_Maquetación 1 25/4/19 9:33 Página 5

- 6 -
3. NEW CONNECTIONS
In order to connect to the ZSM-1050 device, create a new connection with the new option in the General
dropdown menu:
Create access to ZSM-1050:
ACCESS DATA
- Name: the name which identifies the access to the device.
- Device type: type of device to which you are connecting.
- Connection mode.
- Manual mode: connects to a device using an IP, port, user and access password (default 1111).
-Automatic mode (LAN only): the device is connectable provided that it is connected to the local
network. It is only necessary to specify the access password (default 1111): You must select a device
from the local network by pressing the ”Select device on LAN” button.
- IP: IP address of the device.
- Control port: TCP port that the device listens to, controlled remotely.
-Network name: name of the device which, together with the password, make up the connection
credentials
.Connection timeout: maximum waiting time, at TCP/IP level, before closing the connection. It is
recommended that the default value be used.
EN
ZSM-1050_MANUAL_(EN)_20190425.qxp_Maquetación 1 25/4/19 9:33 Página 6

OPTIONS
-Connect when starting the application: When launching the application, an attempt will be made to
connect to the device.
-Automatic reconnection: Only in automatic mode. Whenever a device is available on the local network
and is not connected, it will connect automatically to it.
-Synchronize date and time when connecting: the device will configure the time and date of the PC upon
each connection.
GROUPS
Shows the groups created so that the connection can be assigned to one or more of them.
SELECT DEVICE IN LAN
Press the button to display a list of devices connected to the local network. Select one and press OK or
double-click to load the required data into the connection:
Once the configuration parameters have been entered, click on the Devices menu option, and the window
with access to all the configured devices will appear. Double-click (or right-click ->Connect) to connect to
the system. If you added access to one or more groups, you can access them in the Groups option of the
menu.
- 7 -
EN
ZSM-1050_MANUAL_(EN)_20190425.qxp_Maquetación 1 25/4/19 9:33 Página 7

- 8 -
4. BASIC CONTROLS
There are several options when it comes to operating a connected device.
ICON BUTTONS:
RIGHT-CLICK ON THE DEVICE:
- Dashboard: screen where the current status of the device can be seen and all it's functions
can be accessed.
- File manager: audio file management and transfer.
- Configure: device configuration
- Playback control: background music control and configuration
- Messages: message configuration
- Alarms: configuration of the sensors as alarms.
- Direct messages: instant message configuration and application
- Export data from device: create a backup copy of the contents of a device and download
them to the PC.
- Import data to device: Upload the backup copies to the device.
- Disconnect: disconnect from the device.
Help.
Show/Do not show list of next messages.
Information about the device: time and date, IP
address, network name, ports, current status.
Open background music control window.
Open dashboard window.
Stop current event (message, instant message
or alarm).
SIP server connection status
Hide this window.
EN
ZSM-1050_MANUAL_(EN)_20190425.qxp_Maquetación 1 25/4/19 9:33 Página 8

SIP connection status
If the device has been configured to connect to a SIP server, then an icon representing the current state of
the connection will be displayed.
(orange) Attempting to connect to the SIP server
(green) Connection established
(red) Connection error
(green) SIP call in progress
5. CONFIGURATION
There are 2 ways of accessing the device configuration:
- Right button -> Configure
- From the display: “Dashboard -> “Configuration”
GENERAL
-System time and date: shows the current time and date in the ZSM device. If the “Synchronize with PC”
option is pressed, the ZSM device automatically acquires the time and date in the PC.
-Screen: activates the screensaver after a period of inactivity with the buttons on the front panel of the
device.
-Local lock: activated or deactivated. When activated, a 4 digit password is necessary to unlock the
device, allowing modifications to be made to the device locally using the button pad.
- 9 -
EN
ZSM-1050_MANUAL_(EN)_20190425.qxp_Maquetación 1 25/4/19 9:33 Página 9

INPUTS/OUTPUTS
- Relay sleep mode: Mode in which the relays are normally in when not activated.
- Sensor activation: Alarm activation configuration (see section on alarms).
AUDIO
- Volumes: Each type of audio has its own volume control.
- Sound: Mono or stereo output.
-Default Zone Output: Indicates the default audio source in the zone. Options include: "Background
music", "Aux input" or "No audio".
- 10 -
EN
ZSM-1050_MANUAL_(EN)_20190425.qxp_Maquetación 1 25/4/19 9:33 Página 10

COMMUNICATIONS
- Network access: Credentials to connect to the device, consisting of name and password.
- Local network: DHCP or fixed IP network configuration.
-Port: TCP communications port through which the remote connection is made, and TFTP UDP port for
audio file transfers, and updates and configurations.
-Transfer options: the system has 2 modes for transferring file data. In local area networks there is no
difference, whereas with internet connections the Block mode is much faster reaching speeds of up to
3.8 Mb/s. Conversely, the Serie mode is slower but provides an alternative when slow connection
problems occur.
MAX TRANSFER SPEED
(Megabits per second)
ZSM-1040 ZSM-1000/ZSM-1050
SERIE TRANSFER
MODE
ZSM-1000/ZSM-1050
BLOCK TRANSFER
MODE
LAN 0.150 Mb/s 2.720 Mb/s 3.8 Mb/s
Internet 0.016 Mb/s 0.024 Mb/s 3.8 Mb/s
- 11 -
EN
ZSM-1050_MANUAL_(EN)_20190425.qxp_Maquetación 1 25/4/19 9:33 Página 11

SIP
Allows you to register the device as a SIP client, and hence, to receive calls from another client connected
to the same SIP server/proxy. The following parameters must be activated and configured:
- Address of the SIP server.
- Communications port of the SIP server.
- Username of the extension used on the SIP server.
- Password of the extension used on the SIP server.
-Audio port range indicates the value of the first and last port which is used to specify the usable port range
for SIP calls..
- Active zones, indicates in which zones the SIP call will go through.
- Active relays, indicates the relays that are activated during a call.
- SIP Volume, indicates the playback volume of the SIP call.
6. FILE MANAGER
There are 2 ways of accessing the file manager:
- Right button -> File manager
- From the screen: “Dashboard” -> “File manager”
Audio files are divided into 3 categories:
- Background music files.
- Message files.
- Alarm files (ZSM-1050 only).
- 12 -
EN
ZSM-1050_MANUAL_(EN)_20190425.qxp_Maquetación 1 25/4/19 9:33 Página 12

BACKGROUND MUSIC
The buttons on the left side are divided into two groups:
Channels
- New channel: Allows the creation of a new empty channel.
- Send directory: Select a PC directory to create a channel with the same name and send your files. Files
are not sent in sub-directories.
Files
- Send: Sends files to the marked channel.
- Download: Downloads marked files to PC.
- Delete: Deletes marked files.
- Copy: Disables background music.
There are buttons on each channel by which you can operate directly:
Send files to the channel
Rename the channell
A menu opens that allows you to delete selected files within the channel, or the whole channel.
.
- 13 -
EN
ZSM-1050_MANUAL_(EN)_20190425.qxp_Maquetación 1 25/4/19 9:33 Página 13

MESSAGES
The buttons on the left side allow you to:
- Send: Send files to use as audio for scheduled or direct messages.
- Download: Download the marked files to the PC.
- Delete: Deletes the marked files.
- Copy: Copies the marked files to another device as message files. A connection must be established with
the target device.
ALARMS
- 14 -
EN
ZSM-1050_MANUAL_(EN)_20190425.qxp_Maquetación 1 25/4/19 9:33 Página 14

The buttons on the left side allow you to:
- Send: Send files to use as audio for scheduled or direct messages.
- Download: Download the marked files to the PC.
- Delete: Deletes the marked files.
-Copy: Copies the marked files to another device as message files. A connection must be established with
the target device.
7. BACKGROUND MUSIC
- To play an audio file, first select the channel and then double-click on the desired audio file.
- Current configuration:
o Repeat: Activate repeat mode (repeats all the files contained in the selected folder).
o Random: selects either sequence mode (not activated) or random mode (activated).
oRecover last channel: if this option is enabled, the channel being played when the device is turned
off is saved, so that the same channel will start playing again when the device is turned back on.
- 15 -
EN
ZSM-1050_MANUAL_(EN)_20190425.qxp_Maquetación 1 25/4/19 9:33 Página 15

8. SCHEDULED MESSAGES
In this window all the messages that are scheduled in the device are shown. It also allows new scheduled
messages to be created and edited or existing messages to be deleted.
NEW MESSAGE
General
- Message:
- Name: message identification name.
- Priority: allows the priority among messages to be managed. The value 1 corresponds to the lowest
priority while value 5 corresponds to the highest priority.
- In the case of the time of the messages coinciding, the one with the highest priority will be played
first or otherwise, the one which was created first.
-In the case of one message being played when it is the turn of a higher priority message, the first
message will be interrupted, giving way to playback of the higher priority message.
- Audio track:
- Use random audio: the device randomly selects an audio file in each playback.
Otherwise, manually select the required file.
- 16 -
EN
ZSM-1050_MANUAL_(EN)_20190425.qxp_Maquetación 1 25/4/19 9:33 Página 16

Schedules
-Date intervals: the program allows the use of the message to be limited to a given period of time. Set the
period of time by selecting the starting date and ending date.
- Days of the week: allows the days of the week on which the message will be played to be selected.
- Schedules:
- Once a day: the message will be played once a day at the specified time.
- Repetitive: the message will be played several times a day, from the starting time to the ending
time (both included). It will be played in the period of time specified in the Period option
. Example:
Starting time: 8:00:00. Ending time: 12:00:00. Period 01:00:00.
The message will be played at 8:00, 9:00, 10:00, 11:00 and 12:00.
9. ALARMS
The system has 4 alarms, each of which is connected to a sensor input. That is, one alarm can be set for each
sensor input.
Alarms have higher priority than messages. If an alarm is activated, playback of all the messages will be
cancelled, regardless of the zones in which the messages are being played.
Note: It is very important to set the value of the Sensor Activation in the Configuration section ->
Inputs/Outputs.
- 17 -
EN
ZSM-1050_MANUAL_(EN)_20190425.qxp_Maquetación 1 25/4/19 9:33 Página 17

Once the alarm has been set, activate it by checking the activate box. For the alarm to work, it must be set
and activated.
It is also possible to eliminate the alarm connected to each sensor.
ALARM CONFIGURATION
-Priority: Allows you to manage priority among the different alarms, with 1 corresponding to lowest priority
and 5 corresponding to highest priority.
-In the event that several sensors are activated at the same time, the one with the highest priority,
or the one corresponding to the lowest sensor number, will be activated.
-If an alarm is active at the moment that a higher priority alarm reaches its activation time, the first
alarm will be interrupted and the higher priority alarm will take precedence.
- Activation: defines the manner and time period in which the alarm will be active..
- By level: the alarm will only be active as long as the sensor is in activation mode.
-By pulse: once the sensor enters activation mode, the alarm will be activated regardless of any
subsequent sensor changes.
- Audio track length: the alarm will be active for the duration of the selected audio file.
-Programmed time: the alarm is set to play for the programmed time interval. If the audio file
duration is less than the indicated time interval, the file will be repeated until the time is up.
-Another sensor: the alarm will be active until the activation condition of the second sensor is
met. Only sensors that do not have an alarm set will be available as "deactivators”.
If "Use audio" is activated in the general tab, an audio and the zones in which the alarm will sound must be
selected. This step is mandatory if you have configured the activation as Pulse with Audio Duration.
- 18 -
EN
ZSM-1050_MANUAL_(EN)_20190425.qxp_Maquetación 1 25/4/19 9:33 Página 18

10. DIRECT MESSAGES
Direct messages are useful in cases where you want to play an audio file manually and quickly.
In this window the messages that have already been scheduled in the device are shown. It is also possible
to create new messages and to edit or delete existing ones.
NEW DIRECT MESSAGE
- Name: direct message identification name.
- Audio track: select the audio track you wish to play in the direct message.
- Zones: allows the zones in which the direct message will be heard to be selected.
- Relays: allows the relays of your choice to be activated during playback of the direct message.
- 19 -
EN
ZSM-1050_MANUAL_(EN)_20190425.qxp_Maquetación 1 25/4/19 9:33 Página 19

11. DASHBOARD WINDOW
The window is divided into 3 main blocks:
1- General:
a. Tab which allows switching between the connected devices.
b. File manager direct access button.
c. Configuration direct access button.
2- Zone control: indicates the current audio in each zone.
3- Functions control:
a. Background music:
i. Current channel and audio file.
ii. Background music volume.
iii. Direct access to the playback control window.
b. Alarms:
i. Current active alarm.
ii. Alarm volume.
iii. Direct access to the alarm configuration window.
c. Next messages:
i. Current time of the system.
ii. List of upcoming messages and the time at which they will be played.
iii. Scheduled message volume.
iv. Direct access to the scheduled messages configuration window.
d. Direct messages:
i. List of preset direct messages.
ii. Possibility of executing message playback.
iii. Direct message volume.
iv. Direct access to the direct message configuration window.
- 20 -
EN
ZSM-1050_MANUAL_(EN)_20190425.qxp_Maquetación 1 25/4/19 9:33 Página 20
Table of contents
Other FONESTAR MP3 Player manuals