FONRI GS558D-H04 User manual

USER GUIDE
SMART SMOKE SENSOR

INDEX
EN
AR
TR
FR
NL
ES
RU
DE
IT
SV
SMART SMOKE SENSOR
AKILLI DUMAN SENSÖRÜ
DÉTECTEUR DE FUMÉE INTELLIGENT
SLIMME ROOKMELDER
SENSOR INTELIGENTE DE HUMO
УМНЫЙ ДАТЧИК ДЫМА
SMART RAUCHMELDER
SENSORE INTELLIGENTE DI FUMO
SMART RÖKSENSOR
3
27
51
75
99
15
39
63
87
111

3
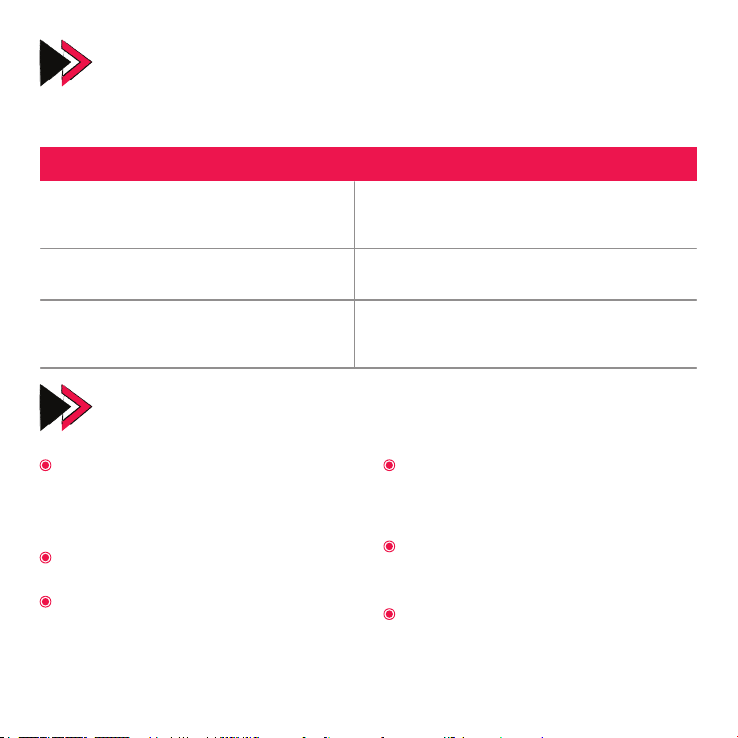
Power:
Operating Current:
Alarm Sound:
Smoke Sensitivity:
Temperature Sensitivity:
DC 2 x 1.5V Alkaline AA Battery
< 6uA (stand by)
< 1200mA (alarm)
3 m away > 85dB(A)
0.108 - 0.141dB/m
54 - 70°C
The test button is used to accurately check whether the smoke sensor is working.
Do not use any other test method. Make sure it works by testing the smoke sensor
weekly.
Since removing the batteries to silence the smoke sensor or stopping it from the
app will reduce the security level, open windows or turn on the vents around the
smoke alarm to silence it.
0.5s beep – 0.5s pause – 0.5s beep -
0.5s pause – 0.5s beep – 1.5s pause.
At the same time, the red LED ash-
es and this pattern repeats.
0.2s beep – 0.1s pause. At the same
time, the red LED ashes and this
pattern repeats.
Specications
Important Safety Information:
Smoke Alarm Sound Pattern: Temperature Alarm Sound Pattern:
Smoke Sensor User Manual
Model: GS558D-H04 Ref: ST558D
EN14604:2005/AC:2008

4
Observe all local and national electrical and building regulations and require-
ments during the installation.
This smoke sensor is designed for use in a single apartment. In multi-apartment
buildings, each apartment must have its own smoke sensor. Do not use in non-res-
idential buildings, this smoke sensor is not a substitute for a complete alarm sys-
tem.
Place the smoke sensor in every room and every oor of the apartment. Smoke
may not reach the sensor for many reasons. For example, if a re starts in a remote
part of the apartment, on another oor, in a chimney, inside a wall, on a roof, or
behind a closed door; the smoke of this re may not reach a distant sensor in time
to alert the residents. Smoke sensors can not timely detect res occurring outside
the room they are placed.
The smoke sensor may not alert every resident. The alarm is loud enough to warn a
person in case of danger. However, there may be situations where some residents
do not hear the alarm. This may be caused by external or internal loud noises such
as snoring and alcohol consumption or hearing impairment also makes it hard to
hear or understand sounds.If you think it would be difcult for a family member
to be alerted by the smoke sensor, it is better to install specialized smoke sensors.
Residents must hear the warning sound of the sensor and react quickly to reduce
the risk of re damage, injury or death. If a resident has a hearing impairment, it is
recommended to install special smoke alarms with light or vibration.
Smoke sensors will only sound alarm when they detect smoke or combustion par-
ticles in the air. They do not sense heat, ame, or gas. This smoke sensor is de-
signed to provide an audible warning of a developing re. However, some res
burn very quickly (explosive, deliberate or non-intentional). In this case, the smoke
sensor may not sound the alarm fast enough to ensure a safe escape.
Smoke sensors have their limits. This smoke sensor is not perfect and capable of
preventing human error; cannot guarantee the protection of life and property
from re. Smoke sensors are no substitute for an insurance. Landlords and tenants
must insure themselves and their properties. Also, it is possible for the smoke sen-
sor to fail at any time. That’s why you should test your smoke sensor weekly and
replace it every 10 years.

5
Battery
Voltage :
Package :
DC 1.5V
AA Alkaline Battery
Areas where combustion occurs under
normal conditions such as kitchen, re-
place or areas where appliances such as
kettle are located. Use special sensors
for these areas that control unwanted
alarms.
Areas with ventilation or where heat-
ing/cooling drains are located. Install at
least 3 meters away from these areas,
airow can keep smoke away from the
alarm, preventing it from sounding.
High-humidity areas such as bathrooms
or areas where dishwashers and washing
machines are located. Install the sensors at
least 3 meters away from these areas.
Areas where the temperature may drop
below 0° or rise above 40°.
Extremely dusty, dirty, insect-infested ar-
eas. Particles in these areas can disrupt
the functioning of the sensor.
Do not install a smoke sensor in the following places:
Turn the sensor body counterclock-
wise and separate it from the mounting
bracket.
Remove the old batteries from the bat-
tery compartment.
Insert two new batteries into the battery
compartment. Pay attention to the pos-
itive and negative terminals of the bat-
tery while placing it.
Place the sensor body on the support by
turning it clockwise.
Test the sensor using the test button. The
sound pattern that should be produced
is 3 short beeps followed by a 1.5 sec-
ond pause. This pattern repeats. If there
is no sound, it means that the sensor is
malfunctioning or there has been an er-
ror during the installation. You can take
a look at the troubleshooting section for
any steps to be taken to solve problems.
Battery Specications:
1.
2.
3.
4.
5.

6
The red LED light ashes once every 40
seconds when the sensor is operating nor-
mally.
If there is a problem with the battery or the
battery power is low, the alarm will sound
low every 40 seconds and the LED light
continues to ash once every 40 seconds.
If there is a problem with the sensor, the
sensor beeps low every 40 seconds.
The red LED light ashes every 8 seconds
when the sensor is operating in silent
mode.
NOTE:
If the sensor starts beeping once every
40 seconds, press the test button. The
warning sound will be silent for 8 hours.
In this process, the sensor can detect
smoke, only the beeping sound for
every 40 seconds is turned off.
1.
2.
3.
4.
LED Light:
Silent Mode:
If you press the test button while the sensor is alarming, the alarm will be silenced for about
10 minutes and the red LED light will start to ash every 8 seconds. This means that the
smoke sensor has gone into silent mode.
Smoke sensors are designed to minimize false alarms. Particles from cooking can trigger an
alarm if the sensor is placed close to the cooking area. While grilling and frying, many am-
mable particles can be emitted into the environment. Using ventilation will help to remove
these particles from the kitchen.Using the test button to silence the alarm is very functional,
especially in areas where false alarms may occur, such as the kitchen.
You should only use the silent mode feature in the event of an alarm of which you know
the source (ex. alarms during cooking). About 10 minutes after going into silent mode, the
sensor will switch back to normal mode and the alarm will sound if there are still particles in
the air. Silent mode can be operated repeatedly until the air is clear of particles.

7
Testing the Smoke Sensor:
Test every smoke sensor in your home to make sure it is installed and working properly.
Press the test button rmly for 5 seconds. The alarm will sound 3 short beeps, then pauses
for 1.5 seconds and this pattern will continue until you release the button. An alarm may
sound for a few seconds after releasing the button.
DANGER: If an alarm sounds in a non-test condition, this means that the sensor is able to
detect smoke. The alarm means that you need to take the necessary precautions for the
situation immediately.
Using ame to test the sensor may result
in injury and/or property damage.
Test the sensor on a weekly basis and
after extended periods of absence, such
as vacation returns.
Click the “+” sign in the upper right corner of the app screen.
Add your device by selecting the “Sensors” tab from the left menu, then “Smoke Sensor”
and follow the instructions in the app.
Stay at arm’s length from the sensor whi-
le testing. You can perform the test by
following the steps below:
1.
2.
3.
Wireless Connection:
Wireless Network Frequency:
Wireless Transmission Current:
Wireless Network Distance:
2.4 GHz Wi-Fi
< 450mA
> 30 metre
Adding devices using the Fonri WiFi app:

8
In addition to the weekly test, the sen-
sor must be regularly cleaned of dust, dirt
and debris. Clear the alarm at least once a
month.
Using a vacuum cleaner with a soft brush,
vacuum all sides of the alarm. Make sure all
holes are free of dirt.
NOTE: Place the sensor immediately after
cleaning and check whether it works using
the test button.
IMPORTANT: Do not remove the cover to
clean the inside of the sensor.This will affect
thewarranty.
WARNING!
Use only recommended batteries. Using dif-
ferent batteries can seriously damage the
sensor. As a precaution, it is recommended
to replace the batteries once a year.
Maintenance and Cleaning:

9
Repairs:
Fire Safety:
WARNING!
Do not attempt to repair the sensor yourself. This will affect the warranty.
If the alarm is not working as it should and is still under warranty, take it to the place of
purchase or send it to the dealer in a protected box.
If the alarm sounds in a situation other than you press the test button, it warns you of a
dangerous situation and you need to react immediately. Develop escape plans with your
family and practice regularly to be prepared for such alarms.
Introduce the smoke sensor and alarm
sound to everyone in the house.
Determine an escape route out of each
room.
Remind everyone in the house to touch a
door in case of an alarm and if hot, not to
open that door and try another door.
Don’t panic, stay calm.
Leave the building as quickly as possible.
Check if a door to be used for exit is hot
and if it is, leave it closed and use a sec-
ond way out. Stay close to the ground and
don’t stop to pick up any items.
Teach everyone in the house to stay
close to the ground to avoid harmful
gases and fumes.
Identify a secure meeting point outside
the building.
Meet at the pre-determined secure me-
eting point outside the building.
Do not return to the building. Wait for
the fire brigade to arrive at the scene.
1.
2.
3.
1.
2.
4.
5.
3.
4.
Things to Do in Case of Fire:
NOTE: These guidelines will help you in the event of a fire. Prevent dangerous situations by
learning the fire safety rules to reduce the possibility of fire.
10
Troubleshooting:
Recommended Places for Installation:
Do not remove the batteries to stop an unwanted alarm. This will reduce your security.
Remove smoke or dust by opening ventilation ducts or windows.
SolutionProblem
First you need to install in your bed-
room and the corridor leading to the
bedroom. If there is more than one
bedroom, it is recommended to place
sensors in each bedroom.
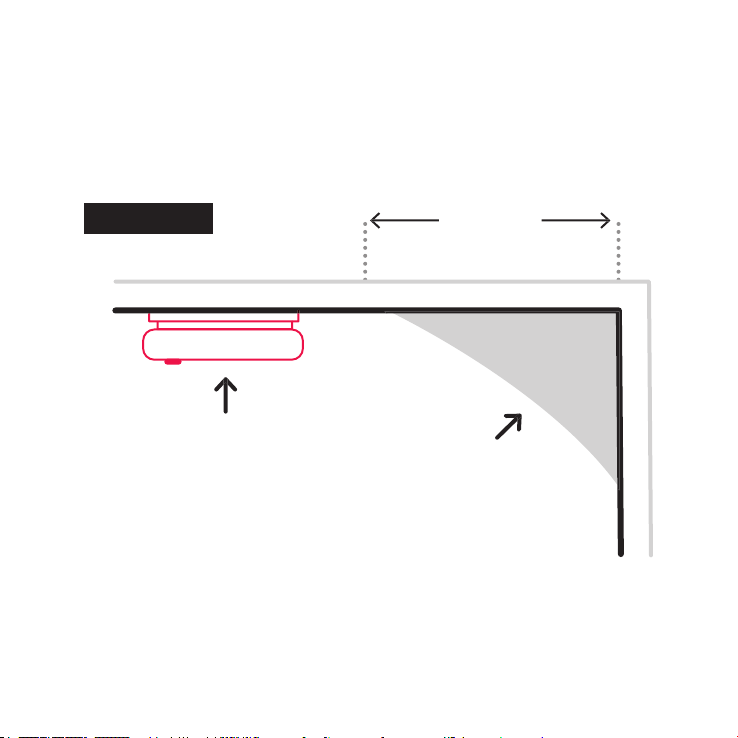
If the sensor cannot be installed in the
centre of the ceiling for any reason, try
to install it 50cm away from the walls
(see FIGURE 1).
Smoke, heat and burning particles will
move horizontally after rising towards
the ceiling. It is therefore recommend-
ed to install the sensor in the centre of
the ceiling. Make sure the sensor covers
every corner..
If the ceiling is sloped, the alarm should
be installed at least 50 cm away from
the highest point of the ceiling (See
FIGURE 2 and 3).
Install sensors on stairs and on each
oor.
If the length of the room or corridor is
longer than 9 meters, it is recommend-
ed to install more t an one alarm.
No alarm sound is heard during the test.
The sensor beeps every 40 seconds and
the red LED light ashes.
The alarm sounds different than before, it
sounds and goes silent then.
• Check if the batteries are placed correctly.
• Replace the sensor.
You need to replace the battery. Refer to the
“Battery” section.
• The alarm is working correctly.
• Cleanthesensor (refer to“Maintenance and
Cleaning”).
11
FLAT CEILING 50 cm
(20’’)
minimum
FIGURE-1
RECOMMENDED
NEVER INSTALL
AIR GAP

12
1 mt
1 mt
50 cm SUITABLE
FOR ANY
POINT
NOT
SUITABLE
NEVER INSTALL
NEVER INSTALL
TRIANGLE CEILING
SLOPED CEILING
FIGURE-2
FIGURE-3
50 cm
SUITABLE FOR ANY
POINT
NOT
SUITABLE

13
Instructions for Installation
Insert two AA batteries into the smoke sensor’s battery compartment.
To install the mounting bracket to the ceiling, hold the bracket against the ceiling and
use pencil to mark where the mounting holes will be.
Test the sensor using the test button. The alarm will sound 3 short beeps, then pause for
1.5 seconds and continue this pattern until you release the button.
You can contact the sales point for any questions about installation.
Drill two holes at the marked locations with diameter around 5mm. Insert the two plastic
dowels into the holes with the hammer.
If there is no sound, it means your alarm is faulty. You can refer to the “Troubleshooting”
section or return the device to the point of sale within the period of warranty.
Other smoke sensors may also alarm during testing. They will also turn off within 1 min-
ute of releasing the test button. So you can control the wireless access function.
WARNING:
To avoid any injury, the sensor should be securely installed on the ceiling, following the
instructions.
Turn on the sensor by following the instructions in the “Wireless Connection” section.
Make sure the wireless network connection is good.
Attach the mounting bracket to the plastic dowels and tighten the screws (3*25mm).
See FIGURE-3..

14
DEVICE FIGURE-4
SCREW
DOWEL
MOUNTING
BRACKET
SENSOR
BODY
CEILING
HOLES
15
Manual de Uso de Sensor de Humo
Modelo:GS558D-H04 Ref: ST558D
EN14604:2005/AC:2008
Potencia :
Corriente de Funcionamiento:
Sonido de Alarma:
Sensibilidad al Humo:
Sensibilidad a la Temperatura:
DC 2 x 1.5V Baterías Alcalinas AA
< 6uA (en modo de espera)
< 1200mA (alarma)
3 metros de distancia > 85dB(A)
0.108 - 0.141dB/m
54 - 70°C
El botón de prueba se usa para vericar con precisión si el sensor de humo está
funcionando. No utilice ningún otro método de prueba. Asegúrese de que funcio-
ne probando el sensor de humo semanalmente.
Dado que quitar las baterías para silenciar el sensor de humo o detenerlo desde
la aplicación reducirá el nivel de seguridad, abra las ventanas o las rejillas de ven-
tilación alrededor de la alarma de humo para silenciarla.
pitido de 0,5s - pausa de 0,5s - pi-
tido de 0,5s - pausa de 0,5s - piti-
do de 0,5s - pausa de 1.5s. Al mis-
mo tiempo, el LED rojo parpadea
y este patrón se repite.
pitido de 0,2s– pausa de 0.1s. Al mis-
mo tiempo, el LED rojo parpadea y
este patrón se repite.
Especicaciones
Informacion de Seguridad Importante:
Patrón de Sonido de Alarma de
Humo: Patrón de Sonido de Alarma de
Temperatura:
ES

16
Observe todas las normas y requisitos eléctricos y de construcción locales y nacionales du-
rante la instalación.
Este sensor de humo está diseñado para su uso en un solo apartamento. En edicios de
varios apartamentos, cada apartamento debe tener su propio sensor de humo. No lo utilice
en edicios no residenciales, este sensor de humo no sustituye a un sistema de alarma
completo.
Coloque el sensor de humo en cada habitación y en cada piso del apartamento. Es posible
que el humo no alcance al sensor por muchas razones. Por ejemplo, si se inicia un incendio
en una parte remota del apartamento, en otro piso, en una chimenea, dentro de una pared,
en un techo o detrás de una puerta cerrada; es posible que el humo de este incendio no
alcance al sensor distante a tiempo para alertar a los residentes. Los sensores de humo no
pueden detectar a tiempo los incendios que se producen fuera de la habitación en la que
están colocados.
Es posible que el sensor de humo no alerte a todos los residentes. La alarma es suciente-
mente fuerte para advertir a una persona en caso de peligro. Sin embargo, puede haber
situaciones en las que algunos residentes no escuchen la alarma. Esto puede ser causado
por ruidos fuertes externos o internos, tal como ronquido; y el consumo de alcohol, o la dis-
capacidad auditiva también diculta escuchar o comprender los sonidos. Si cree que sería
difícil que un miembro de la familia sea alertado por el sensor de humo, es mejor instalar
sensores de humo especializados.
Los residentes deben escuchar el sonido del sensor y reaccionar rápidamente para reducir
el riesgo de daños por incendio, lesiones o muerte. Si hay una discapacidad auditiva, se
recomienda instalar detectores de humo especiales con luz o vibración.
Los sensores de humo solo emitirán una señal de alarma cuando detecten humo o partícu-
las de combustión en el aire. No perciben el calor, las llamas o el gas. Este sensor de humo
está diseñado para proporcionar una advertencia audible de un incendio. Sin embargo,
algunos incendios arden muy rápidamente (intencionales o no intencionales). En este caso,
es posible que el sensor de humo no haga sonar la alarma lo sucientemente rápido para
garantizar un escape seguro.
Los sensores de humo tienen sus límites. Este sensor de humo no es perfecto ni capaz de
evitar errores humanos y por eso no puede garantizar la protección de la vida o la propie-
dad contra incendios.
Los sensores de humo no sustituyen a un seguro. Los propietarios e inquilinos deben ase-
gurar a sí mismos y a sus bienes. Además, es posible que el sensor de humo falle en cual-
quier momento. Es por eso que debe probar su sensor de humo semanalmente y reempla-
zarlo cada 10 años.

17
Baterías
Voltaje :
Paquete :
DC 1.5V
Batería Alcalina AA
Áreas donde se produce la combustión
bajo condiciones normales, tales como
la cocina, la chimenea o áreas donde se
encuentran electrodomésticos como la
tetera. Utilice sensores especiales para
estas áreas que controlen alarmas no
deseadas.
Áreas con ventilación o donde se en-
cuentran sistemas de calefacción o refri-
geración. Instale al menos 3 metros de
distancia de estas áreas, ya que el ujo
de aire puede mantener el humo aleja-
do de la alarma, evitando que suene.
Áreas de alta humedad como baños o lu-
gares donde se encuentran lavavajillas y
lavadoras. Instale los sensores a una distan-
cia mínima de 3 metros de estas áreas.
Áreas donde la temperatura puede caer
por debajo de 0° o subir por encima de
40°.
Áreas extremadamente polvorientas,
sucias e infestadas por insectos. Las par-
tículas en estas áreas pueden interrum-
pir el funcionamiento del sensor.
No instale un sensor de humo en los siguientes lugares:
Gire el cuerpo del sensor en sentido anti-
horario y sepárelo del soporte de montaje.
Retire las baterías viejas del
compartimiento de baterías.
Inserte dos baterías nuevas en el
compartimiento de baterías. Preste aten-
ción al polo positivo y negativo de las ba-
terías mientras las coloca.
Coloque el cuerpo del sensor en el so-
porte girándolo en el sentido horario.
Pruebe el sensor usando el botón de prue-
ba. El patrón de sonido que debe producir-
se es de 3 pitidos cortos seguidos de una
pausa de 1,5 segundos. Este patrón se repi-
te. Si no hay sonido, signica que el sensor
no funciona correctamente o ha habido un
error durante la instalación. Puede echar un
vistazo a la sección de solución de proble-
mas para conocer los pasos que se deben
tomar para resolver los problemas.
Especicaciones de Batería:
1.
2.
3.
4.
5.

18
La luz LED roja parpadea una vez cada 40 segun-
dos cuando el sensor funciona normalmente.
Si hay un problema con la batería o si la poten-
cia dla batería es baja, el sensor emite un pitido
bajo cada 40 segundos y la luz LED seguirá par-
padeando una vez cada 40 segundos.
Si hay un problema con el sensor, el sensor emi-
te un pitido bajo cada 40 segundos.
La luz LED roja parpadea cada 8 segundos
cuando el sensor está funcionando en modo
silencioso..
NOTA:
Si el sensor comienza a emitir un pitido
cada 40 segundos, presione el botón de
prueba. El sonido de advertencia per-
manecerá en silencio durante 8 horas.
En este proceso, el sensor puede detec-
tar humo, solo se apaga el pitido cada
40 segundos.
1.
2.
3.
4.
Luz LED:
Modo Silencioso:
Si presiona el botón de prueba mientras el sensor emite una alarma, la alarma se silenciará
durante unos 10 minutos y la luz LED roja comenzará a parpadear cada 8 segundos. Esto
signica que el sensor de humo ha entrado en modo silencioso.
Los sensores de humo están diseñados para minimizar las falsas alarmas. Las partículas de
la cocción pueden activar una alarma si el sensor se coloca cerca del área de cocción. Al
asar y freír, se pueden emitir muchas partículas inamables al medio ambiente. El uso de
ventilación ayudará a eliminar estas partículas de la cocina. Usar el botón de prueba para
silenciar la alarma es muy funcional, especialmente en áreas donde pueden ocurrir falsas
alarmas, tal como la cocina.
Solo debe utilizar la función de modo silencioso en caso de una alarma de la que conoce el
origen (por ejemplo, alarmas durante la cocción). Aproximadamente 10 minutos después
de pasar al modo silencioso, el sensor volverá al modo normal y la alarma sonará si todavía
hay partículas en el aire. El modo silencioso se puede operar repetidamente hasta que el
aire esté libre de partículas.

19
Prueba del Sensor de Humo:
Pruebe cada sensor de humo en su apartamento para asegurarse de que esté instalado
adecuadamente y funcione correctamente.
Presione rmemente el botón de prueba durante 5 segundos. La alarma emitirá 3 pitidos
cortos, luego se detendrá durante 1,5 segundos y este patrón continuará hasta que suelte
el botón. Una alarma puede sonar durante unos segundos después de soltar el botón.
PELIGRO: Si suena una alarma en una condición de no prueba, esto signica que el sensor
puede detectar humo. La alarma signica que debe tomar las precauciones necesarias
para la situación de inmediato.
El uso de llamas para probar el sensor
puede provocar lesiones y/o daños a la
propiedad.
Pruebe el sensor semanalmente y des-
pués de largos períodos de ausencia,
como el regreso de vacaciones.
Haga clic en el signo “+” en la esquina superior derecha de la pantalla de la aplicación.
Agregue su dispositivo seleccionando la pestaña “Sensores” en el menú de la izquierda,
luego “Sensor de Humo” y siga las instrucciones en la aplicación.
Manténgase alejado del sensor mientras
realiza la prueba. Puede realizar la prue-
ba siguiendo los pasos a continuación:
1.
2.
3.
Conexión Inalámbrica:
Frecuencia de Red Inalámbrica:
Corriente de Transmisión Inalámbrica:
Distancia de Red Inalámbrica:
2.4 GHz Wi-Fi
< 450mA
> 30 m
Agregar dispositivos usando la aplicación de Fonri WiFi:

20
Además de la prueba semanal, el sensor
debe limpiarse periódicamente de polvo,
suciedad y residuos. Limpie el dispositivo al
menos una vez al mes.
Usando una aspiradora con un cepillo sua-
ve, aspire todos los lados del dispositivo.
Asegúrese de que todos los agujeros estén
libres de suciedad.
NOTA: Coloque el sensor inmediatamente
después de limpiarlo y veri que si funciona
usando el botón de prueba.
IMPORTANTE: No retire la cubierta para
limpiar el interior del dispositivo. Esto afec-
tará la garantía.
ADVERTENCIA!
Utilice únicamente las batería s recomen-
dadas. El uso de batería s diferentes puede
dañar gravemente el sensor. Como medida
de precaución, se recomienda reemplazar
las baterías una vez al año.
Mantenimiento y Limpieza:
This manual suits for next models
1
Table of contents
Languages:
Popular Smoke Alarm manuals by other brands

System Sensor
System Sensor FAAST LT Control guide

Bellman & Symfon
Bellman & Symfon BE1281 quick start guide

jablotron
jablotron JA-85ST quick start guide

Universal Security Instruments
Universal Security Instruments MDS300 instructions

Teknim
Teknim TSD-5124 quick guide

Inovonics
Inovonics EN1244 installation instructions

System Sensor
System Sensor 2WTR-B Installation and maintenance instructions

Air Products
Air Products SM-501-N Installation and maintenance instructions

Quell
Quell QM10 manual

Kidde
Kidde 29J user guide

Dahua
Dahua DHI-HY-SAV849HAP-E quick start guide

Greenheck
Greenheck Combination Fire Smoke Damper SEFSDR-511 Specifications


