Fonzarelli Arthur User manual

2
Welcome to
Welcome to the Fonz community - you’ve just taken a positive step in reducing your carbon footprint!
Arthur is the perfect commuter vehicle. It allows you to easily negotiate traffic and park almost anywhere.
The smooth and responsive digitally-controlled powertrain can be optimised to suit your riding style.
Your dynamic ride customisations can include regenerative braking to improve efficiency and power configuration.
Not unlike your laptop or mobile phone, recharging Arthur is suited to the evening so you can probably
benefit from off-peak rates.
Now it’s time to get to know your electric ride!
What is Lithium Ion?
The PowerPack in your Arthur utilises high quality lithium technology; the forefront of rechargeable cell
technology with superior reliability, recharging time and power to weight ratio.
The PowerPack does not develop “charge memory” so you can recharge as frequently as it is convenient to do so.
Lithium Ion is an environmentally sustainable technology and does not use heavy metals like mercury or
cadmium found in other batteries.

3

4
Important Notice
Arthur is rated to carry the operator and up to one
passenger. Combined weight of rider, passenger,
accessories and cargo must never exceed the
maximum rated load capacity of 150kg. Minimising
load will improve performance.
Arthur is designed to travel on sealed roads only.
Personal injury or mechanical damage may result
if you do not operate the vehicle in accordance
with the guidelines of this document.
This symbol indicates that severe personal
injury or damage to equipment may result if
instructions are not followed.
Unless specified, ‘Arthur 1’ refers to the LA Fonzarelli
100 moped category, Arthur 2 and Arthur 3 refer to
LC Fonzarelli 125 motorcycle category.
Brakes & Tyres
Ride slowly and apply brakes gently to run in
tyres and brake pads during the first 100km.
We recommend keeping speed below 45km/h
during the run in period.
PowerPack
Allow 5 to 8 charge cycles for optimal Power-
Pack performance as the system learns your
PowerPack cells.
During the first 200KM do not to drop your
PowerPack below 40%.
All information in this Owners Manual is correct at the time of publication. Fonzarelli Bikes reserves the right to make
changes at any time without incurring obligation. © Fonzarelli Bikes 2020.
Running in
Read this Owners Manual carefully, and retain it for future reference.

5
Content
Safe Riding.......................................................6
Equipment.....................................................7
Storage & load..............................................24
Specification.................................................26
Maintenance.................................................27
Riding..............................................................21
Stands.............................................................17
Right side
Left side
Vehicle identification...................................19
Charger............................................................15
Handlebars......................................................9
Instruments...................................................10
Ignition............................................................11
PowerPack......................................................12
Pillion passenger
Accessories
Electronics.....................................................30
Range & Performance.................................31
Warranty........................................................32
PowerPack storage
Operating temperature
Long-term storage
Reverse, Regeneration...............................23
Equipment
Installation
Charging the PowerPack
Kick stand
Centre stand
VIN location
Motor (engine) number
Compliance plate
Pre-ride inspection
Starting procedure
Review safety before you ride
Braking
Reverse & Parking
Regeneration braking
Dynamic regeneration
Cleaning
Tyres
Brakes
Maintenance schedule

6
Safe Riding
Conduct a pre-ride check before you turn on the vehicle. This will prevent
any accidental damage to equipment.
Safe riding rules
Further riding rules and tips can be found on the website of your local transport authority.
Obey all road regulations, and ride in a manner befitting road conditions
Keep your hands and feet fixed firmly to the vehicle at all times when riding
Always take extra caution at intersections, in high traffic situations, and when lane filtering
A compliant motorcycle helmet must be worn at all times when riding
Wearing a rider jacket, gloves and boots is strongly advised
Ensure that you hold the required rider licence for your state
Never lend your vehicle to an inexperienced rider
Never ride in another driver’s “blind spot”
Above all, ride to live; employ common sense in all traffic situations
Running in
See page 4 for information
about running in your Arthur.
7
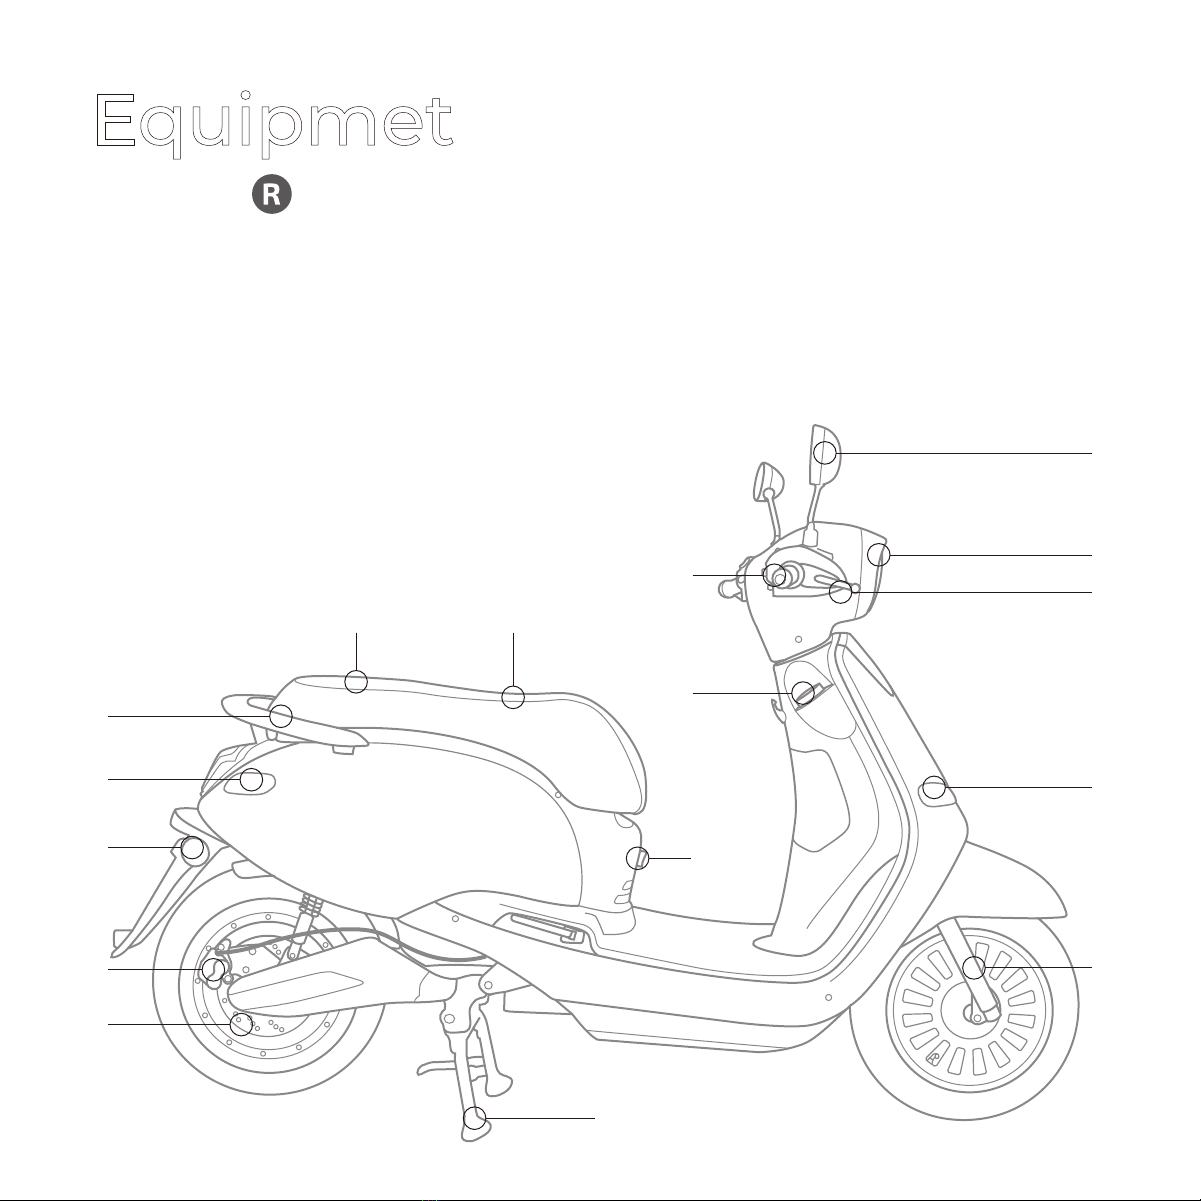
1. Rear view mirrors
2. Headlamp
3. Front brake lever
4. Front indicator
5. Front suspension
6. Centre stand
7. Rear disc brake
8. Rear brake caliper
9. Rear reflector
10. Rear indicator
11. Pillion dink grips
12. Pillion
13. Saddle
14. External Charge Port
15. Ignition
16. Throttle
Equipmet
List of parts -
1
2
3
4
5
6
7
8
9
10
11
12 13
15
16
14
8
16
17
18
19
20
22 21
23
24
25
26
27
28
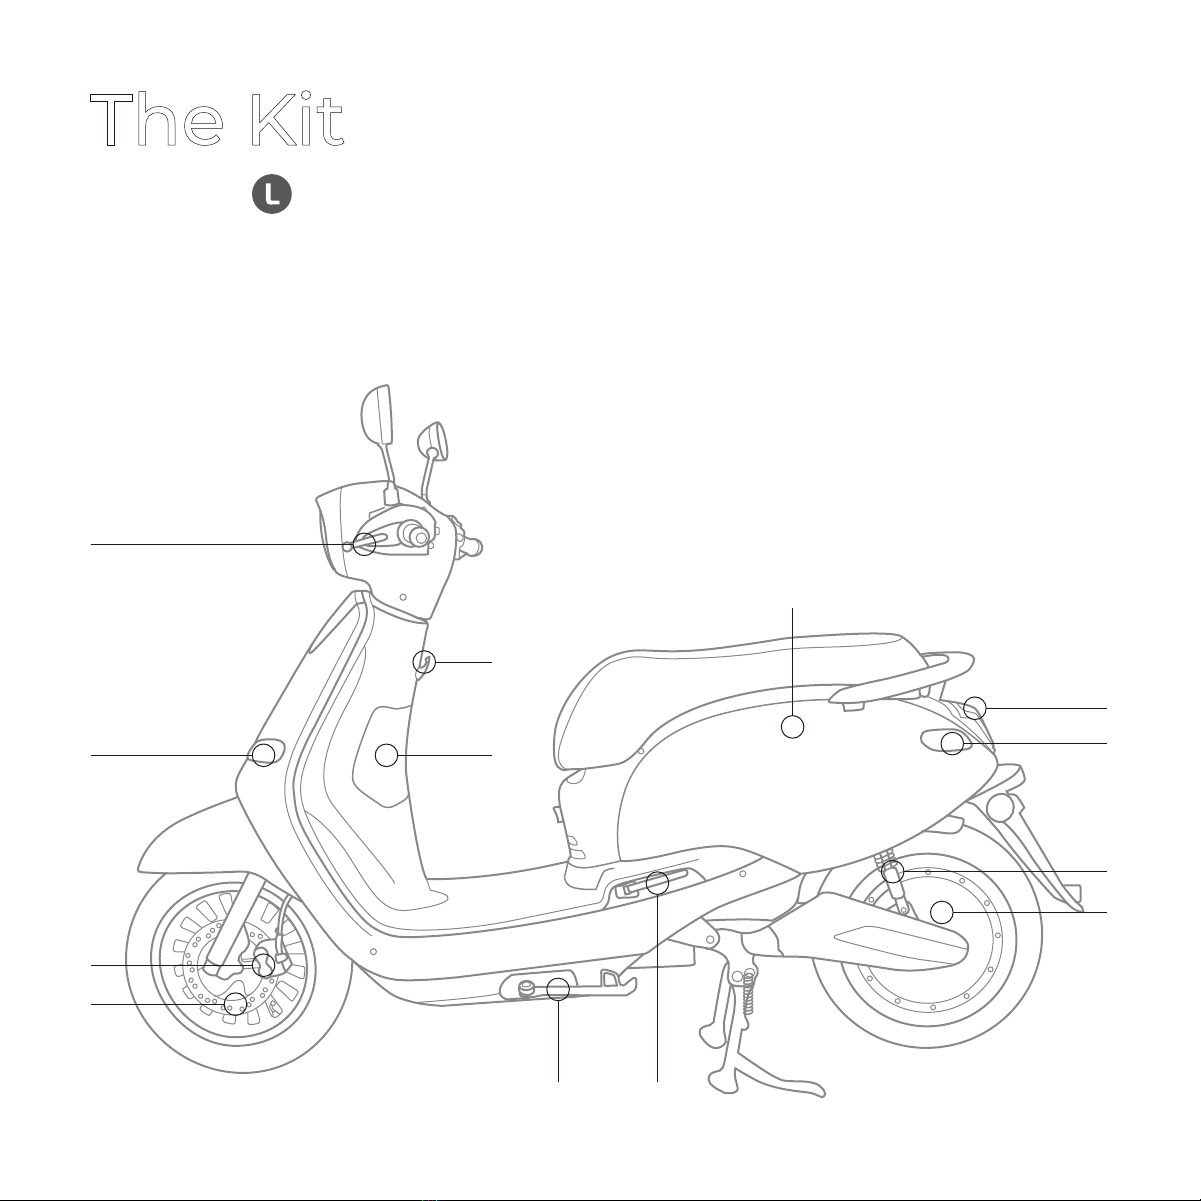
List of parts -
16. Under saddle storage
powerpack compartment
17. Tail light
18. Rear indicator
19. Rear suspension
20. Motor number
21. Pillion foot pegs
22. Side stand
23. Front disc brake
24. Front brake caliper
25. Front indicator
26. Rear brake lever
27. Bag hook
28. Storage Compartment
The Kit
9
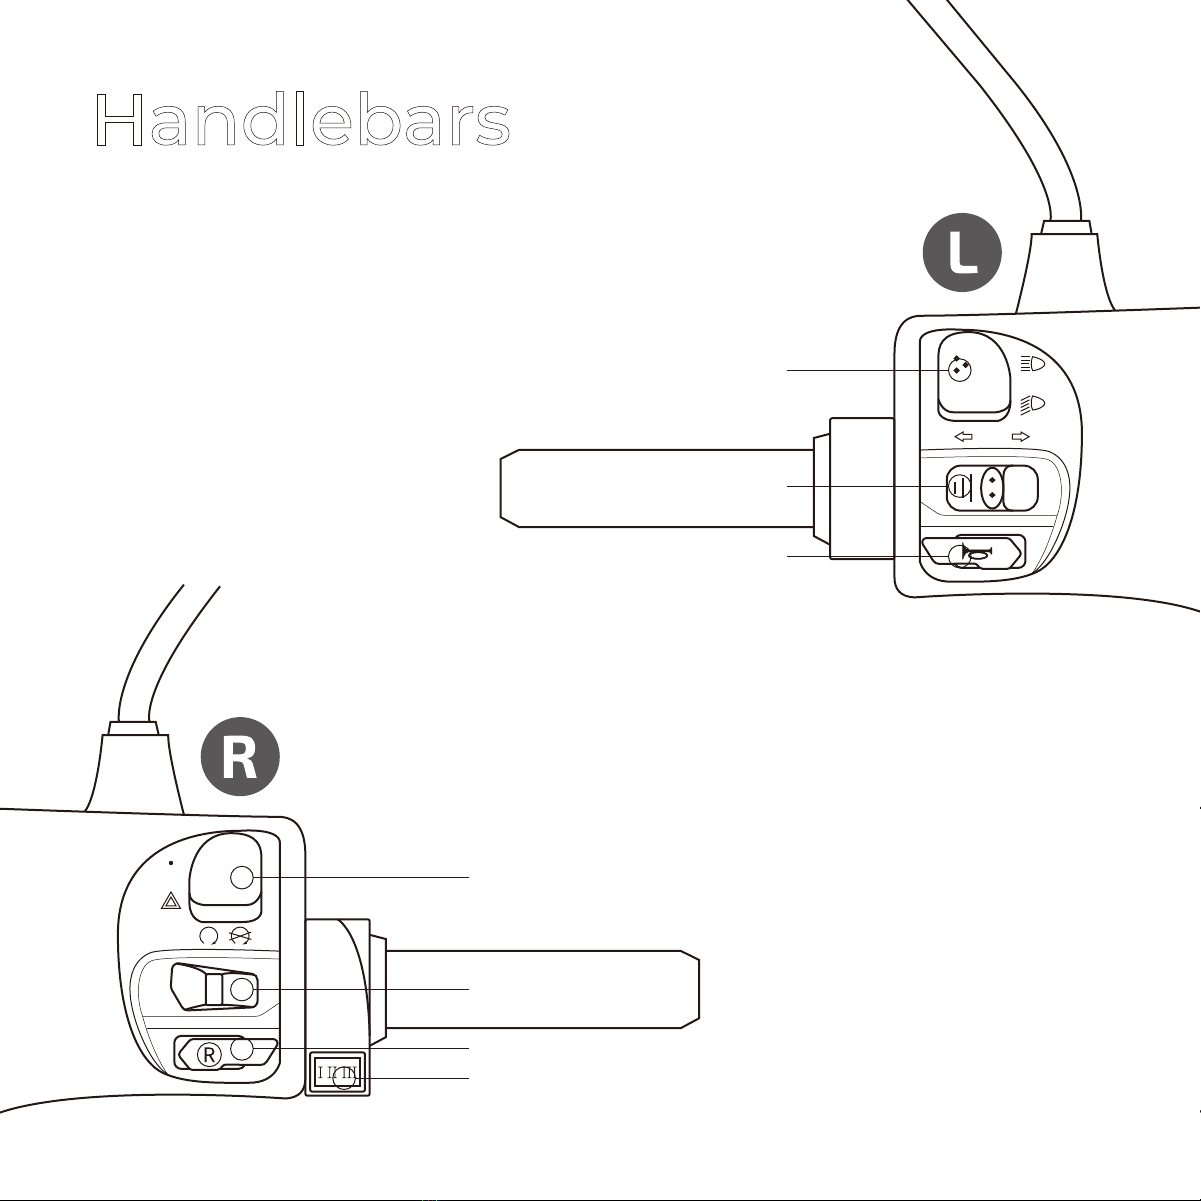
Handlebars
1. High beam/Low beam
2. Indicator switch
3. Horn
4. Hazard switch light
5. Kill switch
6. Ready & Reverse
7. Power modes (varies by model)
1
4
2
3
5
6
7

10
1
2 3 4
5
Instruments
7
6
1. PowerPack percentage
2. Indicator on signal
3. High beam signal
4. Power mode
5. Speed
6a. Odometer, 3 seconds
following power on
6b. Estimated mileage
(kilometres) during
ride mode
7. Powerpack SOC %
11
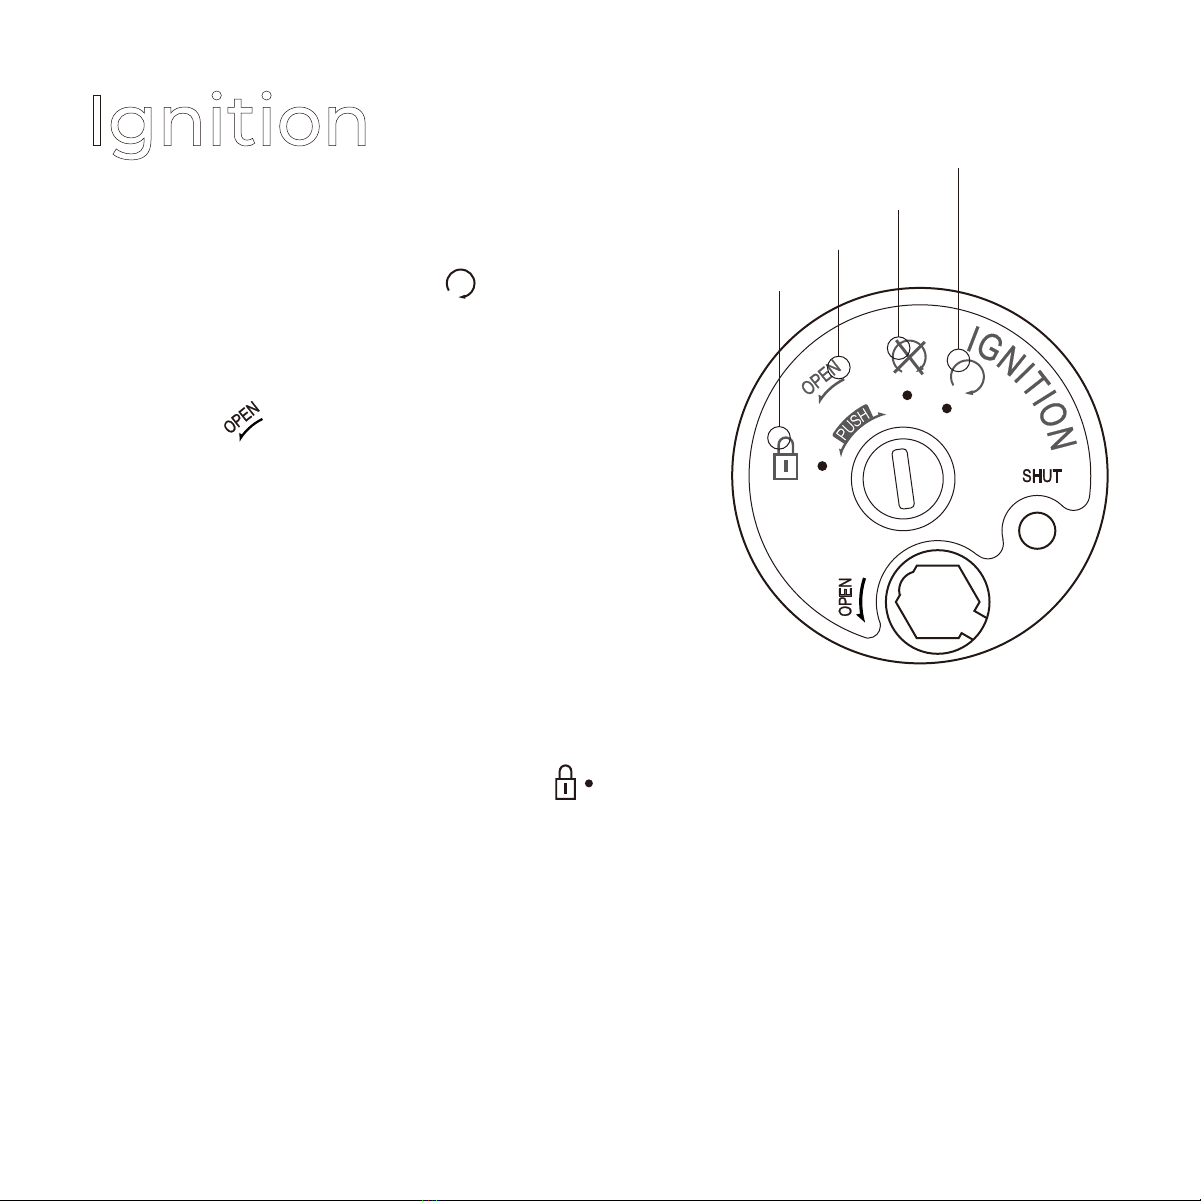
Power On / Off
1. Insert key
2. Turn key clockwise to ON position
3. Press ‘Ready‘ to activate ride mode (p.9, item6)
Saddle Release
1. Insert key
2. Gently turn the key slightly further than the OFF position
to disengage saddle latch
TIP: do not push down on the key or saddle cannot release.
Steering Lock
As an anti-theft precaution, Arthur is fitted with a steering lock after parking.
1. Parking
2. Ensure the handlebars are in the full left position
3. From the OFF position, push down on the key, and rotate
anticlockwise to the STEERING LOCK position
4. If the steering lock does not immediately engage, gently rock the handlebars a few degrees left to right
while turning the key
Disengaging Steering Lock
1. Handlebars will be in the full left position
2. From the STEERING LOCK position, push down on the key, and rotate
key clockwise to the OFF position
3. If the steering lock does not immediately disengage, gently rock the handlebars a few degrees left to right
while turning the key
Power mode on
Power mode off
Saddle release
Steering lock
Ignition

12
PowerPack
Note: Image depicts Arthur Model 1, 2 Configuration. Layout may vary by model.
Powerpack
cover
Locking
mechanism
Connector
PowerPack

13
PowerPack equipment
PowerPack
1. Power connector
2. Charge port
3. Safety switch
4. Charge level
1
2 3 4
Note: Image depicts Arthur Model 1. Configuration will vary by model variants.
14
Installation of PowerPack - Model 1 & 2
1. Insert the key, and turn anticlockwise to the saddle latch release position
2. Remove key from ignition
3. Lift the saddle
4. Release PowerPack cover by turning white locking mechanism clockwise
5. Lift PowerPack cover
6. Ensure PowerPack safety switch is set to the OFF position (right, toward the back of the PowerPack and
the scooter)
7. Insert the PowerPack into the holding bay
8. Connect power Connector (blue colour).
9. Set safety switch to ON position (left, toward front of the PowerPack and scooter)
10. Close PowerPack cover
11. Return locking mechanism anticlockwise to lock cover in place
PowerPack
For a longer service life, prevent arcing wear and tear on the Power
Connector by turning the Safety Switch to OFF position when the Power
Connector is being connected / disconnected. You can also minimise
sparking by ensuring the ignition is turned to OFF.
TIP
15
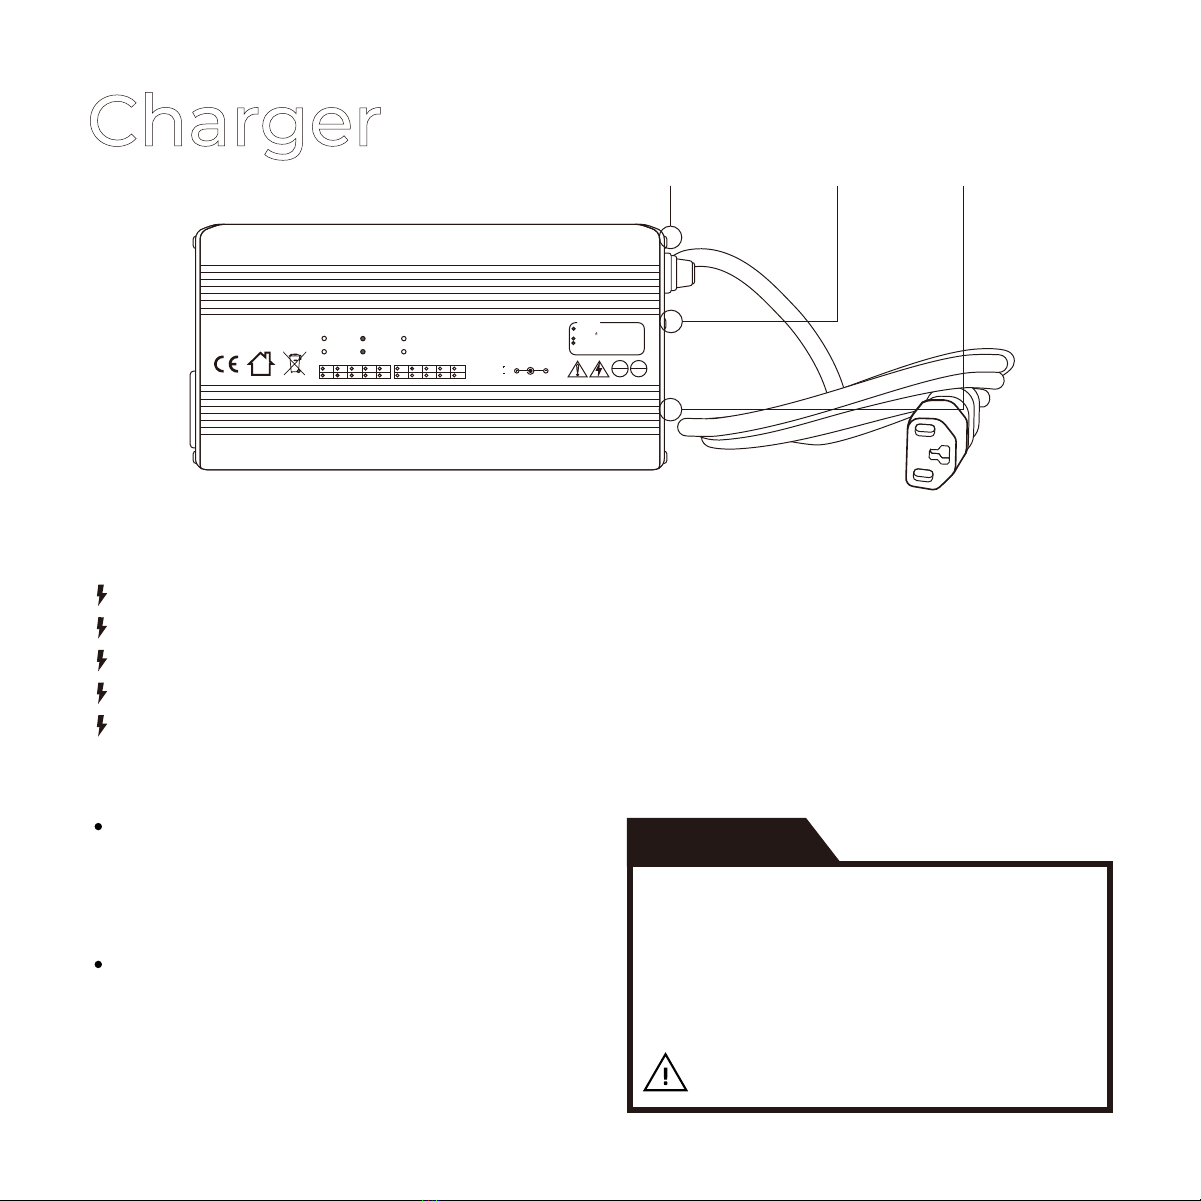
Charging Indicator :
Caution:
DC Output Wire :
LED1 Red: Power On
LED2 Red: Charging
LED2 Green: Charged
Battery Type:
AC Input :
Battery Voltage(V): Charge Current(A):
F M A
L90-120Vac
12
72
24
84
36
96
48 68
108
220-240Vac 100-240Vac
Brown:
Blue:
H W
3
8
4
10
5
12
6 7
Do not expose to wate r, volatile gas
or opened ame.
Charge in a well-ven tilated room.
The case of the charger is the heat
sink; do not cover it.
ATE
OK
20
15
HI-POT
OK
Charger features
If you are not riding the bike for extended periods of
time, you should leave the charge % between
60-90%. In case of malfunction, please contact
cusomer support immediately.
Warning! Never store the PowerPack at 0%.
Constant Current & Voltage (CC & CV)
Multi-Stage Charging
Built-in Microcontroller (MCU)
Pulse Width Modulation (PWM)
LLC Resonance and Synchronous Rectification
Charger Operation
Make sure the charger is firmly connected to the
Powerpack.
The charger will be turned off automatically after
the Powerpack is fully charged. Unplug the charger
from AC outlet when the charger is not in use.
Some chargers are not designed to be carry
onboard the vehicle. Please make sure the voltage
from AC outlet matches that required by the
charger. Fonzarelli is not responsible for any
improper operations.
Notes: Unplug the charger from AC outlet before
unplugging the Powerpack.
Notes: Plug the charger into the Powerpack after
plugging into the standard AC outlet.
LED Display Fuse On/Off switch
Charger
IMPORTANT
60 - 90%

16
Safety Information
NEVER store the charger outdoors. Always store
indoors when not in use.
NEVER place the output cable, power cord or
charger on a wet surface.
NEVER use the charger with defective power cord
and/or damaged wires.
DO NOT use in extremely humid conditions.
DO NOT place the charger directly in sun light.
NEVER use the charger near flammable and explosive
areas.
ALWAYS keep the charger vent 10cm away from
other objects & DO NOT cover.
Unplug charger from AC outlet before attempting
any maintenance or cleaning.
Place the charger in a clean and ventilated enviro-
ment while charging.
Plug in and unplug the AC power cord by grasping the plug.
Do not drag the power cord itself to reduce risk of
damaging power cord.
These techniques will ensure system integrity
and precisely control the charging voltage and
current. The Powerpack will be fully charged but
not overcharged.
Frequent charging will not effect life cycles.
From time-to-time ensure discharging calibrate
cells to PowerPack management system by
charging & discharging 100%-5%.
Charge your Arthur anywhere. Portable charger
may be stowed under the saddle. It must be
stored in charger pouch and secured to avoid
damage to the charger while riding.
Every charger has been tested before shipping.
Please contact customer support immediately if
there is any damage to the charger.
The warranty is void if :
Operation instructions are not followed
Warranty period has passed
The damage is caused by improper operation
Damages caused by force majeure
Warning!
You must only use the charger supplied by Fonzarelli Bikes. Do not
use aftermarket products with the powerpack.
TIP
LIMITED WARRANTY

17
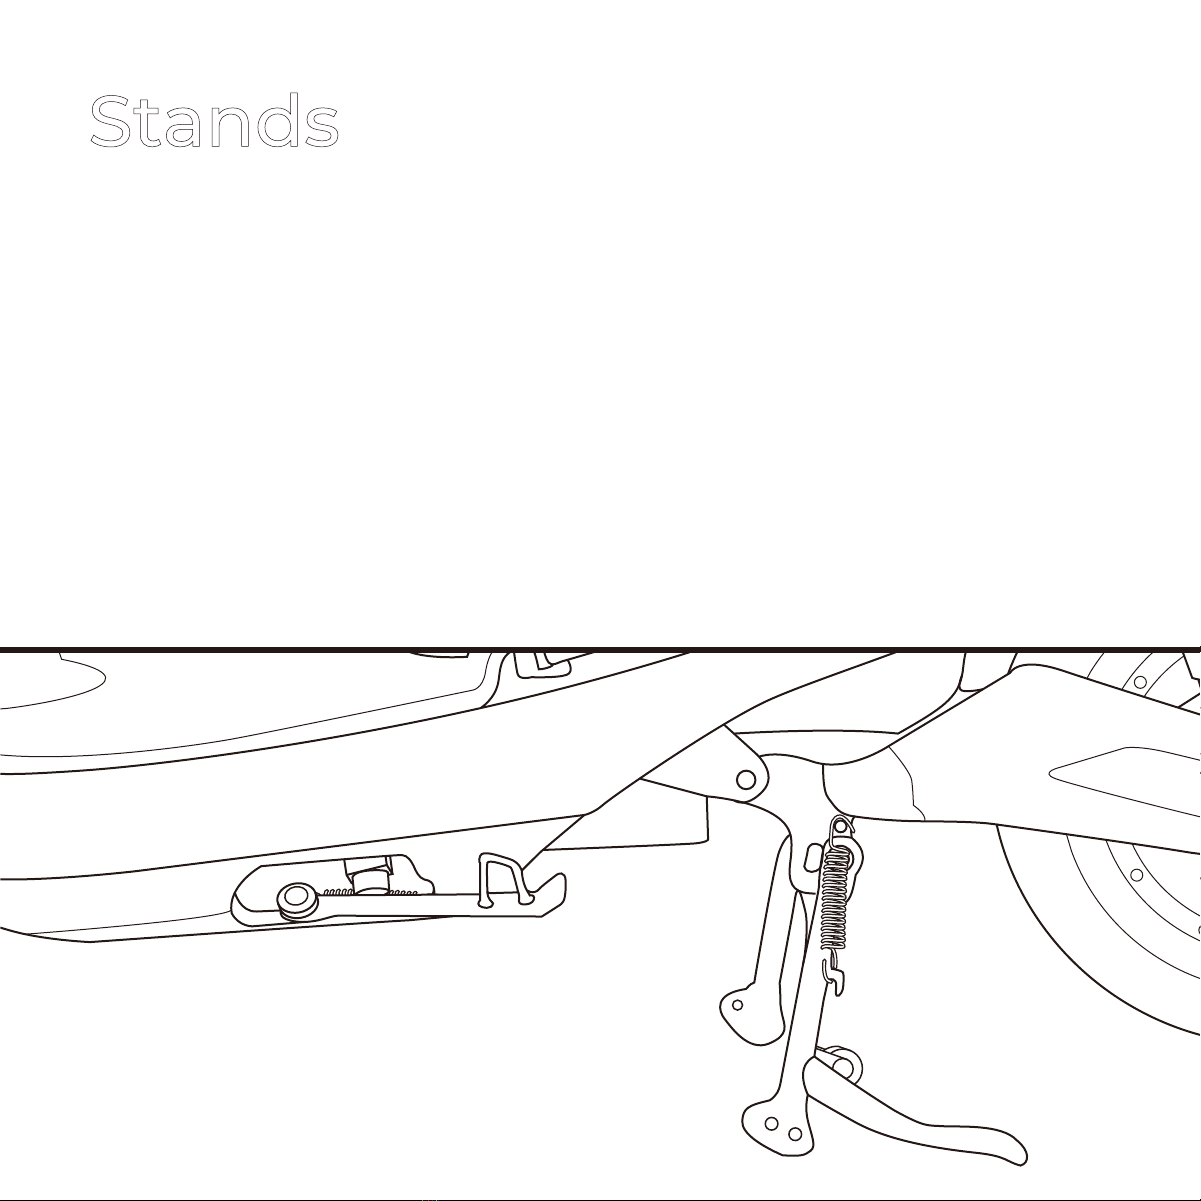
Kick stand
Use the kick stand when parking the scooter for a short amount of time.
1. Position the scooter on firm level ground. If you park on inclined ground, ensure that
the front wheel is pointing up-hill
2. Engage the kill switch
3. Swing the side-stand down, and support the scooter on the side-stand
4. Dismount the scooter, and turn the handlebars fully to the left
5. Turn the key to the OFF position
Stands
18
Centre stand
The centre stand should be employed when parking the scooter for extended periods
or when undertaking maintenance.
1. While dismounted, hold the left hand grip with your left hand
2. With your right hand, hold the pillion passenger left hand grip
3. While applying firm pressure to the main stand foot lever, lift the rear of the scooter
4. Ensure the weight is fully supported by the main stand before you release grip of the scooter
Stands
19
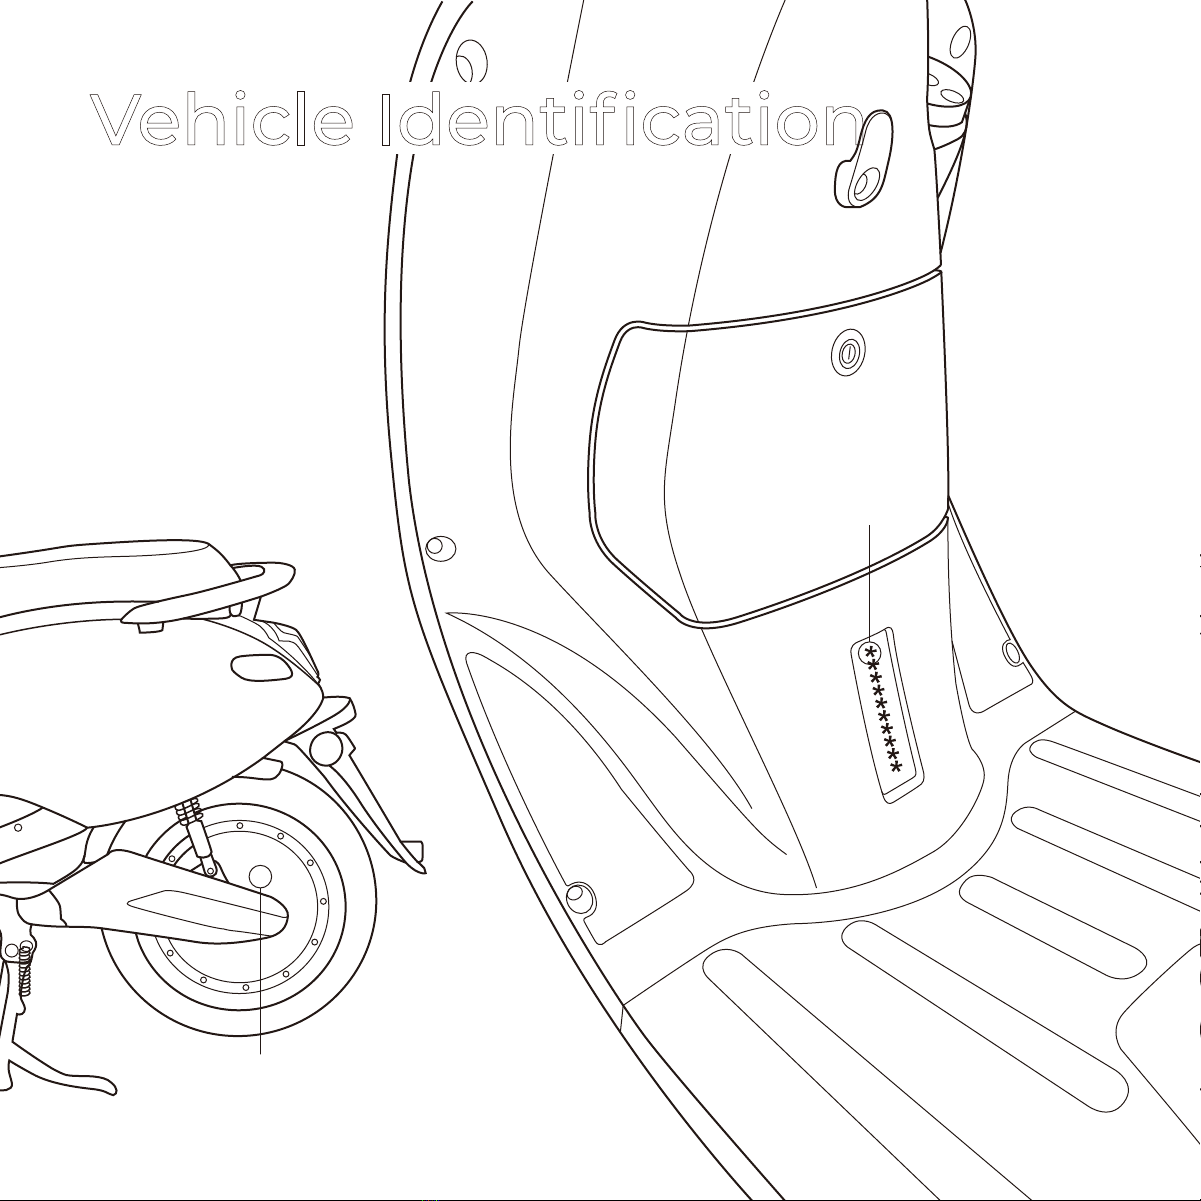
VIN Location
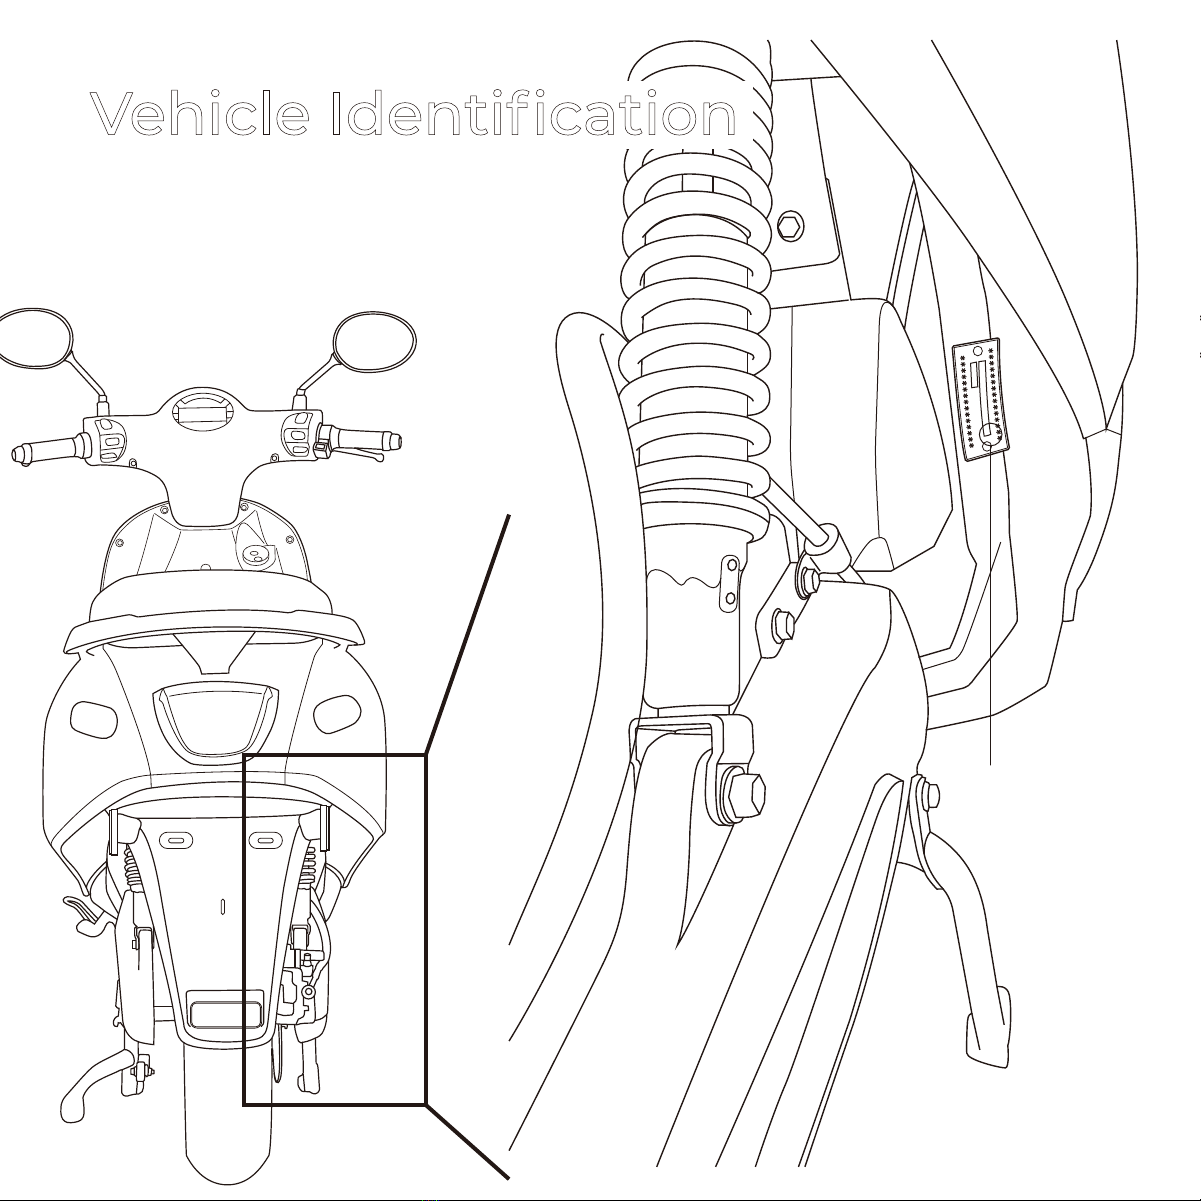
Motor (engine) number
VIN Location
(behind plate)
Motor number location
Vehicle Identification
20
Compliance plate
location
Compliance plate
Vehicle Identification
Table of contents


