Forno Bravo Toscana80 User manual

Forno Bravo, LLC
Toscana Assembled Refractory Ovens, Including:
Toscana80, Toscana90, Toscana100, Toscana110
Installation and Operation Manual
A MAJOR CAUSE OF OVEN-RELATED FIRE IS FAILURE TO MAINTAIN REQUIRED
CLEARANCES (AIR SPACES) TO COMBUSTIBLE MATERIALS. IT IS OF UTMOST
IMPORTANCE THAT THIS OVEN BE INSTALLED ONLY IN ACCORDANCE WITH THESE
INSTRUCTIONS.
Forno Bravo, LLC
744 Neeson Road
Marina, CA 93933
(800) 407-5119
http://www.fornobravo.com
ToscanaAssembledOven
Installation and Operation Manual
© Forno Bravo, LLC 2010. All Rights Served. Ver. 1.4 1

Warning
READ ALL INSTRUCTIONS BEFORE INSTALLING AND USING THE APPLIANCE. FAILURE TO FOLLOW
INSTRUCTIONS MAY RESULT IN PROPERTY DAMAGE, BODILY INJURY, OR EVEN DEATH.
HOT WHILE IN OPERATION. KEEP CHILDREN, CLOTHING AND FURNITURE AWAY. CONTACT MAY CAUSE SKIN
BURNS.
DO NOT BURN GARBAGE OR FLAMMABLE FLUIDS.
DO NOT USE THIS APPLIANCE INDOORS.
Keep children and pets away from hot oven.
Use firewood for burning only. DO NOT use charcoal, pressure treated lumber, chipped wood products, sappy wood such as
pine, laminated wood or any material other than dry medium or hard firewood.
DO NOT USE liquid fuel (firelighter fluid, gasoline, lantern oil, kerosene or similar liquids) to start or maintain a fire.
BEWARE of very high temperatures in the oven and use long oven gloves and mitts to handle pots and tools. DO NOT put
unprotected hands or arms inside oven while it is lit.
Dispose of ashes using a metal shovel and place in a metal bin with a tightly fitting lid. The container should be stored on a
non-combustible surface, away from all combustible materials. Ensure ashes are completely cold before disposing of them
appropriately.
BEWARE of flying sparks from mouth of oven. Ensure that no combustible materials are within range of oven at any time.
DO NOT close the oven door fully while a fire is in the oven. Closing the door fully will cut off oxygen to the fire, causing the fire
to erupt suddenly when the door is removed. Always keep door tilted to allow air to circulate in the oven.
DO NOT use water to dampen or extinguish fire in the oven.
DO NOT pack required air spaces with insulation or other materials.
Curing of the refractories is not done as part of the manufacturing process. Follow the instructions for curing the oven. Failure
to follow the curing schedule can cause damage to the oven, and will void the oven warranty.
SAVE THESE INSTRUCTIONS
ToscanaAssembledOven
Installation and Operation Manual
© Forno Bravo, LLC 2010. All Rights Served. Ver. 1.4 2

Limited Warranty
Forno Bravo, LLC Ovens and Fireplaces
THE WARRANTY
Forno Bravo, LLC, an importer and producer of ovens and
fireplaces, warrants it ovens and fireplaces (herein referred
to as Product) to be free from defects in materials and
workmanship for a period of (1) one year from the date of
shipment.
QUALIFICATIONS TO THE WARRANTY
The complete Product Warranty outlined above does not
apply under the following circumstances:
(1) The Product was not installed in accordance with Forno
Bravo installation instructions and local building codes.
(2) The Product has been subjected to non-standard use,
including burning fuels with abnormal burning
characteristics including, driftwood, coal, plywood and wood
products using a binder that may burn at excessive
temperatures and cause damage to the Product.
(3) This Warranty does not apply to normal wear and tear.
(4) This Warranty does not apply to any cracking caused by
over-firing or the failure to follow a proper curing schedule.
(5) In the event that the Listing plate has been removed,
altered or obliterated.
(6) On parts that would be normally worn or replaced under
normal conditions.
(7) Normal cracking due to expansion and contraction
stress relief in either the dome or floor tiles.
LIMITATION ON LIABILITY
It is expressly agreed and understood that Forno Bravo's
sole obligation and purchaser's exclusive remedy under this
Warranty, under any other warranty, expressed or implied,
otherwise, shall be limited to replacement, repair, or refund,
as specified above, and such liability shall not include, and
purchaser specifically renounces any rights to recover,
special, incidental, consequential or other damages of any
kind whatsoever, including, but not limited to, injuries to
persons or damage to property, loss of profits or anticipated
profits, or loss of use of the product.
In no event shall Forno Bravo be responsible for any
incidental or consequential damages caused by defects in
its products, whether such damage occurs or is discovered
before or after replacement or repair, and whether or not
such damage is caused by Forno Bravo’s negligence.
Some states do not allow the exclusion or limitation of
incidental or consequential damages, so the above
limitation or exclusion may not apply to you. The duration of
any implied warranty with respect to this Product is limited
to the duration of the foregoing warranty. Some states do
not allow limitations on how long an implied warranty lasts,
so the above may not apply to you.
INVESTIGATION OF CLAIMS AGAINST
WARRANTY
Forno Bravo reserves the right to investigate any and all
claims against this Warranty and to decide upon method of
settlement.
DEALERS HAVE NO AUTHORITY TO ALTER THIS
WARRANTY
Forno Bravo's employees and dealers have no authority to
make any warranties nor to authorize any remedies in
addition to or inconsistent with those stated above.
HOW TO REGISTER A CLAIM AGAINST
WARRANTY
In order for any claim under this Warranty to be valid, Forno
Bravo must be notified of the claimed defect in writing or by
telephone to Forno Bravo, 744 Neeson Road, Marina, CA,
93933. Claims against this Warranty in writing should
include the date of installation, and a description of the
defect.
ToscanaAssembledOven
Installation and Operation Manual
© Forno Bravo, LLC 2010. All Rights Served. Ver. 1.4 3

Table of Contents
..................................................................................................................................................1. About Your Oven 5
........................................................................................................................................2. Contained in the Crate 6
............................................................................................................................................3. Optional Oven Tools 7
...............................................................................................................................................4. Moving Your Oven 9
.................................................................................................................................................5. Oven Placement 10
..............................................................................................................................................6. Curing Your Oven 11
.........................................................................................................................................7. Firing and Operation 12
............................................................................................................................8. Oven Care and Maintenance 13
....................................................................................................................................10. How Your Oven Works 14
........................................................................................................................11. Types of Wood-Fired Cooking 16
...........................................................................................................................................12. Oven Management 20
.....................................................................................................................................................13. Pizza Baking 22
...................................................................................................................Appendix 1. Cucina Stand Assembly 23
......................................................................................................................................Appendix 2: Dimensions 24
..........................................................................................................Appendix 3. Optional Cooking Equipment 28
ToscanaAssembledOven
Installation and Operation Manual
© Forno Bravo, LLC 2010. All Rights Served. Ver. 1.4 4

1. About Your Oven
Your assembled Toscana Forno Bravo oven is made by
hand, with care, in the U.S., using traditional methods and
the highest quality refractories and insulators.
PLEASE READ THIS ENTIRE PAGE. IT
CONTAINS IMPORTANT INFORMATION THAT
WILL HELP KEEP YOUR OVEN OPERATING
OPTIMALLY. FAILURE TO FOLLOW THESE
INSTRUCTION CAN DAMAGE THE OVEN AND
POTENTIALLY VOID THE OVEN WARRANTY.
Variations in Finish
Because your oven is handmade, you will see variations in
the exterior finish. These variations are normal. We think
these ovens offer authentic handmade charm, and we
hope that you agree with us.
Curing
Always follow the Curing Schedule provided with your
Toscana oven. It is vital that you bring your oven up to
heat slowly in order to not damage the oven dome and
vent material. In the event that the inside of your oven gets
wet, follow the Curing Schedule to slowly dry it out. You
should also bring your oven up to heat slowly after any
period of rain and/or the oven not being used -- such as
the first firing in the spring (Toscana).
Soot
Over time, as is the case with any wood oven, the top of
the opening to your oven will become black with soot.
While your Toscana oven’s vent and chimney system do
an excellent job of drawing smoke and hot air out of the
oven chamber, soot is an unavoidable part of any wood
oven. You can occasionally clean the oven opening with
soap and water, or you can allow the opening to naturally
become black.
Oven Care
Your oven enclosure is sealed to withstand outdoor
weather conditions, including rain and snow. But you must
take care to ensure that water does not enter the oven
cooking area. When you are not using the oven, always
place the oven door tightly across the oven opening.
Hairline Cracks
Small hairline cracks may appear in your oven dome or
vent, which is a normal part of the heat up/cool down
(expansion/contraction) cycle that all wood ovens
experience. These small cracks will not impact how well
your oven cooks or how long it will last, and a majority of
minor cracks can be ignored. If you have any questions or
concerns, please contact Forno Bravo.
Water
Water can damage the inside of your oven. You must
ensure that no water enters the oven chamber, either
through the oven door opening or through the chimney.
Always place the provided metal door at the oven opening
to stop water from entering through the oven opening. Do
not install the oven at a backward angle, where water
could enter the oven, pool, and cause damage.
ToscanaAssembledOven
Installation and Operation Manual
© Forno Bravo, LLC 2010. All Rights Served. Ver. 1.4 5

2. Contained in the Crate
The oven, chimney and cap;
Steel door with thermometer
Forno Bravo CD ROM with wood-fired cooking and oven
operation eBooks.
Optional Accessories (not included with the
oven)
Cucina metal oven stand;
Oven tools;
Infrared thermometer;
Oven bakeware.
Available in Yellow or Terracotta.
ToscanaAssembledOven
Installation and Operation Manual
© Forno Bravo, LLC 2010. All Rights Served. Ver. 1.4 6

3. Optional Oven Tools
Forno Bravo provides optional oven tools that will make
your Primavera oven more fun and functional:
A rectangular peel for placing pizza, bread and bakeware.
A round peel for turning pizzas.
A brush for cleaning the cooking floor.
A rake with a specially shaped head to allow you to move
wood and hot coals and reach the edge where the oven
dome meets the cooking floor.
A shovel for removing hot coals and ashes and moving
and placing wood.
Short handled wooden pizza peels for assembling pizzas
before sliding them onto a metal peel to set in the oven.
ToscanaAssembledOven
Installation and Operation Manual
© Forno Bravo, LLC 2010. All Rights Served. Ver. 1.4 7

A long handled wooden pizza peel for assembling and
placing pizzas in the oven.
A log holder to keep your wood in place, and improve the
airflow, flame and heat in your oven.
An infrared thermometer for reading the oven dome and
floor temperature.
ToscanaAssembledOven
Installation and Operation Manual
© Forno Bravo, LLC 2010. All Rights Served. Ver. 1.4 8
4. Moving Your Oven
______________________________________________
The Toscana oven is too heavy for a liftgate
truck, and it must be removed from the delivery
truck with an owner provided forklift.
______________________________________________
Take care when moving and placing the Toscana oven. It
is too heavy to be lifted without professional, mechanical
assistance.
______________________________________________
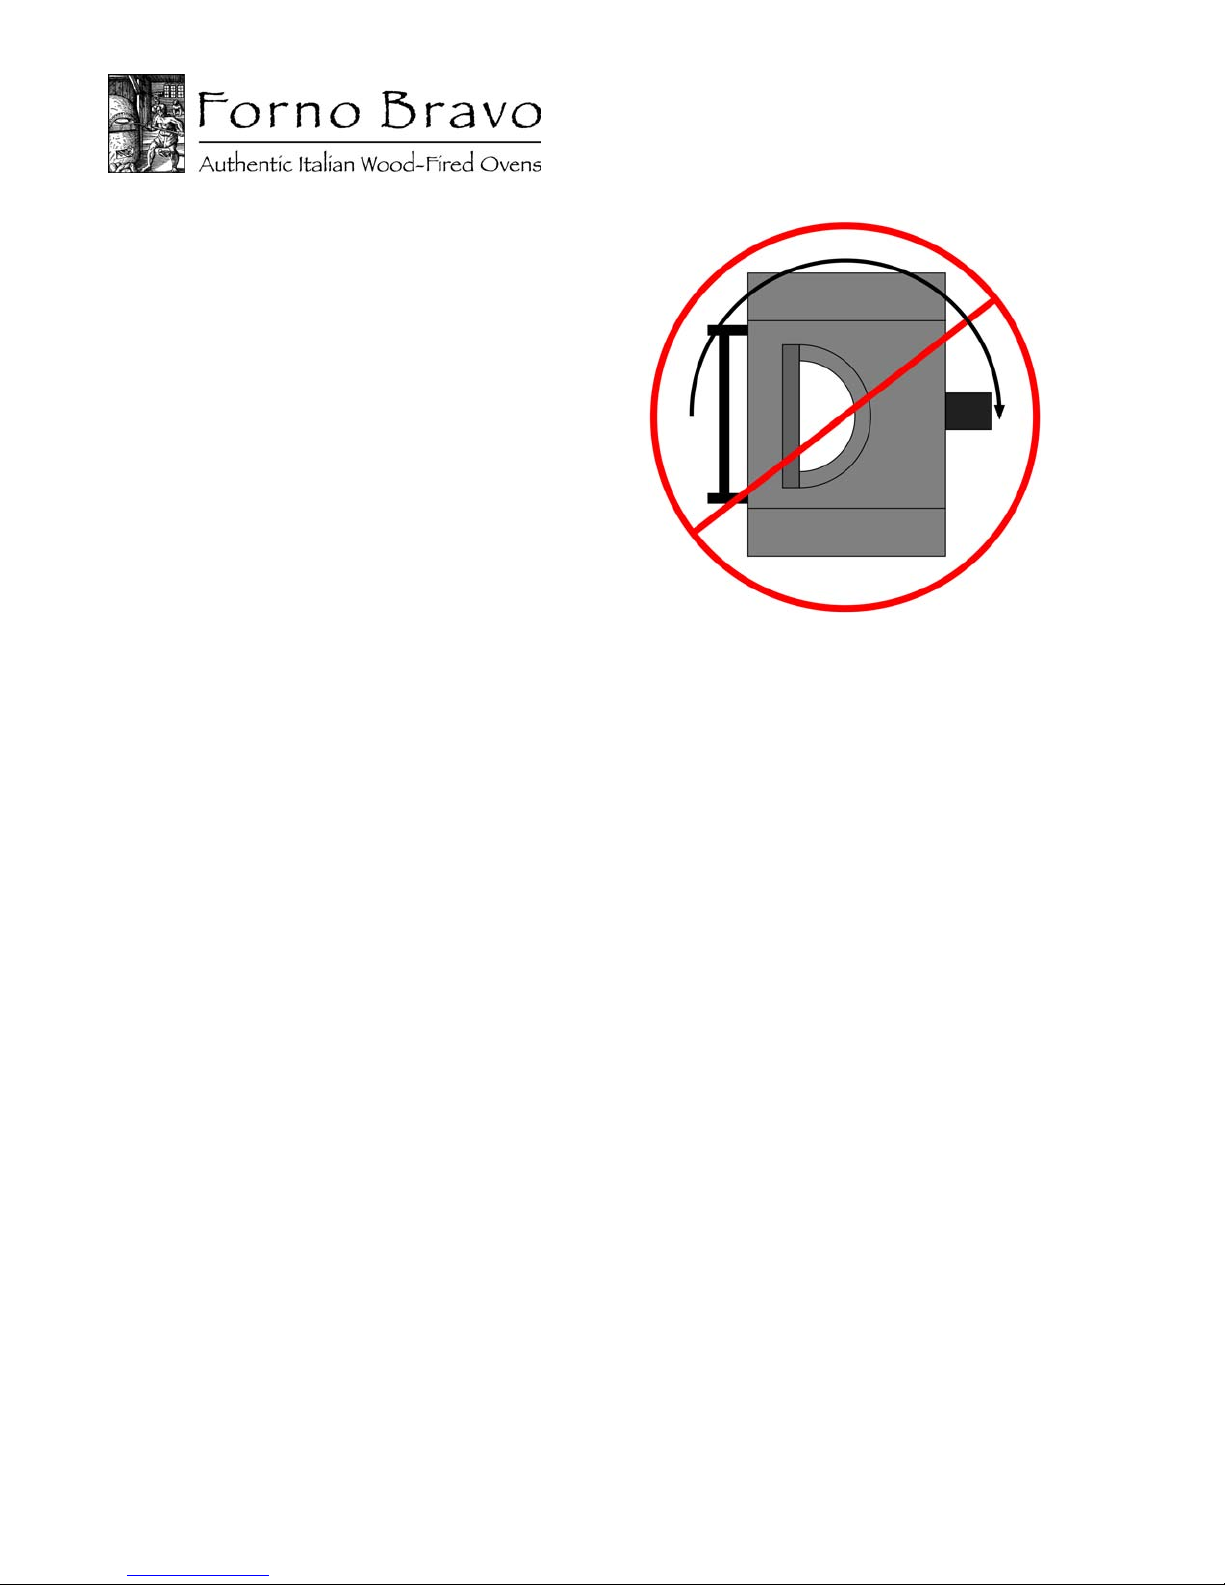
DO NOT TURN THE OVEN ON ITS SIDE. The
Toscana oven is not designed to be turned on its
side and you will cause significant damage to
the oven if you do so.
______________________________________________
ToscanaAssembledOven
Installation and Operation Manual
© Forno Bravo, LLC 2010. All Rights Served. Ver. 1.4 9
5. Oven Placement
______________________________________________
TAKE CARE WHEN SETTING THE OVEN. Take
care when moving and placing the Toscana
oven. It is too heavy to be lifted without
professional, mechanical assistance.
______________________________________________
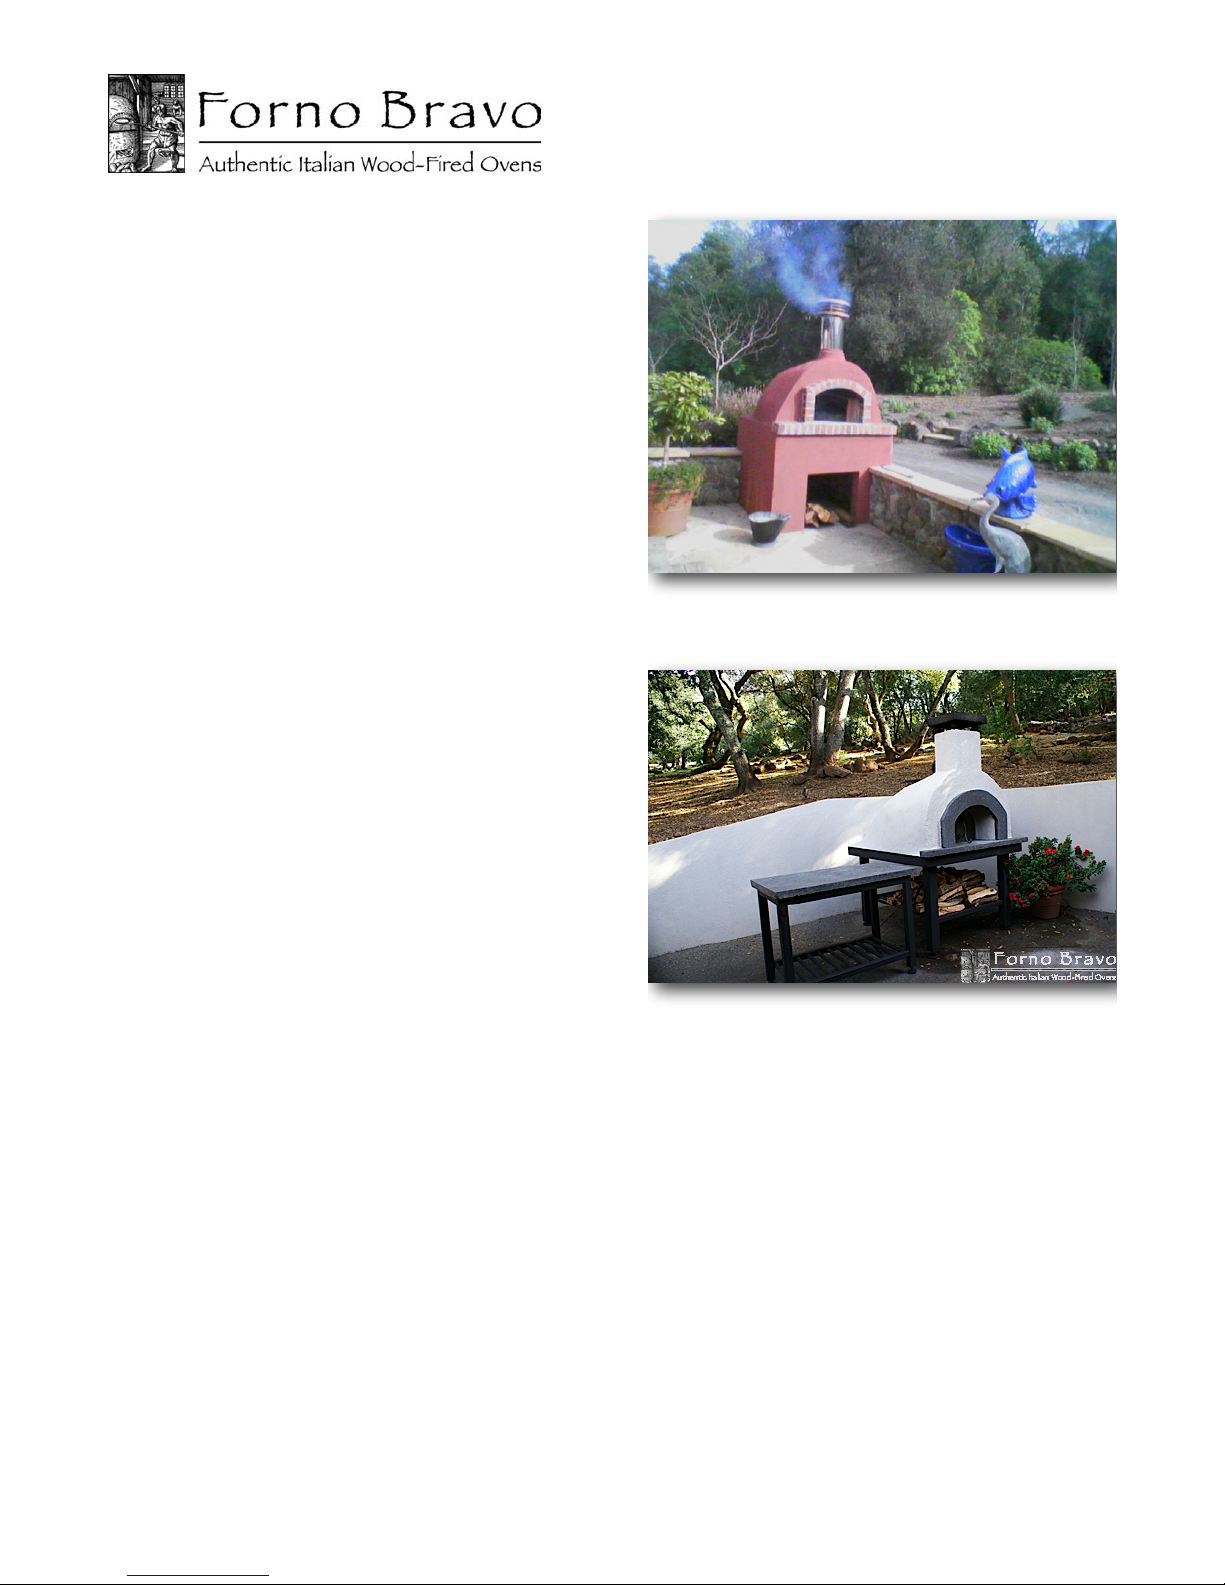
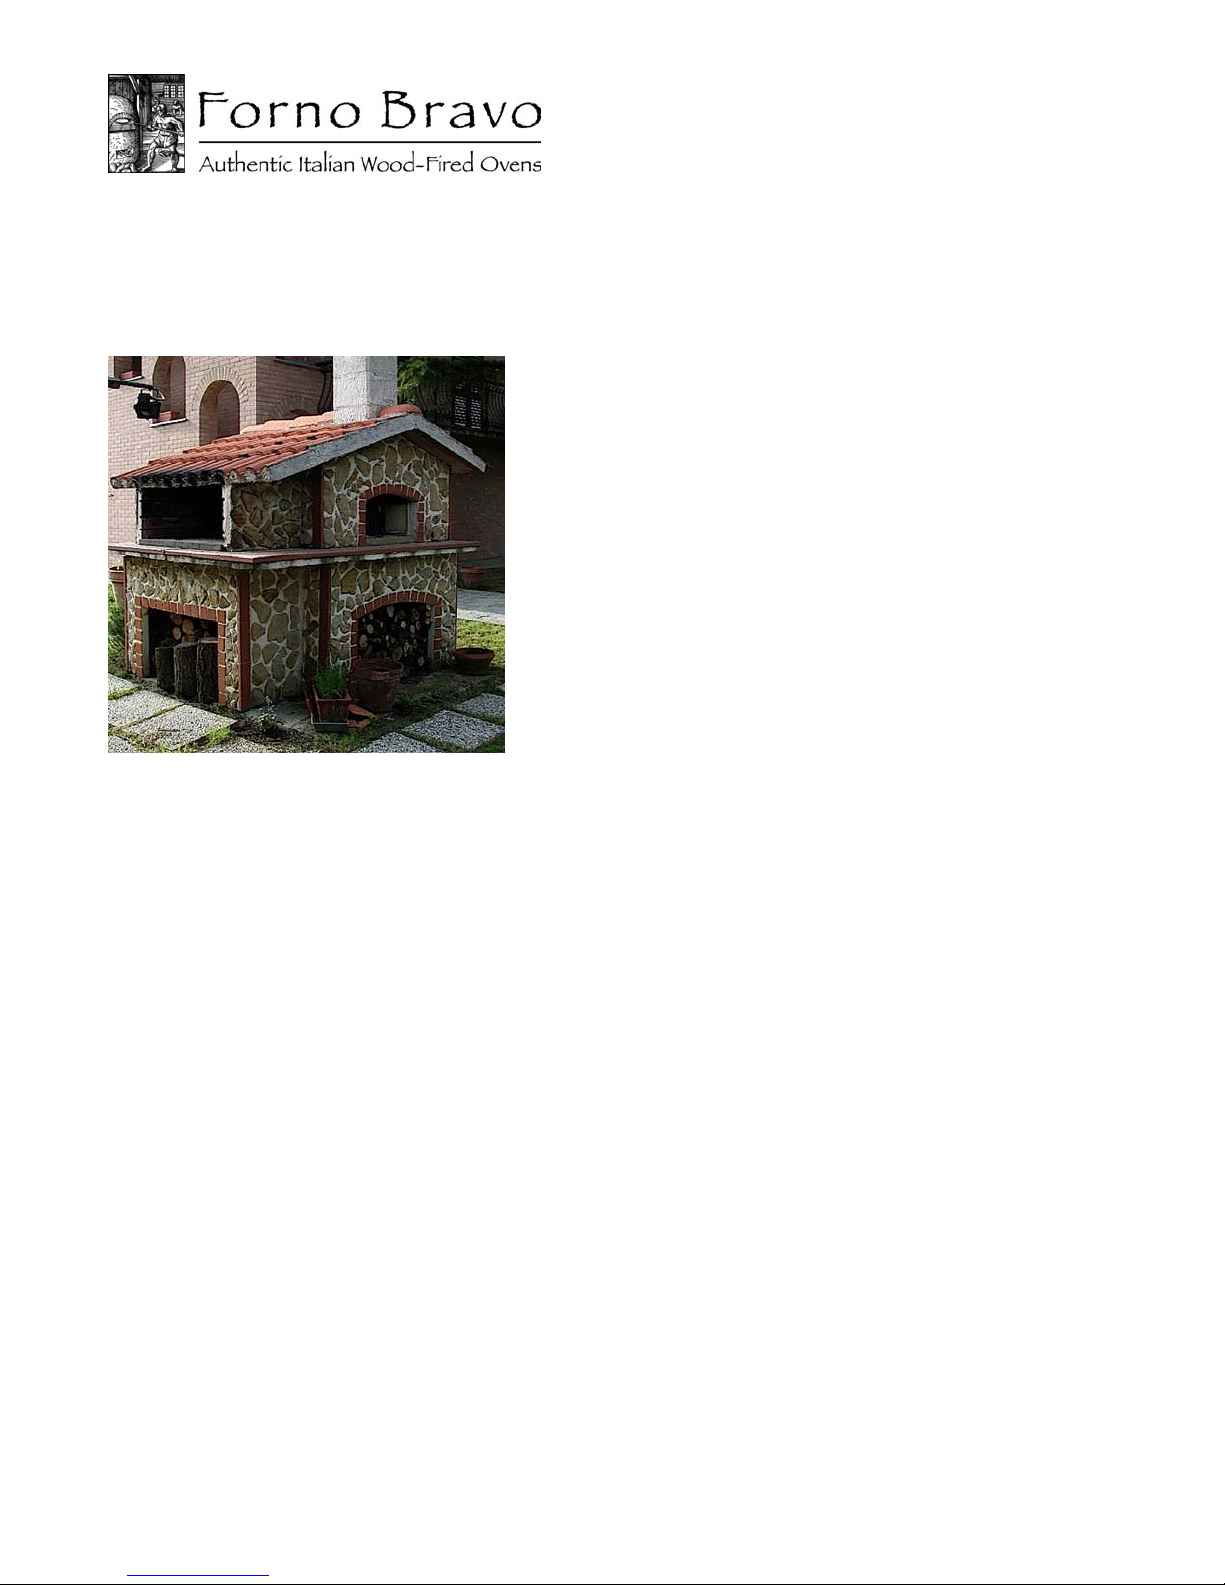
The Toscana oven can be placed on a variety of support
structures, including the Forno Bravo Cucina metal stand
frame, a customer built oven stand, an outdoor kitchen
counter, and a BBQ island. Support structures can be
build from concrete block, metal studs, or angle iron. It is
very important to ensure that the structure is capable of
holding the weight of the oven with any risk of movement
or settling.
A block stand can be stuccoed to match the color of the
Toscana oven.
A custom Toscana oven on a simple metal stand.
ToscanaAssembledOven
Installation and Operation Manual
© Forno Bravo, LLC 2010. All Rights Served. Ver. 1.4 10

6. Curing Your Oven
Although it may appear that your oven is dry, there is
moisture in the oven dome and cooking floor, mortars and
concrete that must work its way out. It is important that
you cure your oven slowly, by building a series of five
increasingly larger fires, starting with a low temperature.
These fires bake the moisture out of your oven slowly,
without creating steam that can damage the oven pieces.
If you begin building large fires in your oven right way, you
will compromise your oven's longevity, and cause damage,
including cracking.
For an accurate reading of the oven’s surface
temperatures, you can use the optional digital infrared
thermometer.
Day 1. Maintain a fire temperature of 300ºF throughout the
day and as long as possible into the evening. Close the
oven door at the end of the day.
Day 2. Repeat at 350ºF.
Important Note. While it is difficult to maintain consistent,
low temperature fires, it is critical for proper curing that you
do not go above these temperatures during the first two
days. The temperature of the oven will vary at different
spots—particularly at first. Do not exceed the
recommended temperature at the hottest spot, typically
the top of the dome directly above the fire.
Day 3. Repeat at 400ºF.
Day 4. Repeat at 450ºF.
Day 5. Repeat at 500ºF.
Close the oven door every evening to preserve dryness
and heat.
Enjoy your oven. For additional information on how to get
the most from your Toscana oven, read our guide to
Wood-Fired Cooking, available on the Forno Bravo CD-
ROM provided with this oven, and through our web site –
www.fornobravo.com.
Small HAIRLINE cracks CAN occur with normal
heating and cooling of the oven. They will not
AFFECT the performance or LONGEVITY of the
oven. If cracks of 1/8" or more develop, contact
Forno Bravo.
Important Notes
Use solid wood fuels only. DO NOT use charcoal,
pressure treated lumber, chipped wood products, sappy
wood such as pine, laminated wood or any material other
than dry medium or hard firewood.
Do not use products not specified for use with this
oven.
DO NOT USE liquid fuel (firelighter fluid, gasoline, lantern
oil, kerosene or similar liquids) to start or maintain a fire.
Never use water to lower the temperature inside the oven,
or to extinguish the fire.
ToscanaAssembledOven
Installation and Operation Manual
© Forno Bravo, LLC 2010. All Rights Served. Ver. 1.4 11

7. Firing and Operation
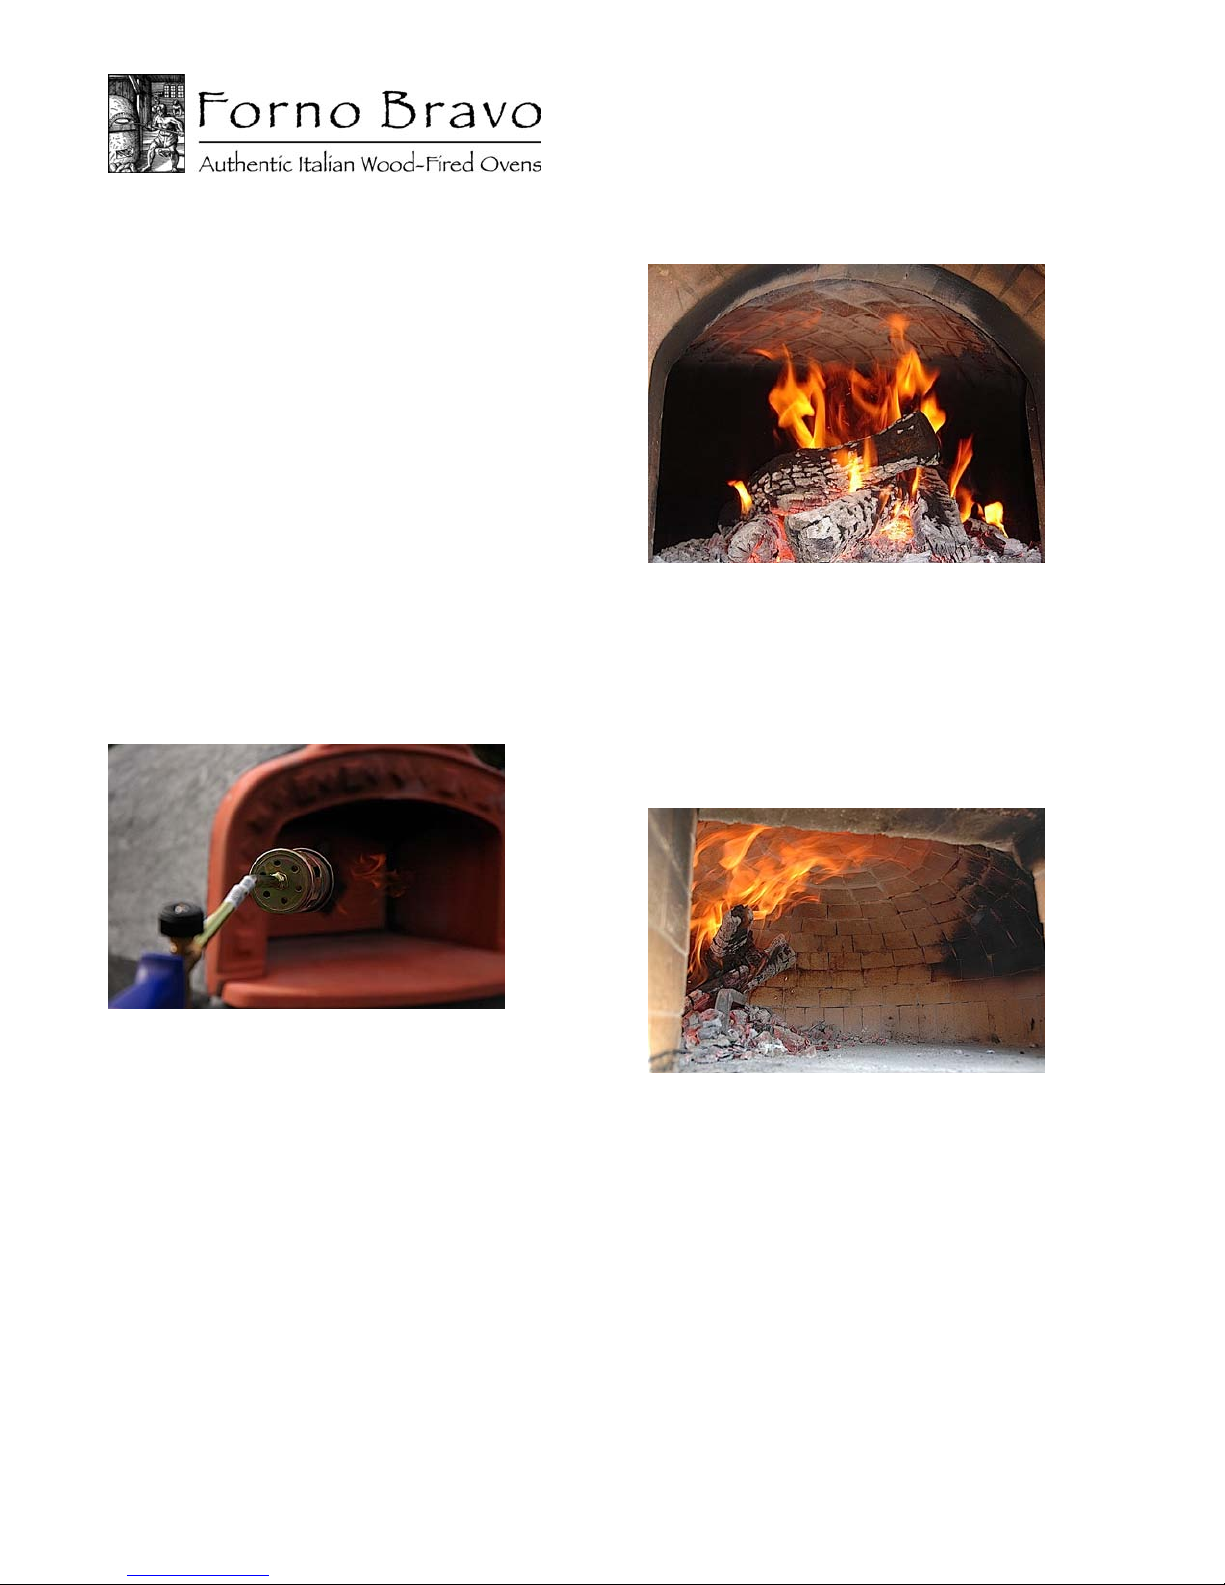
Start your fire in the center of the oven cooking floor using
a taste-free, odor-free fire starter and dry kindling. Build
your fire up slowly, adding wood to the back and sides as
the fire grows.
Continue to add wood until the oven reaches the desired
temperature. Then, move the fire to one side and brush
the oven floor. Only use the copper brush that was
provided with your oven, and do not use steel wire
brushes, natural fiber brushes or wet clothes to clean the
oven floor.
You can monitor your oven temperature using an optional
digital infrared thermometer.
DO NOT over fire your oven, or build a fire where flame
exits the oven door opening.
BEWARE of very high temperatures in the oven and use
long oven gloves and mitts to handle pots and tools. DO
NOT put unprotected hands or arms inside oven while it is
lit.
BEWARE of flying sparks from mouth of oven. Ensure that
no combustible materials are within range of oven at any
time.
DO NOT close the oven door fully while a fire is in the
oven. Closing the door fully will cut off oxygen to the fire,
causing the fire to erupt suddenly when the door is
removed.
Never use gasoline, gasoline-type lantern fuel, kerosene,
charcoal lighter fluid, or similar liquids to start or “freshen
up” a fire in the oven. Keep all such liquids well away from
the oven when in use.
Keep the oven door opening free of all combustible
materials when the oven is in operation.
Disposal of Ashes. Ashes should be placed in a metal
container with a tight-fitting lid. The closed container of
ashes should be placed on a non-combustible floor, or on
the ground, well away from all combustible materials
pending disposal. When the ashes are disposed by burial
in soil, or otherwise locally dispersed, they should be
retained in the closed container until all cinders have
thoroughly cooled.
Wood can be safely stacked in the area under the oven.
——————————————————————————
For more information on Oven Management and
Wood-Fired Cooking, refer to the Forno Bravo
Wood-Fired eCookbook Series—including Wood-
Fired Cooking, Wood-Fired Pizza and Wood-
Fired Hearth Bread—included on the CD ROM
provided with this oven.
——————————————————————————
ToscanaAssembledOven
Installation and Operation Manual
© Forno Bravo, LLC 2010. All Rights Served. Ver. 1.4 12

8. Oven Care and Maintenance
Your oven enclosure is sealed and painted to withstand
outdoor weather conditions, including rain and snow. But
you must take care to ensure that water does not enter the
oven cooking area. If you choose to leave your oven
outside permanently, always place the oven door tightly
across the oven opening, and ensure that the provided
spark arrestor is attached.
Your oven requires very little on-going maintenance or
cleaning. The oven operates at very high temperatures,
which acts as an automatic “self-cleaning” mode, burning
off all spilled or stuck-on foods.
If stuck-on food is a problem during cooking, you can
remove it with the provide brass oven brush.
Clean the ashes out of your oven, before you light a new
fire. Old, cold ashes will get in the way of food baking.
ToscanaAssembledOven
Installation and Operation Manual
© Forno Bravo, LLC 2010. All Rights Served. Ver. 1.4 13

10. How Your Oven Works
Wood-fired ovens use heat retained in the refractory dome
and cooking floor, along with the option of a live fire or hot
coals to create a range of different cooking environments.
Your Toscana oven can work with a live fire, hot or warm
coals and retained heat only.
It is this unique cooking ability that let's you bake Italian
pizza, hearth bread and great roasts in your Toscana
oven, and that makes wood-fired cooking unlike any other
type of cooking.
Live Fire
When cooking with a live fire, your Forno Bravo oven
cooks simultaneously in three ways, as shown in the three
graphics on the right:
•Reflected heat
•Convection
•Conductive heat
With reflective heat, flame from a live fire is bounced off
the dome onto your food. This reflective heat cooks food,
such as pizza, and also recharges the cooking floor,
putting heat back into the floor to replace heat that is lost
through cooking.
Because your Forno Bravo oven breathes, drawing in cold
air through the lower half of the oven opening and
exhausting hot air out the top half of the opening, it is
constantly moving hot, moist air across the top of your
food. While modern convection ovens use fans and heat
coils to move hot, dry air within the oven, nothing can
compare with natural convection.
Finally, heat stored in the cooking floor is transferred
directly into food that is set on top of it. This is true for
bread and pizza, which are set directly on the cooking
floor, as well as for pots and pans which are placed on it.
ToscanaAssembledOven
Installation and Operation Manual
© Forno Bravo, LLC 2010. All Rights Served. Ver. 1.4 14
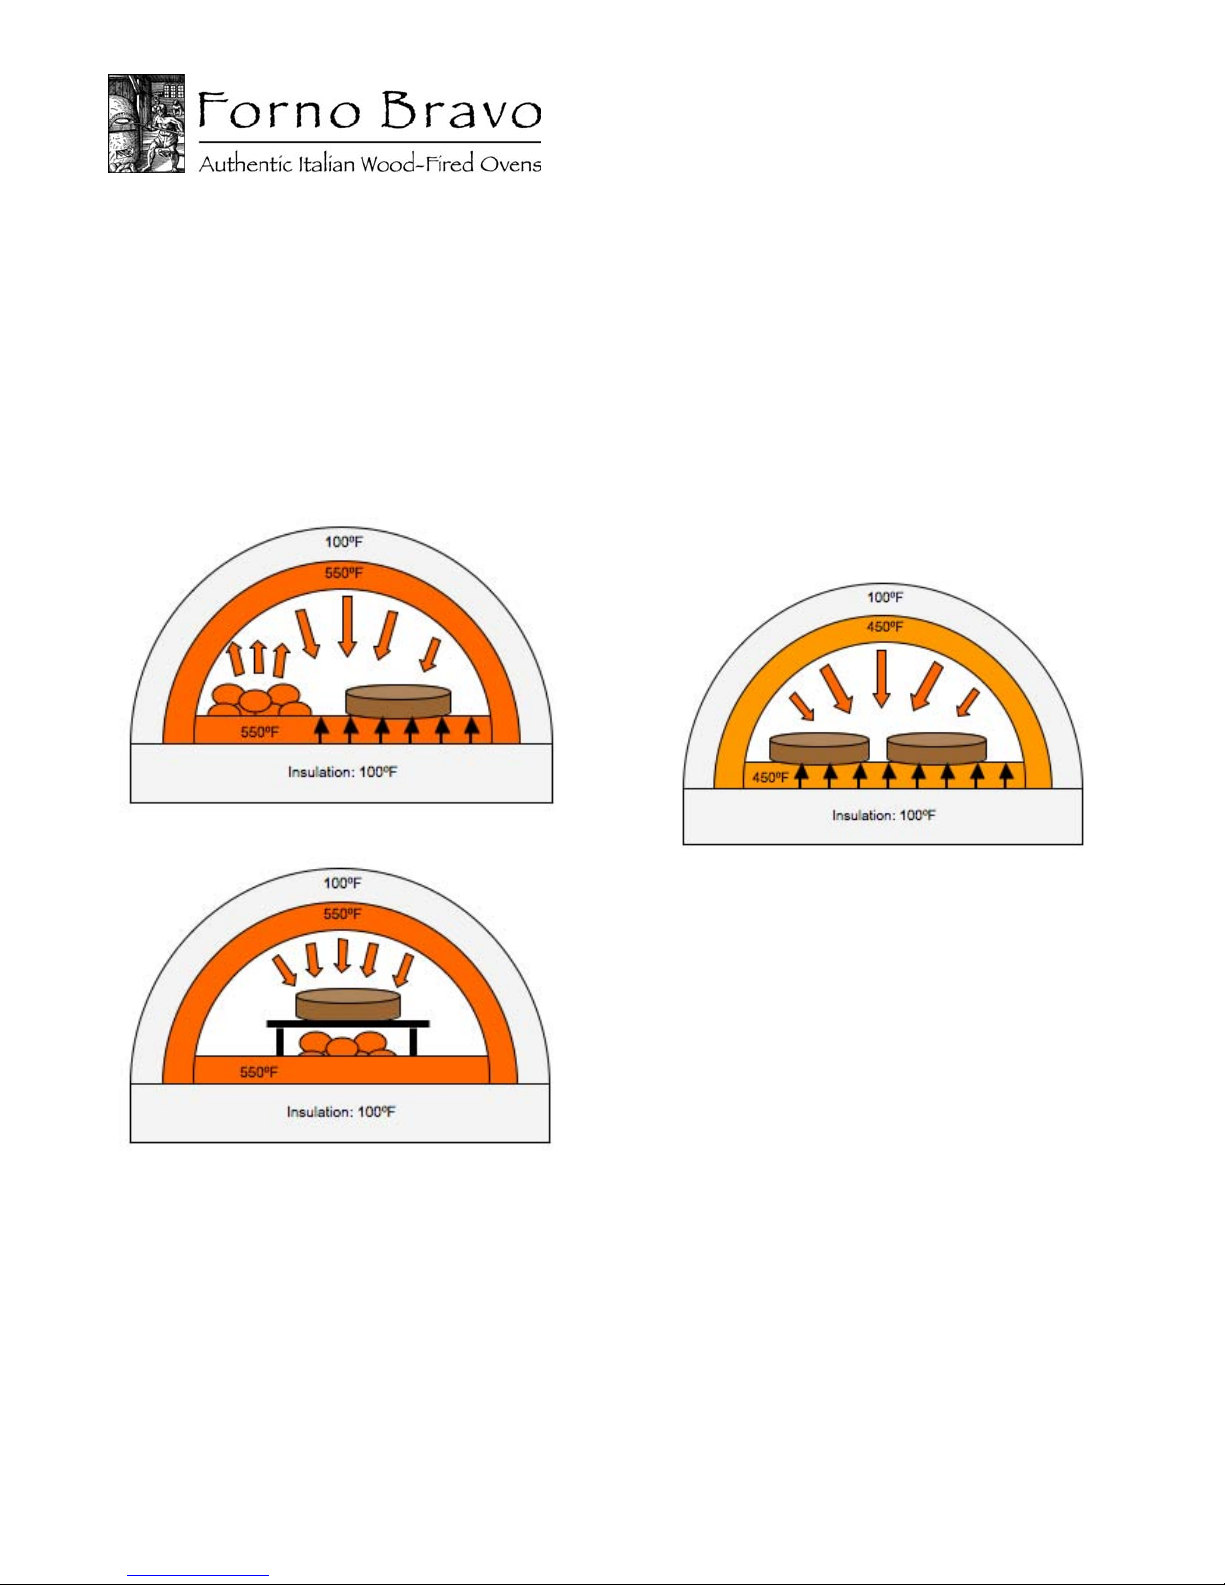
Hot or Warm Coals
There are many dishes that do not need, or want, the high
heat of a live fire and a very hot 700ºF oven. For cooler
styles of cooking, let your fire die down and allow your
oven to cool. You can use the heat of the coals and a hot
oven to roast, brown, sear, and grill, and to ensure that
your oven will retain enough heat for longer periods of
cooking. You can use hot or warm coals either on the side
of the oven, or directly under your food—as shown below.
Retained Heat
For baking bread and other dishes at temperatures where
you would normally cook in a conventional oven, your
oven will cook for hours with retained heat. You can rake
out the coals from the fire, and then close the oven door to
let the oven temperature moderate.
With this type of cooking, you can bake bread, desserts
and small roasts, and as the oven temperature falls, you
can slow cook beans, soups and stews, and long-cooking
meats and ribs.
ToscanaAssembledOven
Installation and Operation Manual
© Forno Bravo, LLC 2010. All Rights Served. Ver. 1.4 15

11. Types of Wood-Fired Cooking
Your Forno Bravo oven is capable of an almost endless
variety of cooking styles. With almost all types of cooking,
you should bring your oven fully up to heat, and then
prepare it for the type of cooking you want to do by moving
the fire and coals to one side of the oven, and then letting
the oven temperature reach the range where you will be
cooking. How long you fire your oven depends on how
much cooking you will be doing, and how long you want
your oven to hold its heat.
Remember that you can only take out heat from the oven
that you put in. If you are going to be cooking a lot of pizza
for a large party, or baking lots of bread or a large roast,
fire your oven longer. If you are making pizza for the family
for a mid-week meal, you can fire your oven for a shorter
time—typically only until the dome goes white.
The main cooking styles are:
Fire-in-the-Oven Cooking
Fire-in-the-oven cooking (650ºF and up) is used for baking
pizza, pizza-like flatbreads and certain types of appetizers,
all of which cook in a couple of minutes. Your Forno Bravo
Pizza Oven can be pizza-ready in about 45 minutes. The
goal with this type of cooking is to completely fill the floor
and dome with heat, build up a large sized bed of coals
and maintain a large fire where the flame reaches to top of
the dome.
There are two ways to know that an oven is ready to cook
pizza. First, when the oven dome itself has gone clear,
and there is no visible black soot. At this point, you should
move the fire to one side, while continuing to maintain a
large fire going with the flame reaching the middle of the
oven.
Alternatively, if you are using an infrared thermometer, the
floor should read approximately 650ºF-700ºF. Pizzas are
baked right on the floor next to the fire. Leave the oven
completely open, and add one piece of wood every 15-20
minutes to maintain a large flame.
——————————————————————————
For a visual description of how your Forno Bravo
oven absorbs, holds and uses heat to cook, see our
Wood-Fired Cooking eBook.
——————————————————————————
Roasting (at higher heat than baking)
When you want to sear meats, brown vegetables or
casseroles before covering them with a lid or with liquid, or
you want a dish to cook completely before the outside
burns or becomes too brown, you should use a roasting
temperature of between 600ºF and 450ºF. This range is
lower than for high heat fire-in-the-oven pizza cooking, but
higher than for traditional baking. In order to roast, first
bring you oven up to pizza temperature, and then allow it
to drop in temperature and the fire to burn down but not
out. Push the coals to one side.
ToscanaAssembledOven
Installation and Operation Manual
© Forno Bravo, LLC 2010. All Rights Served. Ver. 1.4 16

The fully fired oven combined with a low fire, enables you
to sear and brown dishes, and then allows the oven to
slowly drop in temperature for longer cooking. There
should be no visible black on the dome, a medium sized
bed of coals and a small flame of 2”-4” high. The door may
be left off for shorter roasting times (under one hour) or
positioned inside the arch opening to help regulate the
heat for hours of roasting. Add small pieces of wood as
needed to maintain temperature.
Baking (at conventional oven temperatures)
Baking (500ºF and lower) is used for baking bread,
desserts, smaller roast meats, beans and legumes, and
pasta dishes. After fully firing your oven, carefully rake out
the hot coals and brush out the oven. If you wish, you can
swab the deck with a damp, not wet, towel. As the
temperature falls, your oven will cook gently and
consistently using the heat retained in the oven dome and
floor.
With this type of cooking, you can bake either one fully
loaded batch of bread, or multiple batches of different
types of bread, but with smaller quantities.
——————————————————————————
Read the Forno Bravo Wood-Fired Bread eCookbook
for more information on bread baking techniques and
recipes.
——————————————————————————
Grilling
Your brick oven makes a great grill. By raking a layer of
hot coals across the cooking floor at the front of your oven,
and sliding in a free standing cast iron grill into the oven,
you can enjoy wonderful grilling – with top and bottom
heat. Meats and vegetables have very good grill marks
that seal in moisture, giving you food that is crisp and not
dried out. With heat from the grill itself, from the coals
below it, and the heat radiating from oven dome above,
your brick oven can cook faster than a traditional grill,
leaving your food more moist and tender.
ToscanaAssembledOven
Installation and Operation Manual
© Forno Bravo, LLC 2010. All Rights Served. Ver. 1.4 17
Browning
Your Forno Bravo oven reflects heat down from a live fire
to brown and sear foods. You can sear meats, before
adding them to casseroles to cook, and you can brown
vegetables as evenly and quickly as you can with the
broiler in your conventional oven. If your recipe calls for
browning multiple batches of vegetables, such as
Eggplant Parmesan or Ratatouille, you can spread out and
use your entire cooking floor to quickly do the job.
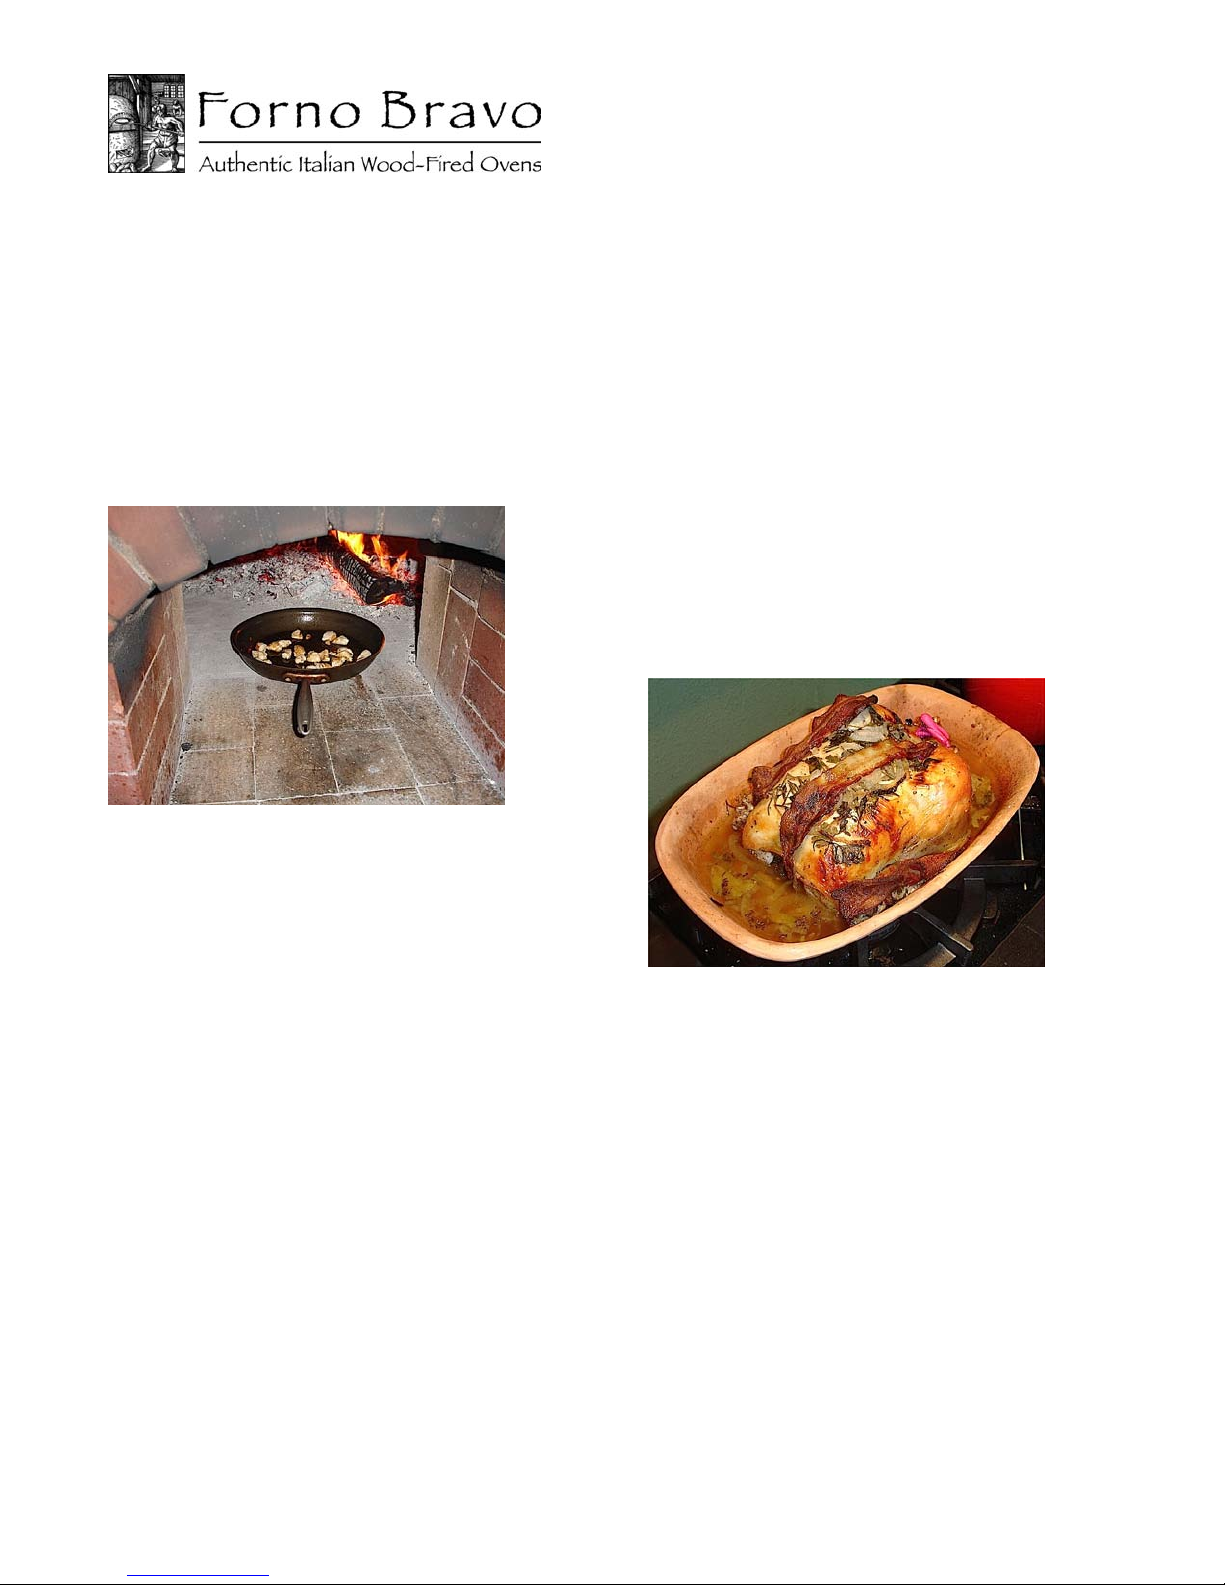
Sautéing
If your recipe calls for sautéing something (anything), such
as onions and garlic, celery and carrots, or ground beef,
you can use a metal pan to do the job in your Forno Bravo
oven. Preheat the pans for a minute or two, and then add
your olive oil, and return the pan for a few seconds. Add
your chopped vegetables, or anything else you need to
sauté, and return the pan for a few minutes. You can either
slightly sauté vegetables until they are soft and
translucent, or leave them in a while longer to brown the
vegetables and build up the browned bits that you can
reduced into a sauce with a splash of wine. You can leave
your pan in even longer to caramelize your onions.
Combination Cooking
Many brick oven dishes, such as Coq au Vin, Chicken
Fricassea and baked vegetable dishes can be cooked in a
single pan, without having to use your conventional oven
cook top. Add your ingredients in layers, sautéing and
browning them as needed. Add your liquid ingredients at
the end, and cover your pan to bake. This not only keeps
you out of the kitchen and reduces the number of pans
you have to clean, it also holds all of the flavors of your
ingredients in your pan and in your food – where you want
them.
Take a look at our Roast Rabbit recipe, and you can see
that this entire recipe can be done in your brick oven.
A Clay Pot in a Brick Oven
Use a covered clay pot, such as a Romertopf or Forno
Bravo terracotta pot, in your Forno Bravo oven to roast a
moist and tender chicken. Fully fire your oven, let the
temperature fall to about 650ºF, and then add your
covered dish. Your roast stays moist for a long time, you
have more room for error between a chicken that is not
quite done, or is already dried out.
Warming and Melting
You can place any type of dish, cup or pan at the mouth of
your oven to warm a sauce or stock, melt butter, and make
flavored olive oils. Try putting 1 Tbs. of fresh rosemary into
a quarter cup to olive oil and leave at the entry to your
oven to warm through. You can use the flavored oil for
dipping, or for vegetable dishes.
ToscanaAssembledOven
Installation and Operation Manual
© Forno Bravo, LLC 2010. All Rights Served. Ver. 1.4 18
Making Wood Coals for External Grilling
Nothing tastes better than food cooked over real wood
coals, and your brick oven is an efficient source of those
coals.
That is why many Italian outdoor kitchens include an
attached open grill, which can be used either with its own
fire, or with coals from the brick oven. If you have a
conventional charcoal grill, use your Forno Bravo oven
shovel to move hot coals to our grill.
——————————————————————————
Finally, try experimenting with different pot and pans.
A grill pan pre-heated in your oven gives your food
nice sear marks, and terracotta pans and steel pans
give roast potatoes a different texture and flavor.
——————————————————————————
ToscanaAssembledOven
Installation and Operation Manual
© Forno Bravo, LLC 2010. All Rights Served. Ver. 1.4 19
12. Oven Management
Remember to leave enough time to fully fire your oven
before you need it for cooking. If you are cooking just for
your family, or for an after work meal, you can fire your
oven for as little as 40 minutes, and still easily bake three
or four pizzas. If you are holding a larger party, or want to
have retained heat for other baking, fire your oven for 90
minutes, or longer.
Build your fire in the center (left to right and front to back)
of the oven using 7-9 sticks of dry kindling, one to two
odor-free, non-toxic fire starters, and two to three pieces of
seasoned medium or hardwood. Alternatively, you can
light your fire with a butane torch. It can be easier and
faster than the traditional match or lighter. Try to avoid wax
and sawdust fireplace starters, as they could leave a taste
in your food.
Once the fire gets going, add 2-3 pieces of wood so that
the flame reaches the center and front of the dome,
without lapping too far out of the oven opening. Use
seasoned wood that is roughly 3”-4” in diameter, and
roughly 12” long. Your firewood should not smolder or
smoke before catching fire, and should burn easily and
quickly. Once the fire is well established, continue adding
more wood, and wait for about 20 minutes.
After about 20 minutes, a small spot at the top center of
the oven dome should start to turn clear (or white) and
then begin expanding outward. This “whitening” is the sign
that dome is reaching the desired cooking temperature.
This change occurs when the carbon accumulated on the
oven dome reaches about 700ºF, and turns from black to
clear.
Once the whitening has started, begin building the fire
toward the walls of the oven by adding pieces of wood on
either side of the fire, and in the back. This wider fire will
help drive the necessary heat across the entire cooking
floor, and evenly spread heat across the dome. Within a
few minutes, you will see the whitening spreading across
the dome to the sides.
After roughly 45 minutes, the entire cooking dome will turn
clear, and the cooking surface will have reached the
desired 700ºF+ for cooking pizza. Push the fire to the side
of the oven, brush the floor, and you are ready to start
baking pizzas.
ToscanaAssembledOven
Installation and Operation Manual
© Forno Bravo, LLC 2010. All Rights Served. Ver. 1.4 20
This manual suits for next models
3
Table of contents
Other Forno Bravo Oven manuals

Forno Bravo
Forno Bravo Giardino60 User manual
 Installation and operating instructions")
Forno Bravo
Forno Bravo Primavera60 (SKUFP60) Installation and operating instructions

Forno Bravo
Forno Bravo Artigiano80 User manual

Forno Bravo
Forno Bravo Pompeii Oven User manual

Forno Bravo
Forno Bravo Primavera 60-W-FA User manual

Forno Bravo
Forno Bravo Casa80 User manual

Forno Bravo
Forno Bravo Casa2G Series User manual


