forus FSV-U2 User manual

Ultra Small Digital Phone Recorder for Smartphones
Operation Manual
FSV-U2
Version 1.0
•Thank you for choosing our Digital Voice Recorder FSV-U2
•Please read this manual carefully before starting operation.
•Please keep this manual with a Warranty card herewith in a safe place for future reference.

Caution: The 4-pole plug in this product is designed for the use with iPhone only.
Please contact our dealers for inquiry on the use with other smart phones.
▌Safety Information▐
The safety information set forth in this manual is to ensure the safety for users and to avoid any
loss of property. You, therefore, are requested to read the information in this manual carefully and
use the product correctly as instructed
•We shall not be liable for any loss arising from the use of this product and any claim made by a
third party.
•We shall not be responsible for damages caused by the loss of the recorded contents due to the
product failure, repair or other reasons.
Precautions for the purpose of safety
•Do not disassemble or alter the product arbitrarily. It may cause a fire or a failure.
•Do not listen to the voice loud through an earphone for a long time. It may cause a hearing loss.
•Do not drop or apply a strong impact on the product. It may cause a product failure.
•Do not use this product either in a high or low temperature or in a place with a high humidity.

Do not try to repair or disassemble this product in case of the product failure but contact our
customer service center or the dealer from whom the product was purchased.
▌Table of Contents▐
•Name of each part of the product···············……………………………………·····4
•Package Contents························………………………………………………····5
•To be prepared before use(Charging a battery) ·····…………………………······· 6
•How to check a battery level·················…………………………………………···· 7
•Recording ··························………………………………………………………··· 8
•Playing-Back···················………………………………………………………······· 11
•File Searching·············………………………………………………………············ 12
•File Deleting ····················………………………………………………………······ 14
•How to turn power off ··················…………………………………………………· 15
•How to set VOR(Voice Operated Recording) Mode ····……………………………· 16
•How to use it connected to a PC ···············………………………………………· 17
•Product Specification ····················………………………………………………·· 18
•Warranty Card ···················…………………………………………………………· 19
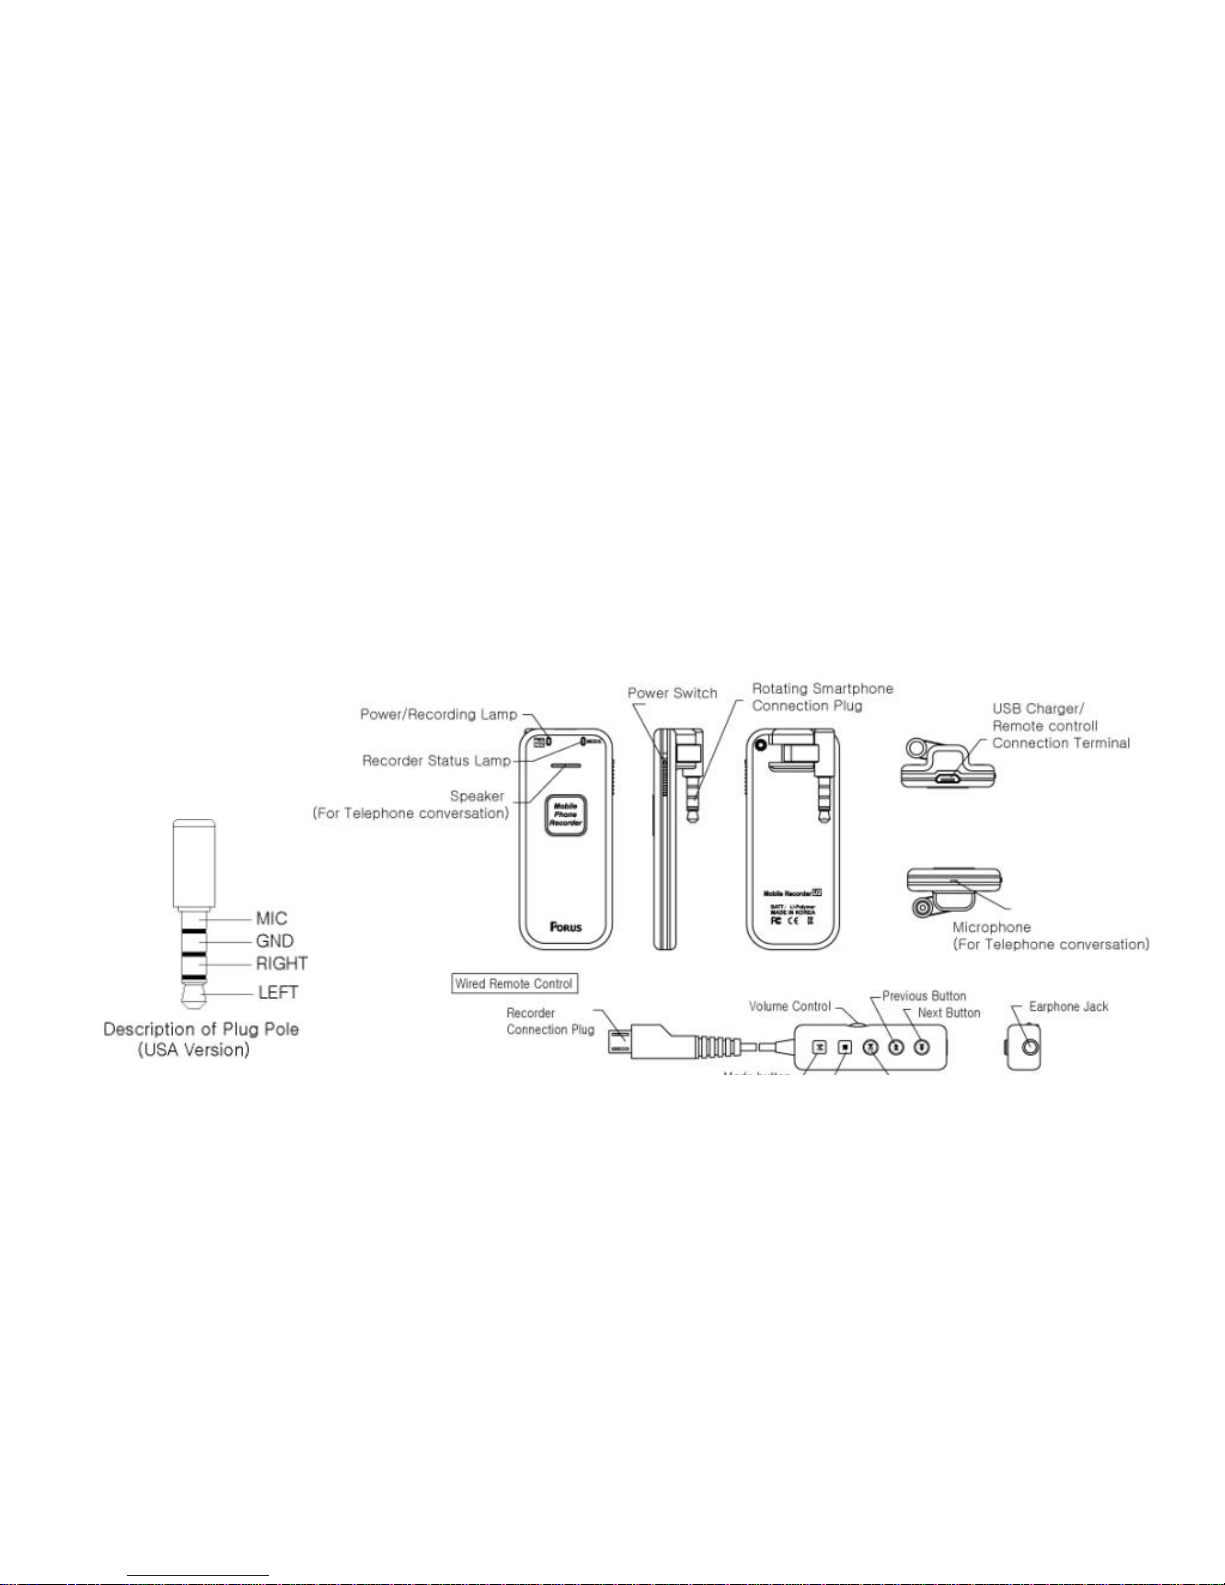
▌Name of each part of the Product▐
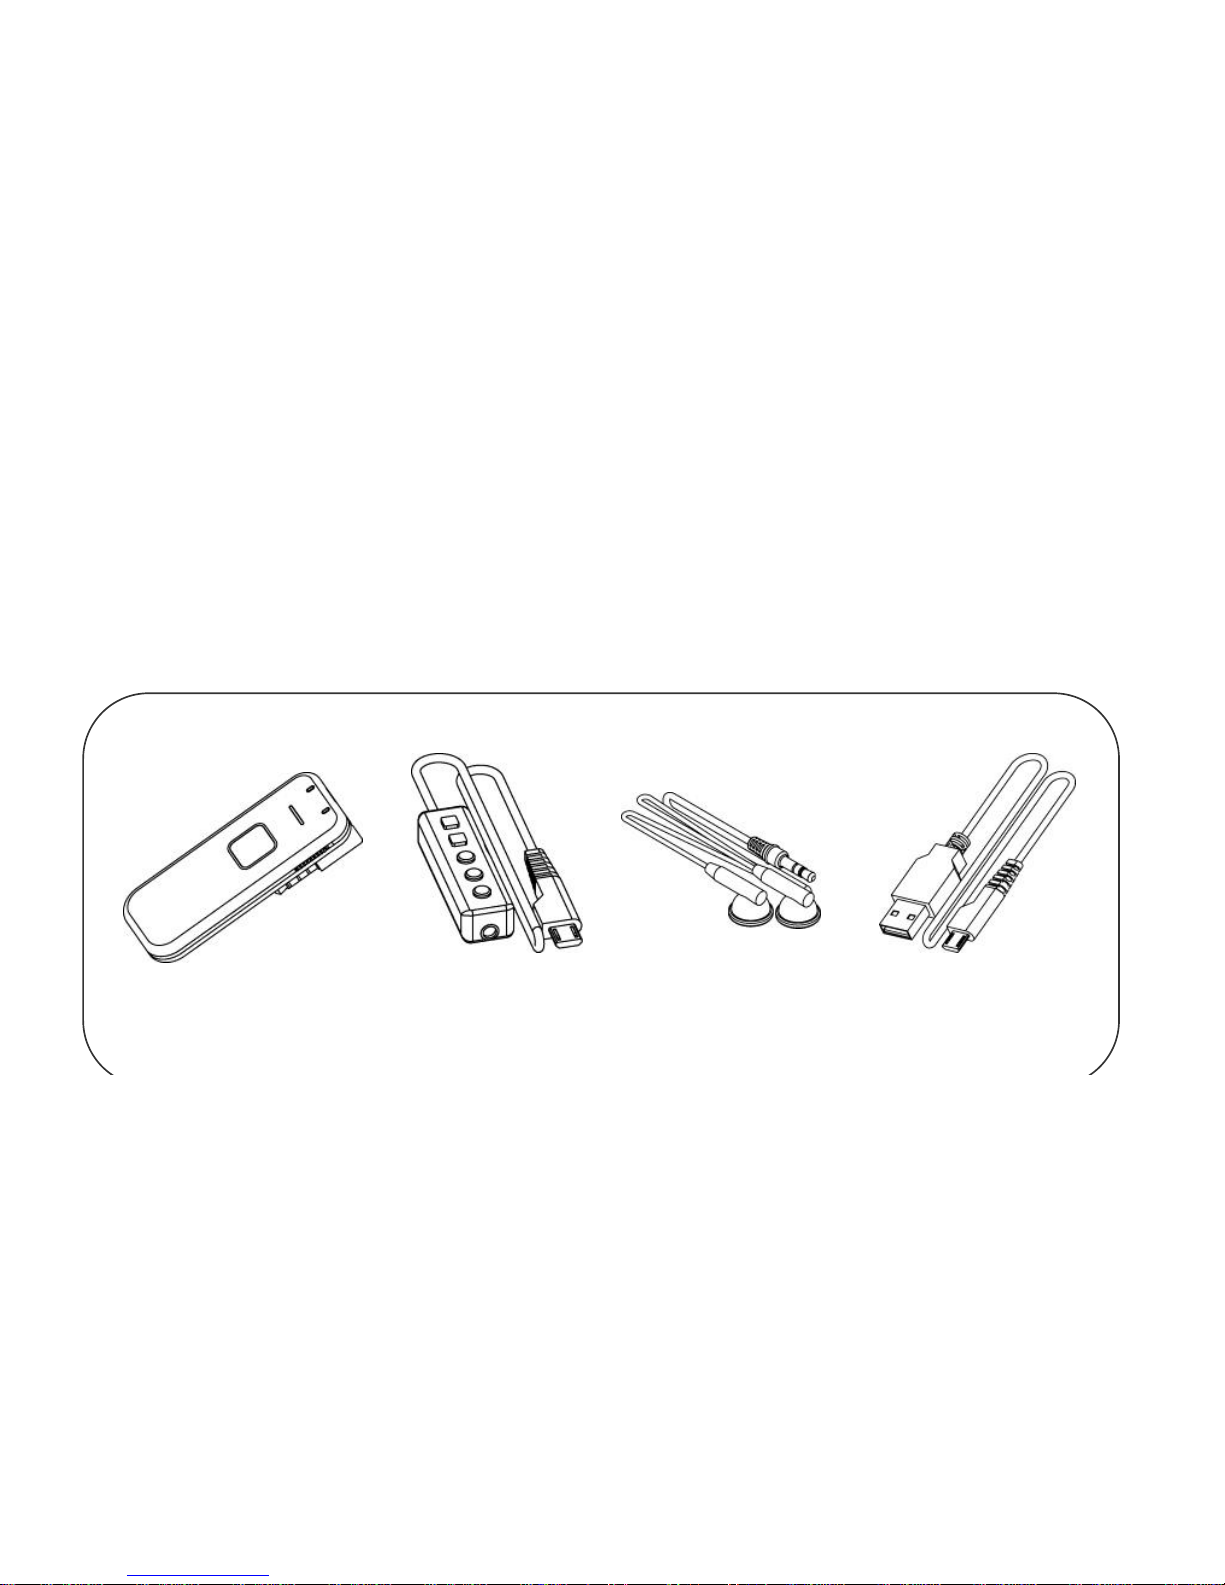
▌Package Contents▐
Voice Recorder Wired Earphone USB Cable

Remote Control
▌To be prepared before use (Charging the Battery)▐
This product is powered by a rechargeable built-in battery. Please be sure to fully charge
the battery when the product is used for the first time after purchase.
Connect one end of the USB cable to the Recorder and the other end to a USB port of a
PC to start charging. (The PC power must be turned on). The Mode lamp will be ON in green
during charging and the green lamp will start blinking as soon as the battery is fully charged.
When the battery is running out while using the product, a triple beep sound will be heard
and the power will turn automatically off. (You can check it through the earphone when using
the remote control)
A battery charging time from the point the battery is fully discharged takes approximately
2.5 hours and it lasts about 20 hours for recording and 18 hours for play-back.
Please disconnect the USB cable from the Recorder and reconnect it if the Mode lamp does

not turn on right after connecting it with the Recorder.
▌How to check a battery level▐
This product is powered by a rechargeable built-in battery.
The battery life may vary depending on the product usage environment. (The more frequently the
battery is charged, the shorter the battery life becomes)
A battery level can be indicated by a status of the Mode lamp as shown below right after the remote
control is connected to the remote control connection terminal of the product in the condition that
the recording (power) switch is in a “stop”position
Battery Level
Indication by the mode lamp
More than 70%
Mode lamp will be on in green for 5 seconds
30% ~ 70%
Mode lamp will be blinking in green for 5 seconds
Less than 30%
Mode lamp will not be on
▌Recording ▐
To start recording, turn on the power switch by pushing it upwards and then the power/recording
lamp will be on in red. Recording will start in approximately 7 seconds after the recording lamp is
on in red.
In case that no additional memory space is available or that the number of total files saved reaches
up to 99, recording will not be made properly. In this case, warning beep sound will be heard for 3
seconds (available through the earphone only) and the recording will be automatically stopped.
Recording time by memory capacity
Memory
Capacity
2GB
4GB
Recording time
72 hours
144 hours
•Note •
A new recording file will be automatically created every 5 hours in case that the
recording continues for longer than 5 hours.
•Recording of General Sound/Voice
The product starts recording the sound detected by the built-in
microphone as soon as the power/recording switch is pushed upwards.
You can also listen to the sound being recorded through the
earphone connected via the remote control (Monitoring function)
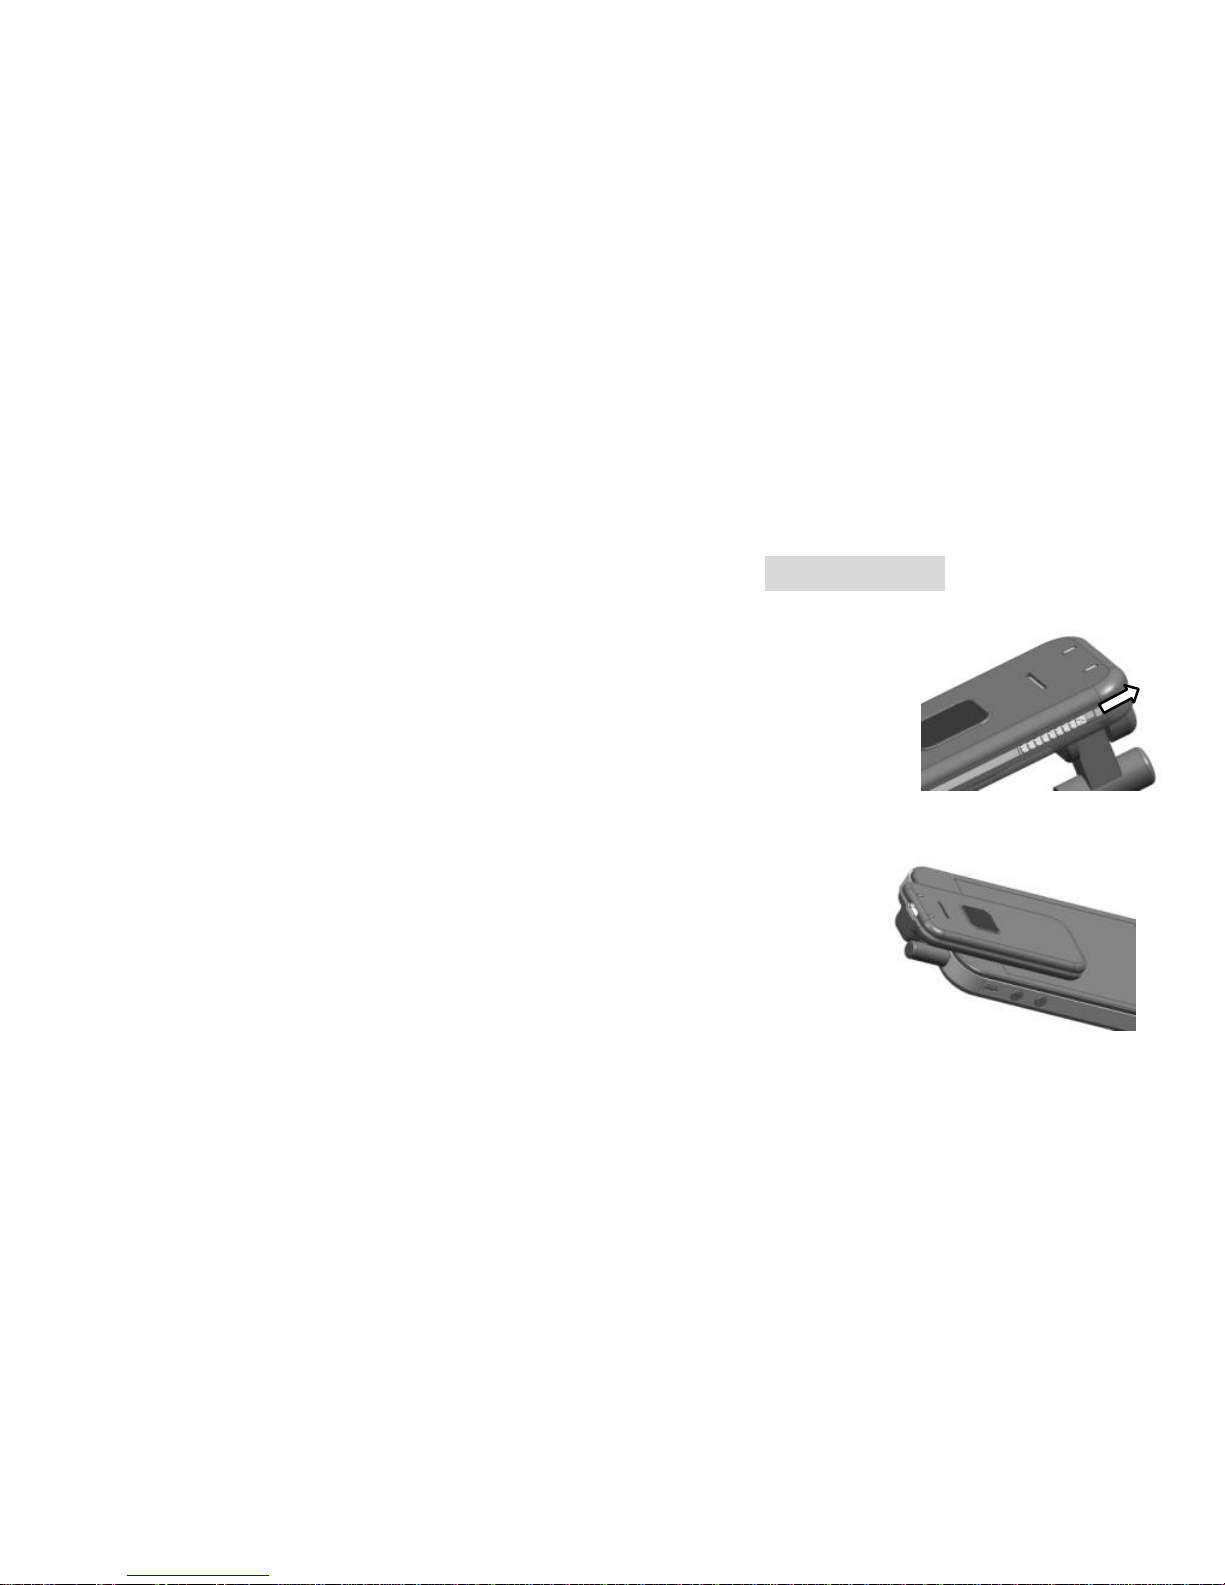
•Recording of Phone Conversation
The recording of the phone conversation will be ready when
the smartphone connection plug in the product is connected to
the ear microphone jack in the smartphone.
Conversation can be made using the speaker (receiver) and
the built-in microphone of the recorder (Telephone conversation
is possible even the recorder power is turned off) and the
Starting recording
Recording the phone
conversation

recording the conversation will start in 5 seconds after the
power/recording switch is pushed upwards.
•Note •
The smartphone connection plug in the product is originally designed
suitable for iPhone. Any smartphone compatible with the ear microphone of
iPhone (possible to talk through an ear microphone) can be used with
this Recorder for the recording of telephone conversation. (See picture
in the right for the description of plug pole)
Please contact us or our dealer in case you are not sure if your
smartphone is compatible with iPhone.
In some smartphones, howling may be heard in the other end in case
that the recorder is connected while talking over the phone.
(Be sure to connect the Recorder to a phone before calling)
•Precautions •
It is requested that all important files or any file needed to be kept permanently be coped or backed

up in your PC. Manufacturer shall not be liable for the data loss or damages incurred by the loss
due to the product failure, repair or other reasons.
▌Playing Back▐All functions hereinafter are available only when the product is used with
the remote control connected to the Recorder.
Set the volume to the maximum after connecting the Recorder to the remote control.
Connect the remote control to the Recorder while power/recording of the product is
in ”OFF”position. Press play-back button (▶║)to play back the saved file. Adjust volume
by using the volume control. Press play-back button (▶║) again to pause play-back or stop
button (■) to stop pay-back

▌File Searching▐
This is a function used to search for data saved in the files
You can select a file you want by pressing previous (
◀◀
) button or next (
▶▶
) button in
the stop position.
•Searching for files in the Intro-Scan mode
If you press and hold play-back button for longer than 3 seconds in the stop position,
the first 5 seconds of each file will be automatically played back. When you find the file
you want to play back, press play-back button again to play back the file continuously.
•Move to and play-back the first and last saved files

If you press and hold previous (
◀◀
) button or next (
▶▶
) button for longer than 3
seconds in the middle of play-back, the first or the last saved file will be played back.
•File Search Modes for quick Movement and Play-back
By pressing previous (
◀◀
) button or next (
▶▶
) button in the middle of play-back, you
can move to the previous or next point or file and play back depending on the
searching mode you preset. (file movement/Search Function 1/Search Function 2).
In this file search function, you can find a target point/file with ease.
You can set the searching mode of your choice by pressing Mode (M) button in the middle
of play-back, which produces different beep sounds depending on the searching mode as
follows.
Model Selected
Beep Sound
Previous (
◀◀
) Button
Next(
▶▶
)Button
File Movement
Beep Sound
Go to previous file
Go to next file
Search Function 1
Double Beep
Move to the point 20
Move to the point 20
seconds earlier
seconds later
Search Function 2
Triple Beep
Move to the point 2
minutes earlier
Move to the point 2
minutes later
▌File Deleting ▐
This is a function used to delete saved files from the memory
In case that the total number of the file saved in the memory reaches to 99 or that no
additional memory space is available, you have to delete existing files to secure a space for
additional recordings.
Play back the file you want to delete and press stop (▣) button in the middle of play-back.
Press (▣) button again and hold it for longer than 3 seconds until a double beep sound is
heard and the file at the same time will be played back for a short period of time to confirm if
it is the exact file you wish to delete. Press stop (▣) button to delete the selected file or any
other button to cancel the deletion.
•Precautions •

The file deleted in the recorder can’t be restored. To avoid such a mistake, you can
download the files to your PC and manage them in your PC. Manufacturer shall not be liable
for the data loss or damages incurred by the loss due to the failure, repair or other reasons.
▌How to turn power off▐
If you push the power/recording switch downwards in the middle of recording,
recording will stop and the recording lamp will be off.
If you press stop (▣) button in the remote control or disconnect remote control from
the recorder in the middle of play-back, play-back will stop and power will go off.
Be sure to store the recorder with the remote control disconnected as the power is
continuously consumed to keep the product ready for the signal from the remote
control while the remote control is connected with the product.

▌How to set VOR(Voice Operated Recording) Mode▐
This is a function to use the product efficiently removing an opportunity for the unnecessary
recording by activating the product to record only when the sound is detected and to stop
recording temporarily when no sound is detected.
Press and hold mode (M) button for longer than 3 seconds in the stop mode until blue recording
status lamp is turned on and press stop (▣) button to set VOR mode with the blue recording status
lamp blinking. To cancel VOR mode, press and hold mode (M) button again for longer than 3
seconds and the recording status lamp will be turned off to confirm the cancellation of VOR mode.
Recording Status Lamp blinking in Blue: VOR ON
Recording Status Lamp is turned off : VOR OFF

•Note •
A new recording file will be automatically created every 5 hours in case that the recording continues
for longer than 5 hours.
▌How to use it being connected to a PC▐
You need to connect the Recorder to a PC to download the files in the recorder to a PC and
to charge a battery.
Connect the Recorder and a PC through the USB cable which comes with the product as one
of standard accessories. The mode set for the Recorder will be changed to USB connection
mode and charging mode regardless of the mode (recording or play-back) set previously.
In order to make sure a stable battery charge and data transmission, it is recommended to
connect the USB cable directly to a USB port in a PC not a USB hub. (In case the power of
the USB hub is not adequate, it may result in a longer battery charging time and frequent
data transmission errors. This problem can be solved by supplying the USB hub with extra

power)
If you select “F”drive in your PC and open the folder in the drive, all the saved files in the
Recorder will be displayed. You can select files and store, copy or move them for your own
purpose.
▌Product Specification▐
Name
Digital Phone Recorder for IPhone
Recording Quality
64kbps, 22.05kHz, Mono
Recording Time
2GB: 72 Hours 4GB: 144 Hours
Max. recording files
Up to 99 files
Dimensions
29.0(W) x 7.2(D) x 69.0(H) except for plug part, 25g
Charging Hours
Approximately 2.5 Hours
Power
3.7V Li-Polymer battery 290mA
Operating Time
Continuous Recording: 20 Hours, Continuous Play-Back: 18
Hours

Input
Internal: Amnidirectional Condenser Microphone, 4-Pole Plug
Operation Temperature
0℃~ 40℃
Accessories
USB Cable, Wired Remote Control, Earphone, Manual
Warranty Card
1. This product was manufactured in accordance with the strict quality control and inspection procedures
and the free warranty will be available for the defects occurred in a normal use within warranty period.
2. In case of the defects listed in the chargeable warranty, service charge associated with the repair will be
applied even within warranty period.
3. This warranty card is valid only within Korea.
4. Please contact the dealer from whom the product has been purchased in case that you find your product
defective.
Product Name:
Digital Phone Recorder
Model:
FSV-U2
Date Purchased:
Warranty Period:
1 year
Dealer Name:
Telephone No.:

Customer
Information:
Address
Name
Telephone No.
<Chargeable Warranty> Improper use and inadequate handling, arbitrary modification by a user and Acts of god
such as fire, salt, flood, earthquake, etc.
MEMO
Table of contents
Other forus Voice Recorder manuals


