ThinkGizmos TG937 User manual

TG937 - DIGITAL RECORDER PEN
User Manual
English p 1
Deutsch p 10
Francais p 19
Italiano p 28
Español p 37
PLEASE FOLLOW THESE INSTRUCTIONS CAREFULLY AND KEEP THIS INSTRUCTION BOOKLET FOR
FUTURE REFERENCE.
DUE TO CONTINUAL IMPROVEMENTS ACTUAL PRODUCT MAY BE DIFFERENT TO ILLUSTRATIONS
Any packaging ties, bags and screws are not part of the
product. For safety please remove and discard any
packaging ties, bags and screws before using this product.

ENGLISH MANUAL - CONTENTS
1. 1.1 Safety Information ............................................................................................... 3
1.2 Battery Charging .................................................................................................. 3
IMPORTANT INFORMATION
2
2.1 Digital Recorder Pen Quick Start ........................................................................ 4
2.2 Full Instructions ................................................................................................ 5-6
2.3 Parameter Settings .......................................................................................... 6-7
2.4 Access Recordings / File Transfer .................................................................. 7-8
2.5 Changing the Ink Pen ........................................................................................... 8
PRODUCT DETAILS
2.
Warranty Information ................................................................................................ 9
WARRANTY
If you have any issues with your product or have any questions, please contact us
via email:
This is the quickest way to resolve any problems. You will be surprised how fast we
will get back to you on email with a resolution.
All our products are covered by our manufacturer’s warranty, details can be found
on page 9.
For more of our brilliant products, search Amazon for “Think Gizmos”.
Think Gizmos “Small enough to care big enough to deliver”.

3
1. IMPORTANT INFORMATION
1.1 Safety Information
Thank you for purchasing the Think Gizmos Digital Recorder Pen. Please read through this
instruction manual before use as it contains all the information you need about how to
correctly enjoy this product.
CAUTION
ELECTRONIC PRODUCT
Do not leave children unattended with this product. Not suitable for children under the age
of 3 Years.
This product should be used in accordance with this user manual in a safe way to avoid
electric shock or injuries.
ADULT SUPERVISION REQUIRED
WARNING! Do not try to modify this product in any way as this may invalidate your
warranty.
WARNING! Contains small parts, child supervision is required at all times.
DO NOT immerse the Digital Recorder Pen in water, it is an electrical product and will get
damaged.
AVOID exposing to excess heat or leave out in direct sunlight.
1.2 Battery Charging
Please fully charge the Digital Recorder Pen before use.
• Ensure the pen is in standby mode. This can be checked by quickly pressing the button
on the top of the pen, if the pen is in standby mode no light should show when pressed.
• Unscrew the the two parts of the pen to reveal the USB charging slot.
• Connect the charger to the pen and plug in the USB Cable.
• The Status Indicator Light will be red when charging and change to blue when fully
charged.

4
2. PRODUCT DETAILS
2.1 Digital Recorder Pen Quickstart
Outside View
1. Power/Recording Button
2. Status Indicator Light / Microphone
3. Core of recording pen
4. Pen clip
5. TF card slot
6. USB interface / Headphone jack
How to record and save?
Press and hold the Power/Recording button (1) for 3 seconds to start the product. The indicator light (2) will
ash blue then red. Once the light goes out the product is in ‘recording’ mode.
During recording, short press the Power/Recording button (1) again, this pauses the recording. A red light will
show on the pen to indicate the recording is paused.
Long press and hold the Power/Recording button (1) to stop and save what has been recorded and 3 seconds
later, the digital recorder pen will shut down and power o. The indicator light will quickly ash red then blue
before turning o.
How to copy the recorded les?
Connect the included data cable to your computer’s USB interface, then the computer will pop up a removable
disk. Open the disk to nd the RECORD folder inside, copy the audio les in WAV format to the computer, and
complete the copying of recording les; then use a music playing application, such as Windows media player
to open the recorded le for playback.
Status Indicator Light
Standby: In standby state, the blue light indicator is ON when the pen is in playback mode and playback is
paused. The red indicator is ON when recording is paused.
Recording: During recording, the red indicator light ashes three times and goes out, the blue light will be OFF.
Play: The blue indicator light ashes slowly in the playing state.
Power Level Notication:
When turning on the Portable Recorder Pen the red and blue indicator lights (2) ash to indicate the battery
level of the pen;
Once to indicate the battery power level is less than 25%
Twice to indicate the battery power level is 50%
3 times to indicate the battery power level is 75%
4 times to indicate the battery power level is 100%
Note: When the battery has low power, the red and blue indicator lights will icker 10 times and
then the product will automatically shut down.

5
2.2 Full Instructions
Power on:
Press and hold the Power/Recording button (1) for 3 seconds and wait for the red and blue lights (2) to indicate
the battery level.
The pen will start recording or le playback after the red light ashes 3 times depending on if headphones are
connected.
Power o:
Press and hold the Power/Recording button (1) for more than 2 seconds in any state, the pen will power down
and be o once the red and blue lights (2) ash 3 times.
This will also stop and save any current recording.
Voice Recording:
One-key recording:
Once powered on, the light indicator (2) will rst show the battery level and then the red light will ash 3 times.
Once the red light goes out for the 3rd time, recording starts.
To Pause Recording: Press the Power/Recording Button, the status indicator light will be red when paused.
To Stop Recording: Press and hold the Recording/Power (1) button for more than 2 seconds to stop and save
the recording le. This will also turn o the Pen.
Voice Controlled Recording:
Auto Recording needs to be enabled by using the following instructions in Parameter Settings.
Once powered on, the light indicator (2) will rst show the battery level and then the red light will ash 3 times.
Recording will not start until a sound is heard.
Once a sound is heard the recording will start, if no sound is heard the recording will pause and will restart
when further sound is heard.
To Stop Recording: Press and hold the Recording/Power (1) button for more than 2 seconds to stop and save
the recording le. This will also turn o the Pen.
During recording, the recording le will be automatically saved and named according to the recording
parameters in the conguration settings.
The recording lename is named using a timestamp, for example, R20221225-100641.WAV or V20221225-
100641.WAV. The character R stands for ordinary recording, while the V stands for voice-activated recording;
“20221225” shows the date that the recording was taken and “100641” shows the time the recording was
made.
Recording/Music Playback:
Enabling Playback:
Connect the Pen to the USB to earphone jack adapter cable and plug in the included earphones.
Turn on the Voice Recorder Pen and if the headphones are connected it will immediately enter playback mode,
the blue indicator light (2) will start ashing slowly.
If the earphones are not plugged in, the pen will enter recording state rst when turned on, and when the
included earphones are connected, the pen will switch to playback mode and start to play the currently saved
recording le.
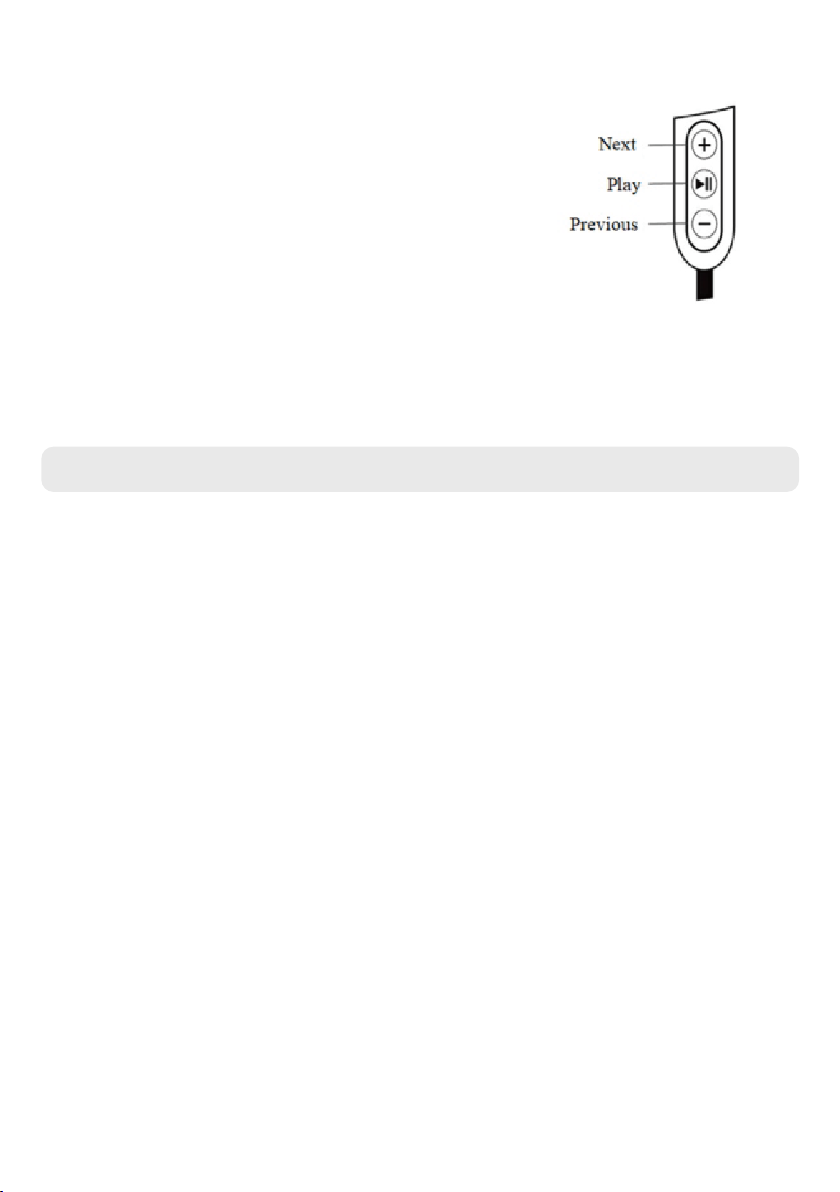
Short press the “Play” button on the earphone controller to pause/play the les.
6
2.3 Parameter Settings
Setting of Recording Parameters:
After connecting the pen to a computer via the USB cable, open the folder for the digital pen, nd and open
the TXT le named “MRECSET” by double-clicking. This will allow you to set your default recording parameters,
including the time (TIME), voice control (VOR), bit rate (BIT), gain (GAIN), recording time part (PART).
Time setting:
A number in the format of “ TIME:22:55 2021/4/21” will appear in the le.
Manually change the date to the desired date for the recorded le name, for example the date you will be
performing the recording.
If using a Windows PC you can highlight the time/date and press F5 to refresh to the current time/date.
Voice Recording Setting:
The default voice number 0 means that voice recording is disabled.
The voice control sensitivity level provides 1-7 levels of sensitivity, any number outside of these will be invalid.
The higher the number the more sensitive the sound detection will be for the recording state to activate. If no
sound is detected, the recording will be paused. If any sound is detected again, the recording will restart.
BIT setting:
1-4 corresponds to 32kbps, 64kbps, 128kbps, 192kbps respectively, the default is 4 - 192kbps.
GAIN setting:
1-7 are optional; the higher the number, the greater the sensitivity of the microphone, and the louder the
recording will sound. It is 5 by default.
Recording time PART setting:
ln order to prevent the failure to save recording les in an emergency, users can set a safest recording
segmentation (how long a recording will be before it autosaves), which can be set at any time frame from 10
minutes to 240 minutes.
Switching between playing recordings or music les:
Long press the Play/Pause button on the earphones to switch between
playing music and playing voice recording les.
Short press the Play button to start looping the songs or recording les
on the pens hard drive.
Note: The music les need to be saved in the root directory of the pens
hard drive, not within subfolders.
Wired controller on earphones:
When playing a le short press the “+” button to skip to next recording/
music le. Press and hold the “+” to increase the volume.
Short press the “-” button to go to the previous recording/music le.
Press and hold the “-” button to decrease the volume.
Android OTG Connection:
Think Gizmos Voice Recorder Pen supports Android OTG Connectivity allowing transfer of les direct to an
Android Phone. This requires an Android OTG Adaptor which is not included.

7
Tip: If the text le MRECSET.txt in the root directory is deleted by mistake or lost. It will be automatically generated
once the pen is restarted, and all parameter settings will be restored to their default values.
Default values are as follows
TIME: 22:55 2021/4/21
VOR:0
BIT: 4
GAIN: 5
PART:60
1. Unscrew the Pen in the middle of the Pen to show the USB slot and SD card hard drive.
2. Connect the included USB cable into the slot provided in the top end of the pen, ensuring the connector is
the correct way around. You do not need to force it too hard, part of the connector will be showing still.
Please Note: When the pen is connected into a USB port of a computer, (except for when recording), the pen
will immediately suspend it’s current operation.
3. Connect to the PC, le transfer operations are allowed when the removable drive appears on your
Computer.
4. Upload/download: When the Pen’s removable hard disk is detected, you will be able to access the data
folder to upload or download MP3/WAV les or other les.
2.4 Access Recordings / File Transfer
Product Specications
Dimensions 14x1.7x1.4cm (5.5x0.6x0.5in)
Weight 30g (1.05oz)
Recording Format WAV
Music Format MP3, WAV, WMA
Recording Time (192Kbps) Approx 384 Hours
Working Time of Battery Approx 25 Hours
Compression Ratio 192Kbps
Sampling Rate 48Khz
Frequency 20-20Khz
Storage Medium 32GB TF Card
Microphone Omni-Directional Microphone
Operating Temperature -10°C -- 40°C
Battery Capacity 180mAh

8
The Pen comes with 4 replacement ink’s. Follow the steps below to replace the Ink.
• Ensure the Pen is o and unscrewed in the middle. Put the top end to one side.
• Holding the front end of the Pen with one hand on the black part, rmly grab the the silver part, using the
two circle ridges for grip, and twist and pull this silver part away from the black part.
• It may be quite tight and a bit tricky to grasp to begin with.
• Once the silver tip is detached, you can easily unscrew the current ink holder by twisting the top white
section anti-clockwise.
• Replace with a new full ink holder, ensuing to screw it clockwise back into place.
• Push the silver tip back onto the black part of the Pen and ensure it is pushed in all the way.
Please dispose of the old ink holder appropriately.
2.5 Changing the Pen Ink
Applicable operating system: XP/Vista/Win7/Win8/win10/win11, Mac OS X
Note: When nished with le transfers, please click the green arrow in the lower right corner of the computer,
and select Safely Eject Removable Disk and then pull out the recorder.
Disclaimer: Users must back up their data during use. We are not responsible for the loss or damage
of personal data caused by software, hardware misoperation, product maintenance, replacement or
other unexpected situations, nor shall we be liable for third party claims caused by the use of this
product. (It is normal that the local system software may occupy a part of capacity and space, causing
a slight dierence from the nominal capacity).

WARRANTY
Warranty Information
Think Gizmos, Unit 19, Lawson Hunt Industrial Park,
Broadbridge Heath, West Sussex, RH12 3JR
Tel.: +44/(0)203 384 8304
What is Covered:
This warranty covers any defects in materials or workmanship, with the exceptions stated
below.
How Long Coverage Lasts:
This warranty runs for 2 Year from the date your Think Gizmos Digital Recorder Pen is
delivered.
What is not covered:
Any problem that is caused by abuse, misuse, or an act of God (such as a ood) are not
covered.
What We Will Do:
If the Product proves defective during the warranty period, we will provide you with the
instructions for the return, and we will take one of the following actions: (i) replace the
Product with a product that is the same or equivalent to the Product you purchased; (ii)
repair the Product; or (iii) refund to you the whole of or part of the purchase price of the
Product.
How To Get Service:
To obtain instructions on how to obtain service under this warranty, contact our customer
service by phone or email. You will nd the contact details of our customer service below.
Customer service may ask you questions to determine your eligibility under this warranty,
and if you are eligible you’ll be given instructions for returning the defective Product. If
we send you a replacement or repair your Product, we will pay the cost of delivering the
replacement or repaired Product to you.
Do not return the item to the original place of purchase, please contact Think
Gizmos direct.
9

TG937 - DIGITAL RECORDER PEN
BEDIENUNGSANLEITUNG
English p 1
Deutsch p 10
Francais p 19
Italiano p 28
Español p 37
BITTE BEFOLGEN SIE DIESE ANWEISUNGEN SORGFÄLTIG UND BEWAHREN SIE DIESE BEDIENUNGSANLEITUNG ZUM SPÄTEREN
NACHSCHLAGEN AUF.
AUFGRUND STÄNDIGER VERBESSERUNGEN KANN DAS TATSÄCHLICHE PRODUKT VON DEN ABBILDUNGEN ABWEICHEN
Etwaige Verpackungsbänder, Tüten und Schrauben
sind nicht Bestandteil des Produktes. Bitte entfernen
und entsorgen Sie aus Sicherheitsgründen alle
Verpackungsbänder, Beutel und Schrauben, bevor Sie
dieses Produkt verwenden.

DEUTSCHE BEDIENUNGSANLEITUNG - INHALTSVERZEICHNIS
1. 1.1 Sicherheitsinformationen ................................................................................ 12
1.2 Auaden des Akkus .......................................................................................... 12
WICHTIGE INFORMATIONEN
11
2.1 Digitaler Aufnahmestift Schnellstart .............................................................. 13
2.2 Vollständige Anweisungen .......................................................................... 14-15
2.3 Parametereinstellungen .............................................................................. 15-16
2.4 Zugri auf Aufzeichnungen / Dateiübertragung ..................................... 16-17
2.5 Stifttinte wechseln ............................................................................................. 17
PRODUKTDETAILS
2.
Garantieinformationen ........................................................................................... 18
GARANTIE
Wenn Sie Probleme mit Ihrem Produkt oder Fragen haben, senden Sie uns bitte
eine E-Mail an:
Dies ist der schnellste Weg, Probleme zu lösen. Die schnelle Antwort mit der
Lösung Ihres Problems per E-Mail wird Sie überraschen. All unsere Produkte fallen
unter unsere Herstellergarantie, weitere Informationen nden Sie auf Seite 18
Für weitere fantastische Produkte suchen Sie auf Amazon nach “Think Gizmos”.
Think Gizmos “Klein genug für einen persönlichen Service, groß genug, diesen auch
zu liefern”

12
1. WICHTIGE INFORMATIONEN
1.1 Sicherheitsinformationen
Vielen Dank, dass Sie sich für den Think Gizmos Digital Recorder Pen entschieden haben.
Bitte lesen Sie diese Bedienungsanleitung vor Gebrauch durch, da sie alle Informationen
enthält, die Sie benötigen, um dieses Produkt richtig zu genießen.
VORSICHT
ELEKTRONISCHES PRODUKT
Lassen Sie Kinder mit diesem Produkt nicht unbeaufsichtigt. Nicht geeignet für Kinder unter
3 Jahren.
Dieses Produkt sollte in Übereinstimmung mit dieser Bedienungsanleitung auf sichere
Weise verwendet werden, um Stromschläge oder Verletzungen zu vermeiden.
AUFSICHT EINES ERWACHSENEN ERFORDERLICH
WARNUNG! Versuchen Sie nicht, dieses Produkt in irgendeiner Weise zu modizieren, da
dies Ihre Garantie ungültig machen kann.
WARNUNG! Enthält Kleinteile, Kinderaufsicht ist jederzeit erforderlich.
Tauchen Sie den Digital Recorder Pen NICHT in Wasser, er ist ein elektrisches Produkt und
kann beschädigt werden.
VERMEIDEN Sie es übermäßiger Hitze auszusetzen oder lassen Sie es in direktem
Sonnenlicht stehen.
1.2 Auaden des Akkus
Bitte laden Sie den Digital Recorder Pen vor Gebrauch vollständig auf.
• Stellen Sie sicher, dass sich der Stift im Standby-Modus bendet. Dies kann durch
schnelles Drücken der Taste auf der Oberseite des Stifts überprüft werden, wenn sich
der Stift im Standby-Modus bendet, sollte beim Drücken kein Licht aueuchten.
• Schrauben Sie die beiden Teile des Stifts ab, um den USB -Ladesteckplatz freizulegen.
• Verbinden Sie das Ladegerät mit dem Stift und stecken Sie das USB-Kabel ein.
• Die Statusanzeige leuchtet beim Auaden rot und wechselt zu blau, wenn sie vollständig
aufgeladen ist.

13
2. PRODUKTDETAILS
2.1 Digitaler Aufnahmestift Schnellstart
Aussenansicht
1. Einschalt-/Aufnahmetaste
2. Statusanzeige/Mikrofon
3. Kern des Aufzeichnungsstifts
4. Stiftclip
5. TF-Kartensteckplatz
6. USB-Schnittstelle / Kopfhörerbuchse
Wie aufzeichnen und speichern?
Halten Sie die Einschalt-/Aufnahmetaste (1) 3 Sekunden lang gedrückt, um das Produkt zu starten. Die
Kontrollleuchte (2) blinkt erst blau und dann rot. Sobald das Licht erlischt, bendet sich das Produkt im
Aufnahmemodus.
Drücken Sie während der Aufnahme erneut kurz die Power/Recording-Taste (1), dies pausiert die Aufnahme.
Auf dem Stift leuchtet ein rotes Licht auf, um anzuzeigen, dass die Aufzeichnung angehalten wurde.
Halten Sie die Einschalt-/Aufnahmetaste (1) lange gedrückt, um die Aufnahme zu stoppen und zu speichern.
3 Sekunden später wird der digitale Aufnahmestift heruntergefahren und ausgeschaltet. Die Kontrollleuchte
blinkt schnell rot und dann blau, bevor sie sich ausschaltet.
Wie kopiere ich die aufgenommenen Dateien?
Schließen Sie das mitgelieferte Datenkabel an die USB-Schnittstelle Ihres Computers an, dann önet der
Computer einen Wechseldatenträger. Önen Sie die Diskette, um den RECORD-Ordner darin zu nden,
kopieren Sie die Audiodateien im WAV-Format auf den Computer und schließen Sie das Kopieren der
Aufnahmedateien ab; Verwenden Sie dann eine Anwendung zum Abspielen von Musik, z. B. Windows Media
Player, um die aufgenommene Datei zur Wiedergabe zu önen.
Statusanzeige:
Standby: Im Standby-Zustand leuchtet die blaue Leuchtanzeige, wenn sich der Stift im Wiedergabemodus
bendet und die Wiedergabe angehalten ist. Die rote Anzeige leuchtet, wenn die Aufnahme angehalten ist.
Aufnahme: Während der Aufnahme blinkt die rote Kontrollleuchte dreimal und erlischt, die blaue Leuchte ist
AUS.
Wiedergabe: Die blaue Kontrollleuchte blinkt langsam im Wiedergabezustand.
Benachrichtigung zum Leistungspegel:
Beim Einschalten des tragbaren Aufnahmestifts blinken die rote und die blaue Kontrollleuchte (2), um den
Batteriestand des Stifts anzuzeigen;
Einmal, um anzuzeigen, dass der Akkustand weniger als 25 % beträgt
Zweimal, um anzuzeigen, dass die Batterie 50 % beträgt
3 Mal, um anzuzeigen, dass der Akkustand 75 % beträgt
4 Mal, um anzuzeigen, dass der Akkuladezustand 100 % beträgt
Hinweis: Wenn der Akku schwach ist, ackern die roten und blauen Kontrollleuchten 10 Mal und
dann wird das Produkt automatisch heruntergefahren.

14
2.2 Vollständige Anweisungen
Ein:
Halten Sie die Einschalt-/Aufnahmetaste (1) 3 Sekunden lang gedrückt und warten Sie, bis die roten und
blauen Lichter (2) den Batteriestand anzeigen.
Der Stift beginnt mit der Aufnahme oder Dateiwiedergabe, nachdem das rote Licht 3 Mal blinkt, je nachdem,
ob Kopfhörer angeschlossen sind.
Ausschalten:
Halten Sie die Power/Recording-Taste (1) in einem beliebigen Zustand länger als 2 Sekunden gedrückt, der Stift
schaltet sich aus und schaltet sich aus, sobald die roten und blauen Lichter (2) dreimal blinken.
Dadurch wird auch jede aktuelle Aufnahme gestoppt und gespeichert.
Stimmaufnahme:
Ein-Tasten-Aufnahme:
Nach dem Einschalten zeigt die Leuchtanzeige (2) zuerst den Batteriestand an und dann blinkt das rote Licht 3
Mal. Sobald das rote Licht zum 3. Mal erlischt, beginnt die Aufnahme.
Um die Aufnahme anzuhalten: Drücken Sie die Power/Recording-Taste, die Statusanzeige leuchtet rot, wenn
sie angehalten wird.
So stoppen Sie die Aufnahme: Halten Sie die Aufnahme-/Ein/Aus-Taste (1) länger als 2 Sekunden gedrückt,
um die Aufnahmedatei zu stoppen und zu speichern. Dadurch wird auch der Stift ausgeschaltet.
Sprachgesteuerte Aufnahme:
Die automatische Aufzeichnung muss mithilfe der folgenden Anweisungen in den Parametereinstellungen
aktiviert werden.
Nach dem Einschalten zeigt die Leuchtanzeige (2) zuerst den Batteriestand an und dann blinkt das rote Licht 3
Mal. Die Aufnahme beginnt erst, wenn ein Ton zu hören ist.
Sobald ein Ton zu hören ist, beginnt die Aufnahme, wenn kein Ton zu hören ist, wird die Aufnahme angehalten
und neu gestartet, wenn ein weiterer Ton zu hören ist.
Um die Aufnahme zu stoppen, halten Sie die Aufnahme-/Ein/Aus-Taste (1) länger als 2 Sekunden gedrückt, um
die Aufnahmedatei zu stoppen und zu speichern. Dadurch wird auch der Stift ausgeschaltet.
Während der Aufnahme wird die Aufnahmedatei automatisch gespeichert und entsprechend den
Aufnahmeparametern in den Kongurationseinstellungen benannt.
Der Dateiname der Aufzeichnung wird mit einem Zeitstempel benannt, z. B. R20221225-100641.WAV oder
V20221225-100641.WAV. Das Zeichen R steht für gewöhnliche Aufnahme, während das V für sprachaktivierte
Aufnahme steht; „20221225“ zeigt das Aufnahmedatum und „100641“ die Uhrzeit der Aufnahme.
Aufnahme/Musikwiedergabe:
Wiedergabe aktivieren:
Verbinden Sie den Stift mit dem Adapterkabel von USB zu Kopfhörerbuchse und schließen Sie die
mitgelieferten Kopfhörer an.
Schalten Sie den Voice Recorder Pen ein und wenn die Kopfhörer angeschlossen sind, wechselt er sofort in
den Wiedergabemodus, die blaue Kontrollleuchte (2) beginnt langsam zu blinken.
Wenn die Ohrhörer nicht eingesteckt sind, wechselt der Stift nach dem Einschalten zuerst in den
Aufnahmemodus, und wenn die mitgelieferten Ohrhörer angeschlossen sind, wechselt der Stift in den
Wiedergabemodus und beginnt mit der Wiedergabe der aktuell gespeicherten Aufnahmedatei.
Drücken Sie kurz die „Play“-Taste auf der Kopfhörersteuerung, um die Dateien anzuhalten/abzuspielen.
15
2.3 Parametereinstellungen
Einstellung der Aufnahmeparameter:
Nachdem Sie den Stift über das USB-Kabel an einen Computer angeschlossen haben, önen Sie den Ordner für den
digitalen Stift, suchen und önen Sie die TXT-Datei mit dem Namen „MRECSET“ durch Doppelklicken. Auf diese Weise
können Sie Ihre Standardaufnahmeparameter einstellen, einschließlich Zeit (TIME), Sprachsteuerung (VOR), Bitrate (BIT),
Verstärkung (GAIN), Aufnahmezeitteil (PART).
Zeiteinstellung:
eine Zahl im Format „ TIME :22:55 2021/4/21“.
Ändern Sie das Datum manuell auf das gewünschte Datum für den aufgezeichneten Dateinamen, z. B. das Datum, an dem
Sie die Aufnahme durchführen.
Wenn Sie einen Windows-PC verwenden, können Sie Uhrzeit/Datum markieren und F5 drücken, um auf die aktuelle
Uhrzeit/das aktuelle Datum zu aktualisieren.
Sprachaufzeichnungseinstellung:
Die Standardstimmennummer 0 bedeutet, dass die Sprachaufzeichnung deaktiviert ist.
Die Sprachsteuerungs-Empndlichkeitsstufe bietet 1-7 Empndlichkeitsstufen, jede Zahl außerhalb dieser ist ungültig. Je
höher die Zahl, desto empndlicher ist die Tonerkennung für die Aktivierung des Aufnahmestatus. Wenn kein Ton erkannt
wird, wird die Aufnahme angehalten. Wenn erneut ein Ton erkannt wird, wird die Aufnahme neu gestartet.
BIT-Einstellung:
1-4 entspricht 32 kbps, 64 kbps, 128 kbps bzw. 192 kbps, der Standardwert ist 4 - 192 kbps.
GAIN-Einstellung:
1-7 sind optional; Je höher die Zahl, desto größer ist die Empndlichkeit des Mikrofons und desto lauter klingt die
Aufnahme. Standardmäßig ist es 5.
Aufnahmezeit PART-Einstellung:
Um zu verhindern, dass Aufnahmedateien in einem Notfall nicht gespeichert werden, können Benutzer eine sichere
Aufnahmesegmentierung (wie lange eine Aufnahme dauert, bevor sie automatisch gespeichert wird) festlegen, die auf
einen beliebigen Zeitrahmen von 10 Minuten bis 240 Minuten eingestellt werden kann.
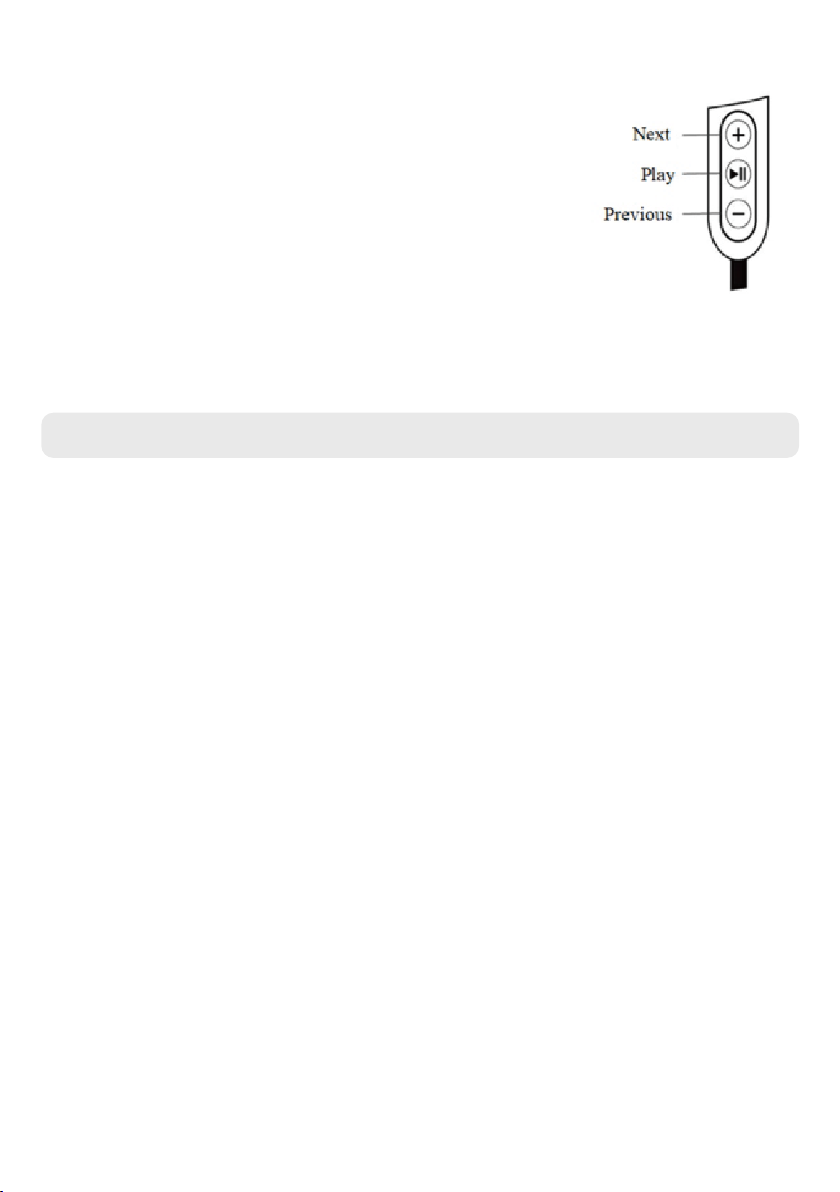
Umschalten zwischen der Wiedergabe von Aufnahmen oder Musikdateien:
Drücken Sie lange auf die Play/Pause-Taste an den Ohrhörern, um zwischen der Wiedergabe
von Musik und der Wiedergabe von Sprachaufzeichnungsdateien zu wechseln.
Drücken Sie kurz die Play-Taste, um die Wiedergabe der Songs oder Aufnahmedateien auf
der Festplatte des Stifts zu starten.
Hinweis: Die Musikdateien müssen im Stammverzeichnis der Stiftfestplatte gespeichert
werden, nicht in Unterordnern.
Kabelgebundener Controller an Kopfhörern:
Drücken Sie während der Wiedergabe einer Datei kurz die „+“-Taste, um zur nächsten
Aufnahme/Musikdatei zu springen. Halten Sie „+“ gedrückt, um die Lautstärke zu erhöhen.
Drücken Sie kurz die „-“-Taste, um zur vorherigen Aufnahme/Musikdatei zu gehen. Halten
Sie die „- “-Taste gedrückt , um die Lautstärke zu verringern.
Android-OTG-Verbindung:
Der Think Gizmos Voice Recorder Pen unterstützt die Android-OTG-Konnektivität, sodass Dateien direkt auf ein Android-
Telefon übertragen werden können. Dies erfordert einen Android-OTG-Adapter, der nicht im Lieferumfang enthalten ist.

16
Tipp: Wenn die Textdatei MRECSET.txt im Stammverzeichnis versehentlich gelöscht wird oder verloren geht. Es
wird automatisch generiert, sobald der Stift neu gestartet wird, und alle Parametereinstellungen werden auf ihre
Standardwerte zurückgesetzt.
Die Standardwerte sind wie folgt
ZEIT: 22:55 2021/4/21
VOR:0
BIT: 4
GEWINN: 5
TEIL:60
1. Schrauben Sie den Stift in der Mitte des Stifts ab, um den USB-Steckplatz und die SD-Kartenfestplatte anzuzeigen.
2. Verbinden Sie das mitgelieferte USB-Kabel mit dem dafür vorgesehenen Schlitz am oberen Ende des Stifts und stellen
Sie dabei sicher, dass der Stecker richtig herum liegt. Sie müssen es nicht zu stark erzwingen, ein Teil des Steckers wird
immer noch sichtbar sein.
Bitte beachten Sie: Wenn der Stift an einen USB-Anschluss eines Computers angeschlossen wird (außer bei der Aufnahme),
unterbricht der Stift sofort seinen aktuellen Betrieb.
3. Stellen Sie eine Verbindung zum PC her. Dateiübertragungsvorgänge sind zulässig, wenn das Wechsellaufwerk auf Ihrem
Computer angezeigt wird.
4. Hochladen/Herunterladen: Wenn die Wechselfestplatte des Stifts erkannt wird, greifen Sie auf den Datenordner zu, um
MP3/WAV-Dateien oder andere Dateien hoch- oder herunterzuladen
.
2.4 Zugri auf Aufzeichnungen / Dateiübertragung
Produktspezikationen
Maße 14x1.7x1.4cm (5.5x0.6x0.5in)
Gewicht 30g (1.05oz)
Aufnahmeformat WAV
Musikformat MP3, WAV, WMA
Aufnahmezeit (192Kbps) Approx 384 Hours
Arbeitszeit der Batterie Approx 25 Hours
Kompressionsrate 192Kbps
Abtastrate 48Khz
Frequenz 20-20Khz
Speichermedium 32GB TF Card
Mikrofon Omni-Directional Microphone
Betriebstemperatur -10°C -- 40°C
Batteriekapazität 180mAh

17
Der Stift wird mit 4 Ersatztinten geliefert . Führen Sie die folgenden Schritte aus, um die Tinte zu ersetzen.
• Vergewissern Sie sich, dass der Stift ausgeschaltet und in der Mitte abgeschraubt ist. Legen Sie das obere
Ende zur Seite.
• Halten Sie das vordere Ende des Stifts mit einer Hand am schwarzen Teil, greifen Sie fest nach dem
silbernen Teil, verwenden Sie die beiden kreisförmigen Rippen als Gri, und drehen und ziehen Sie diesen
silbernen Teil vom schwarzen Teil weg.
• Am Anfang kann es ziemlich eng und etwas schwierig zu greifen sein.
• Sobald die silberne Spitze abgenommen ist, können Sie den aktuellen Tintenhalter leicht abschrauben,
indem Sie den oberen weißen Abschnitt gegen den Uhrzeigersinn drehen.
• Ersetzen Sie ihn durch einen neuen vollen Tintenhalter und schrauben Sie ihn anschließend im
Uhrzeigersinn wieder an seinen Platz.
• Schieben Sie die silberne Spitze zurück auf den schwarzen Teil des Stifts und stellen Sie sicher, dass sie
vollständig eingeschoben ist/
Bitte entsorgen Sie den alten Tintenhalter ordnungsgemäß.
2.5 Stifttinte wechseln
Anwendbares Betriebssystem: XP/Vista/Win7/Win8/win10/win11, Mac OS X
Hinweis: Wenn Sie mit der Dateiübertragung fertig sind, klicken Sie bitte auf den grünen Pfeil in der unteren
rechten Ecke des Computers und wählen Sie „Wechseldatenträger sicher auswerfen“ und ziehen Sie dann den
Rekorder heraus.
Haftungsausschluss: Benutzer müssen ihre Daten während der Nutzung sichern. Wir sind nicht
verantwortlich für den Verlust oder die Beschädigung personenbezogener Daten, die durch Software,
Fehlbedienung der Hardware, Produktwartung, Austausch oder andere unerwartete Situationen
verursacht werden, noch haften wir für Ansprüche Dritter, die durch die Verwendung dieses Produkts
verursacht werden. (Es ist normal, dass die lokale Systemsoftware einen Teil der Kapazität und des
Speicherplatzes belegt, was zu einer geringfügigen Abweichung von der Nennkapazität führt).

Think Gizmos, Unit 19, Lawson Hunt Industrial Park,
Broadbridge Heath, West Sussex, RH12 3JR
Tel.: +44/(0)203 384 8304
18
GARANTIE
Garantieinformation
Was ist abgedeckt:
Die Garantie deckt alle Defekte von Materialien und der Verarbeitung, mit Ausnahme der
unten angeführten Fälle.
Wie lange die Garantie gilt:
Die Garantie gilt für 2 Jahr ab dem Lieferdatum Ihrer Think Gizmos Digital Recorder Pen.
Was nicht abgedeckt ist:
Jedes Problem das durch Missbrauch oder höhere Gewalt (wie Überschwemmung) entsteht
ist nicht gedeckt.
Was wir tun werden:
Sollte das Produkt innerhalb der Laufzeit der Garantie als defekt befunden werden,
erhalten Sie Anweisungen für die Rückgabe und wir werden eine der folgenden Handlungen
vornehmen: (i) wir tauschen das Produkt gegen ein gleiches oder gleichwertiges Produkt
um, (ii) wird reparieren das Produkt, oder (iii) wir erstatten Ihnen den vollen oder einen
Teilbetrag des Kaufpreises des Produkts zurück.
Wie man Service in Anspruch nehmen kann:
Kontaktieren Sie unseren Kundendienst per Telefon oder E-Mail, um Anweisungen zu
erhalten wie Sie eine Serviceleistung unter diesen Garantiebestimmungen erhalten. Sie
nden die Kontaktdaten unseres Kundendienstes weiter unten. Unser Kundendienst kann
Ihnen Fragen stellen, um festzustellen, ob es sich um einen Garantiefall handelt. Sollte dies
der Fall sein, erhalten Sie Anweisungen zur Rücksendung des defekten Produkts. Sollten wir
Ihnen einen Ersatz schicken oder das Produkt reparieren, übernehmen wir die Lieferkosten.
Schicken Sie den Artikel nicht an den Händler zurück bei dem Sie ihn erworben
haben, sondern kontaktieren Sie bitte Think Gizmos direkt.

TG937 - DIGITAL RECORDER PEN
Manuel de l’utilisateur
English p 1
Deutsch p 10
Francais p 19
Italiano p 28
Español p 37
VEUILLEZ SUIVRE ATTENTIVEMENT CES INSTRUCTIONS ET CONSERVER CE LIVRET D’INSTRUCTIONS POUR RÉFÉRENCE
ULTÉRIEURE.
EN RAISON D’AMÉLIORATIONS CONTINUES, LE PRODUIT RÉEL PEUT ÊTRE DIFFÉRENT DES ILLUSTRATIONS
Les attaches, sacs et vis d’emballage ne font pas partie du
produit. Pour des raisons de sécurité, veuillez retirer et
jeter toutattaches d’emballage, sacs et vis avant d’utiliser ce
produit.

MANUEL FRANCAIS - SOMMAIRE
1. 1.1 Informations de sécurité .................................................................................. 20
1.2 Chargement de la batterie ............................................................................... 20
INFORMATIONS IMPORTANTES
20
2.1 Démarrage rapide du stylo enregistreur numérique .................................. 22
2.2 Instructions complètes ................................................................................ 23-24
2.3 Réglages des paramètres ............................................................................ 24-25
2.4 Accéder aux enregistrements / Transfert de chiers ............................. 25-26
2.5 Changer l’encre du stylo ................................................................................... 26
DÉTAILS DU PRODUIT
2.
Informations sur la garantie .................................................................................. 27
GARANTIE
Si vous avez des problèmes avec votre produit ou si vous avez des questions,
n’hésitez pas à nous contacter par mail:
Cela est la manière plus rapide de résoudre les problèmes. Vous seriez étonné à la
vitesse de notre réponse avec une résolution.
Tous nos produits sont couverts par la garantie de notre fabricant, les détails sont
à la page 27.
Pour savoir en plus sur nos produits incroyables, cherchez “Think Gizmos” en
Amazon.
Think Gizmos “Assez petit pour tenir à coeur, assez grand pour livrer”.
Table of contents
Languages:


