Foster Refrigerator EcoPro G2 Series User manual

EcoPro G2
SGD700U & EP700L2MD McDonalds Models
AR2-28 B1Q4E-1FS Controller & LCD5S Display
By Appointment to
Her Majesty Queen Elizabeth II
Suppliers of Commercial Refrigeraon
Foster Refrigerator, King’s Lynn
Foster Refrigerator
Oldmedow Road
King’s Lynn
Norfolk, PE30 4JU
United Kingdom
A division of ITW Ltd
Email:support@foster-uk.comFax: +44 (0)843 216 4700
www.fosterrefrigerator.co.uk
Call: +44 (0)843 216 8800
ISO 9001 ISO 14001
English
00-570046 June 2018 Issue 3 UK
Original Operaon Instrucons

SGD700U
EP700L2MD
Models Applicable to This Manual
Climate Class
Climate class indicated on the serial plate, shows the temperature & humidity at which this appliance has
been tested, for the purposes of establishing values in line with European standards.
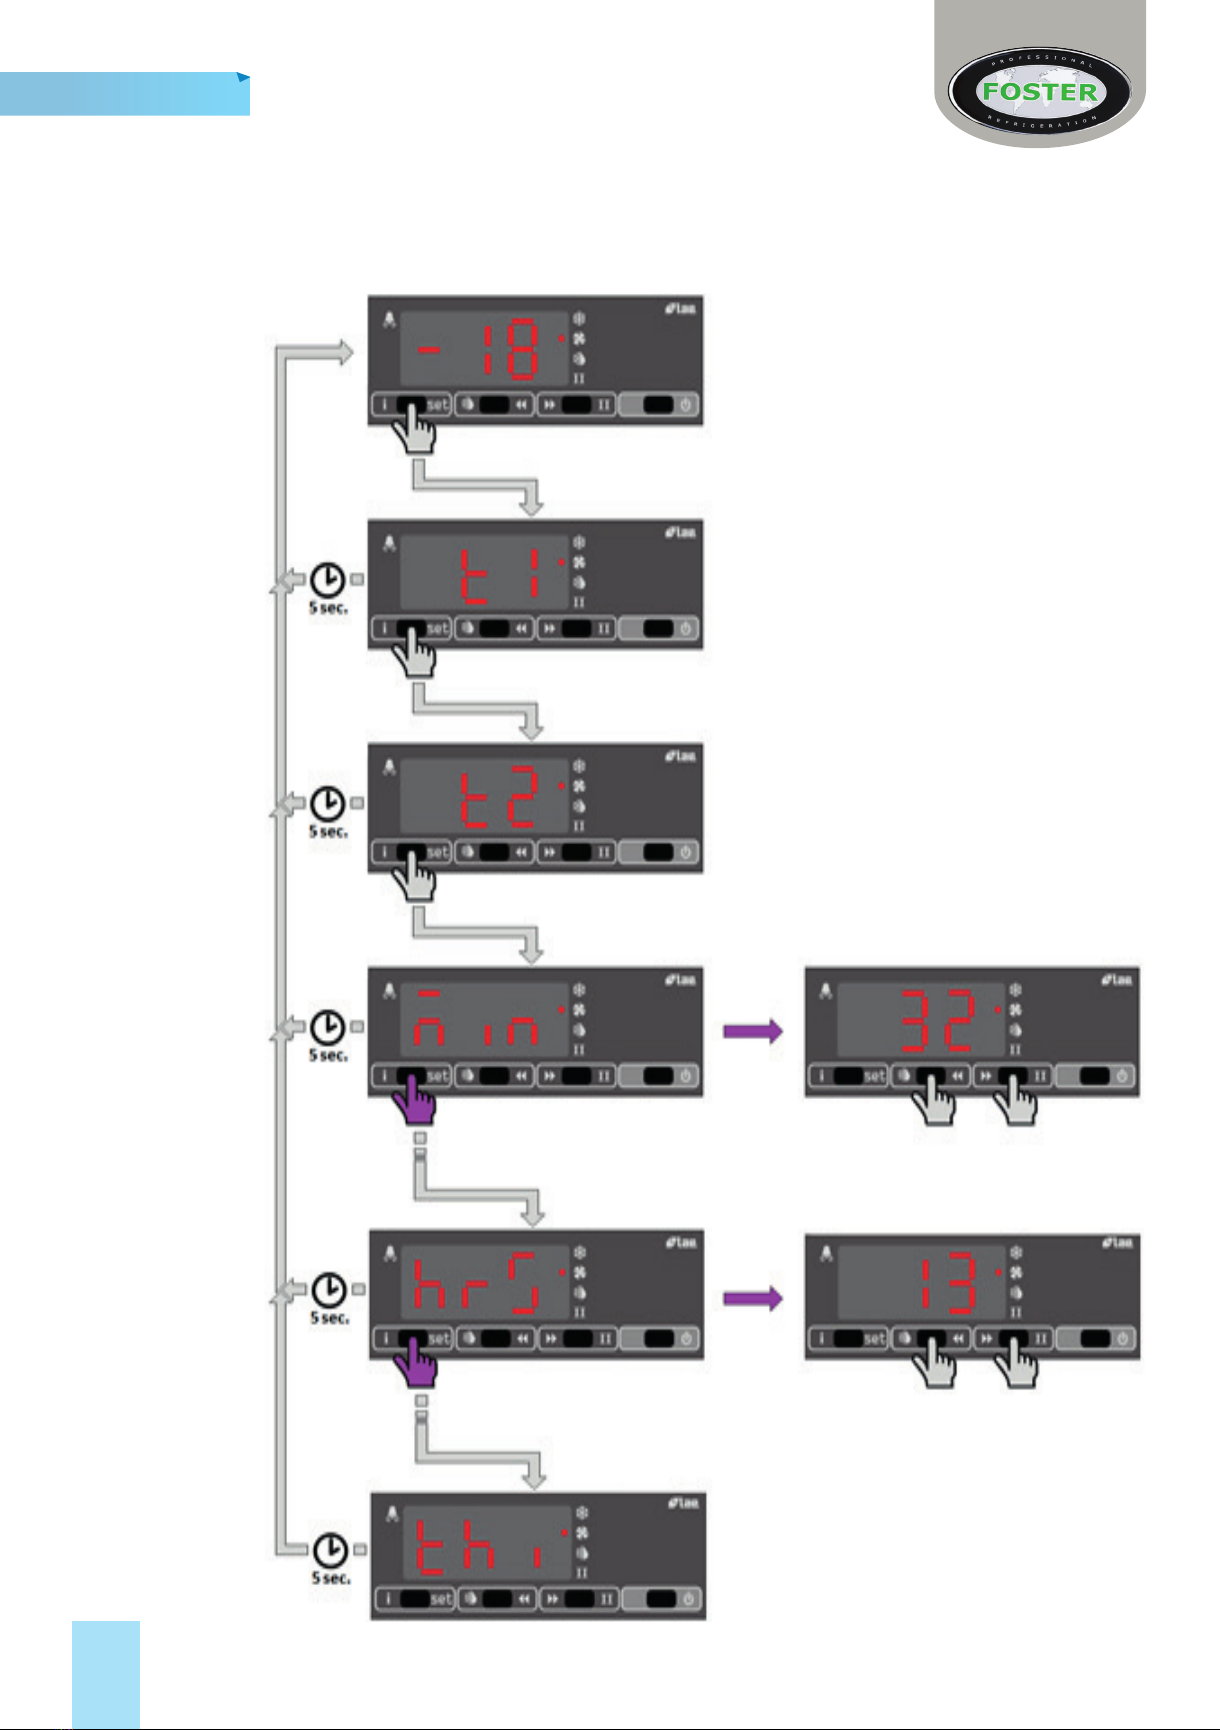
Important Note to the Installer:
Please ensure that this document is passed to the user
as it contains important guidelines on operaon, loading,
cleaning and general maintenance and should be kept for
reference.
English
Electrical Safety
Foster Refrigerator recommends that the equipment is electrically connected via a Residual Current Device,
such as a Residual Current Circuit Breaker (RCCB) type socket, or through a Residual Current Circuit Breaker
with Overload Protecon (RCBO) supplied circuit.
General Safety
Do not store explosive substances such as aerosol cans with a ammable propellant in this appliance.
Keep all venlaon openings in the appliance or in the structure of a built in unit clear of any obstrucons.
Do not use electrical appliances inside the storage compartment.
The appliance is air ght when the door is closed therefore under no circumstances should any living body be
stored or ‘locked in’ the applicance.
The moving of the appliance should be carried out by competent personnel, ensure that two or more people are
used to guide and support the appliance, the appliance should not be moved over uneven surfaces.
The emied sound level of this appliance is 70db(A).
To ensure stability the appliance should be located on a at, level surface, correctly loaded with the castors
locked.
If the supply cord is damaged, it must be replaced by the manufacturer, it’s service agent or similarly qualied
persons in order to avoid hazards.
Care should be taken to avoid prolonged contact with cold surfaces with unprotected body parts, Correct PPE
to be used at all me.
1
Disposal Requirements
If not disposed of properly all refrigerators have components that can be harmful to the environment. All
old refrigerators must be disposed of by appropriately registered and licensed waste contractors, and in
accordance with naonal laws and regulaons.

English
2
Start-Up and Operaon
Aer unpacking, clean and allow the cabinet to stand for 2 hours before turning on (cleaning direcons
supplied within this manual). Ensure the cabinet is situated on a rm, level surface, away from both hot and
cold air sources, as this will aect it’s performance.
Make sure that a minimum clearance of 310mm above and 50mm around the cabinet is available for
venlaon and eecve operaon.
Inial Start-up
Connect the unit to a suitable mains power outlet and turn the supply on. Please do not plug or unplug the
unit with wet hands. Aer doing this you will need to set the real-me clock.
Display Icons and Buons
Icons Buon
Alarm Warning Info & Set Point
Thermostat Output Acve Manual Defrost & Decrease
Fan Output Acve Increase & Manual Acvaon
Defrost Output Acve Standby
2nd Parameter Set Acve
Defrost In Progress Condenser High Pressure Alarm
Controller In Standby Room High Temperature Alarm
Condenser Clean Warning Room Low Temperature Alarm
Door Open Alarm Probe T1 Failure
Condenser High Temperature Alarm Probe T2 Failure
Instant Probe 1 Temperature Maximum Probe 1 Temperature
Instant Probe 2 Temperature Minimum Probe 1 Temperature
Hours of the Real Time Clock Compressor working weeks
(**)
Minutes of the Real Time Clock Keypad Locked
Alarms/Warnings -
During normal operaon the display will show either the temperature or one of the following indicators:
** Displayed only if ACC>0
(Some icons or switches are only visible during adjustment, when acvated by parameters or through operaon/
manual selecon).

Real Time Clock Set Up
The controller requires a me reference for correct operaon; provided by an internal ‘real-me’ clock. When
the mains power is removed a baery maintains the clock sengs for up to 150 hours/ 6 days (this is not a
replaceable baery and re-charges while mains power is supplied).
To check/reset the clock the following procedure should be followed:
English
3
Press and release ‘i / set’ buon
Aer 5 Seconds
with no buons
pressed, the
display reverts to
showing the air
temperature.
Aer 5 Seconds
with no buons
pressed, the
display reverts to
showing the air
temperature.
Aer 5 Seconds
with no buons
pressed, the
display reverts to
showing the air
temperature.
Aer 5 Seconds
with no buons
pressed, the
display reverts to
showing the air
temperature.
The display will change to show ‘t1’.
Press and release ‘i / set’ buon.
The display will change to show ‘t2’.
The display will change to show ‘min’.
Press and hold ‘i / set’ buon.
Display shows current ‘minute’ value.
Keep ‘i / set’ pressed and adjust with ‘<<’ or ‘>>’
Releasing ‘i / set’ the display will show ‘hrs’.
Reduce ‘min’
i.e. 32, 31 …
Increase ‘min’
i.e. 33, 34 …
Press and hold ‘i / set’ buon.
Display shows current ‘hours’ value (24hr clock).
Keep ‘i / set’ pressed and adjust with ‘<<’ or ‘>>’
Reduce ‘hrs’
i.e. 12, 11 …
Releasing ‘i / set’ the display will show ‘thi’.
Increase ‘hrs’
i.e. 14, 15 …
Aer 5 Seconds
with no buons
pressed, the
display reverts to
showing the air
temperature.

4
English
Standby
Pressing the power switch for 3 seconds will turn the unit on or into standby. When in standby the display will
show
Accessing the Info Menu
Press and immediately release the ‘i’ buon then using the and buons select the data you wish to
display the value of. When at the desired point press and hold the ‘i’ buon to display the value.
Press the buon or leave the controller for 30 seconds and the unit will exit the Info menu and resume to
display the current temperature.
Set Point
To amend the set point press and hold the ‘i’ buon for half a second. Then while keeping the ‘i’ buon pressed
use the and buons to set the desired value.
When the ‘i’ buon is released the new value will be stored automacally.
Keypad Security Sengs
This funcon avoids unauthorised controller access.
Access the ‘Info’ menu (as described above) and set the parameter ‘LOC’ to ‘YES’. Once selected this will
inhibit all funcons of the display buons. To resume this seng so the keypad is unlocked re-adjust the
seng back so that parameter ‘LOC’ states ‘NO’.
Internal Light (SGD700U Only)
The lights are turned on and o via the rocker switch posioned next to the
controller display.
Shelves, Supports & Baskets
Shelving on the SGD700U models consist of two trayslides per shelf. These slot directly into the rear of the
cabinet’s airduct and have ladderacking to support the front.
Shelves are a standard wire gastronorm style that slide’s onto the trayslides.
The L2MD models have a basket assembly in each secon that is ed to the cabinet via 4 trayslides. Each
basket consists of two holding chambers.
Food
Cover all foods and separate raw and cooked foods to avoid cross contaminaon.
Loading and Airow
Ensure that there is no more than 40kg of evenly distribute product placed on or within each shelf or basket.
Always ensure the air can circulate around/through the stored product.
t is important that for opmal energy performance that adequate airow is maintained around the perimeter
of the shelves, and around all stored products.
On all models please ensure that no product is placed on the unit base.

English
5
Door Lock
L2MD Model - To lock the door insert the key and turn 90°, turn in the opposite direcon to unlock.
SGD700U Model - The sliding doors only have a loading lock. This sits on the boom door
runner and when a door is fully opened, can be turned 90° to hold the door open. Aer
loading the cabinet turn the latch back so it again runs parallel with the runner and the
door can be closed.
Defrost
All Foster G2 cabinets are ed with a fully automac defrost system to ensure that the evaporator coil
remains free from ice during normal use. Melt-water is evaporated using both the heat from the refrigeraon
system and an electric heater.
To acvate a manual defrost - hold the buon for 4 seconds to display DH1. When visible press and hold
buon for another 4 seconds and the manual defrost will start.
Cleaning and Maintenance
Important: Before cleaning, the unit should be put into standby and then the power supply should be
turned o at the mains. Please do not plug or unplug the unit with wet hands. Only when cleaning has been
completed and the unit is dry should the cabinet be turned back on at the mains.
Suitable P.P.E (Personal Protecve Equipment) should be worn at all mes.
Regular Maintenance:
> As and when required remove all product and shelving (beware of cold and or sharp components) from
the unit. Clean exterior and interior surfaces with mild liquid detergent, following the direcons on the
pack at all mes. Rinse surfaces with a damp cloth containing clean water. Never use wire wool, scouring
pads/powders or high alkaline cleaning agents i.e bleaches, acids and chlorines as these may cause
damage.
> All gaskets should be inspected on a regular basis and replaced if damaged. To clean, wipe with a warm
damp soapy cloth followed by a clean damp cloth. Finally thoroughly dry.
> Shelves and their supports can be removed for cleaning. The shelves are dishwasher safe; however the
vercal supports should be cleaned with warm soapy water then rinsed and dried.
> Condenser Cleaning
Maintenance should take place on a regular basis or as and when required by a competent/trained
personnel.
If there are any stubborn grease deposits le on or through the condenser call your supplier to carry out a
full service (this is normally chargeable). Failure to maintain the condenser may invalidate the warranty of the
condensing unit and cause premature failure of the motor/compressor. Do not use a wire brush to clean the
condenser.
12 to18
Weeks
+Stayclear
Coil
Tradional
Fin Coil
4 to 6
Weeks

English
6
Traditonal Fin Condenser Coil
Hoover or brush the air lter (where ed).
1
6543
2
+Stayclear Condenser Coil

English
7
Troubleshoong
Before calling your supplier please make sure that:
a. The plug has not come out of the socket and the mains power supply is on i.e. is the controller
illuminated?
b. Check to see if the unit is in standby
c. The fuse for the cabinet is intact
d. The cabinet is posioned correctly – cold or warm air sources are not aecng the performance
e. The condenser is not blocked or dirty
f. The products are placed in the unit correctly
g. Defrost is not in progress or required
If the reason for the malfuncon cannot be idened, disconnect the electrical supply to the unit and contact
your supplier. When requesng a service call, please quote the model and serial number which can be found
on the silver label located on the inside of the unit (starts E......).

English
8
>Page Left Blank Intentionally <

English
9
>Page Left Blank Intentionally <

English
10
>Page Left Blank Intentionally <

UK Head Oce
Foster Refrigerator
Oldmedow Road
Kings Lynn
Norfolk
PE30 4JU
a Division of ITW (UK) Ltd
Tel: +44 (0)843 216 8833
Fax: +44 (0)843 216 4707
Email: support@foster-uk.com
Website: www.fosterrefrigerator.co.uk
This manual suits for next models
2
Table of contents
Other Foster Refrigerator Refrigerator manuals