Foto Walser Walimex Radio Flash Trigger Set Duo User manual

2
Content
1. How to understand this instruction manual .................................. 3
1.1 Symbols on the device.......................................................................3
1.2 Symbols in this manual......................................................................4
2. Important safety notes ................................................................. 4
3. Unpack and check the device ........................................................ 5
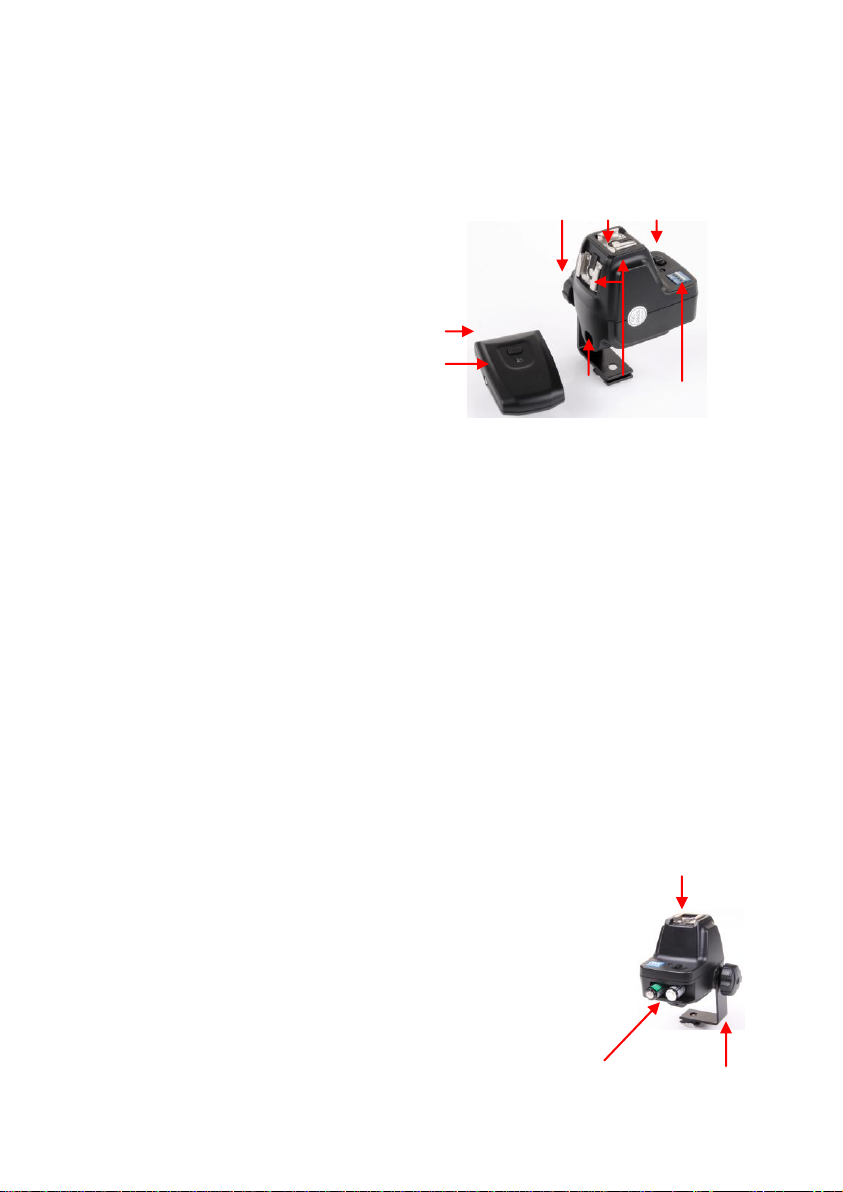
4. Overview of device elements and operating elements.................. 6
5. Quick-start guide........................................................................... 6
6. Prepare devices for operation ....................................................... 6
6.1 Connect receiver to studio flash and power network .......................6
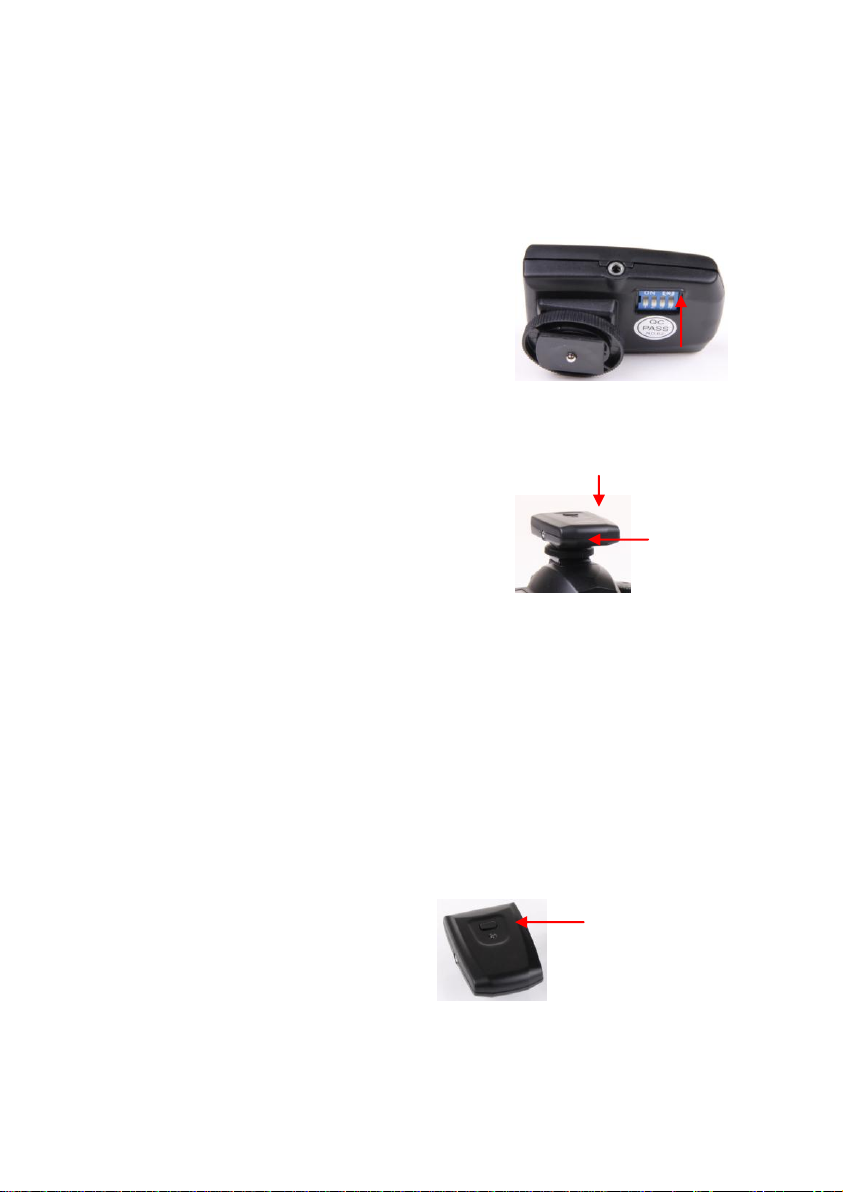
6.2Adjust frequency ...............................................................................7
6.3 Mount transmitter onto the camera .................................................7
7. Operation of the devices............................................................... 7
7.1 Trigger the test button ......................................................................7
8. Solve problems ............................................................................. 8
9. Maintenance of the devices .......................................................... 8
9.1 Continuous inspections and maintenance of the devices .................8
9.2 Cleaning the devices..........................................................................8
9.3 Changing the battery .........................................................................9
10. Accessories and options ................................................................ 9
11. Disposal and environmental protection ........................................ 9
12. Technical Specifications ................................................................ 9

3
We would like to thank you for your confidence and wish you much joy and
success with your new device.
The walimex Radio Flash Trigger Set Duo consists of a transmitter and a
receiver. Flexibly useable due to umbrella mount, tilting tripod mount and
connection of two compact flashes.
The main features of the set are as follows:
Multifunctional: 16 frequencies
Simple, straightforward use
With ¼ inch tripod thread on the receiver
for 2 compact flashes
Please read these instructions carefully before using your new device
for the first time. It includes everything you need to know in order to
avoid physical injuries and damages.
Please pay attention to all safety notes in this instruction manual.
Please keep this manual safe. If you are selling or leaving the device
to another person, please ensure to hand this manual over as well.
1. How to understand this instruction manual
1.1 Symbols on the device
This symbol means that your device meets the safety
requirements of all relevant European Directives.
This symbol means that your device must be disposed of at
local disposal areas.

4
1.2 Symbols in this manual
Symbol
Meaning
Indicates the handling and consequences of safety
notes.
WARNING
Indicates a hazardous situation which, if not
avoided, may result in a serious injury or death.
NOTE:
Indicates potential material damage and other
important information regarding your device.
2. Important safety notes
Danger of breaking due to falling of the devices and other damages.
Do not operate the device with wet hands or feet.
Only operate the device in dry rooms and areas.
Clean the device exclusively as described in this instruction manual.
Ensure that cables and conductors are not damaged. Damage could
be caused due to heat impact, chemical influence or due to
mechanical impacts such as rubbing, bending, tearing, rolling over, or
nibbling animals.
Prevent your device from falling.
In the case of it falling, please have an electrician check the device
before switching it on again.
If your device is damaged or defective or if you notice a burning smell:
Do not operate the device with a damaged housing or a damaged
cable. Do not open the receiver. Never repair the device on your own.
Have the device repaired exclusively by an electrician.
Please follow this instruction manual for maintaining your device.
Cut off power supply by removing the batteries before maintenance
measures.

5
3. Unpack and check the device
1. Please unpack the delivery carefully.
2. Please check if the scope of delivery is complete:
1 x Radio Flash Trigger Set Duo
o1 receiver
o1 transmitter
o1 sync cord
1 x instruction manual in German and English
3. Please check if the scope of delivery is undamaged.
NOTE: If the scope of delivery is incomplete or damaged, please contact
+49 84 32 / 9489-0.
We reserve the right to make technical and optical modifications in the
course of product improvement.

6
4. Overview of device elements and operating elements
A
Transmitter
B
Test button
C
Locking screw
tilt angle
D
Receiver
E
On-/off-switch
F
Umbrella mount
G
Hot shoe for compact flashes
H
Frequency setting
5. Quick-start guide
NOTE:
The detailed instruction for the following operations can be found in the
respective chapters in this instruction manual.
Keep the sequences of the following operation steps when using the device
for the first time to avoid damages on the device.
1. Mount the receiver on, e.g., tripod and compact flash.
2. Set frequency.
3. Mount the transmitter on the camera.
4. Trigger the test button.
6. Prepare devices for operation
6.1 Mount receiver on, e.g., tripod and compact flash
1. Screw receiver to tripod.
2. Slide compact flash into hot shoe of radio receiver
and fasten with locking screw.
3. Set tilt angle and fasten with locking screw.
4. Switch on/off.
C
B
A
Locking screw
Hot shoe for
compact flash
On-/off-switch
D
E
F
G
H

7
6.2 Adjust frequency
You have the option to operate the Radio Trigger on 16 different
frequencies. For this it is important to make the same settings on the
transmitter and receiver as in the
transmitter in the following example.
Set frequency on backside of transmitter.
E.g., set levers in direction of pictured
figures.
6.3 Mount transmitter onto the camera
1. Connect the transmitter with the
foot to the hot shoe of your camera.
2. Fasten the transmitter to the hot
shoe with the locking screw.
3. If your camera does not have a hot
flash contact, please use the enclosed sync cable and connect the
transmitter with your camera or the hot shoe.
7. Operation of the devices
7.1 Trigger test button
Before starting your work, please check your devices for functionality and
trigger your compact flash with the test button on the transmitter.
Test button
Transmitter
with hot shoe
Camera with
hot shoe
Frequency
setting

8
8. Solve problems
Problem
Possible cause
Solution
Radio trigger
shows no function
Radio receiver is
switched off
Switch on radio receiver
Batteries on the
transmitter/receiver
are low
Change the battery
See Change the battery
9. Maintenance of the devices
9.1 Continuous inspections and maintenance of the devices
What you should do
Before each use
Inspect all cables and connectors for damage.
If damaged:
Have the device repaired by an electrician
X
9.2 Cleaning the devices
Please ensure that contact between the device and moisture or water
is avoided.
NOTE: Please only use cleaning supplies as specified in the following table.
Radio Trigger
Cleaning
Casing
Remove light and persistent stains with
microfiber cloth

9
9.3 Changing the battery
WARNING
Please only use batteries for this device which comply with the
required specifications.
See Technical Specifications.
1. Please open the battery compartment lid
on the back.
2. Insert batteries into battery
compartment.
3. Close battery compartment lid.
10. Accessories and options
You can find extensive accessories for your device in our web shop.
11. Disposal and environmental protection
Please dispose of your device at your local disposal area. This service is free
of charge to you.
12. Technical Specifications
Receiver
Power supply
2xAAA 1,5V
Weight
approx. 90g
Dimensions (H x W x L)
approx. 6 x 7 x 9cm
Sync Exit
3.5mm
Material
Plastic
Battery
compartment

10
Transmitter
Max. range
approx. 30m
Sync time
1/200 sec.
Weight
approx. 25g
Dimensions (H x W x L)
approx. 3 x 4 x 6cm
Permitted operation
temperature
-10 °C to + 40 °C
Frequency
433 MHz
Storage conditions
Dry and dust-free in carton at
-20 °C to +50 °C
Reference to declaration of conformity:
„Herewith Foto Walser GmbH & Co. KG declares that the device Radio
Flash Trigger Set Duo conforms to the basic requirements and the
remaining corresponding regulations of the directive 1999/5/EG.” The
declaration of conformity can be requested at the following address:
Table of contents
Other Foto Walser Camera Accessories manuals