FourStar 11009609 Instruction Manual
17” LCD Dual-Screen Monitor Display
Model No: 11009609
Installation & ser’s Manual
All brand names and trademarks are the property of their respective owners
* Important Notice: Please read this manual carefully

2
Table of Contents
Precautions...................................................................................................................................... 3
Package Contents ........................................................................................................................... 4
Overview .......................................................................................................................................... 5
Minimum System Requirements .................................................................................................... 5
Setting up the Monitors .................................................................................................................. 6
Adjusting the Monitors Viewing Positions.................................................................................7-8
Connecting the Cables to the Monitors....................................................................................9-10
Connecting the Monitors to a Computer ..................................................................................... 11
Dual Monitor System Set p Guide ........................................................................................12-20
Menu Control Buttons...................................................................................................................21
OSD Menu Mode.......................................................................................................................22-23
Troubleshooting your DVI monitor connection .......................................................................... 24
Display Modes ............................................................................................................................... 25
Specifications ................................................................................................................................ 26
Troubleshooting/FAQ....................................................................................................................27
Maintaining Your Monitor.............................................................................................................. 28
FCC and CE Radiation Norm ........................................................................................................ 29
Service Procedure......................................................................................................................... 30
Warranty......................................................................................................................................... 31

3
Precautions
1. Read all of these instructions and save this manual for later use.
2. Follow all warnings and instructions on the product.
3. Do not cover or block the ventilation holes in the case.
4. Do not insert sharp objects or spill li uid into the LCD monitor through the cabinet slots; this may
cause accidental fire, electric shock or failure.
5. Unplug the unit when not in use for an extended period of time.
6. Unplug the unit from power outlet before cleaning.
7. Do not attempt to service this product yourself, as opening or removing the cover may expose you
to potential electric shock. Only a ualified technician should service this product.
8. Do not touch the screen directly with your fingers as it may damage the screen; the oil from your
skin is difficult to remove.
9. Do not apply pressure to the screen, the LCD screen is very delicate.
10. Keep the monitor away from extreme heat, cold or humid places.
11. Do not place directly under sunlight, dusty surroundings or near e uipment, which may generate
strong magnetic fields.
12. Do not place any object on the power cord.
13. To avoid danger of the monitor falling and possibly causing injury and/or serious damage to the
monitor, do not place this monitor on an unstable or uneven surface.
14. Please wait at least 2 seconds between switching the monitor ON/OFF.
15. Provide sufficient space between the monitor and the wall for ventilation. Overheating may lead to
a fire.
16. Do not place candles, lit cigarettes, or other heat radiating objects on or near the monitors.
17. Do not place an amplifying speaker near the monitor. It may affect the viewing uality of the
display.
18. Keep the monitors at least 3 feet away from any electronic devices such as radios, fans, clocks
and telephones.

4
Package Contents
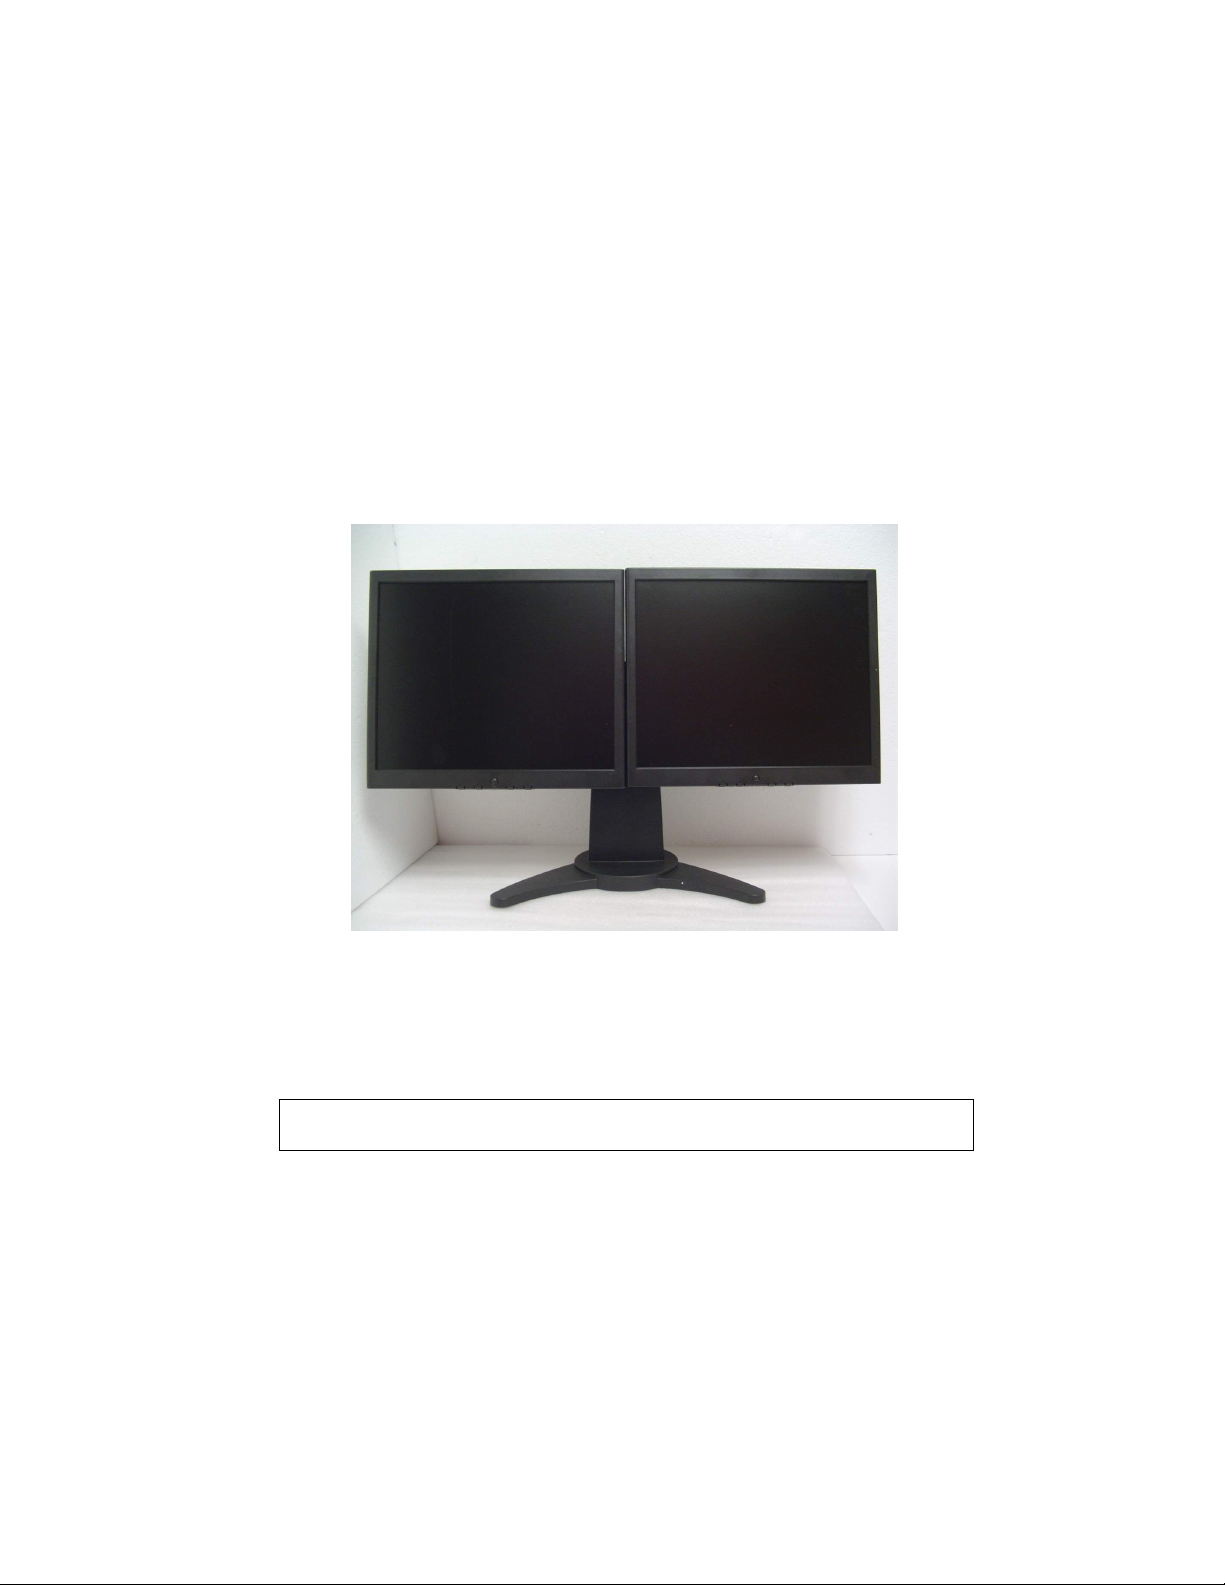
17” LCD Dual-Screen Monitor Display
Dual-Screen Stand (1pc)
ser’s Manual
RGB (Analog) signal cable (2pcs)
DVI signal cable
(2pcs)
Power Cord (2pcs)
Audio cable (1pc)
Thumb Screws

5
Overview
The 17” Dual Screen Monitor Display will enhance your workplace productivity by up to 50%. Dual Screen monitor displays
give you twice the data in one glance.
Dual Screen Monitor Displays eliminate switching between windows and allow you the ability to multitask by presenting your
workspace with a primary window in which to work and a secondary window to watch for e-mails or monitor results as they
come in.
The Dual Screen Monitor Display also allows you to recover valuable desk space by employing a single pedestal base that
supports the Dual Screen Monitor Display.
Dual Screen Monitor Displays will allow PC and Mac user’s the ability to view simultaneous applications in use and the ability
to view spreadsheets across the entire viewing length of the 2 monitors. This reduces scrolling to a minimum and increases
your productivity. You can recreate a spreadsheet on one monitor while viewing it on the adjoining screen.
Dual Screen Monitor Displays are being used by mainstream computer users in many different business and home office
applications today:
Web Researchers, Power Gamers and On-Line Auction participants, Video and Music Editing, Financial Traders and Analysts,
Corporate Managers and IT departments, Graphic Designers, Website Creators, Engineers, Architects, Users of CAD Design
programs.
Setting up the Dual Screen Monitor Display is virtually plug-and-play. Microsoft Windows 98SE, ME, 2000, XP or newer
versions were designed with native support to enable users to connect multiple monitors to a computer. The user will need
either a single video card with multiple video outputs as are being installed in many desktop and laptop computers sold today
or multiple video cards which when combined enable you to have dual video outputs in your computer.
The Monitors used in the Dual Screen Displays feature a slim bezel design with high resolution performance and the ability to
connect to your computer via digital or analog inputs.
Fingertip adjustment screws allow for easy height and side by side positioning of the Dual Monitor Screens and additional
vertical and horizontal angle adjustment allow for a fully customized work environment. The single pedestal base allows you to
reclaim your desk space by occupying a small footprint when compared to 2 monitors side by side.
Minimum System Requirements:
You will need to verify that your computer has either two VGA or two DVI Video outputs in order to connect the Dual Screen
Monitor Displays. You may also use a video card with one VGA and one DVI output to connect to the monitors.
Your computer operating system must be Windows 98SE, 2000, XP or Mac OS in order to run multiple monitors with the Dual
Screen Monitor Displays. No additional software is re uired to install the Dual Screen Monitors since they are plug and play
compatible.
6
Setting up the Monitors
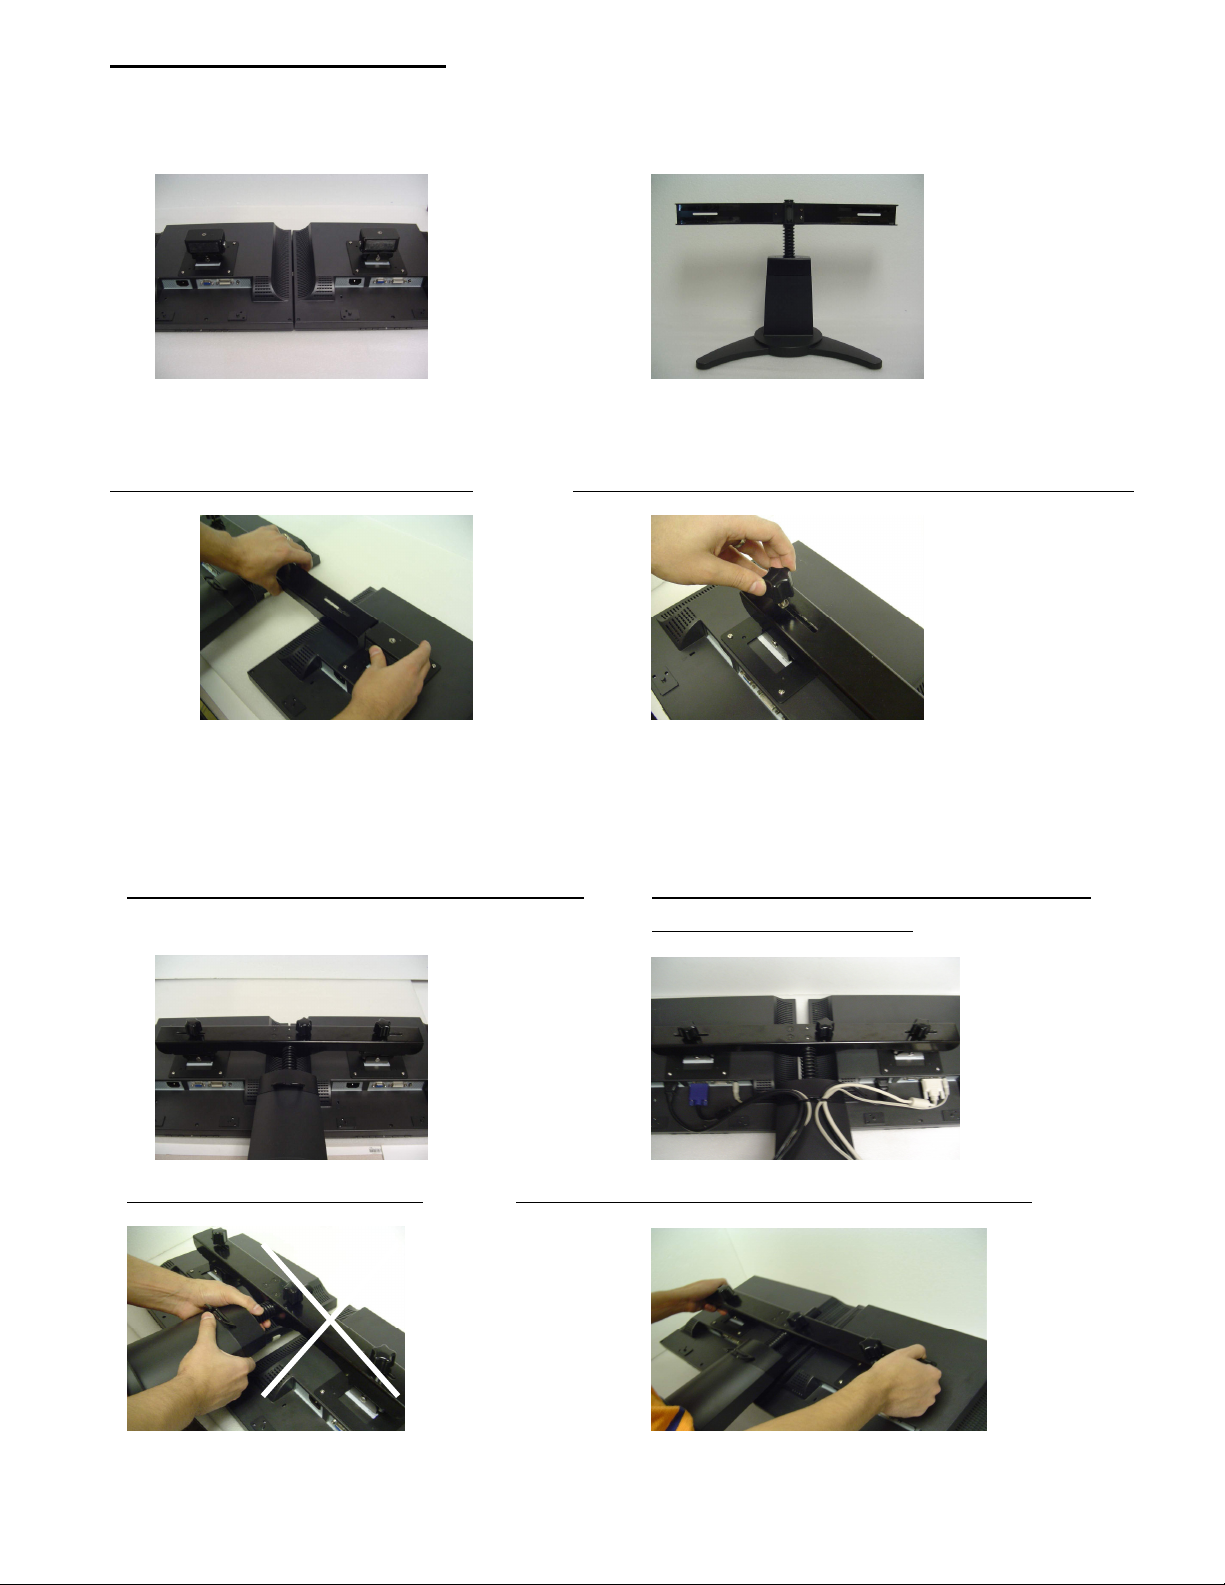
1.
Clear a flat clean area and place a large soft cloth to set your monitors down upon in order to attach the dual screen
stand to the monitors. Make sure there are no sharp objects in the area that can make contact with the LCD monitor
screens that may cause damage to the screens. Leave the transparent sheet attached to the front of the monitors in
place as this will protect the panels.
2.
Carefully slide the mounting bracket back into the monitor stand while the monitor lies flat on the table top. Tighten the
thumb screw and then carefully repeat this step with the other monitor.
Slide the bracket and monitor into the stand. Tighten the thumb screw to secure the mounting bracket to the stand.
3.
The monitors are now installed to the stand, you may now connect the cables and power cord to your monitors while the
unit is in this position. DO NOT lift the monitors by the base, please make sure to hold both ends of the mounting rail (as
shown below) when carrying the monitors.
You may now connect the AC, Audio and Video cables. Power and Videos\Audio cables attached and placed
through cord management loop.
Do not lift the monitors by the base. Carry the monitors by grasping both ends of the mounting rail.
7
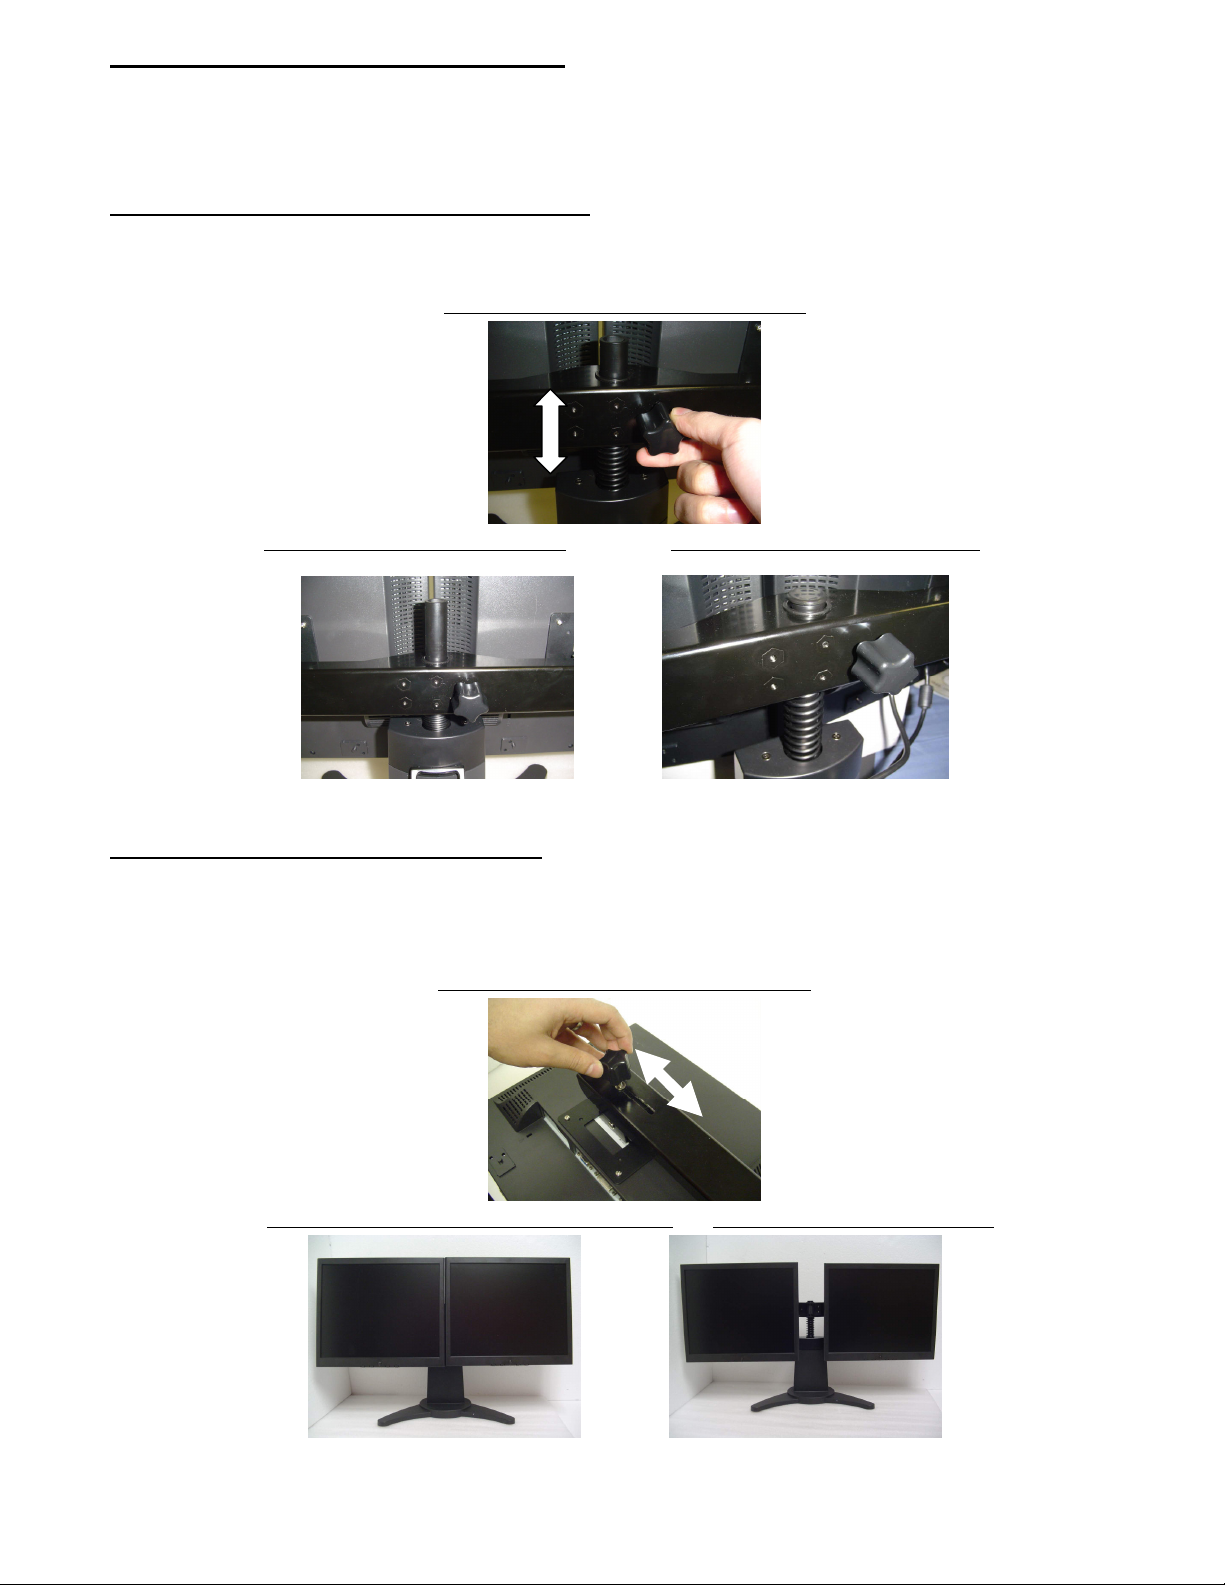
Adjusting the Monitors Position
The Dual Display monitor base allows you to customize your work area by allowing vertical height adjustment of both monitors.
You can also adjust the individual monitors for vertical and horizontal tilt and separation.
Vertical Height Adjustment for both Monitors
You can adjust the viewing height by up to 2 inches up or down on the base by loosening the thumb screw on the back of the
base and lifting or lowering the monitors. Make sure you tighten the thumb screw to secure the correct height.
Loosen the height adjustment thumb screw.
The monitor at their lowest elevation. The monitor at their highest elevation.
Horizontal Adjustment for both Monitors
You can adjust the distance between the monitors by loosening the thumb screw on each monitor and sliding the monitors
towards or away from each other and then secure them by tightening the thumb screw.
Adjusting the monitors for horizontal viewing.
View monitors side by side for single documents. You may separate monitors apart.

8
Adjusting the Monitors’ Viewing Position
Individual Vertical Tilt
You may adjust the monitors’ vertical position by -15° to+30°.
Adjusting the monitors vertically.
Individual Horizontal Tilt
You may tilt the monitor horizontally by -10° to +10°.
Customize your viewing angle by tilting the monitors to the left or right.

9
Connecting the Cables to the Monitors
Handle the LCD monitors with care. Turn off the LCD’s and PC’s power before beginning setup. Follow the installation
instructions step by step.
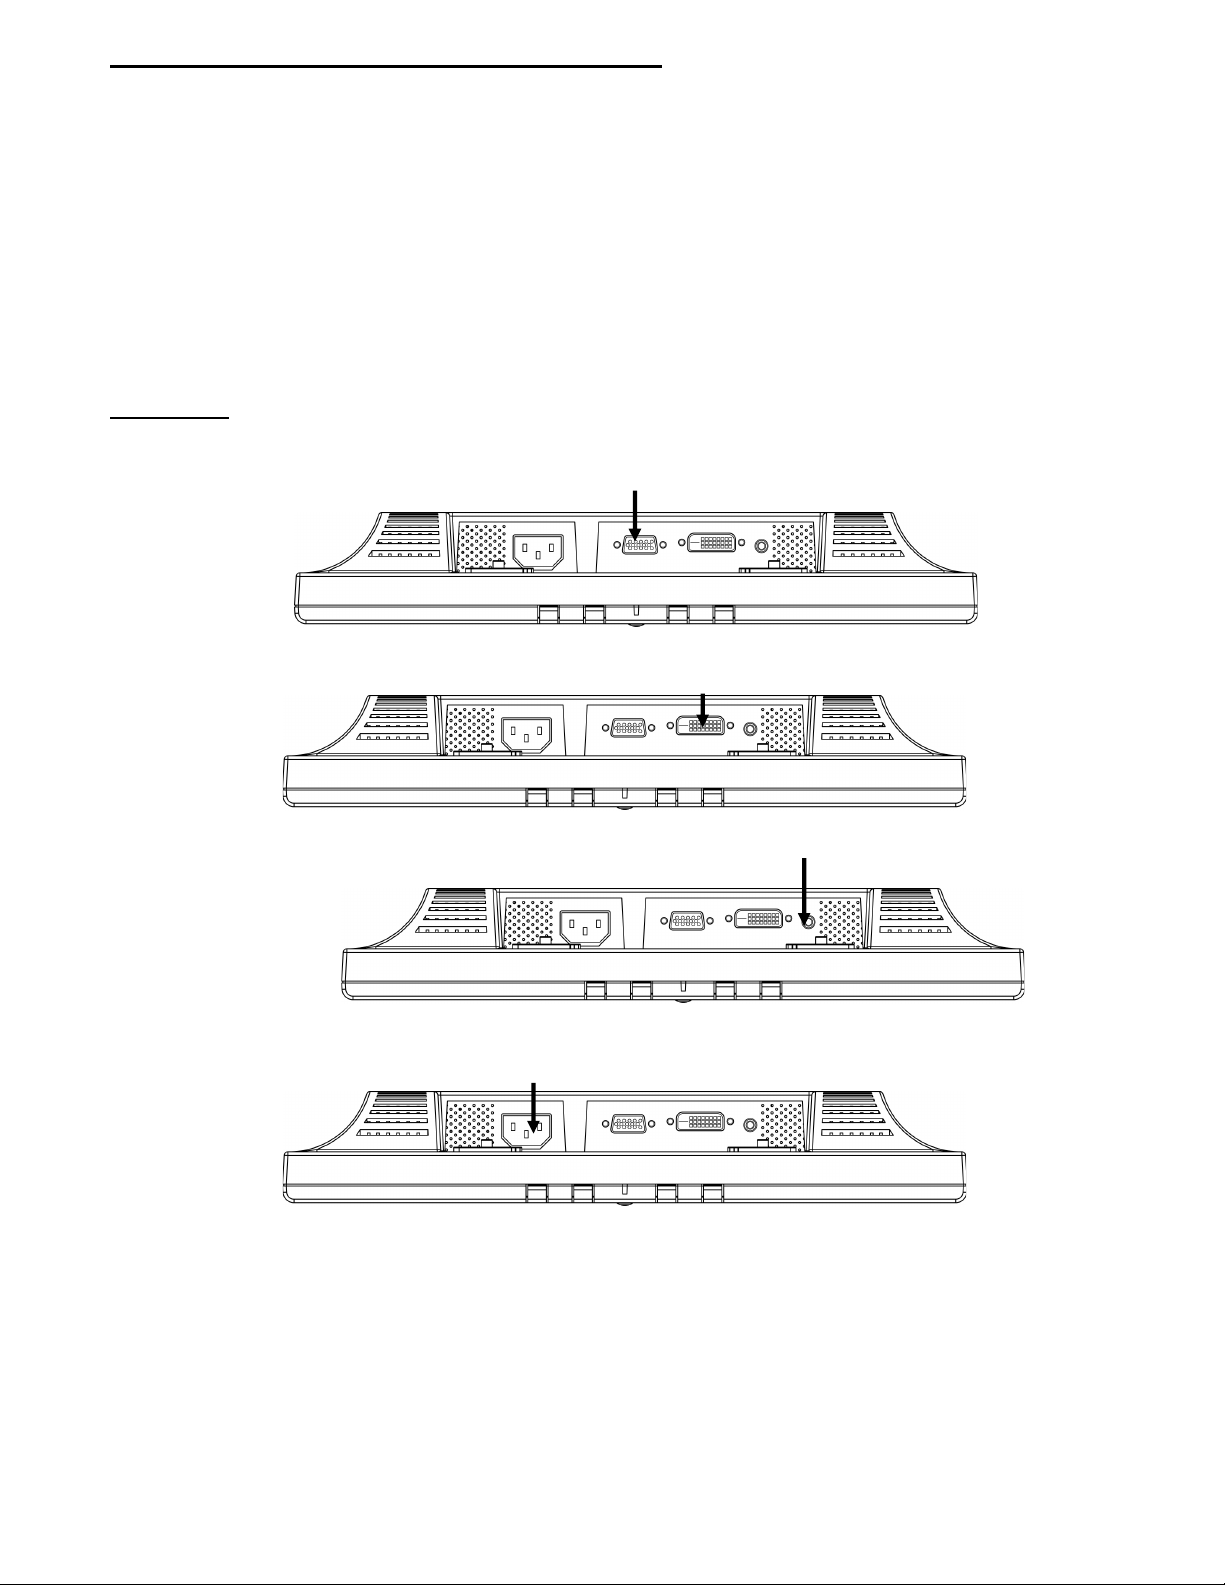
Inputs
NO. Terminal Function
AC Input To connect the power cord
VGA In To PC VGA connector
DVI In To PC DVI connector
Audio To PC Audio output
VGA 1 DVI 1 VGA 2 DVI 2
10
Connecting the Cables to the Monitors
Important note for Windows ser’s
Before attaching your new LCD monitor to your computer, please make sure that your resolution and refresh rates are set
correctly in order that your monitor works properly. This is especially important if you are changing monitors (for example,
from a CRT to a LCD). Before disconnecting your old monitor, please set the resolution to 1024 x 768 and set the refresh
rate to 65Hz. Note: Recommended resolution is 1280 x 1024 at 75Hz. You can adjust these settings by right clicking
your desktop, select “Properties”, then “Settings”. To adjust the refresh rate, click on “Advanced” and search for this option.
Video card settings will be different based on the video capability of your computer. Please consult your video graphics card
or computer manual for information in regards to this.
Installation
1. Carefully position your LCD monitor so that you can see all of the connection ports on the bottom of the monitor.
2. VGA - Plug one end of the D-Sub signal cable into the VGA connector
on the monitor and plug the other end of the
cable into the 15-pin D-Sub connector at the rear of your PC. Make sure that all of the screws are hand-tightened securely.
3. DVI - If you are using a DVI signal cable plug one end into the DVI connector
on the monitor and plug the other end of
the cable into the 24pin DVI connector at the rear of your PC. Make sure that all of the screws are hand-tightened securely.
4. Audio - Plug the Audio connector to the Audio In port
on the monitor, and to the computer line out at the rear of your
PC. This is optional if you wish to use a different audio source.
5. AC Port Cord - Plug the power connector to the AC In port
port at the rear of the monitor, and connect the power cord
to the power outlet.
6. Power on the computer and the monitor.
11
Connecting the Monitors to the Computer
Your video card settings will be different based on the model and manufacturer of your computer. Please consult your video
graphics card or computer manual for information in regards to this.
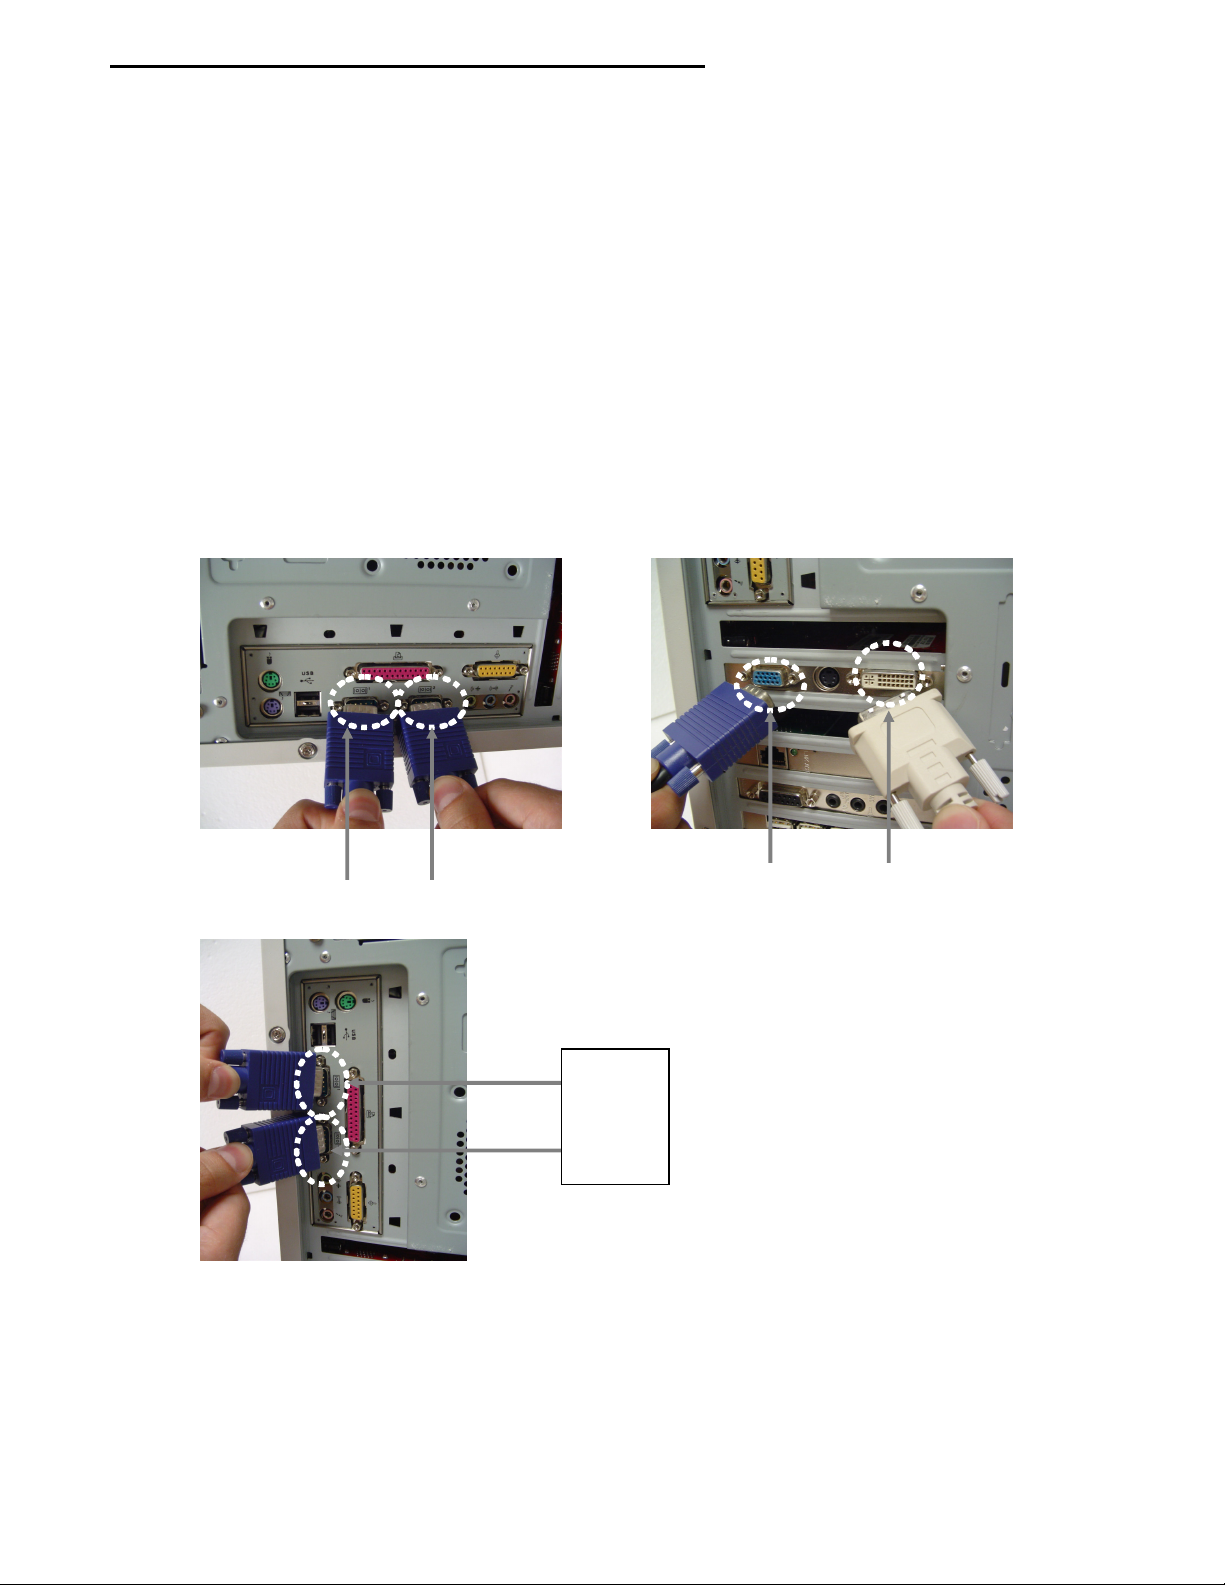
There are different ways to connect your Dual-Screen monitors to your computer. If your computer has two VGA ports, plug
the ends of the VGA cables into each VGA port of your computer. If your computer has one VGA port and one DVI port,
connect the VGA cable to the VGA port of your computer and connect the DVI cable to the DVI port of your computer. You may
connect the Dual Screen Monitors to two separate computers by connecting one video cable to each computer.
If your computer does not specify VGA 1 and 2, you may change the order at a later time by adjusting the video configuration
settings on your computer through your operating system.
If your computer only has one video port, you will need to install an additional video graphics card into your system to support
this dual screen monitor display.
Figure 1 Figure 2
VGA 1 VGA 2 VGA 1 DVI 1
Figure 3
VGA 1
VGA 2

12
Dual Monitor System Set p Guide
After you have checked to see that the cables are properly connected between the monitors and your computer, you can turn
on the power to the monitors and computer.
After your Windows operating system boots up, you will only have an image on one of the two screens. These next steps will
show you examples of how to instruct your computer that you are now using two monitors on the system and how you would
like them to perform.
The Dual Monitor System Setup will depend upon the Video Graphics Card that you have installed in your computer.
The following step by step examples are based on the more popular VGA cards that are being used in computers today. The
ATI (Radeon) and NVIDIA (Gforce) graphics solutions.
For greater detailed information, please refer to the VGA Card User’s manual or visit their website.
ATI (Radeon) Configuration Setting
1. Click the right button on your mouse on desktop, this will display the properties window list, and move to
“Properties” and left click on the mouse, this will show the “Display Properties” click the “Settings” tab.

13
Dual Monitor System Set p Guide
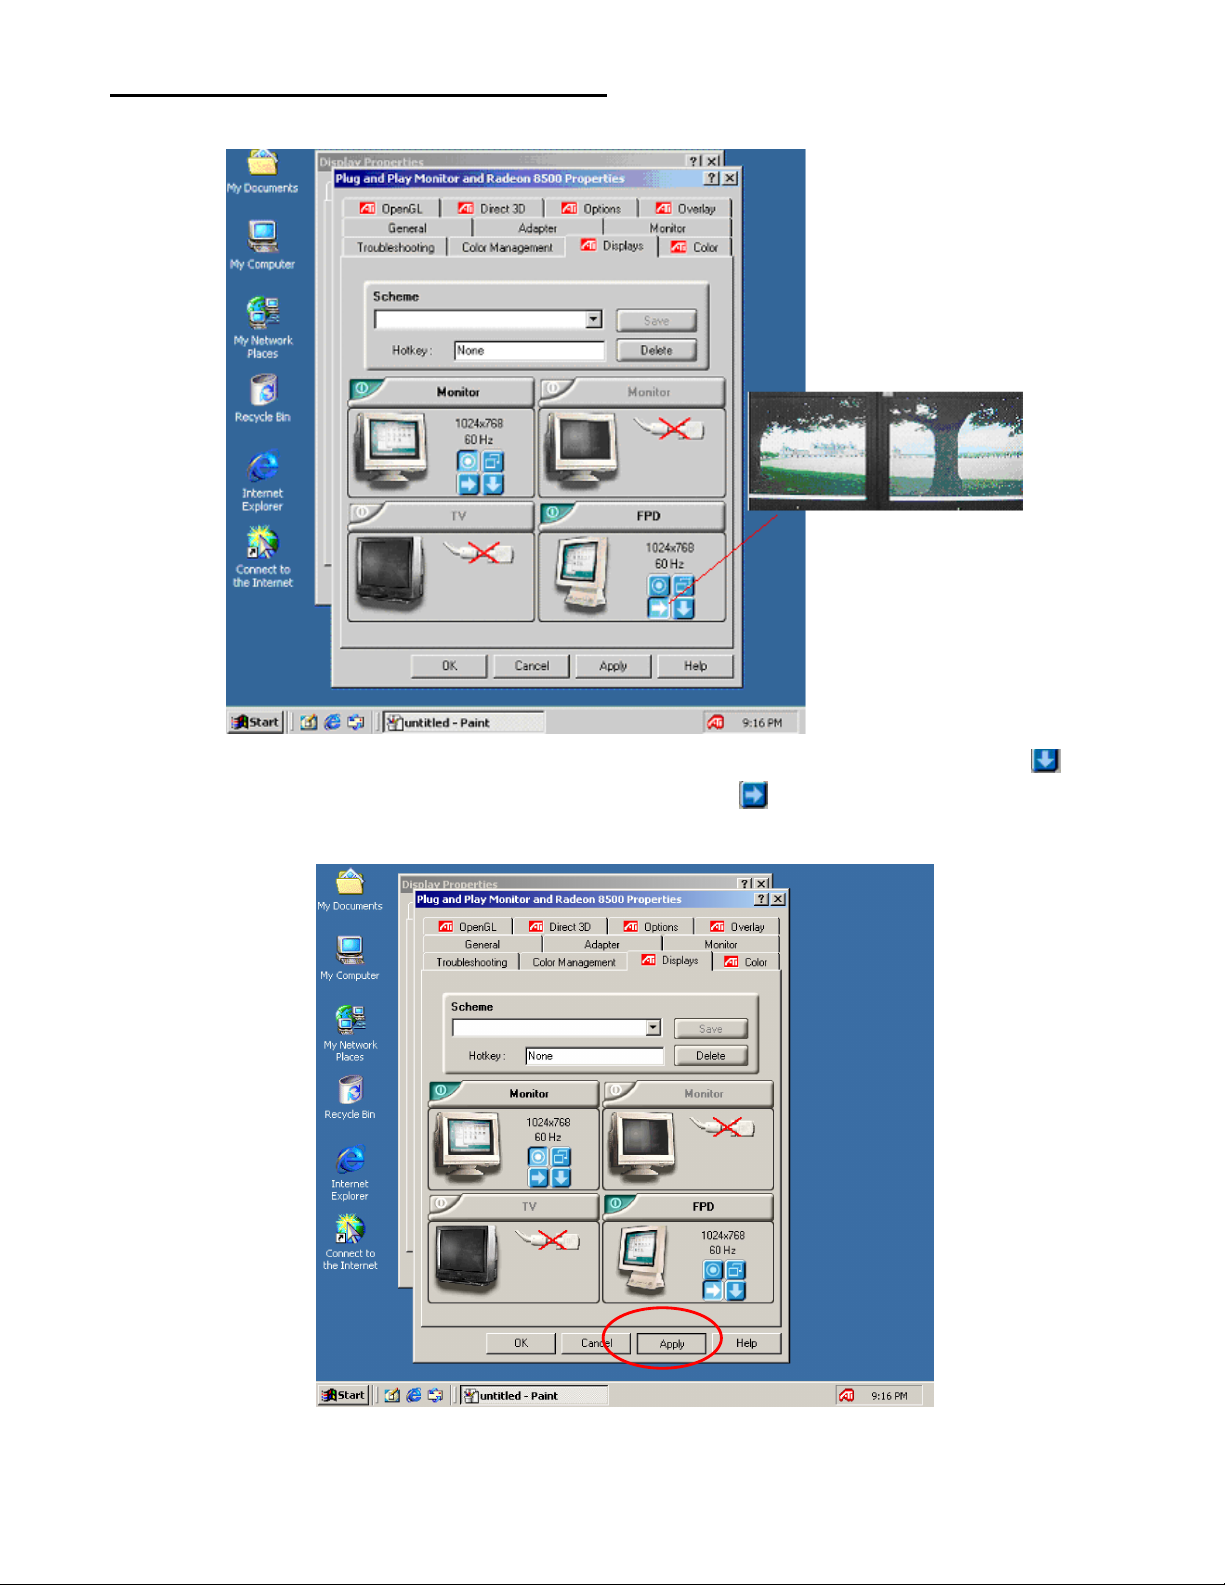
2. Click the “Advanced” button and this will show you the ATI menu, choose the tab “Displays”.
3. Click the red corner on the FPD menu to activate the second monitor.

14
Dual Monitor System Set p Guide
4. Once you have chosen the “FPD” as your second monitor, click on the button and this will set the 2 monitors
on the “Dual View” setting. Both monitors should present the same image as shown in the example below once
you click on the “Apply” button.
5. Click the “Apply” button to confirm and you will see the second monitor become active
.
15
Dual Monitor System Set p Guide
6. You can select the 2
nd
monitor to appear as part of a “Vertical” display arrangement by clicking the “ ” OR you
may choose the “Horizontal Extending” set up by clicking the “ ” button and the monitors will now show one
image across the length of both monitors.
7. Click the “Apply” button to confirm your choice and you will see the second monitor change as you directed.

16
Dual Monitor System Set p Guide
8. Click “Yes” to complete the set up. Click “No” to go back and change the display.

17
NVIDIA (Geforce) Configuration Setting
1. Click the right button on your mouse on desktop, this will display the properties window list, and move to
“Properties” and left click on the mouse, this will show the “Display Properties”, click the “Settings” tab.
2. Click the “Advanced” button and you will see the NVIDIA GeForce menu.
18
Dual Monitor System Set p Guide
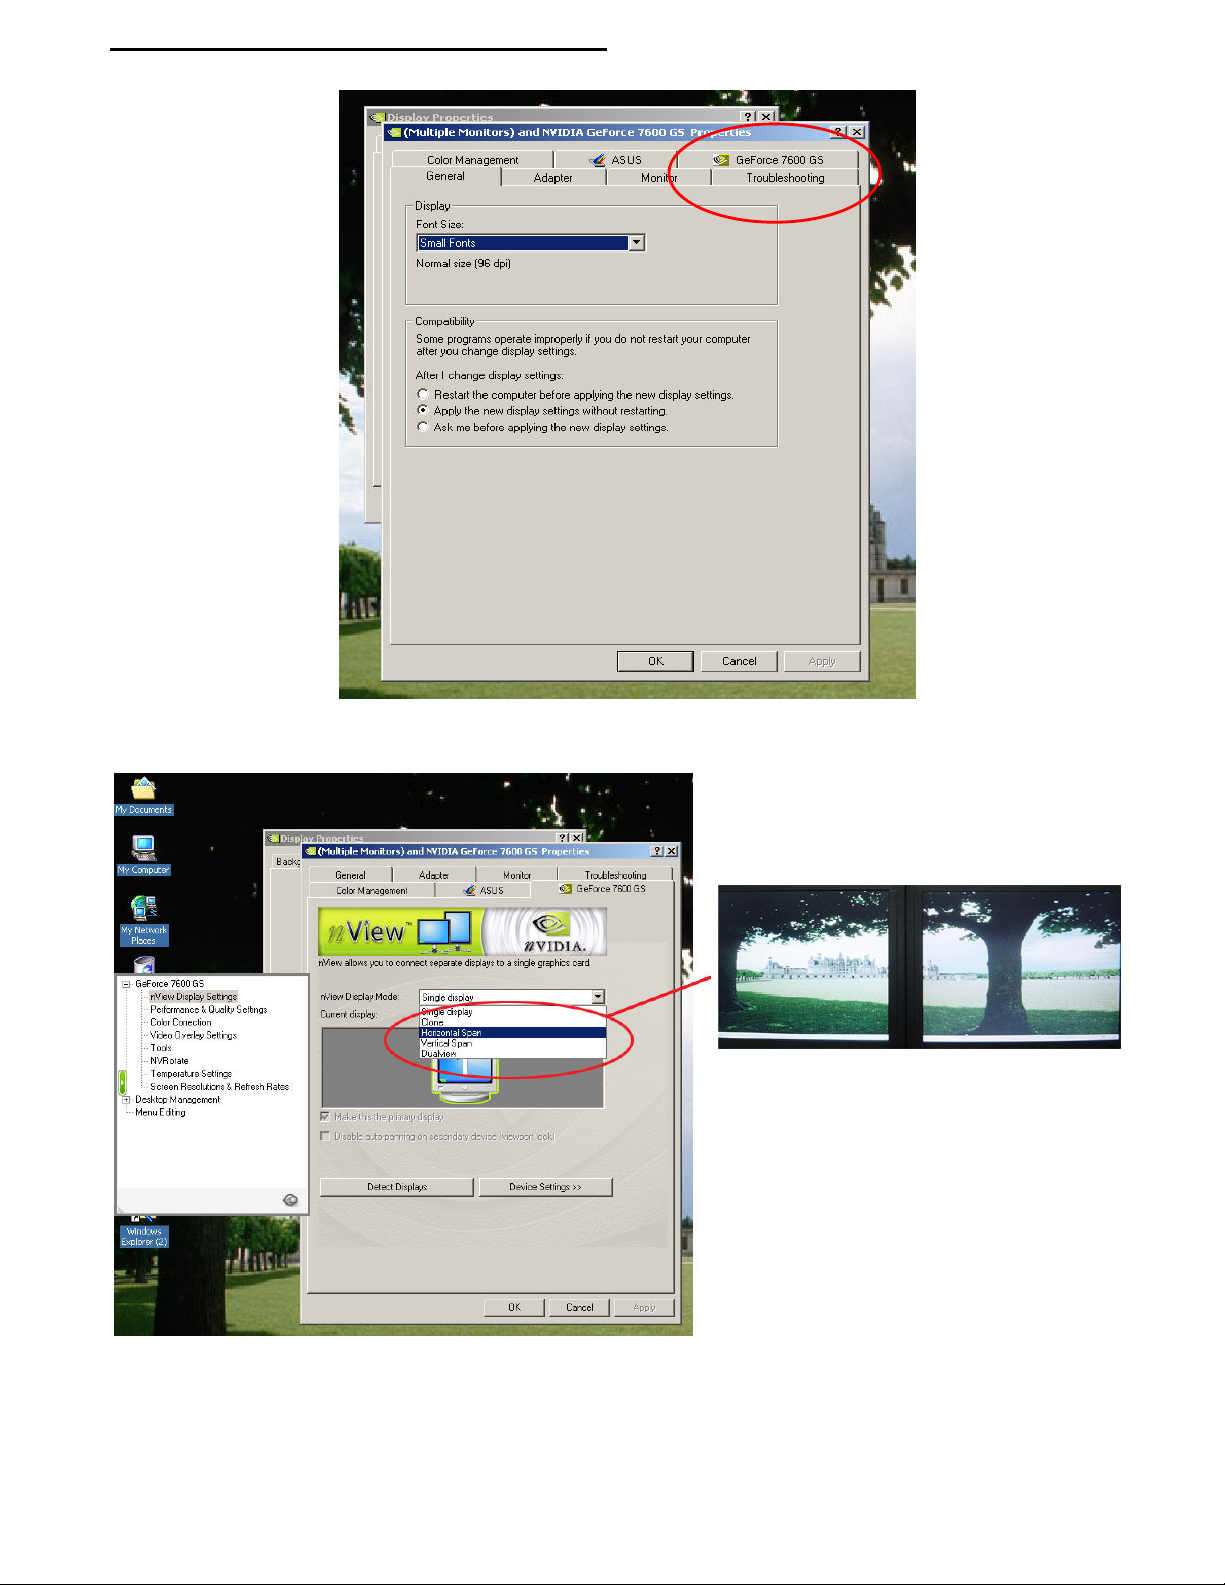
3. Click the “Geforce 7600GS” tab (Your card version may be another version, 7200 or less), this will now show you the
NVIDIA display setting as seen in the following picture.
4. Select “Horizontal Span” and this will instruct the monitors to display one image across the length of both monitors.

19
Dual Monitor System Set p Guide
5. Choose the NVIDIA Display Mode: “Dual View” and this will instruct the monitors to display 2 images on the monitors
as shown above.
6. To complete your selection choose the 1a Monitor in the picture and click it, meanwhile click the box “Make this the
primary display” and Click “Apply”.

20
Dual Monitor System Set p Guide
7. Click the “Yes” tab in the Confirm Display Settings Box and this will apply and keep your screen settings
You have now successfully configured your Dual Monitor Display System.
Table of contents
Languages:


